2016 MERCEDES-BENZ GLS SUV steering wheel adjustment
[x] Cancel search: steering wheel adjustmentPage 196 of 397

Always select as low a vehicle level as possi-
ble and adjust your driving style accordingly. G
WARNING
When driving with a lowered or raised chassis frame, the driving and braking characteristics
may be seriously affected. A raised chassis
frame may also exceed the permissible vehi-
cle height. There is a risk of an accident.
Set the driving level before pulling away. G
WARNING
Due to the high centre of gravity, the vehicle
may start to skid and overturn in the event of abrupt steering manoeuvres and/or when the
vehicle's speed is not adapted to the road
conditions. There is a risk of an accident.
Always adapt your speed and driving style to
the vehicle's driving characteristics and to the prevailing road and weather conditions.
! When driving on extremely rough terrain,
select a high vehicle level in good time. Make
sure there is always sufficient ground clear-
ance. You will otherwise damage the vehicle.
R SUVs overturn considerably more often than
other vehicle types.
If this vehicle is not driven in a safe manner, it can lead to an accident, to the vehicle over-
turning as well as serious or even fatal inju-
ries.
R In the event of an accident with the vehicle
overturning, passengers who are not wearing
their seat belt are considerably more likely to die than passengers wearing their seat belt.
You and all vehicle occupants should always
wear your seat belts.
Basic settings The extent to which the vehicle is raised or low-
ered depends on the basic setting selected.
Select:
R the Comfort orSport drive program for driv-
ing on normal roads
R the Offroad drive program for driving on eas-
ily negotiable off-road terrain
R the Offroad Plus drive program for off-road
driving R
Offroad level 1 for driving on easily negotiable
off-road terrain
R Offroad level 2 for driving on normal off-road
terrain
R Offroad level 3 for freeing the vehicle from
especially difficult off-road terrain at low
speeds
The individual vehicle levels differ from the nor- mal level as follows:
R –15 mm in the Sportdrive program
R +/–0 mm in the Comfortdrive program
R + 30 mm in the Offroaddrive program
R + 60 mm in the Offroad Plusdrive program
R + 30 mm in offroad level 1
R + 60 mm in offroad level 2
R + 90 mm in offroad level 3
Setting the vehicle level !
Make sure there is enough ground clear-
ance when the vehicle is being lowered. It
could otherwise hit the ground, damaging the
underbody. Setting the vehicle level using the selector
wheel
X Start the engine.
X Press selector wheel :.
Selector wheel :extends.
X To raise the vehicle: turn selector wheel :
clockwise ;.
The vehicle is raised.
X To lower the vehicle: turn selector wheel :
anti-clockwise ?.
The vehicle is lowered.
During the adjustment, the Lowering
Lowering orVehi‐ Vehi‐
cle
cle rising
rising message appears in the multifunc-
tion display. Driving systems
193Driving and parking Z
Page 197 of 397

If you press the
%ora button on the
multifunction steering wheel, the message will
disappear. Once normal level has been reached,
all indicator lamps =go out.
The vehicle automatically selects normal level if
you:
R drive at speeds above 115 km/h or
R drive at speeds between 100 km/h and
115 km/h for approximately 20 seconds
The vehicle is lowered to low level if you are
travelling at higher speeds.
Normal level Setting the vehicle to normal level
X Start the engine.
X Press selector wheel :.
Selector wheel :extends.
X To lower the vehicle: turn selector wheel :
anti-clockwise ?.
The vehicle is lowered.
If one or more indicator lamps =are on:
X Turn selector wheel :anti-clockwise ?
until all indicator lamps =that are lit start to
flash.
The vehicle is lowered to normal level. As
soon as the next lowest level is reached, the
indicator lamp stops flashing and goes out.
Offroad levels General notes
Only select an offroad level if this is appropriate for road conditions. Otherwise, fuel consump-
tion may increase and handling performance
may be affected. You can select the following:
R Offroad level 1 at speeds up to 100 km/h
R Offroad level 2 at speeds up to 65 km/h
R Offroad level 3 at speeds up to 20 km/h
If you select an offroad level when driving at too
high a speed, the Please reduce speed Please reduce speed mes-
sage appears in the multifunction display.
Offroad level 3 is only suitable for driving on
extremely difficult off-road terrain under partic- ularly rough conditions.
R Adjust your driving style to the altered han-
dling characteristics.
R Do not drive faster than 20 km/h. Indicator lamps
=for the desired offroad level
flash:
R the lower indicator lamp flashes, offroad
level 1 is selected
R the lower and centre indicator lamps flash,
offroad level 2 is selected
R all three indicator lamps flash, offroad level 3
is selected
The vehicle is being adjusted to the offroad level
selected. As soon as an offroad level is reached,
the corresponding indicator lamp stops flashing and lights up constantly.
Raising the vehicle
Setting the vehicle level using the selector
wheel
X To raise the vehicle: turn selector wheel :
clockwise ;.
The vehicle is raised to offroad level 1 by
30 mm compared to the normal level.
During the adjustment, the Vehicle rising Vehicle rising
message, for example, appears in the multifunc-
tion display. 194
Driving systemsDriving and parking
Page 198 of 397

If you press the
%ora button on the
multifunction steering wheel, the message will
disappear.
i Up to offroad level 2, you can hide the mes-
sages using the %ora button on the
multifunction steering wheel.
While the adjustment from offroad level 2 to off-
road level 3 is taking place, you will see a mes-
sage such as the following in the multifunction
display: Vehicle rising Max. speed
Vehicle rising Max. speed
20 km/h 20 km/h.
The Max. Max. speed
speed 20
20km/h
km/h message draws your
attention to the maximum speed permitted for
offroad level 3.
If you drive above 20 km/h at offroad level 3,
you will see the following message shown in red
in the multifunction display: Lowering Max. Lowering Max.
speed 20 km/h
speed 20 km/h.
i You cannot clear these messages.
You also hear a warning tone. The vehicle is low-
ered and offroad level 3 is cancelled.
If you continue to increase your speed, the red
message continues to be shown in the multi-
function display. The newly set level is not dis-
played until the vehicle has been set to a level
suitable for the current speed.
Lowering the vehicle If you drive faster than 20 km/h while the vehi-
cle is being lowered, you will see the following
message shown in white in the multifunction
display: Lowering Max. speed 20 km/h Lowering Max. speed 20 km/h.
The vehicle is lowered to offroad level 2.
You will see a message in the multifunction dis- play, for example: Lowering
Lowering.
Off-road level 2 is cancelled and the vehicle is
lowered to offroad level 1 if you:
R drive at speeds above 80 km/h or
R drive at speeds between 65 km/h and
80 km/h for longer than 20 seconds
Off-road level 1 is cancelled. Depending on the
vehicle's speed and the selected drive program,
the vehicle is automatically lowered to normal
level or low level if you:
R drive at speeds above 115 km/h or
R drive at speeds between 100 km/h and
115 km/h for longer than 20 seconds HOLD function
General notes The HOLD function can assist you if required in
the following situations:
R
when pulling away, especially on steep
slopes.
R when manoeuvring on steep slopes.
R when waiting in traffic.
The vehicle is kept stationary without the driver having to depress the brake pedal.
The braking effect is cancelled and the HOLD
function is deactivated when you depress the
accelerator pedal to pull away.
i Do not use the HOLD function when driving
off-road, on steep uphill or downhill gradients or on slippery or loose surfaces. The HOLD
function cannot hold the vehicle on such sur- faces.
Important safety notes G
WARNING
When leaving the vehicle, it can still roll away despite being braked by the HOLD function if:
R there is a malfunction in the system or in
the voltage supply
R the HOLD function is deactivated by the
accelerator pedal being depressed, e.g. by
a vehicle occupant
R the electrical system in the engine com-
partment, the battery or the fuses are tam-
pered with
R the battery is disconnected
There is a risk of an accident.
Before leaving the vehicle, always deactivate
the HOLD function and secure the vehicle
from rolling away.
! When DISTRONIC PLUS or the HOLD func-
tion is activated, the vehicle brakes automat- ically in certain situations.
To avoid damage to the vehicle, deactivate
DISTRONIC PLUS and the HOLD function in
the following or similar situations:
R when towing away
R in a car wash Driving systems
195Driving and parking Z
Page 203 of 397

X
Start the engine.
If indicator lamp ;is lit:
X Press button :.
Indicator lamp ;flashes while the vehicle is
being lowered, and goes out as soon as the
desired vehicle level is reached.
Vehicles with no trailer coupled: the vehi-
cle is adjusted to the height of the selected
drive program (Y page 155).
Vehicles with a trailer coupled: the vehicle
is adjusted to normal level regardless of the
drive program selected (Y page 155). The
vehicle remains at normal level, even if you
change drive programs.
During the adjustment, the Lowering
Lowering mes-
sage appears in the multifunction display.
If you press the %ora button on the
multifunction steering wheel, the message will
disappear. AMG RIDE CONTROL
General notes The electronically controlled damping system
works continuously. This improves driving
safety and ride comfort.
The damping is tuned individually to each wheel
and depends on:
R your driving style, e.g. sporty
R the road surface condition, e.g. bumps
R your individual selection of Sport, Sport + or
Comfort
The suspension setting can be adjusted using
the corresponding button in the centre console
or the DYNAMIC SELECT controller
(Y page 155).
If the ignition is switched off for less than four
hours, the previously selected drive program is
activated when the engine is next started. If the
ignition is switched off for more than four hours, Comfort mode is activated when the engine is
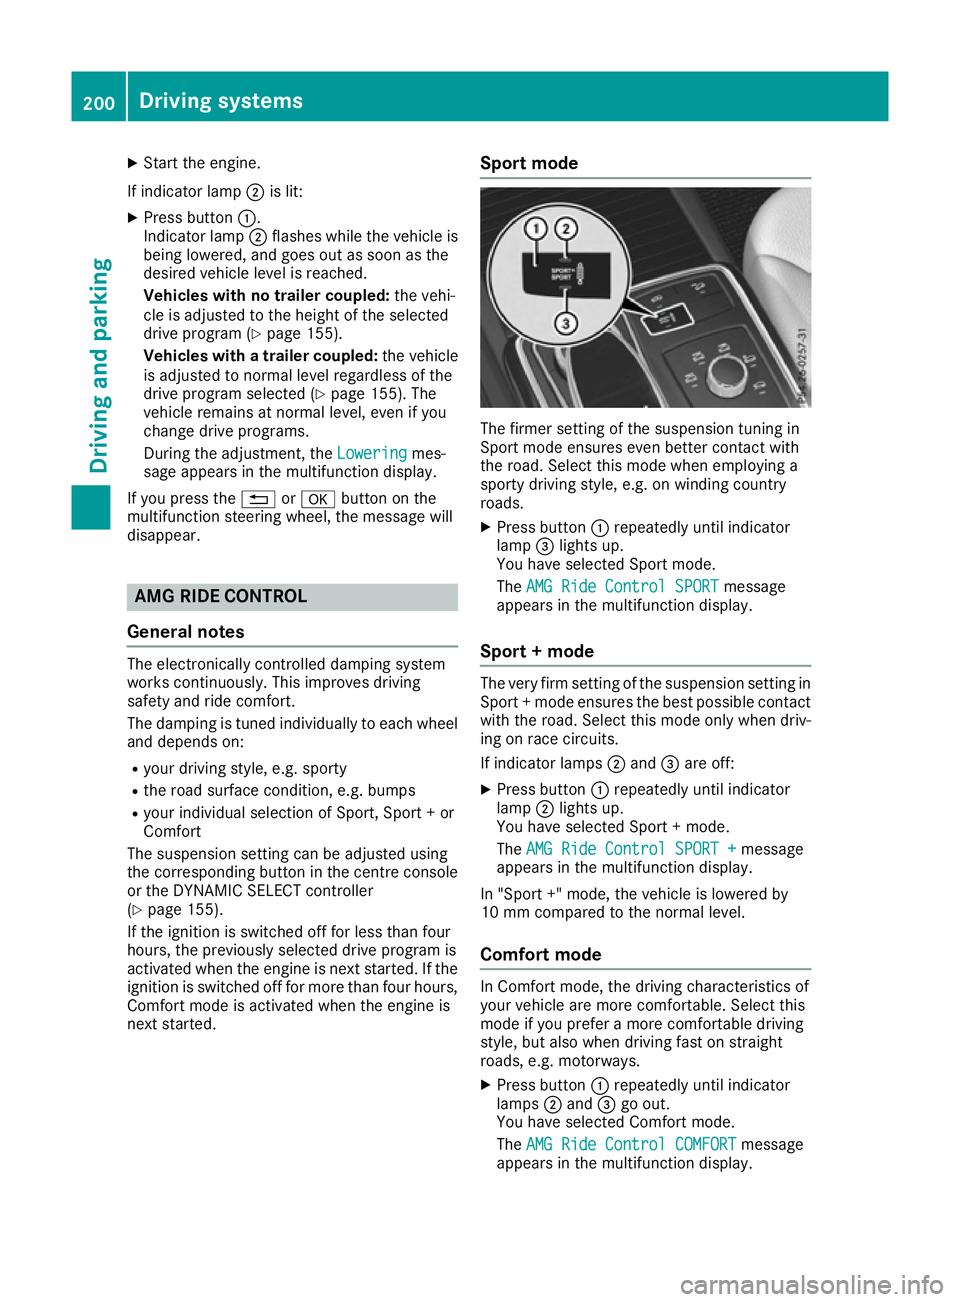
next started. Sport mode The firmer setting of the suspension tuning in
Sport mode ensures even better contact with
the road. Select this mode when employing a
sporty driving style, e.g. on winding country
roads.
X Press button :repeatedly until indicator
lamp =lights up.
You have selected Sport mode.
The AMG Ride Control SPORT AMG Ride Control SPORT message
appears in the multifunction display.
Sport + mode The very firm setting of the suspension setting in
Sport + mode ensures the best possible contact
with the road. Select this mode only when driv-
ing on race circuits.
If indicator lamps ;and =are off:
X Press button :repeatedly until indicator
lamp ;lights up.
You have selected Sport + mode.
The AMG Ride Control SPORT + AMG Ride Control SPORT + message
appears in the multifunction display.
In "Sport +" mode, the vehicle is lowered by
10 mm compared to the normal level.
Comfort mode In Comfort mode, the driving characteristics of
your vehicle are more comfortable. Select this
mode if you prefer a more comfortable driving
style, but also when driving fast on straight
roads, e.g. motorways.
X Press button :repeatedly until indicator
lamps ;and =go out.
You have selected Comfort mode.
The AMG Ride Control COMFORT AMG Ride Control COMFORT message
appears in the multifunction display. 200
Driving systemsDriving and parking
Page 257 of 397

In the
Heating
Heating submenu, you can select a
stored departure time or change a departure
time.
The auxiliary heating timer function calculates
the switch-on time according to the outside
temperature so that the vehicle is preheated by the departure time. When the departure time isreached, the auxiliary heating continues to heat
for a further five minutes and then switches off. The auxiliary heating adopts the THERMATIC or
THERMOTRONIC temperature setting.
You can switch off the auxiliary heating by using the remote control or the auxiliary heating but-
ton on the centre console.
i Switch the auxiliary heating on regularly
once a month for about ten minutes.
Further information on auxiliary heating
(Y page 140).
Selecting the departure time or deactivat- ing a selected departure time
X Press the =or; button on the steering
wheel to select the Settings
Settings menu.
X Press the :or9 button to select the
Heating
Heating submenu.
X Press ato confirm.
You will see the selected setting.
X Press ato confirm.
X Press the :or9 button to select one
of the three departure times or Timer
Timer off off(no
timer active).
X Press ato confirm.
If a departure time is selected, the yellow
indicator lamp lights up on the auxiliary heat-
ing button.
Changing the departure time
X Press the =or; button on the steering
wheel to select the Settings
Settings menu.
X Press the :or9 button to select the
Heating
Heating submenu.
X Press ato confirm.
You will see the selected setting.
X Press the :or9 button to select A A,B
B
or Change C
Change C.
X Press ato confirm.
You can now change the departure time.
X Press the =or; button to select the
display to be changed: hours, minutes. X
Press the :or9 button to set the
selected display.
X Press the abutton to store the entry.
The yellow indicator lamp on the auxiliary
heating button lights up.
Convenience submenu Activating/deactivating the EASY-
ENTRY/EXIT feature
G
WARNING
When the EASY-ENTRY/EXIT feature adjusts
the steering wheel, you and other vehicle
occupants – particularly children – could
become trapped. There is a risk of injury.
While the EASY-ENTRY/EXIT feature is mak-
ing adjustments, make sure that no one has
any body parts in the sweep of the steering
wheel.
If someone is trapped:
R press one of the memory function position
buttons, or
R move the switch for steering wheel adjust-
ment in the opposite direction to that in
which the steering wheel is moving.
The adjustment process is stopped.
X Press the =or; button on the steering
wheel to select the Settings Settingsmenu.
X Press the :or9 button to select the
Convenience
Convenience submenu.
X Press ato confirm.
X Using :or9, select the Easy
EasyEntry/
Entry/
Exit Exit function.
If the Easy Easy Entry/Exit
Entry/Exit function is activated,
the vehicle steering wheel is displayed in
orange in the multifunction display.
X Press the abutton to save the setting.
Further information on the EASY-ENTRY/EXIT
feature (Y page 115).
Switching belt adjustment on/off
X Press the =or; button on the steering
wheel to select the Settings Settingsmenu.
X Press the :or9 button to select the
Convenience
Convenience submenu.
X Press ato confirm. 254
Menus and submenusOn-board computer and displays
Page 258 of 397

X
Press the :or9 button to select the
Belt adjustment
Belt adjustment function.
If the Belt
Belt adjustment
adjustment function is activated,
the vehicle seat belt is shown in orange in the
multifunction display.
X Press the abutton to save the setting.
For further information on belt adjustment, see
(Y page 46).
Switching the fold mirrors in when lock-
ing function on/off This function is only available when the vehicle is
equipped with the electrical fold-in function.
When you activate the Auto. fold-in mir‐
Auto. fold-in mir‐
rors rors function, the exterior mirrors are folded in
when the vehicle is locked. The exterior mirrors fold out automatically again as soon as you
unlock the vehicle.
X Press the =or; button on the steering
wheel to select the Settings
Settings menu.
X Press the :or9 button to select the
Convenience Convenience submenu.
X Press ato confirm.
X Press the :or9 button to select the
Auto. fold-in mirrors
Auto. fold-in mirrors function.
If the Auto. fold-in mirrors
Auto. fold-in mirrors function is
switched on, the multifunction display shows
the exterior mirror in orange.
X Press the abutton to save the setting. If you have switched on the
Auto. fold-in
Auto. fold-in
mirrors
mirrors function and you fold the exterior mir-
rors in using button :, they will not fold out
automatically (Y page 117).
You can then only fold out the exterior mirrors
using button :. Resetting to factory settings X
Press the =or; button on the steering
wheel to select the Settings Settingsmenu.
X Press the :or9 button to select the
Factory setting
Factory setting submenu.
X Press ato confirm.
The Reset all settings?
Reset all settings? message
appears.
X Press the :or9 button to select No
Noor
Yes
Yes.
X Press the abutton to confirm the selec-
tion.
If you have selected Yes Yes, the multifunction
display shows a confirmation message.
For safety reasons, not all functions are reset:
the Limit Limit speed
speed(winter
(winter tyres)
tyres)function of
the permanent speed limiter can only be set in
the Vehicle
Vehicle submenu.
For safety reasons, the Daytime driving
Daytime driving
lights
lights function in the Lights
Lightssubmenu is only
reset if the engine is switched off. ON&OFFROAD menu
X Press the =or; button on the steering
wheel to select the ON&OFFROAD
ON&OFFROADmenu.
You can view the current off-road program set-
tings in the ON&OFFROAD ON&OFFROAD menu:
R Vehicles with the Off-Road Engineering pack-
age (Y page 229)
R Vehicles without the Off-Road Engineering
package (Y page 228) AMG menu (Mercedes-AMG vehicles)
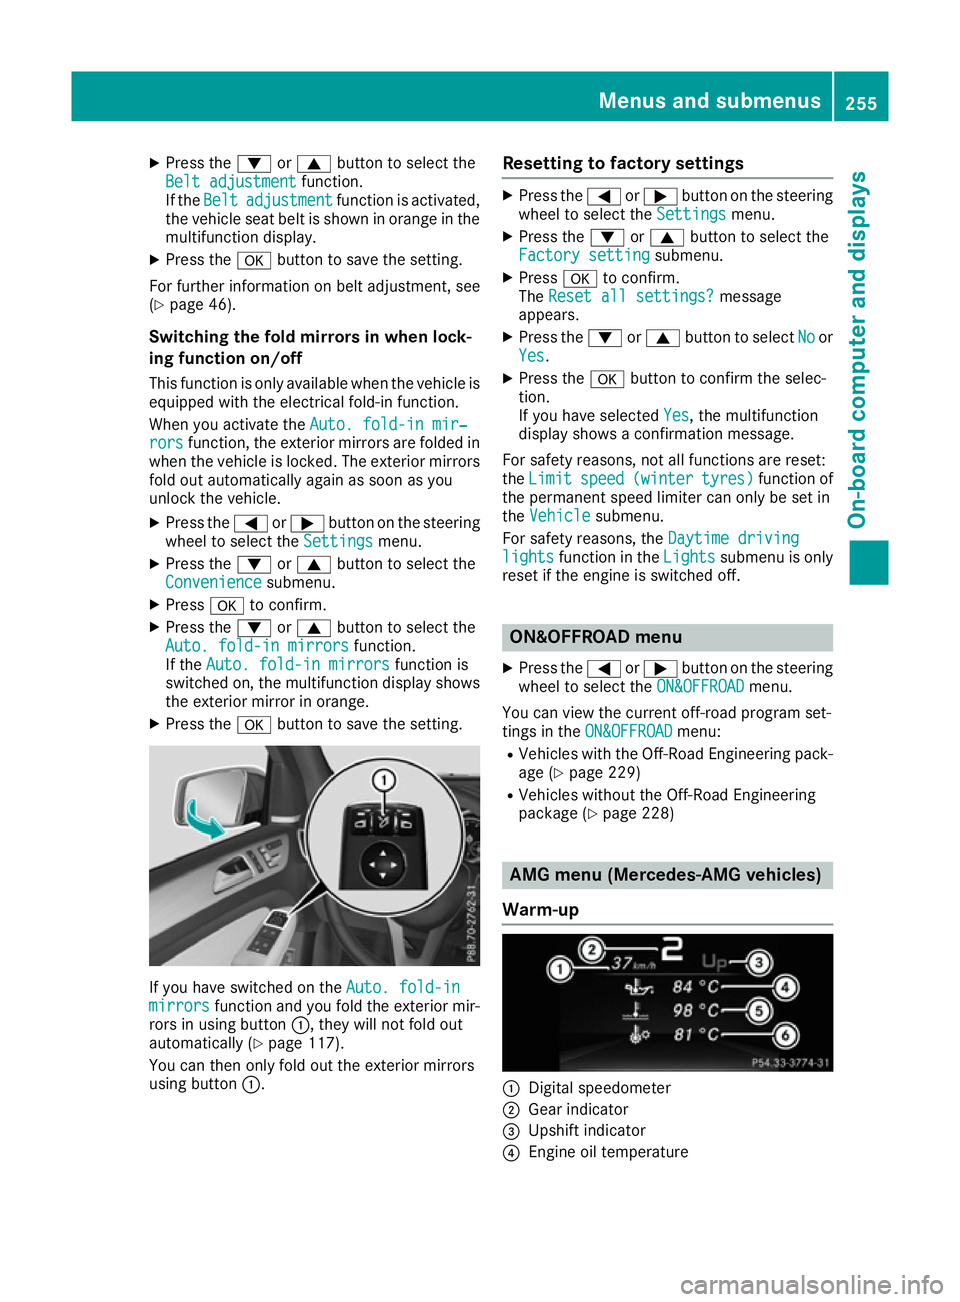
Warm-up :
Digital speedometer
; Gear indicator
= Upshift indicator
? Engine oil temperature Menus and submenus
255On-board computer and displays Z