2016 MERCEDES-BENZ GLS SUV change time
[x] Cancel search: change timePage 144 of 397
Switch the auxiliary heating on regularly once a
month for about ten minutes.
The auxiliary heating heats the air in the vehicle interior to the set temperature. This occurs with-out using the heat of the running engine. The
auxiliary heating is operated directly using the
vehicle's fuel. For this reason, the tank content
must be at least at reserve fuel level to ensure
that the auxiliary heating functions.
The auxiliary heating or auxiliary ventilation
automatically adjusts to changes in tempera-
ture and weather conditions. For this reason,
the auxiliary heating could switch from ventila-
tion mode to heating mode or from heating
mode to ventilation mode.
The auxiliary heating switches off when the
engine is switched off. The auxiliary ventilation
switches off when you turn the key to position 2
(Y page 148).
The auxiliary heating switches off automatically
after 50 minutes. This time limit can be altered.
To do this, visit a qualified specialist workshop.
You cannot use the auxiliary ventilation to cool
the vehicle interior to a temperature lower than
the outside temperature.
Before switching on X
Turn the key to position 2in the ignition lock
(Y page 148).
X Set the desired temperature.
The auxiliary heating/ventilation can be activa-
ted even when climate control is set to manual.
Optimum comfort can be attained when the sys-
tem is set to automatic mode. Set the temper-
ature to 22 †.
The auxiliary heating or auxiliary ventilation can
be switched on/off using the button on the
centre console or the remote control.
The on-board computer can be used to specify
up to three departure times, one of which may
be preselected (Y page 253). Switching the auxiliary heating/venti-
lation on or off using the button on the
centre console General notes
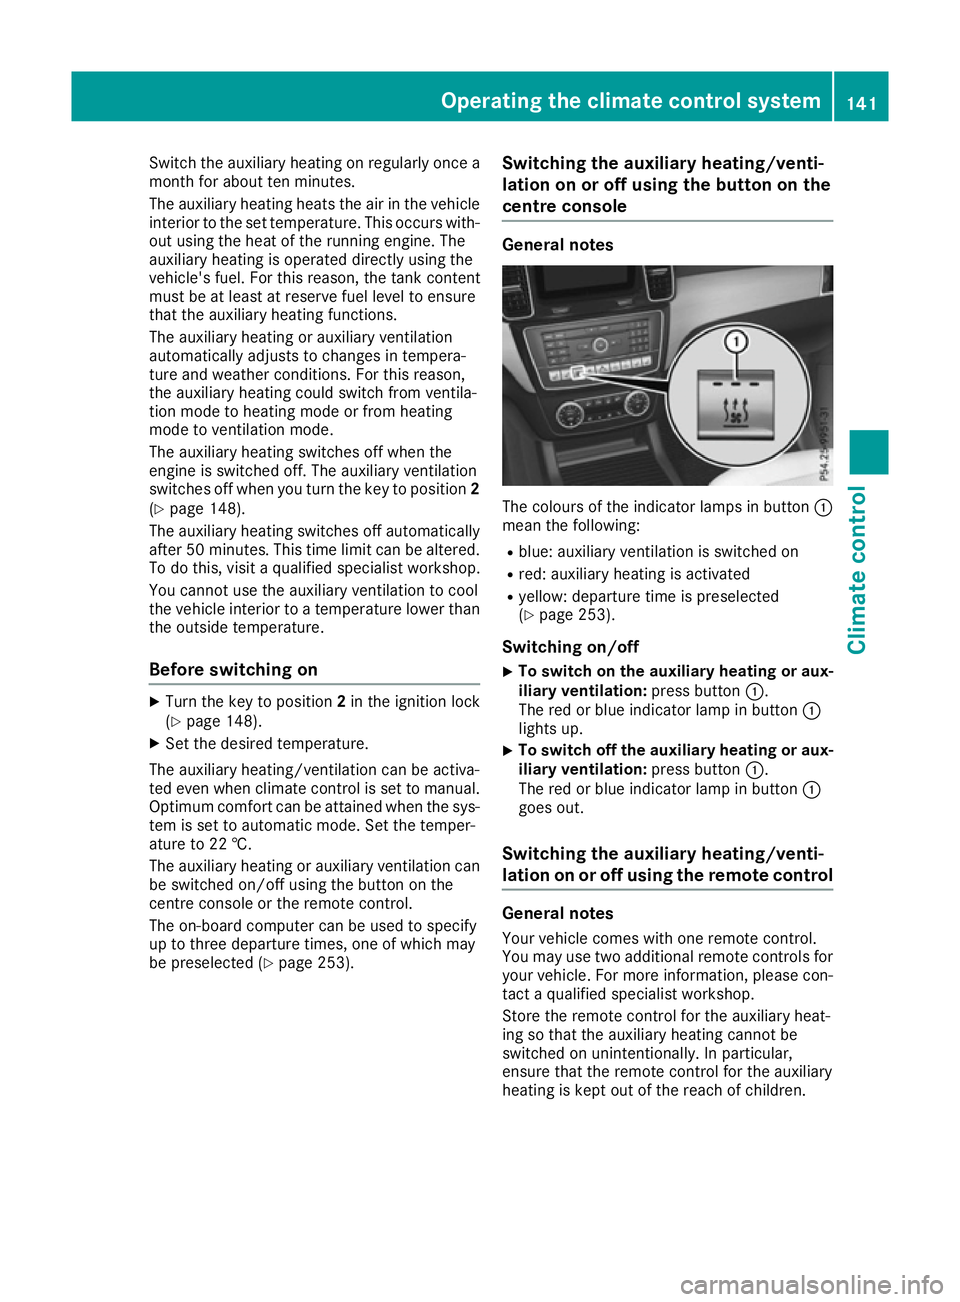
The colours of the indicator lamps in button
:
mean the following:
R blue: auxiliary ventilation is switched on
R red: auxiliary heating is activated
R yellow: departure time is preselected
(Y page 253).
Switching on/off X To switch on the auxiliary heating or aux-
iliary ventilation:
press button:.
The red or blue indicator lamp in button :
lights up.
X To switch off the auxiliary heating or aux-
iliary ventilation: press button:.
The red or blue indicator lamp in button :
goes out.
Switching the auxiliary heating/venti-
lation on or off using the remote control General notes
Your vehicle comes with one remote control.
You may use two additional remote controls for
your vehicle. For more information, please con-
tact a qualified specialist workshop.
Store the remote control for the auxiliary heat-
ing so that the auxiliary heating cannot be
switched on unintentionally. In particular,
ensure that the remote control for the auxiliary
heating is kept out of the reach of children. Operating the climate control system
141Climate control Z
Page 146 of 397
appears in the remote control display and the
running time is zero minutes.
Setting the departure time Make sure that the time set in the vehicle is
correct before setting the departure time (see
the separate operating instructions). Otherwise, the auxiliary heating may switch on at the wrong
time and at an unsuitable location. When setting
the departure time, also observe the important
safety notes (Y page 140).
X Briefly press the ubutton.
X Press the ,or. button repeatedly
until the time to be changed appears in the
display.
X Press the uand^ buttons simultane-
ously.
The Îsymbol in the remote control display
flashes.
X Press the ,or. button to set the
desired departure time.
i The longer you press the
,or. but-
ton, the faster the time changes.
X Press the uand^ buttons simultane-
ously.
The new departure time is stored.
Activating the set departure time
X Briefly press the ubutton.
X Press the ,or. button repeatedly
until the desired departure time appears in
the display.
X Press the ubutton.
The Ísymbol, the departure time and,
depending on the selected departure time,
the letter A, BorCappear in the display.
Deactivating the set departure time
X Briefly press the ubutton.
The status of the auxiliary heating is shown in the display.
X Press the .button.
The first departure time stored appears in the
display.
X Press the ^button.
OFF is shown in the remote control display. Replacing the remote control battery Important safety notes
G
WARNING
Batteries contain toxic and corrosive substan- ces. If batteries are swallowed, it can result in
severe health problems. There is a risk of fatal injury.
Keep batteries out of the reach of children. If
a battery is swallowed, seek medical attention immediately. H
Environmental note Batteries contain pollutants.
It is illegal to dispose of them
with the household rubbish.
They must be collected sep-
arately and disposed of in anenvironmentally responsible
recycling system. Dispose of batteries in an
environmentally responsible
manner. Take discharged
batteries to a qualified spe-
cialist workshop or to a col-
lection point for used batter-
ies.
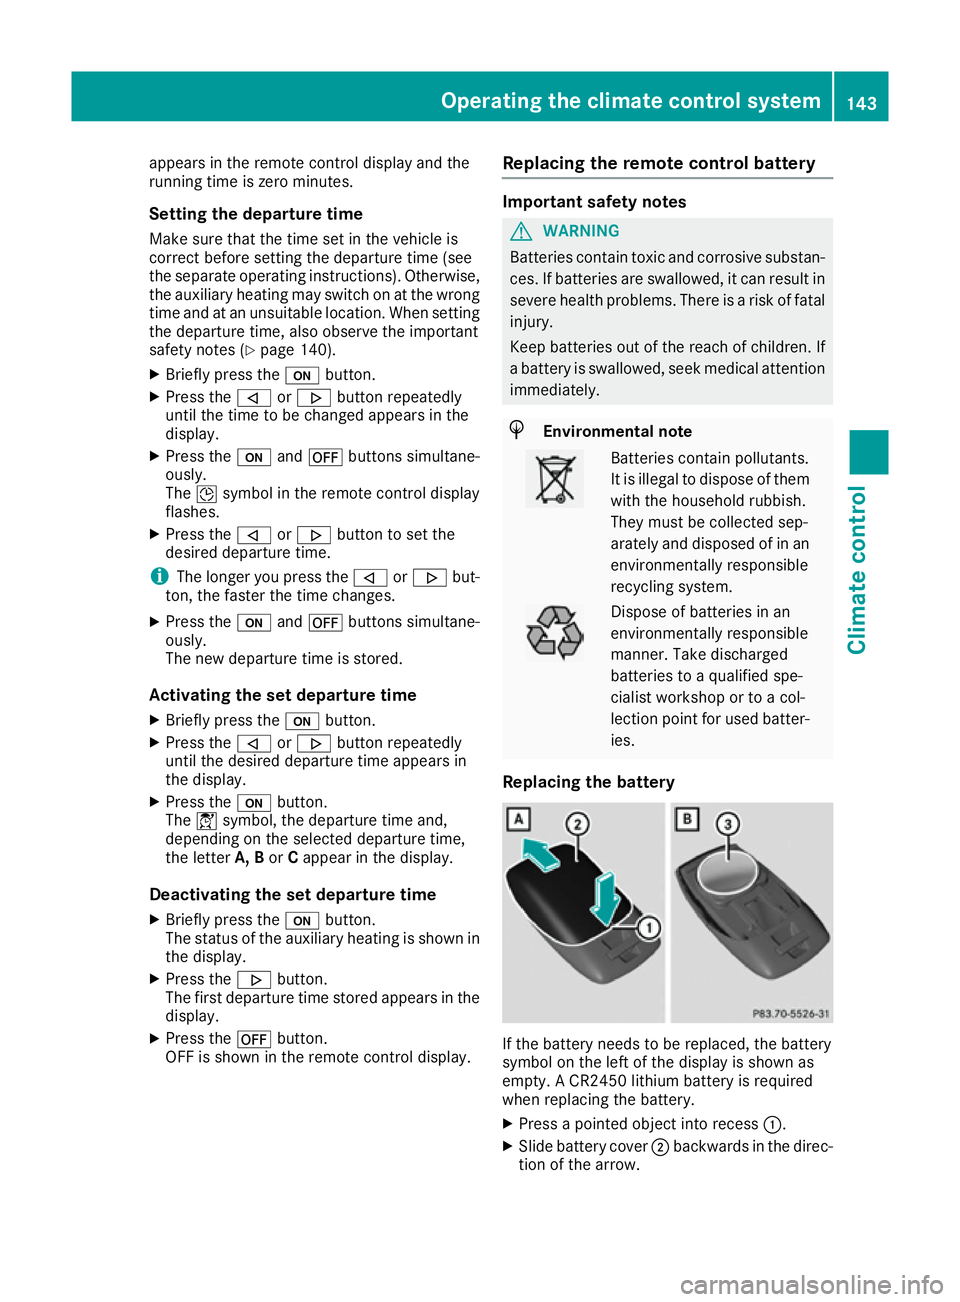
Replacing the battery If the battery needs to be replaced, the battery
symbol on the left of the display is shown as
empty. A CR2450 lithium battery is required
when replacing the battery.
X Press a pointed object into recess :.
X Slide battery cover ;backwards in the direc-
tion of the arrow. Operating the climate control system
143Climate control Z
Page 150 of 397
Running-in notes
Important safety notes
In certain driving and driving safety systems, the sensors adjust automatically while a certain dis-
tance is being driven after the vehicle has been delivered or after repairs. Full system effective-
ness is not reached until the end of this teach-in process.
Brake pads/linings and discs that are either new or have been replaced only achieve optimum
braking effect after several hundred kilometres
of driving. Compensate for the reduced braking
effect by applying greater force to the brake
pedal. The first 1,500 km
If you treat the engine with sufficient care from
the very start, you will be rewarded with excel-
lent performance for the remainder of the
engine's life.
R Drive at varying vehicle speeds and engine
speeds for the first 1500 km.
R Avoid overstraining the vehicle during this
period, e.g. driving at full throttle.
R Change gear in good time, before the rev
counter needle is Ôof the way to the red area
of the rev counter.
R Do not shift down a gear manually in order to
brake.
R Try to avoid depressing the accelerator pedal
beyond the point of resistance (kickdown).
Additional notes on running in Mercedes-AMG
vehicles:
R Do not drive at speeds above 140 km/h for
the first 1500 km.
R Only allow the engine to reach a maximum
engine speed of 4500 rpm briefly.
R Ideally, for the first 1,500 km, drive in the
Comfort drive program.
After 1,500 km, you may gradually accelerate
the vehicle to full road and engine speeds.
You should also observe these notes on running- in if the engine or parts of the drive train on your
vehicle have been replaced.
Always observe the maximum permissible
speed. Driving
Important safety notes
G
WARNING
Objects in the driver's footwell may restrict
the clearance around the pedals or block a
depressed pedal. This jeopardises the oper-
ating and road safety of the vehicle. There is a risk of an accident.
Stow all objects securely in the vehicle so that
they do not get into the driver's footwell.
Always fit the floormats securely and as pre-
scribed in order to ensure that there is always sufficient room for the pedals. Do not use
loose floormats and do not place several floor-mats on top of one another. G
WARNING
Unsuitable footwear can hinder correct usage of the pedals, e.g.:
R shoes with thick soles
R shoes with high heels
R slippers
There is a risk of an accident.
Wear suitable footwear to ensure correct
usage of the pedals. G
WARNING
If you switch off the ignition while driving,
safety-relevant functions are only available
with limitations, or not at all. This could affect, for example, the power steering and the brake
boosting effect. You will require considerably
more effort to steer and brake. There is a risk of an accident.
Do not switch off the ignition while driving. G
WARNING
If the parking brake has not been fully
released when driving, the parking brake can:
R overheat and cause a fire
R lose its hold function.
There is a risk of fire and an accident. Release
the parking brake fully before driving off. Driving
147Driving and parking Z
Page 153 of 397
ignite if in contact with the exhaust system or
parts of the engine that heat up. There is a risk
of fire.
Carry out regular checks to make sure that
there are no flammable foreign materials in
the engine compartment or in the exhaust
system.
General notes Vehicles with a petrol engine:
the catalytic
converter is preheated for up to 30 seconds
after a cold start. The sound of the engine may
change during this time.
Automatic transmission X
Shift the transmission to position P
(Y page 156).
The transmission position indicator in the
multifunction display shows P(Y page 158).
i You can start the engine in transmission
position Pand N.
Starting procedure with the key X
To start a diesel engine : turn the key to
position 2in the ignition lock (Y page 148).
The % preglow indicator lamp in the instru-
ment cluster lights up.
X Turn the key to position 3in the ignition lock
(Y page 148) and release it as soon as the
engine is running.
i Vehicles with a diesel engine:
you can
start the engine without preglow if the engine
is warm.
Using KEYLESS-GO to start the engine The Start/Stop button can be used to start the
vehicle without inserting the key into the ignition
lock. The key must be in the vehicle and the
Start/Stop button must be inserted in the igni-
tion lock. This mode for starting the engine oper-
ates independently of the ECO start/stop auto- matic engine start function. X
Depress the brake pedal and keep it
depressed.
X Press the Start/Stop button once
(Y page 148).
Vehicles with a petrol engine: the engine
starts.
Vehicles with a diesel engine: preglow is
activated and the engine starts. Pulling away
General notes G
WARNING
If the engine speed is above the idling speed
and you engage transmission position Dor R,
the vehicle could pull away suddenly. There is a risk of an accident.
When engaging transmission position Dor R,
always firmly depress the brake pedal and do not simultaneously accelerate.
Depress the accelerator carefully when pulling
away.
The vehicle locks centrally once you have pulled
away. The locking knobs in the doors drop down.
You can open the doors from the inside at any
time.
You can also deactivate the automatic locking
feature (Y page 253).
It is only possible to shift the transmission from position Pto the desired position if you depress
the brake pedal. Only then is the parking lock
released. If you do not depress the brake pedal,
the DIRECT SELECT lever can still be moved but the parking lock remains engaged.
i Upshifts take place at higher engine speeds
after a cold start. This helps the catalytic con- verter to reach its operating temperature
more quickly.
Information on automatically releasing the elec-
trical parking brake (Y page 171).150
DrivingDriving and parking
Page 158 of 397
Problem
Possible causes/consequences and
M
MSolutions The coolant temperature
display is showing more
than 120 †. The coolant warning lamp may also
be on and a warning tone
may sound. The coolant level is too low. The coolant is too hot and the engine is no
longer being cooled sufficiently.
X Stop as soon as possible and allow the engine and the coolant to
cool down.
X Check the coolant level (Y page 335). Observe the warning notes
as you do so and top up the coolant if necessary. If the coolant level is correct, the radiator fan may be faulty. The cool-
ant is too hot and the engine is no longer being cooled sufficiently.
X If the coolant temperature is below 120 †, you can continue driving
to the nearest qualified specialist workshop.
X Avoid heavy loads on the engine as you do so, e.g. driving in moun-
tainous terrain and stop-start traffic. DYNAMIC SELECT controller
Use the DYNAMIC SELECT controller to change the drive program. Depending on the drive pro-
gram selected, the following vehicle character-
istics will change:
R the drive (engine and transmission manage-
ment)
R the transmission
R the suspension
R the steering
R the availability of the ECO start/stop function
If the ignition is switched off for less than four
hours, the previously selected drive program is
activated when the engine is next started. If the
ignition is switched off for more than four hours,
the Comfort drive program is activated when
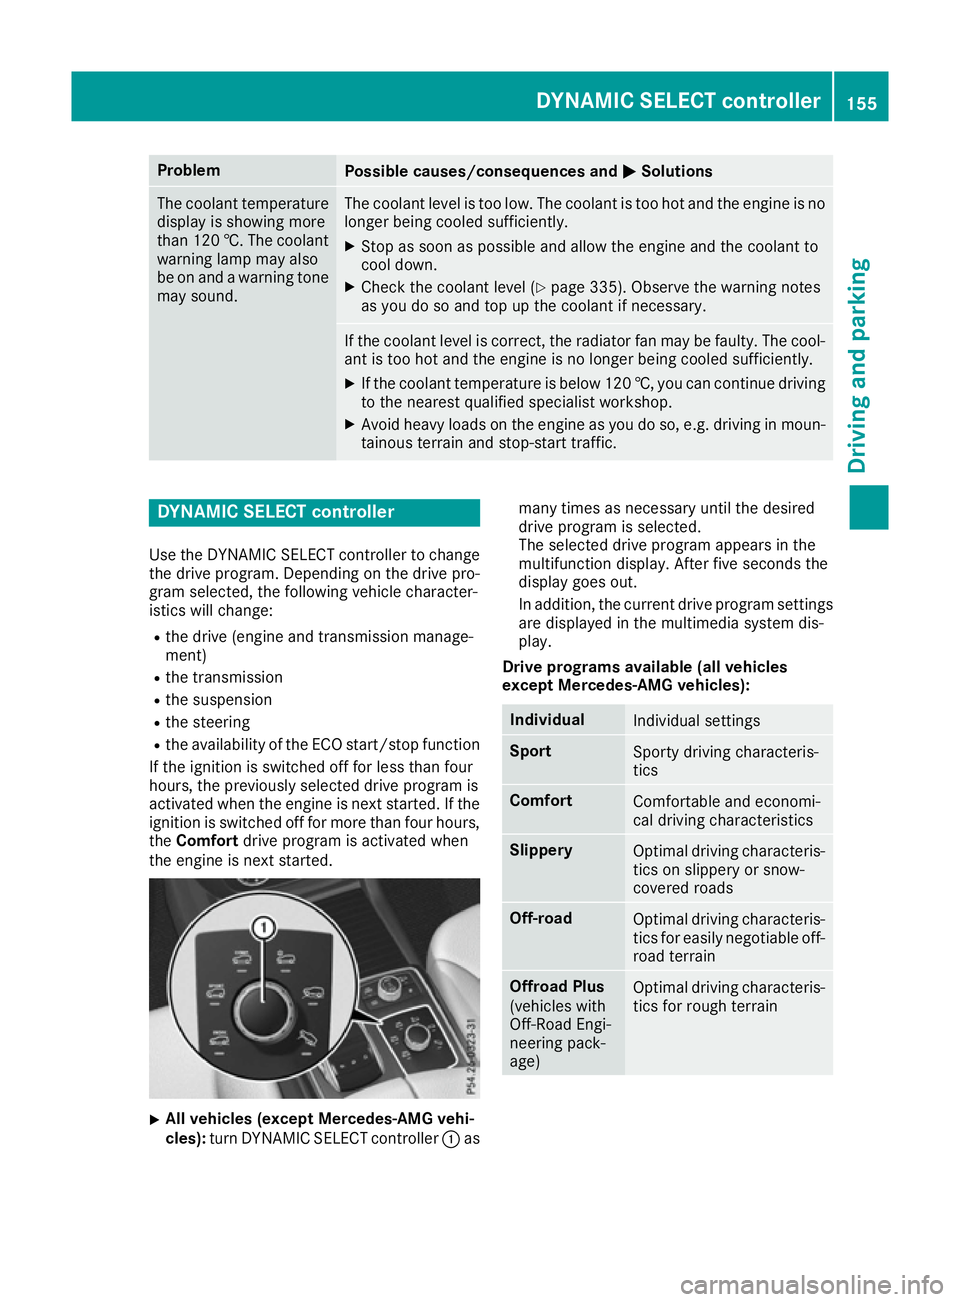
the engine is next started. X
All vehicles (except Mercedes-AMG vehi-
cles):
turn DYNAMIC SELECT controller :as many times as necessary until the desired
drive program is selected.
The selected drive program appears in the
multifunction display. After five seconds the
display goes out.
In addition, the current drive program settings
are displayed in the multimedia system dis-
play.
Drive programs available (all vehicles
except Mercedes-AMG vehicles): Individual
Individual settings
Sport
Sporty driving characteris-
tics
Comfort
Comfortable and economi-
cal driving characteristics
Slippery
Optimal driving characteris-
tics on slippery or snow-
covered roads Off-road
Optimal driving characteris-
tics for easily negotiable off-
road terrain Offroad Plus
(vehicles with
Off-Road Engi-
neering pack-
age)
Optimal driving characteris-
tics for rough terrain DYNAMIC SELECT controller
155Driving and parking Z
Page 176 of 397
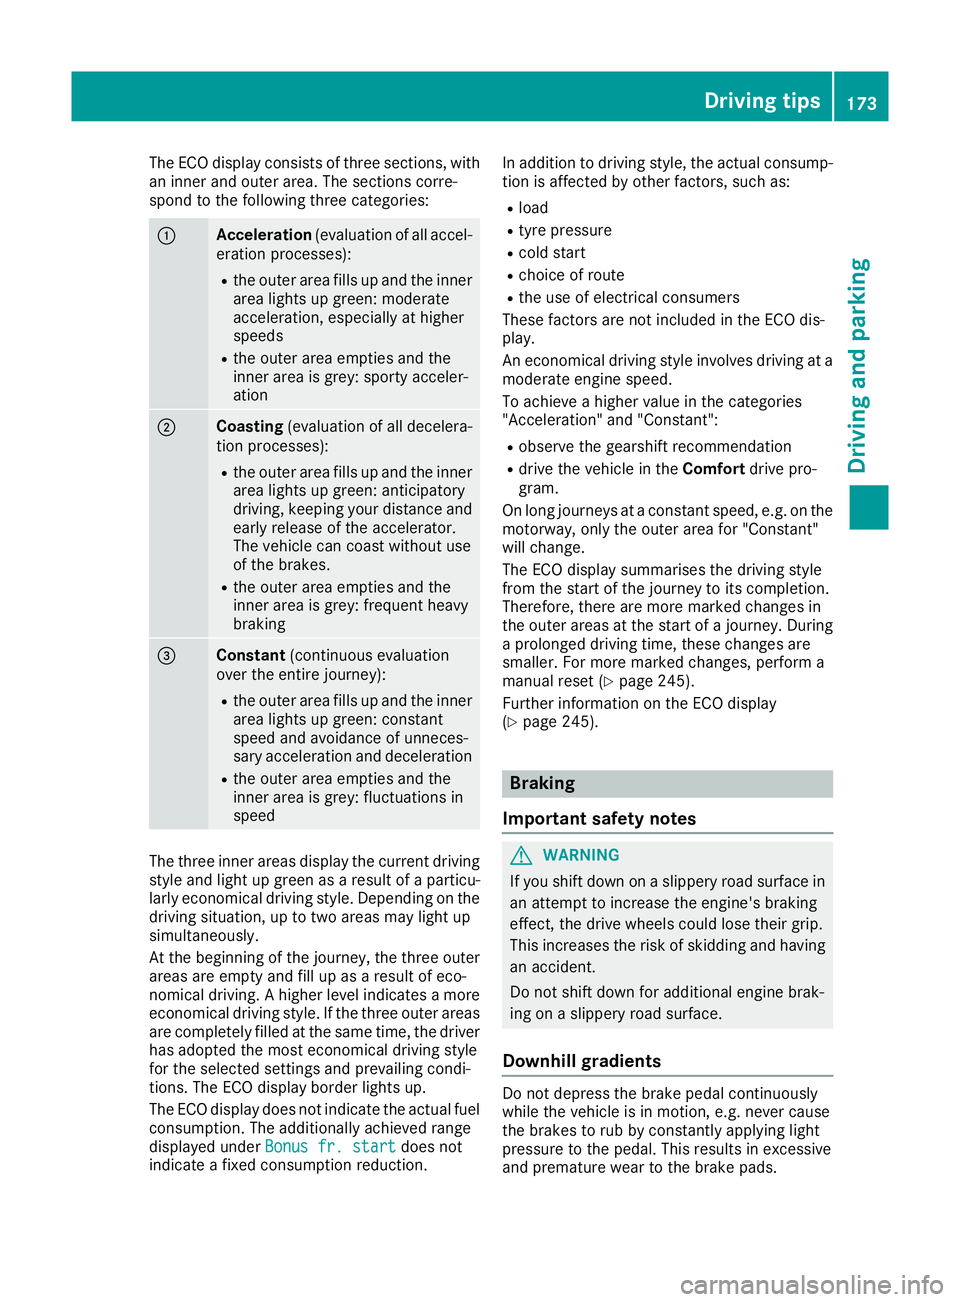
The ECO display consists of three sections, with
an inner and outer area. The sections corre-
spond to the following three categories: :
Acceleration
(evaluation of all accel-
eration processes):
R the outer area fills up and the inner
area lights up green: moderate
acceleration, especially at higher
speeds
R the outer area empties and the
inner area is grey: sporty acceler-
ation ;
Coasting
(evaluation of all decelera-
tion processes):
R the outer area fills up and the inner
area lights up green: anticipatory
driving, keeping your distance and
early release of the accelerator.
The vehicle can coast without use
of the brakes.
R the outer area empties and the
inner area is grey: frequent heavy
braking =
Constant
(continuous evaluation
over the entire journey):
R the outer area fills up and the inner
area lights up green: constant
speed and avoidance of unneces-
sary acceleration and deceleration
R the outer area empties and the
inner area is grey: fluctuations in
speed The three inner areas display the current driving
style and light up green as a result of a particu-
larly economical driving style. Depending on the driving situation, up to two areas may light up
simultaneously.
At the beginning of the journey, the three outer
areas are empty and fill up as a result of eco-
nomical driving. A higher level indicates a more
economical driving style. If the three outer areas
are completely filled at the same time, the driver
has adopted the most economical driving style
for the selected settings and prevailing condi-
tions. The ECO display border lights up.
The ECO display does not indicate the actual fuel consumption. The additionally achieved range
displayed under Bonus fr. start
Bonus fr. start does not
indicate a fixed consumption reduction. In addition to driving style, the actual consump-
tion is affected by other factors, such as:
R load
R tyre pressure
R cold start
R choice of route
R the use of electrical consumers
These factors are not included in the ECO dis-
play.
An economical driving style involves driving at a moderate engine speed.
To achieve a higher value in the categories
"Acceleration" and "Constant":
R observe the gearshift recommendation
R drive the vehicle in the Comfortdrive pro-
gram.
On long journeys at a constant speed, e.g. on the
motorway, only the outer area for "Constant"
will change.
The ECO display summarises the driving style
from the start of the journey to its completion.
Therefore, there are more marked changes in
the outer areas at the start of a journey. During a prolonged driving time, these changes are
smaller. For more marked changes, perform a
manual reset (Y page 245).
Further information on the ECO display
(Y page 245). Braking
Important safety notes G
WARNING
If you shift down on a slippery road surface in an attempt to increase the engine's braking
effect, the drive wheels could lose their grip.
This increases the risk of skidding and having
an accident.
Do not shift down for additional engine brak-
ing on a slippery road surface.
Downhill gradients Do not depress the brake pedal continuously
while the vehicle is in motion, e.g. never cause
the brakes to rub by constantly applying light
pressure to the pedal. This results in excessive
and premature wear to the brake pads. Driving tips
173Driving and parking Z
Page 186 of 397
aid. You are responsible for the distance to the
vehicle in front, for vehicle speed, for braking in
good time and for staying in lane.
If a new driver takes over, advise the new driver
of the speed stored.
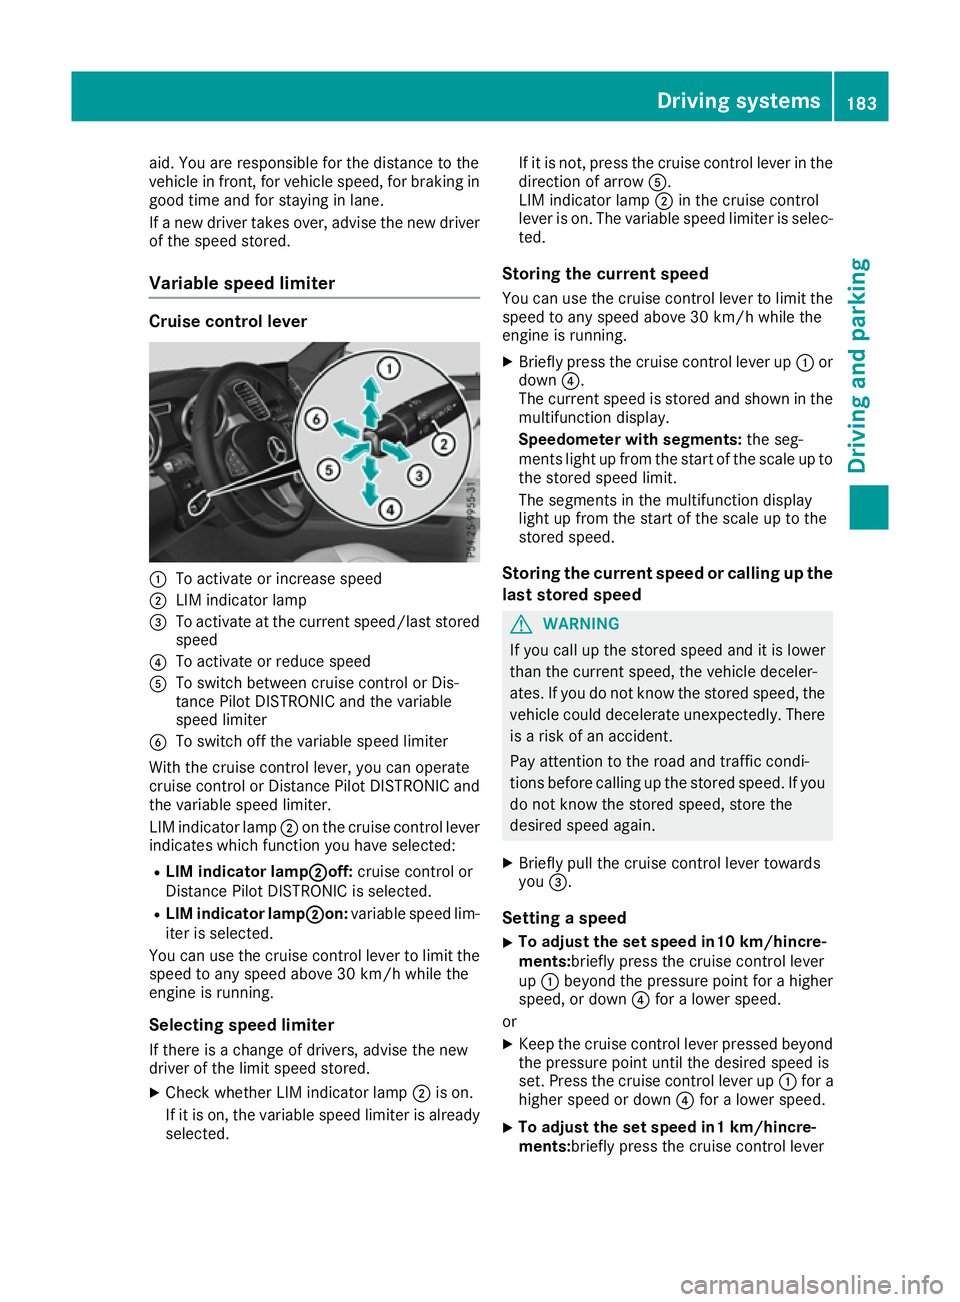
Variable speed limiter Cruise control lever
:
To activate or increase speed
; LIM indicator lamp
= To activate at the current speed/last stored
speed
? To activate or reduce speed
A To switch between cruise control or Dis-
tance Pilot DISTRONIC and the variable
speed limiter
B To switch off the variable speed limiter
With the cruise control lever, you can operate
cruise control or Distance Pilot DISTRONIC and
the variable speed limiter.
LIM indicator lamp ;on the cruise control lever
indicates which function you have selected:
R LIM indicator lamp; ;off:cruise control or
Distance Pilot DISTRONIC is selected.
R LIM indicator lamp; ;on:variable speed lim-
iter is selected.
You can use the cruise control lever to limit the
speed to any speed above 30 km/h while the
engine is running.
Selecting speed limiter If there is a change of drivers, advise the new
driver of the limit speed stored.
X Check whether LIM indicator lamp ;is on.
If it is on, the variable speed limiter is already
selected. If it is not, press the cruise control lever in the
direction of arrow A.
LIM indicator lamp ;in the cruise control
lever is on. The variable speed limiter is selec-
ted.
Storing the current speed You can use the cruise control lever to limit the
speed to any speed above 30 km/h while the
engine is running.
X Briefly press the cruise control lever up :or
down ?.
The current speed is stored and shown in the
multifunction display.
Speedometer with segments: the seg-
ments light up from the start of the scale up to
the stored speed limit.
The segments in the multifunction display
light up from the start of the scale up to the
stored speed.
Storing the current speed or calling up the
last stored speed G
WARNING
If you call up the stored speed and it is lower
than the current speed, the vehicle deceler-
ates. If you do not know the stored speed, the vehicle could decelerate unexpectedly. There
is a risk of an accident.
Pay attention to the road and traffic condi-
tions before calling up the stored speed. If you do not know the stored speed, store the
desired speed again.
X Briefly pull the cruise control lever towards
you =.
Setting a speed
X To adjust the set speed in10 km/hincre-
ments:briefly press the cruise control lever
up : beyond the pressure point for a higher
speed, or down ?for a lower speed.
or
X Keep the cruise control lever pressed beyond
the pressure point until the desired speed is
set. Press the cruise control lever up :for a
higher speed or down ?for a lower speed.
X To adjust the set speed in1 km/hincre-
ments:briefly press the cruise control lever Driving systems
183Driving and parking Z
Page 190 of 397
Driving with Distance Pilot DISTRONIC
Pulling away and driving
X If you want to pull away with Distance
Pilot DISTRONIC:
remove your foot from the
brake pedal.
X Briefly pull the cruise control lever towards
you ?.
or X Accelerate briefly.
Your vehicle pulls away and adapts its speed
to that of the vehicle in front. If no vehicle is
detected in front, your vehicle accelerates to the set speed.
The vehicle can also pull away when it is facing
an unidentified obstacle or is driving on a differ-
ent line from another vehicle. The vehicle then
brakes automatically.
If there is no vehicle in front, Distance Pilot
DISTRONIC operates in the same way as cruise control.
If Distance Pilot DISTRONIC detects a slower-
moving vehicle in front, it brakes your vehicle. In this way, the distance you have selected is main-
tained.
If Distance Pilot DISTRONIC detects a faster-
moving vehicle in front, it increases the driving
speed. However, the vehicle is only accelerated
up to the speed you have stored.
Selecting the drive programDistance Pilot DISTRONIC supports a sporty
driving style if you have selected the Sportor
Sport Plus drive program (Y page 159). Accel-
eration behind the vehicle in front or to the set
speed is then noticeably more dynamic. If you
have selected the Comfortdrive program, the
vehicle accelerates more gently. This setting is
recommended in stop-start traffic.
Changing lanes
If you change to the overtaking lane, Distance
Pilot DISTRONIC supports you if:
R you are driving faster than 70 km/h
R you switch on the respective turn signal
R Distance Pilot DISTRONIC does not currently
detect a danger of collision
If these conditions are met, your vehicle accel-
erates. Acceleration will be interrupted if chang-
ing lanes takes too long or if the distance
between your vehicle and the vehicle in front
becomes too small. i
Vehicles with multimedia system:
when
you change lanes, Distance Pilot DISTRONIC
monitors the right lane (on left-side traffic) or
the left lane (on right-side traffic).
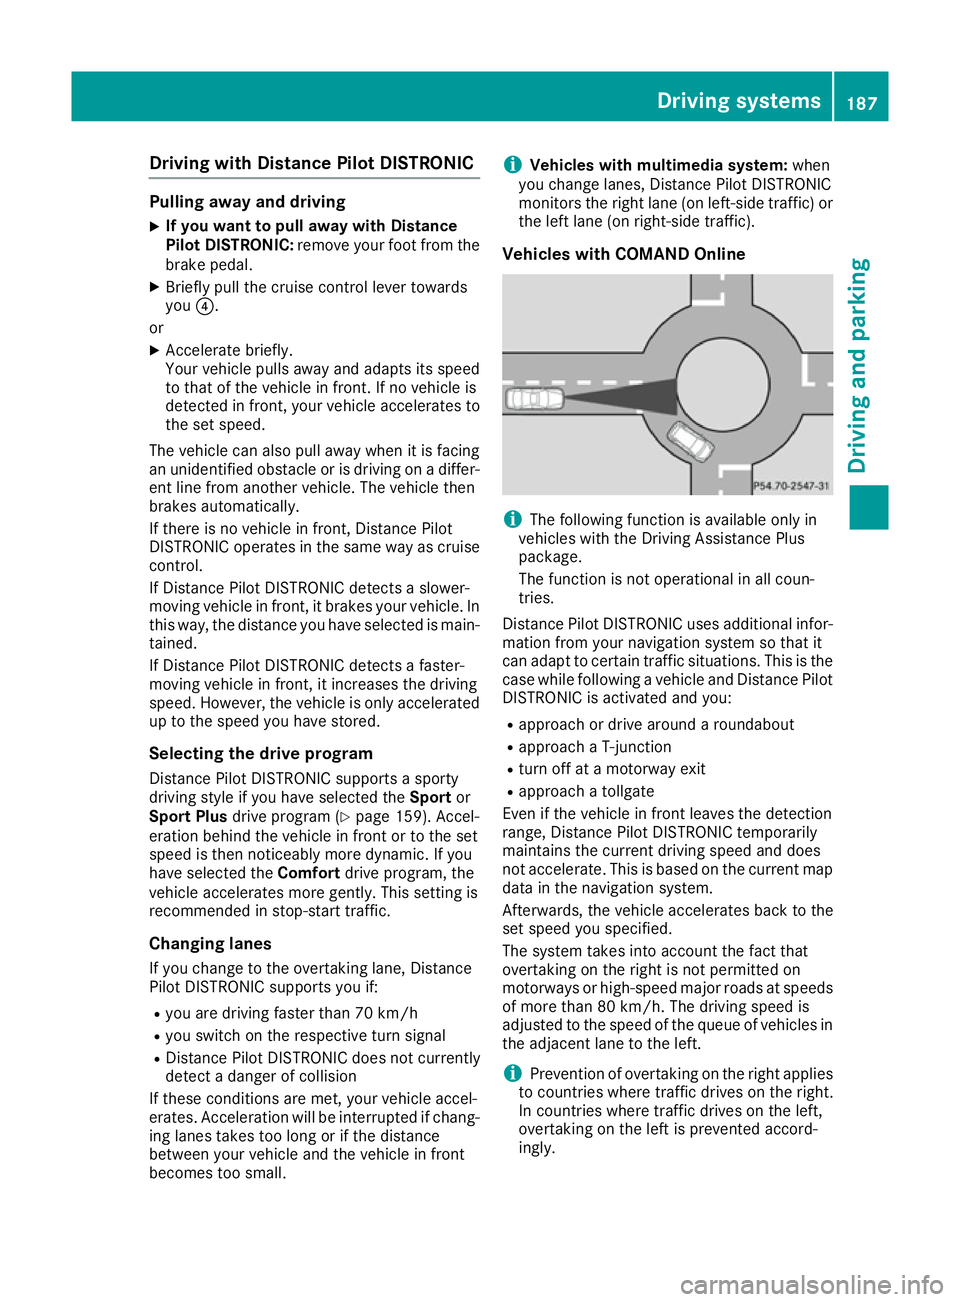
Vehicles with COMAND Online i
The following function is available only in
vehicles with the Driving Assistance Plus
package.
The function is not operational in all coun-
tries.
Distance Pilot DISTRONIC uses additional infor- mation from your navigation system so that it
can adapt to certain traffic situations. This is the
case while following a vehicle and Distance Pilot
DISTRONIC is activated and you:
R approach or drive around a roundabout
R approach a T-junction
R turn off at a motorway exit
R approach a tollgate
Even if the vehicle in front leaves the detection
range, Distance Pilot DISTRONIC temporarily
maintains the current driving speed and does
not accelerate. This is based on the current map
data in the navigation system.
Afterwards, the vehicle accelerates back to the
set speed you specified.
The system takes into account the fact that
overtaking on the right is not permitted on
motorways or high-speed major roads at speeds
of more than 80 km/h. The driving speed is
adjusted to the speed of the queue of vehicles in the adjacent lane to the left.
i Prevention of overtaking on the right applies
to countries where traffic drives on the right.
In countries where traffic drives on the left,
overtaking on the left is prevented accord-
ingly. Driving syste
ms
187Driving an d parking Z