2016 MERCEDES-BENZ GLC COUPE transmission
[x] Cancel search: transmissionPage 163 of 389
the engine speed does not reach the red area
of the rev counter.
X To shift down: pull steering wheel gearshift
paddle :.
The automatic transmission shifts down to
the next gear.
Automatic downshifting occurs when coast-
ing.
If the engine exceeds the maximum engine
speed when shifting down, the automatic
transmission protects against engine damage
by not shifting down.
Gearshift recommendation The gearshift recommendation assists you in
adopting a fuel-efficient driving style. The rec-
ommended gear is shown on the multifunction
display.
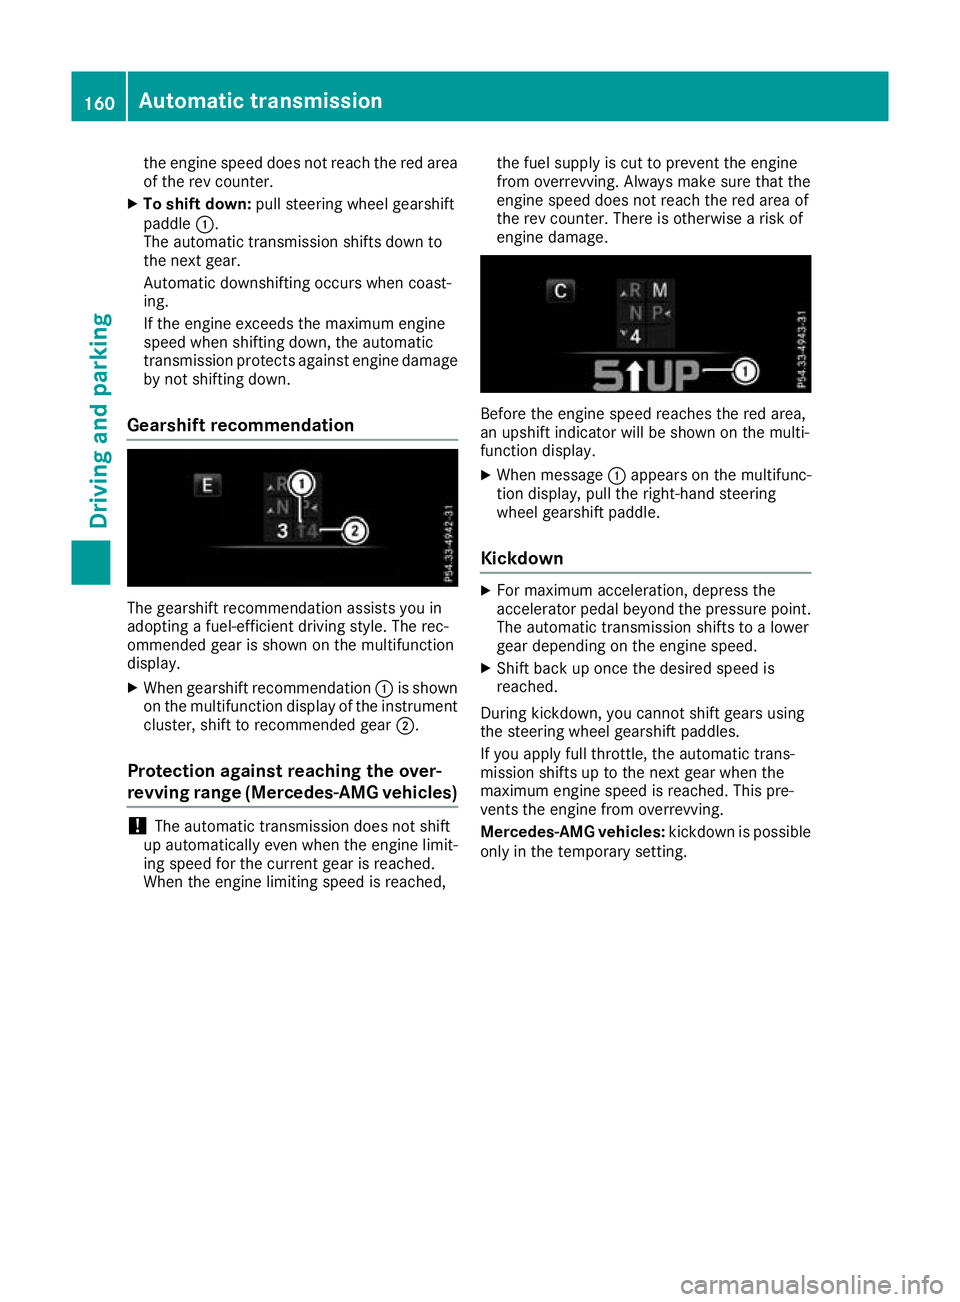
X When gearshift recommendation :is shown
on the multifunction display of the instrument
cluster, shift to recommended gear ;.
Protection against reaching the over-
revving range (Mercedes-AMG vehicles) !
The automatic transmission does not shift
up automatically even when the engine limit-
ing speed for the current gear is reached.
When the engine limiting speed is reached, the fuel supply is cut to prevent the engine
from overrevving. Always make sure that the
engine speed does not reach the red area of
the rev counter. There is otherwise a risk of
engine damage. Before the engine speed reaches the red area,
an upshift indicator will be shown on the multi-
function display.
X When message :appears on the multifunc-
tion display, pull the right-hand steering
wheel gearshift paddle.
Kickdown X
For maximum acceleration, depress the
accelerator pedal beyond the pressure point.
The automatic transmission shifts to a lower
gear depending on the engine speed.
X Shift back up once the desired speed is
reached.
During kickdown, you cannot shift gears using
the steering wheel gearshift paddles.
If you apply full throttle, the automatic trans-
mission shifts up to the next gear when the
maximum engine speed is reached. This pre-
vents the engine from overrevving.
Mercedes-AMG vehicles: kickdown is possible
only in the temporary setting. 160
Automatic transmissionDriving an
d parking
Page 164 of 389
Problems with the transmission
Problem
Possible causes/consequences and
M
MSolutions The transmission has
problems shifting gear. The transmission is losing oil.
X Have the transmission checked at a qualified specialist workshop
immediately. The acceleration charac-
teristics are deteriorat-
ing.
The transmission no lon-
ger changes gear. The transmission is in emergency mode.
It is possible to shift only into
secondgear and reverse gear.
X Stop.
X Shift the transmission to position P.
X Switch off the engine.
X Wait at least ten seconds before restarting the engine.
X Shift the transmission to position Dor R.
If D is selected, the transmission shifts into secondgear; ifRis
selected, the transmission shifts into reverse gear.
X Have the transmission checked at a qualified specialist workshop
immediately. Transfer case
This section only applies to vehicles with all-
wheel drive (4MATIC). The front and rear axles
are constantly driven.
! Performance tests may only be carried out
on a two-axle roller dynamometer. Otherwise,
the braking system or the transfer case could be damaged. Contact a qualified specialist
workshop for more information on perform-
ance tests.
! Since ESP ®
engages automatically, the igni-
tion must be switched off (the key or Start/
Stop button must be in position 0or 1) if:
R the electric parking brake is being tested
using a brake dynamometer.
R the vehicle is being towed with only one
axle raised (not permitted for vehicles with
4MATIC).
The brake system could otherwise be dam-
aged.
! Vehicles with 4MATIC must not be towed
with the front or rear axle raised; otherwise,
the transmission may be damaged. Refuelling
Important safety notes
G
WARNING
Fuel is highly flammable. If you handle fuel
incorrectly, there is a risk of fire and explo-
sion.
You must avoid fire, naked flames, creating
sparks and smoking. Switch off the engine
and, if applicable, the auxiliary heating before refuelling. G
WARNING
Fuels are poisonous and hazardous to health. There is a danger of injury.
Do not swallow fuel or let it come into contact
with skin, eyes or clothing. Do not inhale fuel
vapours. Keep fuels out of the reach of chil-
dren. Refuelling
161Driving and parking
Z
Page 170 of 389
shop. AdBlue
®
refill canisters are often sold with
a filler hose. A filler hose that does not exactly fit
the vehicle's AdBlue ®
tank offers no overfill pro-
tection. AdBlue ®
may leak out as a result of
overfilling. Mercedes-Benz offers a special dis-
posable hose with overfill protection. You can
obtain this from any Mercedes-Benz Service
Centre. AdBlue ®
is available in a variety of con-
tainers and receptacles. Use the disposable
hose only with the Mercedes-Benz AdBlue ®
refill
canisters.
AdBlue ®
refill bottle !
Only screw on the AdBlue ®
refill bottle so
that it is hand-tight. Otherwise, the thread of
the AdBlue ®
refill bottle could be damaged
and AdBlue ®
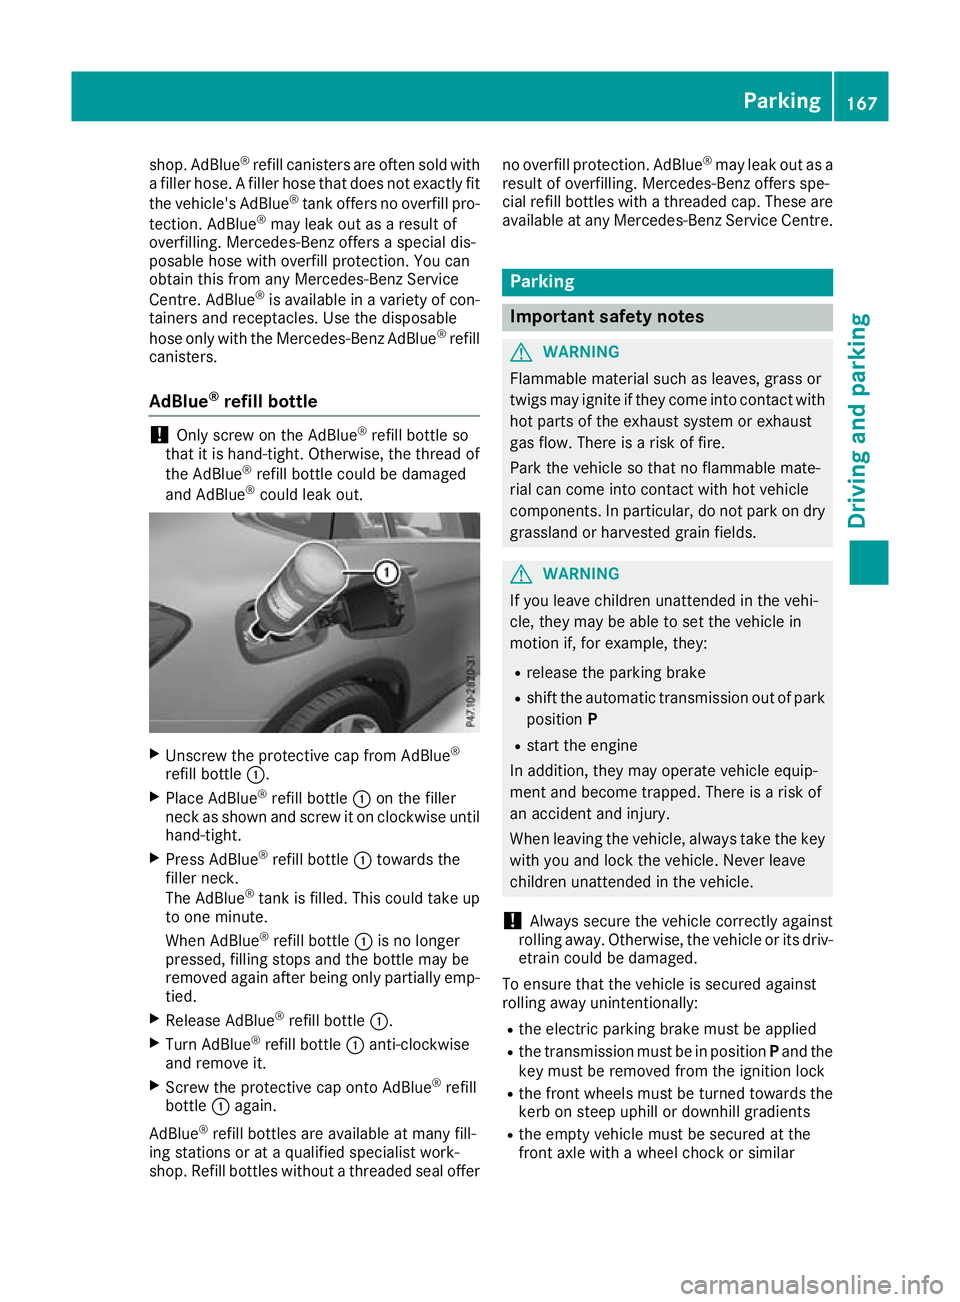
could leak out. X
Unscrew the protective cap from AdBlue ®
refill bottle :.
X Place AdBlue ®
refill bottle :on the filler
neck as shown and screw it on clockwise until hand-tight.
X Press AdBlue ®
refill bottle :towards the
filler neck.
The AdBlue ®
tank is filled. This could take up
to one minute.
When AdBlue ®
refill bottle :is no longer
pressed, filling stops and the bottle may be
removed again after being only partially emp- tied.
X Release AdBlue ®
refill bottle :.
X Turn AdBlue ®
refill bottle :anti-clockwise
and remove it.
X Screw the protective cap onto AdBlue ®
refill
bottle :again.
AdBlue ®
refill bottles are available at many fill-
ing stations or at a qualified specialist work-
shop. Refill bottles without a threaded seal offer no overfill protection. AdBlue
®
may leak out as a
result of overfilling. Mercedes-Benz offers spe-
cial refill bottles with a threaded cap. These are
available at any Mercedes-Benz Service Centre. Parking
Important safety notes
G
WARNING
Flammable material such as leaves, grass or
twigs may ignite if they come into contact with hot parts of the exhaust system or exhaust
gas flow. There is a risk of fire.
Park the vehicle so that no flammable mate-
rial can come into contact with hot vehicle
components. In particular, do not park on dry grassland or harvested grain fields. G
WARNING
If you leave children unattended in the vehi-
cle, they may be able to set the vehicle in
motion if, for example, they:
R release the parking brake
R shift the automatic transmission out of park
position P
R start the engine
In addition, they may operate vehicle equip-
ment and become trapped. There is a risk of
an accident and injury.
When leaving the vehicle, always take the key
with you and lock the vehicle. Never leave
children unattended in the vehicle.
! Always secure the vehicle correctly against
rolling away. Otherwise, the vehicle or its driv-
etrain could be damaged.
To ensure that the vehicle is secured against
rolling away unintentionally:
R the electric parking brake must be applied
R the transmission must be in position Pand the
key must be removed from the ignition lock
R the front wheels must be turned towards the
kerb on steep uphill or downhill gradients
R the empty vehicle must be secured at the
front axle with a wheel chock or similar Parking
167Driving and parking Z
Page 171 of 389
object, for example, on uphill or downhill gra-
dients
R on uphill or downhill gradients the laden vehi-
cle must also be secured at the rear axle, for
example with a wheel chock or similar object Switching off the engine
Important safety notes G
WARNING
The automatic transmission switches to neu-
tral position Nwhen you switch off the engine.
The vehicle may roll away. There is a risk of an
accident.
After switching off the engine, always switch
to parking position P. Prevent the parked vehi-
cle from rolling away by applying the parking
brake.
Vehicles with automatic transmission X
Apply the electric parking brake.
X Shift the transmission to position P.
X With the key: turn the key to position 0in the
ignition lock and remove it.
The immobiliser is activated.
X With the Start/Stop button: press the
Start/Stop button (Y page 144).
The engine stops and all the indicator lamps in the instrument cluster go out.
When the driver's door is closed, this corre-
sponds to key position 1. When the driver's
door is open, this corresponds to key position
0: "key removed".
If you switch the engine off with the transmis-
sion in position Ror D, the automatic transmis-
sion shifts to Nautomatically.
With the key: if you then open the driver's door
or the front-passenger door or remove the key
from the ignition, the automatic transmission
shifts to Pautomatically.
With the Start/Stop button: if you then open
the driver's door or the front-passenger door,
the automatic transmission shifts to Pautomat-
ically.
If you want the automatic transmission to
remain in neutral N, e.g. when having the vehicle cleaned in an automatic car wash with a towing
system:
X Vehicles with KEYLESS-GO or KEYLESS-
GO start function:
remove the Start/Stop
button from the ignition lock.
X Insert the key into the ignition lock.
X All vehicles: switch the ignition on.
X Depress the brake pedal and keep it
depressed.
X Shift to neutral N.
X Release the brake pedal.
X Release the electric parking brake.
X Switch off the ignition and leave the key in the
ignition lock.
The engine can be switched off while the vehicle
is in motion by pressing and holding the Start/
Stop button for about three seconds. This func- tion operates independently of the ECO start/
stop automatic engine switch-off function. Electric parking brake
General notes G
WARNING
If you leave children unattended in the vehi-
cle, they may be able to set the vehicle in
motion if, for example, they:
R release the parking brake
R shift the automatic transmission out of park
position P
R start the engine
In addition, they may operate vehicle equip-
ment and become trapped. There is a risk of
an accident and injury.
When leaving the vehicle, always take the key
with you and lock the vehicle. Never leave
children unattended in the vehicle.
The function of the electric parking brake is
dependent on the on-board voltage. If the on-
board voltage is low or the system is malfunc-
tioning, it may not be possible to apply the
released parking brake. 168
ParkingDriving and parking
Page 172 of 389
X
If this is the case, park the vehicle only on
level ground and secure it to prevent it from
rolling away.
X Shift the automatic transmission to position
P.
It may not be possible to release an applied
parking brake if the on-board voltage is low or if there is a malfunction in the system. Contact a
qualified specialist workshop.
The electric parking brake carries out a function
check at regular intervals when the engine is
switched off. Noises that occur are normal.
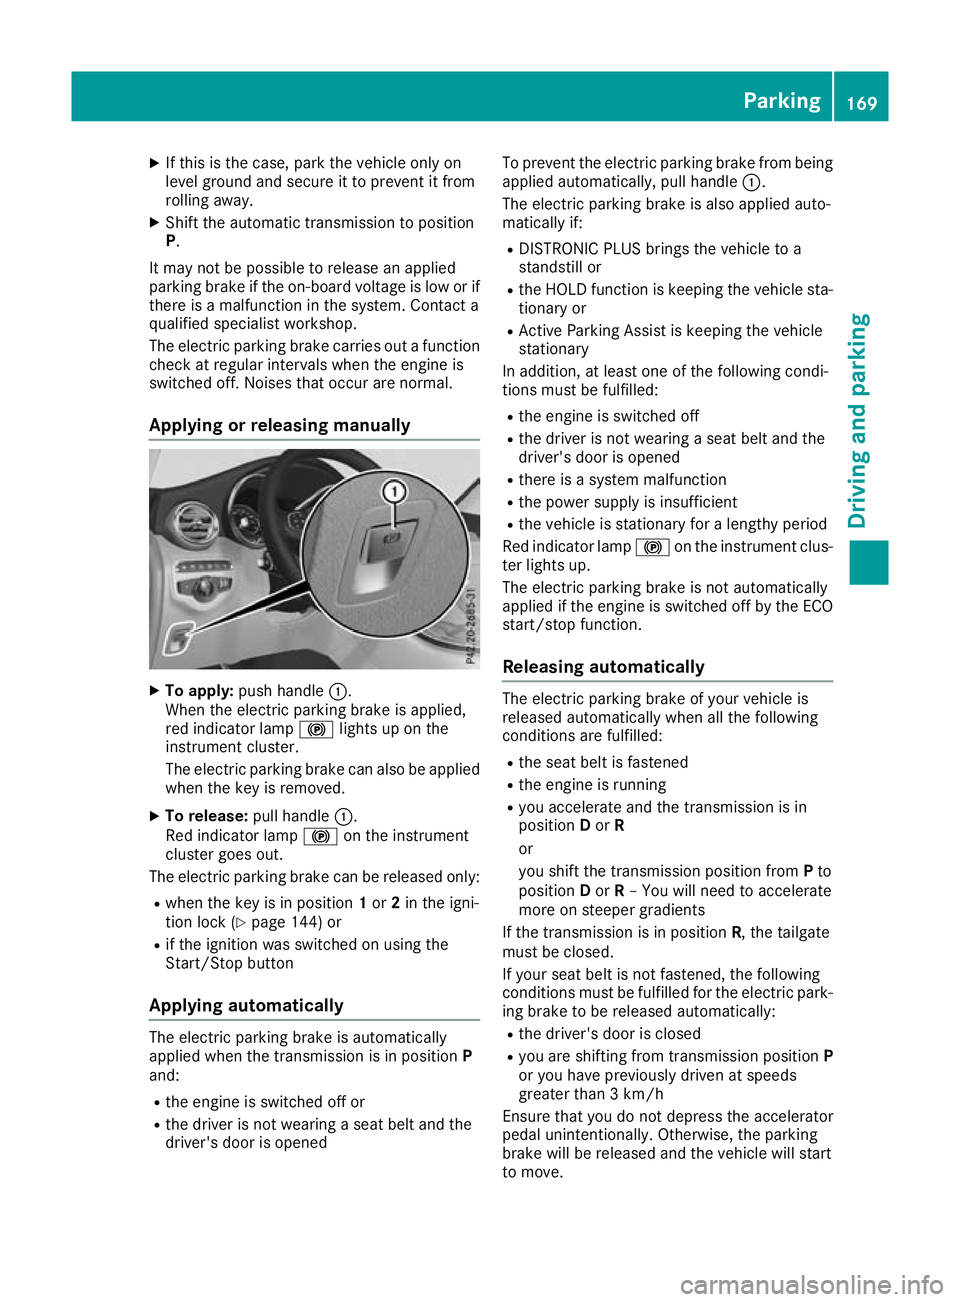
Applying or releasing manually X
To apply: push handle :.
When the electric parking brake is applied,
red indicator lamp !lights up on the
instrument cluster.
The electric parking brake can also be applied when the key is removed.
X To release: pull handle:.
Red indicator lamp !on the instrument
cluster goes out.
The electric parking brake can be released only:
R when the key is in position 1or 2in the igni-
tion lock (Y page 144) or
R if the ignition was switched on using the
Start/Stop button
Applying automatically The electric parking brake is automatically
applied when the transmission is in position P
and:
R the engine is switched off or
R the driver is not wearing a seat belt and the
driver's door is opened To prevent the electric parking brake from being
applied automatically, pull handle :.
The electric parking brake is also applied auto-
matically if:
R DISTRONIC PLUS brings the vehicle to a
standstill or
R the HOLD function is keeping the vehicle sta-
tionary or
R Active Parking Assist is keeping the vehicle
stationary
In addition, at least one of the following condi-
tions must be fulfilled:
R the engine is switched off
R the driver is not wearing a seat belt and the
driver's door is opened
R there is a system malfunction
R the power supply is insufficient
R the vehicle is stationary for a lengthy period
Red indicator lamp !on the instrument clus-
ter lights up.
The electric parking brake is not automatically
applied if the engine is switched off by the ECO
start/stop function.
Releasing automatically The electric parking brake of your vehicle is
released automatically when all the following
conditions are fulfilled:
R the seat belt is fastened
R the engine is running
R you accelerate and the transmission is in
position Dor R
or
you shift the transmission position from Pto
position Dor R– You will need to accelerate
more on steeper gradients
If the transmission is in position R, the tailgate
must be closed.
If your seat belt is not fastened, the following
conditions must be fulfilled for the electric park- ing brake to be released automatically:
R the driver's door is closed
R you are shifting from transmission position P
or you have previously driven at speeds
greater than 3 km/h
Ensure that you do not depress the accelerator
pedal unintentionally. Otherwise, the parking
brake will be released and the vehicle will start
to move. Parking
169Driving and parking Z
Page 176 of 389
the lightweight brake discs, particularly on the
brake plate. Driving on wet roads
Aquaplaning If water has accumulated to a certain depth on
the road surface, there is a danger of aquaplan-
ing occurring, even if:
R you are driving at low speeds
R the tyres have adequate tread depth
For this reason, drive in the following manner in
the event of heavy rain or in conditions in which aquaplaning can occur:
R lower your speed
R avoid tyre ruts
R avoid sudden steering movements
R brake carefully
Driving on flooded roads !
Bear in mind that vehicles travelling in front
or in the opposite direction create waves. This may cause the maximum permissible water
depth to be exceeded.
These notes must be observed under all cir-
cumstances. You could otherwise damage
the engine, the electronics or the transmis-
sion.
If you must drive on stretches of road on which
water has collected, please bear in mind that:
R in the case of standing water, the water level
must be no higher than the lower edge of the
vehicle body
R you should drive no faster than walking pace Winter driving
G
WARNING
If you shift down on a slippery road surface in an attempt to increase the engine's braking
effect, the drive wheels could lose their grip.
This increases the risk of skidding and having
an accident.
Do not shift down for additional engine brak-
ing on a slippery road surface. G
DANGER
If the exhaust pipe is blocked or adequate
ventilation is not possible, poisonous gases
such as carbon monoxide (CO) may enter the vehicle. This is the case, e.g. if the vehicle
becomes trapped in snow. There is a risk of
fatal injury.
If you leave the engine or the auxiliary heating
running, make sure the exhaust pipe and area
around the vehicle are clear of snow. To
ensure an adequate supply of fresh air, open a window on the side of the vehicle that is not
facing into the wind.
Have your vehicle winterproofed at a qualified
specialist workshop at the onset of winter.
You should drive particularly carefully on slip-
pery road surfaces. Avoid sudden acceleration,
steering and braking manoeuvres. Do not use
cruise control or DISTRONIC PLUS.
If the vehicle threatens to skid or cannot be
stopped when moving at low speed:
X Shift the transmission to position N.
X Try to bring the vehicle under control by using
corrective steering.
The outside temperature indicator is not
designed to serve as an ice-warning device and
is therefore unsuitable for that purpose.
Changes in the outside temperature are dis-
played after a short delay.
Indicated temperatures just above the freezing
point do not guarantee that the road surface is
free of ice. The road may still be icy, especially in wooded areas or on bridges. The vehicle could
skid if you fail to adapt your driving style. Always
adapt your driving style and drive at a speed to
suit the prevailing weather conditions.
You should pay special attention to road condi-
tions when temperatures are around freezing
point.
Further information on driving with snow chains (Y page 359).
Further information on driving with summer
tyres (Y page 358).
Observe the notes in the "Winter operation" sec-
tion (Y page 358). Driving
tips
173Driving an d parking Z
Page 178 of 389
stored speed to the end of the scale or to a per-
manently set speed limit light up.
Selecting cruise control X
Check whether LIM indicator lamp ;is off.
If it is off, cruise control is already selected.
If it is not, press the cruise control lever in the direction of arrow A.
LIM indicator lamp ;in the cruise control
lever goes out. Cruise control is selected.
Storing and maintaining the current
speed You can store the current speed if you are driv-
ing faster than 30 km/h.
X Accelerate the vehicle to the desired speed.
X Briefly press the cruise control lever up :or
down ?.
X Remove your foot from the accelerator pedal.
Cruise control is activated. The vehicle auto-
matically maintains the speed.
i Cruise control may be unable to maintain
the stored speed on uphill gradients. The
stored speed is resumed when the gradient
evens out. Cruise control maintains the
stored speed on downhill gradients by auto-
matically braking the vehicle.
To store the current speed or call up the
last stored speed G
WARNING
If you call up the stored speed and it is lower
than the current speed, the vehicle deceler-
ates. If you do not know the stored speed, the vehicle could decelerate unexpectedly. There
is a risk of an accident.
Pay attention to the road and traffic condi-
tions before calling up the stored speed. If you do not know the stored speed, store the
desired speed again.
X Briefly pull the cruise control lever towards
you =.
X Remove your foot from the accelerator pedal.
The first time cruise control is activated, it
stores the current speed or regulates the speed of the vehicle to the previously stored
speed.
Setting a speed Bear in mind that it may take a brief moment
until the vehicle has accelerated or braked to
the set speed.
X Press the cruise control lever up :for a
higher speed or down ?for a lower speed.
X Keep the cruise control lever pressed until the
desired speed is reached.
X Release the cruise control lever.
The new speed is stored.
X To adjust the set speed in1 km/hincre-
ments:
briefly press the cruise control lever
up : or down ?to the pressure point.
The last stored speed increases or decreases
in 1 km/h increments.
X To adjust the set speed in10 km/hincre-
ments: briefly press the cruise control lever
up : or down ?beyond the pressure point.
The last stored speed increases or decreases
in 10 km/h increments.
i Cruise control is not deactivated if you
depress the accelerator pedal. If you acceler-
ate to overtake, cruise control adjusts the
vehicle's speed to the last speed stored after
you have finished overtaking.
Deactivating cruise control There are several ways to deactivate cruise con-
trol:
X Briefly press the cruise control lever forwards
B.
or
X Brake.
or
X Briefly move the cruise control lever in the
direction of arrow A.
Variable SPEEDTRONIC is selected. LIM indi-
cator lamp ;in the cruise control lever is on.
Cruise control is automatically deactivated if: R you apply the electric parking brake
R you are driving at less than 30 km/h
R ESP ®
engages or you deactivate ESP ®
R you shift the transmission to position Nwhile
driving Driving systems
175Driving and parking Z
Page 182 of 389
In particular, the detection of obstacles can be
impaired in the case of:
R dirt on the sensors or obscured sensors
R snow or heavy rain
R interference by other radar sources
R strong radar reflections, e.g. in multi-storey
car parks
If DISTRONIC PLUS no longer detects a vehicle
in front, it may unexpectedly accelerate to the
speed stored.
This speed can:
R be too high for a filter lane or a slip road
R be so high in the right lane that you pass vehi-
cles driving on the left (in countries where
they drive on the right)
R be so high in the left lane that you pass vehi-
cles driving on the right (in countries where
they drive on the left)
If there is a change of drivers, advise the new
driver of the speed stored.
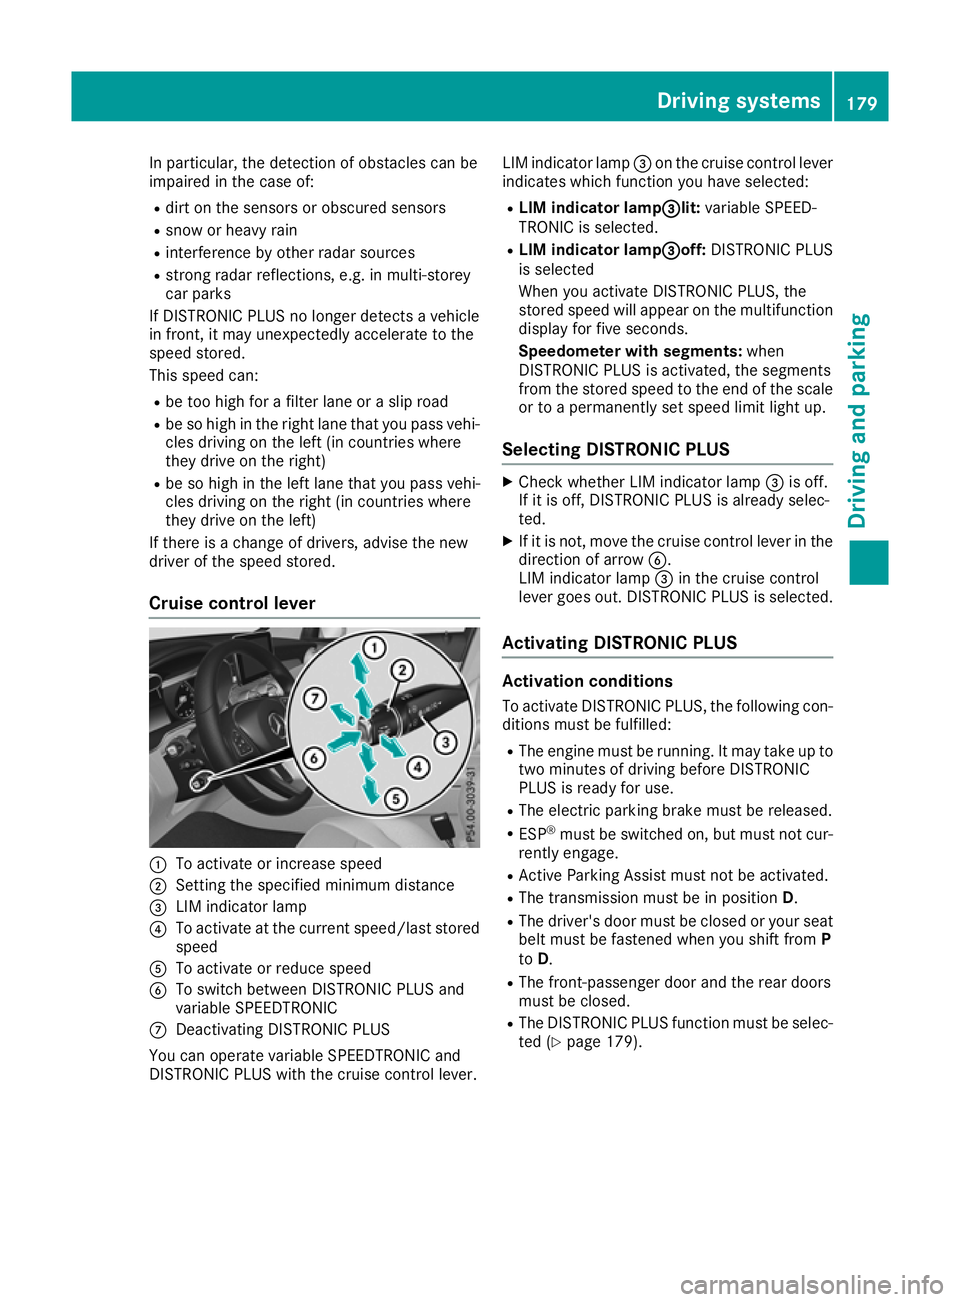
Cruise control lever :
To activate or increase speed
; Setting the specified minimum distance
= LIM indicator lamp
? To activate at the current speed/last stored
speed
A To activate or reduce speed
B To switch between DISTRONIC PLUS and
variable SPEEDTRONIC
C Deactivating DISTRONIC PLUS
You can operate variable SPEEDTRONIC and
DISTRONIC PLUS with the cruise control lever. LIM indicator lamp
=on the cruise control lever
indicates which function you have selected:
R LIM indicator lamp= =lit:variable SPEED-
TRONIC is selected.
R LIM indicator lamp = =off:DISTRONIC PLUS
is selected
When you activate DISTRONIC PLUS, the
stored speed will appear on the multifunction display for five seconds.
Speedometer with segments: when
DISTRONIC PLUS is activated, the segments
from the stored speed to the end of the scale or to a permanently set speed limit light up.
Selecting DISTRONIC PLUS X
Check whether LIM indicator lamp =is off.
If it is off, DISTRONIC PLUS is already selec-
ted.
X If it is not, move the cruise control lever in the
direction of arrow B.
LIM indicator lamp =in the cruise control
lever goes out. DISTRONIC PLUS is selected.
Activating DISTRONIC PLUS Activation conditions
To activate DISTRONIC PLUS, the following con-
ditions must be fulfilled:
R The engine must be running. It may take up to
two minutes of driving before DISTRONIC
PLUS is ready for use.
R The electric parking brake must be released.
R ESP ®
must be switched on, but must not cur-
rently engage.
R Active Parking Assist must not be activated.
R The transmission must be in position D.
R The driver's door must be closed or your seat
belt must be fastened when you shift from P
to D.
R The front-passenger door and the rear doors
must be closed.
R The DISTRONIC PLUS function must be selec-
ted (Y page 179). Driving systems
179Driving and parking Z