2016 MERCEDES-BENZ GLC COUPE emergency towing
[x] Cancel search: emergency towingPage 6 of 389
Care ....................................................
.331 Breakdown assistance
.....................338
Where will I find...? .............................. 338
Flat tyre ............................................... 341
Battery (vehicle) .................................. 345
Jump-starting ....................................... 348
Towing away and tow-starting ............. 350
Fuses ................................................... 354 Wheels and tyres
.............................. 356
Important safety notes ........................ 356
Operation ............................................ 356
Winter operation .................................. 358
Tyre pressure ....................................... 359
Changing a wheel ................................ 364
Wheel-tyre combination ....................... 368
Emergency spare wheel ....................... 369 Technical data
................................... 371
Information on technical data .............. 371
Vehicle electronics .............................. 371
Identification plates ............................ .372
Service products and capacities .......... 373
Vehicle data ......................................... 379
Trailer tow hitch ................................... 380 Contents
3
Page 20 of 389

Operating instructions
Vehicle equipment ........................... 27
Operating safety
Declaration of conformit y................ 28
Important safety note ...................... 27
Operating system
see On-board computer
Operation
Digital Owner's Manua l.................... 25
Outside temperature display ........... 229
Overhead control panel ...................... 39
Override feature
Rear side window s........................... 67
Owner's Manual
Overview .......................................... 27 P
Paint code .......................................... 372
Paintwork (cleaning instructions) ... 333
Panic alarm .......................................... 41
Parking
Important safety notes .................. 167
Parking brake ................................ 168
Parking position for the exterior
mirror on the front-passenger
side ................................................ 112
Reversing camera .......................... 198
Switching off the engine ................ 168
see PARKTRONIC
Parking aid
see 360° camera
see Active Parking Assist
see Exterior mirrors
see PARKTRONIC
see Reversing camera
Parking brake
Applying automaticall y................... 169
Applying or releasing manually ...... 169
Display message ............................ 252
Electric parking brake .................... 168
Emergency braking ........................ 170
General information ....................... 168
Releasing automaticall y................. 169
Warning lamp ................................. 286
Parking lamps
Display message ............................ 261
Switching on/of f........................... 116 PARKTRONIC
Deactivating/activating ................. 193
Driving system ............................... 191
Function/note s............................. 191
Important safety notes .................. 191
Problem (fault) ............................... 193
Sensor rang e................................. 191
Trailer towing ................................. 191
Warning display ............................. 192
PASSENGER AIR BAG
Display message ............................ 259
Indicator lamps ................................ 42
Problems (malfunctions) ................ 259
Perfume atomiser
Setting the perfume intensity
(multimedia system )...................... 296
Vial ................................................ 135
Perfume atomizer
Operating ....................................... 135
Problem (malfunction) ................... 137
Petrol .................................................. 374
Pets in the vehicle ............................... 67
Phone book
See also Digital Owner's Manua l... 292
Plastic trim (cleaning instruc-
tions) .................................................. 336
Power windows
see Side windows
PRE-SAFE ®
(anticipatory occupant
protection)
Operation ......................................... 55
PRE-SAFE ®
(preventive occupant
safety system)
Display message ............................ 255
PRE-SAFE ®
Brake
Activating/deactivating ................. 241
Display message ............................ 256
Function/note s................................ 77
Important safety notes .................... 77
Warning lamp ................................. 289
PRE-SAFE ®
PLUS (anticipatory
occupant protection PLUS)
Operation ......................................... 55
Protection against theft
ATA (Anti-Theft Alarm system )......... 79
Immobiliser ...................................... 79
Interior motion sensor ..................... 81 Index
17
Page 25 of 389
Transmission oil (on-board com-
puter, Mercedes-AMG vehicles) ..... 245
TEMPOMAT
Function/notes ............................. 174
Text messages
Telephone module with Blue-
tooth ®
(SAP profile) ....................... 302
Timing (RACETIMER) .........................247
TIREFIT Kit
Declaration of conformity ................ 29
Important safety notes .................. 342
Storage location ............................ 340
Tyre pressure not reached ............. 344
Tyre pressure reached ................... 344
Using ............................................. 343
Top Tether ............................................ 59
Total distance recorder .................... 232
Touchpad
Changing the station/music
track .............................................. 295
Character suggestions ................... 294
Deleting characters ....................... 294
Entering a space ............................ 294
Entering characters ....................... 294
Gesture control .............................. 294
Handwriting recognition ................ 294
Operating the touchpad ................. 294
Overview ........................................ 293
Quick access for audio .................. 295
Switching ....................................... 293
Switching input line ....................... 294
Tow-away protection
Deactivating ..................................... 80
Function .......................................... .80
Priming/deactivating ....................... 80
Tow-starting
Emergency engine starting ............ 353
Important safety notes .................. 350
Towing
Important safety notes .................. 350
Notes for 4MATIC vehicles ............ 353
Transporting the vehicle ................3 53
Towing a trailer
Active Blind Spot Assist ................. 215
Active Lane Keeping Assist ............ 218
Active Parking Assist ..................... 194
Axle load, permissible .................... 381 ESP
®
(Electronic Stability Pro-
gram) ............................................... 76
Failure check for LEDs ................... 223
Pulling away with a trailer .............. 147
Swinging out the ball coupling ....... 220
Trailer tow hitch display message .. 277
Towing away
Fitting the towing eye .................... 352
Removing the towing eye ............... 352
With both axles on the ground ....... 353
Towing eye ......................................... 340
Traffic Sign Assist
Activating/deactivating the warn-ing function .................................... 241
Display message ............................ 269
Function/note s............................. 208
Important safety notes .................. 209
Instrument cluster display ............. 209
Trailer coupling
see Towing a trailer
Trailer towing
7-pin connecto r............................. 223
Blind Spot Assist ............................ 211
Cleaning the trailer tow hitch ......... 336
Coupling up a traile r...................... 222
Decoupling a trailer ....................... 222
Driving tip s.................................... 219
Important safety notes .................. 218
Lights display message .................. 261
Parktronic ...................................... 191
Power supply ................................. 222
Problem (fault) ............................... 224
Trailer load s................................... 380
Transfer case ..................................... 161
Transmission
see Automatic transmission
Transmission position display ......... 155
Transporting the vehicle .................. 353
Trim pieces (cleaning instruc-
tions) .................................................. 336
Trip computer (on-board com-
puter) .................................................. 233
Trip meter
Calling up ....................................... 232
Resetting (on-board computer) ...... 234
Turn signals
Replacing bulbs (front) ................... 123 22
Index
Page 26 of 389
Switching on/of
f........................... 117
TV
Operating (on-board computer) ..... 238
Two-way radio
Frequencies ................................... 371
Installation ..................................... 371
Transmission output (maximum) .... 371
Type identification plate
see Vehicle identification plate
Tyre changing tool kit ....................... 340
Tyre inflation compressor
see TIREFIT kit
Tyre pressure
Calling up (on-board computer) ..... 361
Display message ............................ 273
Not reached (TIREFIT) .................... 344
Reached (TIREFIT) .......................... 344
Recommended ............................... 359
Tyre pressure loss warning
General notes ................................ 360
Important safety notes .................. 361
Restarting ...................................... 361
Tyre pressure monitor
Checking the tyre pressure elec-
tronically ........................................ 362
Function/note s............................. 361
General notes ................................ 361
Important safety notes .................. 362
Radio type approval for the tyre
pressure monitor ........................... 364
Restarting ...................................... 363
Warning lamp ................................. 290
Warning message .......................... 363
Tyres
Changing a whee l.......................... 364
Checking ........................................ 356
Direction of rotation ...................... 365
Display message ............................ 273
Important safety notes .................. 356
Information on driving .................... 356
MOExtended tyre s......................... 358
Replacing ....................................... 364
Service life ..................................... 357
Snow chains .................................. 359
Storing ........................................... 365
Summer tyres in winter ................. 358
Tyre size (data ).............................. 368
Tyre tread ...................................... 357 Wheel and tyre combinations ........ 368
see Flat tyre U
Unlocking Emergency unlocking ....................... 90
From inside the vehicle (central
unlocking button) ............................. 89
USB devices
Connecting to the Media Inter-
face ............................................... 304
Using the TIREFIT
tyre pressure kit ............................ 343 V
Vanity mirror (in sun visor) .............. 317
Variable SPEEDTRONIC
see SPEEDTRONIC
Vehicle
Correct use ...................................... 30
Data acquisition ............................... 30
Display message ............................ 275
Electronics ..................................... 371
Equipment ....................................... 27
Implied warranty .............................. 30
Individual settings .......................... 240
Leaving parked up ......................... 170
Locking (in an emergency) ............... 90
Locking (key) ................................... 83
Lowering ........................................ 368
Operating safety .............................. 27
Parking .......................................... 167
Pulling away ................................... 146
Raising ........................................... 366
Registration ..................................... 30
Securing from rolling away ............ 365
Technical data ............................... 371
Towing away .................................. 350
Transporting .................................. 353
Unlocking (in an emergency) ........... 90
Unlocking (key) ................................ 83
Vehicle data ................................... 379
Vehicle dimensions ........................... 379
Vehicle emergency locking ................ 90
Vehicle identification number
see VIN Index
23
Page 59 of 389

Using the radar sensor system, PRE-SAFE
®
PLUS is able to detect that a head-on or rear-end
collision is imminent. In certain hazardous sit-
uations, PRE-SAFE ®
PLUS takes pre-emptive
measures to protect the vehicle occupants.
Important safety notes The intervention of PRE-SAFE
®
PLUS cannot
prevent an imminent collision.
The driver is not warned before the intervention
of PRE-SAFE ®
PLUS.
PRE-SAFE ®
PLUS does not intervene:
R if the vehicle is reversing
R when the vehicle is towing a trailer and there
is a risk of a rear-end collision
When driving, or when parking or exiting a park- ing space with assistance from Active Parking
Assist, PRE-SAFE ®
PLUS will not apply the
brakes.
Function PRE-SAFE
®
PLUS intervenes in certain situa-
tions if the radar sensor system detects an
imminent head-on or rear-end collision.
PRE-SAFE ®
PLUS takes the following measures
depending on the hazardous situation detected:
R if the radar sensor system detects that a
head-on collision is imminent, the seat belts
are pre-tensioned
R if the radar sensor system detects that a rear-
end collision is imminent:
- the rear hazard warning lamps are activa-
ted and flash at a higher frequency
- the brake pressure is increased if the driver
applies the brakes when the vehicle is sta-
tionary
- the seat belts are pre-tensioned
The PRE-SAFE ®
PLUS braking application is can-
celled:
R if the accelerator pedal is depressed when a
gear is engaged
R if the risk of a collision passes or is no longer
detected
R if DISTRONIC PLUS indicates an intention to
pull away
If the hazardous situation passes without result- ing in an accident, the original settings are
restored. Automatic measures after an acci-
dent
Immediately after an accident, the following
measures are implemented, depending on the
type and severity of the impact:
R the hazard lamps are switched on
R the emergency lighting is switched on
R the vehicle doors are unlocked
R the front side windows are lowered
R vehicles with the memory function: the elec-
trically adjustable steering wheel is raised
R the engine is switched off and the fuel supply
is cut off
R vehicles with the Mercedes-Benz emergency
call system: automatic emergency call Children in the vehicle
Important safety notes
Accident statistics show that children secured
in the rear seats are safer than children secured in the front-passenger seat. For this reason,
Mercedes-Benz strongly advises that you install
a child restraint system on a rear seat. Children are generally better protected there.
If a child younger than twelve years old and
under 1.50 min height is travelling in the vehi-
cle:
R always secure the child in a child restraint
system suitable for Mercedes-Benz vehicles.
The child restraint system must be appropri-
ate to the age, weight and size of the child.
R be sure to observe the instructions and safety
notes in this section in addition to the child
restraint system manufacturer's installation
instructions.
R be sure to observe the instructions and safety
notes on the automatic front-passenger front airbag deactivation system (Y page 49).56
Children in the vehicleSafety
Page 309 of 389
Front stowage compartments
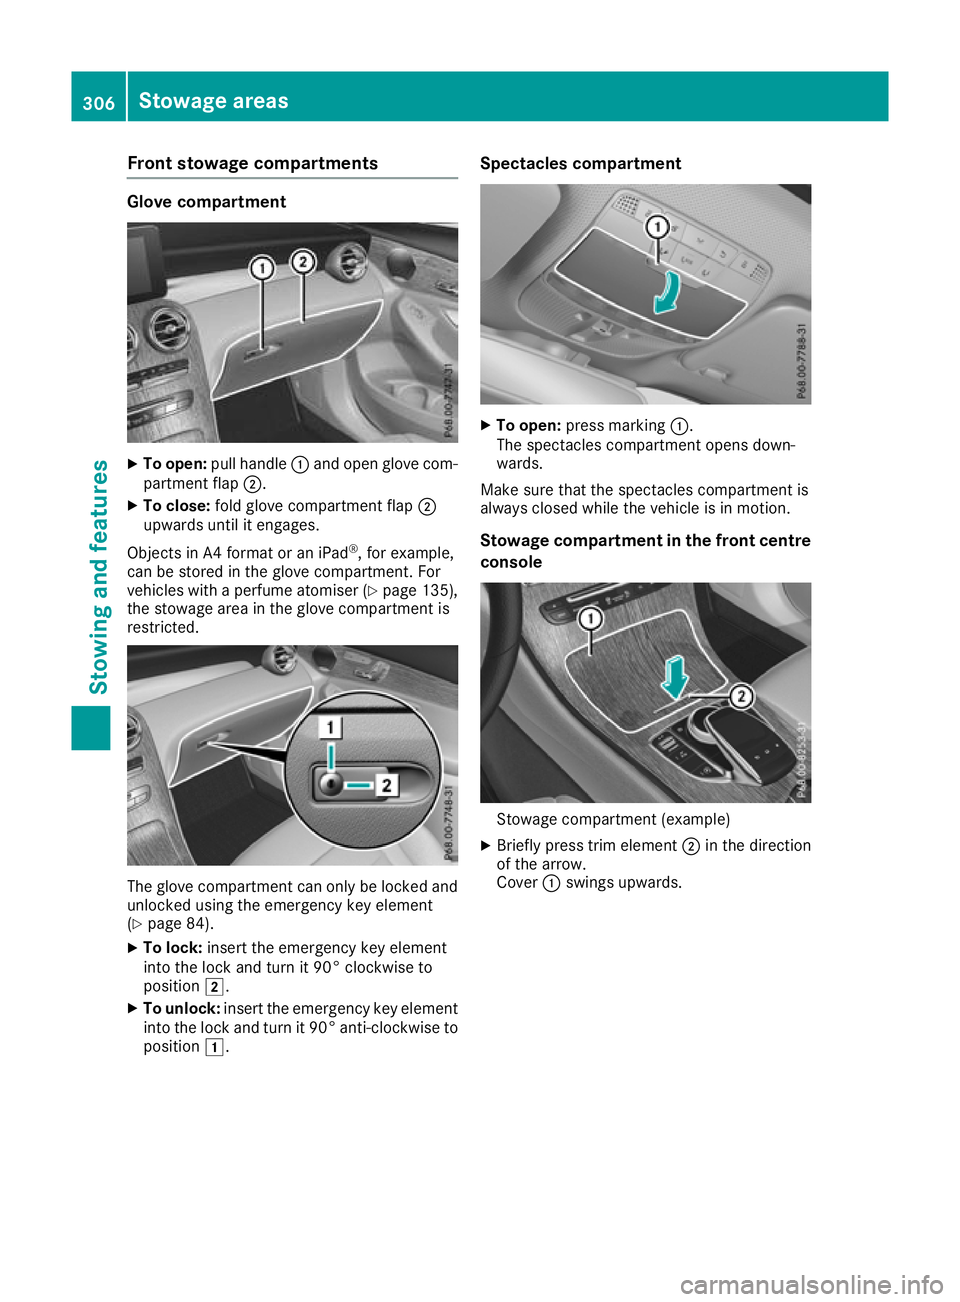
Glove compartment
X
To open: pull handle :and open glove com-
partment flap ;.
X To close: fold glove compartment flap ;
upwards until it engages.
Objects in A4 format or an iPad ®
, for example,
can be stored in the glove compartment. For
vehicles with a perfume atomiser (Y page 135),
the stowage area in the glove compartment is
restricted. The glove compartment can only be locked and
unlocked using the emergency key element
(Y page 84).
X To lock: insert the emergency key element
into the lock and turn it 90° clockwise to
position 2.
X To unlock: insert the emergency key element
into the lock and turn it 90° anti-clockwise to
position 1. Spectacles compartment
X
To open: press marking :.
The spectacles compartment opens down-
wards.
Make sure that the spectacles compartment is
always closed while the vehicle is in motion.
Stowage compartment in the front centre
console Stowage compartment (example)
X Briefly press trim element ;in the direction
of the arrow.
Cover :swings upwards. 306
Stowage areasStowing and featu
res
Page 318 of 389
X
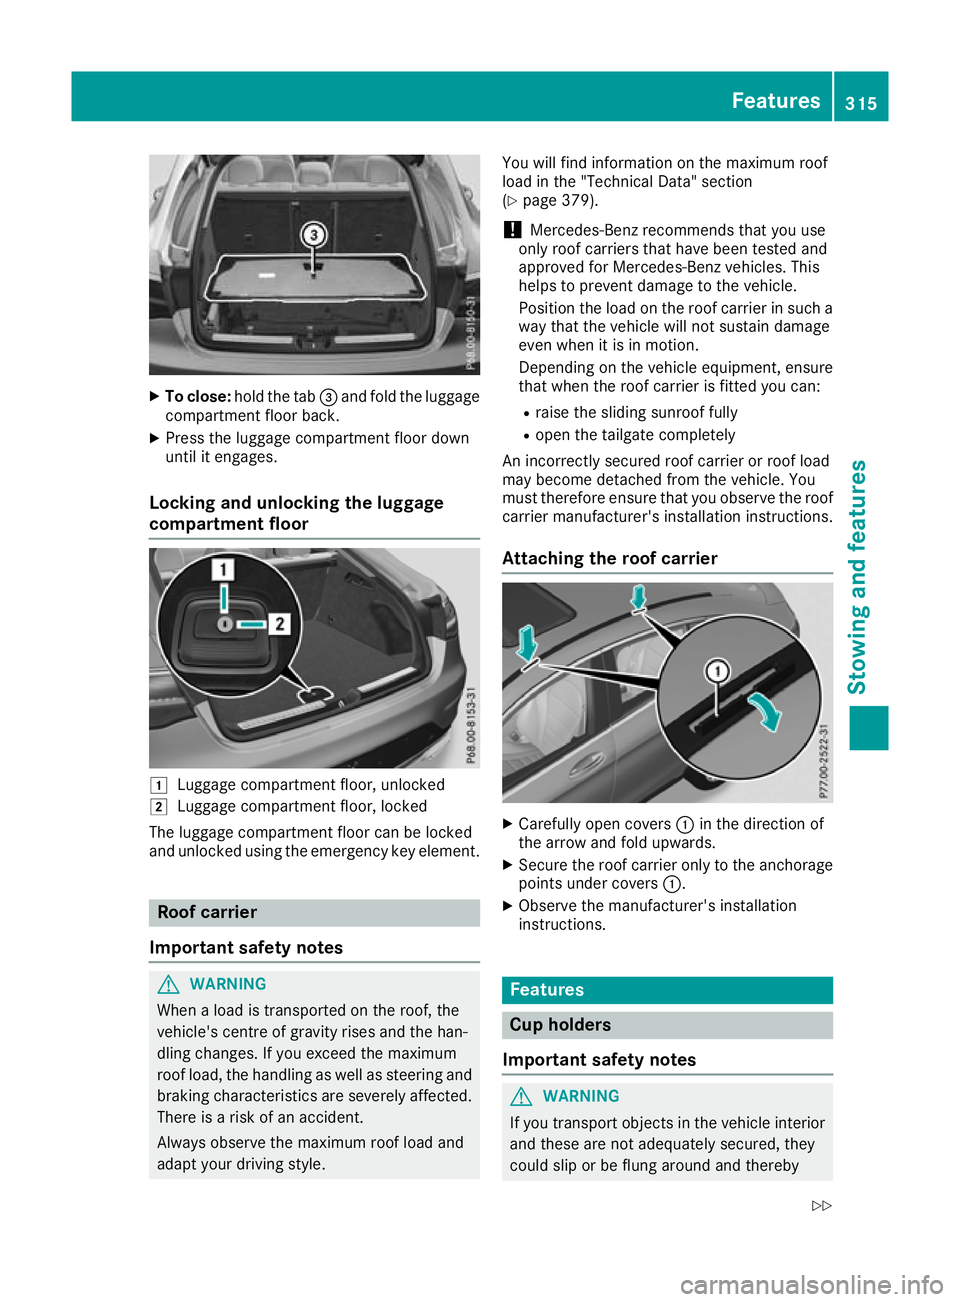
To close: hold the tab =and fold the luggage
compartment floor back.
X Press the luggage compartment floor down
until it engages.
Locking and unlocking the luggage
compartment floor 1
Luggage compartment floor, unlocked
2 Luggage compartment floor, locked
The luggage compartment floor can be locked
and unlocked using the emergency key element. Roof carrier
Important safety notes G
WARNING
When a load is transported on the roof, the
vehicle's centre of gravity rises and the han-
dling changes. If you exceed the maximum
roof load, the handling as well as steering and braking characteristics are severely affected.
There is a risk of an accident.
Always observe the maximum roof load and
adapt your driving style. You will find information on the maximum roof
load in the "Technical Data" section
(Y
page 379).
! Mercedes-Benz recommends that you use
only roof carriers that have been tested and
approved for Mercedes-Benz vehicles. This
helps to prevent damage to the vehicle.
Position the load on the roof carrier in such a way that the vehicle will not sustain damage
even when it is in motion.
Depending on the vehicle equipment, ensure
that when the roof carrier is fitted you can:
R raise the sliding sunroof fully
R open the tailgate completely
An incorrectly secured roof carrier or roof load
may become detached from the vehicle. You
must therefore ensure that you observe the roof carrier manufacturer's installation instructions.
Attaching the roof carrier X
Carefully open covers :in the direction of
the arrow and fold upwards.
X Secure the roof carrier only to the anchorage
points under covers :.
X Observe the manufacturer's installation
instructions. Features
Cup holders
Important safety notes G
WARNING
If you transport objects in the vehicle interior and these are not adequately secured, they
could slip or be flung around and thereby Features
315Stowing an d features
Z
Page 321 of 389
i
You can remove the ashtray insert and use
the resultant compartment for stowage.
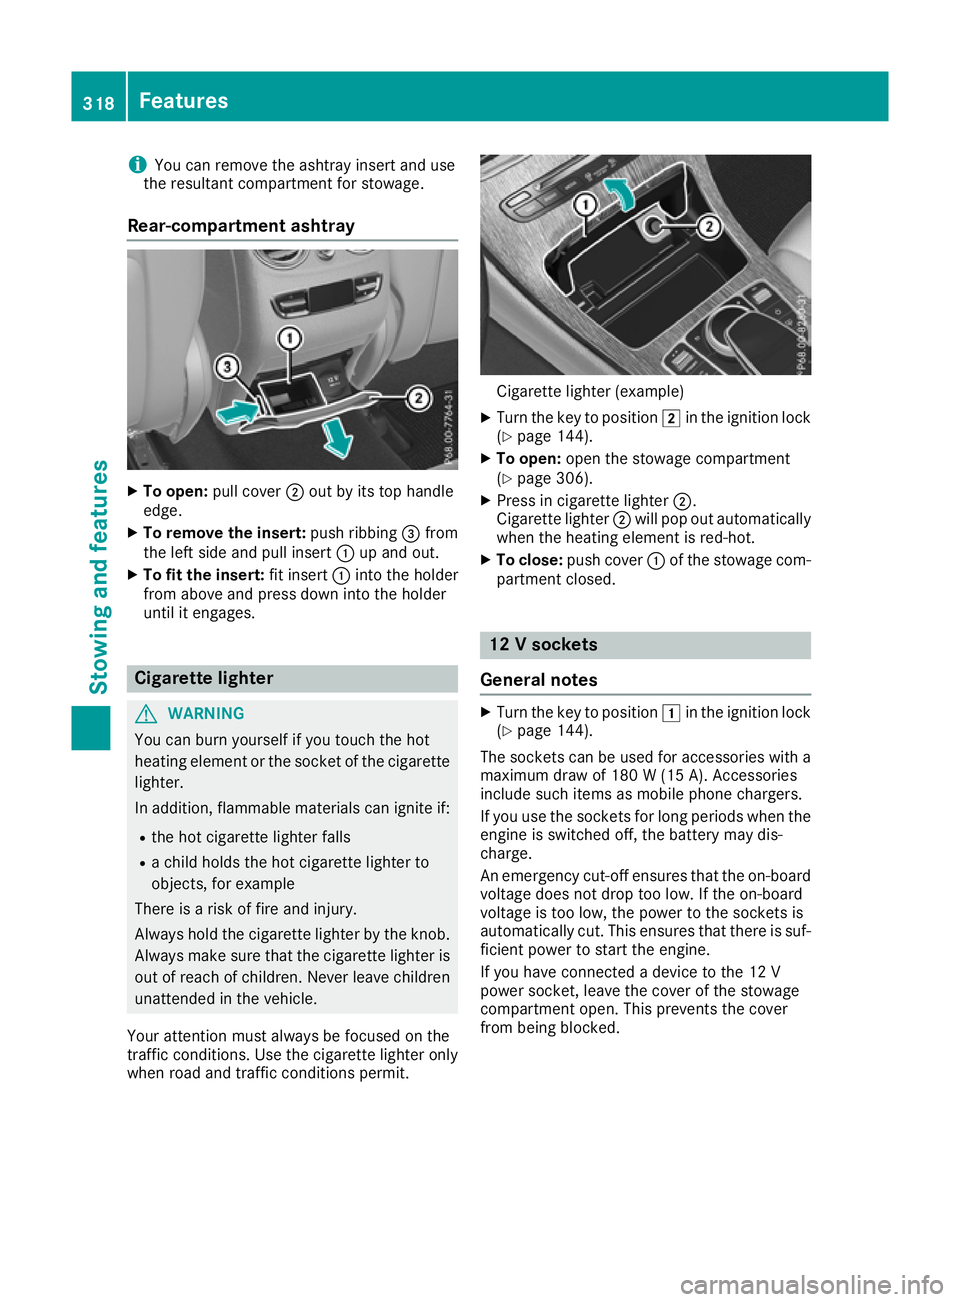
Rear-compartment ashtray X
To open: pull cover ;out by its top handle
edge.
X To remove the insert: push ribbing=from
the left side and pull insert :up and out.
X To fit the insert: fit insert:into the holder
from above and press down into the holder
until it engages. Cigarette lighter
G
WARNING
You can burn yourself if you touch the hot
heating element or the socket of the cigarette lighter.
In addition, flammable materials can ignite if:
R the hot cigarette lighter falls
R a child holds the hot cigarette lighter to
objects, for example
There is a risk of fire and injury.
Always hold the cigarette lighter by the knob.
Always make sure that the cigarette lighter is
out of reach of children. Never leave children unattended in the vehicle.
Your attention must always be focused on the
traffic conditions. Use the cigarette lighter only when road and traffic conditions permit. Cigarette lighter (example)
X Turn the key to position 2in the ignition lock
(Y page 144).
X To open: open the stowage compartment
(Y page 306).
X Press in cigarette lighter ;.
Cigarette lighter ;will pop out automatically
when the heating element is red-hot.
X To close: push cover :of the stowage com-
partment closed. 12 V sockets
General notes X
Turn the key to position 1in the ignition lock
(Y page 144).
The sockets can be used for accessories with a
maximum draw of 180 W (15 A). Accessories
include such items as mobile phone chargers.
If you use the sockets for long periods when the engine is switched off, the battery may dis-
charge.
An emergency cut-off ensures that the on-board
voltage does not drop too low. If the on-board
voltage is too low, the power to the sockets is
automatically cut. This ensures that there is suf- ficient power to start the engine.
If you have connected a device to the 12 V
power socket, leave the cover of the stowage
compartment open. This prevents the cover
from being blocked. 318
FeaturesStowing and features