2016 MERCEDES-BENZ GLC COUPE parking sensors
[x] Cancel search: parking sensorsPage 10 of 389

Important safety notes .................. 171
Parking brake ................................ 168
Warning lamp .................................2
82
Breakdown
Where will I find...? ........................ 338
see Flat tyre
see Towing away
Brightness control (instrument
cluster lighting) ................................... 32
Buttons on the steering column ...... 229C
Calling up a fault see Display messages
Calling up the climate control bar
Multimedia system ........................ 296
Calling up the climate control
menu
Multimedia system ........................ 296
Camera
see 360° camera
see Reversing camera
Car
see Vehicle
Car wash (care) ................................. 331
Care
360° camera ................................. 335
Automatic car wash ....................... 331
Carpets .......................................... 337
Display .......................................... .336
Exhaust pipe .................................. 335
Exterior lighting ............................ .334
General notes ................................ 331
High-pressure cleaner .................... 332
Interior .......................................... .336
Matt paintwork .............................. 333
Paint .............................................. 333
Plastic trim ................................... .336
Reversing camera .......................... 335
Roof lining ...................................... 337
Seat belt ........................................ 337
Seat cover ..................................... 337
Selector lever ................................ 336
Sensors ......................................... 335
Side running board ........................ 335
Steering wheel ............................... 336
Trim pieces ................................... .336 Washing by hand ........................... 332
Wheels ..........................................
.334
Windows ........................................ 334
Wiper blades .................................. 334
Wooden trim .................................. 336
CD
See also Digital Owner's Manual ... 292
CD player (on-board computer) ........237
Central locking
Locking/unlocking (key ).................. 83
Centre console
Lower section .................................. 37
Upper section .................................. 36
Changing the media source ............. 236
Charge-air pressure (on-board
computer, Mercedes-AMG vehi-
cles) .................................................... 245
Child
Restraint system .............................. 57
Child seat
Forward-facing restraint system ...... 61
i-Size ................................................ 58
ISOFIX .............................................. 58
On the front-passenger sea t............ 60
Rearward-facing restraint system .... 61
Recommendations ........................... 65
Suitable positions ............................ 61
Top Tether ....................................... 59
Child-proof locks
Important safety notes .................... 66
Rear doors ....................................... 67
Children in the vehicle
Important safety notes .................... 56
Cigarette lighter ................................ 318
Cleaning
Mirror turn signal ........................... 335
Trailer tow hitch ............................. 336
Climate control
Auxiliary heating/ventilation .......... 137
Control panel for THERMATIC
automatic climate control (2-
zone) .............................................. 127
Controlling automaticall y............... 131
Convenience opening/closing
(air-recirculation mode) ................. 134
Cooling with air dehumidification .. 130
Cooling with air dehumidification
(multimedia system )...................... 297 Index
7
Page 146 of 389
Running-in notes
Important safety notes
In certain driving and driving safety systems, the sensors adjust automatically while a certain dis-
tance is being driven after the vehicle has been delivered or after repairs. Full system effective-
ness is not reached until the end of this teach-in process.
Brake pads/linings and discs that either are new or have been replaced achieve optimum braking
effect only after several hundred kilometres of
driving. Compensate for the reduced braking
effect by applying greater force to the brake
pedal. The first 1500 km
The more you treat the engine with sufficient
care at the start, the more satisfied you will be
with the engine performance later on.
R You should therefore drive at varying road
speeds and engine speeds for the first
1500 km.
R Avoid overstraining the vehicle during this
period, e.g. driving at full throttle.
R When shifting gears manually, shift up in good
time, before the rev counter needle reaches
Ô of the way to the red area of the rev counter
display.
R Do not shift down a gear manually in order to
brake.
R Try to avoid depressing the accelerator pedal
beyond the pressure point (kickdown).
After 1500 km, you can increase the engine
speed gradually and accelerate the vehicle to
full speed.
You should also observe these notes on running- in if the engine or parts of the drive train on your
vehicle have been replaced.
Always observe the maximum permissible
speed. Driving
Important safety notes
G
WARNING
Objects in the driver's footwell can impede
pedal travel or block a pedal which is
depressed. This jeopardises safe operation of the vehicle. There is a risk of an accident.
Stow all objects in the vehicle safely, so that
they cannot reach the driver's footwell. Make sure the floormats and carpets are properly
secured so that they cannot slip and obstruct the pedals. Do not lay several floormats or
carpets on top of one another. G
WARNING
Unsuitable footwear can hinder correct usage of the pedals, e.g.:
R shoes with thick soles
R shoes with high heels
R slippers
There is a risk of an accident.
Wear suitable footwear to ensure correct
usage of the pedals. G
WARNING
If you switch off the ignition while driving,
safety-relevant functions are only available
with limitations, or not at all. This could affect, for example, the power steering and the brake
boosting effect. You will require considerably
more effort to steer and brake. There is a risk of an accident.
Do not switch off the ignition while driving. G
WARNING
If the parking brake has not been fully
released when driving, the parking brake can:
R overheat and cause a fire
R lose its hold function.
There is a risk of fire and an accident. Release
the parking brake fully before driving off.
! Do not warm up the engine when the vehicle
is stationary. Drive off immediately. Avoid Driving
143Driving and parking Z
Page 182 of 389
In particular, the detection of obstacles can be
impaired in the case of:
R dirt on the sensors or obscured sensors
R snow or heavy rain
R interference by other radar sources
R strong radar reflections, e.g. in multi-storey
car parks
If DISTRONIC PLUS no longer detects a vehicle
in front, it may unexpectedly accelerate to the
speed stored.
This speed can:
R be too high for a filter lane or a slip road
R be so high in the right lane that you pass vehi-
cles driving on the left (in countries where
they drive on the right)
R be so high in the left lane that you pass vehi-
cles driving on the right (in countries where
they drive on the left)
If there is a change of drivers, advise the new
driver of the speed stored.
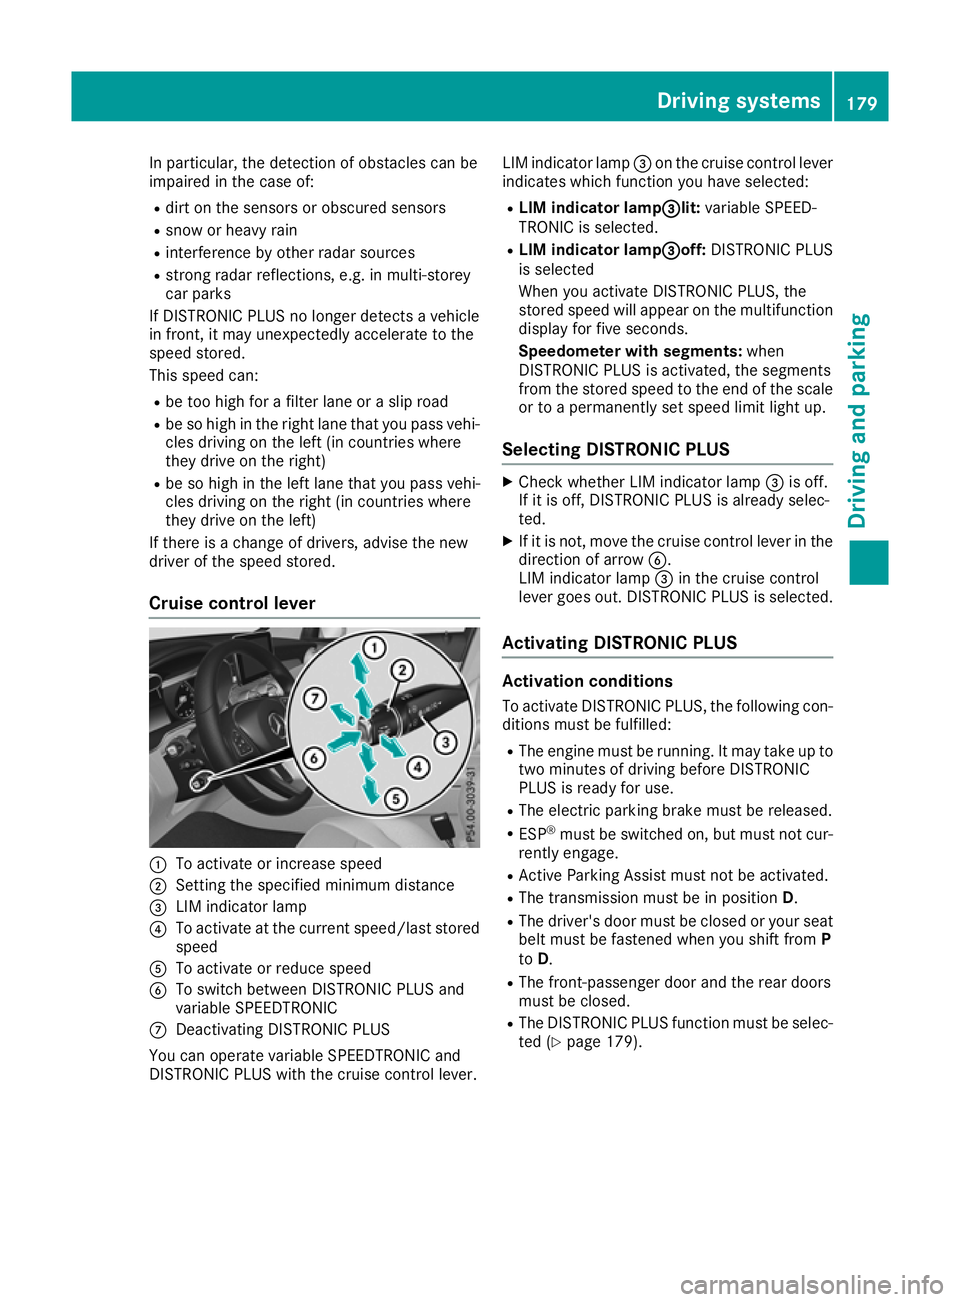
Cruise control lever :
To activate or increase speed
; Setting the specified minimum distance
= LIM indicator lamp
? To activate at the current speed/last stored
speed
A To activate or reduce speed
B To switch between DISTRONIC PLUS and
variable SPEEDTRONIC
C Deactivating DISTRONIC PLUS
You can operate variable SPEEDTRONIC and
DISTRONIC PLUS with the cruise control lever. LIM indicator lamp
=on the cruise control lever
indicates which function you have selected:
R LIM indicator lamp= =lit:variable SPEED-
TRONIC is selected.
R LIM indicator lamp = =off:DISTRONIC PLUS
is selected
When you activate DISTRONIC PLUS, the
stored speed will appear on the multifunction display for five seconds.
Speedometer with segments: when
DISTRONIC PLUS is activated, the segments
from the stored speed to the end of the scale or to a permanently set speed limit light up.
Selecting DISTRONIC PLUS X
Check whether LIM indicator lamp =is off.
If it is off, DISTRONIC PLUS is already selec-
ted.
X If it is not, move the cruise control lever in the
direction of arrow B.
LIM indicator lamp =in the cruise control
lever goes out. DISTRONIC PLUS is selected.
Activating DISTRONIC PLUS Activation conditions
To activate DISTRONIC PLUS, the following con-
ditions must be fulfilled:
R The engine must be running. It may take up to
two minutes of driving before DISTRONIC
PLUS is ready for use.
R The electric parking brake must be released.
R ESP ®
must be switched on, but must not cur-
rently engage.
R Active Parking Assist must not be activated.
R The transmission must be in position D.
R The driver's door must be closed or your seat
belt must be fastened when you shift from P
to D.
R The front-passenger door and the rear doors
must be closed.
R The DISTRONIC PLUS function must be selec-
ted (Y page 179). Driving systems
179Driving and parking Z
Page 194 of 389
4MATIC is only an aid. You are responsible for
the distance to the vehicle in front, for vehicle
speed, for braking in good time and for staying in
lane.
If a drive wheel spins due to insufficient grip:
R When pulling away, only depress the acceler-
ator pedal as far as is necessary.
R accelerate less when driving.
! Never tow the vehicle with one axle raised.
This may damage the transfer case. Damage
of this sort is not covered by the Mercedes-
Benz implied warranty. All wheels must
remain either on the ground or be fully raised.
Observe the instructions for towing the vehi-
cle with all wheels in full contact with the
ground.
i In wintry driving conditions, the maximum
effect of 4MATIC can only be achieved if you
use winter tyres (M+S tyres), with snow
chains if necessary. PARKTRONIC
Important safety notes PARKTRONIC is an electronic parking aid with
ultrasound. It monitors the area around your
vehicle using six sensors in the front bumper
and six sensors in the rear bumper.
PARKTRONIC visually and audibly indicates the
distance between your vehicle and an object.
PARKTRONIC is only an aid. It is not a substitute for your attention to the immediate surround-
ings. The responsibility for safe manoeuvring
and parking remains with you. Make sure that
there are no persons, animals or objects in
range while manoeuvring and parking.
! When parking, pay particular attention to
objects above or below the sensors, such as
flower pots or trailer drawbars. PARKTRONIC does not detect such objects when they are in
the immediate vicinity of the vehicle. You
could damage the vehicle or the objects.
The sensors may not detect snow and objects which absorb ultrasonic sources.
Ultrasonic sources, such as an automatic car
wash, a lorry's compressed-air brakes or a
pneumatic drill, could cause PARKTRONIC to
malfunction.
PARKTRONIC may not function correctly on
uneven terrain. !
Fold in the ball coupling if the trailer tow
hitch is not required. PARKTRONIC measures the minimum detection range to an obstacle
from the bumper, not the ball coupling.
PARKTRONIC is activated automatically when
you: R switch on the ignition
R shift the transmission to position D,Ror N
PARKTRONIC is deactivated at speeds above
18 km/h. It is reactivated at lower speeds.
PARKTRONIC is deactivated for the rear area
when you establish the electrical connection
between your vehicle and a trailer.
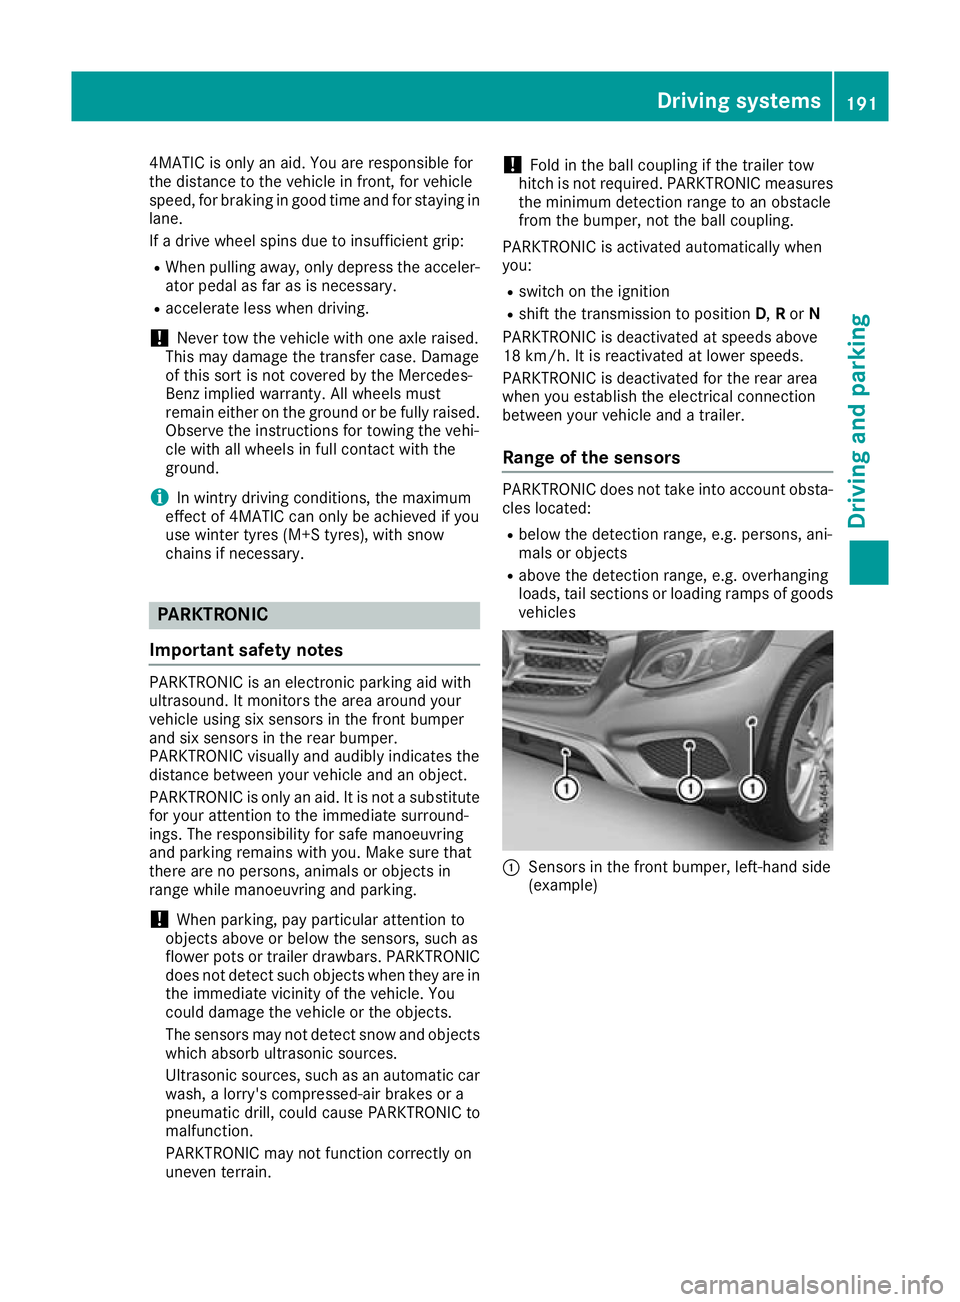
Range of the sensors PARKTRONIC does not take into account obsta-
cles located:
R below the detection range, e.g. persons, ani-
mals or objects
R above the detection range, e.g. overhanging
loads, tail sections or loading ramps of goods
vehicles :
Sensors in the front bumper, left-hand side
(example) Driving systems
191Driving and parking Z
Page 195 of 389
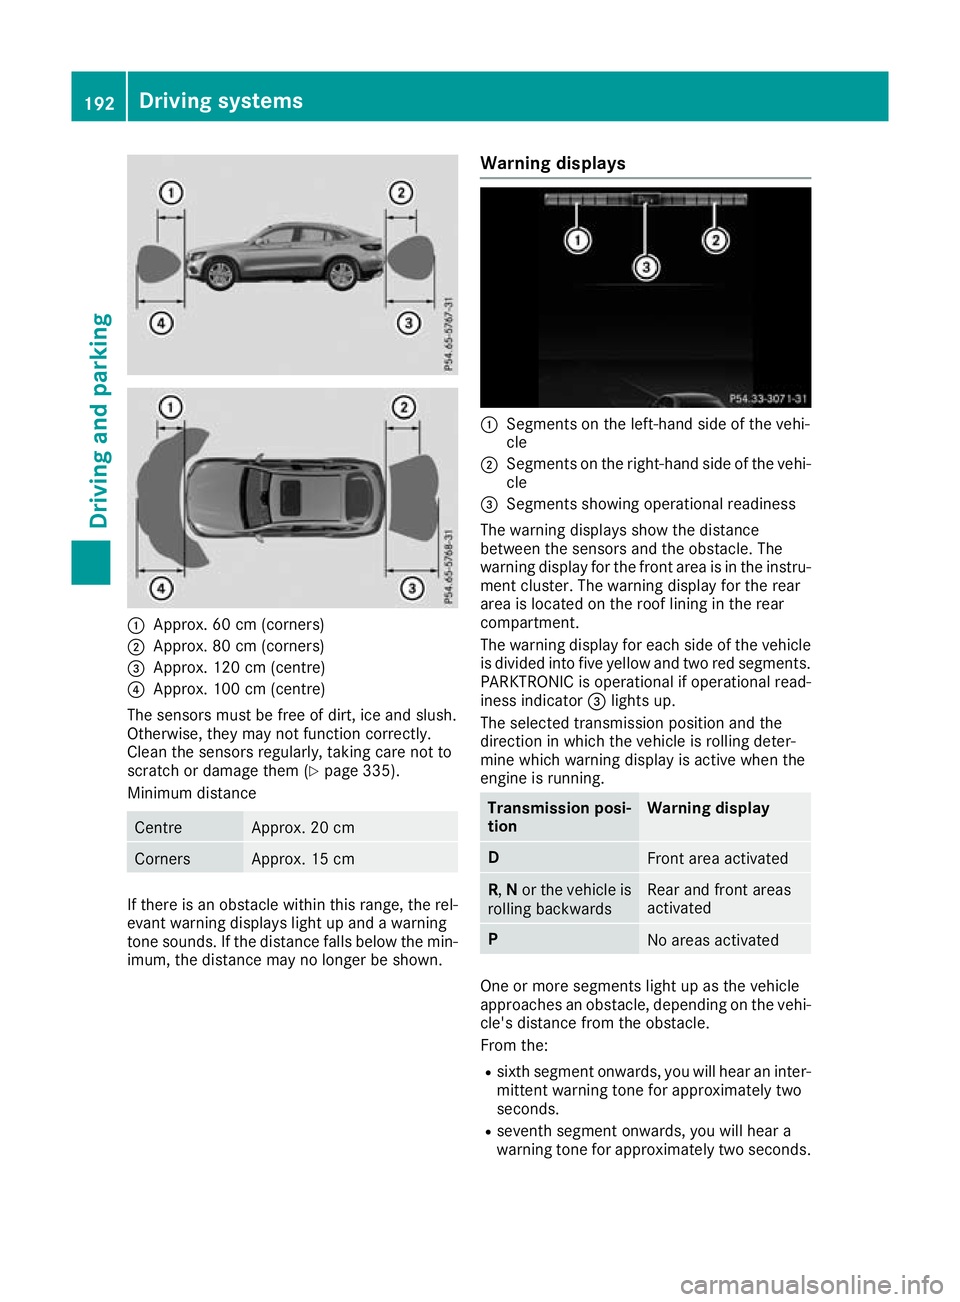
:
Approx. 60 cm (corners)
; Approx. 80 cm (corners)
= Approx. 120 cm (centre)
? Approx. 100 cm (centre)
The sensors must be free of dirt, ice and slush.
Otherwise, they may not function correctly.
Clean the sensors regularly, taking care not to
scratch or damage them (Y page 335).
Minimum distance Centre Approx. 20 cm
Corners Approx. 15 cm
If there is an obstacle within this range, the rel-
evant warning displays light up and a warning
tone sounds. If the distance falls below the min- imum, the distance may no longer be shown. Warning displays :
Segments on the left-hand side of the vehi-
cle
; Segments on the right-hand side of the vehi-
cle
= Segments showing operational readiness
The warning displays show the distance
between the sensors and the obstacle. The
warning display for the front area is in the instru- ment cluster. The warning display for the rear
area is located on the roof lining in the rear
compartment.
The warning display for each side of the vehicle
is divided into five yellow and two red segments.
PARKTRONIC is operational if operational read-
iness indicator =lights up.
The selected transmission position and the
direction in which the vehicle is rolling deter-
mine which warning display is active when the
engine is running. Transmission posi-
tion Warning display
D
Front area activated
R,
Nor the vehicle is
rolling backwards Rear and front areas
activated
P
No areas activated
One or more segments light up as the vehicle
approaches an obstacle, depending on the vehi-
cle's distance from the obstacle.
From the:
R sixth segment onwards, you will hear an inter-
mittent warning tone for approximately two
seconds.
R seventh segment onwards, you will hear a
warning tone for approximately two seconds. 192
Driving systemsDriving an
d parking
Page 196 of 389
This indicates that you have now reached the
minimum distance.
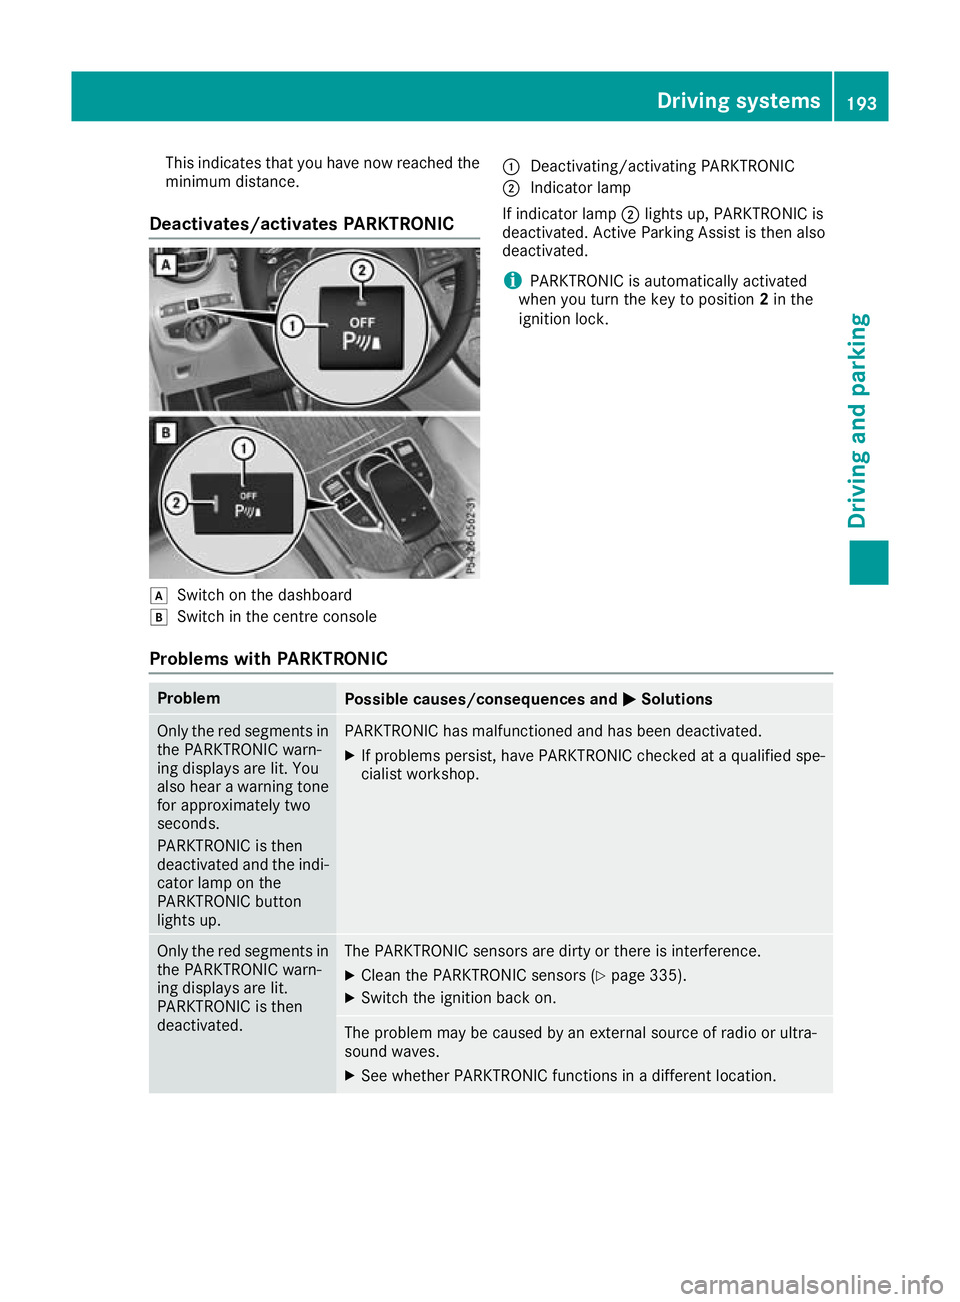
Deactivates/activates PARKTRONIC d
Switch on the dashboard
e Switch in the centre console :
Deactivating/activating PARKTRONIC
; Indicator lamp
If indicator lamp ;lights up, PARKTRONIC is
deactivated. Active Parking Assist is then also
deactivated.
i PARKTRONIC is automatically activated
when you turn the key to position 2in the
ignition lock.
Problems with PARKTRONIC Problem
Possible causes/consequences and
M
MSolutions Only the red segments in
the PARKTRONIC warn-
ing displays are lit. You
also hear a warning tone
for approximately two
seconds.
PARKTRONIC is then
deactivated and the indi-
cator lamp on the
PARKTRONIC button
lights up. PARKTRONIC has malfunctioned and has been deactivated.
X If problems persist, have PARKTRONIC checked at a qualified spe-
cialist workshop. Only the red segments in
the PARKTRONIC warn-
ing displays are lit.
PARKTRONIC is then
deactivated. The PARKTRONIC sensors are dirty or there is interference.
X
Clean the PARKTRONIC sensors (Y page 335).
X Switch the ignition back on. The problem may be caused by an external source of radio or ultra-
sound waves.
X See whether PARKTRONIC functions in a different location. Driving systems
193Driving and parking Z
Page 213 of 389
Lane Tracking package
General notes The Lane Tracking package consists of Blind
Spot Assist (Y page 210) and Lane Keeping
Assist (Y page 211).
Blind Spot Assist General notes
Blind Spot Assist monitors the areas on either
side of the vehicle that are not visible to the
driver with two lateral, rear-facing radar sen-
sors. A warning lamp lights up on the exterior
mirror and draws your attention to vehicles
detected in the monitored area. If you then
switch on the corresponding turn signal to
change lanes, you will also receive a visual and
audible warning.
Blind Spot Assist supports you from a speed of
approximately 30 km/h.
Important safety notes G
WARNING
Blind Spot Assist does not react to vehicles:
R overtaken too closely on the side, placing
them in the blind spot area
R when the difference in the speed of
approach and overtaking is too great
As a result, Blind Spot Assist cannot warn
drivers in these situations. There is a risk of an accident.
Always pay careful attention to the traffic sit- uation and maintain a safe distance at the side
of the vehicle.
Blind Spot Assist is only an aid. It may fail to
detect some vehicles and is not a substitute for
attentive driving. Always ensure that there is
sufficient distance to the side for other road
users and obstacles.
Radar sensors The radar sensors for Blind Spot Assist are inte-
grated into the rear bumper. Make sure that the
bumpers are free of dirt, ice and slush. The sen- sors must not be covered, e.g. by cycle racks oroverhanging loads. Following a severe impact or in the event of damage to the bumpers, have the
function of the radar sensors checked at a quali- fied specialist workshop. Blind Spot Assist may
no longer work properly in such cases.
Monitoring range In particular, the detection of obstacles can be
impaired in the case of:
R dirt on the sensors or obscured sensors
R poor visibility, e.g. due to fog, heavy rain,
snow or spray
R narrow vehicles, e.g. motorcycles or bicycles
R very wide lanes
R narrow lanes
R vehicles not driving in the middle of their lane
R crash barriers or other road boundaries
Vehicles in the monitoring range are then not
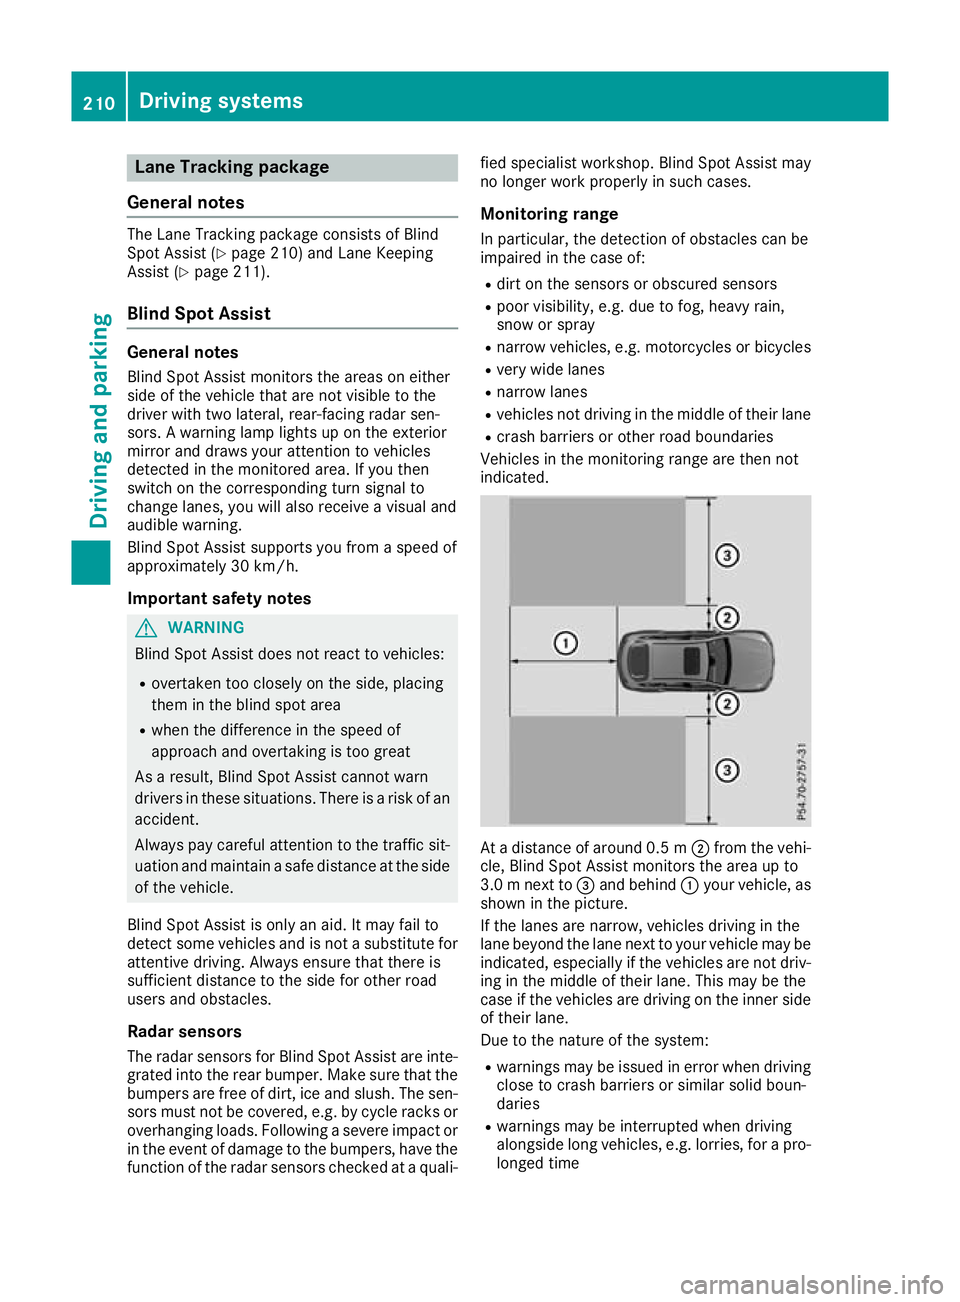
indicated. At a distance of around 0.5 m
;from the vehi-
cle, Blind Spot Assist monitors the area up to
3.0 mnext to =and behind :your vehicle, as
shown in the picture.
If the lanes are narrow, vehicles driving in the
lane beyond the lane next to your vehicle may be
indicated, especially if the vehicles are not driv-
ing in the middle of their lane. This may be the
case if the vehicles are driving on the inner side of their lane.
Due to the nature of the system:
R warnings may be issued in error when driving
close to crash barriers or similar solid boun-
daries
R warnings may be interrupted when driving
alongside long vehicles, e.g. lorries, for a pro-
longed time 210
Driving systemsDriving and parking
Page 216 of 389
R
you have switched on the turn signal. In this
case, the warnings are suppressed for a cer-
tain period of time.
R a driving safety system such as ABS, BAS or
ESP ®
engages
Adaptive
When Adaptive Adaptive is selected, no warning vibra-
tion occurs if:
R you have switched on the turn signal. In this
case, the warnings are suppressed for a cer-
tain period of time.
R a driving safety system such as ABS, BAS or
ESP ®
engages
R you accelerate hard, e.g. kickdown
R you brake hard
R you steer actively, e.g. swerve to avoid an
obstacle or change lane quickly
R you cut the corner on a sharp bend
To ensure that you are warned only when nec-
essary and in good time if you cross the lane
marking, the system detects certain conditions
and warns you accordingly.
The warning vibration occurs earlier in the fol-
lowing situations:
R you approach the outer lane marking on a
bend
R the road has very wide lanes, e.g. a motorway
R the system detects solid lane markings
The warning vibration occurs later in the follow- ing situations:
R the road has narrow lanes
R you cut the corner on a bend Driving Assistance Plus package
General notes The Driving Assistance PLUS package consists
of DISTRONIC PLUS (Y page 178), Active Blind
Spot Assist (Y page 213) and Active Lane Keep-
ing Assist (Y page 216).
Active Blind Spot Assist General notes
Using two lateral, rear-facing radar sensors,
Active Blind Spot Assist monitors the areas on
either side of the vehicle that are not visible to
the driver. A warning lamp lights up on the exte- rior mirrors and draws your attention to vehicles
detected in the monitored area. If you then
switch on the corresponding turn signal to
change lanes, you will also receive a visual and
audible warning. If a risk of side impact is detec- ted, a course-corrective brake application may
help you avoid a collision. Active Blind Spot
Assist evaluates the free space in the direction
of travel and to the side before making a course-correcting brake application. For this, Active
Blind Spot Assist uses the forward-facing radar
sensors.
Active Blind Spot Assist supports you from a
speed of approximately 30 km/h.
Important safety notes Active Blind Spot Assist is only an aid and is not
a substitute for attentive driving. G
WARNING
Active Blind Spot Assist does not react to
vehicles:
R overtaking too closely on the side, placing
them in the blind spot area
R if the difference in the speed of approach
and overtaking is too great
As a result, Active Blind Spot Assist may nei-
ther give warnings nor intervene in such sit-
uations. There is a risk of an accident.
Always pay careful attention to the traffic sit-
uation and maintain a safe distance at the side of the vehicle.
Radar sensors
The Active Blind Spot Assist radar sensors are
integrated in the front and rear bumpers and
behind a cover in the radiator trim. Make sure
that the bumpers and the cover in the radiator
trim are free of dirt, ice or slush. The rear sen-
sors must not be covered, e.g. by bicycle racks
or overhanging loads. Following a severe impact or in the event of damage to the bumpers, have
the function of the radar sensors checked at a
qualified specialist workshop. Active Blind Spot
Assist might otherwise no longer function prop-
erly. Driving systems
213Driving and parking Z