2016 MERCEDES-BENZ GLC COUPE phone
[x] Cancel search: phonePage 324 of 389
Problems with the 230 V power socket
Problem
Possible causes/consequences and
M
MSolutions The warning lamp on the
230 V power socket is
not lit. The on-board voltage is too low because the battery is too weak.
X Start the engine.
or X Charge the battery (Y page 347).
If the indicator lamp still does not light up: X Consult a qualified specialist workshop. The temperature of the DC/AC converter is temporarily too high.
X Remove the electronic device connector from the 230 V socket.
X Let the DC/AC converter cool down.
If the indicator lamp still does not light up after the converter cools
down:
X Consult a qualified specialist workshop. You have connected an electronic device that has a constant nominal
power of less than 150 watts, but has a very high switch-on current.
This device will not work. If you connect such a device, the 230 V
power socket will not supply it with power.
X Connect a suitable electronic device. Mercedes-Benz emergency call sys-
tem
Information on these requirements can be found in the Digital Owner's Manual. X
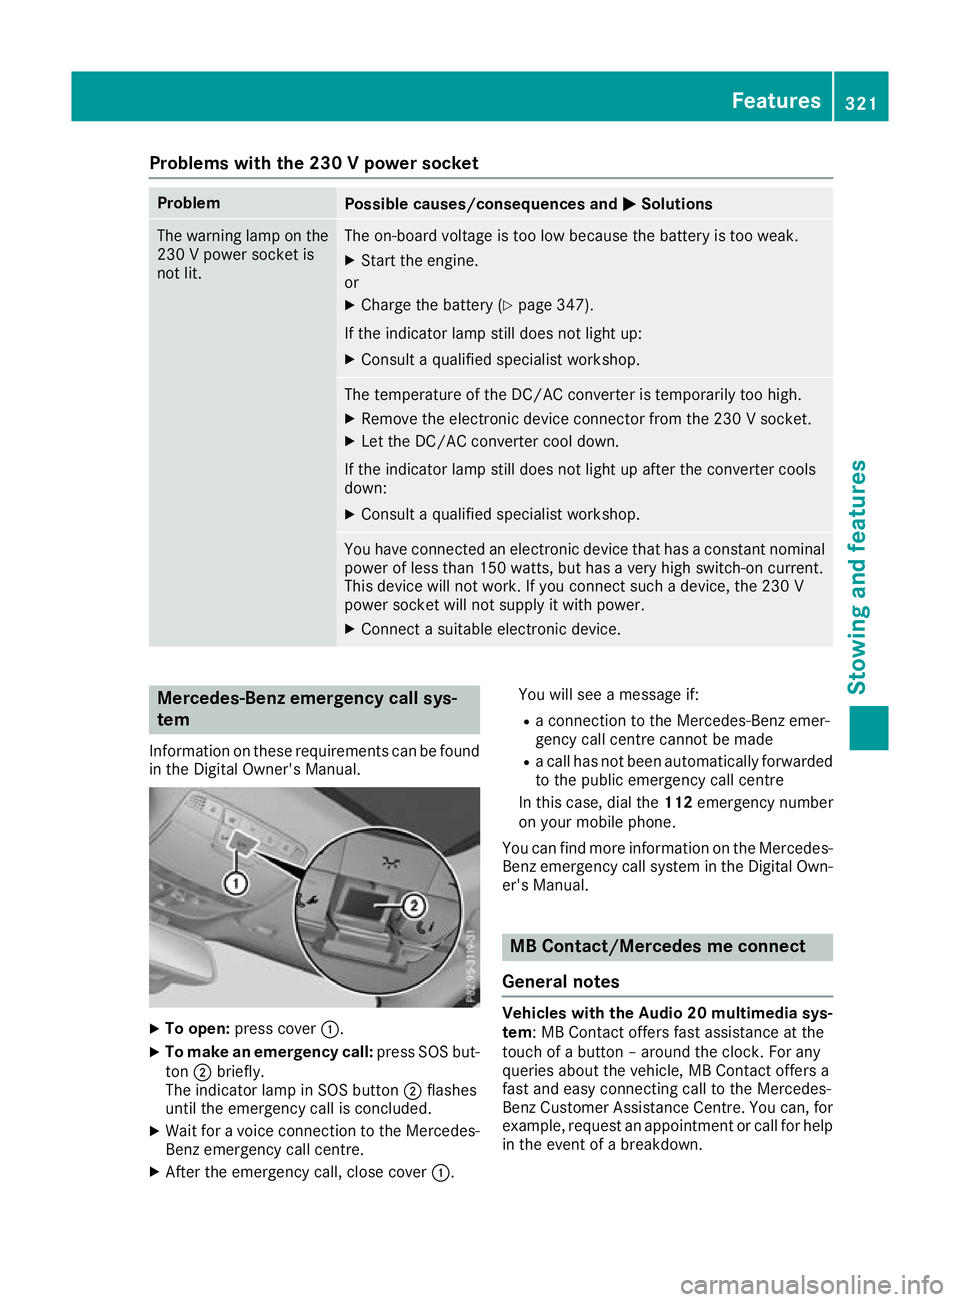
To open: press cover :.
X To make an emergency call: press SOS but-
ton ;briefly.
The indicator lamp in SOS button ;flashes
until the emergency call is concluded.
X Wait for a voice connection to the Mercedes-
Benz emergency call centre.
X After the emergency call, close cover :.You will see a message if:
R a connection to the Mercedes-Benz emer-
gency call centre cannot be made
R a call has not been automatically forwarded
to the public emergency call centre
In this case, dial the 112emergency number
on your mobile phone.
You can find more information on the Mercedes- Benz emergency call system in the Digital Own-
er's Manual. MB Contact/Mercedes me connect
General notes Vehicles with the Audio 20 multimedia sys-
tem: MB Contact offers fast assistance at the
touch of a button – around the clock. For any
queries about the vehicle, MB Contact offers a
fast and easy connecting call to the Mercedes-
Benz Customer Assistance Centre. You can, for
example, request an appointment or call for help in the event of a breakdown. Features
321Stowing and features Z
Page 325 of 389
Vehicles with the COMAND Online multime-
dia system: Mercedes me connect offers fast
assistance at the touch of a button – around the clock. For any queries about the vehicle,
Mercedes me connect offers a fast and easy
connecting call to the Mercedes-Benz CustomerAssistance Centre. You can, for example,
request an appointment or call for help in the
event of a breakdown.
The display of the multimedia system indicates
that a call is active. During the call, you can
change to the navigation menu by pressing the
Ø button on the multimedia system, for
example. Voice output is not available in this
case.
The Digital Owner's Manual contains further
information about:
R vehicles with the AUDIO 20 multimedia
system: MB Contact
R vehicles with the COMAND Online multi-
media system: Mercedes me connect
Breakdown assistance call button X
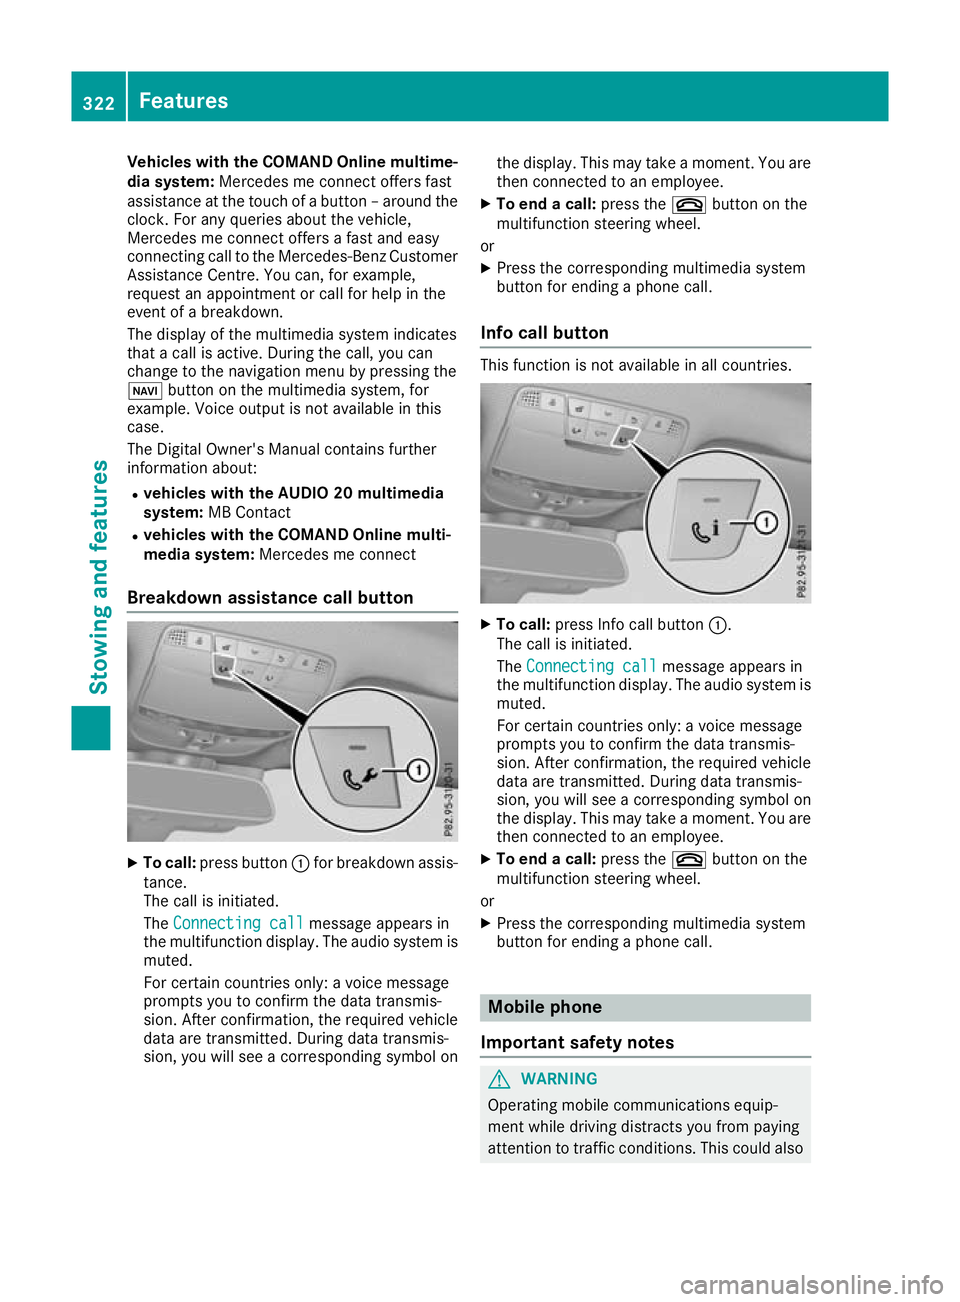
To call: press button :for breakdown assis-
tance.
The call is initiated.
The Connecting call
Connecting call message appears in
the multifunction display. The audio system is
muted.
For certain countries only: a voice message
prompts you to confirm the data transmis-
sion. After confirmation, the required vehicle
data are transmitted. During data transmis-
sion, you will see a corresponding symbol on the display. This may take a moment. You are
then connected to an employee.
X To end a call: press the~button on the
multifunction steering wheel.
or X Press the corresponding multimedia system
button for ending a phone call.
Info call button This function is not available in all countries.
X
To call: press Info call button :.
The call is initiated.
The Connecting call
Connecting call message appears in
the multifunction display. The audio system is muted.
For certain countries only: a voice message
prompts you to confirm the data transmis-
sion. After confirmation, the required vehicle
data are transmitted. During data transmis-
sion, you will see a corresponding symbol on
the display. This may take a moment. You are
then connected to an employee.
X To end a call: press the~button on the
multifunction steering wheel.
or
X Press the corresponding multimedia system
button for ending a phone call. Mobile phone
Important safety notes G
WARNING
Operating mobile communications equip-
ment while driving distracts you from paying
attention to traffic conditions. This could also 322
FeaturesStowing and features
Page 326 of 389
cause you to lose control of the vehicle. There
is a risk of an accident.
Use this device only when the vehicle is sta-
tionary.
You must observe the legal requirements for the country in which you are currently driving whenoperating mobile communications equipment in
the vehicle.
If it is permitted by law to operate communica-
tions equipment while the vehicle is in motion,
you may do so only if the traffic situation per-
mits. You may otherwise be distracted from the traffic conditions, cause an accident and injure
yourself and others.
Excessive levels of electromagnetic radiation
may cause damage to your health and to the
health of others. The use of an exterior aerial
takes into consideration the scientific discus-
sion surrounding the possible health risk posed
by electromagnetic fields.
Mercedes-Benz recommends the use of an
approved exterior aerial. This ensures:
R optimal mobile phone reception quality in the
vehicle
R that mutual interference between the vehicle
electronics and mobile phones is minimised
An exterior aerial has the following advantages:
R it conducts the electromagnetic fields gener-
ated by a wireless device to the exterior
R the field strength in the vehicle interior is
lower than in a vehicle that does not have an exterior aerial
Information on retrofitting two-way radios and
mobile phones (RF transmitters) (Y page 371).
General notes Depending on the vehicle equipment, there are
various mobile phone brackets that may be fit-
ted in your vehicle; in some cases, these are
country-specific.
More information on suitable mobile phones,
mobile phone brackets and on connecting Blue-
tooth ®
-capable mobile phones with the multi-
media system can be obtained:
R at a qualified specialist workshop
R on the internet at http://www.mercedes-
benz.com/connect The functions and services available when you
use the phone depend on your mobile phone
model and service provider.
Using a mobile phone To connect a mobile phone to the exterior aerial
and charge it, insert it into the mobile phone
bracket.
X Open the telephone compartment
(Y page 307).
X Place the mobile phone bracket into the pre-
installed fitting; see the separate installation
instructions for the mobile phone fitting.
X Insert the mobile phone into the mobile phone
bracket; see the separate installation instruc-
tions for the mobile phone fitting.
i The mobile phone can also be operated
without being in the bracket. However, the
charging function and aerial function are not
available.
In order to use Bluetooth ®
(SAP profile) on your
telephone module, you must first insert the tele-
phone module into the pre-installed fitting. This connects it to the exterior aerial. If you wish to
charge the mobile phone, you must connect it to
a USB port.
Further information on the telephone module
with Bluetooth ®
(SAP profile) can be found in the
Digital Owner's Manual.
Operating the mobile phone You can operate the phone using the
6and
~ buttons on the multifunction steering
wheel. You can operate other mobile phone
functions via the on-board computer
(Y page 238).
When you remove the key from the ignition lock, the mobile phone is disconnected from the vehi-cle. You can then no longer make calls using the
hands-free system.
If a call is active and you remove the key from
the ignition lock, the conversation is transferred
over to the mobile phone. It is then possible to
continue the conversation on the mobile phone. Features
323Stowing and features Z
Page 327 of 389
Floormats
G
WARNING
Objects in the driver's footwell may restrict
the clearance around the pedals or block a
depressed pedal. This jeopardises the oper-
ating and road safety of the vehicle. There is a risk of an accident.
Stow all objects securely in the vehicle so that
they do not get into the driver's footwell.
Always fit the floormats securely and as pre-
scribed in order to ensure that there is always sufficient room for the pedals. Do not use
loose floormats and do not place several floor-mats on top of one another. X
Slide the relevant seat back.
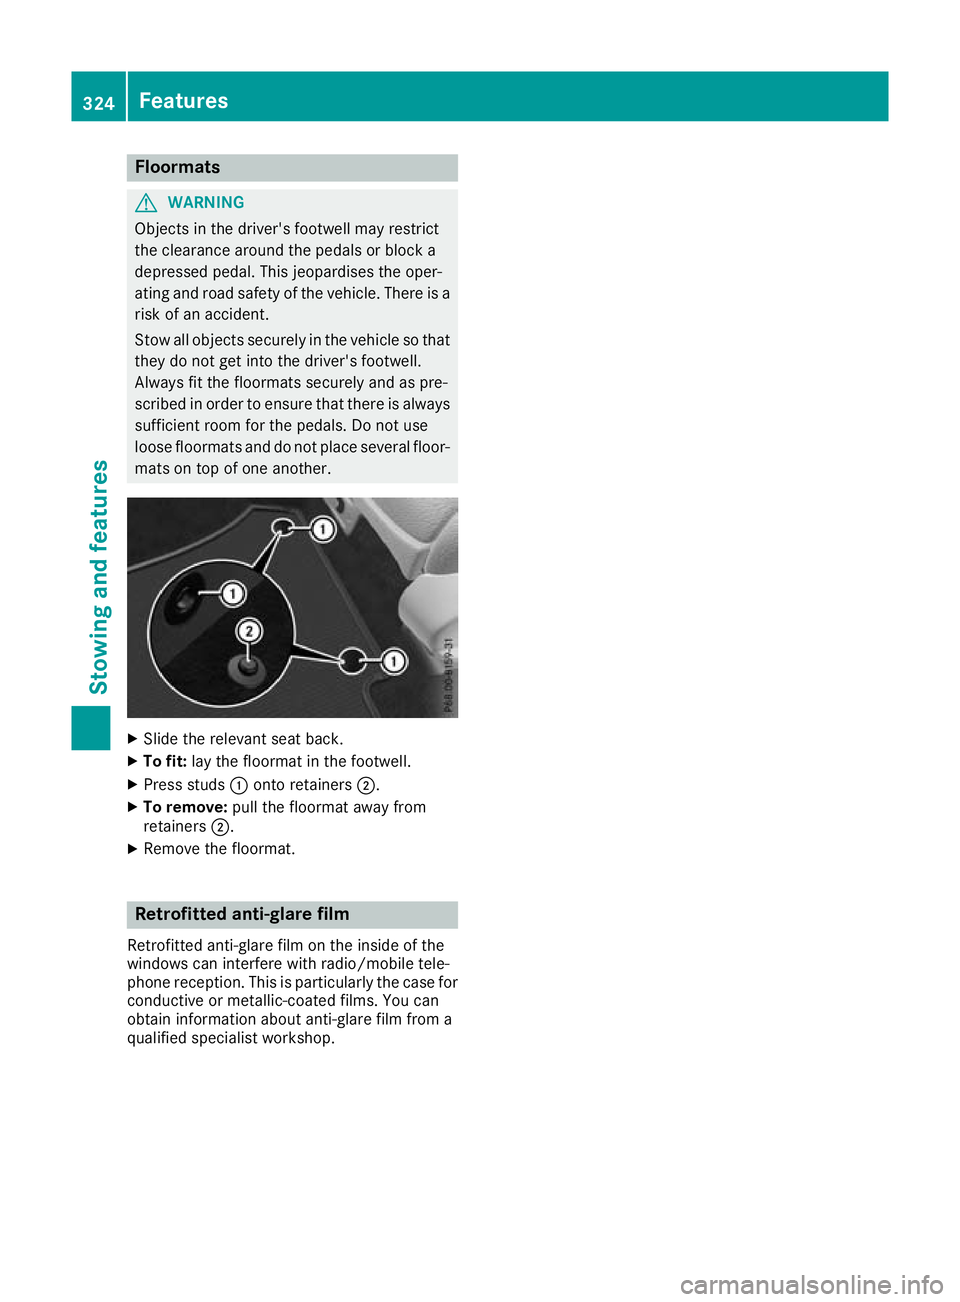
X To fit: lay the floormat in the footwell.
X Press studs :onto retainers ;.
X To remove: pull the floormat away from
retainers ;.
X Remove the floormat. Retrofitted anti-glare film
Retrofitted anti-glare film on the inside of the
windows can interfere with radio/mobile tele-
phone reception. This is particularly the case for conductive or metallic-coated films. You can
obtain information about anti-glare film from a
qualified specialist workshop. 324
FeaturesStowing and featu
res
Page 331 of 389
X
Slowly slide oil dipstick :into the guide tube
to the stop and take it out again after approx- imately three seconds.
If the level is between MIN mark =and MAX
mark ;, the oil level is correct.
X If the oil level has dropped to MIN mark =or
below, top up with 1.0 lof engine oil.
Topping up engine oil H
Environmental note
When topping up the oil, take care not to spill any. If oil enters the soil or waterways, it is
harmful to the environment.
! Use only engine oils and oil filters that are
approved for vehicles with a service system. A list of the engine oils and oil filters that have
been tested and approved in accordance with
Mercedes-Benz Specifications for Service
Products is available at any Mercedes-Benz
Service Centre.
The following cause engine failure or damage
to the exhaust system:
R Use of engine oils and oil filters that have
not been expressly approved for the service system
R Replacement of engine oil and oil filter after
the replacement interval specified by the
service system has expired
R Use of engine oil additives
! Do not add too much oil. Topping up with too
much engine oil can result in damage to the
engine or to the catalytic converter. Have
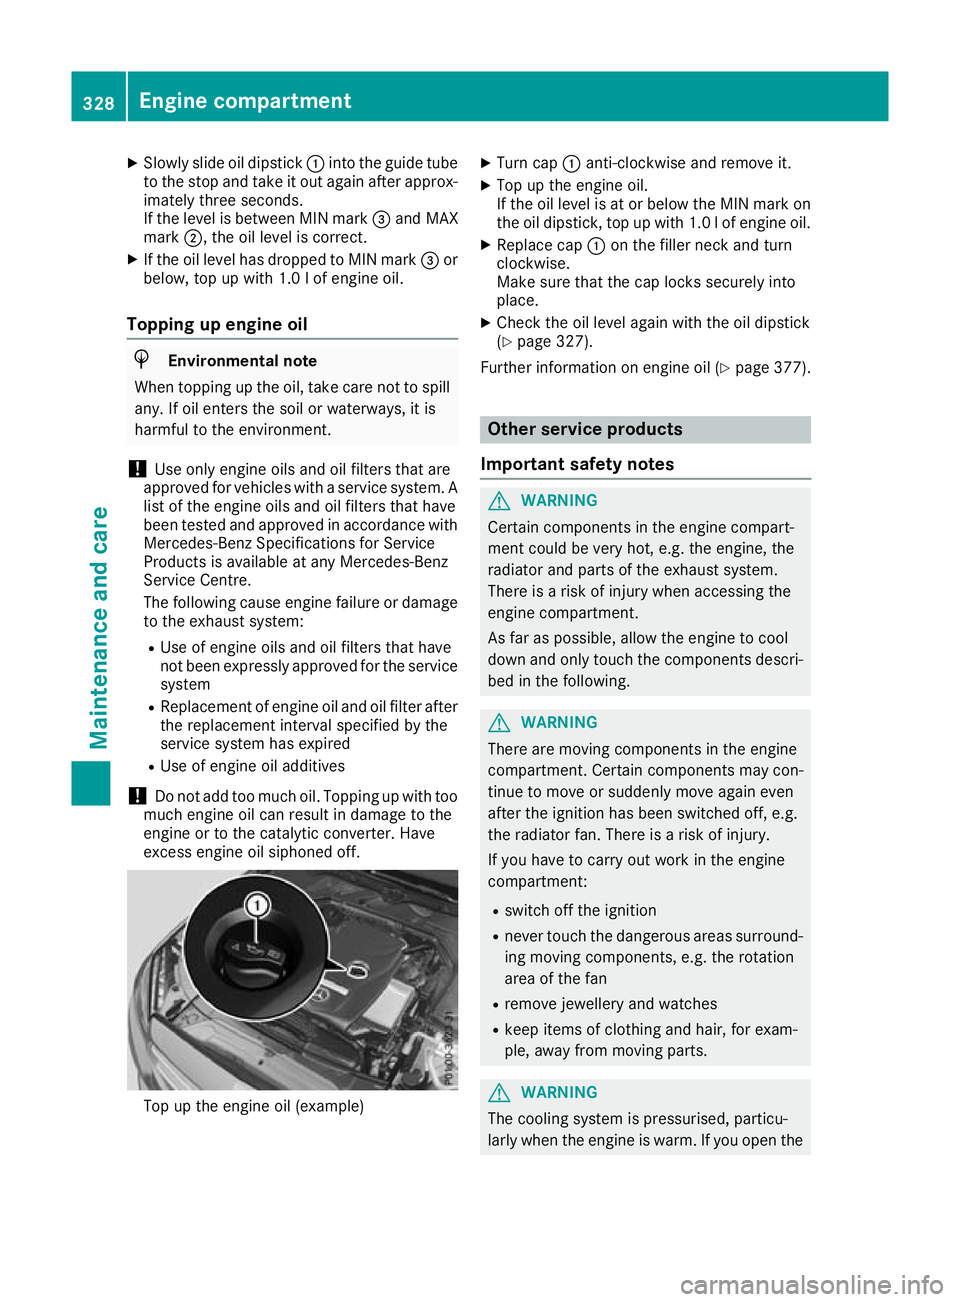
excess engine oil siphoned off. Top up the engine oil (example) X
Turn cap :anti-clockwise and remove it.
X Top up the engine oil.
If the oil level is at or below the MIN mark on
the oil dipstick, top up with 1.0 l of engine oil.
X Replace cap :on the filler neck and turn
clockwise.
Make sure that the cap locks securely into
place.
X Check the oil level again with the oil dipstick
(Y page 327).
Further information on engine oil (Y page 377). Other service products
Important safety notes G
WARNING
Certain components in the engine compart-
ment could be very hot, e.g. the engine, the
radiator and parts of the exhaust system.
There is a risk of injury when accessing the
engine compartment.
As far as possible, allow the engine to cool
down and only touch the components descri- bed in the following. G
WARNING
There are moving components in the engine
compartment. Certain components may con-
tinue to move or suddenly move again even
after the ignition has been switched off, e.g.
the radiator fan. There is a risk of injury.
If you have to carry out work in the engine
compartment:
R switch off the ignition
R never touch the dangerous areas surround-
ing moving components, e.g. the rotation
area of the fan
R remove jewellery and watches
R keep items of clothing and hair, for exam-
ple, away from moving parts. G
WARNING
The cooling system is pressurised, particu-
larly when the engine is warm. If you open the 328
Engine compartmentMaintenance and care
Page 347 of 389
X
Insert connector ?into cigarette lighter
socket (Y page 318) or into another 12 V
socket in your vehicle (Y page 318).
X Turn the key to position 1in the ignition lock
(Y page 144).
X Press on/off switch =on tyre inflation com-
pressor.
The tyre inflation compressor is switched on.
The tyre is inflated.
First, tyre sealant is pumped into the tyre. The pressure may briefly rise to approximately
500 kPa (5 bar/73 psi).
Do not switch off the tyre inflation com-
pressor during this phase.
X Let the tyre inflation compressor run for a
maximum of ten minutes. The tyre should
then have reached a pressure of at least
200 kPa (2.0 bar/29 psi).
If a pressure of 200 kPa (2.0 bar/29 psi) has
been attained after ten minutes, see "Tyre pres- sure reached" (Y page 344).
If a tyre pressure of 200 kPa (2.0 bar/29 psi) has
not been attained after ten minutes, see "Tyre
pressure not reached" (Y page 344).
If tyre sealant leaks out, make sure you clean the affected area as quickly as possible. It is pref-
erable to use clear water.
If you get tyre sealant on your clothing, have it
cleaned as soon as possible with perchloroethy-
lene.
Tyre pressure not reached If a tyre pressure of 200 kPa (2.0 bar/29 psi) has
not been reached after ten minutes:
X Switch off the tyre inflation compressor.
X Unscrew the filler hose from the valve of the
faulty tyre.
Tyre sealant may leak out when the filler hose
is unscrewed.
X Very slowly drive forwards or reverse approx-
imately 10 m.
X Pump up the tyre again.
After a maximum of ten minutes, the tyre
pressure must be at least 200 kPa (2.0 bar/
29 psi). G
WARNING
If the required tyre pressure is not reached
after the specified time, the tyre is too badly
damaged. The tyre sealant cannot repair the tyre in this instance. Damaged tyres and a tyre
pressure that is too low can significantly
impair the vehicle's braking and driving char-
acteristics. There is a risk of accident.
Do not continue driving. Contact a qualified
specialist workshop.
Countries with Mercedes-Benz Service24h:
you will find a sticker with the telephone number on the B-pillar on the driver's side, for example.
Tyre pressure reached G
WARNING
A tyre temporarily sealed with tyre sealant
impairs the driving characteristics and is not
suitable for higher speeds. There is a risk of
accident.
You should therefore adapt your driving style
accordingly and drive carefully. Do not exceed the specified maximum speed with a tyre that
has been repaired using tyre sealant.
The maximum permissible speed for a tyre
sealed with tyre sealant is 80 km/h. The upper
part of the TIREFIT sticker must be affixed to the
instrument cluster where it will be easily seen by
the driver.
If a tyre pressure of 200 kPa (2.0 bar/29 psi) has been reached after ten minutes:
X Switch off the tyre inflation compressor.
X Unscrew the filler hose from the valve of the
faulty tyre.
Tyre sealant may leak out when the filler hose
is unscrewed.
X Stow the tyre sealant bottle, the tyre inflation
compressor and the warning triangle.
X Pull away immediately.
X Stop after driving for approximately ten
minutes and check the tyre pressure with the
tyre inflation compressor.
The tyre pressure must now be at least
130 kPa (1.3 bar/19 psi). G
WARNING
If the required tyre pressure is not reached
after driving for a short period, the tyre is too badly damaged. The tyre sealant cannot
repair the tyre in this instance. Damaged tyres 344
Flat tyreBreakdown assistance
Page 348 of 389
and a tyre pressure that is too low can signif-
icantly impair the vehicle's braking and driv-
ing characteristics. There is a risk of accident.
Do not continue driving. Contact a qualified
specialist workshop.
Countries with Mercedes-Benz Service24h:
you will find a sticker with the telephone number
on the B-pillar on the driver's side, for example.
X Correct the tyre pressure if it is still at least
130 kPa (1.3 bar/19 psi) . See the tyre pres-
sure table on the fuel filler flap for values.
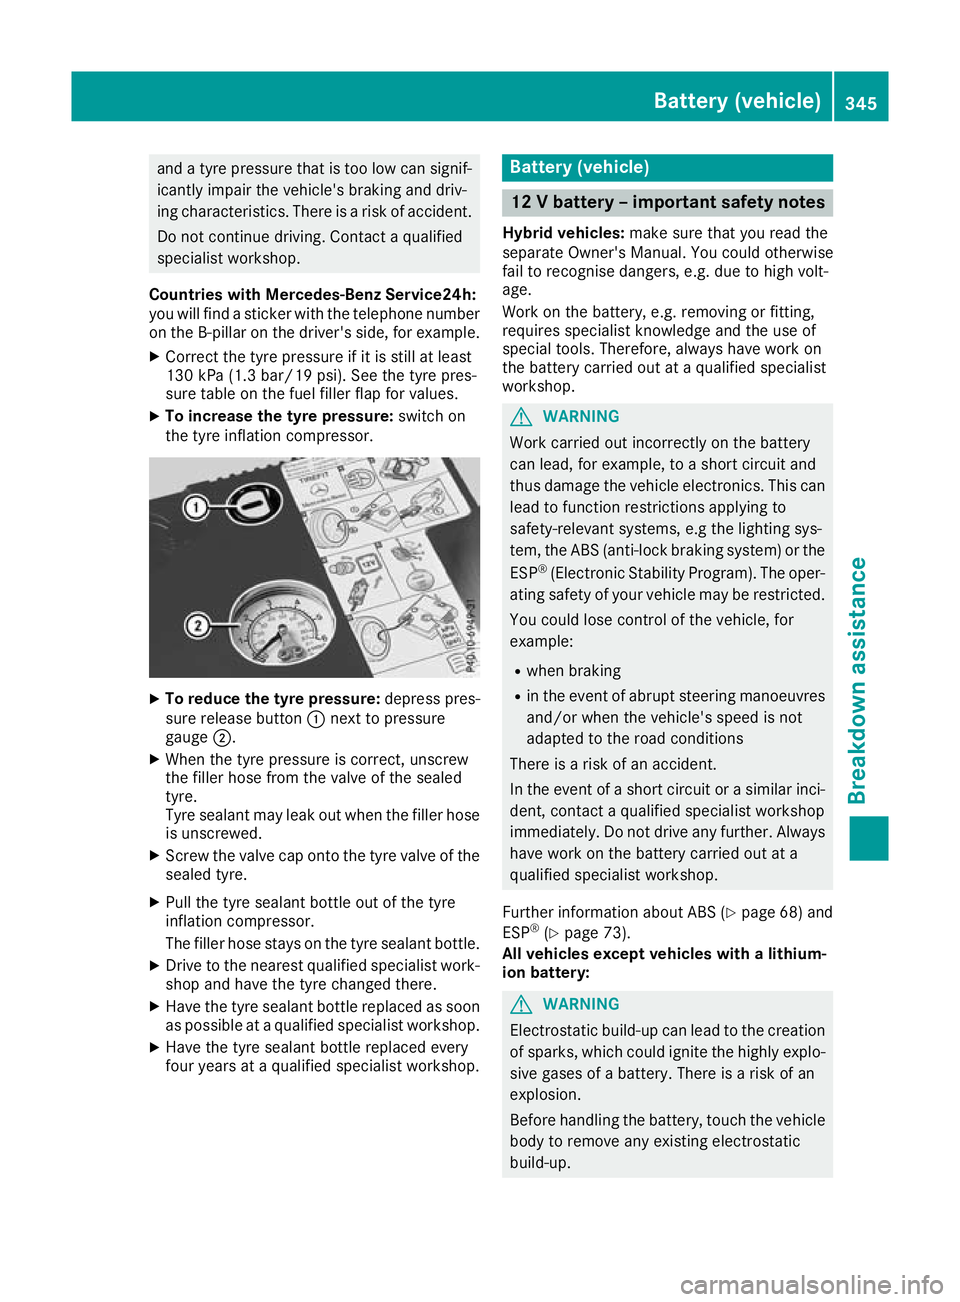
X To increase the tyre pressure: switch on
the tyre inflation compressor. X
To reduce the tyre pressure: depress pres-
sure release button :next to pressure
gauge ;.
X When the tyre pressure is correct, unscrew
the filler hose from the valve of the sealed
tyre.
Tyre sealant may leak out when the filler hose
is unscrewed.
X Screw the valve cap onto the tyre valve of the
sealed tyre.
X Pull the tyre sealant bottle out of the tyre
inflation compressor.
The filler hose stays on the tyre sealant bottle.
X Drive to the nearest qualified specialist work-
shop and have the tyre changed there.
X Have the tyre sealant bottle replaced as soon
as possible at a qualified specialist workshop.
X Have the tyre sealant bottle replaced every
four years at a qualified specialist workshop. Battery (vehicle)
12 V battery – important safety notes
Hybrid vehicles: make sure that you read the
separate Owner's Manual. You could otherwise
fail to recognise dangers, e.g. due to high volt-
age.
Work on the battery, e.g. removing or fitting,
requires specialist knowledge and the use of
special tools. Therefore, always have work on
the battery carried out at a qualified specialist
workshop. G
WARNING
Work carried out incorrectly on the battery
can lead, for example, to a short circuit and
thus damage the vehicle electronics. This can lead to function restrictions applying to
safety-relevant systems, e.g the lighting sys-
tem, the ABS (anti-lock braking system) or the
ESP ®
(Electronic Stability Program). The oper-
ating safety of your vehicle may be restricted.
You could lose control of the vehicle, for
example:
R when braking
R in the event of abrupt steering manoeuvres
and/or when the vehicle's speed is not
adapted to the road conditions
There is a risk of an accident.
In the event of a short circuit or a similar inci- dent, contact a qualified specialist workshop
immediately. Do not drive any further. Alwayshave work on the battery carried out at a
qualified specialist workshop.
Further information about ABS (Y page 68) and
ESP ®
(Y page 73).
All vehicles except vehicles with a lithium-
ion battery: G
WARNING
Electrostatic build-up can lead to the creation of sparks, which could ignite the highly explo-
sive gases of a battery. There is a risk of an
explosion.
Before handling the battery, touch the vehicle body to remove any existing electrostatic
build-up. Battery (vehicle)
345Breakdown assistance Z
Page 365 of 389
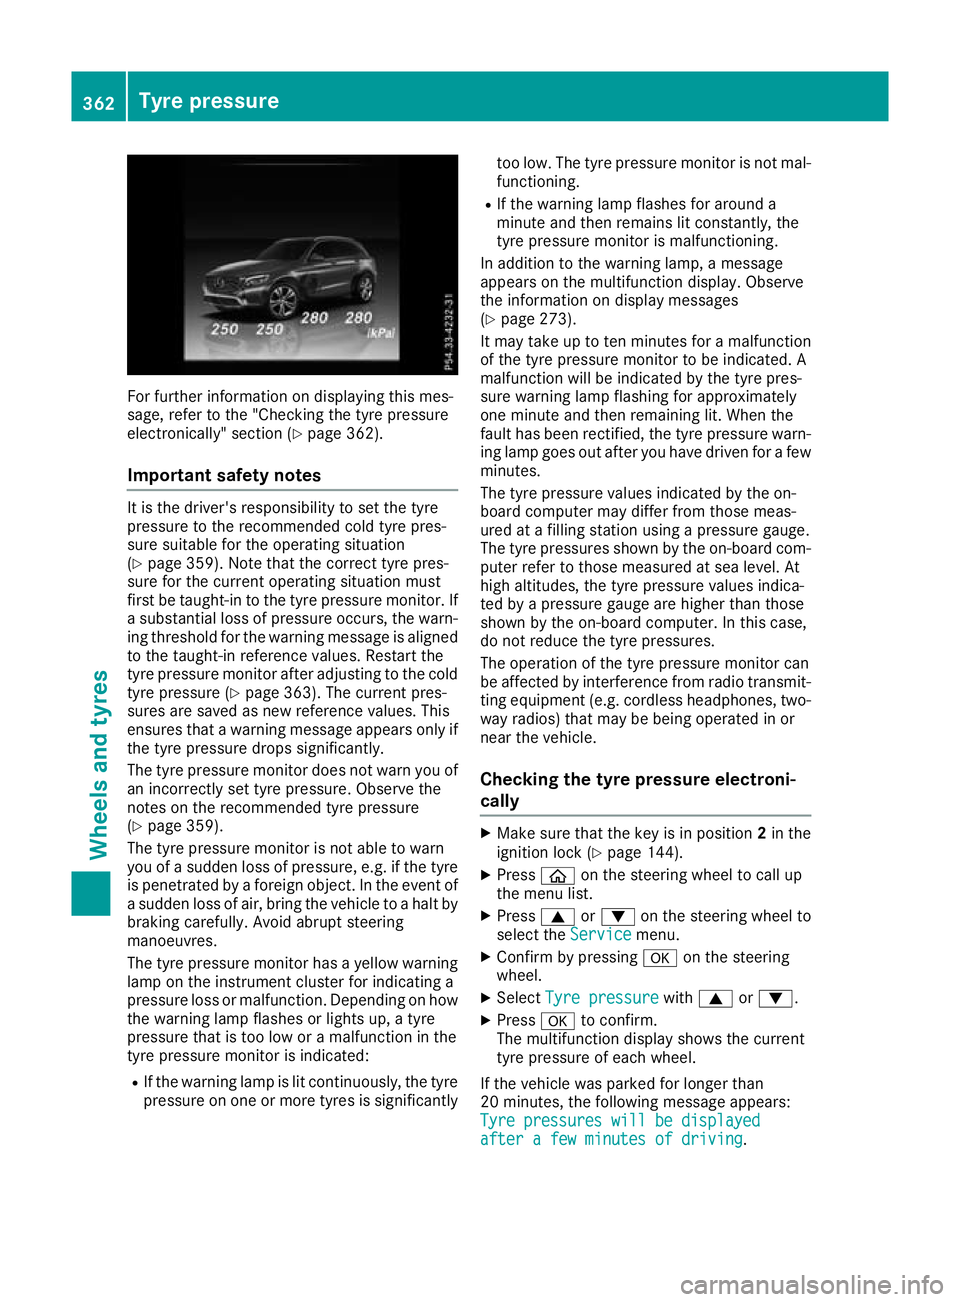
For further information on displaying this mes-
sage, refer to the "Checking the tyre pressure
electronically" section (Y page 362).
Important safety notes It is the driver's responsibility to set the tyre
pressure to the recommended cold tyre pres-
sure suitable for the operating situation
(Y page 359). Note that the correct tyre pres-
sure for the current operating situation must
first be taught-in to the tyre pressure monitor. If
a substantial loss of pressure occurs, the warn- ing threshold for the warning message is aligned
to the taught-in reference values. Restart the
tyre pressure monitor after adjusting to the cold tyre pressure (Y page 363). The current pres-
sures are saved as new reference values. This
ensures that a warning message appears only if
the tyre pressure drops significantly.
The tyre pressure monitor does not warn you of
an incorrectly set tyre pressure. Observe the
notes on the recommended tyre pressure
(Y page 359).
The tyre pressure monitor is not able to warn
you of a sudden loss of pressure, e.g. if the tyre
is penetrated by a foreign object. In the event of
a sudden loss of air, bring the vehicle to a halt by braking carefully. Avoid abrupt steering
manoeuvres.
The tyre pressure monitor has a yellow warning
lamp on the instrument cluster for indicating a
pressure loss or malfunction. Depending on how
the warning lamp flashes or lights up, a tyre
pressure that is too low or a malfunction in the
tyre pressure monitor is indicated:
R If the warning lamp is lit continuously, the tyre
pressure on one or more tyres is significantly too low. The tyre pressure monitor is not mal-
functioning.
R If the warning lamp flashes for around a
minute and then remains lit constantly, the
tyre pressure monitor is malfunctioning.
In addition to the warning lamp, a message
appears on the multifunction display. Observe
the information on display messages
(Y page 273).
It may take up to ten minutes for a malfunction
of the tyre pressure monitor to be indicated. A
malfunction will be indicated by the tyre pres-
sure warning lamp flashing for approximately
one minute and then remaining lit. When the
fault has been rectified, the tyre pressure warn- ing lamp goes out after you have driven for a few
minutes.
The tyre pressure values indicated by the on-
board computer may differ from those meas-
ured at a filling station using a pressure gauge.
The tyre pressures shown by the on-board com- puter refer to those measured at sea level. At
high altitudes, the tyre pressure values indica-
ted by a pressure gauge are higher than those
shown by the on-board computer. In this case,
do not reduce the tyre pressures.
The operation of the tyre pressure monitor can
be affected by interference from radio transmit- ting equipment (e.g. cordless headphones, two-
way radios) that may be being operated in or
near the vehicle.
Checking the tyre pressure electroni-
cally X
Make sure that the key is in position 2in the
ignition lock (Y page 144).
X Press òon the steering wheel to call up
the menu list.
X Press 9or: on the steering wheel to
select the Service
Service menu.
X Confirm by pressing aon the steering
wheel.
X Select Tyre pressure Tyre pressure with9 or:.
X Press ato confirm.
The multifunction display shows the current
tyre pressure of each wheel.
If the vehicle was parked for longer than
20 minutes, the following message appears:
Tyre pressures will be displayed Tyre pressures will be displayed
after a few minutes of driving after a few minutes of driving. 362
Tyre pressureWheels and tyres