2016 MERCEDES-BENZ GLC COUPE phone
[x] Cancel search: phonePage 304 of 389
Connecting the module via a USB cable
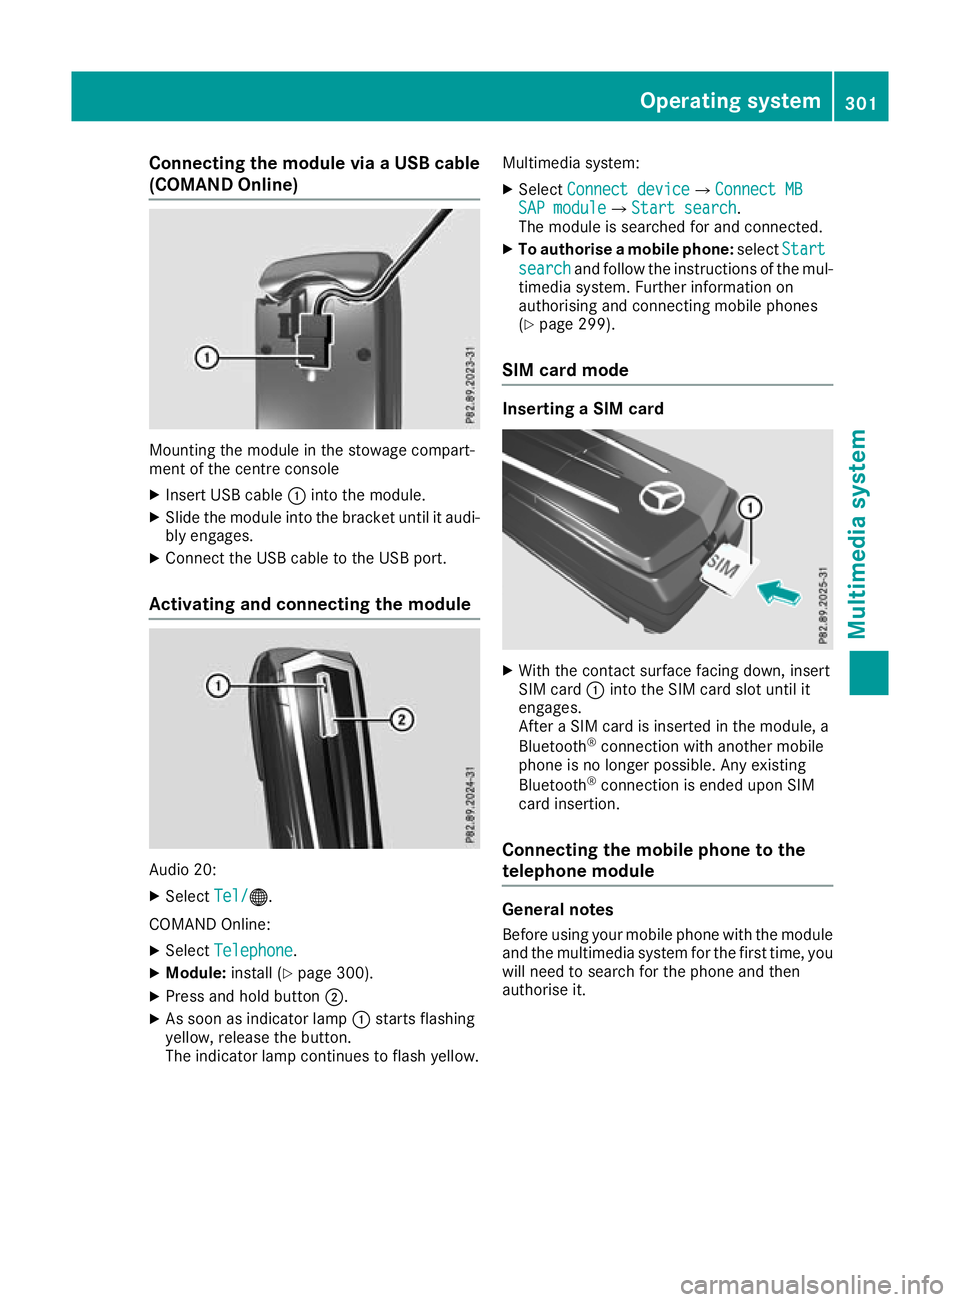
(COMAND Online) Mounting the module in the stowage compart-
ment of the centre console
X Insert USB cable :into the module.
X Slide the module into the bracket until it audi-
bly engages.
X Connect the USB cable to the USB port.
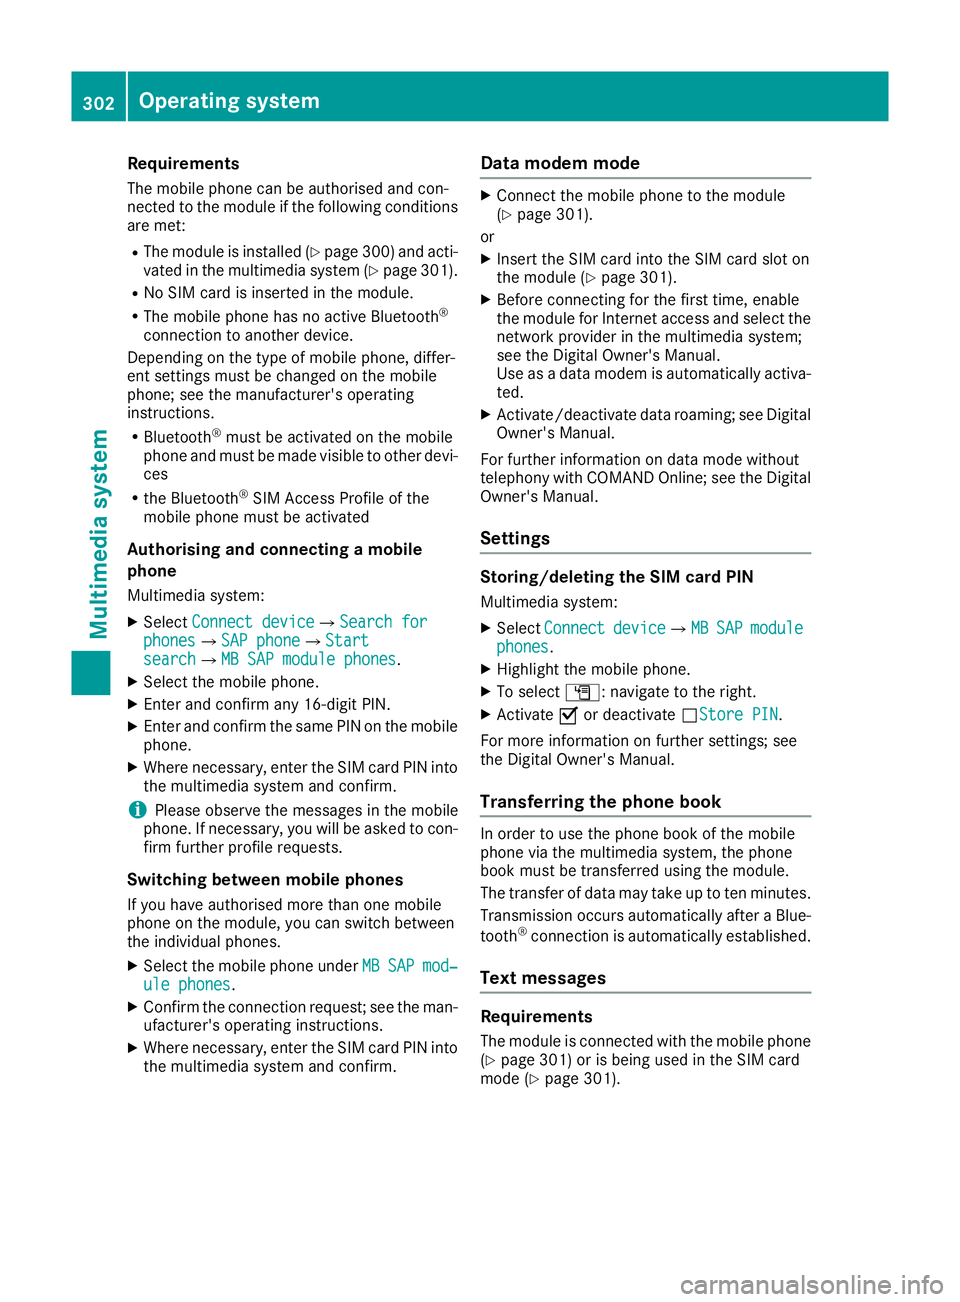
Activating and connecting the module Audio 20:
X Select Tel/ Tel/®.
COMAND Online:
X Select Telephone Telephone .
X Module: install (Y page 300).
X Press and hold button ;.
X As soon as indicator lamp :starts flashing
yellow, release the button.
The indicator lamp continues to flash yellow. Multimedia system:
X Select Connect device
Connect device QConnect MBConnect MB
SAP module SAP module QStart searchStart search .
The module is searched for and connected.
X To authorise a mobile phone: selectStart
Start
search
search and follow the instructions of the mul-
timedia system. Further information on
authorising and connecting mobile phones
(Y page 299).
SIM card mode Inserting a SIM card
X
With the contact surface facing down, insert
SIM card :into the SIM card slot until it
engages.
After a SIM card is inserted in the module, a
Bluetooth ®
connection with another mobile
phone is no longer possible. Any existing
Bluetooth ®
connection is ended upon SIM
card insertion.
Connecting the mobile phone to the
telephone module General notes
Before using your mobile phone with the module
and the multimedia system for the first time, you will need to search for the phone and then
authorise it. Operating system
301Multimedia system Z
Page 305 of 389
Requirements
The mobile phone can be authorised and con-
nected to the module if the following conditions are met:
R The module is installed (Y page 300)and acti-
vated in the multimedia system (Y page 301).
R No SIM card is inserted in the module.
R The mobile phone has no active Bluetooth ®
connection to another device.
Depending on the type of mobile phone, differ-
ent settings must be changed on the mobile
phone; see the manufacturer's operating
instructions.
R Bluetooth ®
must be activated on the mobile
phone and must be made visible to other devi-
ces
R the Bluetooth ®
SIM Access Profile of the
mobile phone must be activated
Authorising and connecting a mobile
phone
Multimedia system:
X Select Connect device Connect device QSearch forSearch for
phones
phones QSAP phoneSAP phoneQ Start
Start
search
search QMB SAP module phonesMB SAP module phones .
X Select the mobile phone.
X Enter and confirm any 16-digit PIN.
X Enter and confirm the same PIN on the mobile
phone.
X Where necessary, enter the SIM card PIN into
the multimedia system and confirm.
i Please observe the messages in the mobile
phone. If necessary, you will be asked to con-
firm further profile requests.
Switching between mobile phones If you have authorised more than one mobile
phone on the module, you can switch between
the individual phones.
X Select the mobile phone under MB MBSAP
SAP mod‐
mod‐
ule phones
ule phones .
X Confirm the connection request; see the man-
ufacturer's operating instructions.
X Where necessary, enter the SIM card PIN into
the multimedia system and confirm. Data modem mode X
Connect the mobile phone to the module
(Y page 301).
or
X Insert the SIM card into the SIM card slot on
the module (Y page 301).
X Before connecting for the first time, enable
the module for Internet access and select the network provider in the multimedia system;
see the Digital Owner's Manual.
Use as a data modem is automatically activa- ted.
X Activate/deactivate data roaming; see Digital
Owner's Manual.
For further information on data mode without
telephony with COMAND Online; see the Digital Owner's Manual.
Settings Storing/deleting the SIM card PIN
Multimedia system:
X Select Connect Connect device
deviceQ MB
MBSAP
SAP module
module
phones
phones .
X Highlight the mobile phone.
X To select G: navigate to the right.
X Activate Oor deactivate ªStore PINStore PIN .
For more information on further settings; see
the Digital Owner's Manual.
Transferring the phone book In order to use the phone book of the mobile
phone via the multimedia system, the phone
book must be transferred using the module.
The transfer of data may take up to ten minutes.
Transmission occurs automatically after a Blue- tooth ®
connection is automatically established.
Text messages Requirements
The module is connected with the mobile phone
(Y page 301) or is being used in the SIM card
mode (Y page 301). 302
Operating systemMultimedia system
Page 306 of 389
Activating/deactivating text message
downloading from the mobile phone Dial number Function
00080 Text message down-
loading is deactiva-
ted.
00081 Text message down-
loading is activated.
For further information on receiving text mes-
sages when using the telephone module; see
Digital Owner's Manual.
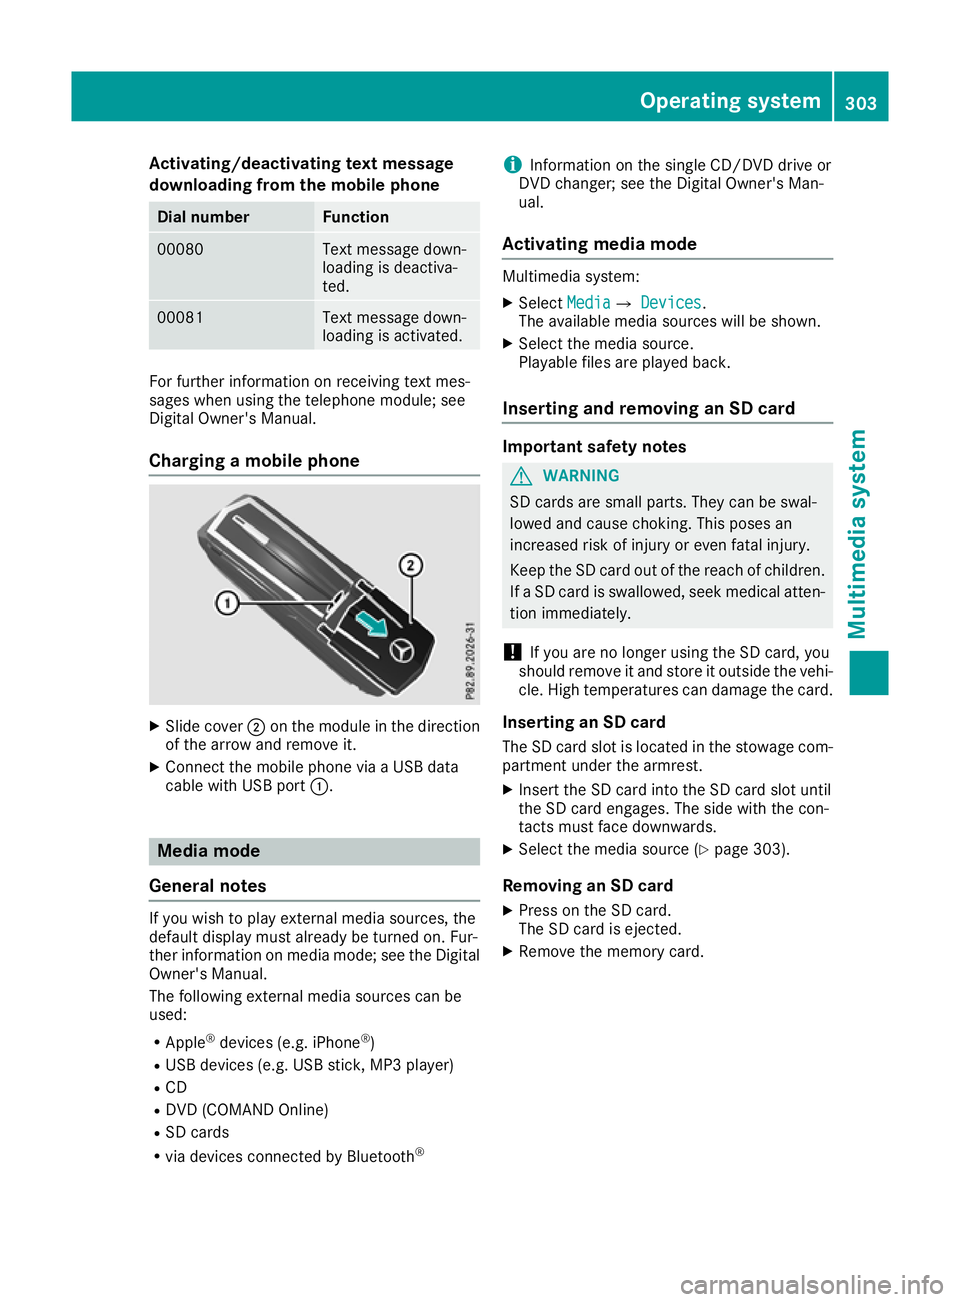
Charging a mobile phone X
Slide cover ;on the module in the direction
of the arrow and remove it.
X Connect the mobile phone via a USB data
cable with USB port :. Media mode
General notes If you wish to play external media sources, the
default display must already be turned on. Fur-
ther information on media mode; see the Digital
Owner's Manual.
The following external media sources can be
used:
R Apple ®
devices (e.g. iPhone ®
)
R USB devices (e.g. USB stick, MP3 player)
R CD
R DVD (COMAND Online)
R SD cards
R via devices connected by Bluetooth ®i
Information on the single CD/DVD drive or
DVD changer; see the Digital Owner's Man-
ual.
Activating media mode Multimedia system:
X Select Media
MediaQ Devices Devices.
The available media sources will be shown.
X Select the media source.
Playable files are played back.
Inserting and removing an SD card Important safety notes
G
WARNING
SD cards are small parts. They can be swal-
lowed and cause choking. This poses an
increased risk of injury or even fatal injury.
Keep the SD card out of the reach of children. If a SD card is swallowed, seek medical atten-
tion immediately.
! If you are no longer using the SD card, you
should remove it and store it outside the vehi-
cle. High temperatures can damage the card.
Inserting an SD card
The SD card slot is located in the stowage com- partment under the armrest.
X Insert the SD card into the SD card slot until
the SD card engages. The side with the con-
tacts must face downwards.
X Select the media source (Y page 303).
Removing an SD card X Press on the SD card.
The SD card is ejected.
X Remove the memory card. Operating system
303Multimedia system Z
Page 308 of 389
Stowage areas
Loading guidelines
G
WARNING
Combustion engines emit poisonous exhaust
gases such as carbon monoxide. If the tailgate is open when the engine is running, particu-
larly if the vehicle is moving, exhaust fumes
could enter the passenger compartment.
There is a risk of poisoning.
Turn off the engine before opening the tail-
gate. Never drive with the tailgate open. G
WARNING
If objects, luggage or loads are not secured or not secured sufficiently, they could slip, tip
over or be flung around and thereby hit vehicle
occupants. There is a risk of injury, especially when braking or abruptly changing directions.
Always store objects so that they cannot be
flung around. Secure objects, luggage or
loads against slipping or tipping before the
journey. G
WARNING
The exhaust tail pipe and tail pipe trim can
become very hot. If you come into contact
with these parts of the vehicle, you could burn
yourself. There is a risk of injury.
Always be particularly careful around the
exhaust tail pipe and the tail pipe trim. Allow
these components to cool down before touch-
ing them.
The handling characteristics of a laden vehicle
are dependent on the distribution of the load
within the vehicle. For this reason, you should
note the following when transporting a load:
R never exceed the maximum gross vehicle
weight or the permissible axle loads for the
vehicle (including occupants).
R the luggage compartment is the preferred
place to store objects.
R position heavy loads as far forward as possi-
ble and as low down in the load compartment as possible. R
the load must not protrude above the upper
edge of the seat backrests.
R always place the load behind unoccupied
seats if possible.
R hook in the safety net when loading.
R secure the load with sufficiently strong and
wear-resistant lashing material. pad sharp
edges for protection.
i Lashing material is available at any qualified
specialist workshop. Stowage compartments
Important safety notes G
WARNING
If you transport objects in the vehicle interior and these are not adequately secured, they
could slip or be flung around and thereby
strike vehicle occupants. In addition, cup
holders, open stowage spaces and mobile
phone brackets may not always be able to
hold the objects placed in them in the event of an accident. There is a risk of injury, particu-
larly in the event of sharp braking or sudden
changes of direction.
R Always stow objects in such a way that they
cannot be tossed about in these or similar
situations.
R Always make sure that objects do not proj-
ect from stowage spaces, luggage nets or
stowage nets.
R Ensure that closable stowage spaces are
shut before beginning your journey.
R Always stow and secure heavy, hard, poin-
ted, sharp-edged, fragile or outsize objects
in the load compartment.
Read the loading guidelines (Y page 305). Stowage areas
305Stowing and features Z
Page 310 of 389
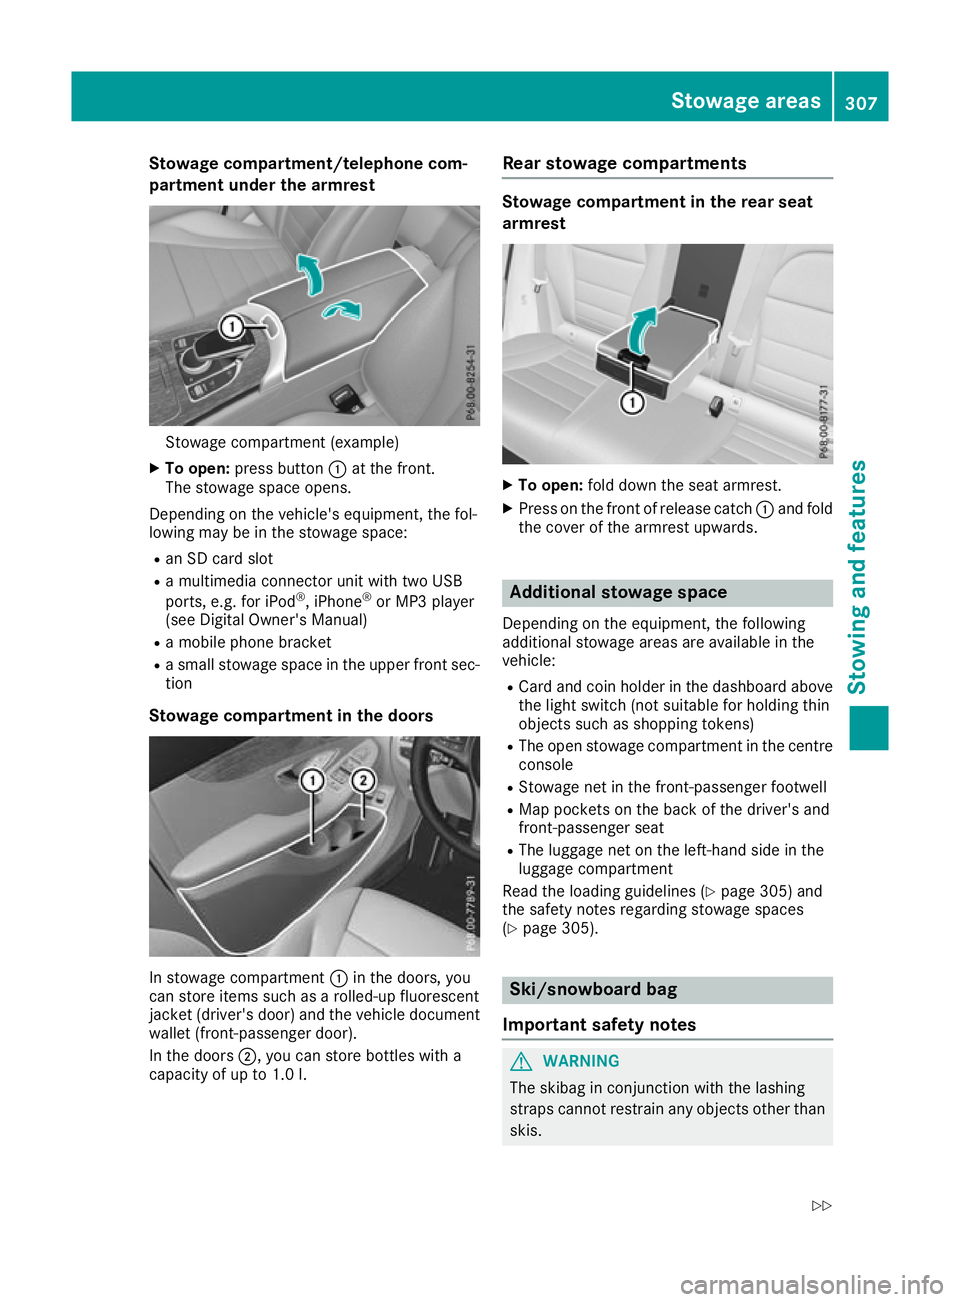
Stowage compartment/telephone com-
partment under the armrest Stowage compartment (example)
X To open: press button :at the front.
The stowage space opens.
Depending on the vehicle's equipment, the fol-
lowing may be in the stowage space:
R an SD card slot
R a multimedia connector unit with two USB
ports, e.g. for iPod ®
, iPhone ®
or MP3 player
(see Digital Owner's Manual)
R a mobile phone bracket
R a small stowage space in the upper front sec-
tion
Stowage compartment in the doors In stowage compartment
:in the doors, you
can store items such as a rolled-up fluorescent
jacket (driver's door) and the vehicle document wallet (front-passenger door).
In the doors ;, you can store bottles with a
capacity of up to 1.0 l. Rear stowage compartments Stowage compartment in the rear seat
armrest
X
To open: fold down the seat armrest.
X Press on the front of release catch :and fold
the cover of the armrest upwards. Additional stowage space
Depending on the equipment, the following
additional stowage areas are available in the
vehicle:
R Card and coin holder in the dashboard above
the light switch (not suitable for holding thin
objects such as shopping tokens)
R The open stowage compartment in the centre
console
R Stowage net in the front-passenger footwell
R Map pockets on the back of the driver's and
front-passenger seat
R The luggage net on the left-hand side in the
luggage compartment
Read the loading guidelines (Y page 305) and
the safety notes regarding stowage spaces
(Y page 305). Ski/snowboard bag
Important safety notes G
WARNING
The skibag in conjunction with the lashing
straps cannot restrain any objects other than skis. Stowage areas
307Stowing and features
Z
Page 315 of 389
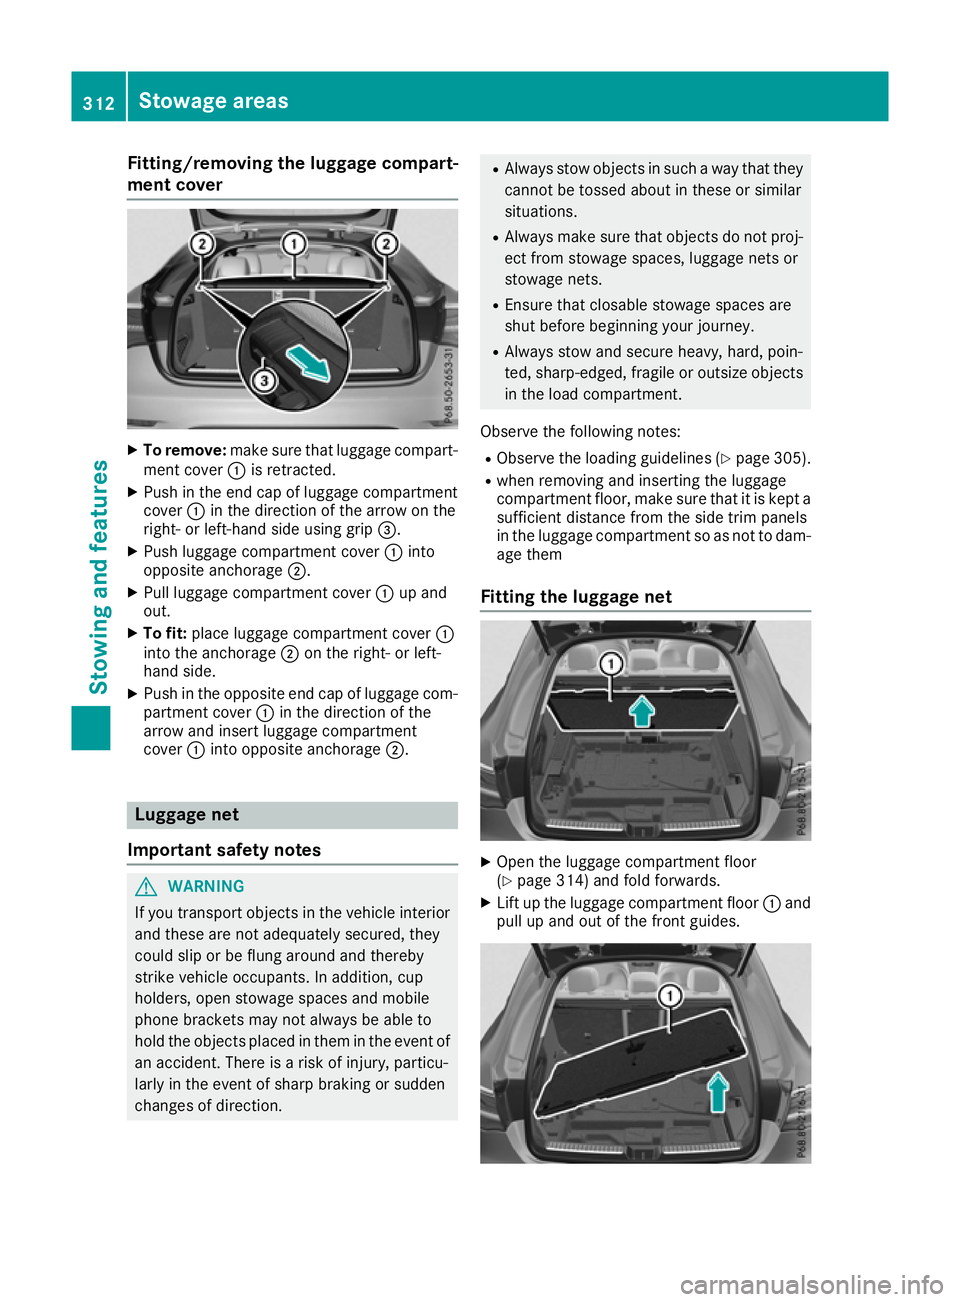
Fitting/removing the luggage compart-
ment cover X
To remove: make sure that luggage compart-
ment cover :is retracted.
X Push in the end cap of luggage compartment
cover :in the direction of the arrow on the
right- or left-hand side using grip =.
X Push luggage compartment cover :into
opposite anchorage ;.
X Pull luggage compartment cover :up and
out.
X To fit: place luggage compartment cover :
into the anchorage ;on the right- or left-
hand side.
X Push in the opposite end cap of luggage com-
partment cover :in the direction of the
arrow and insert luggage compartment
cover :into opposite anchorage ;.Luggage net
Important safety notes G
WARNING
If you transport objects in the vehicle interior and these are not adequately secured, they
could slip or be flung around and thereby
strike vehicle occupants. In addition, cup
holders, open stowage spaces and mobile
phone brackets may not always be able to
hold the objects placed in them in the event of an accident. There is a risk of injury, particu-
larly in the event of sharp braking or sudden
changes of direction. R
Always stow objects in such a way that they
cannot be tossed about in these or similar
situations.
R Always make sure that objects do not proj-
ect from stowage spaces, luggage nets or
stowage nets.
R Ensure that closable stowage spaces are
shut before beginning your journey.
R Always stow and secure heavy, hard, poin-
ted, sharp-edged, fragile or outsize objects in the load compartment.
Observe the following notes:
R Observe the loading guidelines (Y page 305).
R when removing and inserting the luggage
compartment floor, make sure that it is kept a
sufficient distance from the side trim panels
in the luggage compartment so as not to dam- age them
Fitting the luggage net X
Open the luggage compartment floor
(Y page 314) and fold forwards.
X Lift up the luggage compartment floor :and
pull up and out of the front guides. 312
Stowage areasStowing and featu
res
Page 319 of 389
strike vehicle occupants. In addition, cup
holders, open stowage spaces and mobile
phone brackets may not always be able to
hold the objects placed in them in the event of an accident. There is a risk of injury, particu-
larly in the event of sharp braking or sudden
changes of direction.
R Always stow objects in such a way that they
cannot be tossed about in these or similar
situations.
R Always make sure that objects do not proj-
ect from stowage spaces, luggage nets or
stowage nets.
R Ensure that closable stowage spaces are
shut before beginning your journey.
R Always stow and secure heavy, hard, poin-
ted, sharp-edged, fragile or outsize objects in the load compartment.
! Only use the cup holders for containers of
the right size and which have lids. The drinks
could otherwise spill.
! Do not expose drinks bottles in the cup
holder in the centre console to continuous,
strong and direct sunlight. The passenger
compartment in the area of the centre con-
sole can otherwise be damaged by the con-
centrated and reflected sunlight.
Observe the loading guidelines (Y page 305).
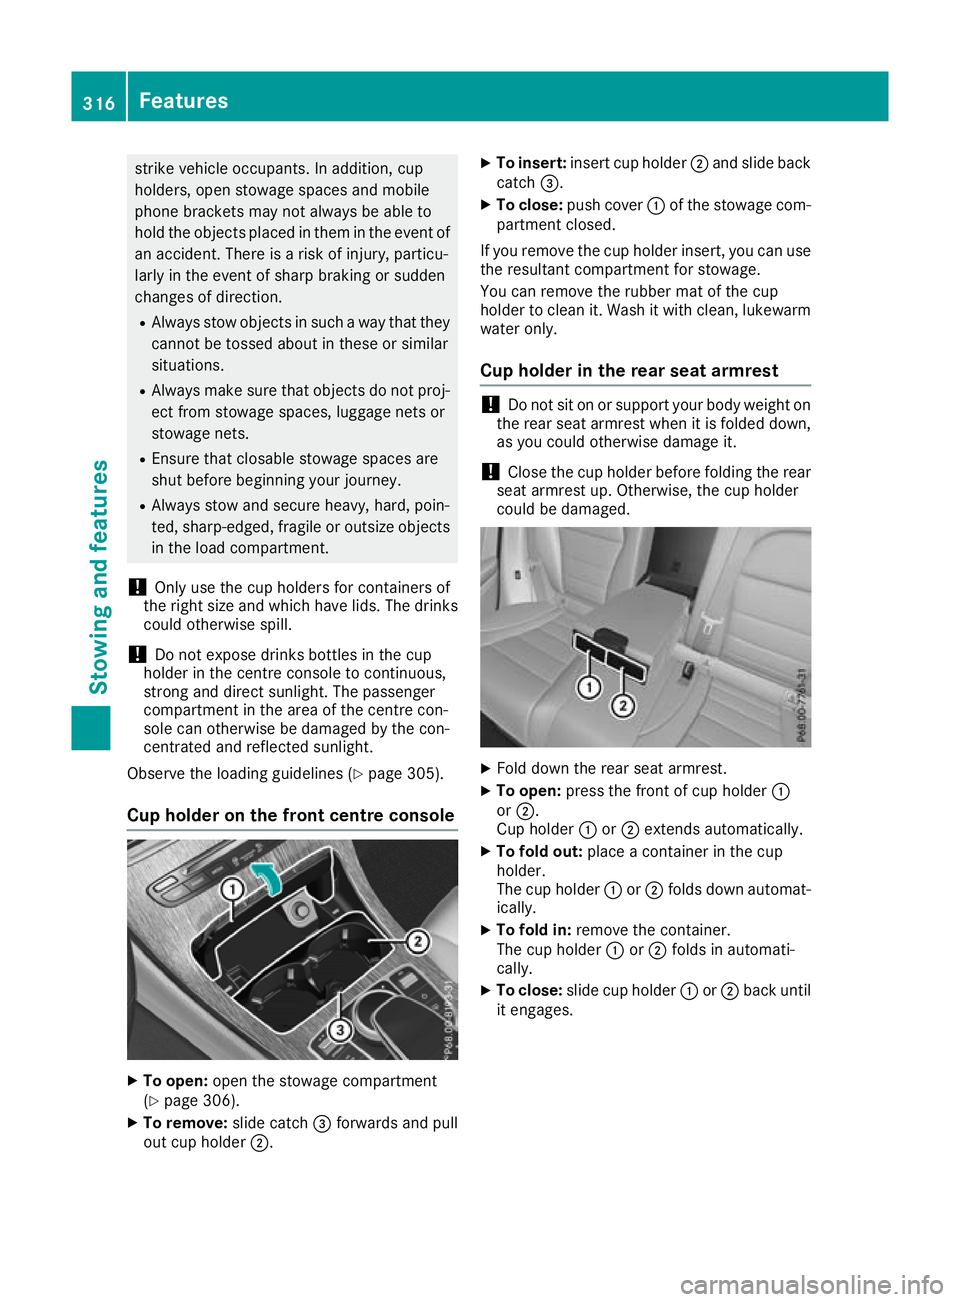
Cup holder on the front centre console X
To open: open the stowage compartment
(Y page 306).
X To remove: slide catch=forwards and pull
out cup holder ;. X
To insert: insert cup holder ;and slide back
catch =.
X To close: push cover :of the stowage com-
partment closed.
If you remove the cup holder insert, you can use
the resultant compartment for stowage.
You can remove the rubber mat of the cup
holder to clean it. Wash it with clean, lukewarm water only.
Cup holder in the rear seat armrest !
Do not sit on or support your body weight on
the rear seat armrest when it is folded down,
as you could otherwise damage it.
! Close the cup holder before folding the rear
seat armrest up. Otherwise, the cup holder
could be damaged. X
Fold down the rear seat armrest.
X To open: press the front of cup holder :
or ;.
Cup holder :or; extends automatically.
X To fold out: place a container in the cup
holder.
The cup holder :or; folds down automat-
ically.
X To fold in: remove the container.
The cup holder :or; folds in automati-
cally.
X To close: slide cup holder :or; back until
it engages. 316
FeaturesStowing and features
Page 321 of 389
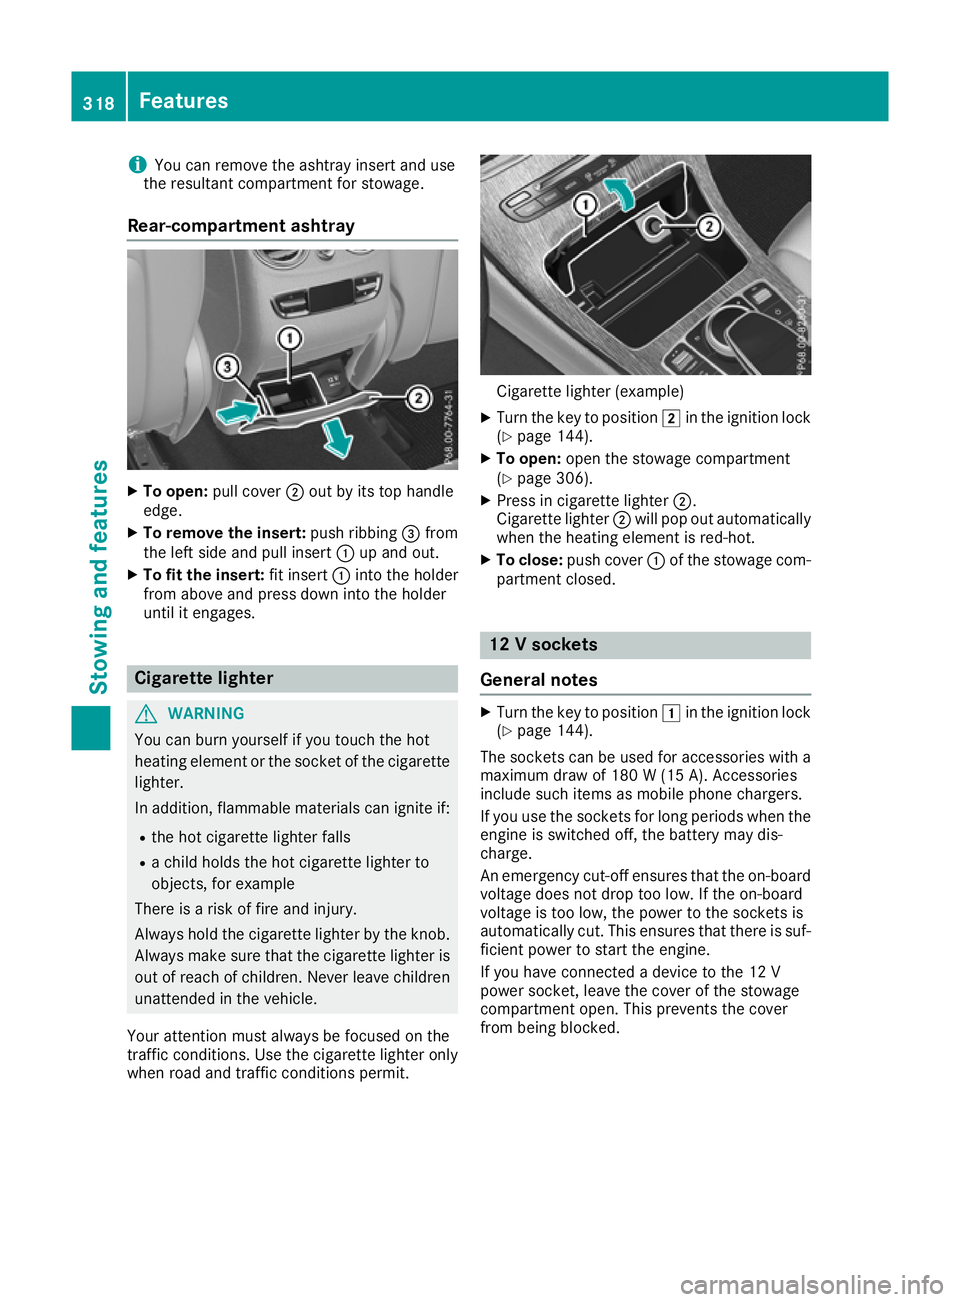
i
You can remove the ashtray insert and use
the resultant compartment for stowage.
Rear-compartment ashtray X
To open: pull cover ;out by its top handle
edge.
X To remove the insert: push ribbing=from
the left side and pull insert :up and out.
X To fit the insert: fit insert:into the holder
from above and press down into the holder
until it engages. Cigarette lighter
G
WARNING
You can burn yourself if you touch the hot
heating element or the socket of the cigarette lighter.
In addition, flammable materials can ignite if:
R the hot cigarette lighter falls
R a child holds the hot cigarette lighter to
objects, for example
There is a risk of fire and injury.
Always hold the cigarette lighter by the knob.
Always make sure that the cigarette lighter is
out of reach of children. Never leave children unattended in the vehicle.
Your attention must always be focused on the
traffic conditions. Use the cigarette lighter only when road and traffic conditions permit. Cigarette lighter (example)
X Turn the key to position 2in the ignition lock
(Y page 144).
X To open: open the stowage compartment
(Y page 306).
X Press in cigarette lighter ;.
Cigarette lighter ;will pop out automatically
when the heating element is red-hot.
X To close: push cover :of the stowage com-
partment closed. 12 V sockets
General notes X
Turn the key to position 1in the ignition lock
(Y page 144).
The sockets can be used for accessories with a
maximum draw of 180 W (15 A). Accessories
include such items as mobile phone chargers.
If you use the sockets for long periods when the engine is switched off, the battery may dis-
charge.
An emergency cut-off ensures that the on-board
voltage does not drop too low. If the on-board
voltage is too low, the power to the sockets is
automatically cut. This ensures that there is suf- ficient power to start the engine.
If you have connected a device to the 12 V
power socket, leave the cover of the stowage
compartment open. This prevents the cover
from being blocked. 318
FeaturesStowing and features