2016 MERCEDES-BENZ GLC COUPE belt
[x] Cancel search: beltPage 105 of 389
G
WARNING
The head restraints cannot provide the inten-
ded protection unless they are fitted and
adjusted correctly. There is an increased risk of injury to the head and neck in the event of
an accident or sudden braking, for example.
Always drive with the head restraints fitted.
Ensure that the centre of the head restraints
support the back of each vehicle occupant's
head at eye level before driving off.
Do not interchange the head restraints of the
front and rear seats. Otherwise, you cannot
adjust the height and angle of the head
restraints correctly.
Adjust the head restraint fore-and-aft position
so that it is as close as possible to the back of
your head. G
WARNING
If the driver's seat is not correctly engaged, it could unexpectedly move while driving. This
could cause you to lose control of the vehicle. There is a risk of an accident.
Always ensure that the driver's seat is
engaged before starting the vehicle. G
WARNING
You could lose control of the vehicle while
driving if you:
R adjust the driver's seat, steering wheel or
mirrors
R fasten the seat belt
There is a risk of an accident.
Adjust the driver's seat, head restraint, steer-
ing wheel and mirrors and fasten your seat
belt before starting the engine. G
WARNING
If you adjust the seat height carelessly, you or other vehicle occupants could be trapped andthereby injured. Children in particular could
accidentally press the electrical seat adjust-
ment buttons and become trapped. There is a
risk of injury.
While moving the seats, make sure that your
hands or other body parts do not get under the lever assembly of the seat adjustment sys-
tem.
G
WARNING
The seat belt does not offer the intended level of protection if you have not moved the back-
rest to an almost vertical position. When brak-
ing or in the event of an accident, you could
slide underneath the seat belt and sustain
abdomen or neck injuries, for example. This
poses an increased risk of injury or even fatal injury.
Adjust the seat properly before beginning
your journey. Always ensure that the backrest
is in an almost vertical position and that the
shoulder section of your seatbelt is routed
across the centre of your shoulder.
! To avoid damage to the seats and the seat
heating, observe the following information:
R do not spill any liquids on the seats. If liquid
is spilled on the seats, dry them as soon as possible.
R if the seat covers are damp or wet, do not
switch on the seat heating. The seat heat-
ing should also not be used to dry the seats.
R clean the seat covers as recommended;
see "Interior care".
R do not transport heavy loads on the seats.
Do not place sharp objects on the seat
cushions, e.g. knives, nails or tools. The
seats should only be occupied by passen-
gers, if possible.
R when the seat heating is in operation, do
not cover the seats with insulating materi-
als, e.g. blankets, coats, bags, seat covers,
child seats or booster seats.
! Make sure that there are no objects in the
footwell under or behind the seats when mov- ing the seats back. There is a risk that the
seats and/or the objects could be damaged.
i The rear-compartment head restraints can
be removed (Y page 105).
For more information, contact a qualified spe-
cialist workshop.
i Related topic:
R EASY-PACK quickfold rear bench seat
(Y page 308) 102
SeatsSeats, steering wheel and mirrors
Page 107 of 389
i
Further related subjects:
R You can store the seat settings using the
memory function (Y page 113).
R If PRE-SAFE ®
is triggered, the front-
passenger seat will be moved to a better
position if it was previously in an unfavour- able position (Y page 55).
R When the seat is moved forwards or back-
wards, the head restraint is moved up or
down automatically.
Vehicles with AMG Performance Seat: the
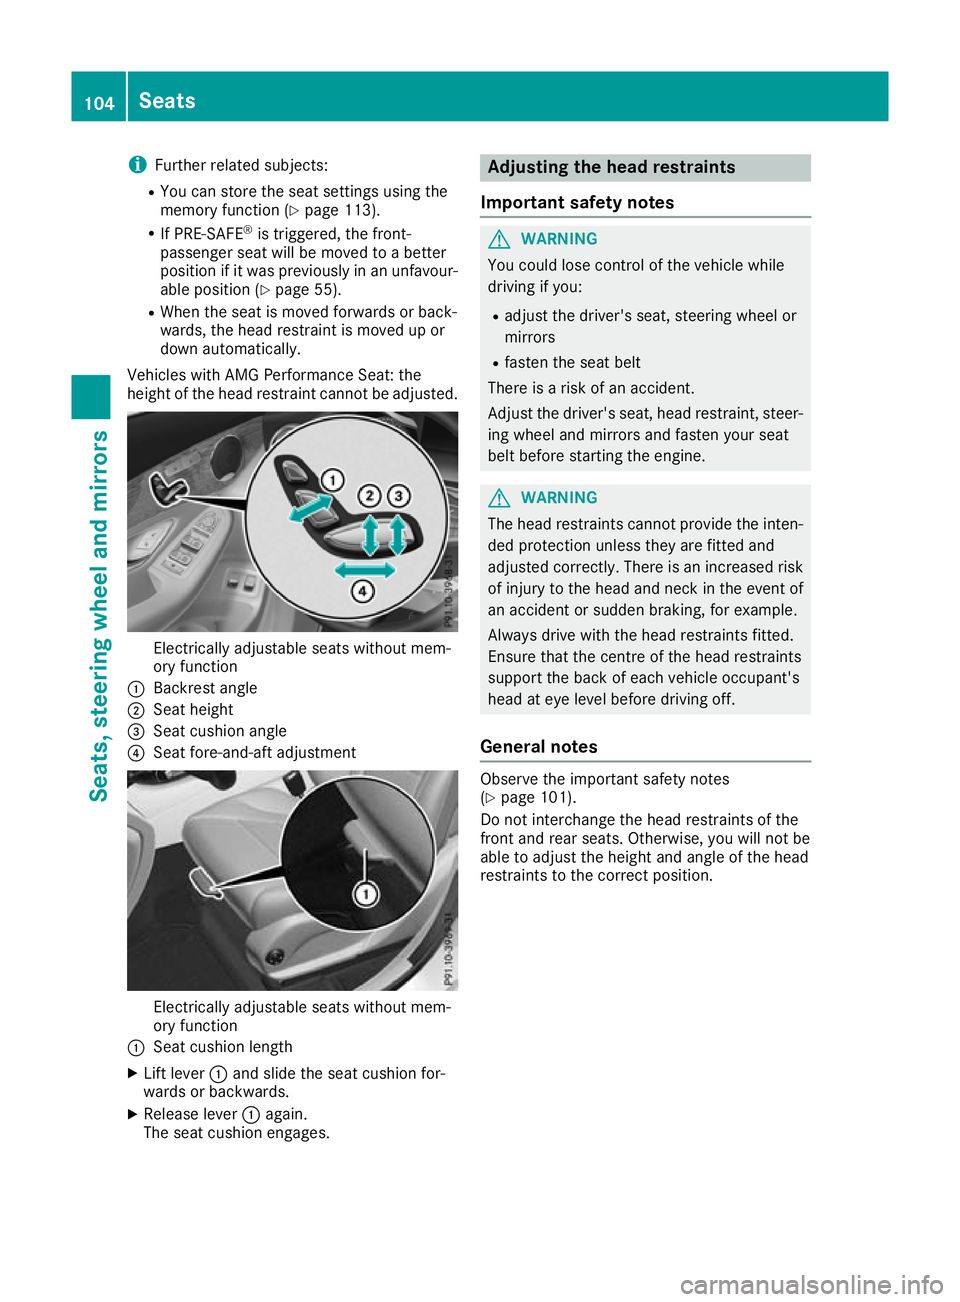
height of the head restraint cannot be adjusted. Electrically adjustable seats without mem-
ory function
: Backrest angle
; Seat height
= Seat cushion angle
? Seat fore-and-aft adjustment Electrically adjustable seats without mem-
ory function
: Seat cushion length
X Lift lever :and slide the seat cushion for-
wards or backwards.
X Release lever :again.
The seat cushion engages. Adjusting the head restraints
Important safety notes G
WARNING
You could lose control of the vehicle while
driving if you:
R adjust the driver's seat, steering wheel or
mirrors
R fasten the seat belt
There is a risk of an accident.
Adjust the driver's seat, head restraint, steer-
ing wheel and mirrors and fasten your seat
belt before starting the engine. G
WARNING
The head restraints cannot provide the inten-
ded protection unless they are fitted and
adjusted correctly. There is an increased risk of injury to the head and neck in the event of
an accident or sudden braking, for example.
Always drive with the head restraints fitted.
Ensure that the centre of the head restraints
support the back of each vehicle occupant's
head at eye level before driving off.
General notes Observe the important safety notes
(Y
page 101).
Do not interchange the head restraints of the
front and rear seats. Otherwise, you will not be
able to adjust the height and angle of the head
restraints to the correct position. 104
SeatsSeats, steering wheel and mirrors
Page 111 of 389
Problems with the seat heating / seat ventilation
Problem
Possible causes/consequences and
M
MSolutions The seat heating or seat
ventilation has switched
off prematurely or can-
not be switched on. The on-board voltage is too low because too many electrical consum-
ers are switched on.
X Switch off electrical consumers that you do not need, such as the
rear window heating or interior lighting.
Once the battery is sufficiently charged, the seat heating or seat
ventilation can be switched back on manually. Steering wheel
Important safety notes
G
WARNING
You could lose control of the vehicle while
driving if you:
R adjust the driver's seat, steering wheel or
mirrors
R fasten the seat belt
There is a risk of an accident.
Adjust the driver's seat, head restraint, steer-
ing wheel and mirrors and fasten your seat
belt before starting the engine. G
WARNING
Children could become trapped by the steer-
ing wheel if they adjust it. There is a risk of
injury.
When leaving the vehicle, always take the key with you and lock the vehicle. Never leave
children unattended in the vehicle.
The electrically adjustable steering wheel can
still be adjusted when there is no key in the igni-
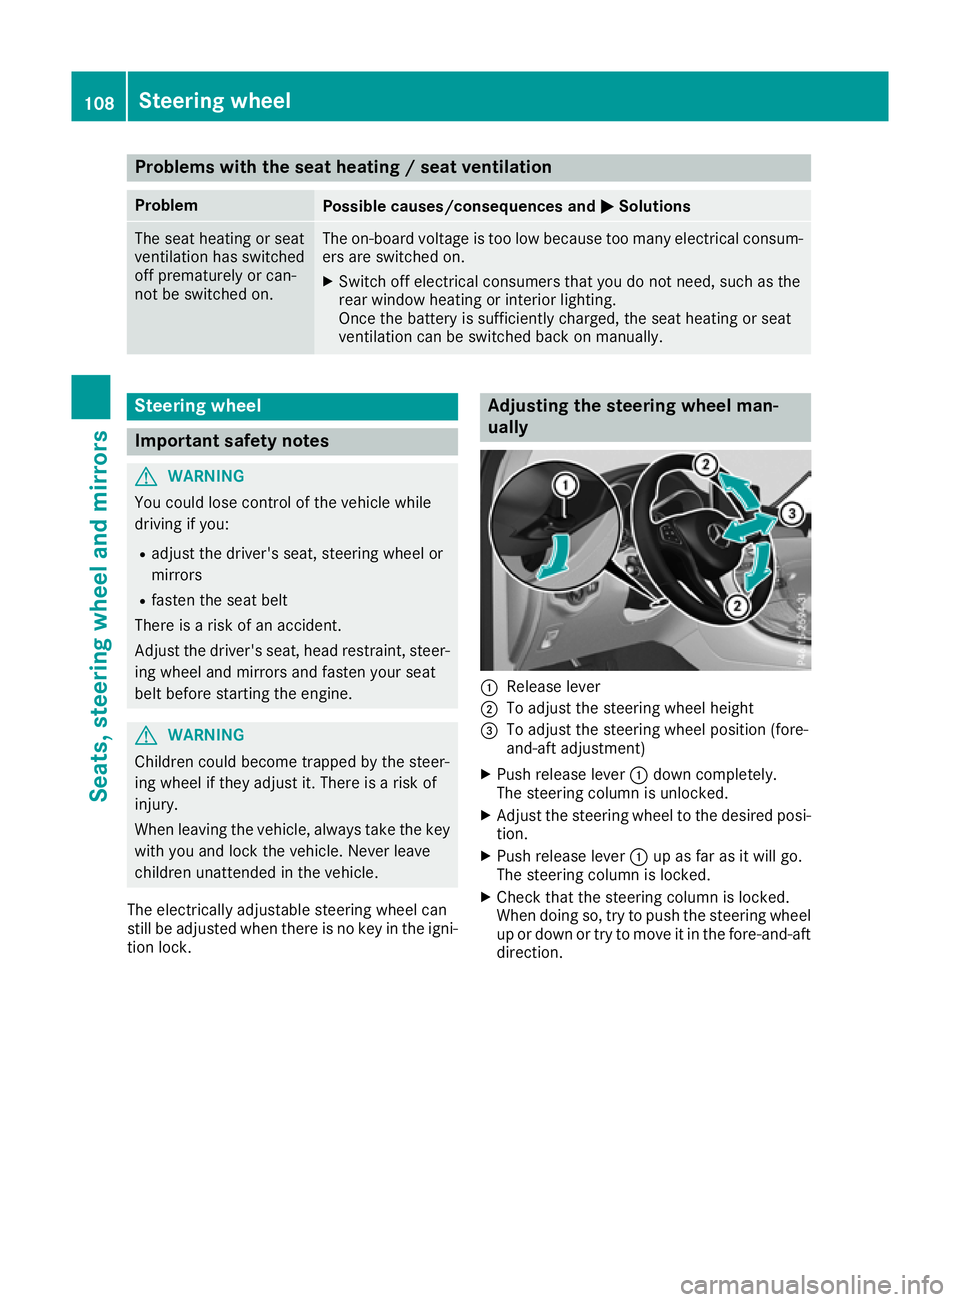
tion lock. Adjusting the steering wheel man-
ually
:
Release lever
; To adjust the steering wheel height
= To adjust the steering wheel position (fore-
and-aft adjustment)
X Push release lever :down completely.
The steering column is unlocked.
X Adjust the steering wheel to the desired posi-
tion.
X Push release lever :up as far as it will go.
The steering column is locked.
X Check that the steering column is locked.
When doing so, try to push the steering wheel
up or down or try to move it in the fore-and-aft
direction. 108
Steering wheelSeats, steering wheel and mirrors
Page 114 of 389
Exterior mirrors
Important safety notes G
WARNING
You could lose control of the vehicle while
driving if you:
R adjust the driver's seat, steering wheel or
mirrors
R fasten the seat belt
There is a risk of an accident.
Adjust the driver's seat, head restraint, steer-
ing wheel and mirrors and fasten your seat
belt before starting the engine. G
WARNING
The exterior mirrors reduce the size of the
image. Objects visible in the mirrors are
closer than they appear. You could misjudge
the distance from road users driving behind
you when changing lanes, for instance. There is a risk of an accident.
You should therefore always look over your
shoulder to determine the actual distance
from road users driving behind you.
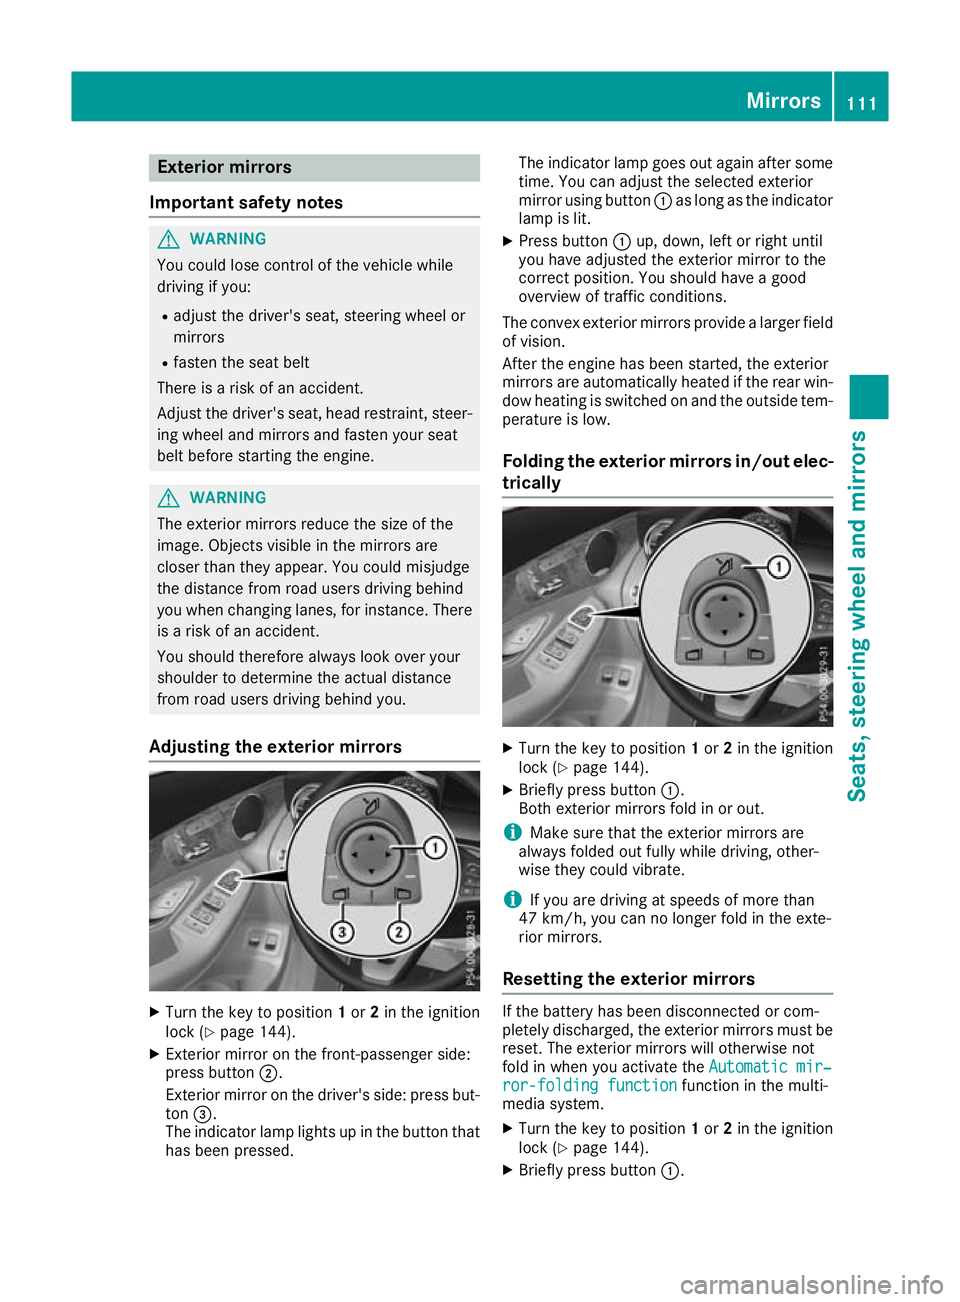
Adjusting the exterior mirrors X
Turn the key to position 1or 2in the ignition
lock (Y page 144).
X Exterior mirror on the front-passenger side:
press button ;.
Exterior mirror on the driver's side: press but-
ton =.
The indicator lamp lights up in the button that has been pressed. The indicator lamp goes out again after some
time. You can adjust the selected exterior
mirror using button :as long as the indicator
lamp is lit.
X Press button :up, down, left or right until
you have adjusted the exterior mirror to the
correct position. You should have a good
overview of traffic conditions.
The convex exterior mirrors provide a larger field of vision.
After the engine has been started, the exterior
mirrors are automatically heated if the rear win-
dow heating is switched on and the outside tem- perature is low.
Folding the exterior mirrors in/out elec- trically X
Turn the key to position 1or 2in the ignition
lock (Y page 144).
X Briefly press button :.
Both exterior mirrors fold in or out.
i Make sure that the exterior mirrors are
always folded out fully while driving, other-
wise they could vibrate.
i If you are driving at speeds of more than
47 km/h, you can no longer fold in the exte-
rior mirrors.
Resetting the exterior mirrors If the battery has been disconnected or com-
pletely discharged, the exterior mirrors must be reset. The exterior mirrors will otherwise not
fold in when you activate the Automatic mir‐ Automatic mir‐
ror-folding function
ror-folding function function in the multi-
media system.
X Turn the key to position 1or 2in the ignition
lock (Y page 144).
X Briefly press button :. Mirrors
111Seats, steering wheel and mirrors Z
Page 151 of 389
If you wish to exit the vehicle, always turn off
the ignition and secure the vehicle against
rolling away.
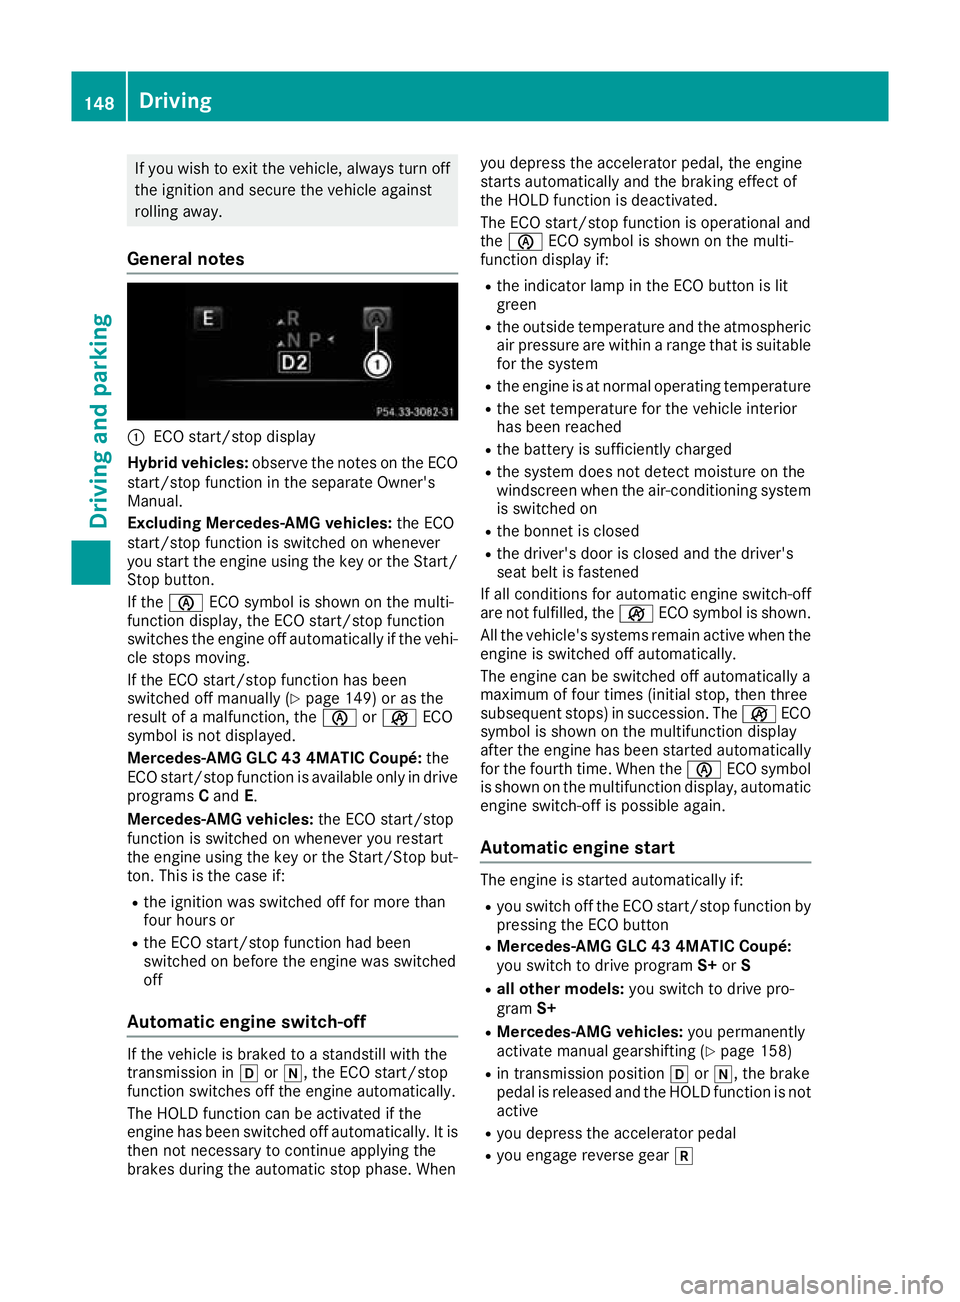
General notes :
ECO start/stop display
Hybrid vehicles: observe the notes on the ECO
start/stop function in the separate Owner's
Manual.
Excluding Mercedes-AMG vehicles: the ECO
start/stop function is switched on whenever
you start the engine using the key or the Start/ Stop button.
If the è ECO symbol is shown on the multi-
function display, the ECO start/stop function
switches the engine off automatically if the vehi-
cle stops moving.
If the ECO start/stop function has been
switched off manually (Y page 149) or as the
result of a malfunction, the èorç ECO
symbol is not displayed.
Mercedes-AMG GLC 43 4MATIC Coupé: the
ECO start/stop function is available only in drive programs Cand E.
Mercedes-AMG vehicles: the ECO start/stop
function is switched on whenever you restart
the engine using the key or the Start/Stop but-
ton. This is the case if:
R the ignition was switched off for more than
four hours or
R the ECO start/stop function had been
switched on before the engine was switched
off
Automatic engine switch-off If the vehicle is braked to a standstill with the
transmission in hori, the ECO start/stop
function switches off the engine automatically.
The HOLD function can be activated if the
engine has been switched off automatically. It is then not necessary to continue applying the
brakes during the automatic stop phase. When you depress the accelerator pedal, the engine
starts automatically and the braking effect of
the HOLD function is deactivated.
The ECO start/stop function is operational and
the
è ECO symbol is shown on the multi-
function display if:
R the indicator lamp in the ECO button is lit
green
R the outside temperature and the atmospheric
air pressure are within a range that is suitablefor the system
R the engine is at normal operating temperature
R the set temperature for the vehicle interior
has been reached
R the battery is sufficiently charged
R the system does not detect moisture on the
windscreen when the air-conditioning system
is switched on
R the bonnet is closed
R the driver's door is closed and the driver's
seat belt is fastened
If all conditions for automatic engine switch-off
are not fulfilled, the çECO symbol is shown.
All the vehicle's systems remain active when the engine is switched off automatically.
The engine can be switched off automatically a
maximum of four times (initial stop, then three
subsequent stops) in succession. The çECO
symbol is shown on the multifunction display
after the engine has been started automatically
for the fourth time. When the èECO symbol
is shown on the multifunction display, automatic engine switch-off is possible again.
Automatic engine start The engine is started automatically if:
R
you switch off the ECO start/stop function by
pressing the ECO button
R Mercedes-AMG GLC 43 4MATIC Coupé:
you switch to drive program S+orS
R all other models: you switch to drive pro-
gram S+
R Mercedes-AMG vehicles: you permanently
activate manual gearshifting (Y page 158)
R in transmission position hori, the brake
pedal is released and the HOLD function is not active
R you depress the accelerator pedal
R you engage reverse gear k148
DrivingDriving and parking
Page 152 of 389
R
you move the transmission out of position j
R you unfasten your seat belt or open the driv-
er's door
R the vehicle starts to roll
R the brake system requires this
R the temperature in the vehicle interior devi-
ates from the set range
R the system detects moisture on the wind-
screen when the air-conditioning system is
switched on
R the battery's charge status is too low
Shifting the transmission to position jdoes
not start the engine.
If you shift the transmission from ktoh, the
ECO start/stop function is available as soon as
the è ECO symbol appears on the multifunc-
tion display.
Switching the ECO start/stop function
off/on Mercedes-AMG vehicles
X
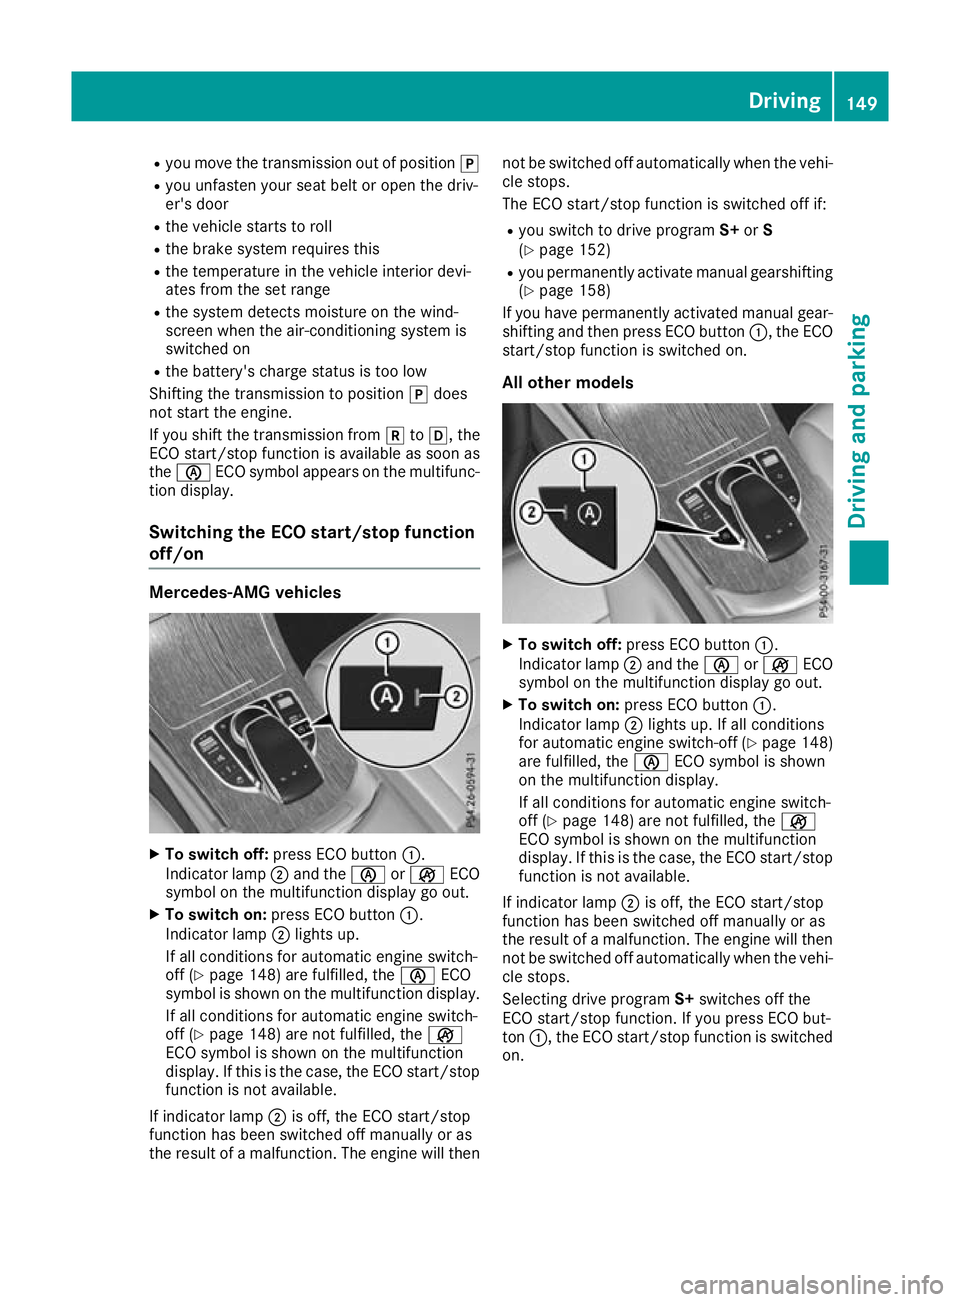
To switch off: press ECO button :.
Indicator lamp ;and the èorç ECO
symbol on the multifunction display go out.
X To switch on: press ECO button :.
Indicator lamp ;lights up.
If all conditions for automatic engine switch-
off (Y page 148) are fulfilled, the èECO
symbol is shown on the multifunction display.
If all conditions for automatic engine switch-
off (Y page 148) are not fulfilled, the ç
ECO symbol is shown on the multifunction
display. If this is the case, the ECO start/stop
function is not available.
If indicator lamp ;is off, the ECO start/stop
function has been switched off manually or as
the result of a malfunction. The engine will then not be switched off automatically when the vehi-
cle stops.
The ECO start/stop function is switched off if:
R you switch to drive program S+orS
(Y page 152)
R you permanently activate manual gearshifting
(Y page 158)
If you have permanently activated manual gear- shifting and then press ECO button :, the ECO
start/stop function is switched on.
All other models X
To switch off: press ECO button :.
Indicator lamp ;and the èorç ECO
symbol on the multifunction display go out.
X To switch on: press ECO button :.
Indicator lamp ;lights up. If all conditions
for automatic engine switch-off (Y page 148)
are fulfilled, the èECO symbol is shown
on the multifunction display.
If all conditions for automatic engine switch-
off (Y page 148) are not fulfilled, the ç
ECO symbol is shown on the multifunction
display. If this is the case, the ECO start/stop
function is not available.
If indicator lamp ;is off, the ECO start/stop
function has been switched off manually or as
the result of a malfunction. The engine will then
not be switched off automatically when the vehi- cle stops.
Selecting drive program S+switches off the
ECO start/stop function. If you press ECO but-
ton :, the ECO start/stop function is switched
on. Driving
149Driving and pa rking Z
Page 172 of 389
X
If this is the case, park the vehicle only on
level ground and secure it to prevent it from
rolling away.
X Shift the automatic transmission to position
P.
It may not be possible to release an applied
parking brake if the on-board voltage is low or if there is a malfunction in the system. Contact a
qualified specialist workshop.
The electric parking brake carries out a function
check at regular intervals when the engine is
switched off. Noises that occur are normal.
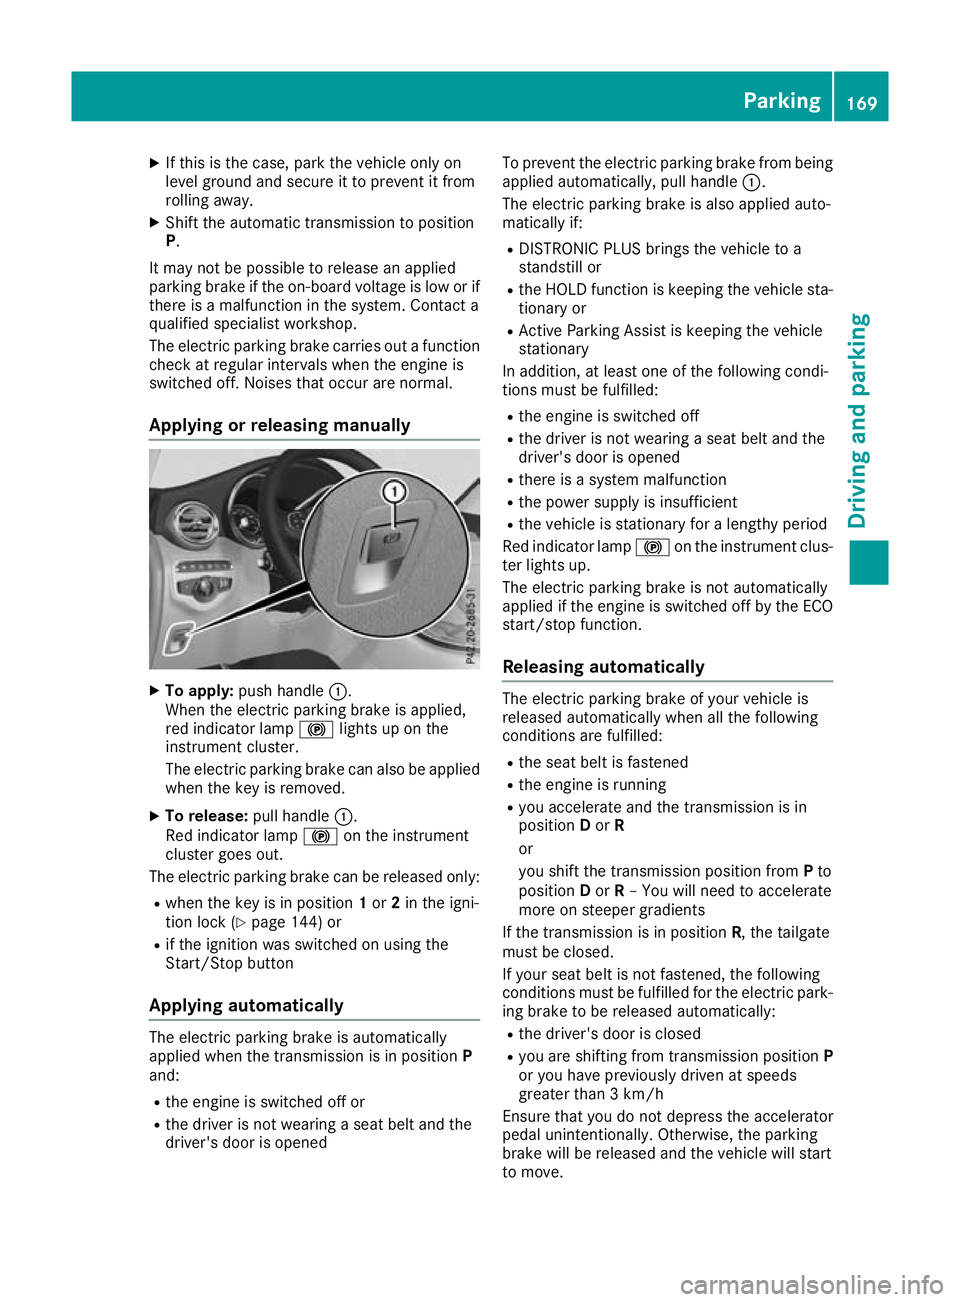
Applying or releasing manually X
To apply: push handle :.
When the electric parking brake is applied,
red indicator lamp !lights up on the
instrument cluster.
The electric parking brake can also be applied when the key is removed.
X To release: pull handle:.
Red indicator lamp !on the instrument
cluster goes out.
The electric parking brake can be released only:
R when the key is in position 1or 2in the igni-
tion lock (Y page 144) or
R if the ignition was switched on using the
Start/Stop button
Applying automatically The electric parking brake is automatically
applied when the transmission is in position P
and:
R the engine is switched off or
R the driver is not wearing a seat belt and the
driver's door is opened To prevent the electric parking brake from being
applied automatically, pull handle :.
The electric parking brake is also applied auto-
matically if:
R DISTRONIC PLUS brings the vehicle to a
standstill or
R the HOLD function is keeping the vehicle sta-
tionary or
R Active Parking Assist is keeping the vehicle
stationary
In addition, at least one of the following condi-
tions must be fulfilled:
R the engine is switched off
R the driver is not wearing a seat belt and the
driver's door is opened
R there is a system malfunction
R the power supply is insufficient
R the vehicle is stationary for a lengthy period
Red indicator lamp !on the instrument clus-
ter lights up.
The electric parking brake is not automatically
applied if the engine is switched off by the ECO
start/stop function.
Releasing automatically The electric parking brake of your vehicle is
released automatically when all the following
conditions are fulfilled:
R the seat belt is fastened
R the engine is running
R you accelerate and the transmission is in
position Dor R
or
you shift the transmission position from Pto
position Dor R– You will need to accelerate
more on steeper gradients
If the transmission is in position R, the tailgate
must be closed.
If your seat belt is not fastened, the following
conditions must be fulfilled for the electric park- ing brake to be released automatically:
R the driver's door is closed
R you are shifting from transmission position P
or you have previously driven at speeds
greater than 3 km/h
Ensure that you do not depress the accelerator
pedal unintentionally. Otherwise, the parking
brake will be released and the vehicle will start
to move. Parking
169Driving and parking Z
Page 182 of 389
In particular, the detection of obstacles can be
impaired in the case of:
R dirt on the sensors or obscured sensors
R snow or heavy rain
R interference by other radar sources
R strong radar reflections, e.g. in multi-storey
car parks
If DISTRONIC PLUS no longer detects a vehicle
in front, it may unexpectedly accelerate to the
speed stored.
This speed can:
R be too high for a filter lane or a slip road
R be so high in the right lane that you pass vehi-
cles driving on the left (in countries where
they drive on the right)
R be so high in the left lane that you pass vehi-
cles driving on the right (in countries where
they drive on the left)
If there is a change of drivers, advise the new
driver of the speed stored.
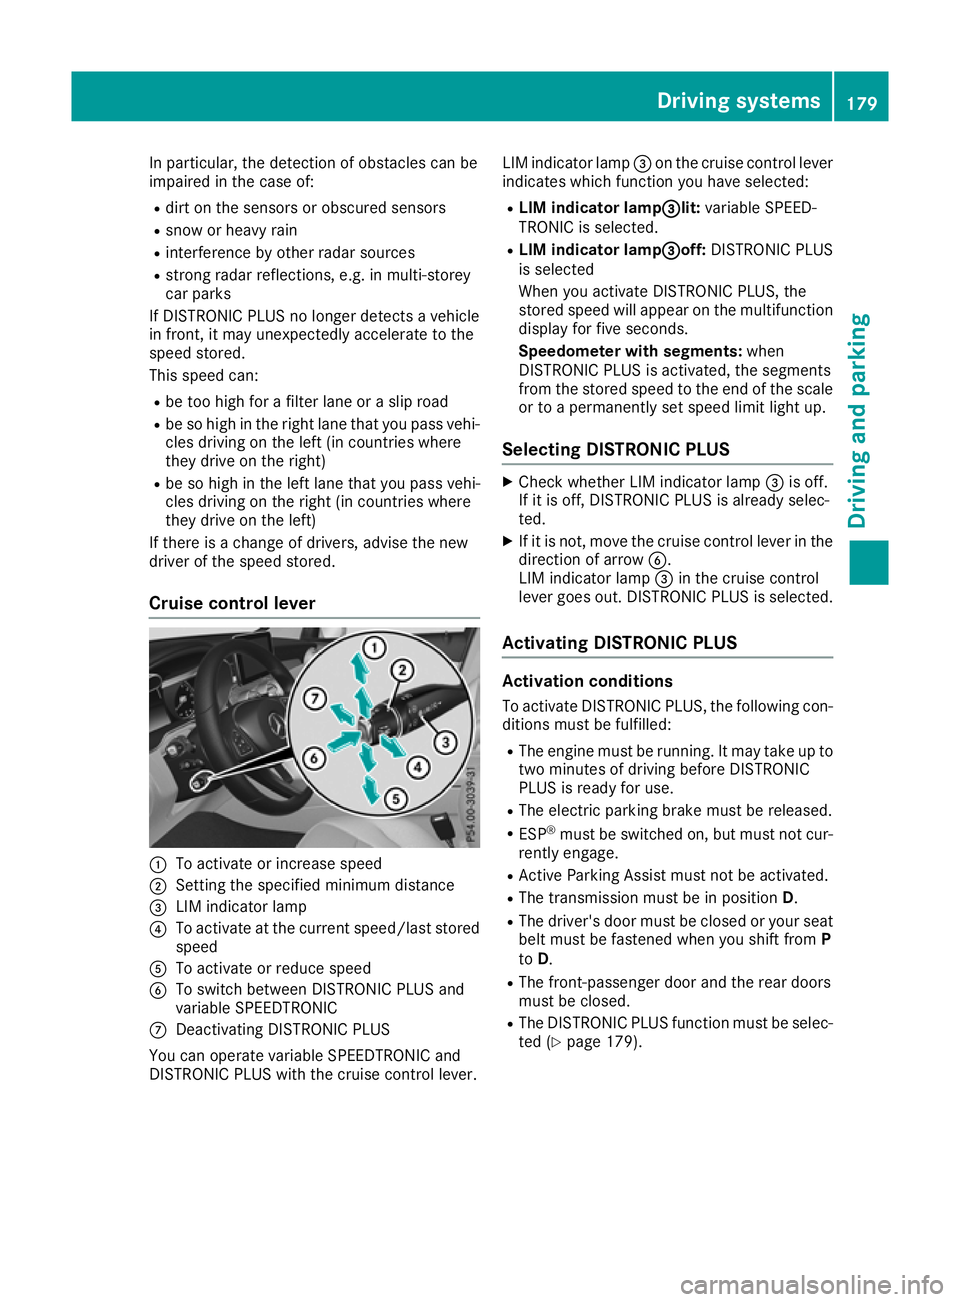
Cruise control lever :
To activate or increase speed
; Setting the specified minimum distance
= LIM indicator lamp
? To activate at the current speed/last stored
speed
A To activate or reduce speed
B To switch between DISTRONIC PLUS and
variable SPEEDTRONIC
C Deactivating DISTRONIC PLUS
You can operate variable SPEEDTRONIC and
DISTRONIC PLUS with the cruise control lever. LIM indicator lamp
=on the cruise control lever
indicates which function you have selected:
R LIM indicator lamp= =lit:variable SPEED-
TRONIC is selected.
R LIM indicator lamp = =off:DISTRONIC PLUS
is selected
When you activate DISTRONIC PLUS, the
stored speed will appear on the multifunction display for five seconds.
Speedometer with segments: when
DISTRONIC PLUS is activated, the segments
from the stored speed to the end of the scale or to a permanently set speed limit light up.
Selecting DISTRONIC PLUS X
Check whether LIM indicator lamp =is off.
If it is off, DISTRONIC PLUS is already selec-
ted.
X If it is not, move the cruise control lever in the
direction of arrow B.
LIM indicator lamp =in the cruise control
lever goes out. DISTRONIC PLUS is selected.
Activating DISTRONIC PLUS Activation conditions
To activate DISTRONIC PLUS, the following con-
ditions must be fulfilled:
R The engine must be running. It may take up to
two minutes of driving before DISTRONIC
PLUS is ready for use.
R The electric parking brake must be released.
R ESP ®
must be switched on, but must not cur-
rently engage.
R Active Parking Assist must not be activated.
R The transmission must be in position D.
R The driver's door must be closed or your seat
belt must be fastened when you shift from P
to D.
R The front-passenger door and the rear doors
must be closed.
R The DISTRONIC PLUS function must be selec-
ted (Y page 179). Driving systems
179Driving and parking Z