2016 MERCEDES-BENZ GLC COUPE belt
[x] Cancel search: beltPage 284 of 389
Warning/
indicator
lamp
N N
Signal type
Possible causes/consequences and M
MSolutions ü
N
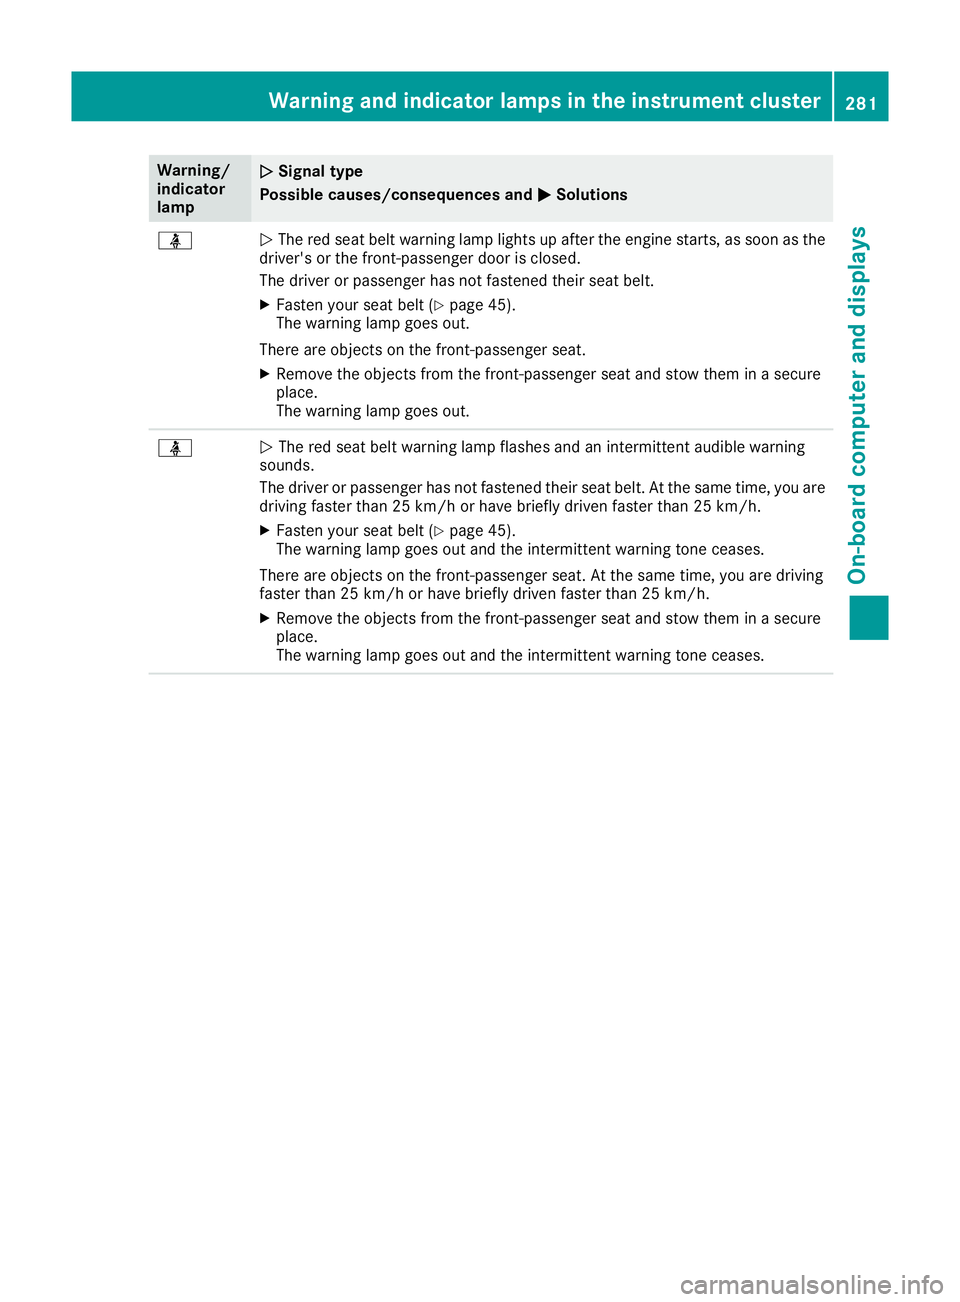
The red seat belt warning lamp lights up after the engine starts, as soon as the
driver's or the front-passenger door is closed.
The driver or passenger has not fastened their seat belt.
X Fasten your seat belt (Y page 45).
The warning lamp goes out.
There are objects on the front-passenger seat.
X Remove the objects from the front-passenger seat and stow them in a secure
place.
The warning lamp goes out. ü
N
The red seat belt warning lamp flashes and an intermittent audible warning
sounds.
The driver or passenger has not fastened their seat belt. At the same time, you are
driving faster than 25 km/h or have briefly driven faster than 25 km/h.
X Fasten your seat belt (Y page 45).
The warning lamp goes out and the intermittent warning tone ceases.
There are objects on the front-passenger seat. At the same time, you are driving
faster than 25 km/h or have briefly driven faster than 25 km/h.
X Remove the objects from the front-passenger seat and stow them in a secure
place.
The warning lamp goes out and the intermittent warning tone ceases. Warning and indicator lamps in the instrument cluster
281On-board computer and displays Z
Page 289 of 389
Warning/
indicator
lamp
N N
Signal type
Possible causes/consequences and M
M Solutions !
N
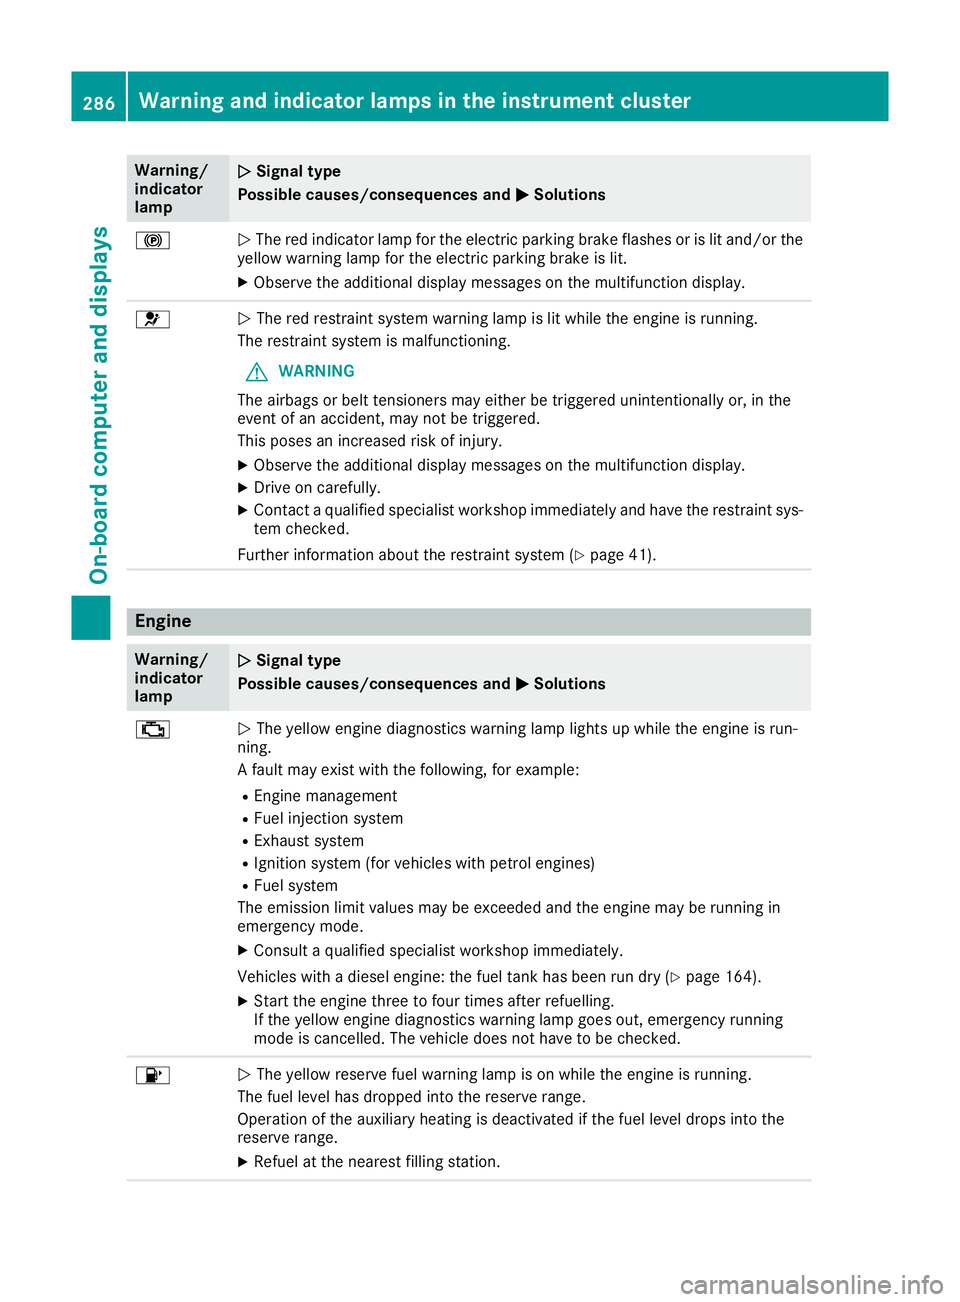
The red indicator lamp for the electric parking brake flashes or is lit and/or the
yellow warning lamp for the electric parking brake is lit.
X Observe the additional display messages on the multifunction display. 6
N
The red restraint system warning lamp is lit while the engine is running.
The restraint system is malfunctioning.
G WARNING
The airbags or belt tensioners may either be triggered unintentionally or, in the
event of an accident, may not be triggered.
This poses an increased risk of injury.
X Observe the additional display messages on the multifunction display.
X Drive on carefully.
X Contact a qualified specialist workshop immediately and have the restraint sys-
tem checked.
Further information about the restraint system (Y page 41).Engine
Warning/
indicator
lamp
N N
Signal type
Possible causes/consequences and M
M Solutions ;
N
The yellow engine diagnostics warning lamp lights up while the engine is run-
ning.
A fault may exist with the following, for example:
R Engine management
R Fuel injection system
R Exhaust system
R Ignition system (for vehicles with petrol engines)
R Fuel system
The emission limit values may be exceeded and the engine may be running in
emergency mode.
X Consult a qualified specialist workshop immediately.
Vehicles with a diesel engine: the fuel tank has been run dry (Y page 164).
X Start the engine three to four times after refuelling.
If the yellow engine diagnostics warning lamp goes out, emergency running
mode is cancelled. The vehicle does not have to be checked. 8
N
The yellow reserve fuel warning lamp is on while the engine is running.
The fuel level has dropped into the reserve range.
Operation of the auxiliary heating is deactivated if the fuel level drops into the
reserve range.
X Refuel at the nearest filling station. 286
Warning and indicator lamps in the instrument clusterOn-board computer and displays
Page 311 of 389
Vehicle occupants could be struck in the
event of sudden braking or an accident, for
instance, if you:
R transport other heavy or sharp-edged
objects in the skibag
R do not secure the skibag with the lashing
straps
There is a risk of accident and injury.
Store only skis in the skibag. Always secure
the skibag with the lashing straps so that it
cannot move around.
A maximum of four pairs of skis or two snow-
boards can be transported in the ski/snow-
board bag.
Securing the ski/snowboard bag in the
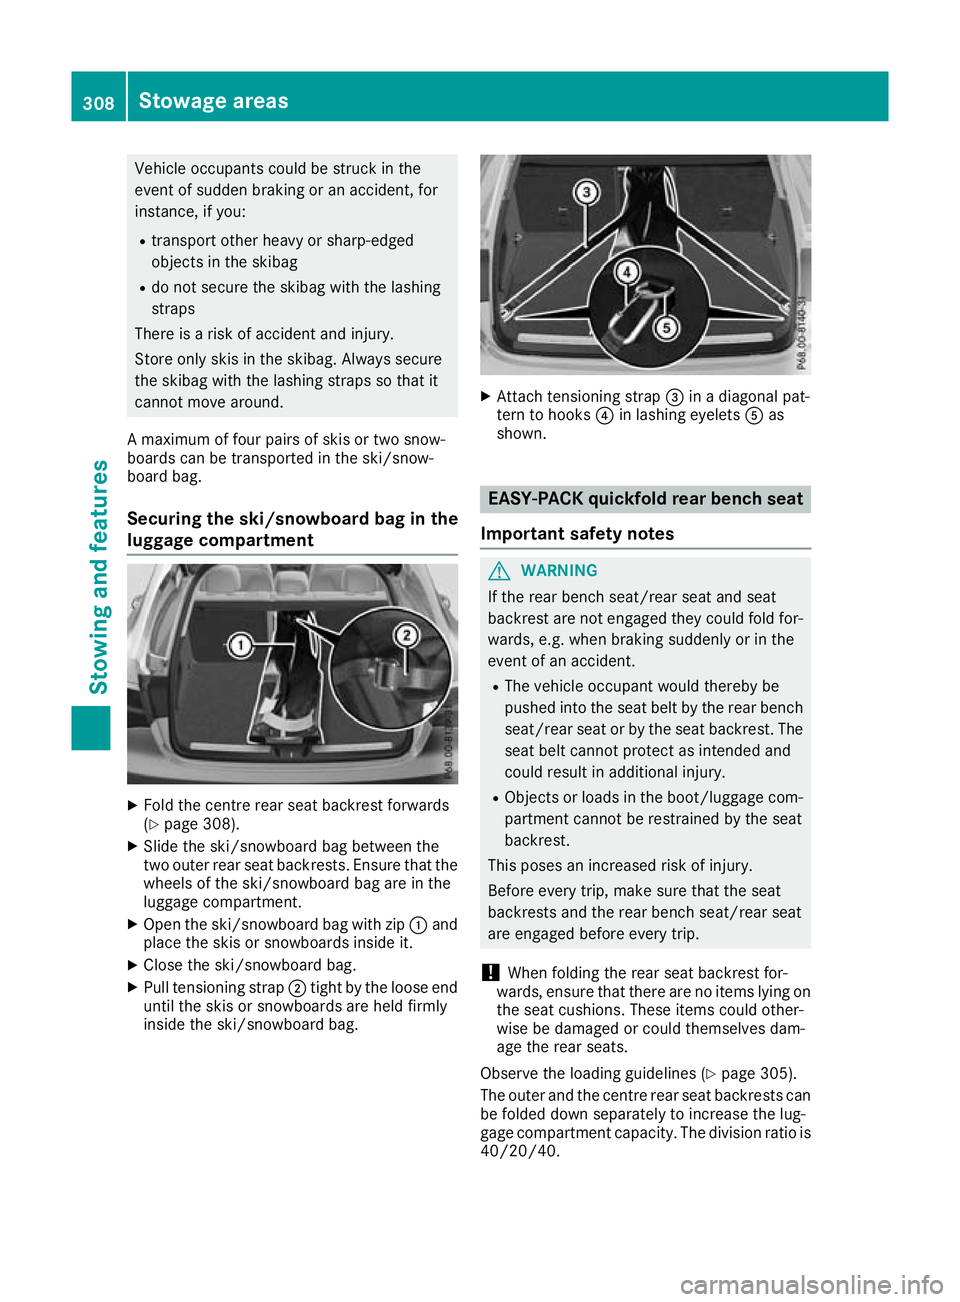
luggage compartment X
Fold the centre rear seat backrest forwards
(Y page 308).
X Slide the ski/snowboard bag between the
two outer rear seat backrests. Ensure that the
wheels of the ski/snowboard bag are in the
luggage compartment.
X Open the ski/snowboard bag with zip :and
place the skis or snowboards inside it.
X Close the ski/snowboard bag.
X Pull tensioning strap ;tight by the loose end
until the skis or snowboards are held firmly
inside the ski/snowboard bag. X
Attach tensioning strap =in a diagonal pat-
tern to hooks ?in lashing eyelets Aas
shown. EASY-PACK quickfold rear bench seat
Important safety notes G
WARNING
If the rear bench seat/rear seat and seat
backrest are not engaged they could fold for- wards, e.g. when braking suddenly or in the
event of an accident.
R The vehicle occupant would thereby be
pushed into the seat belt by the rear bench
seat/rear seat or by the seat backrest. The
seat belt cannot protect as intended and
could result in additional injury.
R Objects or loads in the boot/luggage com-
partment cannot be restrained by the seat
backrest.
This poses an increased risk of injury.
Before every trip, make sure that the seat
backrests and the rear bench seat/rear seat
are engaged before every trip.
! When folding the rear seat backrest for-
wards, ensure that there are no items lying on the seat cushions. These items could other-
wise be damaged or could themselves dam-
age the rear seats.
Observe the loading guidelines (Y page 305).
The outer and the centre rear seat backrests can be folded down separately to increase the lug-
gage compartment capacity. The division ratio is
40/20/40. 308
Stowage areasStowing and features
Page 312 of 389
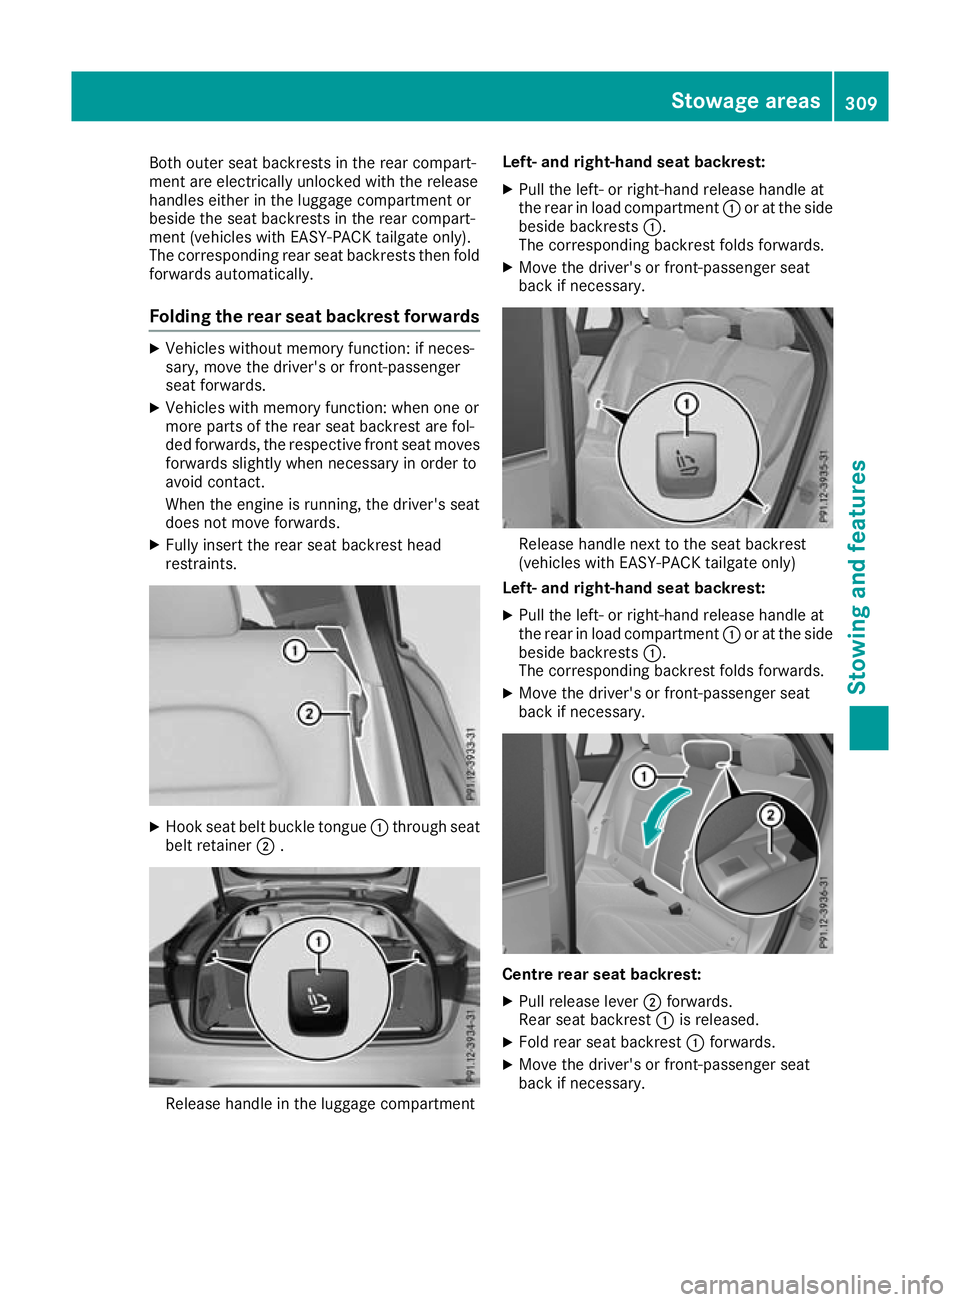
Both outer seat backrests in the rear compart-
ment are electrically unlocked with the release
handles either in the luggage compartment or
beside the seat backrests in the rear compart-
ment (vehicles with EASY-PACK tailgate only).
The corresponding rear seat backrests then fold forwards automatically.
Folding the rear seat backrest forwards X
Vehicles without memory function: if neces-
sary, move the driver's or front-passenger
seat forwards.
X Vehicles with memory function: when one or
more parts of the rear seat backrest are fol-
ded forwards, the respective front seat moves
forwards slightly when necessary in order to
avoid contact.
When the engine is running, the driver's seat
does not move forwards.
X Fully insert the rear seat backrest head
restraints. X
Hook seat belt buckle tongue :through seat
belt retainer ;. Release handle in the luggage compartment Left- and right-hand seat backrest:
X Pull the left- or right-hand release handle at
the rear in load compartment :or at the side
beside backrests :.
The corresponding backrest folds forwards.
X Move the driver's or front-passenger seat
back if necessary. Release handle next to the seat backrest
(vehicles with EASY-PACK tailgate only)
Left- and right-hand seat backrest:
X Pull the left- or right-hand release handle at
the rear in load compartment :or at the side
beside backrests :.
The corresponding backrest folds forwards.
X Move the driver's or front-passenger seat
back if necessary. Centre rear seat backrest:
X Pull release lever ;forwards.
Rear seat backrest :is released.
X Fold rear seat backrest :forwards.
X Move the driver's or front-passenger seat
back if necessary. Stowage areas
309Stowing and features Z
Page 313 of 389
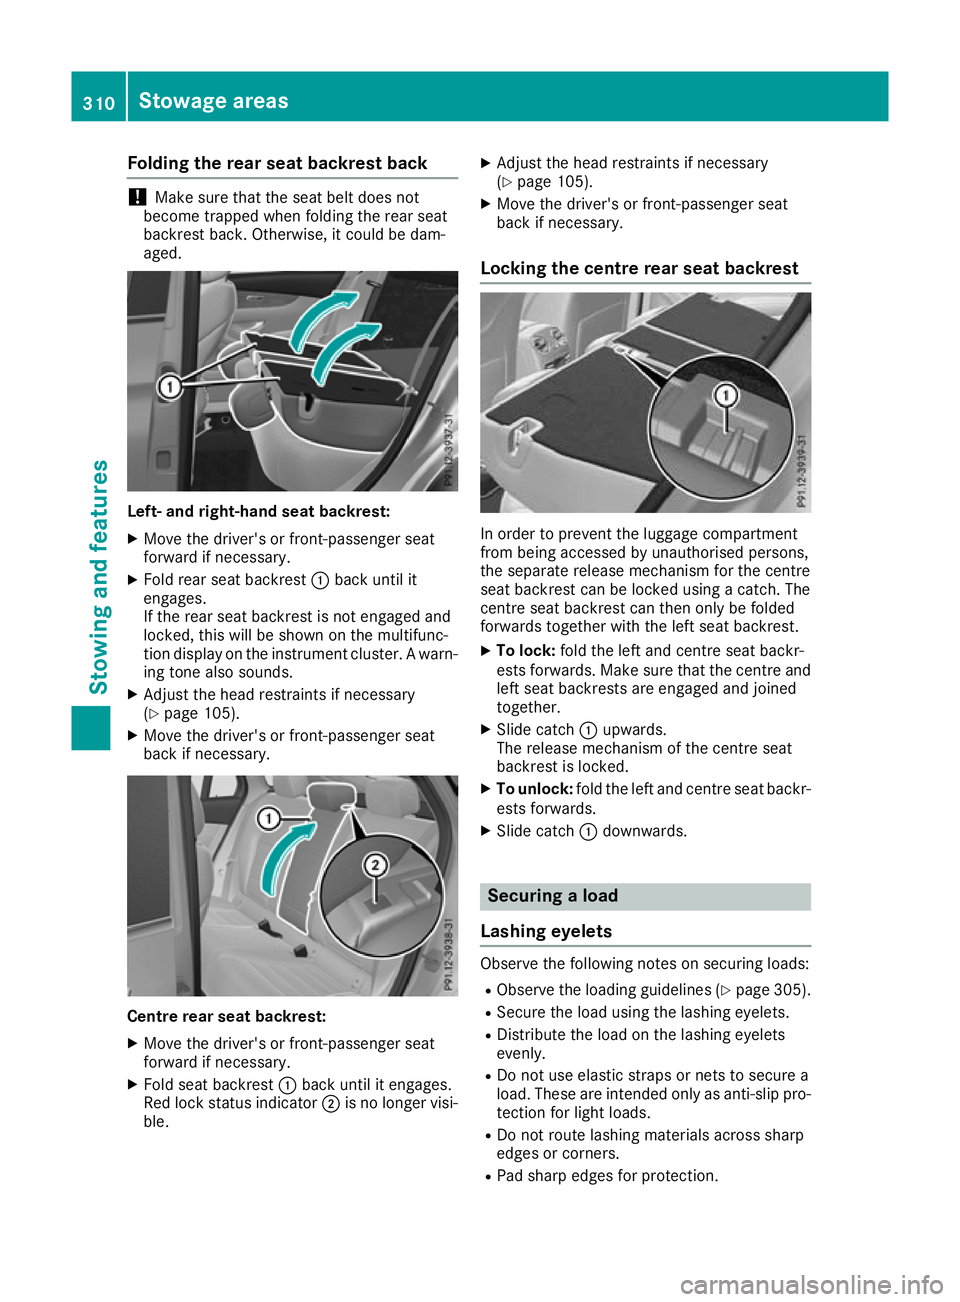
Folding the rear seat backrest back
!
Make sure that the seat belt does not
become trapped when folding the rear seat
backrest back. Otherwise, it could be dam-
aged. Left- and right-hand seat backrest:
X Move the driver's or front-passenger seat
forward if necessary.
X Fold rear seat backrest :back until it
engages.
If the rear seat backrest is not engaged and
locked, this will be shown on the multifunc-
tion display on the instrument cluster. A warn- ing tone also sounds.
X Adjust the head restraints if necessary
(Y page 105).
X Move the driver's or front-passenger seat
back if necessary. Centre rear seat backrest:
X Move the driver's or front-passenger seat
forward if necessary.
X Fold seat backrest :back until it engages.
Red lock status indicator ;is no longer visi-
ble. X
Adjust the head restraints if necessary
(Y page 105).
X Move the driver's or front-passenger seat
back if necessary.
Locking the centre rear seat backrest In order to prevent the luggage compartment
from being accessed by unauthorised persons,
the separate release mechanism for the centre
seat backrest can be locked using a catch. The
centre seat backrest can then only be folded
forwards together with the left seat backrest.
X To lock: fold the left and centre seat backr-
ests forwards. Make sure that the centre and left seat backrests are engaged and joined
together.
X Slide catch :upwards.
The release mechanism of the centre seat
backrest is locked.
X To unlock: fold the left and centre seat backr-
ests forwards.
X Slide catch :downwards. Securing a load
Lashing eyelets Observe the following notes on securing loads:
R Observe the loading guidelines (Y page 305).
R Secure the load using the lashing eyelets.
R Distribute the load on the lashing eyelets
evenly.
R Do not use elastic straps or nets to secure a
load. These are intended only as anti-slip pro-
tection for light loads.
R Do not route lashing materials across sharp
edges or corners.
R Pad sharp edges for protection. 310
Stowage areasStowing and featu
res
Page 340 of 389
X
Wipe the wood trim and trim elements with a
damp, lint-free cloth, e.g. a microfibre cloth.
X Trim elements with piano black finish:
wipe with a soft, damp cotton cloth. Use clean
water.
X Heavy soiling: use care and cleaning prod-
ucts recommended and approved by
Mercedes-Benz.
Cleaning the seat covers General notes
! Do not use a microfibre cloth to clean covers
made out of real leather, artificial leather or
DINAMICA. If used frequently, this can dam-
age the cover.
Note that regular care is essential to make sure
that the appearance and comfort of the covers
are retained over time.
Genuine leather seat covers
! To retain the natural appearance of the
leather, observe the following cleaning
instructions:
R Clean genuine leather covers carefully with
a damp cloth and then wipe the covers
down with a dry cloth.
R Make sure that the leather does not
become soaked. It may otherwise become
rough and cracked.
R Only use leather care agents that have
been tested and approved by Mercedes-
Benz. You can obtain these from a qualified
specialist workshop.
Leather is a natural product.
It has natural surface properties, e.g.:
R unevenness in structure
R marks caused by growth and injury
R subtle colour differences
These are characteristics of leather and not
material faults.
Seat covers from other materials
! Observe the following when cleaning:
R clean artificial leather covers with a cloth
moistened with a solution containing 1%
detergent (e.g. washing-up liquid).
R clean cloth covers with a microfibre cloth
moistened with a solution containing 1%
detergent (e.g. washing-up liquid). Rub carefully, and always wipe entire seat sec-
tions to avoid leaving visible lines. Leave
the seat to dry afterwards. Cleaning results
depend on the type of dirt and how long it
has been there.
R Clean DINAMICA covers with a damp cloth.
Make sure that you wipe entire seat sec-
tions to avoid leaving visible lines.
Cleaning the seat belts G
WARNING
Seat belts may be severely weakened if
bleached or coloured. This may lead to the
seat belts, for example, tearing or failing in an accident. There is an increased risk of injury,
possibly even fatal.
Never bleach or colour seat belts.
! Do not clean the seat belts using chemical
cleaning agents. Do not dry the seat belts at
temperatures above 80 † or in direct sun-
light.
X Use clean, lukewarm water and soap solution.
Cleaning the roof lining and carpets X
Roof lining: if it is very dirty, use a soft brush
or dry shampoo.
X Carpets: use the carpet and textile cleaning
agents recommended and approved by
Mercedes-Benz. Care
337Maintenance and care Z
Page 352 of 389
R
It is particularly important to observe the described order when connecting and disconnecting
the jump leads.
R Never connect or disconnect the battery terminals while the engine is running. G
WARNING
A discharged battery can freeze at temperatures below freezing point. When jump-starting the
vehicle or charging the battery, gases can escape from the battery. There is a risk of an explosion.
Allow the frozen battery to thaw out before charging it or jump-starting.
If the warning and indicator lamps do not light up on the instrument cluster when temperatures are low, it is probably because the discharged battery has frozen. In this case, you may neither jump-
start the vehicle nor charge the battery. The service life of a battery that has been thawed may be
reduced. The starting characteristics may be impaired, especially at low temperatures. Have the
thawed battery checked at a qualified specialist workshop.
All vehicles:
! Vehicles with a petrol engine:
avoid repeated and lengthy starting attempts. Otherwise, the
non-combusted fuel may damage the catalytic converter.
Do not use a rapid charging device to start the vehicle. If your vehicle's battery is discharged, the
engine can be jump-started from another vehicle or from a second battery using jump leads.
Observe the following points:
R The battery is not accessible in all vehicles. If the other vehicle's battery is not accessible, jump-
start the vehicle using a second battery or a jump-starting device.
R Vehicles with a petrol engine: jump-start the vehicle only when the engine and exhaust system
are cold.
R All vehicles except vehicles with a lithium-ion battery: do not start the engine if the battery
is frozen. Let the battery thaw first.
R Jump-starting may be performed only using batteries with a nominal voltage of 12 V.
R Use only jump leads that have a sufficient cross-section and insulated terminal clamps.
R If the battery is fully discharged, leave the battery that is being used to jump-start connected for
a few minutes before attempting to start. This charges the empty battery a little.
R Make sure that the two vehicles do not touch.
Make sure that:
R The jump leads are not damaged.
R Non-insulated parts of the terminal clamps do not come into contact with other metal parts while
the jump leads are connected to the battery.
R The jump leads cannot come into contact with parts that can move when the engine is running,
such as the V-belt pulley or the fan.
X Secure the vehicle by applying the electric parking brake.
X Shift the transmission to position P.
X Make sure that the ignition is switched off . All indicator lamps on the instrument cluster must be
off. When using the key, turn the key to position 0in the ignition lock and remove it (Y page 144).
X Switch off all electrical consumers, e.g. rear window heating, lighting etc.
X Open the bonnet. Jump-starting
349Breakdown assistance Z