2016 MERCEDES-BENZ GLC COUPE door lock
[x] Cancel search: door lockPage 99 of 389
only opens again automatically after the corre-
sponding switch is released. The automatic
reversing feature is only an aid and is no substi-
tute for your attention when closing a side win-
dow. G
WARNING
The reversing function does not react:
R to soft, light and thin objects, e.g. small fin-
gers
R while resetting
This means that the reversing feature cannot
prevent someone being trapped in these sit-
uations. There is a risk of injury.
When closing, make sure that no parts of the
body are in the closing area. If someone
becomes trapped, press the switch to open
the side window again. Opening and closing the side win-
dows
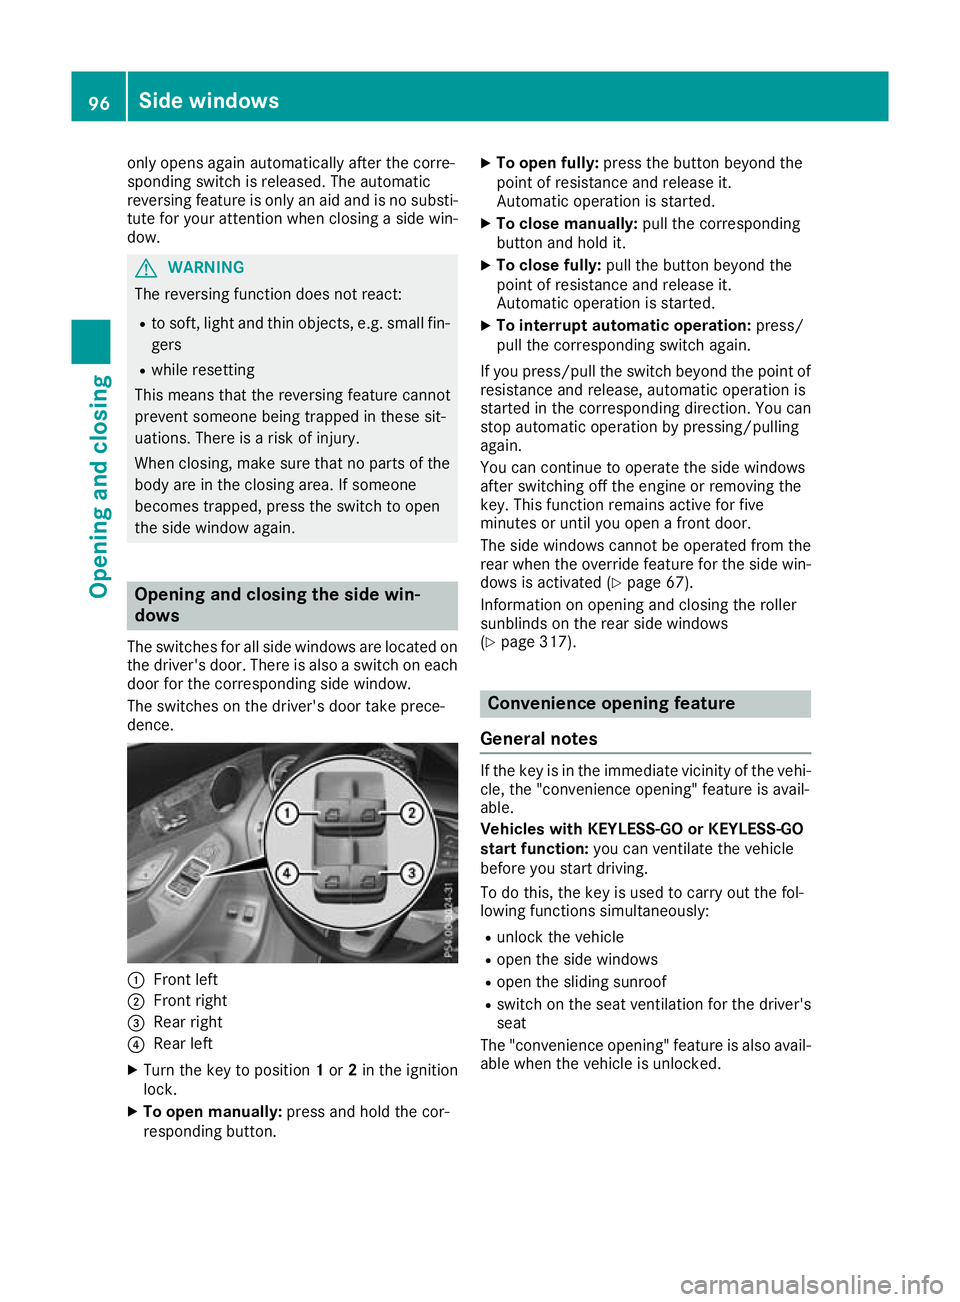
The switches for all side windows are located on
the driver's door. There is also a switch on each door for the corresponding side window.
The switches on the driver's door take prece-
dence. :
Front left
; Front right
= Rear right
? Rear left
X Turn the key to position 1or 2in the ignition
lock.
X To open manually: press and hold the cor-
responding button. X
To open fully: press the button beyond the
point of resistance and release it.
Automatic operation is started.
X To close manually: pull the corresponding
button and hold it.
X To close fully: pull the button beyond the
point of resistance and release it.
Automatic operation is started.
X To interrupt automatic operation: press/
pull the corresponding switch again.
If you press/pull the switch beyond the point of resistance and release, automatic operation is
started in the corresponding direction. You can
stop automatic operation by pressing/pulling
again.
You can continue to operate the side windows
after switching off the engine or removing the
key. This function remains active for five
minutes or until you open a front door.
The side windows cannot be operated from the
rear when the override feature for the side win-
dows is activated (Y page 67).
Information on opening and closing the roller
sunblinds on the rear side windows
(Y page 317). Convenience opening feature
General notes If the key is in the immediate vicinity of the vehi-
cle, the "convenience opening" feature is avail-
able.
Vehicles with KEYLESS-GO or KEYLESS-GO
start function: you can ventilate the vehicle
before you start driving.
To do this, the key is used to carry out the fol-
lowing functions simultaneously:
R unlock the vehicle
R open the side windows
R open the sliding sunroof
R switch on the seat ventilation for the driver's
seat
The "convenience opening" feature is also avail-
able when the vehicle is unlocked. 96
Side windowsOpening and closing
Page 100 of 389
Convenience opening feature
X
Press and hold the %button on the key
until the sliding sunroof is in the desired posi- tion.
X To interrupt convenience opening: release
the % button. Convenience closing feature
Important safety notes G
WARNING
When the convenience closing feature is oper- ating, parts of the body could become trapped
in the closing area of the side window and the
sliding sunroof. There is a risk of injury.
Observe the complete closing procedure
when the convenience closing feature is oper-
ating. When closing make sure that no parts of the body are in the closing area.
Vehicles with KEYLESS-GO or KEYLESS-GO
start function: if the key is in the immediate
vicinity of the vehicle, the "convenience closing" feature is available.
When you lock the vehicle, you can simultane-
ously:
R close the side windows
R close the sliding sunroof
Notes on the automatic reversing function for:
R the side windows (Y page 95)
R the sliding sunroof (Y page 99)
Using the key X
Press and hold the &button until the side
windows and the sliding sunroof are fully
closed.
X Make sure that all the side windows and the
sliding sunroof are closed.
X To interrupt convenience closing: release
the & button.
Using KEYLESS-GO The driver's door and the door at which the han-
dle is used must both be closed. The key must be outside the vehicle. The distance between the
key and the corresponding door handle must not
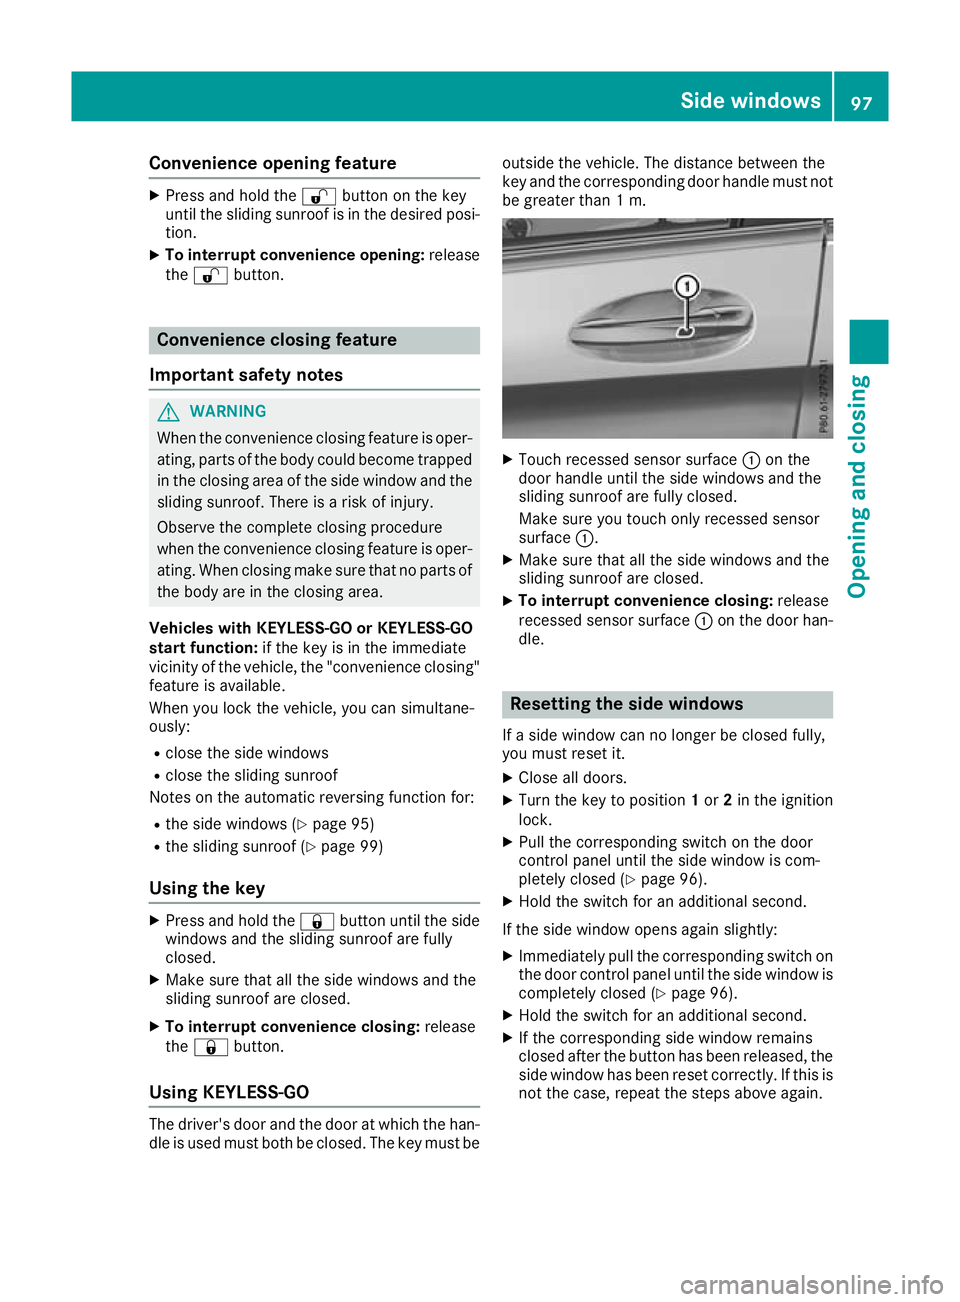
be greater than 1 m. X
Touch recessed sensor surface :on the
door handle until the side windows and the
sliding sunroof are fully closed.
Make sure you touch only recessed sensor
surface :.
X Make sure that all the side windows and the
sliding sunroof are closed.
X To interrupt convenience closing: release
recessed sensor surface :on the door han-
dle. Resetting the side windows
If a side window can no longer be closed fully,
you must reset it.
X Close all doors.
X Turn the key to position 1or 2in the ignition
lock.
X Pull the corresponding switch on the door
control panel until the side window is com-
pletely closed (Y page 96).
X Hold the switch for an additional second.
If the side window opens again slightly: X Immediately pull the corresponding switch on
the door control panel until the side window is completely closed (Y page 96).
X Hold the switch for an additional second.
X If the corresponding side window remains
closed after the button has been released, the
side window has been reset correctly. If this is
not the case, repeat the steps above again. Side windows
97Opening and closing Z
Page 102 of 389
Sliding sunroof reversing feature
The sliding sunroof is equipped with an auto-
matic reversing function. If an solid object
blocks or restricts the sliding sunroof during the
closing process, the sliding sunroof opens again automatically. The automatic reversing function
is only an aid and is not a substitute for your
attention when closing the sliding roof. G
WARNING
The reversing feature does not react:
R to soft, light and thin objects, e.g. small fin-
gers
R over the last 4 mm of the closing movement
R during resetting
R when closing the sliding sunroof again man-
ually immediately after automatic reversing
This means that the reversing feature cannot
prevent someone being trapped in these sit-
uations. There is a risk of injury.
When closing make sure that no body parts
are in the closing area.
If someone is trapped:
R release the switch immediately or
R press the switch in any direction during the
automatic closing process
The closing process is stopped. Operating the sliding sunroof
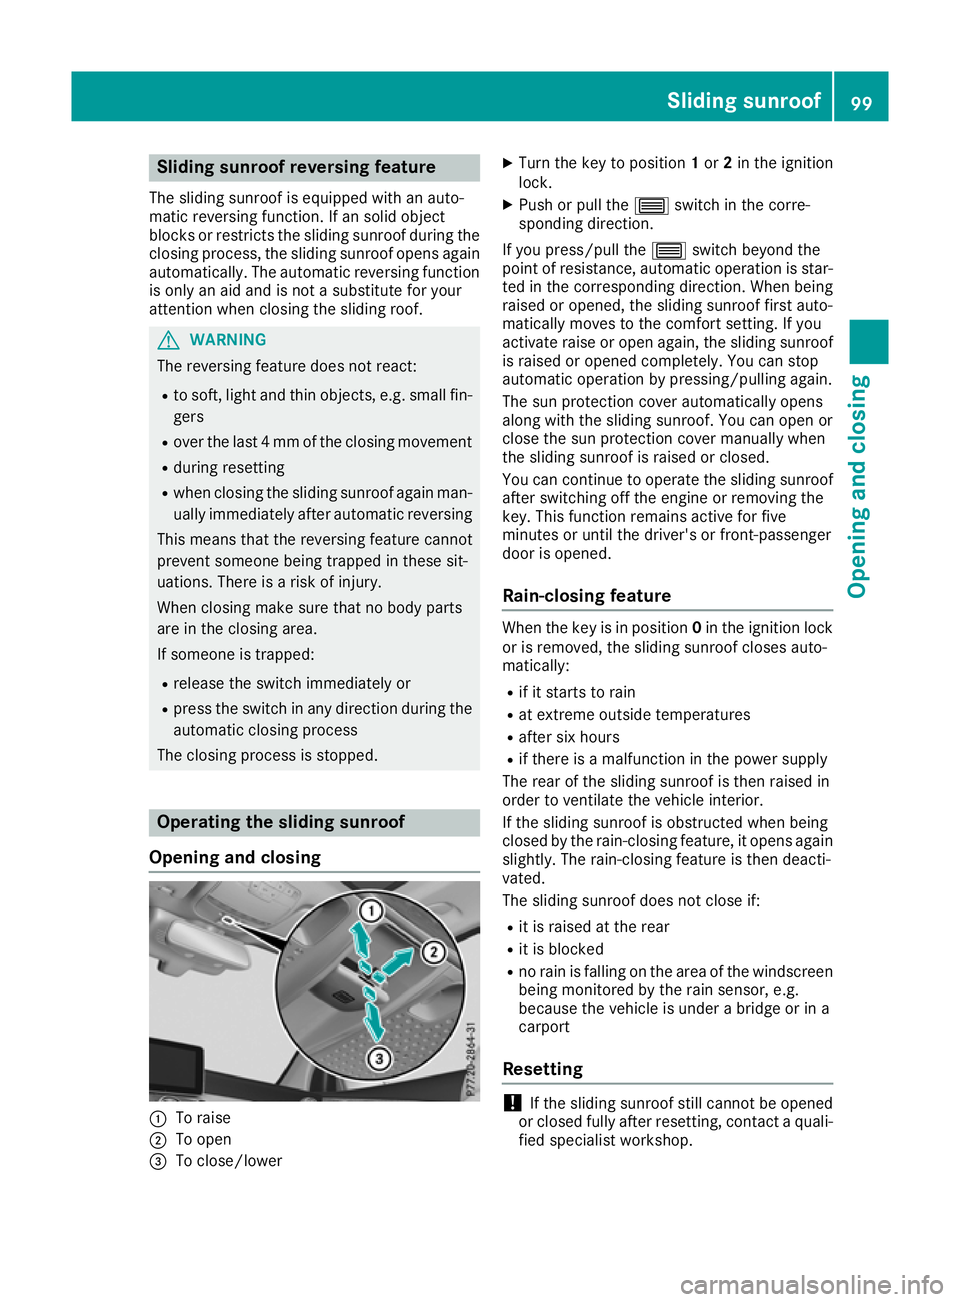
Opening and closing :
To raise
; To open
= To close/lower X
Turn the key to position 1or 2in the ignition
lock.
X Push or pull the 3switch in the corre-
sponding direction.
If you press/pull the 3switch beyond the
point of resistance, automatic operation is star- ted in the corresponding direction. When being
raised or opened, the sliding sunroof first auto-
matically moves to the comfort setting. If you
activate raise or open again, the sliding sunroof
is raised or opened completely. You can stop
automatic operation by pressing/pulling again.
The sun protection cover automatically opens
along with the sliding sunroof. You can open or
close the sun protection cover manually when
the sliding sunroof is raised or closed.
You can continue to operate the sliding sunroof
after switching off the engine or removing the
key. This function remains active for five
minutes or until the driver's or front-passenger
door is opened.
Rain-closing feature When the key is in position
0in the ignition lock
or is removed, the sliding sunroof closes auto-
matically:
R if it starts to rain
R at extreme outside temperatures
R after six hours
R if there is a malfunction in the power supply
The rear of the sliding sunroof is then raised in
order to ventilate the vehicle interior.
If the sliding sunroof is obstructed when being
closed by the rain-closing feature, it opens again
slightly. The rain-closing feature is then deacti-
vated.
The sliding sunroof does not close if:
R it is raised at the rear
R it is blocked
R no rain is falling on the area of the windscreen
being monitored by the rain sensor, e.g.
because the vehicle is under a bridge or in a
carport
Resetting !
If the sliding sunroof still cannot be opened
or closed fully after resetting, contact a quali- fied specialist workshop. Sliding sunroof
99Opening and closing Z
Page 113 of 389
control of the vehicle. There is a risk of an
accident.
Always wait until the adjustment process is
complete before driving off.
The EASY-ENTRY/EXIT feature makes getting in
and out of your vehicle easier.
You can activate and deactivate the EASY-
ENTRY/EXIT feature using the multimedia sys-
tem (see the Digital Operating Instructions).
Position of the steering wheel when the
EASY-ENTRY/EXIT feature is active The steering wheel tilts upwards if you:
R remove the key from the ignition lock
R with KEYLESS-GO or KEYLESS-GO start
function: open the driver's door; the voltage
supply must be switched on
R with the key: open the driver's door; the key
must be in position 0or 1in the ignition lock
(Y page 144)
R open the driver's door when the ignition is
switched off
i The steering wheel tilts upwards only if the
driving position is stored after the steering
column adjustment has been adjusted
(Y page 113).
The most recent driving position of the steering
wheel is stored if:
R the ignition is switched off
R the setting is stored using the memory func-
tion (Y page 113)
i The steering wheel moves upwards only if it
has not already reached the upper steering
limiter.
Position of the steering wheel for driv-
ing The steering wheel is moved to the previously
set position if:
R the driver's door is closed and you insert the
key into the ignition lock
R you close the driver's door when the ignition
is switched on
R you press the Start/Stop button once in vehi-
cles with KEYLESS-GO or the KEYLESS-GO
start function i
The steering wheel returns to the last set
position only if the driving position is stored
after the seat or steering column has been
adjusted (Y page 113).
The most recent driving position of the steering
wheel is stored if:
R the ignition is switched off
R the setting is stored using the memory func-
tion (Y page 113)
Crash-responsive EASY-EXIT feature If the crash-responsive EASY-EXIT feature is trig-
gered in an accident, the steering column will
move upwards when the driver's door is opened
or the key is removed from the ignition lock. This
makes it easier to exit the vehicle and rescue the
occupants.
The crash-responsive EASY-EXIT feature is
operational only if the EASY-EXIT/ENTRY fea-
ture is activated in the multimedia system (see
Digital Operating Instructions). Mirrors
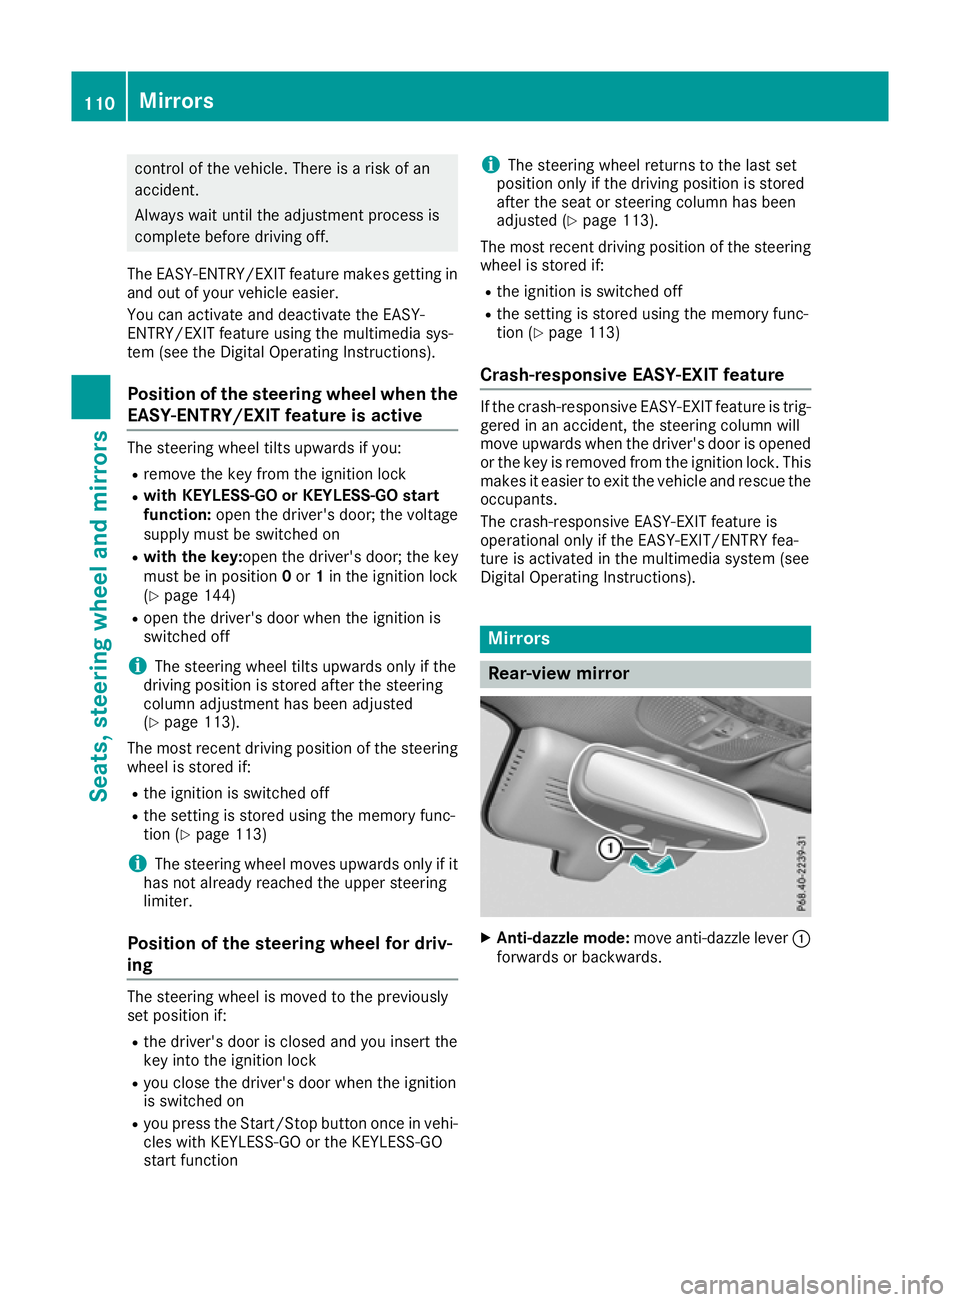
Rear-view mirror
X
Anti-dazzle mode: move anti-dazzle lever :
forwards or backwards. 110
MirrorsSeats, steering wheel and mirrors
Page 118 of 389
Exterior lighting
General notes
For reasons of safety, Mercedes-Benz recom-
mends that you drive with lights switched on
even during the daytime. In some countries,
operation of the headlamps varies due to legal
requirements and voluntary recommendations. Driving abroad
Vehicles with halogen headlamps It is not necessary to switch your headlamps to
symmetrical dipped beam when driving in coun- tries where vehicles are driven on the opposite
side of the road to the country in which the vehi-
cle is registered. Legal requirements are fulfilled
without switching the headlamps to symmetri-
cal dipped beam.
Vehicles with Intelligent Light System It is necessary to switch your headlamps to sym-
metrical dipped beam before crossing the bor-
der into countries where vehicles are driven on
the opposite side of the road. This prevents
oncoming traffic from being dazzled.
You can switch the headlamps to symmetrical or
asymmetrical dipped beam using the "dipped-
beam headlamps for driving on the right/left"
function via the on-board computer
(Y page 244). This must be switched back to
asymmetrical dipped beam upon your return.
Symmetrical lights do not illuminate as large an
area of the edge of the carriageway. In this case,
"highway mode" and "extended-range fog
lamps" are not available. Setting the exterior lighting
Setting options Exterior lighting can be set using the:
R light switch (Y page 115)
R combination switch (Y page 117)
R headlamp range control for vehicles with hal-
ogen headlamps (Y page 117)
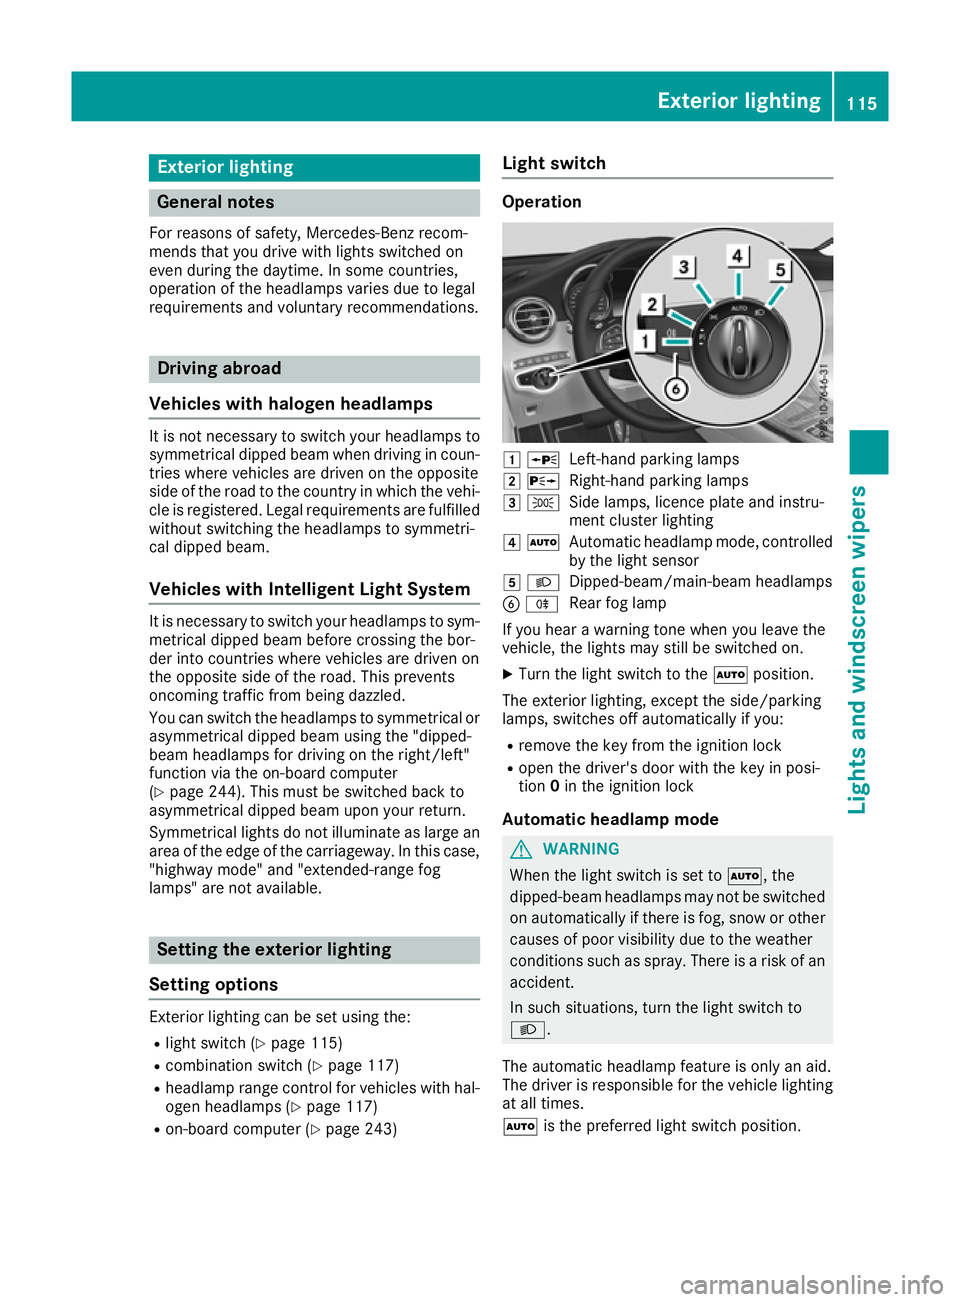
R on-board computer (Y page 243) Light switch Operation
1
W
Left-hand parking lamps
2 X
Right-hand parking lamps
3 T
Side lamps, licence plate and instru-
ment cluster lighting
4 Ã
Automatic headlamp mode, controlled
by the light sensor
5 L
Dipped-beam/main-beam headlamps
B R
Rear fog lamp
If you hear a warning tone when you leave the
vehicle, the lights may still be switched on.
X Turn the light switch to the Ãposition.
The exterior lighting, except the side/parking
lamps, switches off automatically if you: R remove the key from the ignition lock
R open the driver's door with the key in posi-
tion 0in the ignition lock
Automatic headlamp mode G
WARNING
When the light switch is set to Ã, the
dipped-beam headlamps may not be switched on automatically if there is fog, snow or othercauses of poor visibility due to the weather
conditions such as spray. There is a risk of an
accident.
In such situations, turn the light switch to
L.
The automatic headlamp feature is only an aid.
The driver is responsible for the vehicle lighting at all times.
à is the preferred light switch position. Exterior lighting
115Lights and windscreen wipers Z
Page 124 of 389
Interior lighting
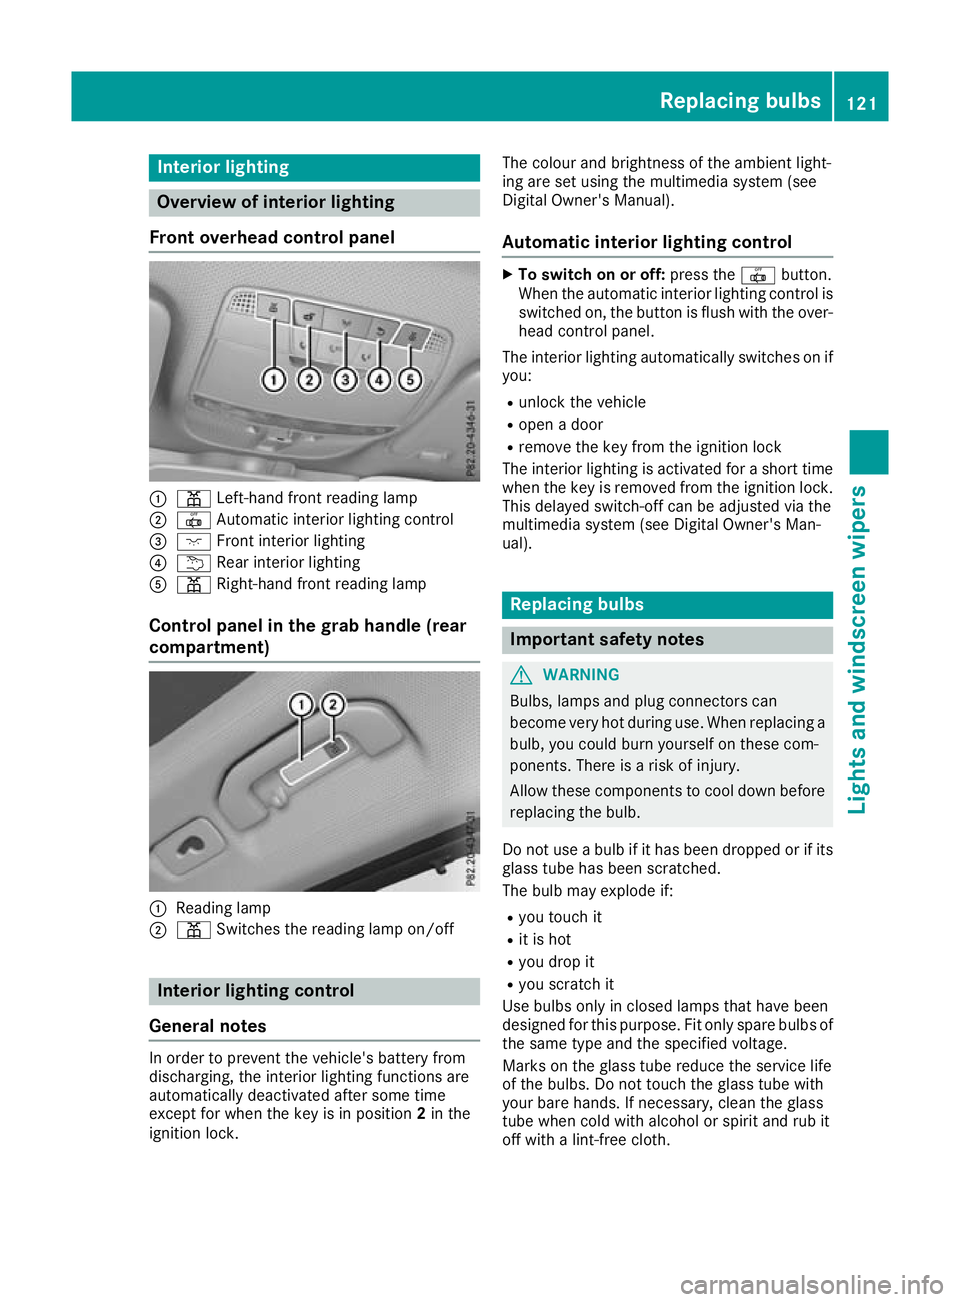
Overview of interior lighting
Front overhead control panel :
p Left-hand front reading lamp
; | Automatic interior lighting control
= c Front interior lighting
? u Rear interior lighting
A p Right-hand front reading lamp
Control panel in the grab handle (rear
compartment) :
Reading lamp
; p Switches the reading lamp on/off Interior lighting control
General notes In order to prevent the vehicle's battery from
discharging, the interior lighting functions are
automatically deactivated after some time
except for when the key is in position 2in the
ignition lock. The colour and brightness of the ambient light-
ing are set using the multimedia system (see
Digital Owner's Manual).
Automatic interior lighting control X
To switch on or off: press the|button.
When the automatic interior lighting control is
switched on, the button is flush with the over- head control panel.
The interior lighting automatically switches on if
you:
R unlock the vehicle
R open a door
R remove the key from the ignition lock
The interior lighting is activated for a short time
when the key is removed from the ignition lock. This delayed switch-off can be adjusted via the
multimedia system (see Digital Owner's Man-
ual). Replacing bulbs
Important safety notes
G
WARNING
Bulbs, lamps and plug connectors can
become very hot during use. When replacing a bulb, you could burn yourself on these com-
ponents. There is a risk of injury.
Allow these components to cool down beforereplacing the bulb.
Do not use a bulb if it has been dropped or if its
glass tube has been scratched.
The bulb may explode if:
R you touch it
R it is hot
R you drop it
R you scratch it
Use bulbs only in closed lamps that have been
designed for this purpose. Fit only spare bulbs of the same type and the specified voltage.
Marks on the glass tube reduce the service life
of the bulbs. Do not touch the glass tube with
your bare hands. If necessary, clean the glass
tube when cold with alcohol or spirit and rub it
off with a lint-free cloth. Replacing bulbs
121Lights and windscreen wipers Z
Page 129 of 389
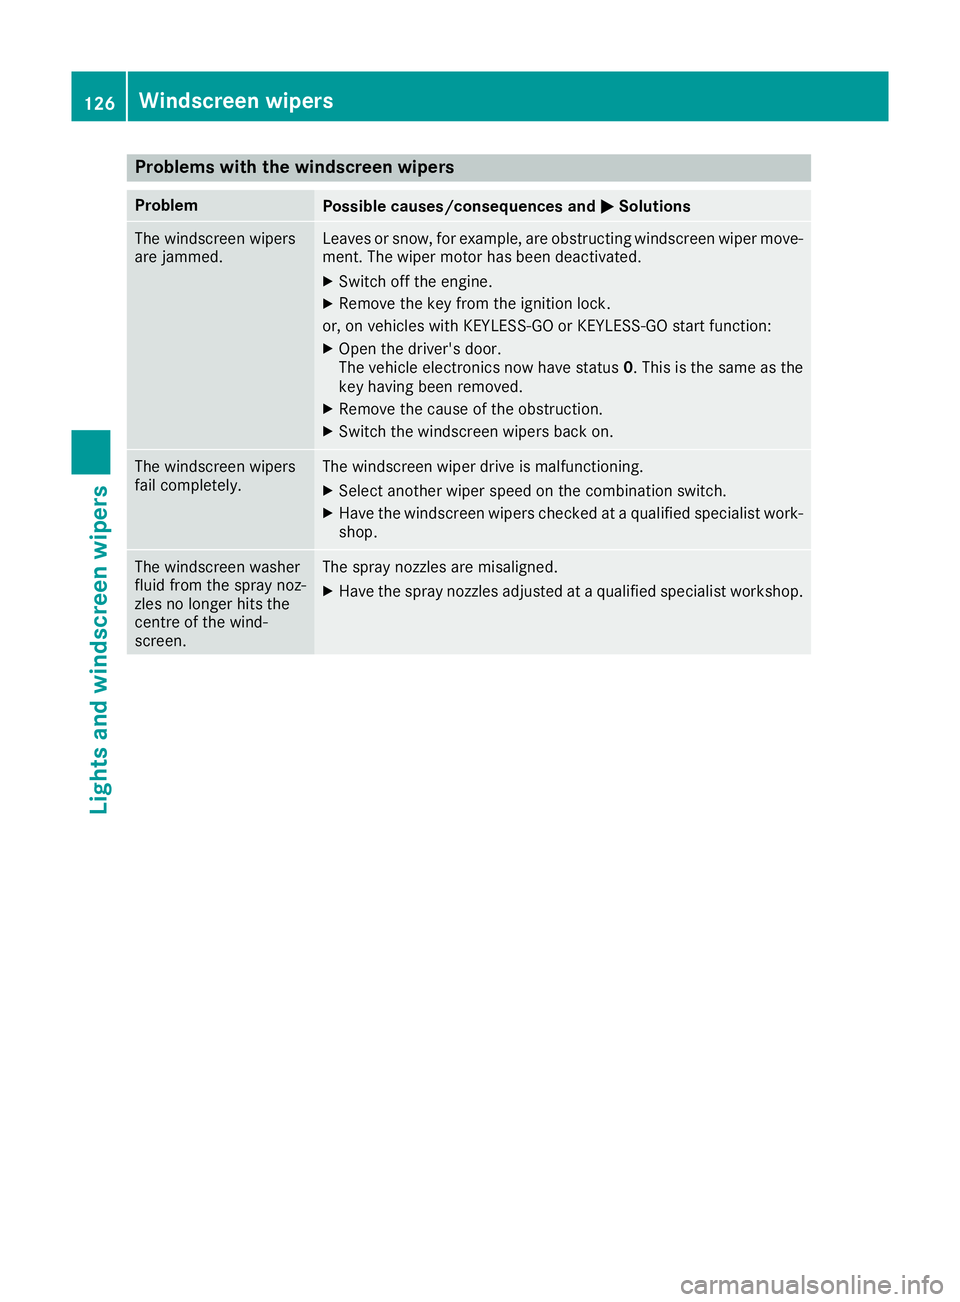
Problems with the windscreen wipers
Problem
Possible causes/consequences and
M
MSolutions The windscreen wipers
are jammed. Leaves or snow, for example, are obstructing windscreen wiper move-
ment. The wiper motor has been deactivated.
X Switch off the engine.
X Remove the key from the ignition lock.
or, on vehicles with KEYLESS-GO or KEYLESS ‑GO start function:
X Open the driver's door.
The vehicle electronics now have status 0. This is the same as the
key having been removed.
X Remove the cause of the obstruction.
X Switch the windscreen wipers back on. The windscreen wipers
fail completely. The windscreen wiper drive is malfunctioning.
X Select another wiper speed on the combination switch.
X Have the windscreen wipers checked at a qualified specialist work-
shop. The windscreen washer
fluid from the spray noz-
zles no longer hits the
centre of the wind-
screen. The spray nozzles are misaligned.
X Have the spray nozzles adjusted at a qualified specialist workshop. 126
Windscreen wipersLights and windscreen wipers
Page 137 of 389

Activating/deactivating air-recircula-
tion mode
General notes You can also temporarily deactivate the flow of
fresh air manually if unpleasant odours are
entering the vehicle from outside. The air
already inside the vehicle will then be recircula-
ted.
If you activate air-recirculation mode, the win-
dows can mist up more quickly, particularly at
low outside temperatures. Use air-recirculation
mode only briefly to prevent the windows from
misting up.
Activating/deactivating X
Turn the key to position 2in the ignition lock
(Y page 144).
X To activate: press thegrocker switch up
or down.
The indicator lamp above the grocker
switch lights up.
Air-recirculation mode is activated automati-
cally:
R at high outside temperatures
R at high levels of pollution (THERMOTRONIC
automatic climate control only)
R in tunnels (vehicles with a navigation system
only)
The indicator lamp above the grocker
switch is not lit when automatic air-recirculation
mode is activated. Outside air is added after
approximately 30 minutes.
X To deactivate: press thegrocker switch
up or down.
The indicator lamp above the grocker
switch goes out.
Air-recirculation mode is deactivated automati-
cally:
R after approximately five minutes at outside
temperatures below approximately 5 †
R after approximately five minutes if "Cooling
with air dehumidification" is deactivated
R after approximately 30 minutes at outside
temperatures above approximately 5 †if the
"Cooling with air dehumidification" function is
activated Convenience opening or closing using
the air-recirculation button G
WARNING
When the convenience closing feature is oper- ating, parts of the body could become trapped
in the closing area of the side window and the
sliding sunroof. There is a risk of injury.
Observe the complete closing procedure
when the convenience closing feature is oper-
ating. When closing make sure that no parts of the body are in the closing area. G
WARNING
During convenience opening parts of the body could be drawn in or become trapped
between the side window and window frame.
There is a risk of injury.
When opening, make sure that nobody is
touching the side window. If someone
becomes trapped, immediately press
the W switch in the door to stop the move-
ment of the side windows. To continue closing
the side window, pull on the Wswitch.
X Convenience closing feature: press and
hold the grocker switch up or down until
the side windows start to close automatically. Vehicles with sliding sunroof: the sliding
sunroof closes simultaneously.
The indicator lamp above the grocker
switch lights up. Air-recirculation mode is
activated.
If you open the side windows or the sliding
sunroof manually after closing with the con-
venience closing feature, they will remain in
this position when opened using the conve-
nience opening feature.
If parts of the body are in the closing area during convenience closing, proceed as follows:
X Press the Wbutton to stop the side win-
dows.
The side windows stop.
X To then open the side windows, press the
W button again. 134
Operating the climate control systemClimate control