2016 MERCEDES-BENZ GLC COUPE change wheel
[x] Cancel search: change wheelPage 155 of 389
DYNAMIC SELECT switch
Mercedes-AMG vehicles
General information Use the DYNAMIC SELECT switch to select the
drive program.
Available drive programs: S+
Sport Plus Particularly sporty driving
characteristics
S
Sport Sporty driving characteris-
tics
C
Comfort Comfortable and economi-
cal driving characteristics
E
Economy Particularly economical
driving characteristics
I
Individual Individual settings
Depending on the drive program selected, the
following vehicle characteristics will change:
R the engine management
R the transmission management
R the suspension
R the steering
R the availability of the ECO start/stop function
R climate control
R the driver assistance systems
R the availability of gliding mode
Further information for automatic drive program
characteristics (Y page 157).
Additionally, in drive program Iyou can config-
ure the respective vehicle characteristics via the
multimedia system. You can find information
about this in the Digital Owner's Manual.
If the ignition is switched off for less than four
hours, the previously selected drive program is
activated when the engine is next started. If the ignition is switched off for more than four hours,
drive program Cis activated when the engine is
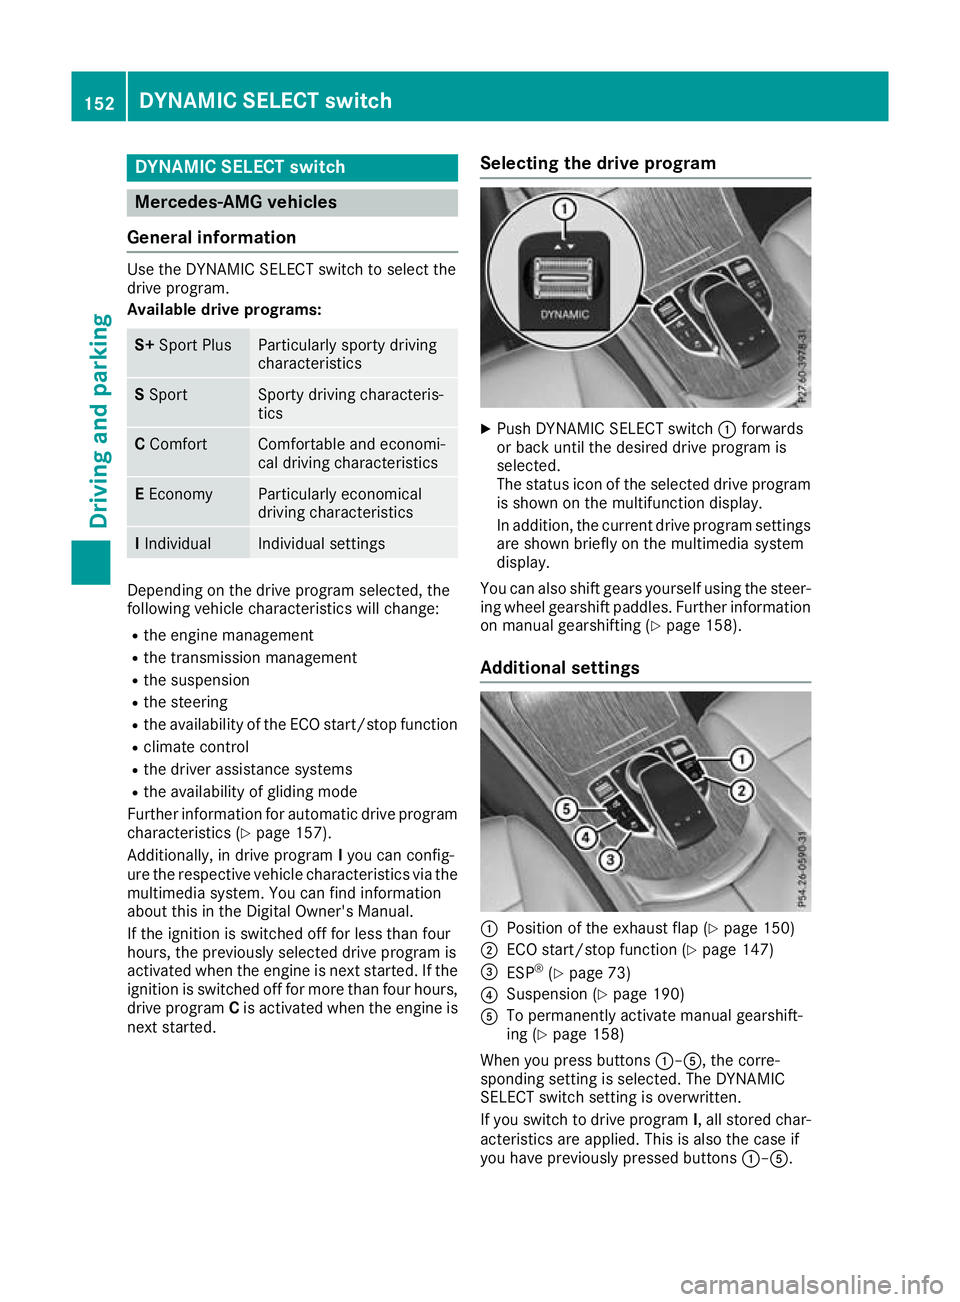
next started. Selecting the drive program X
Push DYNAMIC SELECT switch :forwards
or back until the desired drive program is
selected.
The status icon of the selected drive program is shown on the multifunction display.
In addition, the current drive program settings
are shown briefly on the multimedia system
display.
You can also shift gears yourself using the steer- ing wheel gearshift paddles. Further information
on manual gearshifting (Y page 158).
Additional settings :
Position of the exhaust flap (Y page 150)
; ECO start/stop function (Y page 147)
= ESP ®
(Y page 73)
? Suspension (Y page 190)
A To permanently activate manual gearshift-
ing (Y page 158)
When you press buttons :–A, the corre-
sponding setting is selected. The DYNAMIC
SELECT switch setting is overwritten.
If you switch to drive program I, all stored char-
acteristics are applied. This is also the case if
you have previously pressed buttons :–A. 152
DYNAMIC SELECT switchDriving and pa
rking
Page 156 of 389
i
In a few countries, the ECO start/stop func-
tion is deactivated at the factory due to the
quality of the available fuel. In this case, the
ECO start/stop function is not available in any
drive program, regardless of what is shown on
the multimedia system display. All other models
Hybrid vehicles: observe the notes on the
DYNAMIC SELECT switch in the separate Own-
er's Manual.
Use the DYNAMIC SELECT switch to change the
drive program.
Depending on the drive program selected, the
following vehicle characteristics will change:
R the drive (engine and transmission manage-
ment)
R the suspension
R the steering
R the availability of the ECO start/stop function
R the climate control
- The climate control settings
- The rear window heating operation period
- The performance of the seat heating
If the ignition is switched off for less than four
hours, the previously selected drive program is
activated when the engine is next started. If the
ignition is switched off for more than four hours, drive program Cis activated when the engine is
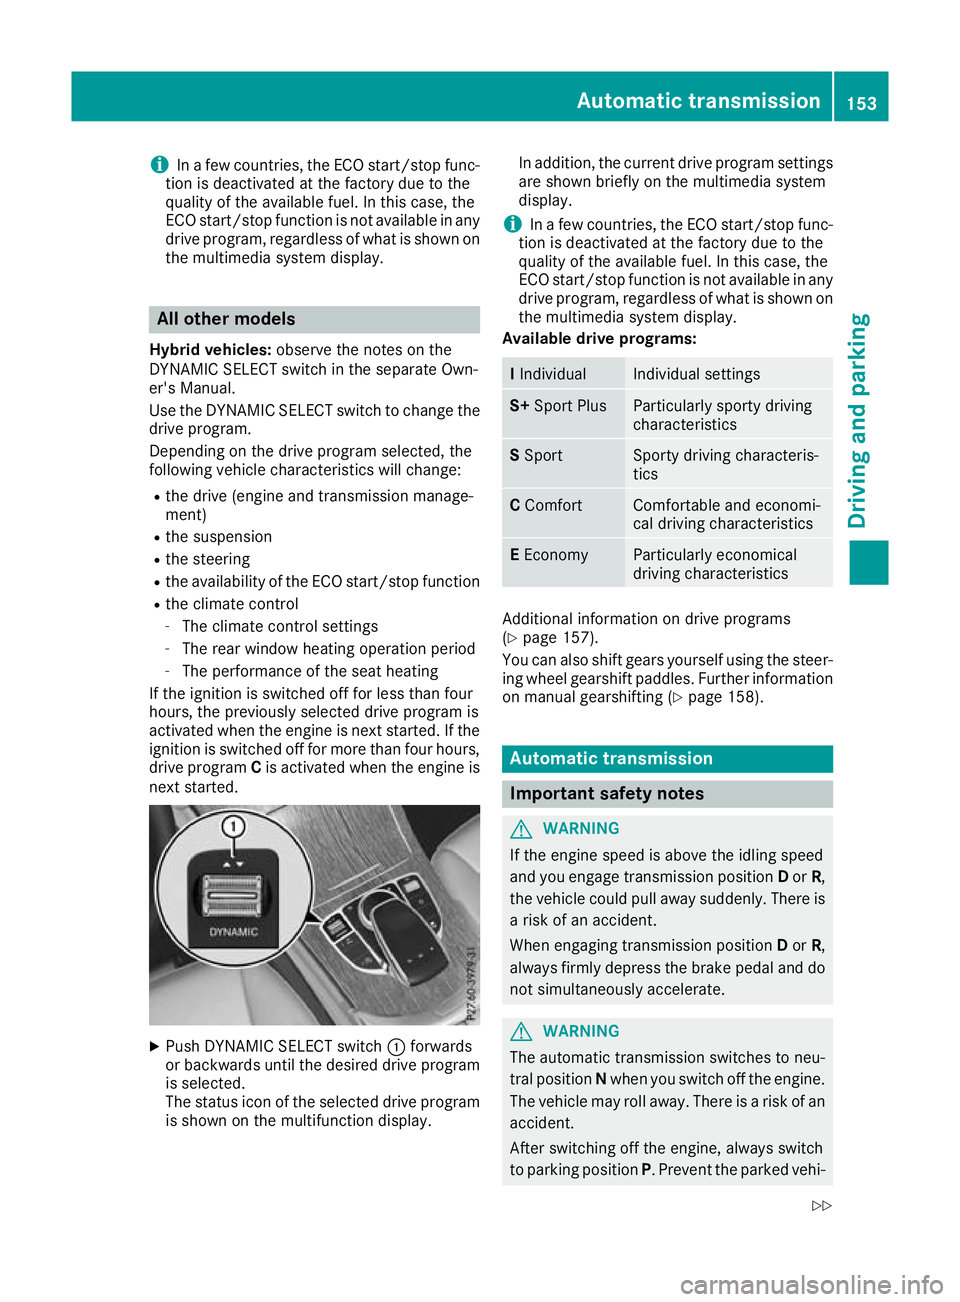
next started. X
Push DYNAMIC SELECT switch :forwards
or backwards until the desired drive program is selected.
The status icon of the selected drive program
is shown on the multifunction display. In addition, the current drive program settings
are shown briefly on the multimedia system
display.
i In a few countries, the ECO start/stop func-
tion is deactivated at the factory due to the
quality of the available fuel. In this case, the
ECO start/stop function is not available in any
drive program, regardless of what is shown on
the multimedia system display.
Available drive programs: I
Individual Individual settings
S+
Sport Plus Particularly sporty driving
characteristics
S
Sport Sporty driving characteris-
tics
C
Comfort Comfortable and economi-
cal driving characteristics
E
Economy Particularly economical
driving characteristics
Additional information on drive programs
(Y
page 157).
You can also shift gears yourself using the steer- ing wheel gearshift paddles. Further information
on manual gearshifting (Y page 158). Automatic transmission
Important safety notes
G
WARNING
If the engine speed is above the idling speed
and you engage transmission position Dor R,
the vehicle could pull away suddenly. There is a risk of an accident.
When engaging transmission position Dor R,
always firmly depress the brake pedal and do not simultaneously accelerate. G
WARNING
The automatic transmission switches to neu-
tral position Nwhen you switch off the engine.
The vehicle may roll away. There is a risk of an
accident.
After switching off the engine, always switch
to parking position P. Prevent the parked vehi- Automatic transmission
153Driving and parking
Z
Page 159 of 389
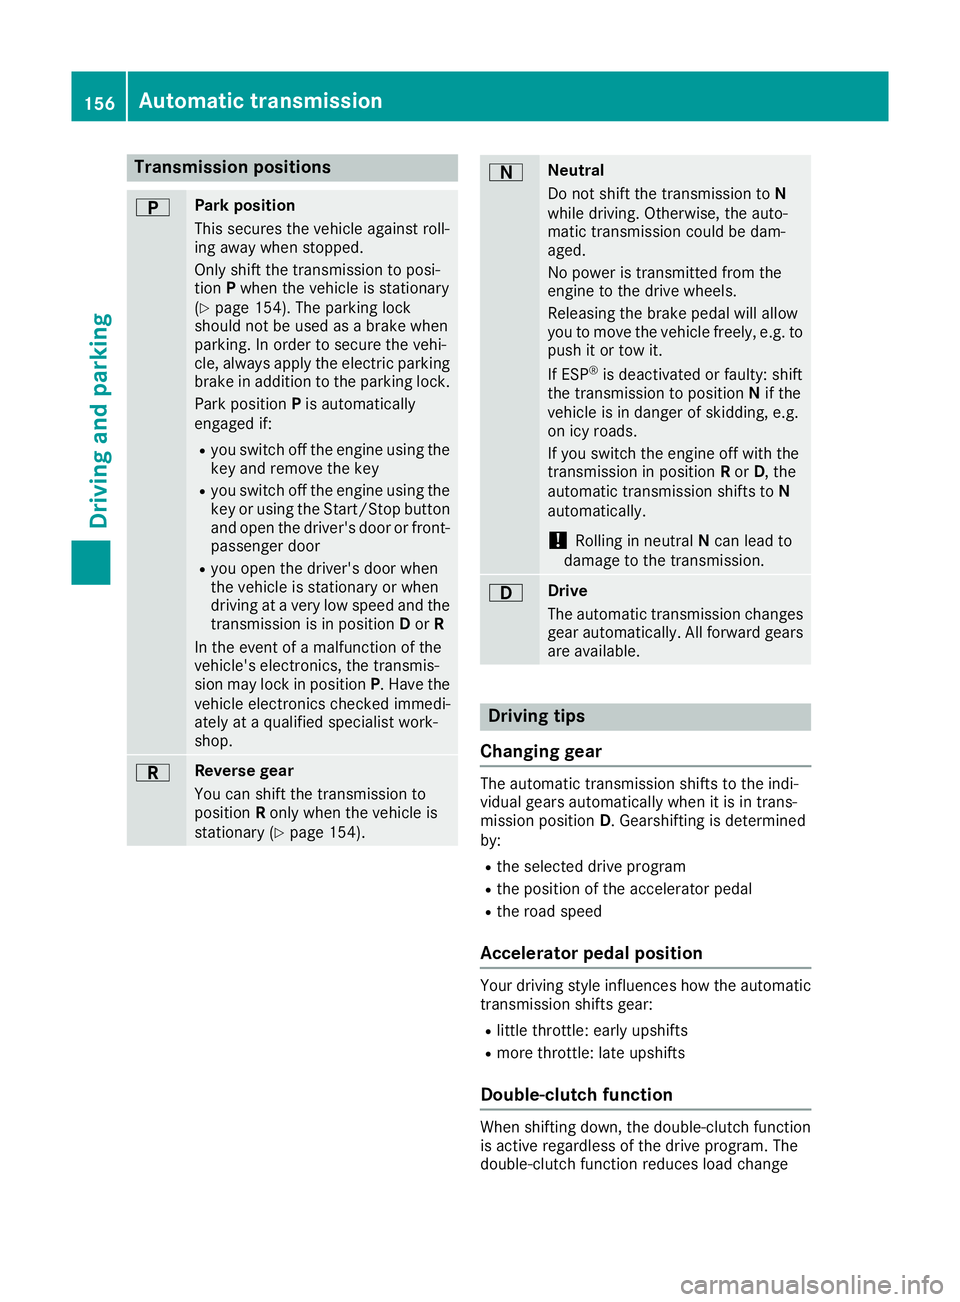
Transmission positions
B Park position
This secures the vehicle against roll-
ing away when stopped.
Only shift the transmission to posi-
tion Pwhen the vehicle is stationary
(Y page 154). The parking lock
should not be used as a brake when
parking. In order to secure the vehi-
cle, always apply the electric parking brake in addition to the parking lock.
Park position Pis automatically
engaged if:
R you switch off the engine using the
key and remove the key
R you switch off the engine using the
key or using the Start/Stop button
and open the driver's door or front- passenger door
R you open the driver's door when
the vehicle is stationary or when
driving at a very low speed and the
transmission is in position Dor R
In the event of a malfunction of the
vehicle's electronics, the transmis-
sion may lock in position P. Have the
vehicle electronics checked immedi-
ately at a qualified specialist work-
shop. C Reverse gear
You can shift the transmission to
position Ronly when the vehicle is
stationary (Y page 154). A Neutral
Do not shift the transmission to
N
while driving. Otherwise, the auto-
matic transmission could be dam-
aged.
No power is transmitted from the
engine to the drive wheels.
Releasing the brake pedal will allow
you to move the vehicle freely, e.g. to push it or tow it.
If ESP ®
is deactivated or faulty: shift
the transmission to position Nif the
vehicle is in danger of skidding, e.g.
on icy roads.
If you switch the engine off with the
transmission in position Ror D, the
automatic transmission shifts to N
automatically.
! Rolling in neutral
Ncan lead to
damage to the transmission. 7 Drive
The automatic transmission changes
gear automatically. All forward gears
are available. Driving tips
Changing gear The automatic transmission shifts to the indi-
vidual gears automatically when it is in trans-
mission position
D. Gearshifting is determined
by:
R the selected drive program
R the position of the accelerator pedal
R the road speed
Accelerator pedal position Your driving style influences how the automatic
transmission shifts gear:
R little throttle: early upshifts
R more throttle: late upshifts
Double-clutch function When shifting down, the double-clutch function
is active regardless of the drive program. The
double-clutch function reduces load change 156
Automatic transmissionDriving an
d parking
Page 160 of 389
reactions and is conducive to a sporty driving
style. The sound generated by the double-clutch
function depends on the drive program.
Kickdown Use kickdown for maximum acceleration:
X Depress the accelerator pedal beyond the
pressure point.
The automatic transmission shifts to a lower
gear depending on the engine speed.
X Ease off the accelerator pedal once the
desired speed is reached.
The automatic transmission shifts back up.
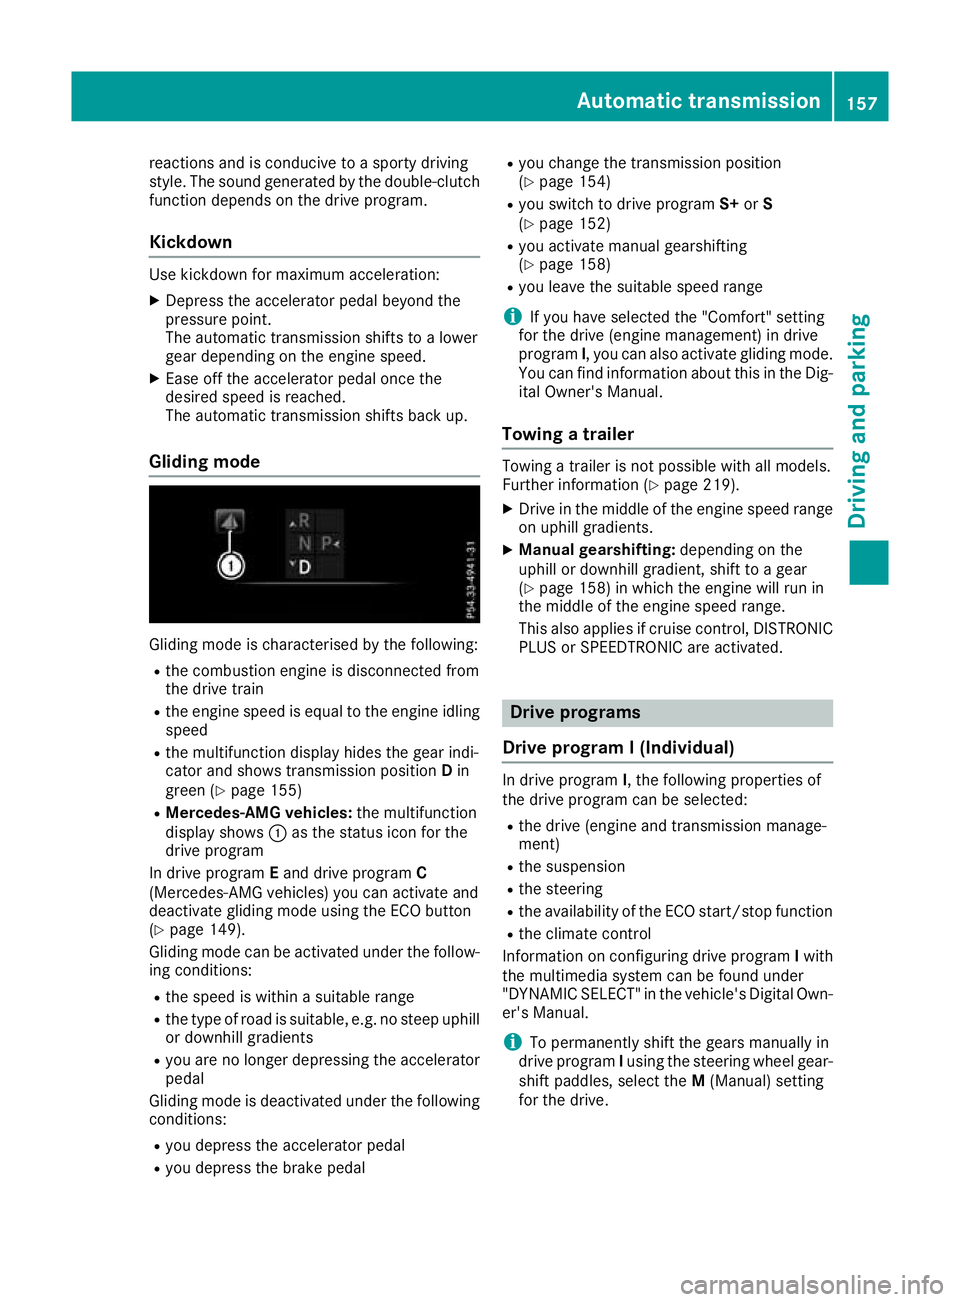
Gliding mode Gliding mode is characterised by the following:
R the combustion engine is disconnected from
the drive train
R the engine speed is equal to the engine idling
speed
R the multifunction display hides the gear indi-
cator and shows transmission position Din
green (Y page 155)
R Mercedes-AMG vehicles: the multifunction
display shows :as the status icon for the
drive program
In drive program Eand drive program C
(Mercedes-AMG vehicles) you can activate and
deactivate gliding mode using the ECO button
(Y page 149).
Gliding mode can be activated under the follow-
ing conditions:
R the speed is within a suitable range
R the type of road is suitable, e.g. no steep uphill
or downhill gradients
R you are no longer depressing the accelerator
pedal
Gliding mode is deactivated under the following
conditions:
R you depress the accelerator pedal
R you depress the brake pedal R
you change the transmission position
(Y page 154)
R you switch to drive program S+orS
(Y page 152)
R you activate manual gearshifting
(Y page 158)
R you leave the suitable speed range
i If you have selected the "Comfort" setting
for the drive (engine management) in drive
program I, you can also activate gliding mode.
You can find information about this in the Dig- ital Owner's Manual.
Towing a trailer Towing a trailer is not possible with all models.
Further information (Y
page 219).
X Drive in the middle of the engine speed range
on uphill gradients.
X Manual gearshifting: depending on the
uphill or downhill gradient, shift to a gear
(Y page 158) in which the engine will run in
the middle of the engine speed range.
This also applies if cruise control, DISTRONIC PLUS or SPEEDTRONIC are activated. Drive programs
Drive program I (Individual) In drive program
I, the following properties of
the drive program can be selected:
R the drive (engine and transmission manage-
ment)
R the suspension
R the steering
R the availability of the ECO start/stop function
R the climate control
Information on configuring drive program Iwith
the multimedia system can be found under
"DYNAMIC SELECT" in the vehicle's Digital Own- er's Manual.
i To permanently shift the gears manually in
drive program Iusing the steering wheel gear-
shift paddles, select the M(Manual) setting
for the drive. Automatic transmission
157Driving and parking Z
Page 162 of 389
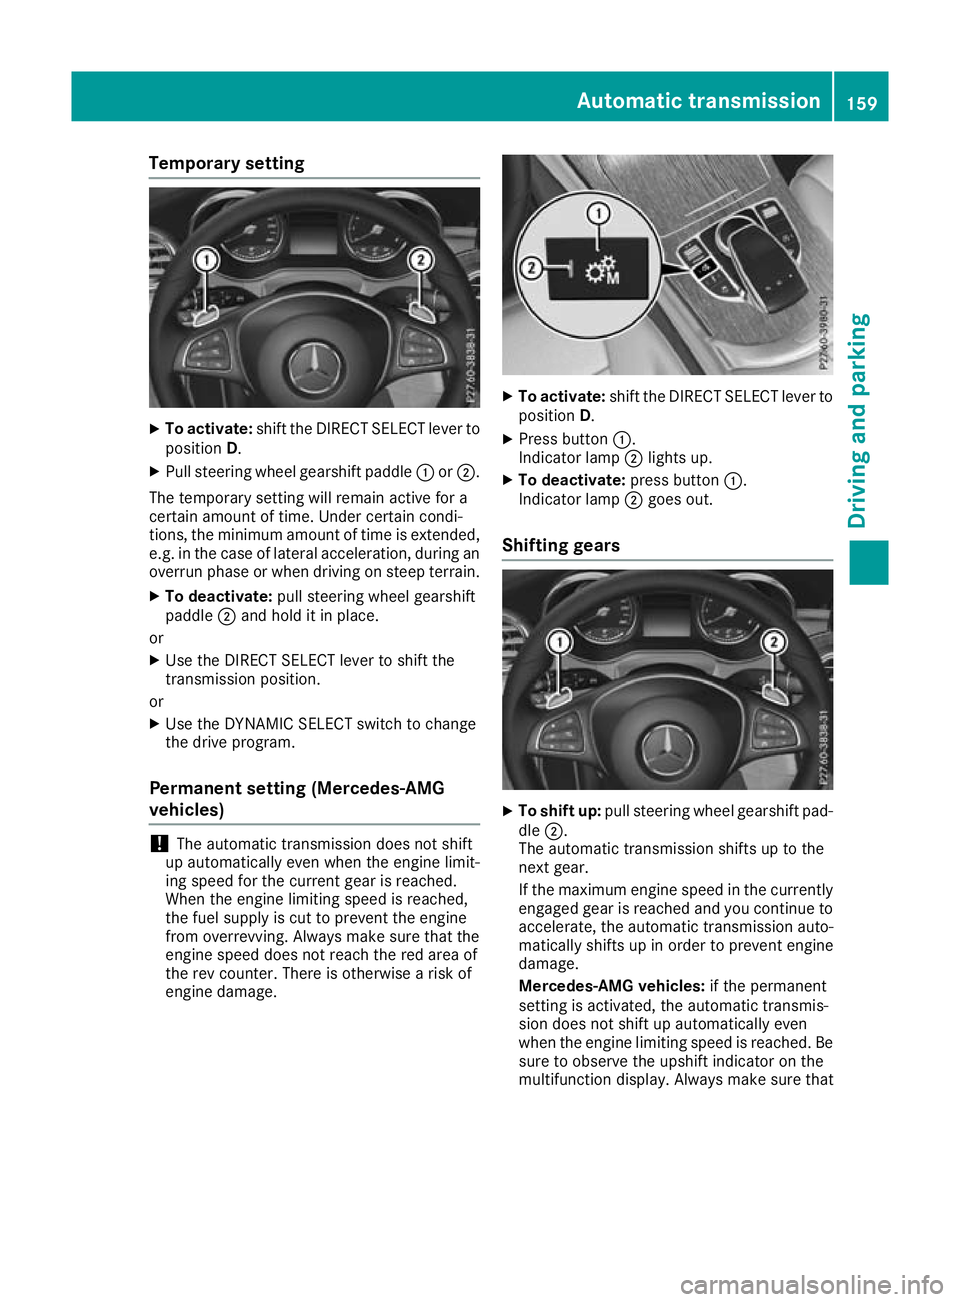
Temporary setting
X
To activate: shift the DIRECT SELECT lever to
position D.
X Pull steering wheel gearshift paddle :or;.
The temporary setting will remain active for a
certain amount of time. Under certain condi-
tions, the minimum amount of time is extended,
e.g. in the case of lateral acceleration, during an overrun phase or when driving on steep terrain.
X To deactivate: pull steering wheel gearshift
paddle ;and hold it in place.
or X Use the DIRECT SELECT lever to shift the
transmission position.
or X Use the DYNAMIC SELECT switch to change
the drive program.
Permanent setting (Mercedes-AMG
vehicles) !
The automatic transmission does not shift
up automatically even when the engine limit-
ing speed for the current gear is reached.
When the engine limiting speed is reached,
the fuel supply is cut to prevent the engine
from overrevving. Always make sure that the
engine speed does not reach the red area of
the rev counter. There is otherwise a risk of
engine damage. X
To activate: shift the DIRECT SELECT lever to
position D.
X Press button :.
Indicator lamp ;lights up.
X To deactivate: press button:.
Indicator lamp ;goes out.
Shifting gears X
To shift up: pull steering wheel gearshift pad-
dle ;.
The automatic transmission shifts up to the
next gear.
If the maximum engine speed in the currently engaged gear is reached and you continue to
accelerate, the automatic transmission auto-
matically shifts up in order to prevent engine
damage.
Mercedes-AMG vehicles: if the permanent
setting is activated, the automatic transmis-
sion does not shift up automatically even
when the engine limiting speed is reached. Be
sure to observe the upshift indicator on the
multifunction display. Always make sure that Automatic transmission
159Driving and parking Z
Page 164 of 389
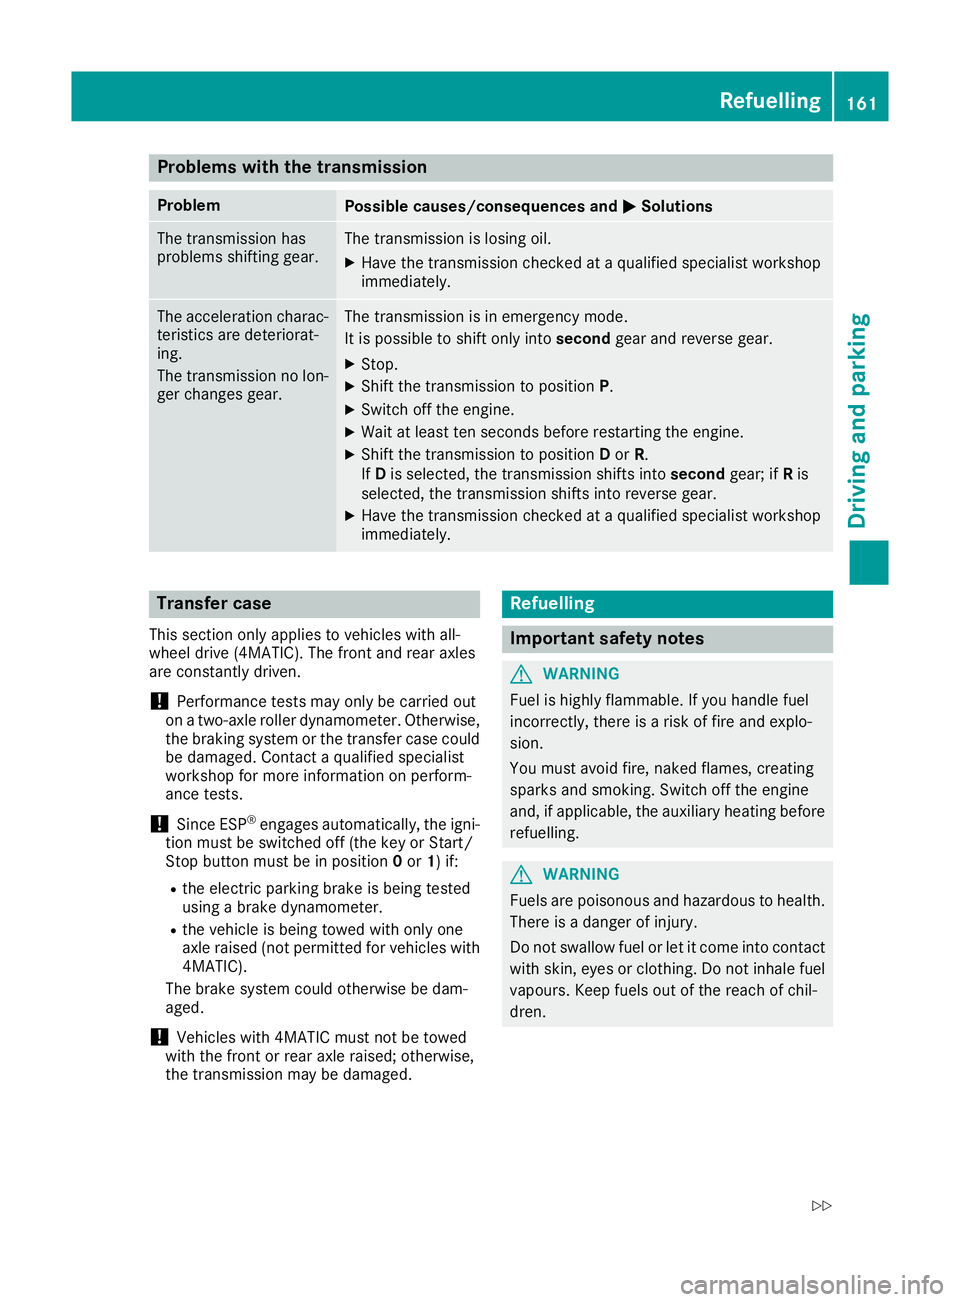
Problems with the transmission
Problem
Possible causes/consequences and
M
MSolutions The transmission has
problems shifting gear. The transmission is losing oil.
X Have the transmission checked at a qualified specialist workshop
immediately. The acceleration charac-
teristics are deteriorat-
ing.
The transmission no lon-
ger changes gear. The transmission is in emergency mode.
It is possible to shift only into
secondgear and reverse gear.
X Stop.
X Shift the transmission to position P.
X Switch off the engine.
X Wait at least ten seconds before restarting the engine.
X Shift the transmission to position Dor R.
If D is selected, the transmission shifts into secondgear; ifRis
selected, the transmission shifts into reverse gear.
X Have the transmission checked at a qualified specialist workshop
immediately. Transfer case
This section only applies to vehicles with all-
wheel drive (4MATIC). The front and rear axles
are constantly driven.
! Performance tests may only be carried out
on a two-axle roller dynamometer. Otherwise,
the braking system or the transfer case could be damaged. Contact a qualified specialist
workshop for more information on perform-
ance tests.
! Since ESP ®
engages automatically, the igni-
tion must be switched off (the key or Start/
Stop button must be in position 0or 1) if:
R the electric parking brake is being tested
using a brake dynamometer.
R the vehicle is being towed with only one
axle raised (not permitted for vehicles with
4MATIC).
The brake system could otherwise be dam-
aged.
! Vehicles with 4MATIC must not be towed
with the front or rear axle raised; otherwise,
the transmission may be damaged. Refuelling
Important safety notes
G
WARNING
Fuel is highly flammable. If you handle fuel
incorrectly, there is a risk of fire and explo-
sion.
You must avoid fire, naked flames, creating
sparks and smoking. Switch off the engine
and, if applicable, the auxiliary heating before refuelling. G
WARNING
Fuels are poisonous and hazardous to health. There is a danger of injury.
Do not swallow fuel or let it come into contact
with skin, eyes or clothing. Do not inhale fuel
vapours. Keep fuels out of the reach of chil-
dren. Refuelling
161Driving and parking
Z
Page 174 of 389
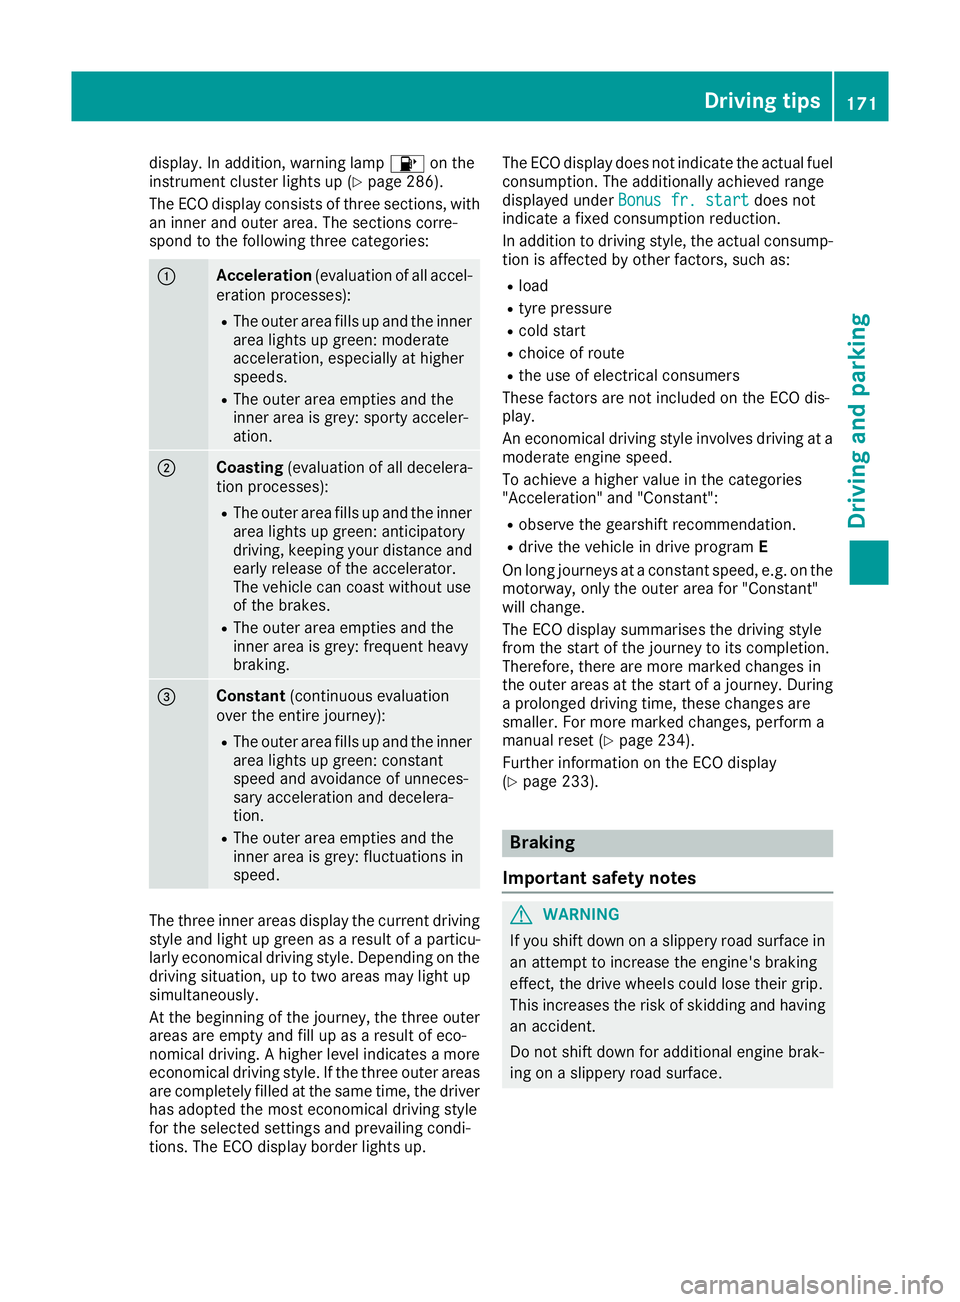
display. In addition, warning lamp
8on the
instrument cluster lights up (Y page 286).
The ECO display consists of three sections, with an inner and outer area. The sections corre-
spond to the following three categories: :
Acceleration
(evaluation of all accel-
eration processes):
R The outer area fills up and the inner
area lights up green: moderate
acceleration, especially at higher
speeds.
R The outer area empties and the
inner area is grey: sporty acceler-
ation. ;
Coasting
(evaluation of all decelera-
tion processes):
R The outer area fills up and the inner
area lights up green: anticipatory
driving, keeping your distance and early release of the accelerator.
The vehicle can coast without use
of the brakes.
R The outer area empties and the
inner area is grey: frequent heavy
braking. =
Constant
(continuous evaluation
over the entire journey):
R The outer area fills up and the inner
area lights up green: constant
speed and avoidance of unneces-
sary acceleration and decelera-
tion.
R The outer area empties and the
inner area is grey: fluctuations in
speed. The three inner areas display the current driving
style and light up green as a result of a particu-
larly economical driving style. Depending on the driving situation, up to two areas may light up
simultaneously.
At the beginning of the journey, the three outer
areas are empty and fill up as a result of eco-
nomical driving. A higher level indicates a more
economical driving style. If the three outer areas
are completely filled at the same time, the driver
has adopted the most economical driving style
for the selected settings and prevailing condi-
tions. The ECO display border lights up. The ECO display does not indicate the actual fuel
consumption. The additionally achieved range
displayed under Bonus fr. start
Bonus fr. start does not
indicate a fixed consumption reduction.
In addition to driving style, the actual consump- tion is affected by other factors, such as:
R load
R tyre pressure
R cold start
R choice of route
R the use of electrical consumers
These factors are not included on the ECO dis-
play.
An economical driving style involves driving at a moderate engine speed.
To achieve a higher value in the categories
"Acceleration" and "Constant":
R observe the gearshift recommendation.
R drive the vehicle in drive program E
On long journeys at a constant speed, e.g. on the motorway, only the outer area for "Constant"
will change.
The ECO display summarises the driving style
from the start of the journey to its completion.
Therefore, there are more marked changes in
the outer areas at the start of a journey. During
a prolonged driving time, these changes are
smaller. For more marked changes, perform a
manual reset (Y page 234).
Further information on the ECO display
(Y page 233). Braking
Important safety notes G
WARNING
If you shift down on a slippery road surface in an attempt to increase the engine's braking
effect, the drive wheels could lose their grip.
This increases the risk of skidding and having
an accident.
Do not shift down for additional engine brak-
ing on a slippery road surface. Driving tips
171Driving and parking Z
Page 175 of 389
Downhill gradients
Change into a lower gear in good time on long
and steep downhill gradients. Take particular
note of this when driving a laden vehicle and
when towing a trailer.
This also applies if cruise control, DISTRONIC
PLUS or SPEEDTRONIC is activated.
This will use the braking effect of the engine, so
less braking will be required to maintain vehicle
speed. This relieves the load on the brake sys-
tem and prevents the brakes from overheating
and wearing too quickly.
Heavy and light loads G
WARNING
The braking system can overheat if you leave your foot on the brake pedal while driving.
This increases the braking distance and could
even cause the braking system to fail. There is
a risk of an accident.
Never use the brake pedal as a footrest. Do
not simultaneously depress both the brake
pedal and the accelerator pedal while driving.
! Depressing the brake pedal constantly
results in excessive and premature wear to
the brake pads.
If heavy demands are made on the brakes, do
not park the vehicle immediately. Drive on for a
short while. This allows the airflow to cool the
brakes more quickly.
If the brakes have been used only moderately,
you should occasionally test their effectiveness.
To do this, brake more firmly from a higher
speed while paying attention to the traffic con-
ditions. This improves the grip of the brakes.
Wet road surfaces If you have driven for a long time in heavy rain
without braking, there may be a delayed reac-
tion from the brakes when braking for the first
time. This may also occur after a car wash or
after driving through deep water.
You will have to depress the brake pedal more
firmly. Maintain a greater distance to the vehicle in front.
After driving on a wet road or having the vehicle
washed, brake firmly while paying attention to
the traffic conditions. This will warm up the brake discs, thereby drying them more quickly
and protecting them against corrosion.
Limited braking performance on salt-
treated roads If you drive on salt-treated roads, a layer of salt
may form on the brake discs and pads. This can
increase the braking distance considerably.
R In order to prevent any salt build-up, apply the
brakes occasionally while paying attention to
the traffic conditions.
R Carefully depress the brake pedal at the end
of the journey and when starting the next
journey.
R Maintain a much greater distance to the vehi-
cle in front.
New brake discs and brake pads/
linings Brake pads/linings and discs that are either new
or have been replaced achieve optimum braking
effect only after several hundred kilometres of
driving. Compensate for the reduced braking
effect by applying greater force to the brake
pedal.
For safety reasons, Mercedes-Benz recom-
mends only fitting the following brake discs and brake pads/linings:
R brake discs that have been approved by
Mercedes-Benz
R brake pads/linings that have been approved
by Mercedes-Benz or that are of an equivalent
standard of quality
Other brake discs or brake pads/linings can
compromise the safety of your vehicle.
Always replace all brake discs and brake pads/
linings on an axle at the same time. Always fit
new brake pads/linings when replacing brake
discs.
The vehicle is equipped with lightweight brake
discs to which the wheel assembly with rim and threaded connection is matched.
The use of brake discs other than those
approved by Mercedes-Benz may alter track
width and is subject to approval, if applicable.
Shock-type loads when handling the brake
discs, such as when changing wheels, can lead
to a reduction in comfort when driving with light-
weight brake discs. Avoid shock-type loads on 172
Driving tipsDriving and pa
rking