2016 MERCEDES-BENZ GLC COUPE change wheel
[x] Cancel search: change wheelPage 282 of 389
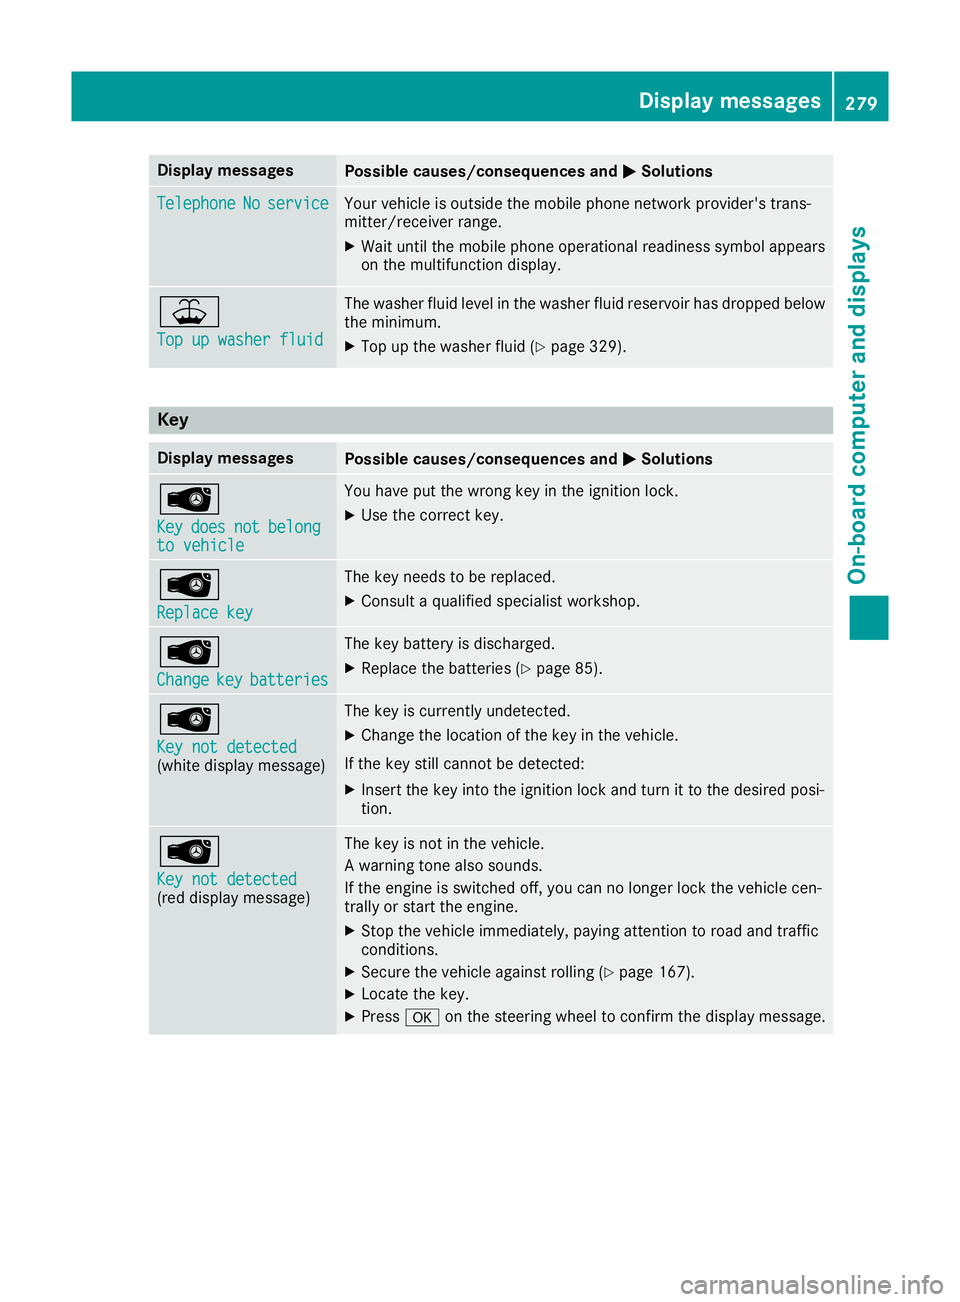
Display messages
Possible causes/consequences and
M
MSolutions Telephone
Telephone
No
Noservice
service Your vehicle is outside the mobile phone network provider's trans-
mitter/receiver range.
X Wait until the mobile phone operational readiness symbol appears
on the multifunction display. ¥
Top up washer fluid Top up washer fluid The washer fluid level in the washer fluid reservoir has dropped below
the minimum.
X Top up the washer fluid (Y page 329).Key
Display messages
Possible causes/consequences and
M
MSolutions Â
Key Key
does
does not
notbelong
belong
to vehicle
to vehicle You have put the wrong key in the ignition lock.
X Use the correct key. Â
Replace key Replace key The key needs to be replaced.
X Consult a qualified specialist workshop. Â
Change Change
key
keybatteries
batteries The key battery is discharged.
X Replace the batteries (Y page 85).Â
Key not detected Key not detected
(white display message) The key is currently undetected.
X Change the location of the key in the vehicle.
If the key still cannot be detected:
X Insert the key into the ignition lock and turn it to the desired posi-
tion. Â
Key not detected Key not detected
(red display message) The key is not in the vehicle.
A warning tone also sounds.
If the engine is switched off, you can no longer lock the vehicle cen-
trally or start the engine.
X Stop the vehicle immediately, paying attention to road and traffic
conditions.
X Secure the vehicle against rolling (Y page 167).
X Locate the key.
X Press aon the steering wheel to confirm the display message. Display
messages
279On-board computer and displays Z
Page 296 of 389
The display must be switched off and have
cooled down before you start cleaning. Do not
apply pressure to the display surface when
cleaning it, as this could cause irreversible dam- age to the display.
Switching the multimedia system
on/off X
Press the Übutton on the centre console
to the right of the controller.
X For Mercedes-AMG vehicles with a switch-
able AMG Performance exhaust system:
press the thumbwheel which is to the right of
the controller.
Adjusting the volume X
Turn the thumbwheel on the right of the con-
troller.
The volume changes:
R for the currently set media source
R during a traffic announcement or navigation
message
R in hands-free mode during an active call
Switching the sound on/off This function is only available on the multifunc-
tion steering wheel for Mercedes-AMG vehicles
with a selectable AMG Performance exhaust
system.
X Press the thumbwheel to the right of the con-
troller.
or X Press the 8button on the multifunction
steering wheel.
If the audio output is switched off, the status
line will show the 8symbol. If you switch
the media source or change the volume, the
sound is automatically switched on.
i You will hear navigation messages even
when the sound is muted.
Functions The multimedia system has the following func-
tions:
R Radio mode
R Media mode with media search
R Sound systems R
Navigation system
COMAND Online: navigation using hard drive
Audio 20: navigation using SD memory card
R Communication functions
R Vehicle functions with system settings
R Favourites functions
Controller The controller in the centre console lets you:
R select menu items on the display
R enter characters
R select a destination on the map
R save entries
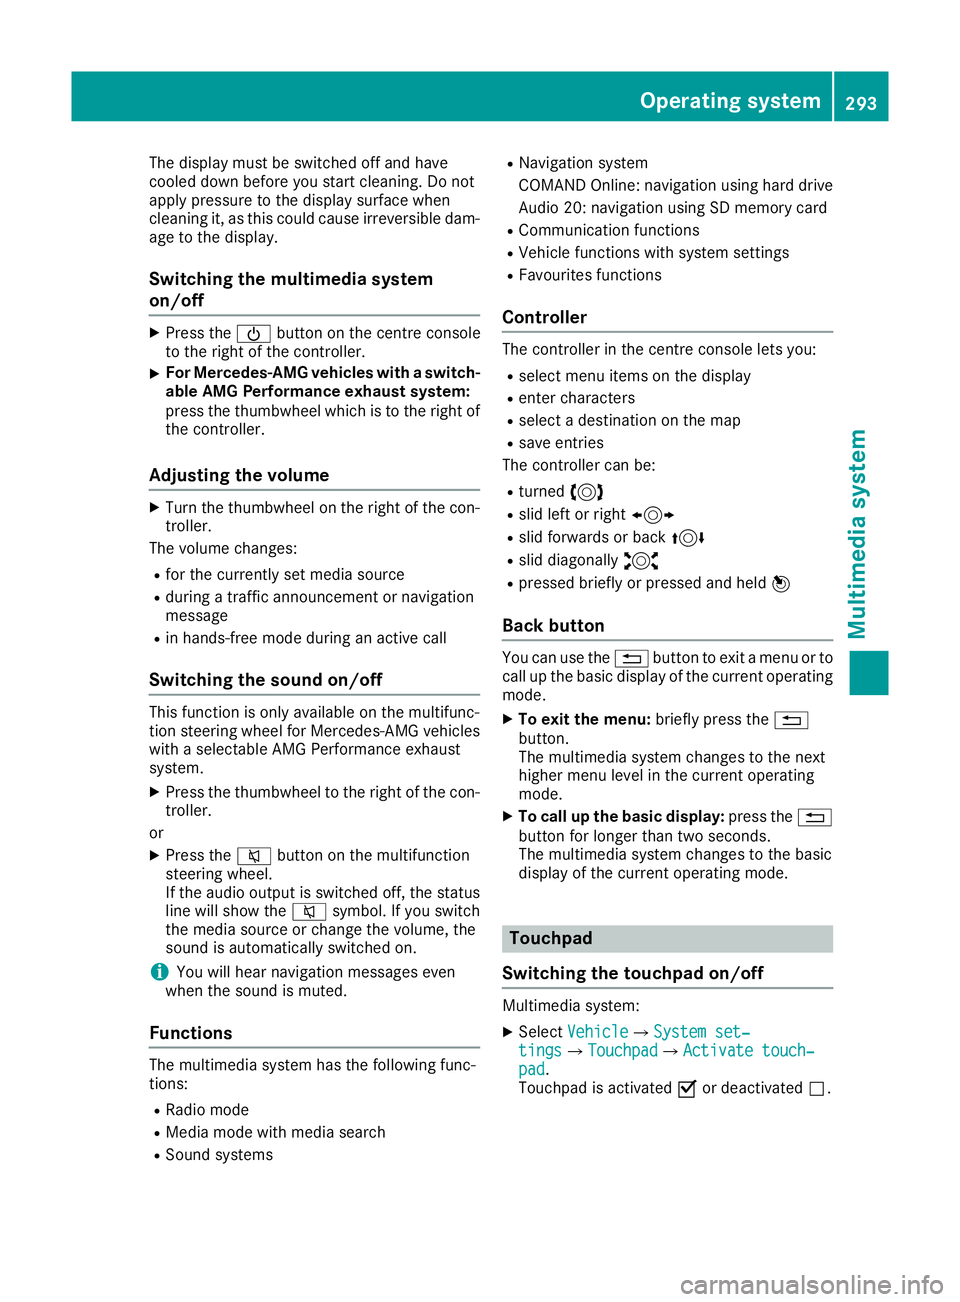
The controller can be:
R turned 3
R slid left or right 1
R slid forwards or back 4
R slid diagonally 2
R pressed briefly or pressed and held 7
Back button You can use the
%button to exit a menu or to
call up the basic display of the current operating mode.
X To exit the menu: briefly press the%
button.
The multimedia system changes to the next
higher menu level in the current operating
mode.
X To call up the basic display: press the%
button for longer than two seconds.
The multimedia system changes to the basic
display of the current operating mode. Touchpad
Switching the touchpad on/off Multimedia system:
X Select Vehicle VehicleQSystem set‐ System set‐
tings tingsQTouchpad TouchpadQActivate touch‐ Activate touch‐
pad pad.
Touchpad is activated Oor deactivated ª. Operating system
293Multimedia system Z
Page 325 of 389
Vehicles with the COMAND Online multime-
dia system: Mercedes me connect offers fast
assistance at the touch of a button – around the clock. For any queries about the vehicle,
Mercedes me connect offers a fast and easy
connecting call to the Mercedes-Benz CustomerAssistance Centre. You can, for example,
request an appointment or call for help in the
event of a breakdown.
The display of the multimedia system indicates
that a call is active. During the call, you can
change to the navigation menu by pressing the
Ø button on the multimedia system, for
example. Voice output is not available in this
case.
The Digital Owner's Manual contains further
information about:
R vehicles with the AUDIO 20 multimedia
system: MB Contact
R vehicles with the COMAND Online multi-
media system: Mercedes me connect
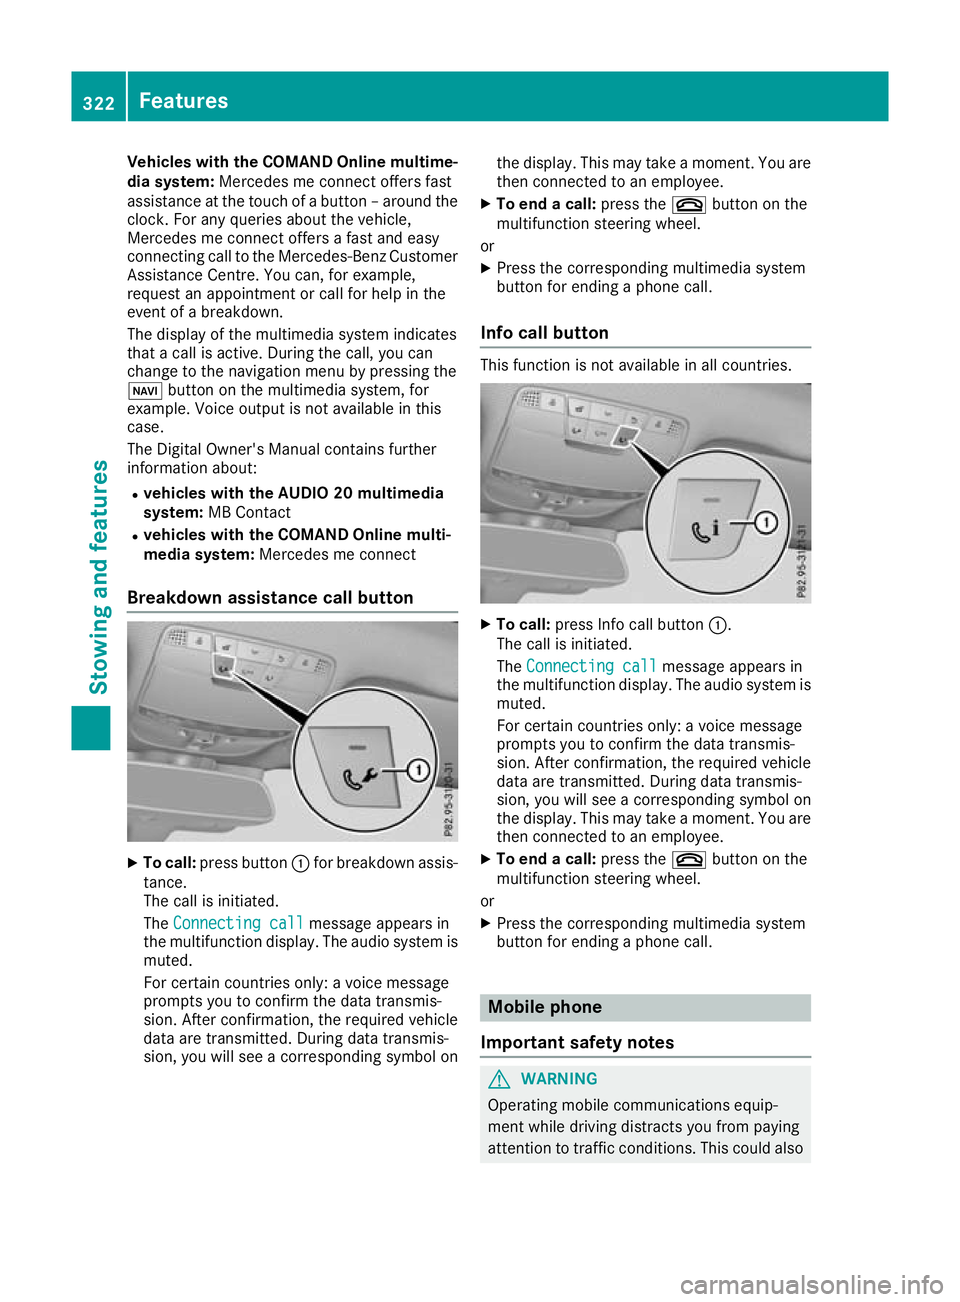
Breakdown assistance call button X
To call: press button :for breakdown assis-
tance.
The call is initiated.
The Connecting call
Connecting call message appears in
the multifunction display. The audio system is
muted.
For certain countries only: a voice message
prompts you to confirm the data transmis-
sion. After confirmation, the required vehicle
data are transmitted. During data transmis-
sion, you will see a corresponding symbol on the display. This may take a moment. You are
then connected to an employee.
X To end a call: press the~button on the
multifunction steering wheel.
or X Press the corresponding multimedia system
button for ending a phone call.
Info call button This function is not available in all countries.
X
To call: press Info call button :.
The call is initiated.
The Connecting call
Connecting call message appears in
the multifunction display. The audio system is muted.
For certain countries only: a voice message
prompts you to confirm the data transmis-
sion. After confirmation, the required vehicle
data are transmitted. During data transmis-
sion, you will see a corresponding symbol on
the display. This may take a moment. You are
then connected to an employee.
X To end a call: press the~button on the
multifunction steering wheel.
or
X Press the corresponding multimedia system
button for ending a phone call. Mobile phone
Important safety notes G
WARNING
Operating mobile communications equip-
ment while driving distracts you from paying
attention to traffic conditions. This could also 322
FeaturesStowing and features
Page 334 of 389
Special service requirements
The prescribed service interval is based on nor-
mal operation of the vehicle. Service work will
need to be performed more often if the vehicle is
operated under arduous conditions or increased loads, for example:
R Regular city driving with frequent intermedi-
ate stops
R If the vehicle is primarily used to travel short
distances
R For frequent use in mountainous terrain or on
poor road surfaces
R If the engine is often left idling for long periods
In these or similar operating conditions, have
the air filter, engine oil and oil filter, for example, changed more frequently. The tyres must be
checked more frequently if the vehicle is oper-
ated under increased loads. Further informationcan be obtained at a qualified specialist work-
shop, e.g. a Mercedes-Benz Service Centre.
Driving abroad An extensive Mercedes-Benz Service network is
also available in other countries. You can obtain further information from any Mercedes-Benz
Service Centre. Care
General notes
! For cleaning your vehicle, do not use any of
the following:
R dry, rough or hard cloths
R abrasive cleaning agents
R solvents
R cleaning agents containing solvents
Do not scrub.
Do not touch the surfaces or protective films
with hard objects, e.g. a ring or ice scraper.
You could otherwise scratch or damage the
surfaces and protective film.
! Do not park up your vehicle for a long period
of time immediately after cleaning, particu-
larly after cleaning the wheel rim with wheel
cleaner. Wheel cleaner may lead to increased corrosion of the brake discs and pads. You
should therefore drive for a few minutes after
cleaning. By heating up the brakes, the brake discs and pads dry. The vehicle can then be
parked up for a long period of time. H
Environmental note
Dispose of empty packaging and cleaning
cloths in an environmentally responsible man-
ner.
Regular care of your vehicle is a condition for
retaining quality in the long term.
Use care products and cleaning agents recom-
mended and approved by Mercedes-Benz. Washing the vehicle and cleaning the
paintwork
Automatic car wash G
WARNING
Braking efficiency is reduced after the vehicle has been washed. There is a risk of an acci-
dent.
After washing the vehicle, brake carefully
while paying attention to the traffic conditions in order to restore full braking efficiency.
! When DISTRONIC PLUS or the HOLD func-
tion is activated, the vehicle brakes automat- ically in certain situations.
To avoid damage to the vehicle, deactivate
DISTRONIC PLUS and the HOLD function in
the following or similar situations:
R when towing away
R in a car wash
! Make sure:
R the side windows and sliding sunroof are
closed completely.
R the blower is switched off
R the windscreen wiper switch is at position
0
R the 360° camera or the reversing camera is
switched off.
The vehicle could otherwise be damaged. Care
331Maintenance and care Z
Page 339 of 389
flash rust to form on the surface. You can
restore the original shine of the exhaust pipe by cleaning it regularly, especially in winter and
after washing the vehicle.
X Clean the exhaust pipe with a care product
tested and approved by Mercedes-Benz.
Cleaning the trailer tow hitch H
Environmental note
Dispose of oily and greasy cloths in an envi-
ronmentally-responsible manner.
! Do not clean the ball coupling with a high-
pressure cleaner. Do not use solvents.
The ball coupling must be cleaned if it becomes
dirty or corroded.
X Remove rust on the ball, e.g. with a wire
brush.
X Remove dirt with a clean, lint-free cloth or a
brush.
X After cleaning, lightly oil or grease the ball
coupling.
X Check that the vehicle's trailer tow hitch is
working properly.
You can also have the maintenance work on the
ball coupling and the trailer tow hitch carried out
by a qualified specialist workshop. Interior care
Cleaning the display !
For cleaning, do not use any of the following:
R alcohol-based thinner or petrol
R abrasive cleaning agents
R commercially-available household cleaning
agents
These may damage the display surface. Do
not put pressure on the display surface when cleaning. This could lead to irreparable dam-
age to the display.
X Before cleaning the display, make sure that it
is switched off and has cooled down.
X Clean the display surface using a commer-
cially available microfibre cloth and TFT/LCD
display cleaner.
X Dry the display surface using a dry microfibre
cloth. Cleaning the plastic trim G
WARNING
Care products and cleaning agents containing solvents can cause surfaces in the cockpit to
become porous. This could result in plastic
parts breaking away when the airbags are
deployed. There is a danger of injury.
Do not use care products and cleaning agents containing solvents to clean the cockpit.
! Never attach the following to plastic surfa-
ces:
R stickers
R films
R perfume oil container or similar
You could otherwise damage the plastic.
! Do not allow cosmetics, insect repellent or
sunscreen to come in contact with the plastic trim. This maintains the high-quality look of
the surfaces.
X Wipe the plastic trim with a damp, lint-free
cloth, e.g. a microfibre cloth.
X Heavy soiling: use care and cleaning prod-
ucts recommended and approved by
Mercedes-Benz.
The surface may change colour temporarily.
Wait until the surface is dry again.
Cleaning the steering wheel and selec-
tor lever X
Thoroughly wipe with a damp cloth or use
leather care agents that have been recom-
mended and approved by Mercedes-Benz.
Cleaning wood trim and trim elements !
Do not use solvent-based cleaning agents
such as tar remover, wheel cleaners, polishes
or waxes. There is otherwise a risk of damag- ing the surface. 336
CareMaintenance and care
Page 343 of 389
Towing eye
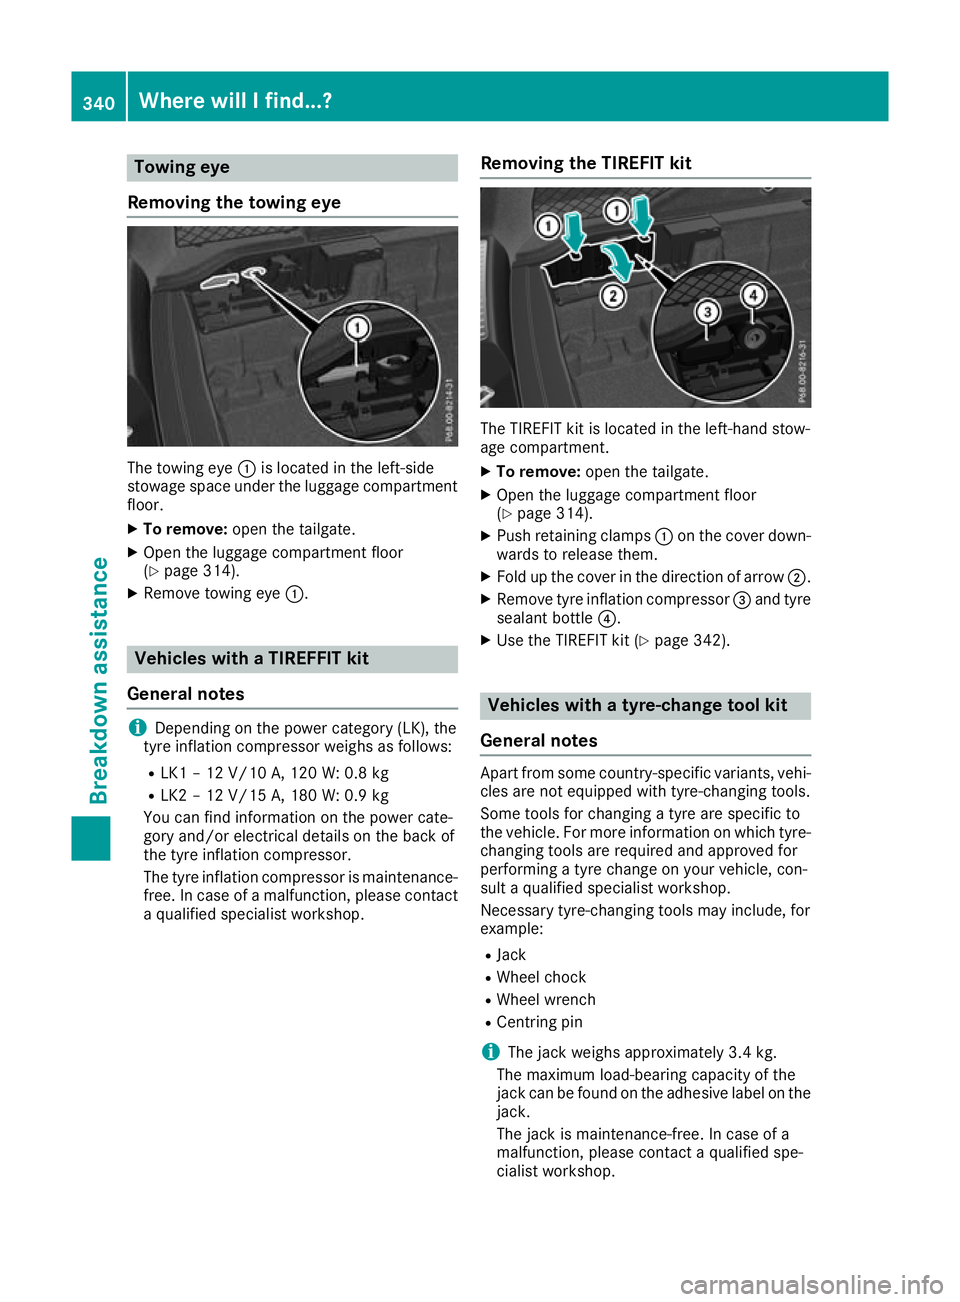
Removing the towing eye The towing eye
:is located in the left-side
stowage space under the luggage compartment
floor.
X To remove: open the tailgate.
X Open the luggage compartment floor
(Y page 314).
X Remove towing eye :.Vehicles with a TIREFFIT kit
General notes i
Depending on the power category (LK), the
tyre inflation compressor weighs as follows:
R LK1 – 12 V/10 A, 120 W: 0.8 kg
R LK2 – 12 V/15 A, 180 W:0.9 kg
You can find information on the power cate-
gory and/or electrical details on the back of
the tyre inflation compressor.
The tyre inflation compressor is maintenance-
free. In case of a malfunction, please contact
a qualified specialist workshop. Removing the TIREFIT kit The TIREFIT kit is located in the left-hand stow-
age compartment.
X To remove: open the tailgate.
X Open the luggage compartment floor
(Y page 314).
X Push retaining clamps :on the cover down-
wards to release them.
X Fold up the cover in the direction of arrow ;.
X Remove tyre inflation compressor =and tyre
sealant bottle ?.
X Use the TIREFIT kit (Y page 342). Vehicles with a tyre-change tool kit
General notes Apart from some country-specific variants, vehi-
cles are not equipped with tyre-changing tools.
Some tools for changing a tyre are specific to
the vehicle. For more information on which tyre- changing tools are required and approved for
performing a tyre change on your vehicle, con-
sult a qualified specialist workshop.
Necessary tyre-changing tools may include, for
example:
R Jack
R Wheel chock
R Wheel wrench
R Centring pin
i The jack weighs approximately 3.4 kg.
The maximum load-bearing capacity of the
jack can be found on the adhesive label on the jack.
The jack is maintenance-free. In case of a
malfunction, please contact a qualified spe-
cialist workshop. 340
Where will I find...?Breakdown assistance
Page 344 of 389
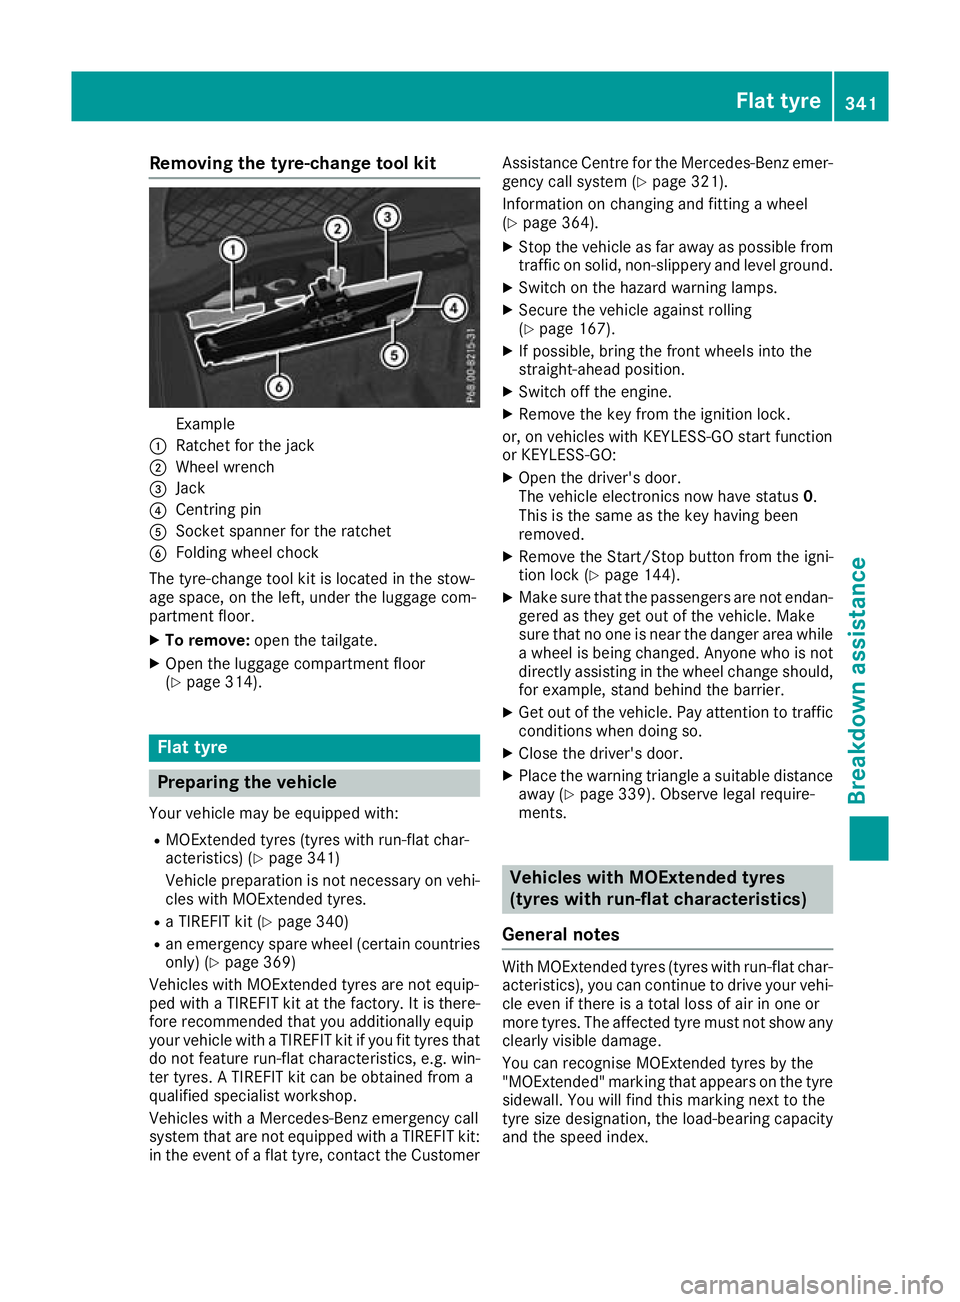
Removing the tyre-change tool kit
Example
: Ratchet for the jack
; Wheel wrench
= Jack
? Centring pin
A Socket spanner for the ratchet
B Folding wheel chock
The tyre-change tool kit is located in the stow-
age space, on the left, under the luggage com-
partment floor.
X To remove: open the tailgate.
X Open the luggage compartment floor
(Y page 314). Flat tyre
Preparing the vehicle
Your vehicle may be equipped with: R MOExtended tyres (tyres with run-flat char-
acteristics) (Y page 341)
Vehicle preparation is not necessary on vehi- cles with MOExtended tyres.
R a TIREFIT kit (Y page 340)
R an emergency spare wheel (certain countries
only) (Y page 369)
Vehicles with MOExtended tyres are not equip-
ped with a TIREFIT kit at the factory. It is there-
fore recommended that you additionally equip
your vehicle with a TIREFIT kit if you fit tyres that do not feature run-flat characteristics, e.g. win-
ter tyres. A TIREFIT kit can be obtained from a
qualified specialist workshop.
Vehicles with a Mercedes-Benz emergency call
system that are not equipped with a TIREFIT kit:
in the event of a flat tyre, contact the Customer Assistance Centre for the Mercedes-Benz emer-
gency call system (Y page 321).
Information on changing and fitting a wheel
(Y page 364).
X Stop the vehicle as far away as possible from
traffic on solid, non-slippery and level ground.
X Switch on the hazard warning lamps.
X Secure the vehicle against rolling
(Y page 167).
X If possible, bring the front wheels into the
straight-ahead position.
X Switch off the engine.
X Remove the key from the ignition lock.
or, on vehicles with KEYLESS-GO start function
or KEYLESS ‑GO:
X Open the driver's door.
The vehicle electronics now have status 0.
This is the same as the key having been
removed.
X Remove the Start/Stop button from the igni-
tion lock (Y page 144).
X Make sure that the passengers are not endan-
gered as they get out of the vehicle. Make
sure that no one is near the danger area while a wheel is being changed. Anyone who is notdirectly assisting in the wheel change should,
for example, stand behind the barrier.
X Get out of the vehicle. Pay attention to traffic
conditions when doing so.
X Close the driver's door.
X Place the warning triangle a suitable distance
away (Y page 339). Observe legal require-
ments. Vehicles with MOExtended tyres
(tyres with run-flat characteristics)
General notes With MOExtended tyres (tyres with run-flat char-
acteristics), you can continue to drive your vehi-
cle even if there is a total loss of air in one or
more tyres. The affected tyre must not show any clearly visible damage.
You can recognise MOExtended tyres by the
"MOExtended" marking that appears on the tyre
sidewall. You will find this marking next to the
tyre size designation, the load-bearing capacity
and the speed index. Flat tyre
341Breakdown assistance
Page 346 of 389
inhale TIREFIT fumes. Keep tyre sealant away
from children. There is a risk of injury.
If you come into contact with the tyre sealant,
observe the following:
R Rinse off the tyre sealant from your skin
immediately with water.
R If the tyre sealant comes into contact with
your eyes, immediately rinse them thor-
oughly with clean water.
R If tyre sealant is swallowed, immediately
rinse your mouth out thoroughly and drink
plenty of water. Do not induce vomiting,
and seek medical attention immediately.
R Immediately change out of clothing which
has come into contact with tyre sealant.
R If an allergic reaction occurs, seek medical
attention immediately.
! After use, excess tyre sealant may run out of
the filler hose. This could cause stains.
Therefore, place the tyre sealant bottle with
filler hose in the plastic bag which is con-
tained the TIREFIT kit. H
Environmental note
Have the used tyre sealant bottle disposed of
professionally, e.g. at a qualified specialist
workshop.
! Do not operate the tyre inflation compres-
sor for longer than ten minutes at a time with- out a break. It may otherwise overheat.
The tyre inflation compressor can be oper-
ated again once it has cooled down.
Comply with the manufacturer's safety instruc-
tions on the sticker on the tyre inflation com-
pressor.
Using the TIREFIT kit X
Do not remove any foreign objects that have
penetrated the tyre, e.g. screws or nails.
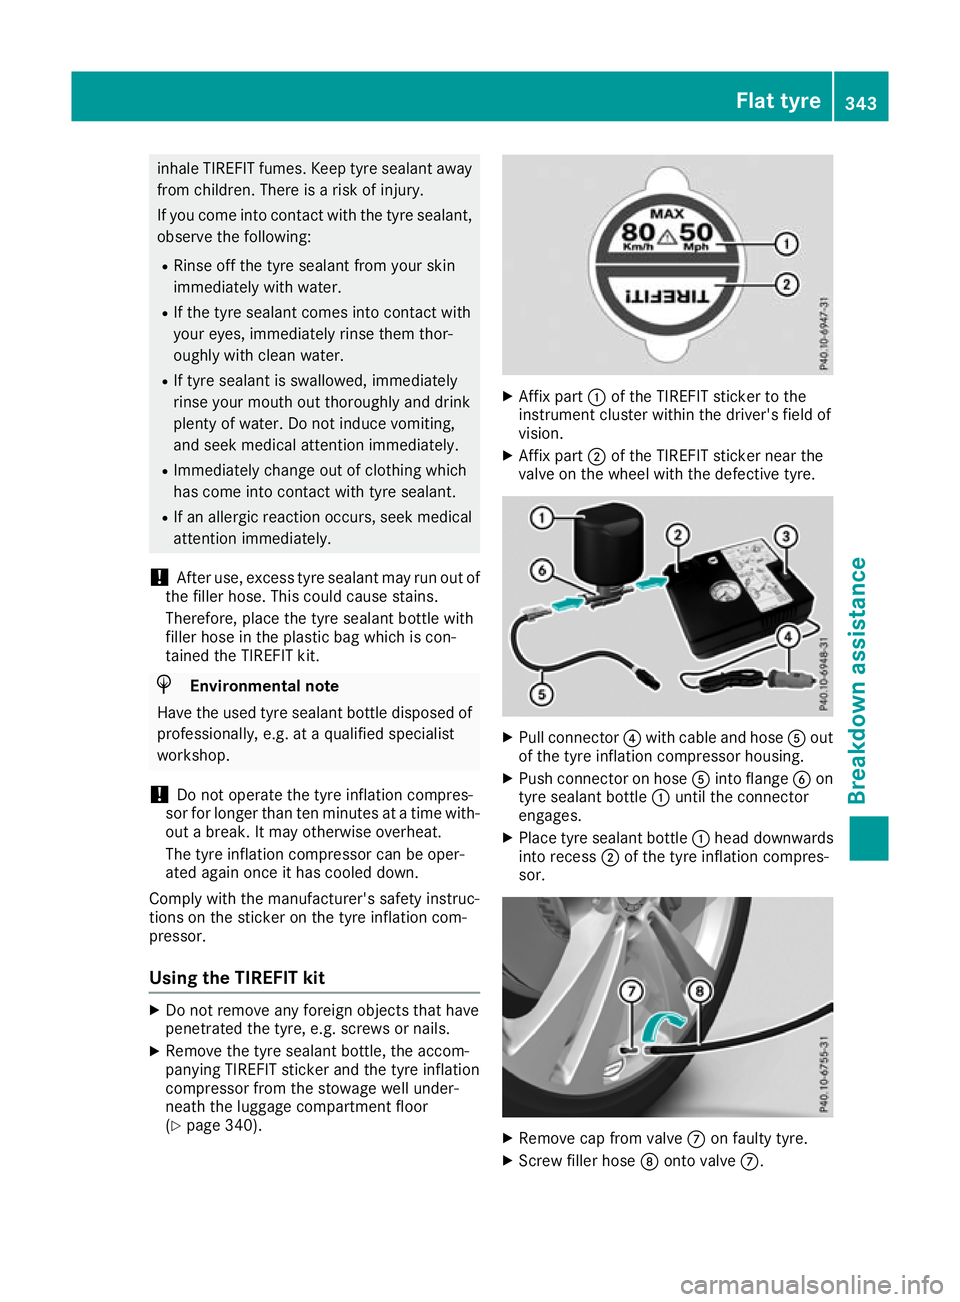
X Remove the tyre sealant bottle, the accom-
panying TIREFIT sticker and the tyre inflation
compressor from the stowage well under-
neath the luggage compartment floor
(Y page 340). X
Affix part :of the TIREFIT sticker to the
instrument cluster within the driver's field of
vision.
X Affix part ;of the TIREFIT sticker near the
valve on the wheel with the defective tyre. X
Pull connector ?with cable and hose Aout
of the tyre inflation compressor housing.
X Push connector on hose Ainto flange Bon
tyre sealant bottle :until the connector
engages.
X Place tyre sealant bottle :head downwards
into recess ;of the tyre inflation compres-
sor. X
Remove cap from valve Con faulty tyre.
X Screw filler hose Donto valve C. Flat tyre
343Breakdown assistance Z