2016 MERCEDES-BENZ GLC-Class tow
[x] Cancel search: towPage 92 of 418

Meanwhile, the fuel filler flap will not be
locked or unlocked.
You cannot unlock the vehicle centrally from
the inside if the vehicle has been locked with
the SmartKey or KEYLESS-GO.
If the vehicle has been locked with the Smart-
Key or with KEYLESS-GO, opening a door from the inside will trigger the anti-theft alarm sys-
tem. Switch off the alarm (
Ypage 78).
When a locked door is opened from inside the
vehicle, the previous unlocking process will
be acknowledged if the vehicle:
Rhas been locked with the locking button for
the central locking or
Rhas been locked automatically
The vehicle will be fully unlocked if it had pre-
viously been fully unlocked. If only the driver's
door had been previously unlocked, only the
door which has been opened from the inside
is unlocked.
Automatic locking feature
XTo deactivate: press and hold button :
for approximately five seconds until a tone sounds.
XTo activate: press and hold button ;for
approximately five seconds until a tone
sounds.
If you press one of the two buttons and do not
hear a tone, the relevant setting has already
been selected. The vehicle is locked automatically when the
ignition is switched on and the wheels are
turning.
You could therefore be locked out if:
Rthe vehicle is being pushed.
Rthe vehicle is being towed.
Rthe vehicle is on a roller dynamometer.
iYou can also activate and deactivate the
automatic locking function via COMAND or
Audio 20 (see the separate operating
instructions).
Unlocking the driver's door (mechan-
ical key)
If the vehicle can no longer be locked or
unlocked with the SmartKey or KEYLESS-GO,
use the mechanical key.
XTake the mechanical key out of the Smart-
Key (
Ypage 85).
XInsert the mechanical key into opening :
in the protective cap.
XPull and hold the door handle.
XPull the protective cap on the mechanical
key as straight as possible away from the
vehicle until it releases.
XRelease the door handle.
90Doors
Opening and closing
Page 135 of 418

XIn recess?on the inside of the closing
handle, pry off and remove the upper sec-
tion of handle =with a flat and smooth
object, e.g. a screwdriver.
XPull the lower section of handle :using a
sharp, sudden movement to remove it from
the paneling and then place it to one side.
XReach under the right-hand side of paneling
B and apply a gentle jolting force along the
entire length of the paneling in order to
unclip it.
XRelease and pull out locator lighting con-
nector Cat the latch.
XVehicles with EASY-PACK tailgate: pull out
the plug connector for the switch of the
EASY-PACK tailgate in the top right of the
paneling.
XVehicles with electric fold-out trailer tow
hitch: unlock and pull out the plug connec-
tor for the electric fold-out trailer tow hitch
in the top left of the paneling.
XPlace paneling Bto one side.
XOn the side where the bulb is to be
changed, unclip the remaining part of pan- eling
Dfrom the assembly using a sudden,
sharp movements, until bulb holder Eis
accessible.
XTurn the bulb counter-clockwise and pull it out of bulb holder E.
XInsert the new bulb into bulb holder Eand
turn it clockwise.
XPosition paneling Dand engage it in place
by tapping it with your hand.
XBefore beginning the installation, check
that all the metal clips are inserted in the
parts placed to one side: 2 clips ;in the
upper part of handle =and 4 clips Ain
paneling B.
XIf not, remove the missing metal clips from
the metal openings in the tailgate and
insert them in the appropriate places.
XTake paneling Band connect plug con-
nector Cto the surround lighting.
iThe surround lighting only illuminates
when the tailgate has been shut and reop-
ened.
XVehicles with EASY-PACK tailgate: push in
the plug connector for the switch of the
EASY-PACK tailgate in the top right of the
paneling.
XVehicles with electric fold-out trailer tow
hitch: push in the plug connector for the
electric fold-out trailer tow hitch in the top
left of the paneling.
XPosition paneling Band engage it in place
by tapping it with your hand, starting from
the outside.
Replacing bulbs133
Lights and windshield wipers
Z
Page 136 of 418
XClip inthe lower section of handle :again.
XInsert and engage the upper section of han-
dle =into lower section :.
Windshield wipers
Switching the windshield wiper
on/off
!
Do not operate the windshield wipers
when the windshield isdry, as this could
damage the wiperblades. Moreover, dust
that has co llected on the windshield can
scratch the glass if wiping takes place when
the windshield is dry.
If it is necessary to switch on the windshield
wiper sin dry weather conditions, always
use washer fluid when operating the wind-
shield wiper s.
!Ifthe windshield wipers leave smears on
the windshield after the vehicle has been
washed inan automat iccar wash, wax or
other residues may bethe reason for this.
Clean the windshield using washer fluid
after washing the vehicle inan automat ic
car wash.
!In term ittent wiping with rain sensor: due
to optical influences and the windshield
becoming dirtyin dry weather conditions,
the windshield wipers may beactivated
inadvertently. This could then damage the
win dshield wiper blades or scratch the
win dshield.
For th isreason, you should always switch
off the windshield wipersin dry weather.
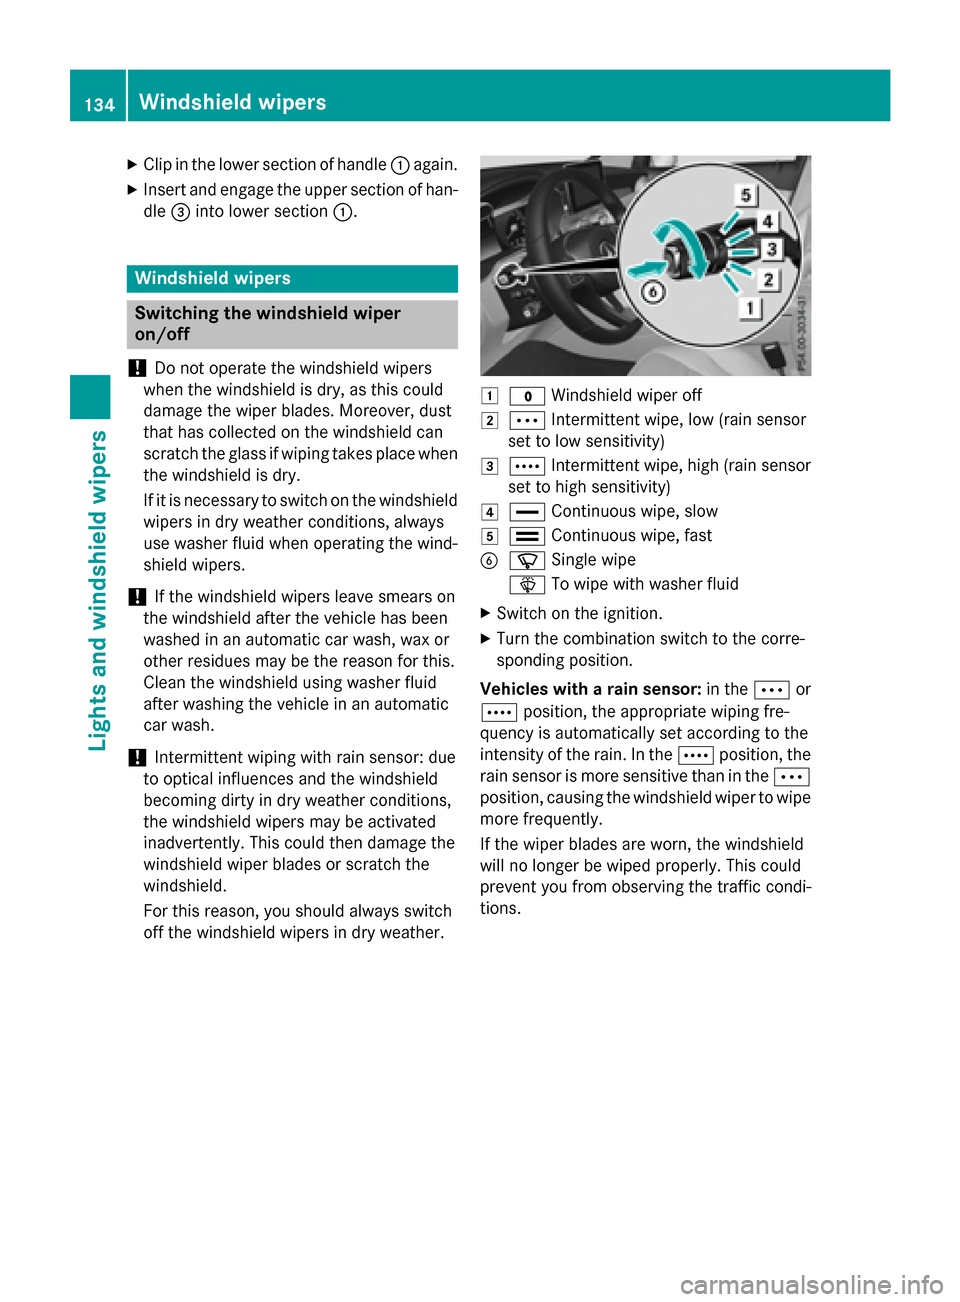
1$ Windshield wiper off
2ÄInterm ittent wipe, low (rain sensor
set to low sensitivit y)
3ÅInterm ittent wipe, high (rain sensor
set to high sensitivit y)
4°Continuous wipe, slow
5¯Continuous wipe, fast
BíSingle wipe
î Towipe with washer fluid
XSwitch on the ignition.
XTurn the combination switch to the corre-
sponding position.
Vehicles with a rain sensor: inthe Ä or
Å position, the appropriate wiping fre-
quency isautomatical lyset according to the
intensity of the rain. Inthe Å position, the
rain sensor ismore sensitive thaninthe Ä
position, causing the windshield wiper to wipe
more frequently.
If the wiper bladesare worn, the windshield
will no longer bewiped properly. This could
prevent you from observing the traff iccond i-
tions.
134Windshield wipers
Lights and windshield wipers
Page 153 of 418
Useful information............................152
Notes on breaking-in a new vehi-
cle ....................................................... 152
Driving ............................................... 152
DYNAMIC SELECT switch .................161
Automatic transmission ...................161
Refueling ............................................ 169
Parking ............................................... 172
Driving tips ........................................ 176
Driving systems ................................ 181
Towing a trailer ................................. 227
151
Driving and parking
Page 154 of 418
Useful information
i
This Operator's Manual describes all
models and all standard and optional equip-
ment of your vehicle available at the time of
publication of the Operator's Manual.
Country-specific differences are possible.
Please note that your vehicle may not be
equipped with all features described. This
also applies to safety-related systems and
functions.
iRead the information on qualified special-
ist workshops (
Ypage 27).
Notes on breaking-in a new vehicle
Important safety notes
The sensor system of some driving and driv-
ing safety systems adjusts automatically
while a certain distance is being driven after
the vehicle has been delivered or after
repairs. Full system effectiveness is not
reached until the end of this teach-in proce-
dure.
New and replaced brake pads and discs only
reach their optimum braking effect after sev-
eral hundred kilometers of driving. Compen-
sate for this by applying greater force to the
brake pedal.
The first 1000 miles (1500 km)
The more you look after the engine when it is
new, the more satisfied you will be with its
performance in the future.
RYou should therefore drive at varying vehi-
cle and engine speeds for the first
1000 miles (1500 km).
RAvoid heavy loads, e.g. driving at full throt-
tle, during this period.
RWhen changing gears manually, change up
in good time, before the tachometer needle
reaches Ôof the way to the red area of the
tachometer.
RDo not manually shift to a lower gear to
brake the vehicle.
RTry to avoid depressing the accelerator
pedal beyond the point of resistance (kick-
down).
RIdeally, for the first 1,000 miles (1,500 km),
drive in program E.
After 1000 miles (1500 km), you can increase
the engine speed gradually and accelerate
the vehicle to full speed.
You should also observe these notes on
breaking in if the engine or parts of the drive
train on your vehicle have been replaced.
Always observe the maximum permissible
speed.
Driving
Important safety notes
GWARNING
Objects in the driver's footwell can restrict the pedal travel or obstruct a depressed pedal.
The operating and road safety of the vehicle is
jeopardized. There is a risk of an accident.
Make sure that all objects in the vehicle are
stowed correctly, and that they cannot enter
the driver's footwell. Install the floormats
securely and as specified in order to ensure
sufficient clearance for the pedals. Do not use
loose floormats and do not place floormats on
top of one another.
GWARNING
Unsuitable footwear can hinder correct usage of the pedals, e.g.:
Rshoes with thick soles
Rshoes with high heels
Rslippers
There is a risk of an accident.
Wear suitable footwear to ensure correct
usage of the pedals.
152Driving
Driving and parking
Page 165 of 418

Shifting to neutral N
GWARNING
If children are left unsupervised in the vehicle,
they could:
Ropen the doors, thus endangering other
people or road users.
Rget out and disrupt traffic.
Roperate the vehicle's equipment.
Additionally, children could set the vehicle in
motion if, for example, they:
Rrelease the parking brake.
Rshifting the automatic transmission out of
park position P
RStart the engine.
There is a risk of an accident and injury.
When leaving the vehicle, always take the
SmartKey with you and lock the vehicle. Never
leave children or animals unattended in the
vehicle. Always keep the SmartKey out of
reach of children.
XIf the transmission is in position Dor R:
push the DIRECT SELECT lever up or down to the first point of resistance.
XIf the transmission is in position P: depress
the brake pedal and push the DIRECT
SELECT lever up or down to the first point of
resistance.
If you switch the engine off with the trans-
mission in position Ror D, the automatic
transmission shifts to Nautomatically.
With the SmartKey: if you then open the
driver's door or the front-passenger door or
remove the SmartKey from the ignition, the
automatic transmission shifts to Pautomati-
cally.
With the Start/Stop button: if you then
open the driver's door or the front-passenger door, the automatic transmission shifts to P
automatically.
If you want the automatic transmission to
remain in neutral N, e.g. when having the vehicle cleaned in an automatic car wash with
a towing system:
Using the SmartKey:
XSwitch on the ignition.
XDepress the brake pedal and keep it
depressed.
XShift to neutral
N.
XRelease the brake pedal.
XRelease the electric parking brake.
XSwitch off the ignition and leave the Smart-
Key in the ignition lock.
With the Start/Stop button:
XRemove the Start/Stop button from the
ignition lock.
XInsert the SmartKey into the ignition lock.
XSwitch on the ignition.
XDepress the brake pedal and keep it
depressed.
XShift to neutral N.
XRelease the brake pedal.
XRelease the electric parking brake.
XSwitch off the ignition and leave the Smart-
Key in the ignition lock.
Engaging drive position D
XIf the transmission is in position Ror N:
push the DIRECT SELECT lever down past
the first point of resistance.
XIf the transmission is in position P: depress
the brake pedal and push the DIRECT
SELECT lever down past the first point of
resistance.
Transmission position and drive pro-
gram display
The current transmission position and drive
program appear in the multifunction display.
Automatic transmission163
Driving and parking
Z
Page 167 of 418

ANeutral
Do not shift the transmission toN
while driving. Otherwise, the auto-
matic transmission could be dam-
aged.
No power is transmitted from the
engine to the drive wheels.
Releasing the brake pedal will allow
you to move the vehicle freely, e.g. to push it or tow it.
If ESP
®is deactivated or faulty:
shift the transmission to position N
if the vehicle is in danger of skid-
ding, e.g. on icy roads.
If you switch the engine off with the
transmission in position Ror D, the
automatic transmission shifts to N
automatically.
!Rolling in neutral Ncan damage
the drive train.
7Drive
The automatic transmission
changes gear automatically. All
forward gears are available.
Driving tips
Changing gear
The automatic transmission shifts to the indi-
vidual gears automatically when it is in trans-
mission position D. This automatic gear shift-
ing behavior is determined by:
Rthe selected drive program
Rthe position of the accelerator pedal
Rthe road speed
Accelerator pedal position
Your style of driving influences how the auto- matic transmission shifts gear:
Rlittle throttle: early upshifts
Rmore throttle: late upshifts
Double-clutch function
When shifting down, the double-clutch func-
tion is active regardless of the currently selec-
ted drive program. The double-clutch function
reduces load change reactions and is condu-
cive to a sporty driving style. The sound gen-
erated by the double-clutch function depends
on the drive program selected.
Kickdown
Use kickdown for maximum acceleration.
XDepress the accelerator pedal beyond the
pressure point.
The automatic transmission shifts to a
lower gear depending on the engine speed.
XEase off the accelerator pedal once the
desired speed is reached.
The automatic transmission shifts back up.
Rocking the vehicle free
Rocking the vehicle free by shifting back and
forth between transmission positions Dand R
can help to free a vehicle that has become
stuck in mud or snow.
The vehicle's engine management restricts
switching between transmission positions D
and Rto speeds up to a maximum of 5 mph
(9 km/h).
To shift back and forth between transmission
positions Dand R, move the DIRECT SELECT
lever up and down past the point of resist-
ance.
Towing a trailer
XDrive in the middle of the engine speed
range on uphill gradients.
XManual shifting: depending on the uphill
or downhill gradient, shift into a gear
(
Ypage 167), in which the engine will run
the middle of the engine speed range.
This also applies if cruise control or
DISTRONIC PLUS is activated.
Automatic transmission165
Driving an d parking
Z
Page 171 of 418

Problems with the transmission
ProblemPossible causes/consequences andMSolutions
The transmission has
problems shifting gear.The transmission is losing oil.
XHave the transmission checked at a qualified specialist work-
shop immediately.
The acceleration ability
is deteriorating.
The transmission no
longer changes gear.The transmission is in emergency mode.
It is only possible to shift intosecondgear and reverse gear.
XStop the vehicle.
XShift the transmission to position P.
XSwitch off the engine.
XWait at least ten seconds before restarting the engine.
XShift the transmission to positionDor R.
If D is selected, the transmission shifts into secondgear; ifRis
selected, the transmission shifts into reverse gear.
XHave the transmission checked at a qualified specialist work-
shop immediately.
Transfer case
This section is only valid for vehicles with 4-
wheel drive (4MATIC). Power is always trans-
mitted to both axles.
!Performance tests may only be carried
out on a 2-axle dynamometer. The brake
system or transfer case could otherwise be
damaged. Contact a qualified specialist
workshop for a performance test.
!Since ESP®engages automatically, the
ignition must be switched off (the Smart-
Key or Start/Stop button must be in posi-
tion 0or 1) if:
Rthe electric parking brake is being tested
on a brake dynamometer
Rthe vehicle is being towed with only one
axle raised (not permitted for vehicles
with 4MATIC).
The brake system could otherwise be dam-
aged.
!Vehicles with 4MATIC must not be towed
with either the front or the rear axle raised,
as doing so will damage the transmission.
Refueling
Important safety notes
GWARNING
Fuel is highly flammable. If you handle fuel
incorrectly, there is a risk of fire and explo-
sion.
You must avoid fire, open flames, creating
sparks and smoking. Switch off the engine
and, if applicable, the auxiliary heating before refueling.
GWARNING
Fuel is poisonous and hazardous to health.
There is a risk of injury.
You must make sure that fuel does not come into contact with your skin, eyes or clothing
and that it is not swallowed. Do not inhale fuel
vapors. Keep fuel away from children.
Refueling169
Driving and parking
Z