2016 MERCEDES-BENZ GLC-Class battery
[x] Cancel search: batteryPage 7 of 418

Driving abroad ............................... 343
Hiding a service message .............. 342
Resetting the service interval dis-
play ................................................ 343
Service message ............................ 342
Special service requirements ......... 343
ATA (Anti-Theft Alarm system)
Activating/deactivating ................... 78
Function ........................................... 78
Switching off the alarm .................... 78
ATTENTION ASSIST
Activating/deactivating ................. 253
Display message ............................ 279
Function/notes ............................. 214
Authorized Mercedes-Benz Center
see Qualified specialist workshop
AUTO lights
Display message ............................ 275
see Lights
Automatic car wash (care) ............... 344
Automatic engine start (ECO start/
stop function) .................................... 159
Automatic engine switch-off (ECO
start/stop function) .......................... 158
Automatic headlamp mode .............. 124
Automatic transmission
Accelerator pedal position ............. 165
Changing gear ............................... 165
DIRECT SELECT lever ..................... 162
Display message ............................ 287
Double-clutch function .................. 165
Drive program ................................ 166
Drive program display .................... 163
Driving tips .................................... 165
DYNAMIC SELECT switch .............. 161
Emergency running mode .............. 169
Engaging drive position .................. 163
Engaging neutral ............................ 163
Engaging park position automati-
cally ............................................... 162
Engaging reverse gear ................... 162
Engaging the park position ............ 162
Kickdown ....................................... 165
Manual shifting .............................. 167
Overview ........................................ 161
Problem (malfunction) ................... 169
Pulling away ................................... 157
Rocking the vehicle free ................ 165 Starting the engine
........................ 155
Ste
ering wheel paddle shifters ...... 167
Trailer towing ................................. 165
Transmission position display
(DIRECT SELECT lever) ................... 163
Transmission positions .................. 164
Automatic transmission emer-
gency mode ....................................... 169
Axle load, permissible (trailer tow-
ing) ...................................................... 416
B
Backup lamp
Changing bulbs .............................. 132
Bag hook ............................................ 313
Ball coupling
Installing ........................................ 230
Removing ....................................... 234
BAS (Brake Assist System) ................. 68
BAS PLUS with Cross-Traffic Assist
(Brake Assist PLUS with Cross-
Traffic Assist)
Function/notes ................................ 68
Important safety notes .................... 68
Battery (SmartKey)
Checking .......................................... 86
Important safety notes .................... 85
Replacing ......................................... 86
Battery (vehicle)
Charging ........................................ 363
Display message ............................ 277
Important safety notes .................. 361
Jump starting ................................. 365
Blind Spot Assist
Activating/deactivating (on-
board computer) ............................ 253
Display message ............................ 281
Notes/function .............................. 217
see Active Blind Spot Assist
Brake fluid
Display message ............................ 264
Notes ............................................. 412
Brake force distribution
see EBD (electronic brake force
distribution)
Brake lamps
Display message ............................ 273
Index5
Page 19 of 418

Fuel ................................................ 409
Important safety notes .................. 409
Refrigerant (air-conditioning sys-
tem) ............................................... 414
Washer fluid ................................... 413
Settings
Factory (on-board computer) ......... 256
On-board computer ....................... 252
Side impact air bag ............................. 50
Side marker lamp (display mes-
sage) ................................................... 274
Side windows
Cleaning ......................................... 347
Convenience closing feature ............ 99
Convenience opening feature .......... 99
Important safety information ........... 98
Opening/closing .............................. 98
Problem (malfunction) ................... 101
Resetting ....................................... 100
Reversing feature ............................. 98
Ski and snowboard bag .................... 309
Sliding sunroof
see Panorama roof with power
tilt/sliding panel
SmartKey
Changing the battery ....................... 86
Changing the programming ............. 84
Checking the battery ....................... 86
Convenience closing feature .......... 100
Convenience opening feature .......... 99
Display message ............................ 290
Door central locking/unlocking ....... 83
Important safety notes .................... 82
KEYLESS-GO start function .............. 84
Loss ................................................. 87
Mechanical key ................................ 85
Overview .......................................... 82
Positions (ignition lock) ................. 153
Problem (malfunction) ..................... 87
Starting the engine ........................ 155
Smartphone
Starting the engine ........................ 156
Snow chains ...................................... 377
Socket (12 V)
Cargo compartment ....................... 322
Center console .............................. 321
General notes ................................ 321
Rear compartment ......................... 321 Special seat belt retractor
.................. 61
Specialist workshop ............................ 27
Speed, controlling
see Cruise control
Speedometer
Activating/deactivating the addi-
tional speedometer ........................ 255
Digital ............................................ 245
In the Instrume
nt cluster ................. 33
Segments ...................................... 238
Selecting the display unit ............... 255
see Instrument cluster
Standing lamps
Display message ............................ 274
Switching on/off ........................... 126
Start/Stop button
Starting the engine ........................ 156
Start/stop function
see ECO start/stop function
Starting (engine) ................................ 155
STEER CONTROL .................................. 78
Steering
Display message ............................ 289
Warning lamps ............................... 303
Steering Assist and Stop&Go Pilot
(DISTRONIC PLUS)
Display message ............................ 284
Steering assistant STEER CON-
TROL
see STEER CONTROL
Steering wheel
Adjusting (electrically) ................... 116
Adjusting (manually) ...................... 115
Button overview ............................... 35
Buttons (on-board computer) ......... 239
Cleaning ......................................... 350
EASY ENTRY/EXIT feature ............. 117
Important safety notes .................. 115
Steering wheel heating .................. 116
Storing settings (memory func-
tion) ............................................... 122
Steering wheel heating
Problem (malfunction) ................... 117
Switching on/off ........................... 116
Steering wheel paddle shifters ........ 167
Stowage areas ................................... 306
Index17
Page 29 of 418

the driver's footwell. Install the floormats
securely and as specified in order to ensure
sufficient clearance for the pedals. Do not use
loose floormats and do not place floormats on
top of one another.
!If the engine is switched off and equip-
ment on the diagnostics connection is
used, the starter battery may discharge.
Connecting equipment to the diagnostics
connection can lead to emissions monitoring
information being reset, for example. This
may lead to the vehicle failing to meet the
requirements of the next emissions test dur-
ing the main inspection.
Qualified specialist workshop
An authorized Mercedes-Benz Center is a
qualified specialist workshop. It has the nec-
essary specialist knowledge, tools and quali-
fications to correctly carry out the work
required on your vehicle. This is especially the
case for work relevant to safety.
Observe the notes in the Maintenance Book-
let.
Always have the following work carried out at an authorized Mercedes-Benz Center:
Rwork relevant to safety
Rservice and maintenance work
Rrepair work
Ralterations, installation work and modifica-
tions
Rwork on electronic components
Correct use
If you remove any warning stickers, you or
others could fail to recognize certain dangers.
Leave warning stickers in position.
Observe the following information when driv-
ing your vehicle:
Rthe safety notes in this manual
Rthe vehicle technical data
Rtraffic rules and regulations
Rlaws and safety standards pertaining to
motor vehicles
Problems with your vehicle
If you should experience a problem with your
vehicle, particularly one that you believe mayaffect its safe operation, we urge you to con-
tact an authorized Mercedes-Benz Center
immediately to have the problem diagnosed
and rectified. If the problem is not resolved to
your satisfaction, please discuss the problem
again with a Mercedes-Benz Center or con-
tact us at one of the following addresses.
In the USA
Customer Assistance Center
Mercedes-Benz USA, LLC
One Mercedes Drive
Montvale, NJ 07645-0350
In Canada
Customer Relations Department
Mercedes-Benz Canada, Inc.
98 Vanderhoof Avenue
Toronto, Ontario M4G 4C9
Reporting safety defects
USA only:
The following text is published as required ofmanufacturers under Title 49, Code of U.S.
Federal Regulations, Part 575 pursuant to the
"National Traffic and Motor Vehicle Safety Act
of 1966".
If you believe that your vehicle has a defect
which could cause a crash or could cause
injury or death, you should immediately
inform the National Highway Traffic Safety
Administration (NHTSA) in addition to notify-
ing Mercedes-Benz USA, LLC.
If NHTSA receives similar complaints, it may
open an investigation, and if it finds that a
safety defect exists in a group of vehicles, it
may order a recall and remedy campaign.
Introduction27
Z
Page 80 of 418

You can prevent the intervention of the PRE-
SAFE®Brake at any time by:
Rdepressing the accelerator pedal further.
Ractivating kickdown.
Rreleasing the brake pedal.
The braking action of PRE-SAFE
®Brake is
ended automatically if:
Ryou maneuver to avoid the obstacle.
Rthere is no longer a risk of collision.
Rthere is no longer an obstacle detected in
front of your vehicle.
STEER CONTROL
General information
STEER CONTROL helps you by transmitting a noticeable steering force to the steering
wheel in the direction required for vehicle
stabilization.
This steering assistance is provided in partic-
ular if:
Rboth right wheels or both left wheels are on
a wet or slippery road surface when you
brake.
Rthe vehicle starts to skid.
Important safety notes
iObserve the "Important safety notes" sec-
tion (
Ypage 67).
No steering support is provided from STEER
CONTROL, if:
RESP®is malfunctioning.
Rthe lighting is faulty.
If ESP
®is malfunctioning, you will be assisted
further by the electrical power steering.
Protection against theft
Immobilizer
The immobilizer prevents your vehicle from
being started without the correct SmartKey.
XTo activate with the SmartKey: remove
the SmartKey from the ignition lock.
XTo activate with KEYLESS-GO start-
function or KEYLESS-GO: switch the igni-
tion off and open the driver's door.
XTo deactivate: switch on the ignition.
When leaving the vehicle, always take the
SmartKey with you and lock the vehicle. Any-
one can start the engine if a valid SmartKey
has been left inside the vehicle.
iThe immobilizer is always deactivated
when you start the engine.
In the event that the engine cannot be star-
ted (yet the vehicle's battery is charged),
the system is not operational. Contact an
authorized Mercedes-Benz Center or call
1-800-FOR-MERCedes (in the USA) or
1-800-387-0100 (in Canada).
ATA (anti-theft alarm system)
XTo arm: lock the vehicle with the SmartKey
or KEYLESS-GO.
Indicator lamp :flashes. The alarm sys-
tem is armed after approximately
10 seconds.
XTo disarm: unlock the vehicle with the
SmartKey or KEYLESS-GO.
or
XInsert the SmartKey into the ignition lock.
78Protection against theft
Safety
Page 86 of 418

Rwhen the external door handles are
touched
Rduring convenience closing
XTo unlock the vehicle:touch the inner
surface of the door handle.
XTo lock the vehicle: touch sensor sur-
face :or;.
Make sure that you do not touch the inner
surface of the door handle.
XConvenience closing feature: touch
recessed sensor surface ;for an exten-
ded period.
Further information on the convenience
closing feature (
Ypage 99).
XTo unlock the tailgate: pull the tailgate
handle.
Deactivating and activating
If you do not intend to use a SmartKey for an
extended period of time, you can deactivate
the KEYLESS-GO function of the SmartKey.
The SmartKey will then use very little power,
thereby conserving battery power. For the
purposes of activation/deactivation, the
vehicle must not be nearby.
XTo deactivate: press the&button on
the SmartKey twice in rapid succession.
The battery check lamp of the SmartKey
flashes twice briefly and lights up once, then KEYLESS-GO is deactivated
(
Ypage 86).
XTo activate:
press any button on the
SmartKey.
or
XInsert the SmartKey into the ignition lock.
KEYLESS-GO and all of its associated fea-
tures are available again.
KEYLESS-GO start function
Bear in mind that the engine can be started by
any of the vehicle occupants if there is a
SmartKey in the vehicle.
Changing the settings of the locking
system
You can change the settings of the locking
system. This means that only the driver's door
and the fuel filler flap are unlocked when the
vehicle is unlocked. This is useful if you fre-
quently travel on your own.
XTo change the setting: press and hold the
% and& buttons simultaneously for
approximately six seconds until the battery
indicator lamp flashes twice (
Ypage 86).
If the setting of the locking system is changed
within the signal range of the vehicle, press-
ing the &or% button:
Rlocks or
Runlocks the vehicle
The SmartKey now functions as follows:
XTo unlock: press the%button once.
XTo unlock centrally: press the%but-
ton twice.
XTo lock: press the &button.
84SmartKey
Opening and closing
Page 87 of 418

The KEYLESS-GO function is changed as fol-
lows:
XTo unlock the driver's door:touch the
inner surface of the door handle on the
driver's door.
XTo unlock centrally: touch the inner sur-
face of the door handle on the front-
passenger door or the rear door.
XTo lock centrally: touch the outer sensor
surface on one of the door handles.
XTo restore the factory settings: press
and hold the %and& buttons simul-
taneously for approximately six seconds
until the battery check lamp flashes twice
(
Ypage 86).
Mechanical key
General notes
If the vehicle can no longer be locked or
unlocked with the SmartKey or KEYLESS-GO,
use the mechanical key.
If you use the mechanical key to unlock and
open the driver's door, the anti-theft alarm
system will be triggered. Switch off the alarm
(
Ypage 78).
If you unlock the vehicle using the mechanical
key, the fuel filler flap will not be unlocked
automatically.
XTo unlock the fuel filler flap: insert the
SmartKey into the ignition lock.
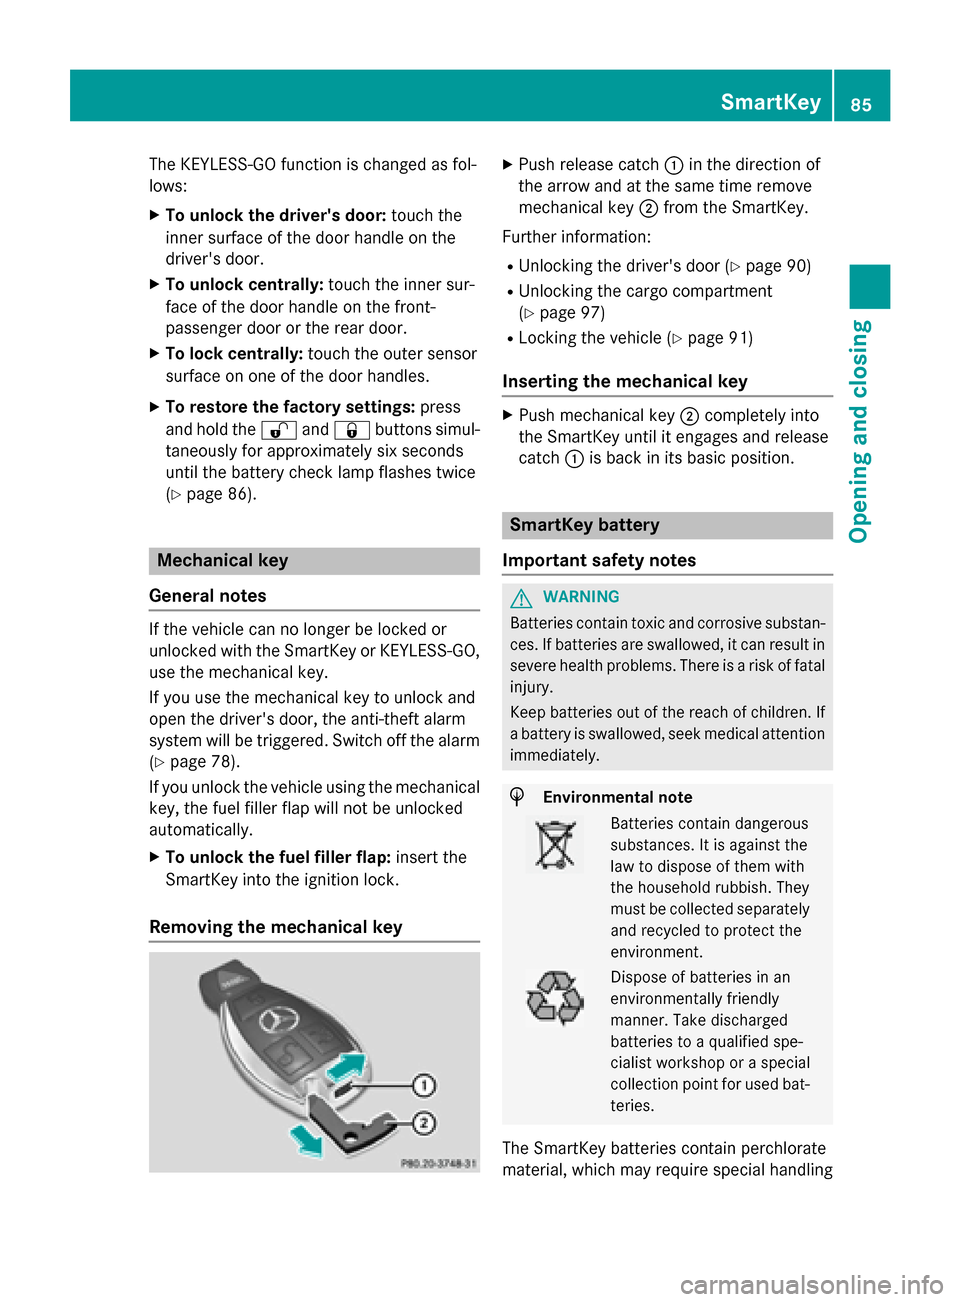
Removing the mechanical key
XPush release catch :in the direction of
the arrow and at the same time remove
mechanical key ;from the SmartKey.
Further information:
RUnlocking the driver's door (Ypage 90)
RUnlocking the cargo compartment
(
Ypage 97)
RLocking the vehicle (Ypage 91)
Inserting the mechanical key
XPush mechanical key ;completely into
the SmartKey until it engages and release
catch :is back in its basic position.
SmartKey battery
Important safety notes
GWARNING
Batteries contain toxic and corrosive substan- ces. If batteries are swallowed, it can result in
severe health problems. There is a risk of fatalinjury.
Keep batteries out of the reach of children. If
a battery is swallowed, seek medical attention
immediately.
HEnvironmental note
Batteries contain dangerous
substances. It is against the
law to dispose of them with
the household rubbish. They
must be collected separately and recycled to protect the
environment.
Dispose of batteries in an
environmentally friendly
manner. Take discharged
batteries to a qualified spe-
cialist workshop or a special
collection point for used bat-
teries.
The SmartKey batteries contain perchlorate
material, which may require special handling
SmartKey85
Opening and closing
Z
Page 88 of 418

and regard for the environment. National
guidelines must be observed during disposal.
In California, seewww.dtsc.ca.gov/
HazardousWaste/Perchlorate/
index.cfm.
Mercedes-Benz recommends that you have
the batteries replaced at a qualified specialist
workshop.
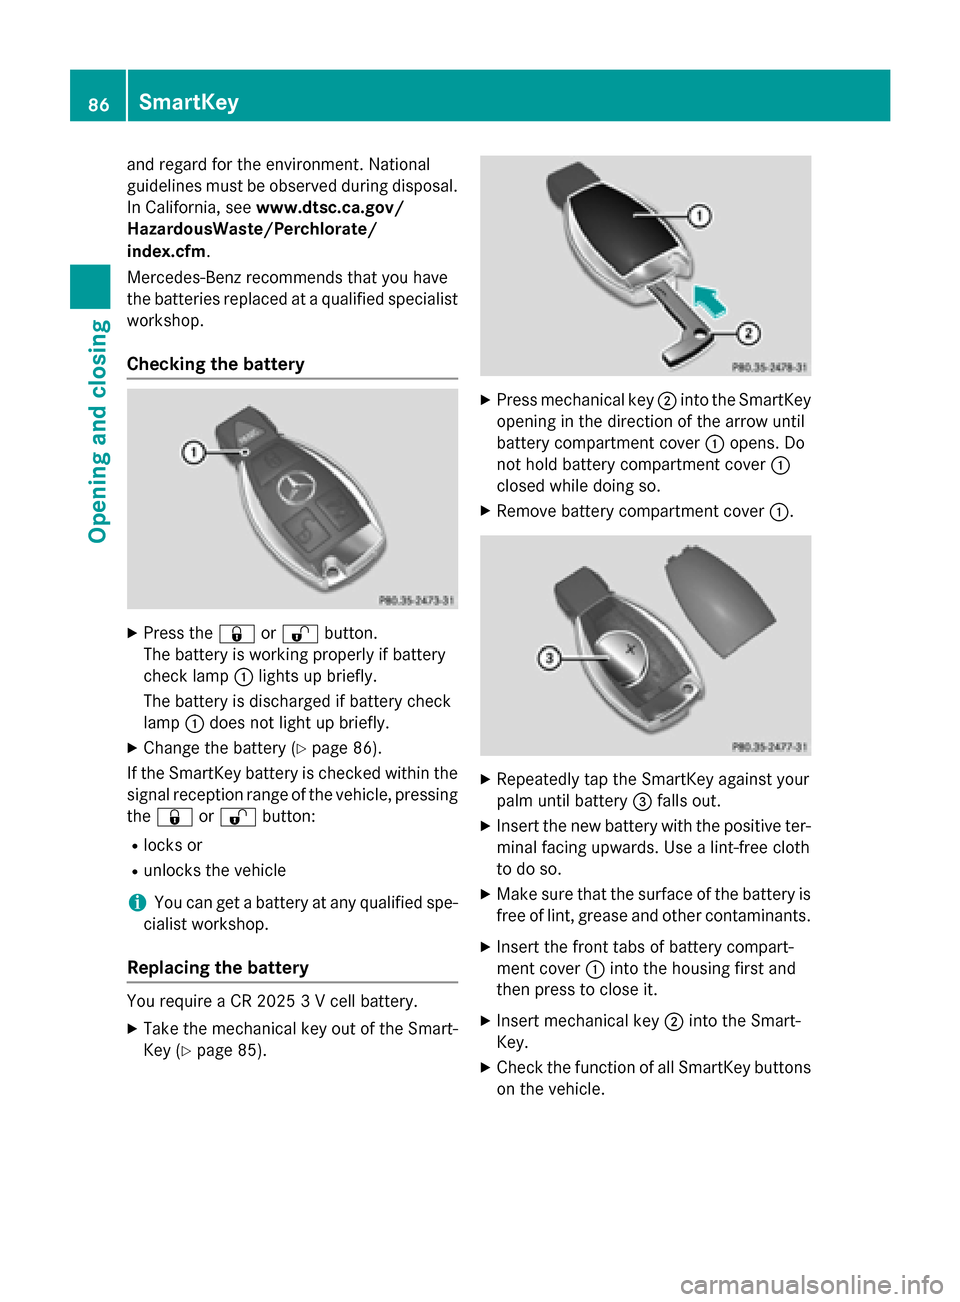
Checking the battery
XPress the &or% button.
The battery is working properly if battery
check lamp :lights up briefly.
The battery is discharged if battery check
lamp :does not light up briefly.
XChange the battery (Ypage 86).
If the SmartKey battery is checked within the
signal reception range of the vehicle, pressing
the & or% button:
Rlocks or
Runlocks the vehicle
iYou can get a battery at any qualified spe-
cialist workshop.
Replacing the battery
You require a CR 2025 3 V cell battery.
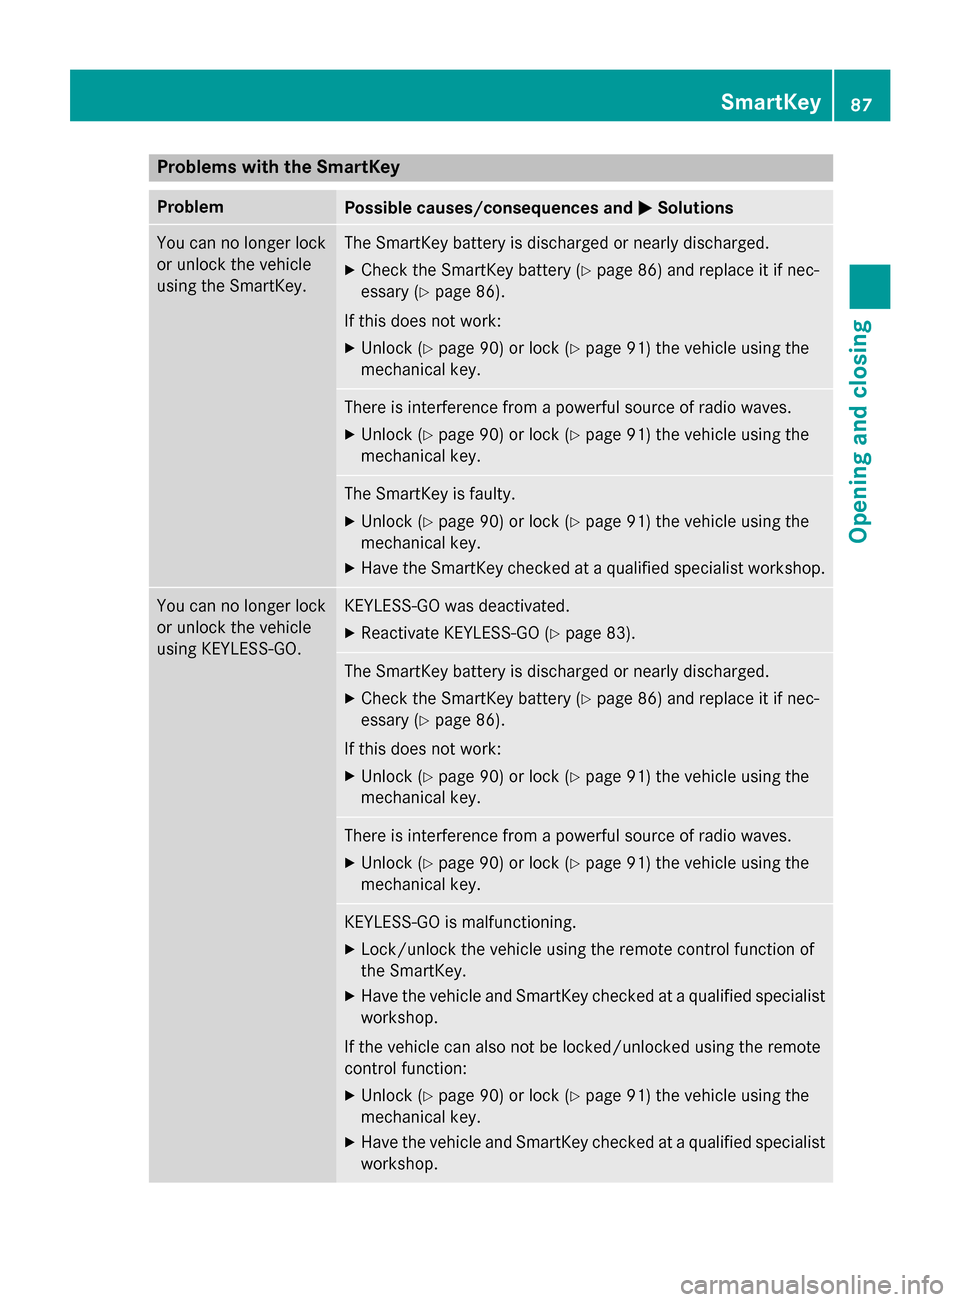
XTake the mechanical key out of the Smart-
Key (
Ypage 85).
XPress mechanical key ;into the SmartKey
opening in the direction of the arrow until
battery compartment cover :opens. Do
not hold battery compartment cover :
closed while doing so.
XRemove battery compartment cover :.
XRepeatedly tap the SmartKey against your
palm until battery=falls out.
XInsert the new battery with the positive ter-
minal facing upwards. Use a lint-free cloth
to do so.
XMake sure that the surface of the battery is
free of lint, grease and other contaminants.
XInsert the front tabs of battery compart-
ment cover :into the housing first and
then press to close it.
XInsert mechanical key ;into the Smart-
Key.
XCheck the function of all SmartKey buttons
on the vehicle.
86SmartKey
Opening and closing
Page 89 of 418

Problems with the SmartKey
ProblemPossible causes/consequences andMSolutions
You can no longer lock
or unlock the vehicle
using the SmartKey.The SmartKey battery is discharged or nearly discharged.
XCheck the SmartKey battery (Ypage 86) and replace it if nec-
essary (
Ypage 86).
If this does not work:
XUnlock (Ypage 90) or lock (Ypage 91) the vehicle using the
mechanical key.
There is interference from a powerful source of radio waves.
XUnlock (Ypage 90) or lock (Ypage 91) the vehicle using the
mechanical key.
The SmartKey is faulty.
XUnlock (Ypage 90) or lock (Ypage 91) the vehicle using the
mechanical key.
XHave the SmartKey checked at a qualified specialist workshop.
You can no longer lock
or unlock the vehicle
using KEYLESS-GO.KEYLESS-GO was deactivated.
XReactivate KEYLESS-GO (Ypage 83).
The SmartKey battery is discharged or nearly discharged.
XCheck the SmartKey battery (Ypage 86) and replace it if nec-
essary (
Ypage 86).
If this does not work:
XUnlock (Ypage 90) or lock (Ypage 91) the vehicle using the
mechanical key.
There is interference from a powerful source of radio waves.
XUnlock (Ypage 90) or lock (Ypage 91) the vehicle using the
mechanical key.
KEYLESS-GO is malfunctioning.
XLock/unlock the vehicle using the remote control function of
the SmartKey.
XHave the vehicle and SmartKey checked at a qualified specialist
workshop.
If the vehicle can also not be locked/unlocked using the remote
control function:
XUnlock (Ypage 90) or lock (Ypage 91) the vehicle using the
mechanical key.
XHave the vehicle and SmartKey checked at a qualified specialist
workshop.
SmartKey87
Opening and closing
Z