2016 MERCEDES-BENZ G-CLASS SUV key
[x] Cancel search: keyPage 165 of 261

Engine
Warning/
indicator
lamp
N N
Signal type
Possible causes/consequences and M
MSolutions ;
N
The yellow engine diagnostics warning lamp lights up whil ethe engine is run-
ning.
There may be afault with the following, for example:
R engine management
R fuel injection system
R exhaust system
R fuel system
The emission limit values may be exceeded and the engine may be runnin gin
emergenc ymode.
X Consult aqualified specialist workshop immediately.
Vehicles with adiesel engine: the fuel tank has been run dry (Y page 110).
X Start the engine three to four times after refuelling.
If the yellow engine diagnostics warning lamp goes out, emergenc ymode is
cancelled. The vehicle does not have to be checked. 8
N
The yellow reserve fuel warning lamp lights up while the engine is running.
The fuel level has dropped into the reserve range.
Operation of the auxiliary heating is deactivated if the fuel level drops into the
reserve range.
X Refuel at the nearest filling station. %
N
On diesel engine vehicles, the preglow indicator lamp does not light up when the
key is in position 2(Y page 96).
The preglow system is malfunctioning.
X Consult aqualified specialist workshop immediately. ?
N
The red coolant warning lamp lights up while the engine is running and the
coolant temperature display is at the start of the scale.
The temperature sensor for the coolant temperature gauge is malfunctioning.
The coolant temperature is no longer being monitored. The engine could be dam-
aged if the coolant temperature is too high.
X Stop the vehicle immediately,p aying attention to road and traffic conditions,
and switch off the engine. Do not continue driving.
X Secure the vehicle against rolling away (Y page 113).
X Consult aqualified specialist workshop. 162
Warning and indicator lamps on the instrument clusterOn-board computer and displays
Page 175 of 261
Setting the date
X
Select ¯.
X Select Date/Time
Date/Time.
X Select the date.
An input men uappears.
X Set the date using the arrows.
Setting the time X
Select ¯.
X Select Date/Time
Date/Time.
X Select the time.
An input menu appears.
X Set the time using the arrows. Synchronisin
gthe time
The following functions are available:
R RDS RDS:ift his function is activated, the time will
be regularly compared with the RDS 5
time
signal and adjusted if necessary
R GPS
GPS:ift his function is activated, the time will
be regularly compared with the GPS 6
time
signal and adjusted if necessary
R Manually
Manually:ift his function is activated, the
time set manually is maintained
X Select ¯.
X Select Time synchronizing
Time synchronizing.
X Select the desired setting.
The #dot indicates the current setting. Adjusting the standby time
If this function is activated, the mul timedia sys-
te mr emain sinstandby mod efor th eset time
after th eignition has been switched off .Ifthe
ignition is switched on again during this set time,
th en avigation system, for example, is available
again immediately.
X Select ¯.
X Select Standby
Standby.
X Selec tthe desired setting, 5minutes
5m inutes, 15 15
minutes
minutes, 30 minutes
30 minutes orOff
Off .
The #dot indicates the curren tsetting. Switching the button tone on/off
X Select ¯.
X Select Key tone
Key tone.
X The #dot indicates that the function is acti-
vated. Switching the AM waveband on/off
In order to select the AM waveband in radio
operation, the AM-Tuner AM-Tunermust be activated in
the system settings.
X To switch the AM waveband on/off: select
¯.
X Select AM-Tuner
AM-Tuner.
The #dot indicates that the function is acti-
vated. Display settings
The mul timedia system includes an optimised
display design fo rday and night mode.
X Select ¯.
X Select Day/night mode
Day/night mode.
X Selec tthe desire dsetting.
The #dot indicates th ecurren tsetting.
Wit hthe Auto
Auto setting ,the display design is
automatically adapted to th ebrightness of
th ea mbien tlight.
Afte rselecting Custom
Custom,aday mode bright-
ness scale appears.
X Se tthe desire dbrightness usin gthe arrows.
X Selec tSave ý.
An ight mode brightness scale appears.
X Se tthe desire dbrightness usin gthe arrows.
X Selec tSave ý. Control settings
The function of th econtrol knob in navigation
mod ecan be set in amultimedia system with
navigation.
The control knob can be set so that turning:
R zooms in or out of th emap
R jumps to th enextorp revious statio nortrack
5 Radio Dat aSystem.
6 Global Positionin gSystem. 172
System settingsMultimedia system
Page 185 of 261
Switching to navigation mode
X Press the NAVI button.
The main menu appears. Entering the destination
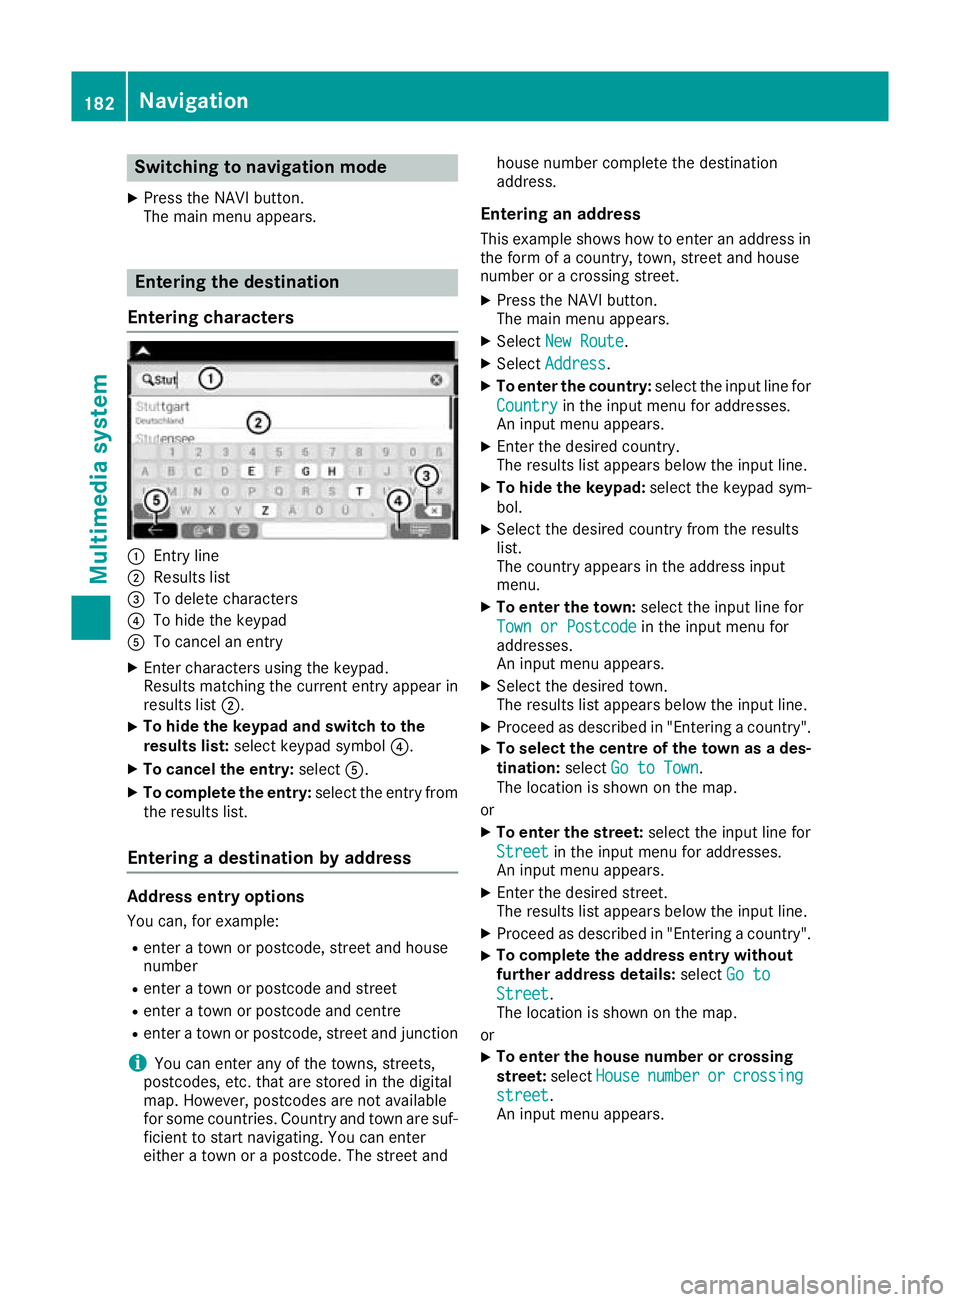
Entering characters :
Entry line
; Results list
= To delete characters
? To hide the keypad
A To cancel an entry
X Enter characters using the keypad.
Results matching the current entry appear in
results list ;.
X To hide the keypa
dand switc htothe
results list: select keypadsym bol ?.
X To cancel the entry: selectA.
X To complete the entry: select the entry from
the results list.
Entering adestinatio nbyaddress Address entry options
Yo uc an,for example:
R ente ratownorp ostcode, stree tand house
number
R ente ratownorp ostcode and street
R ente ratownorp ostcode and centre
R ente ratownorp ostcode, stree tand junction
i You can ente
rany of th etow ns,streets,
postcodes, etc. that are store dinthedigital
map. However, postcodes are no tavailable
for som ecountries .Countr yand town are suf-
ficien ttostart navigating .You can enter
either atow norap ostcode. The stree tand house number complete the destination
address.
Entering an addre ss
This example shows how to enter an address in the form of acountry, town, street and house
number or acrossing street.
X Press the NAVI button.
The main menu appears.
X Select New Route New Route.
X Select Address
Address.
X To enter the country: select the input line for
Country
Country in the input menu for addresses.
An input menu appears.
X Enter the desired country.
The results list appears below the input line.
X To hide the keypad: select the keypad sym-
bol.
X Select the desired countryf rom the results
list.
The countrya ppears in the address input
menu.
X To enter the town: select the input line for
Town or Postcode Town or Postcode in the input menu for
addresses.
An input menu appears.
X Select the desired town.
The results list appears below the input line.
X Proceed as described in "Entering acountry".
X To selectt
he centre of the town as ades-
tination: selectGo to Town Go to Town.
The location is shown on the map.
or
X To enter the street: select the input line for
Street
Street in the input menu for addresses.
An input menu appears.
X Enter the desired street.
The results list appears below the input line.
X Proceed as described in "Entering acountry".
X To complete the address entry without
further address details:
selectGo to
Go to
Street Street.
The location is shown on the map.
or X To enter the house number or crossing
street:
selectHouse House number
number or
orcrossing
crossing
street
street.
An input menu appears. 182
NavigationMultimedia system
Page 193 of 261
R
Alerts Alerts:a djusts the volume of acoustic warn-
ings
R Ding
Ding:a djusts the volume of the attention
tone. The attention tone is output before nav- igation announcements
R Keys Keys:a djusts the volume of the button tones
X Press the NAVI button.
The main menu appears.
X Select Settings
Settings.
X Select Sound
Sound.
X Select the desired function.
Am enu appears.
X Adjust the desired volume.
Activating/deactivating sound outputs The following functions are available:
R Voice Guidance Voice Guidance:w hen this function is acti-
vated, voice instructionsa re output
R Early Indication of Manoeuvres
Early Indication of Manoeuvres:w hen
this function is activated, the multimedia sys- tem announces impending changes of direc-
tion immediately.W hen this function is deac-
tivated, the multimedia system announces
impending changes of direction only just
before the change of direction.
R Announce Route Summary
Announce Route Summary:w hen this func-
tion is activated, the multimedia system reads out aroute summary during route search
R Announce
Announce Country CountryInfo
Info:when this function
is activated, the multimedia system reads out country information when reaching acountry
border
R Announce
Announce Traffic
TrafficInfo
Info:when this function
is activated, the multimedia system reads out traffic information received
R Announce System Messages
Announce System Messages:w hen this
function is activated, the multimedia system
reads out system messages
X Press the NAVI button.
The main menu appears.
X Select Settings
Settings.
X Select Sound
Sound.
X Select the desired function.
The function is activated or deactivated. Adjusting the verbosity level of voice
ins
truc tions
The followin gfunction sare available:
R Minimal Minimal:v oice instruction sare output once
directly before th enextc hang eofd irection
R Medium
Medium :voice instruction sare output when
approachin gthe next chang eofdirection and
immediately beforehand
R Verbose
Verbose:v oice instruction sare output at a
relatively far distanc efromt henext chang eof
direction ,when approachin gthe chang eof
direction and immediately beforehand
X Press th eNAVIbutton.
The main men uappears.
X Select Settings
Settings.
X Select Sound
Sound.
X Select Verbosity Level
Verbosity Level.
Am enua ppears.
X Selec tthe desired function.
The Ytickm arki ndicates th eactivated
function.
Readin gout stree tnames
X Press th eNAVIbutton.
The main men uappears.
X Select Settings
Settings.
X Select Sound
Sound.
X Select Say Roa dNames in Native Lan‐
Say Roa dNames in Native Lan‐
guage Area
guage Area orSay Roa dNames in For‐
Say Road Names in For‐
eign Language Area
eign Language Area.
Am enu appears.
X Select the desired function.
The Ytick mark indicates the activated
function.
Defining warning settings Speed warnings
If the digital map includes relevant data, the
multimedia system can issue awarning when
you exceed the maximum permissible speed.
This function is not available in all countries and
regions. The display of the maximum permissi-
ble speed may differ from the actual traffic sit-
uation, e.g. due to erroneous map data. 190
NavigationMultimedia system
Page 198 of 261
Setting map view and alignment
The following options are available:
R 3D map: the map view is aligned to the direc-
tion of travel
R 2D map in direction of travel: the map view is
aligned to the direction of travel. The direction
of travel is alwaysatt he top.
R North-oriented 2D map: the map view is dis-
played so that northisa lwaysatthe top
X Press the NAVI button.
The main menu appears.
X Dependin gonthe current setting, select 3D 3D,
2D
2D or2D
2DLL.
In accordance with your selection, the setting
changes to 3D
3D, 2D
2Dor2D
2DLL.
Defining regional settings Setting the user interface language
X Press the NAVI button.
The main menu appears.
X Select Settings Settings.
X Select Regional
Regional.
X Select Language
Language.
Al ist of available languages appears.
X Select the desired language.
The multimedia system is restarted with the
selected language set.
Setting the language for voice output
X Press the NAVI button.
The main menu appears.
X Select Settings Settings.
X Select Regional
Regional.
X Select Voice Language
Voice Language.
Al ist of the available languages and speakers
appears.
X Select the desired language and speaker.
The selected language and speaker are adop-
ted for the voice output.
Setting units and formats The following functions are available:
R Distance
Distance
R Fuel consumption Fuel consumption
R Weight
Weight
R Time Format
Time Format
R Date Format
Date Format R
Date Delimiter
Date Delimiter
R Coordinate Display Format
Coordinate Display Format
X Press the NAVI button.
The main menu appears.
X Select Settings
Settings.
X Select Regional Regional.
X Select Units &Formats
Units &Formats.
X Select the desired function.
Am enu appears.
X Select the desired setting.
The Ytick indicates the activated function.
Setting the time zone and daylight saving
time
X Press the NAVI button.
The main menu appears.
X Select Settings
Settings.
X Select Regional Regional.
X Select Time Zone
Time Zone.
X To set the time zone automatically: select
Automatic Time Zone
Automatic Time Zone.
Am enu appears.
X Select the desired setting.
The Ytick indicates the activated function.
X To set the time zone manually: select
Automatic Time Zone Automatic Time Zone.
Am enu appears.
X Select Manual Time Zone Manual Time Zone.
The Ytick indicates the activated function.
X Select Time Zone
Time Zone.
X Set the desired time zone using the slider.
X To activate or deactivate daylight saving
time:
select Daylight Saving Time Daylight Saving Time.
The function is activated or deactivated.
Activating or deactivating menu anima-
tions If this function is activated, buttons in menus,
keyboard displays and screen transitions are
animated.
X Press the NAVI button.
The main menu appears.
X Select Settings Settings.
X Select Display
Display.
X Select Menu Animations
Menu Animations.
The function is activated or deactivated. Navigation
195Multimedia system Z
Page 212 of 261
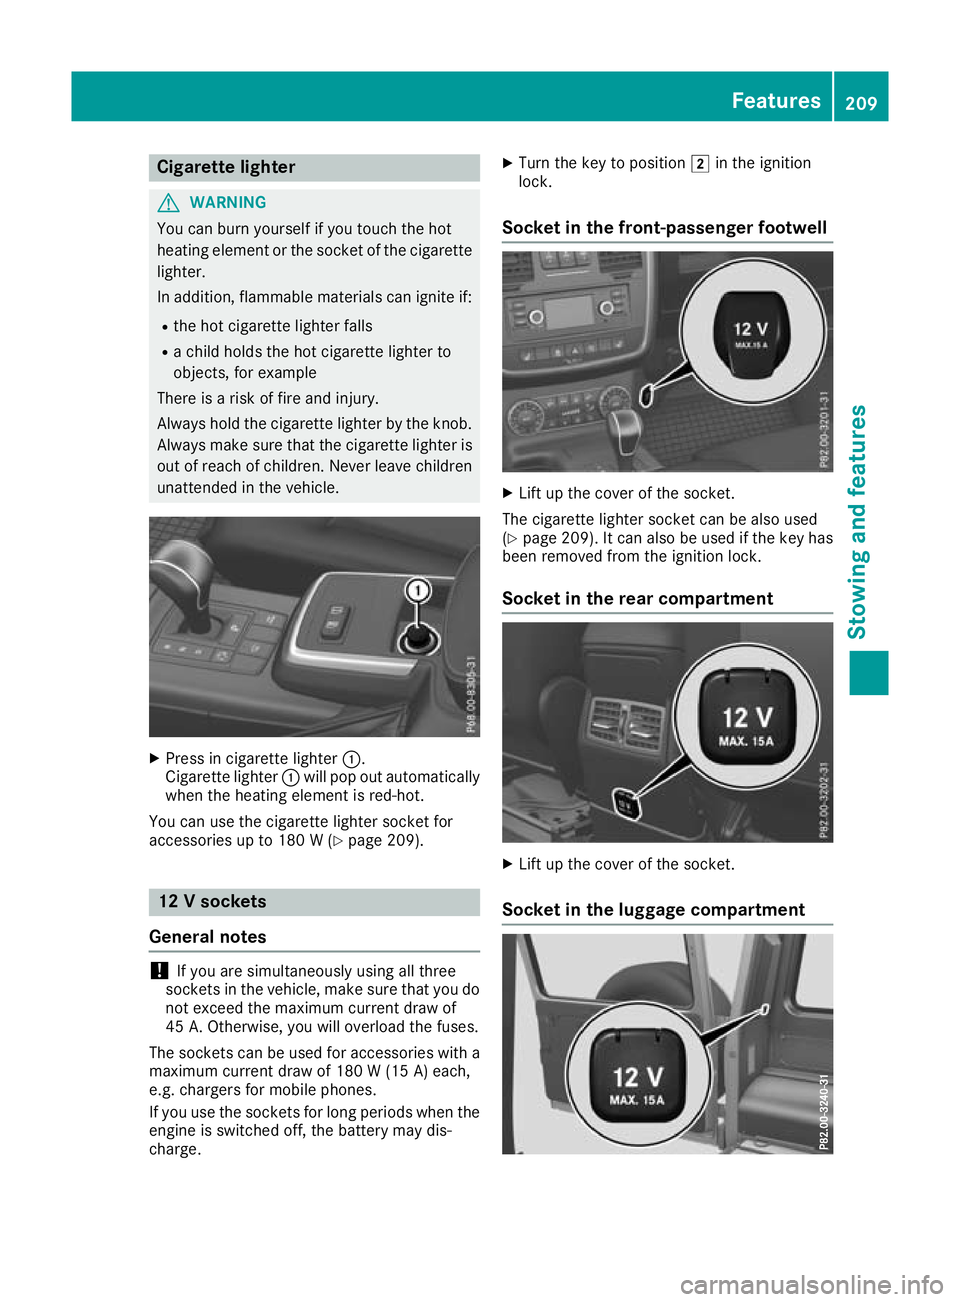
Cigarett
elighter G
WARNING
Yo uc an burn yourself if you touch the hot
heating element or the socket of the cigarette lighter.
In addition, flammable materials can ignite if:
R the hot cigarette lighter falls
R ac hild hold sthe hot cigarette lighter to
objects, for example
There is arisk of fire and injury.
Always hold the cigarette lighter by the knob.
Always make sure that the cigarette lighter is
out of reach of children. Never leave children unattended in the vehicle. X
Pres sinc igarett elighter :.
Cigarette lighter :will pop out automatically
when the heating element is red-hot.
You can use the cigarett elighter socket for
accessories up to 180 W(Ypage 209). 12
Vsockets
General notes !
If you are simultaneously using all three
socketsint he vehicle, make sure that you do
not exceed the maximum current draw of
45 A. Otherwise, you will overload the fuses.
The sockets can be used for accessories with a maximum current draw of 180 W(15 A) each,
e.g. chargers fo rmobile phones.
If you use the sockets for long periods whe nthe
engine is switched off, the battery may dis-
charge. X
Turn the key to position 2in the ignition
lock.
Socket in the front-passenger footwell X
Lift up the cover of the socket.
The cigarette lighter socket can be also used
(Y page 209). It can also be used if the key has
been removed from the ignition lock.
Socket in the rear compartment X
Lift up the cover of the socket.
Socket in the luggag ecompartment Features
209Stowing and features Z
Page 213 of 261
The socket is located in the luggage compart-
ment on the left-hand-side when viewed in the
direction of travel, next to the rear door.
X Lift up the cover of the socket. Assembly tool
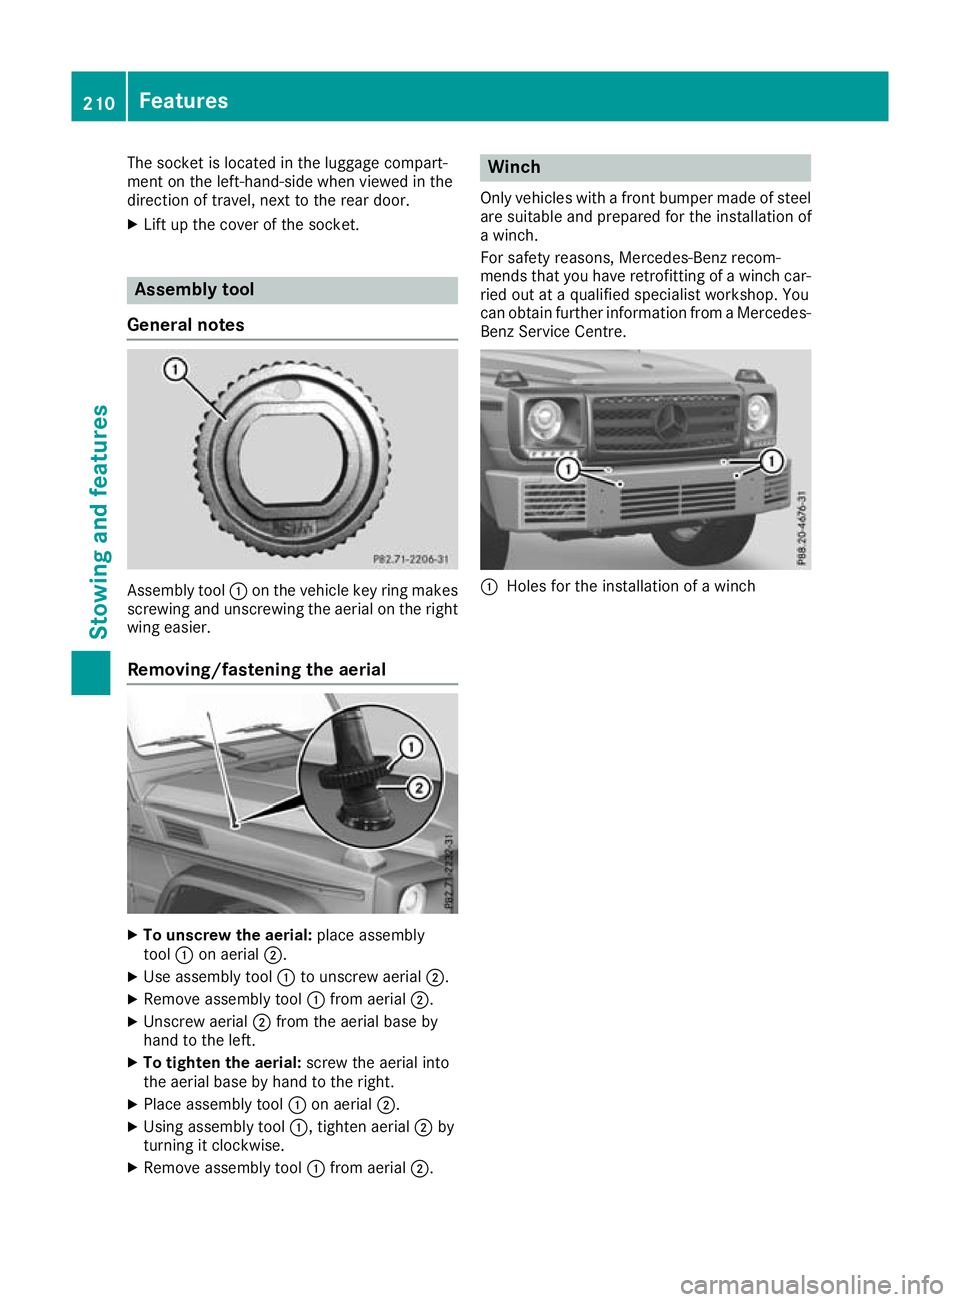
Genera lnotes Assembly tool
:on th evehicl ekey ring makes
screwing and unscrewing the aeria lonthe right
wing easier.
Removing/fastening the aerial X
To unscre wthe aerial: place assembly
tool :on aerial ;.
X Use assembl ytool :to unscrew aerial ;.
X Remove assembl ytool :from aerial ;.
X Unscrew aerial ;from the aeria lbaseby
hand to the left.
X To tighten the aerial: screwthe aeria linto
the aeria lbasebyh andtot he right.
X Place assembl ytool :on aerial ;.
X Using assembl ytool :,t ighten aerial ;by
turning it clockwise.
X Remove assembl ytool :from aerial ;. Winch
Only vehic lesw ithafront bumper made of steel
are suitabl eand prepared for the installation of
aw inch.
For safety reasons, Mercedes-Benz recom-
mends that you have retrofitting of awinch car-
ried out at aqualified specialist workshop. You
can obtai nfurther information from aMercedes-
Benz Service Centre. :
Holes for the installation of awinch 210
FeaturesStowing and features
Page 216 of 261
Note
sono illevel Depending on your drivin
gstyle ,the vehicle
consumes up to 0.8 litres of oi lper 1,000 km.
The oi lconsumption ma ybehighe rtha nt his
when the vehicl eisnew or if yo ufrequentl ydrive
at high engine speeds.
To check the oi llev el:
R park the vehicl eonalevel surface
R the engine shoul dbeswitched off for approx-
imatel yfivem inute sifthe engine is at normal
operating temperature
R if the engine is not at normal operating tem-
perature, e.g .ifthe engine wa sonlys tarted
briefly, wait approximately 30 minute sbefore
carrying out the measurement
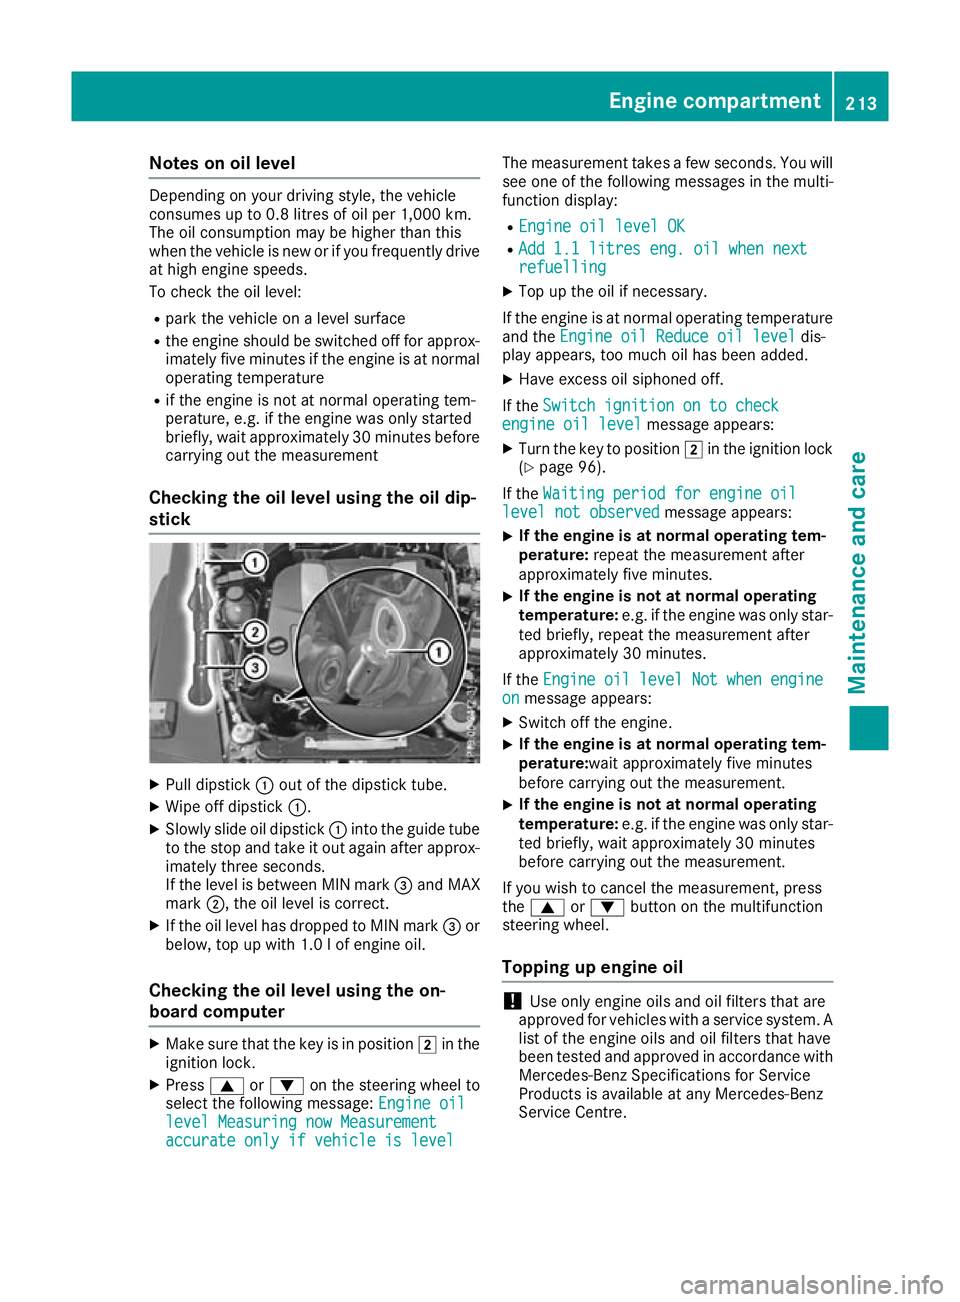
Checking the oil level using the oil dip-
stick X
Pull dipstick :out of the dipstick tube.
X Wipe off dipstick :.
X Slowly slide oil dipstick :into the guide tube
to the stop and take it out again after approx- imately three seconds.
If the level is between MIN mark =and MAX
mark ;,the oil level is correct.
X If the oil level has dropped to MIN mark =or
below, top up with 1.0 lofe ngine oil.
Checking the oil level using the on-
board computer X
Make sure that the key is in position 2in the
ignition lock.
X Press 9or: on the steering wheel to
select the following message: Engine oil Engine oil
level Measuring now Measurement level Measuring now Measurement
accurate only if vehicle is level accurate only if vehicle is level The measurement takes
afew seconds. You will
see one of the following messages in the multi-
function display:
R Engine oil level OK Engine oil level OK
R Add 1.1 litres eng. oil when next
Add 1.1 litres eng. oil when next
refuelling refuelling
X Top up the oil if necessary.
If the engine is at normal operating temperature and the Engine oil Reduce oil level
Engine oil Reduce oil level dis-
play appears, too much oil has been added.
X Have excess oil siphoned off.
If the Switch ignition on to check
Switch ignition on to check
engine oil level
engine oil level message appears:
X Turn the key to position 2in the ignition lock
(Y page 96).
If the Waiting period for engine oil
Waiting period for engine oil
level not observed
level not observed message appears:
X If the engine is at normal operating tem-
perature:
repeat the measurement after
approximately five minutes.
X If the engine is not at normal operating
temperature:
e.g. if the engine was only star-
ted briefly, repeat the measurement after
approximately 30 minutes.
If the Engine oil level Not when engine Engine oil level Not when engine
on
on message appears:
X Switch off the engine.
X If the engine is at normal operating tem-
perature:wait approximately five minutes
before carrying out the measurement.
X If the engine is not at normal operating
temperature:
e.g. if the engine was only star-
ted briefly, wait approximately 30 minutes
before carrying out the measurement.
If you wish to cancel the measurement ,press
the 9 or: button on the multifunction
steering wheel.
Topping up engineo il !
Use only engine oils and oil filters that are
approved for vehicles with aservice system. A
list of the engine oils and oil filters that have
been tested and approved in accordance with
Mercedes-Benz Specifications for Service
Products is available at any Mercedes-Benz
Service Centre. Engine compartment
213Maintenance and care Z