2016 MERCEDES-BENZ G-CLASS SUV transmission
[x] Cancel search: transmissionPage 122 of 261
Off-road driving
Important safet ynotes G
WARNING
If you driv eonas teep incline at an angle or
turn on asteep incline, the vehicl ecoulds lip
sideways, tip and overturn. There is arisk of
an accident.
When driving on an incline, drive into the line of fall (upwards or downward sinastraight
line) and do not turn. G
WARNING
Flammable materia lsuch as leaves, grass or
twigs may ignite if they come into contact with hot parts of the exhaust system. There is arisk
of fire.
When driving off road or on unpaved roads,
check the vehicle's underside regularly. In
particular, remove parts of plants or other
flammable materials which have become
trapped. In the case of damage, contact a
qualified specialist workshop.
! There is
arisk of damage to the vehicl eif:
R the vehicl ebecome sstuck, e.g. on ahigh
kerb or an unpaved road
R you drive too quickly over an obstacle, e.g.
ak erb, slowing thresholds or apothol ein
the road
R ah eavy object strikes the underbody or
parts of the chassis
In situations like this, the body ,underbody,
chassi sparts, wheels or tyres coul dbedam-
agedw ithout the damage being visible. Com-
ponents damaged in this way can unexpect-
edlyf ail or, in the case of an accident, no lon-
ger withstand the strain they are designed to withstand.
If the underbody panelling is damaged, com-
bustible materials such as leaves, grass or
twigs can gather between the underbody and
the underbody panelling. If these materials
come into contact with hot parts of the
exhaust system, they can catch fire.
In such situations, have the vehicl echecked
and repaired immediatel yataqualified spe-
cialist workshop. If, on continuing yourj our-
ney, you notice that driving safety is impaired, stop the vehicle immediately
,paying atten-
tion to road and traffic conditions. In such
cases, consult aqualified specialist work-
shop.
! If there are steep gradients while driving off-
road, asufficient filling level in the AdBlue ®
tank must be ensured. Make sure for this rea- son that there is aminimum fill level of ten
litres before driving off-road.
When driving off-road, substances such as sand,
mud and water or water mixed with oil may get
into the brakes. This may lead to areduction in
braking performance or total brake failure as a
result of increased wear. The braking charac-
teristics will vary depending on the substances
that get into the brakes. Cleant he brakes after
driving off-road. If you notice grinding noises or ar eduction in braking performance, have the
brake system checked at aqualified specialist
workshop immediately.A dapt your driving style
to the altered braking characteristics.
Driving off-road increases the possibility of dam- age to the vehicle, which may cause assemblies
or systems to fail. Adapt your driving style to the
conditions of the terrain. Drive carefully.H ave
vehicle damage rectified immediately at aquali-
fied specialist workshop.
Do not shift into transmission position Nwhen
driving off-road. You could lose control of the
vehicle if you attempt to brake the vehicle using
the service brake. If the gradient is too steep for your vehicle, back up in reverse gear.
General notes H
Envi
ronmenta lnote
Protection of th eenvironmen tisofprimary
importance. Treat nature with respect.
Observe all prohibiting signs.
Read this sectio nbefore driving your vehicle off-
road. Practis ebydriving over mor egentle off-
road terrain first.
The following driving systems are specially
adapted to off-road driving:
R 4ETS (Y page 54)
R Off-road ABS
R transfer case (Y page 124)
R differential lock s(Ypage 125) Driving tips
119Driving and parking Z
Page 124 of 261
X
Clean th ewheels, wheel arches and th evehi-
cle underside wit hawaterjet;c he ck for any
foreign object sand damage.
X Chec kwhether twigs or other part sofplants
have become trapped. Thes eincreas ethe risk
of fir eand can damag efuel pipes ,brake
hoses or th erubbe rbellows of th eaxle joints
and propeller shafts.
X Afte rthe trip, examin ewithout fail th eentire
undercarriage, wheels, tyres, bodywork struc- ture, brakes, steering ,cha ssis and exhaust
system for damage.
X Afte rdriving in sand, mud, gravel, wate ror
similar dirt yconditions ,have th efollowing
checked and cleaned:
R brak ediscs
R wheels
R brak epads
R axle joints
X If you notic estron gv ibrations after off-road
driving ,che ck for foreign object sinthe
wheel sand driv etrain and ,ifnecessary,
remove them. Foreign object scan disturb the
balance and caus evibrations.
Driving on sand Observ
ethe following rules when driving on
sand:
R shift the transfer case to the LOW RANGEoff-
road driving position (Y page 124).
R avoid high engine speeds.
R Shift the automatic transmission to alow
gear.
R drive quickly to overcome the rolling resist-
ance. Otherwise, the vehicle could dig itself
into the sand.
R drive in the tracks of other vehicles if possible.
When doing so, make sure that:
- the tyre ruts are not too deep
- the sand is firm enough
- your vehicle has sufficient ground clear-
ance
Tyre rutsa nd unpaved roads !
Check that the ruts are not too deep and
that your vehicle has sufficient clearance.
Otherwise, your vehicle could be damaged or bottom out and get stuck. Observe the following rules when driving along
ruts in off-road terrain or on roads with loose
gravel:
R shift the transfer case to the LOW RANGEoff-
road driving position (Y page 124)
R avoid high engine speeds
R observe the safety notes (Y page 119) and the
general notes (Y page 119) on off-road driving
R shift the automatic transmission to alow gear
R drive slowly
R where ruts are too deep, drive with the wheels
on one side on the middle section of turf if
possible
Driving over obstacles !
Obstacles could damage the floor of the
vehicle or componentsoft he chassis. Ask
passengers for guidance when driving over
large obstacles. Any damage to the vehicle
always increases the risk of an accident.
! Drive with particular care when driving over
an obstacle while driving up or down asteep
slope.
The vehicle could otherwise tilt and slide side- waysort ip over.
Observe the following rules when driving over
tree stumps, large stones and other obstacles:
R observe the safety notes (Y page 119) and the
general notes (Y page 119) on off-road driving
R shift the transfer case to the LOW RANGEoff-
road driving position (Y page 124)
R avoid high engine speeds
R shift the automatic transmission to alow gear
R make sure that you have enough ground
clearance before driving across an obstacle
R drive very slowly
R try to drive straight over the centreofo bsta-
cles: front wheel first, then rear wheel Travelling uphill
Approach/departure angle G
WARNING
If you drive on asteep incline at an angle or
turn on asteep incline, the vehicl ecoulds lip
sideways, tip and overturn. There is arisk of
an accident. Drivingt
ips
121Driving an dparking
Z
Page 125 of 261
When driving on an incline, drive into the line
of fall (upwards or downwards in astraight
line) and do not turn.
Always observe the approach/departure angle
values (Y page 255).
R Observe the safety notes (Y page 119) and
general notes (Y page 119) on driving off-
road.
R Follow the line of fall when driving on slopes
and steep inclines.
R Befor edriving on extreme uphill and extreme
downhill gradients ,set the transfer case to
the LOW RANGE off-road driving position
(Y page 124).
R Engage the differential locks if necessary
(Y page 126).
R Drive slowly.
R Accelerate gently and make sure that the
wheels are gripping.
R Avoid high engine speeds, except when driv-
ing on sandy and muddy routes with high driv-
ing resistance.
R Use the braking power of the engine when
driving down aslope. Observe the engine
speed; do not overrev the engine.
R Shift the automatic transmission to alow gear
appropriate for tackling an uphill gradient or a long, steep downhill gradient.
The HOLD function assists you when pulling
away and manoeuvrin gonaslope or hillside
(Y page 122).
Maximum gradient-climbing capability Alwayso
bserve the maximu mgradient climbing
ability values (Y page 255).
Hilltops When drivin
gupanu phill gradient, slightly
reduce pressure on the accelerator immediately
before reaching the brow of the hill. Make use of the vehicle's own impetus to travel over the
brow.
This style of driving prevents:
R the vehicle from lifting off the ground on the
brow of ahill
R loss of traction
R the vehicle from travelling too quickly down
the other side Driving downhill R
Drive slowly.
R Do no tdrive at an angle down stee pinclines.
Stee rinto the line of fall and drive with the
front wheels aligned straight forwards .Oth-
erwise, the vehicl ecould slip sideways ,tip
and overturn.
R Before tackling stee pdownhil lgradients ,shift
the automatic transmission to alow gear.
By doing so, yo uwillu se the braking effect of
the engine to reduce the speed. If thi sisnot
sufficient, brake gently .Whend oing so, make
sure tha tthe vehicl eisfacing in the direction
of the line of fall.
R Observe the note sondrivinginm ountainous
terrai n(Ypage 122).
R Check tha tthe servic ebrake is workin gnor-
mall yafter alon gd ownhil lstretch.
When drivin gatspeeds below60km/h ,off-road
ABS is activated and the front wheels lock cycli- cally durin gbraking .The digging-i neffect ach-
ieved in the proces sreduce sthe stopping dis-
tance durin goff-roa ddriving. Thi slim its steering
capability. Driving systems
HOLD function
General notes Th
eH OLD function can assist the driver in the
following situations:
R when pulling away,e specially on steep slopes
R when manoeuvring on steep slopes
R when waiting in traffic
The vehicle is kept stationary without the driver having to depress the brake pedal.
The braking effect is cancelled and the HOLD
function deactivated when you depress the
accelerator pedal to pull away.
Do not use the HOLD function when driving off-
road, on steep uphill or downhill gradients or on
slippery or loose surfaces. The HOLD function
cannot hold the vehicle on such surfaces. 122
Driving systemsDriving and parking
Page 126 of 261
Important safety notes
G
WARNING
When leavin gthe vehicle, it can still roll away
despite being braked by the HOLD function if:
R there is amalfunction in the system or in
the voltag esupply
R the HOLD function is deactivated by the
accelerator peda lbeing depressed, e.g. by
av ehicl eoccupant
R the electrica lsystem in the engine com-
partment, the battery or the fuses are tam-
pered with
R the battery is disconnected
There is arisk of an accident.
Before leaving the vehicle, alwaysd eactivate
the HOLD function and secure the vehicle
from rolling away.
Deactivating the HOLD function (Y page123).
Activation conditions You can activate the HOLD fun
ction if:
R the vehicle is stationary
R the engin eisrunning or if it has been auto-
matically switched off by the ECO start/stop
function
R the driver's door is close dorifyour seat belt
is fastened
R the parking brak eisreleased
R the transmission is in position D,Ror N
Activating th eHOLD function X
Make sure that the activation condition sare
met.
X Depress the brake pedal.
X Quickly depress the brake pedal further until
ë appears in the multifunction display.
The HOLD function is activated. You can
release the brake pedal.
If depressing the brake pedal the first time does not activate the HOLD function, wait briefly and
then try again. Deactivating the HOLD function The HOLD function is deactivated automatically
if:
R you depress the accelerator and the trans-
mission is in position Dor R.
R the transmission is in position j.
R you depress the brake pedal again with acer-
tain amount of pressure until ëdisap-
pears from the multifunction display.
On steep uphill or downhill inclines or if there is
am alfunction, the transmission may also be
automatically shifted into position P. Permanent all-wheel drive
! Never tow the vehicle with one axle raised.
This may damage the transfer case. Damage
of this sort is not covered by the Mercedes-
Benz implied warranty. All wheels must
remain either on the ground or be fully raised.
Observe the instructions for towing the vehi-
cle with all wheels in full contact with the
ground.
! When testin
gthe parking brake, operate the
vehicle only briefly (for amaximum of ten sec-
onds) on abrake test dynamometer. When
doing this, turn the key to position 0or 1in
the ignition. Failure to do this can cause dam- age to the drive train or the brake system.
! Af
unction or performanc etest should only
be carried out on atwin-axle dynamometer.
Before you operate the vehicle on such a
dynamometer, please consult aqualified
workshop. You could otherwise damage the
drive train or the brake system.
The all-wheel drive system ensures that all four
wheels are permanently driven. The all-wheel
drive system improves vehicle traction together with ESP ®
and 4ETS if adrive wheel spins due to
insufficient grip.
Only when you use winter tyres (M+S tyres) in
wintry driving condition sand, if necessary, snow
chains (Y page 237). Only in this way can the
maximum effect of all-wheel drive be achieved.
Information about driving off-road (Y page 119). Driving systems
123Driving and parking Z
Page 127 of 261
Off-road driving systems
Transfer case
General notes The vehicle has permanent all-wheel drive. The
front and rear axles are constantly driven.
Further information on driving off-road
(Y page 119).
Shift ranges HIGH
RANGE
Position for all normal on-
road driving conditions.
LOW RANGE
Low-range position for driving
off-road.
Also for use on steep uphill or downhill gradients, especially
when towin gatrailer.
The vehicle travels around
half the speed of on-road driv-
ing range HIGH RANGE.T he
tractive powerisc orrespond-
ingly higher. Shiftin
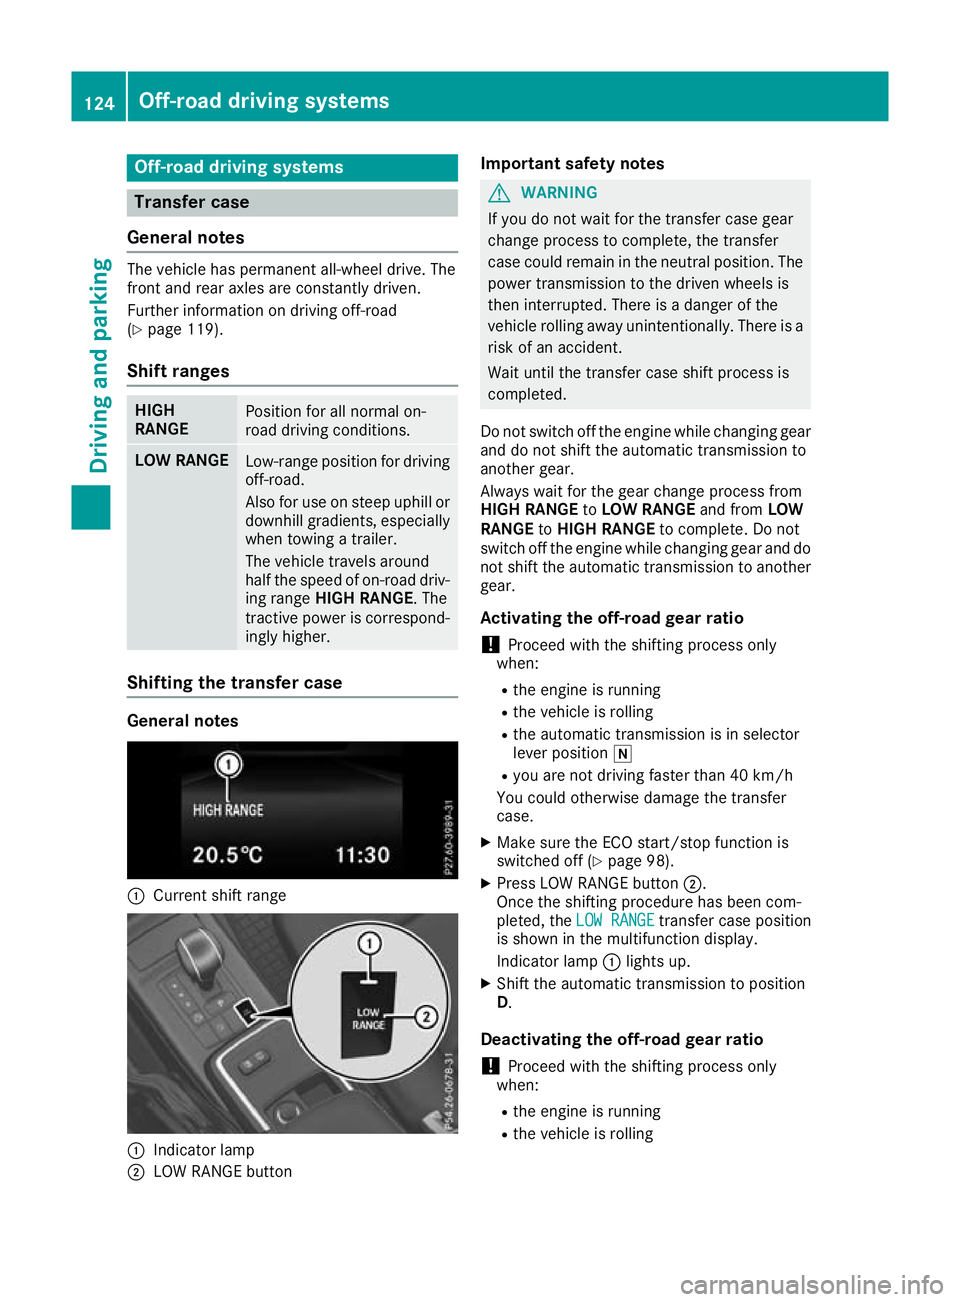
gthe transfer case General notes
:
Curren tshif trange :
Indicator lamp
; LOW RANGE button Important safety notes G
WARNING
If yo udon ot waitf or the transfer case gear
change process to complete, the transfer
case coul dremai ninthe neutral position. The
power transmission to the drive nwheels is
then interrupted. There is adange rofthe
vehicl erolling awayu nintentionally.T here is a
risk of an accident.
Waitu ntil the transfer case shift process is
completed.
Do not switch off the engine while changing gear and do not shift the automatic transmission to
another gear.
Always waitf or the gearchange process from
HIGH RANGE toLOW RANGE and fromLOW
RANGE toHIGH RANGE to complete. Do not
switch off the engine while changing geara nd do
not shift the automatic transmission to another gear.
Activating the off-road gear ratio ! Proceed with the shifting process only
when:
R the engine is running
R the vehicl eisrolling
R the automatic transmission is in selector
leve rposition i
R you are not driving faster than 40 km/h
You coul dotherwise damage the transfer
case.
X Make sure the ECO start/stop function is
switched off (Y page98).
X Press LOW RANGE button ;.
Once the shifting procedure has been com-
pleted, the LOW RANGE LOW RANGE transfer case position
is show ninthe multifunction display.
Indicator lamp :lights up.
X Shift the automatic transmission to position
D.
Deactivatin gthe off-road gear ratio
! Proceed with the shifting process only
when:
R the engine is running
R the vehicl eisrolling 124
Off-roa
ddriving systemsDriving and parking
Page 128 of 261
R
the automatic transmission is in selector
lever position i
R youa renot drivin gfastert ha n7 0km/h
Yo uc ould otherwis edamag ethe transfer
case.
X Press button ;.
Once the shiftin gprocedur ehasbeen com-
pleted, the HIGH
HIGH RANGE RANGE transfe rcasep osit ion
is shown in the multifunctio ndisplay.
Indicato rlamp :goes out.
If the shiftin gprocedur eisunsuccessful, the
multifunctio ndisplay mayshowt he following
messages:
R TC shift condition snot fulfilled
TC shift condition snot fulfilled
One or mor eshift conditions ha snot been
met.
R TC neutra lon
TC neutra lon
The transfe rcaseh ascancelle dthe shifting
procedur eand is in position N.
R TC shift cancelled
TC shift cancelled
The transfe rcaseh ascancelle dthe gear
change process.
X Repeat the gear change process.
Make sure al lconditions for gear changing are
met.
R TC malfunction Visit workshop
TC malfunction Visit workshop
The transfe rcaseisf aulty.
X Do not shift the transfe rcase.
X Hav ethe vehicl echecked as soo naspossible
at aq uali fied specialis tworkshop.
Shifting to neutral G
WARNING
If you do not wai tfor the transfer case gear
change process to complete, the transfer
case coul dremai ninthe neutral position. The
power transmission to the drive nwheels is
then interrupted. There is adange rofthe
vehicl erolling awayu nintentionally.T here is a
risk of an accident.
Waitu ntil the transfer case shift process is
completed.
X Turn the key to position 2in the ignitio nlock.
X Apply the parking brake.
X Depress the brake pedal. X
Shift the automatic transmissio ntoposition
N.
X Press and hol dLOW RANG Ebutton ;for
approximately ten seconds.
Whe nthe shift procedure is complete, the
multifunction display shows the TC TCNeutral
Neutral
on
on message for five seconds.
If the shifting procedur eisunsuccessful, the
multifunction displaym ay show the following
messages (Y page 149).
If the transfer case is in Neutral,the key is in the
ignition lock and you open the driver's door, the
TC Neutral on
TC Neutral on message appears in the multi-
function display. If you then release the parking
brake, awarning tone will sound. Differentia
llocks
General notes G
WARNING
When th edifferential locks are engaged, ABS,
4ETS, ESP ®
and BAS are deactivated. This
coul dcauset he wheels to lock and increases
the braking distance. There is arisk of an
accident.
Disengage the differential locks immediately
on firm surfaces with good grip.
! To prevent damage to the transfer case, you
may only operate the vehicl eonaroller dyna-
mometer (single-axle roller dynamometer) if:
R the axle that is not being drive nisraised.
or
R the corresponding propellers haft is dis-
connected and the transfer case differen-
tial lock is engaged.
Otherwise, the transfer case can be damaged.
Differentia llocks improv ethe traction of the
vehicle.
Yourv ehicleise quipped with adifferential lock
each for:
R the transfer case: this controls the balance
between the front and rear axles
R the rear axle :this controls the balance
between the wheels on the rear axle
R the front axle :this controls the balance
between the wheels on the front axle Off-roa
ddriving systems
125Driving and parking Z
Page 132 of 261

also applies in countries in whic
hthe maximum
permissible spee dfor car/trailer combinations
is greate rtha n1 00 km/h.
When towing atrailer, your vehicle's handling
characteristics will be differen ttowhen driving
without atrailer and th evehicle will consume
mor efuel.
Driving tips R
Maintain agreater distance to the vehicle in
front than when driving without atrailer.
R Avoid braking abruptly. If possible, brake gen-
tly at first to allow the trailer to run on. Then,
increase the braking force rapidly.
R The values given for gradient-climbing capa-
bilities from astandstill refer to sea level.
When driving in mountainous areas, note that
the power output of the engine, and conse-
quently the vehicle's gradient-climbing capa-
bility from astandstill, decrease with increas-
ing altitude.
If the trailer swings from side to side:
X Do not accelerate under any circumstances.
X Do not countersteer.
X Brake, if necessary. Coupling up
atrailer
! Do no
tconnect th etrailer brak esystem (if
th et railer is fitte dwitho ne)d irectly to the
towing vehicle's hydraulic brak esystem,
since this is equipped wit hananti-lock brak-
ing system. Otherwise, neither th ebrakes on
th et ow ing vehicle no rthe brakes on the
trailer will work.
Observ ethe maximum permissible trailer
dimension s(widt hand length).
X Apply th evehicle's parking brake.
X Mak esure that th eautomatic transmission is
in transmission position P.
X Positio nthe trailer on aleve lsurface behind
th ev ehicle.
X Couple up th etrailer.
X Establish th eelectrical connection between
th ev ehicle and th etrailer.
X Chec kthatthe trailer lighting system is work-
ing.
X Push th ecombinatio nswitch upward sand
downwards and check whether th ecorre- sponding tur
nsignal indicator on the trailer is
flashing.
Ac onnected trailer is only detected when the
electrical connection is established correctly
and when the lighting system is working prop-
erly. The function of other systems, such as
ESP ®
also depends on this. Uncoupling
atrailer G
WARNING
If you uncouple atrailer with an engaged over-
run brake, you coul dtrap yourh and between
the vehicl eand the trailer drawbar. This poses
ar isk of injury.
Do not uncouple atrailer with an engaged
overru nbrake.
! Do not disconnect
atrailer with an engaged
overru nbrake. Otherwise, yourv ehiclecould
be damaged by the rebounding of the overrun brake.
X Apply the parking brake.
X Make sure that the automatic transmission is
in transmission position P.
X Secure the vehicl eand trailer against rolling
away.
X Close all doors, including the rear door.
X Remove the trailer cable.
X Uncoupl ethe trailer. Traile
rpower supply
! Yo
uc an connect accessories with amaxi-
mu mp ower consumption of 180 Wtothe
permanent powe rsupply.
Yo um ustn ot charge atrailer battery using the
powe rsupply.
The trailer socket of your vehicl eisequippe dat
the factory with apermanent powe rsupply.
The permanent powe rsuppl yiss upplie dvia
trailer socket pi n9.
Yo uc an find mor einformatio nabout installing
the trailer electrics at aquali fied specialis twork-
shop. Towin
gatrailer
129Driving an dparking Z
Page 136 of 261
Back button
% Press briefly:
R Back
R Hides displa ymessages/calls up
the last Trip
Tripmenu function used
R Exitst he telephone book/redial
memory % Press and hold:
R Callsupt he standard display in the
Trip
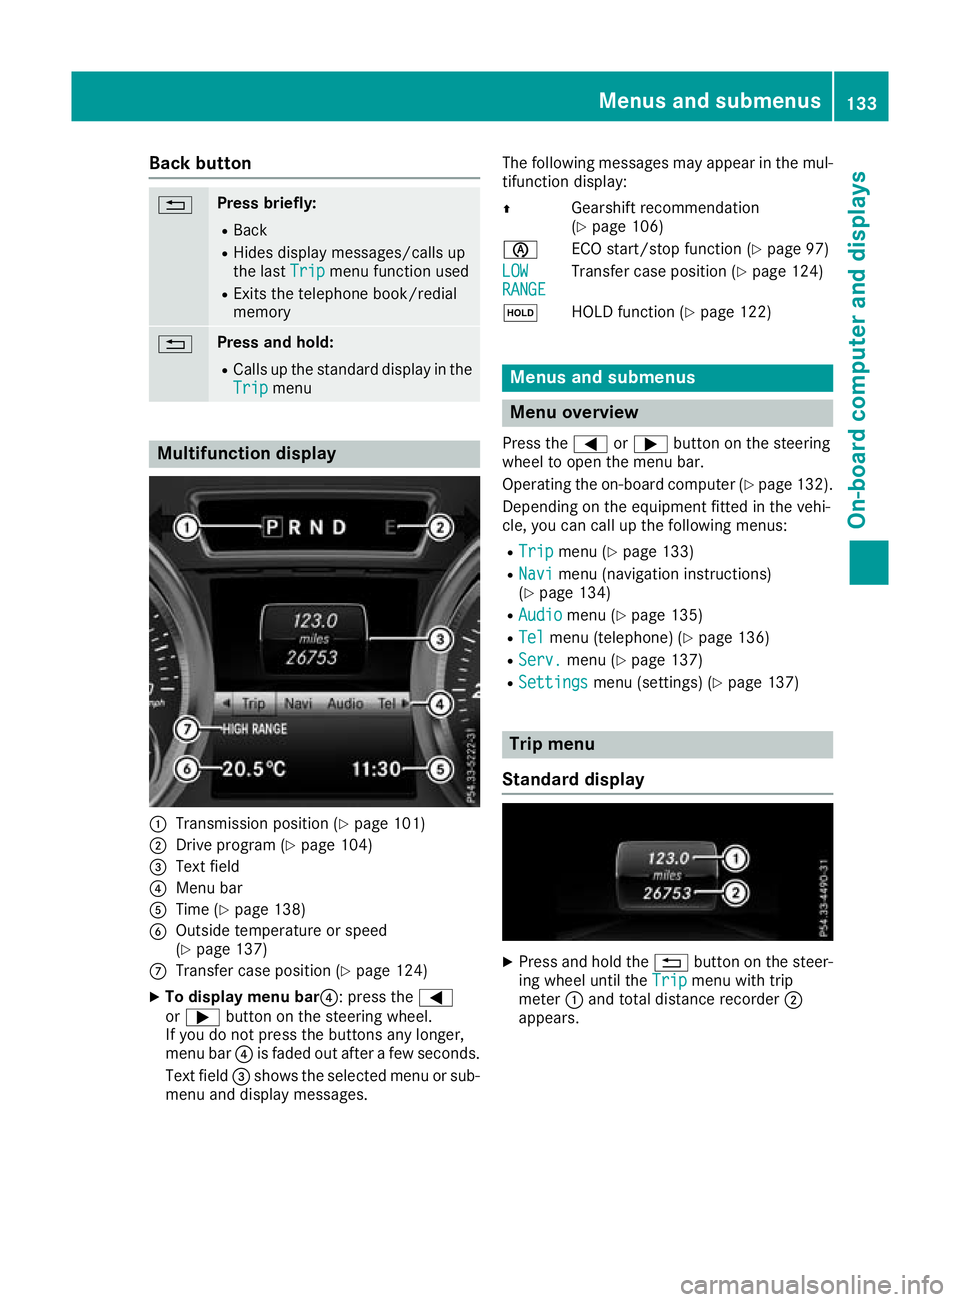
Trip menu Multifunction display
:
Transmission position (Y page 101)
; Drive program (Y page 104)
= Text field
? Menu bar
A Time (Y page 138)
B Outside temperature or speed
(Ypage 137)
C Transfer case position (Y page 124)
X To display menu bar?:p ress the=
or ; button on the steerin gwheel.
If you do not press the button sany longer,
menu bar ?is faded out after afew seconds.
Text field =shows the selected menu or sub-
menu and display messages. The following messages may appear in the mul-
tifunction display:
Z Gearshift recommendation
(Ypage 106)
è ECO start/stopf unction (Ypage 97)
LOW LOW
RANGE RANGE Transfer case position (Y
page 124)
ë HOLD function (Y page 122) Menu
sand submenus Menu overview
Press the =or; button on the steering
whee ltoopen the menu bar.
Operating the on-board compute r(Ypag e132).
Depending on the equipment fitted in the vehi-
cle, you can call up the following menus:
R Trip Trip menu (Y page133)
R Navi
Navi menu (navigatio ninstructions)
(Y pag e134)
R Audio
Audio menu (Y page135)
R Tel
Tel menu (telephone) (Y page136)
R Serv.
Serv. menu (Y page137)
R Settings
Settings menu (settings) (Y page137) Trip menu
Standard display X
Pres sand hold the %button on the steer-
ing wheel until the Trip
Tripmenu with trip
meter :and total distanc erecorder ;
appears. Menu
sand submenus
133On-boardcomputer and displays Z