2016 MERCEDES-BENZ G-CLASS SUV light
[x] Cancel search: lightPage 191 of 261
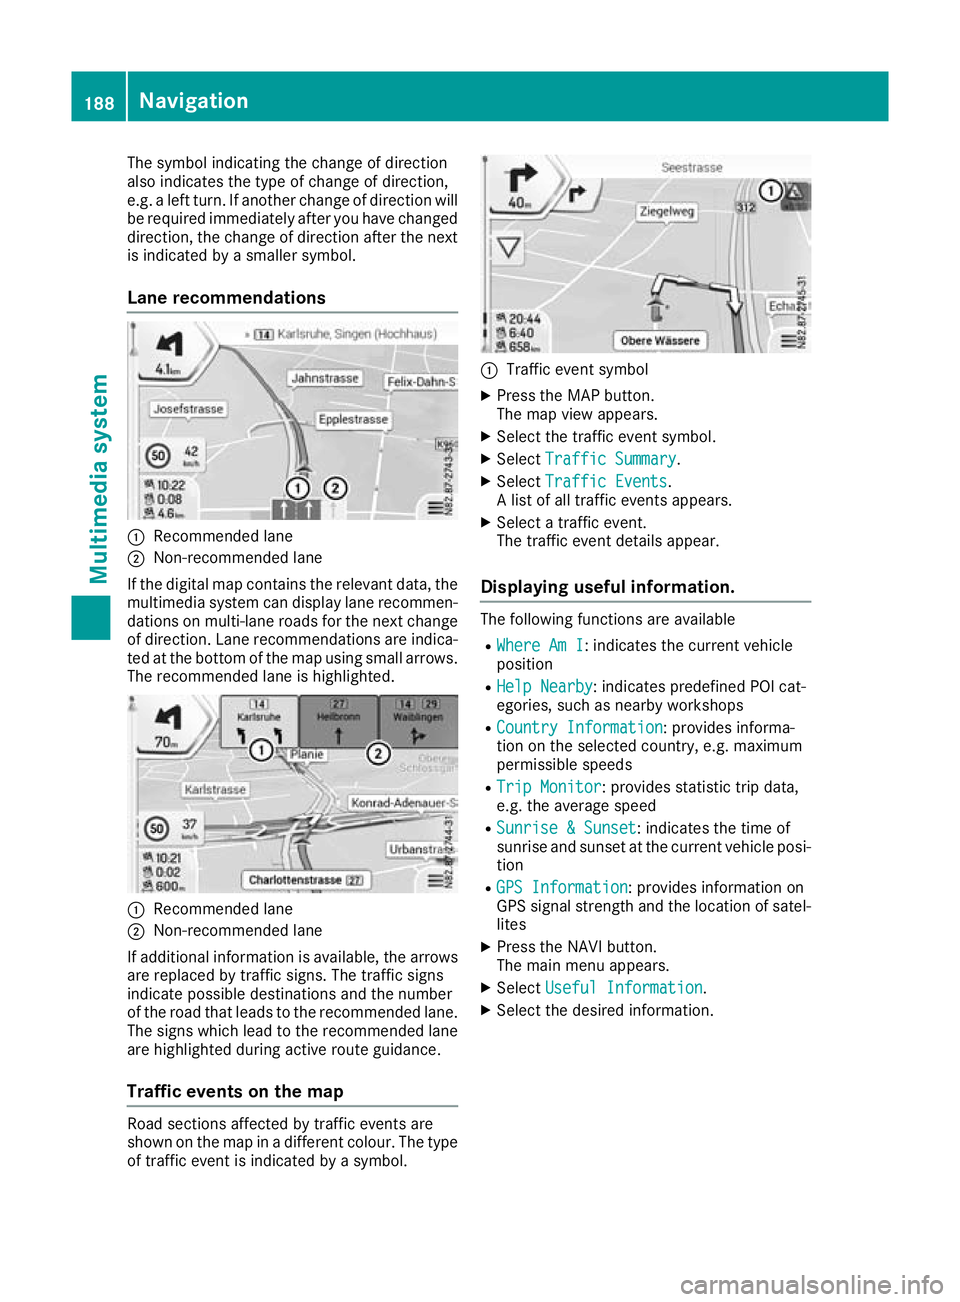
The symbol indicatin
gthe change of direction
also indicates the type of change of direction,
e.g. aleft turn. If another change of direction will
be required immediately after you have changed direction ,the change of direction after the next
is indicated by asmaller symbol.
Lane recommendations :
Recommended lane
; Non-recommended lane
If the digi talm ap contain sthe relevan tdata, the
multimedia system can display lan erecommen-
dation sonm ulti-lane road sfor th enextc hange
of direction .Lan er ecommendation sare indica-
te datt hebotto moft hemap usin gsmall arrows.
The recommended lan eishighlighted. :
Recommended lane
; Non-recommended lane
If additional information is available, th earrows
are replace dbytraffic signs. The traffic signs
indicat epossibl edestination sand th enumber
of th eroad that leads to th erecommended lane.
The sign swhichlead to th erecommended lane
are highlighte dduring active rout eguidance.
Traffic event sonthemap Road section
saffecte dbytraffic event sare
shown on th emap in adifferen tcolour .The type
of traffic event is indicated by asymbol. :
Traffic even tsymbol
X Press the MAP button.
The map view appears.
X Select the traffic event symbol.
X Select Traffic Summary Traffic Summary.
X Select Traffic Events
Traffic Events.
Al ist of all traffic event sappears.
X Select atraffic event.
The traffic event details appear.
Displaying useful information. The following functions are available
R Where Am I
Where Am I:i ndicates the current vehicle
position
R Help Nearby
Help Nearby:i ndicates predefined POI cat-
egories, such as nearby workshops
R Country Information
Country Information :provides informa-
tion on the selected country, e.g. maximum
permissible speeds
R Trip Monitor Trip Monitor:p rovides statistic trip data,
e.g. the average speed
R Sunrise &Sunset
Sunrise &Sunset:i ndicates the time of
sunrise and sunset at the current vehicle posi- tion
R GPS Information
GPS Information :provides information on
GPS signal strength and the location of satel-
lites
X Press the NAVI button.
The main menu appears.
X Select Useful Information Useful Information .
X Select the desired information. 188
NavigationMultimedia system
Page 195 of 261
Setting warnings on the map
When the function is activated, warnings appear on the map.
X Press the NAVI button.
The main menu appears.
X Select Settings
Settings.
X Select Warnings
Warnings.
X Select Road Signs
Road Signs.
The function is activated or deactivated.
X Select the desired alert point.
X To set awarning: selectWarning Type Warning Type.
Am enu appears.
X Select the desired function.
The Ytick indicates the activated function.
X To set the distance: selectDistance
Distance.
Am enu appears.
X Set the desired distance from the alert point.
Defining the settings the navigation
view Setting the map display
Setting zoom and degree of inclination X Press the NAVI button.
The main menu appears.
X Select Settings
Settings.
X Select Navigation View
Navigation View.
X Select Map Appearance
Map Appearance.
X Select Viewpoint
Viewpoint.
Am enu appears.
X Select the desired setting.
The Ytick indicates the active function.
Setting the display colours
The multimedia system includes an optimised
display design for day and night mode.
X Press the NAVI button.
The main menu appears.
X Select Settings
Settings.
X Select Navigation View
Navigation View.
X Select Map Appearance
Map Appearance.
X Select Colour mode Colour mode.
X Select the desired setting.
The Ytick indicates the activated function.
With the Auto Autosetting, the display design is
automatically adapted to the brightness of
the ambient light. Setting the map colours
X Press the NAVI button.
The main menu appears.
X Select Settings Settings.
X Select Navigation View
Navigation View.
X Select Map Appearance
Map Appearance.
X Select Day Map Colours
Day Map Colours orNight Map
Night Map
Colours
Colours.
X Select the desired map colour using the
arrows.
Activating or deactivating 3D display of
objects on the map
The following types of 3D objects are available:
R Landmarks Landmarks:3Dd isplayofprominent or
known objects
R Buildings
Buildings:3Dd isplayofthe buildings in a
town
R 3D Terrain
3D Terrain:3Dd isplayofthe surrounding
area
X Press the NAVI button.
The main menu appears.
X Select Settings Settings.
X Select Navigation View Navigation View.
X Select Map Appearance Map Appearance.
X Select Landmarks
Landmarks, Buildings
Buildingsor3D Ter‐
3D Ter‐
rain
rain.
The function is activated or deactivated.
Activating or deactivating route recording
If this function is activated, the towns through
which the vehicle is driven are recorded.
X Press the NAVI button.
The main menu appears.
X Select Settings Settings.
X Select Navigation View
Navigation View.
X Select Map Appearance
Map Appearance.
X Select Track logs
Track logs.
The function is activated or deactivated.
Activating or deactivating the display of
POI symbols on the map
X Press the NAVI button.
The main menu appears.
X Select Settings Settings.
X Select Navigation View Navigation View.
X Select Map Appearance
Map Appearance. 192
NavigationMultimedia system
Page 198 of 261
Setting map view and alignment
The following options are available:
R 3D map: the map view is aligned to the direc-
tion of travel
R 2D map in direction of travel: the map view is
aligned to the direction of travel. The direction
of travel is alwaysatt he top.
R North-oriented 2D map: the map view is dis-
played so that northisa lwaysatthe top
X Press the NAVI button.
The main menu appears.
X Dependin gonthe current setting, select 3D 3D,
2D
2D or2D
2DLL.
In accordance with your selection, the setting
changes to 3D
3D, 2D
2Dor2D
2DLL.
Defining regional settings Setting the user interface language
X Press the NAVI button.
The main menu appears.
X Select Settings Settings.
X Select Regional
Regional.
X Select Language
Language.
Al ist of available languages appears.
X Select the desired language.
The multimedia system is restarted with the
selected language set.
Setting the language for voice output
X Press the NAVI button.
The main menu appears.
X Select Settings Settings.
X Select Regional
Regional.
X Select Voice Language
Voice Language.
Al ist of the available languages and speakers
appears.
X Select the desired language and speaker.
The selected language and speaker are adop-
ted for the voice output.
Setting units and formats The following functions are available:
R Distance
Distance
R Fuel consumption Fuel consumption
R Weight
Weight
R Time Format
Time Format
R Date Format
Date Format R
Date Delimiter
Date Delimiter
R Coordinate Display Format
Coordinate Display Format
X Press the NAVI button.
The main menu appears.
X Select Settings
Settings.
X Select Regional Regional.
X Select Units &Formats
Units &Formats.
X Select the desired function.
Am enu appears.
X Select the desired setting.
The Ytick indicates the activated function.
Setting the time zone and daylight saving
time
X Press the NAVI button.
The main menu appears.
X Select Settings
Settings.
X Select Regional Regional.
X Select Time Zone
Time Zone.
X To set the time zone automatically: select
Automatic Time Zone
Automatic Time Zone.
Am enu appears.
X Select the desired setting.
The Ytick indicates the activated function.
X To set the time zone manually: select
Automatic Time Zone Automatic Time Zone.
Am enu appears.
X Select Manual Time Zone Manual Time Zone.
The Ytick indicates the activated function.
X Select Time Zone
Time Zone.
X Set the desired time zone using the slider.
X To activate or deactivate daylight saving
time:
select Daylight Saving Time Daylight Saving Time.
The function is activated or deactivated.
Activating or deactivating menu anima-
tions If this function is activated, buttons in menus,
keyboard displays and screen transitions are
animated.
X Press the NAVI button.
The main menu appears.
X Select Settings Settings.
X Select Display
Display.
X Select Menu Animations
Menu Animations.
The function is activated or deactivated. Navigation
195Multimedia system Z
Page 205 of 261
Rear benc
hseat Folding th
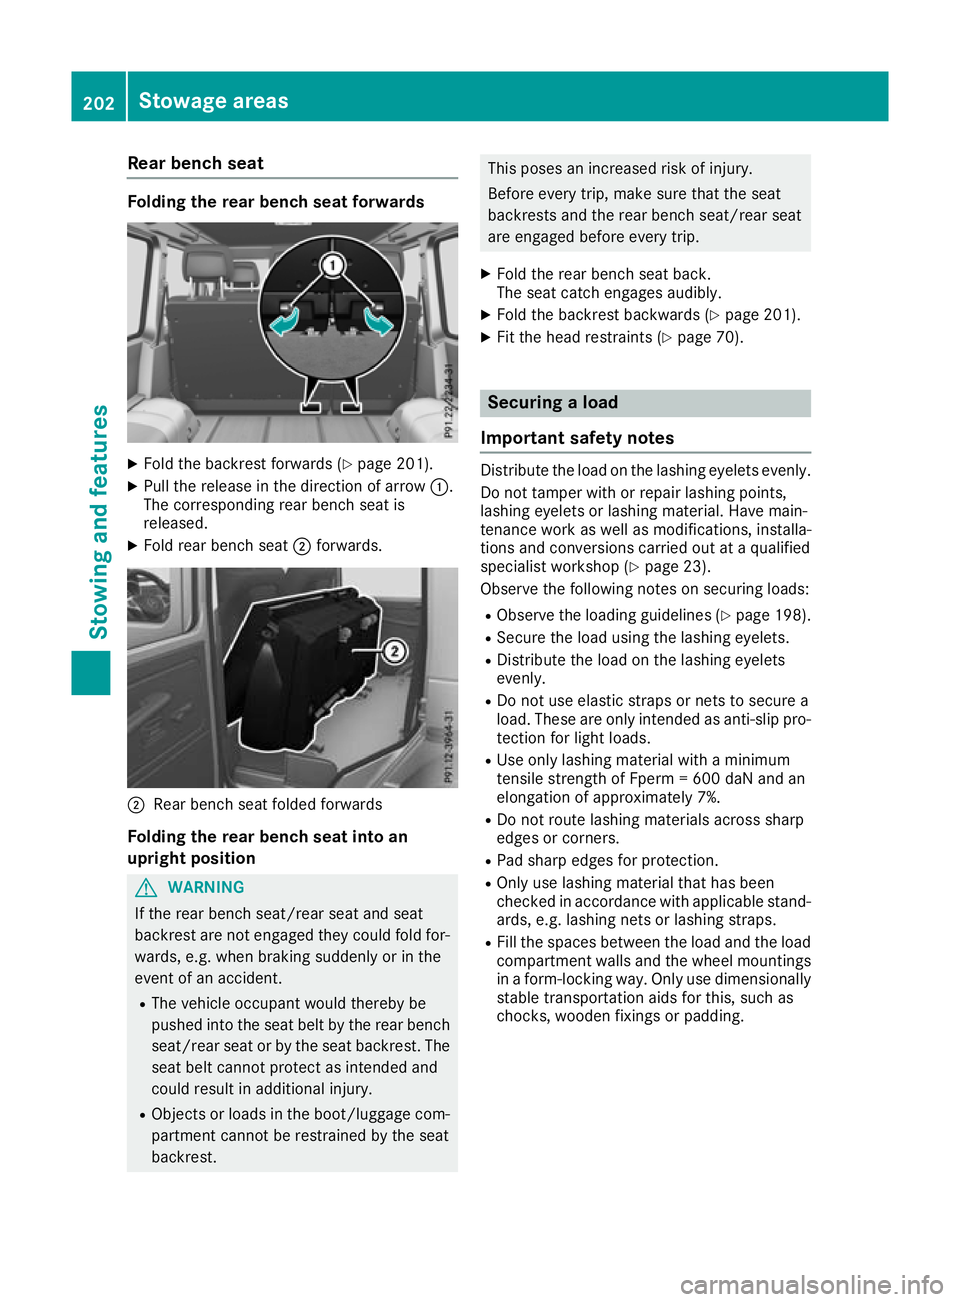
erearb ench seat forwards X
Fold th ebackrest forward s(Ypage 201).
X Pull the release in the directio nofarrow:.
The corresponding rea rbench sea tis
released.
X Fold rea rbench seat ;forwards. ;
Rear bench seat foldedf orwards
Folding th erearb ench sea tint oan
upright position G
WARNING
If th erear bench seat/rea rseat and seat
backrest are not engaged they coul dfold for-
wards, e.g. when braking suddenly or in the
event of an accident.
R The vehicl eoccupant would thereby be
pushed into the seat beltb ythe rear bench
seat/rea rseat or by the seat backrest. The
seat beltc annot protect as intended and
coul dresult in additiona linjury.
R Objects or loads in the boot/luggag ecom-
partment cannot be restrained by the seat
backrest. This poses an increased risk of injury.
Befor
eevery trip, make sure that the seat
backrest sand the rear bench seat/rear seat
are engaged before every trip.
X Fold the rear bench seat back.
The seat catche ngages audibly.
X Fold the backrest backwards (Y page 201).
X Fit the head restraints (Y page 70). Securing
aload
Important safety notes Distribute the load on the lashing eyelets evenly.
Do not tamper with or repair lashing points,
lashing eyelets or lashing mater ial.Hav emain-
tenance work as well as modifications, installa-
tions and conversions carrie doutataq uali fied
specialis tworkshop (Y page 23).
Observe the following note sonsecuring loads:
R Observe the loading guideline s(Ypage 198).
R Secure the load using the lashing eyelets.
R Distribute the load on the lashing eyelets
evenly.
R Do not us eelast ic straps or nets to secur ea
load .These ar eonlyi ntende dasanti-slip pro-
tection for light loads.
R Use onl ylas hing material with aminimum
tensil estrength of Fperm =600 da Nand an
elongation of approximately 7%.
R Do not route lashing material sacross sharp
edge sorc orners.
R Pa ds harp edge sfor protection.
R Onl yuselashing material tha thas been
checked in accordance with applicabl estand-
ards ,e.g.las hing nets or lashing straps.
R Fillthe space sbetween the load and the load
compartment wall sand the whee lmountings
in af orm-locking way. Onl yusedimensionally
stabl etransportatio naidsf or this, such as
chocks, wooden fixings or padding. 202
Stowag
eareasStowing and features
Page 210 of 261
could sli
porbef lung around and thereby
strike vehicle occupants. In addition, cup
holders, ope nstowag espaces and mobile
phone brackets may not always be able to
hol dthe objects place dinthem in the event of
an accident. There is ariskofi njury, particu-
larly in the event of sharp braking or sudden
changes of direction.
R Alway sstow objects in such awaythat they
cannot be tosse dabout in these or similar
situations.
R Alway smake sure that objects do not proj-
ect from stowag espaces, luggage nets or
stowag enets.
R Ensure that closable stowag espaces are
shu tbefore beginning your journey.
R Alway sstow and secure heavy, hard, poin-
ted, sharp-edged, fragil eoroutsize objects
in the loa dcompartment. G
WARNING
The cup holder cannot secure adrinks con-
tainer in place during ajourney .Ifyou use a
cup holder during ajourney ,the drinks con-
tainer coul dbeflung around and liquid could
be spilt. Vehicle occupants coul dcome into
contact with the liquid and, in particular, be
scalded by hot liquid.Y ou couldbedistracted
from the traffic situation and lose control of
the vehicle. There is arisk of an accident and
injury.
Only use the cup holder when the vehicl eis
stationary. Only place containers of asuitable
size in the cup holder. Seal the container, in
particular when it contains hot liquid.
! Only use the cup holders for containers of
the right size and which have lids. The drinks
coul dotherwise spill.
Observe the loading guidelines (Y page198). Cu
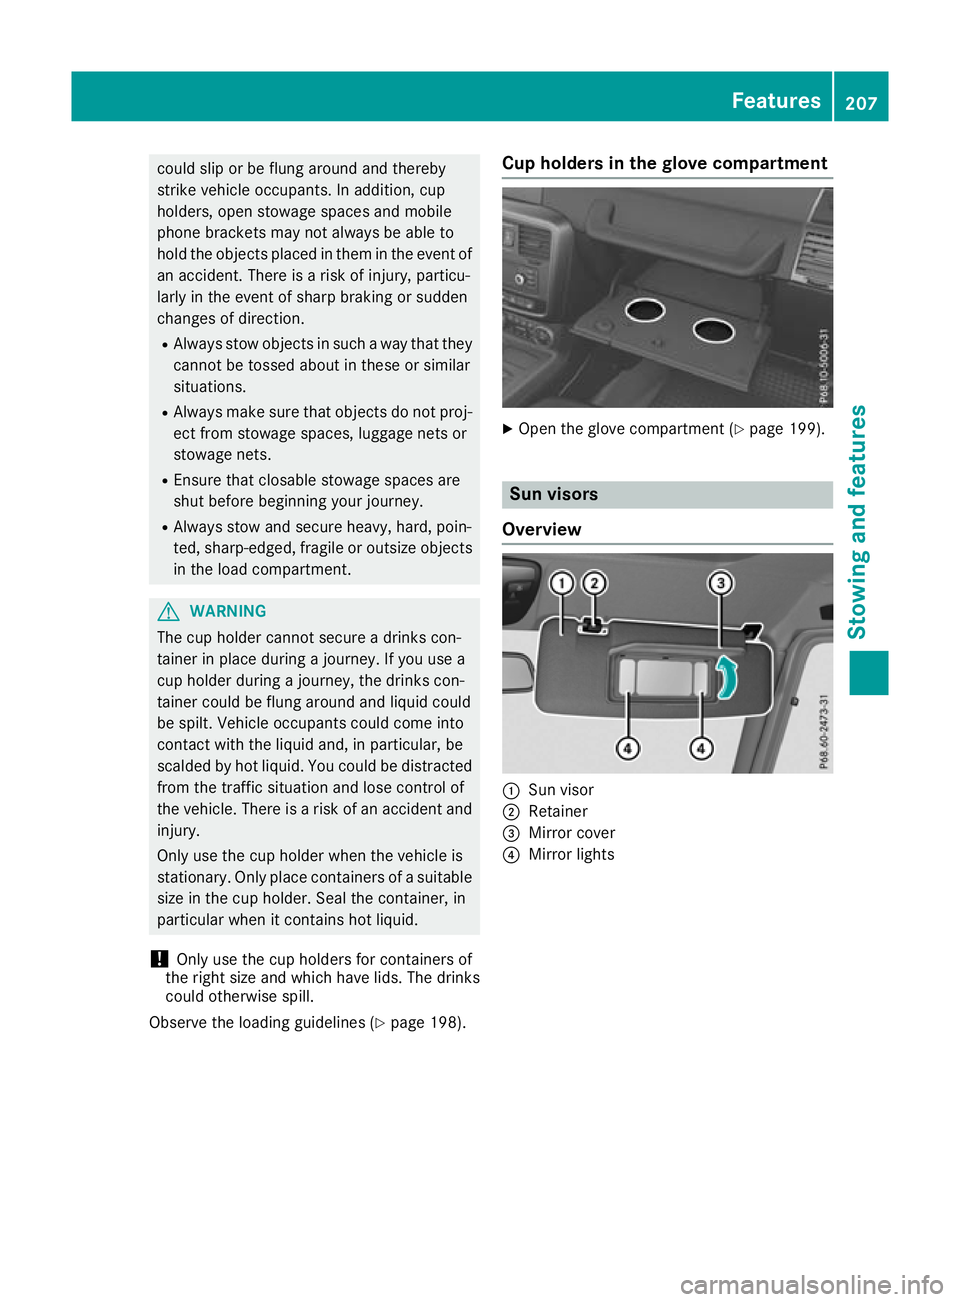
ph olders in th eglove compartment X
Ope nthe glove compartment (Y page 199). Sun visors
Overview :
Sun visor
; Retainer
= Mirror cover
? Mirror lights Features
207Stowing and features Z
Page 211 of 261
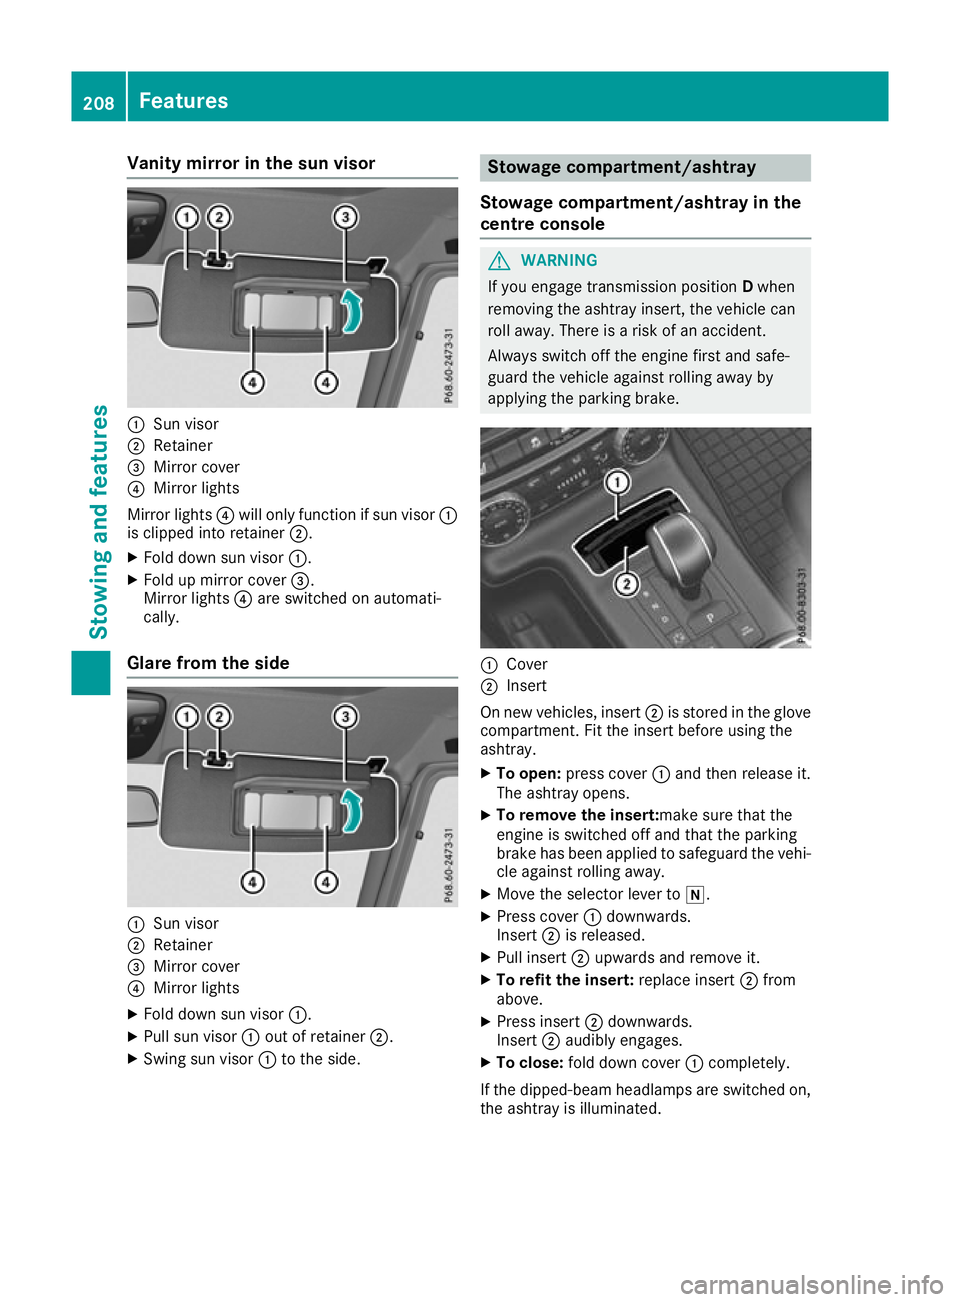
Vanity mirro
rint he sun visor :
Sun visor
; Retainer
= Mirror cover
? Mirror lights
Mirror lights ?will only function if su nvisor :
is clippe dinto retainer ;.
X Fol dd owns un visor :.
X Fol dupm irror cover =.
Mirror lights ?are switched on automati-
cally.
Glare from the side :
Sun visor
; Retainer
= Mirror cover
? Mirror lights
X Fol dd owns un visor :.
X Pull su nvisor :outofr etainer ;.
X Swing su nvisor :to the side. Stowag
ecompartment/ashtray
Stowage compartment/ashtray in the
centre console G
WARNING
If you engage transmission position Dwhen
removing the ashtray insert, the vehicle can
roll away. There is arisk of an accident.
Always switch off the engine first and safe-
guard the vehicl eagainst rolling awayby
applying the parking brake. :
Cover
; Insert
On new vehicles, insert ;is stored in the glove
compartment. Fi tthe insert before usin gthe
ashtray.
X To open: press cover :and then release it.
The ashtray opens.
X To remove th einsert:ma ke sure that the
engin eisswitched off and that th eparking
brak ehas been applied to safeguard th evehi-
cle against rolling away.
X Mov ethe selector leve rtoi.
X Press cover :downwards.
Insert ;is released.
X Pull insert ;upward sand remove it.
X To refit th einsert: replace insert ;from
above.
X Press insert ;downwards.
Insert ;audibly engages.
X To close: fold down cover :completely.
If th edipped-beam headlamps are switched on,
th ea shtray is illuminated. 208
Featu
resStowing and features
Page 212 of 261
Cigarett
elighter G
WARNING
Yo uc an burn yourself if you touch the hot
heating element or the socket of the cigarette lighter.
In addition, flammable materials can ignite if:
R the hot cigarette lighter falls
R ac hild hold sthe hot cigarette lighter to
objects, for example
There is arisk of fire and injury.
Always hold the cigarette lighter by the knob.
Always make sure that the cigarette lighter is
out of reach of children. Never leave children unattended in the vehicle. X
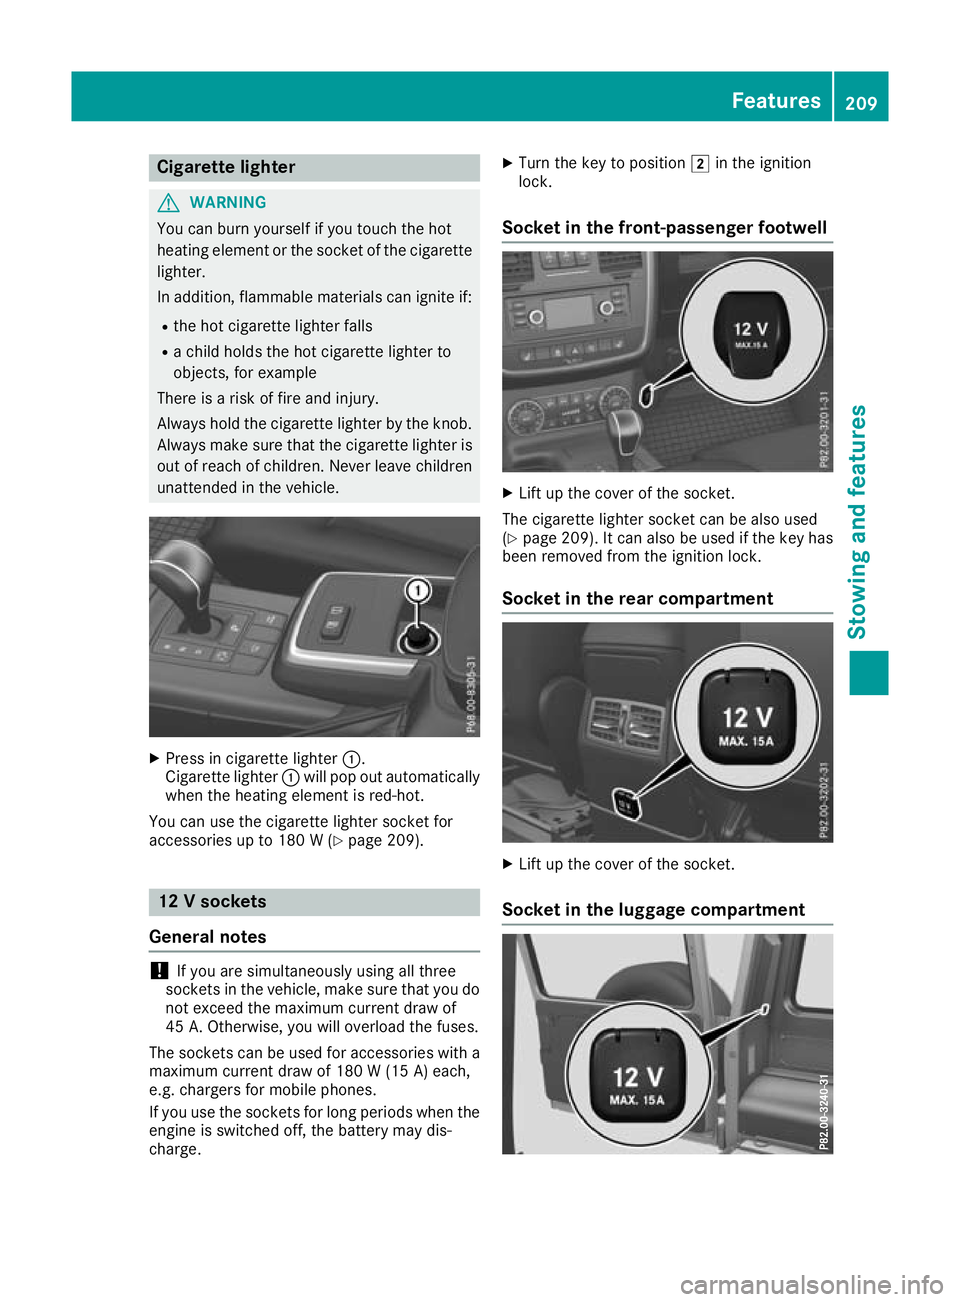
Pres sinc igarett elighter :.
Cigarette lighter :will pop out automatically
when the heating element is red-hot.
You can use the cigarett elighter socket for
accessories up to 180 W(Ypage 209). 12
Vsockets
General notes !
If you are simultaneously using all three
socketsint he vehicle, make sure that you do
not exceed the maximum current draw of
45 A. Otherwise, you will overload the fuses.
The sockets can be used for accessories with a maximum current draw of 180 W(15 A) each,
e.g. chargers fo rmobile phones.
If you use the sockets for long periods whe nthe
engine is switched off, the battery may dis-
charge. X
Turn the key to position 2in the ignition
lock.
Socket in the front-passenger footwell X
Lift up the cover of the socket.
The cigarette lighter socket can be also used
(Y page 209). It can also be used if the key has
been removed from the ignition lock.
Socket in the rear compartment X
Lift up the cover of the socket.
Socket in the luggag ecompartment Features
209Stowing and features Z
Page 215 of 261
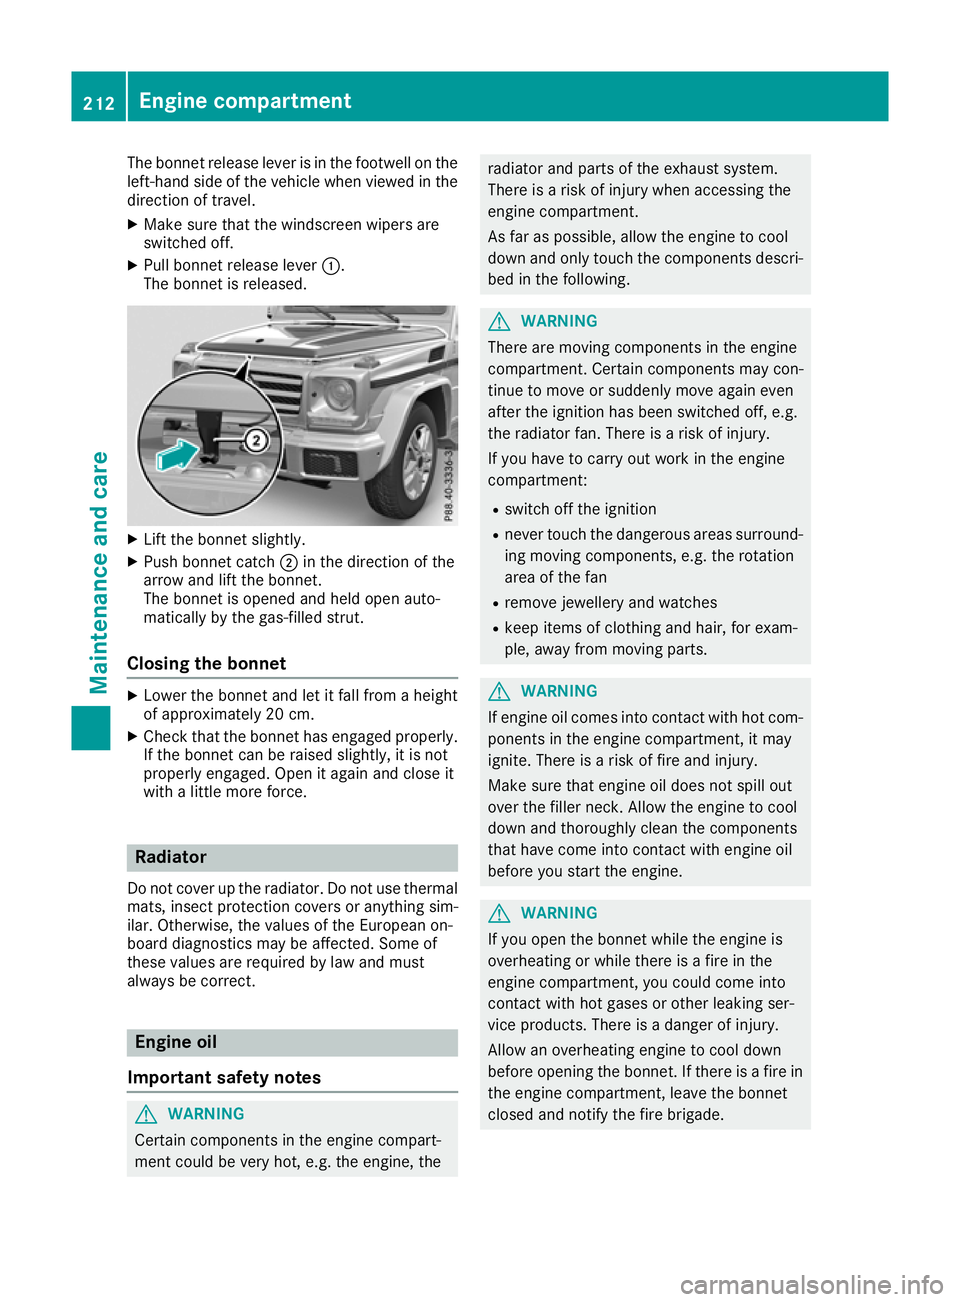
The bonnet release lever is in the footwell on the
left-hand side of the vehicle when viewed in the
direction of travel.
X Make sure that the windscreen wipers are
switched off.
X Pull bonnet release lever :.
The bonnet is released. X
Lift the bonnet slightly.
X Push bonnet catch ;in the direction of the
arrow and lift the bonnet.
The bonnet is opened and held open auto-
matically by the gas-filled strut.
Closing the bonnet X
Lower the bonnet and let it fall from aheight
of approximately 20 cm.
X Check that the bonnet has engaged properly.
If the bonnet can be raiseds lightly, it is not
properl yengaged .Open it again and close it
with alittle more force. Radiator
Do not cover up the radiator. Do not use thermal mats, insect protection covers or anything sim-
ilar. Otherwise, the valuesoft he Europeanon-
board diagnostics may be affected .Some of
thes evalue sare required by la wand must
always be correct. Engine oil
Importan tsafety notes G
WARNING
Certain components in th eengine compart-
ment coul dbevery hot, e.g. the engine, the radiator and parts of the exhaust system.
There is
arisk of injury when accessing the
engine compartment.
As far as possible, allow the engine to cool
down and only touch the components descri- bed in the following. G
WARNING
There are moving components in the engine
compartment. Certain components may con-
tinue to move or suddenly move again even
after the ignitio nhas been switched off, e.g.
the radiator fan. There is arisk of injury.
If you have to carry out work in the engine
compartment:
R switch off the ignition
R never touch the dangerous area ssurround-
ing moving components, e.g. the rotation
area of the fan
R remove jewellery and watches
R keep items of clothing and hair, for exam-
ple,a wayfrom moving parts. G
WARNING
If engine oil comes into contact with hot com- ponents in the engine compartment, it may
ignite. There is arisk of fire and injury.
Make sure that engine oil does not spil lout
over the filler neck. Allow the engine to cool
downa nd thoroughly clea nthe components
that have come into contact with engine oil
before you start the engine. G
WARNING
If you open the bonnet while the engine is
overheating or while there is afire in the
engine compartment, you coul dcome into
contact with hot gase sorother leaking ser-
vice products. There is adange rofinjury.
Allow an overheating engine to cool down
before opening the bonnet. If there is afire in
the engine compartment, leave the bonnet
closed and notify the fire brigade. 212
Engine compartmentMaintenanc
eand care