2016 MERCEDES-BENZ G-CLASS SUV change wheel
[x] Cancel search: change wheelPage 25 of 261
Do not attempt to modify the wirin
gaswellas
electronic components or their software.
Alway shavew orkone lectrical and electronic
components carrie doutataq uali fied special-
is tw orkshop.
If yo umakea ny change stothe vehicl eelec-
tronics, the genera lope rating permi tisr en-
dered invalid.
! There is
ariskofd amagetothe vehicl eif:
R the vehicl ebecome sstuck, e.g .onahigh
kerb or an unpaved road
R youd rive too quickl yoverano bstacle ,e.g.
ak erb ,slowin gthreshold sorapothol ein
the road
R ah eavy object strikes the underbod yor
parts of the chassis
In situations like this, the body ,underbody,
chassi sparts, wheels or tyres could be dam-
aged withou tthe damage being visible .Com-
ponents damage dinthisw aycan unexpect-
edly fail or, in the cas eofanaccident, no lon-
ge rw ithstand the strain the yaredesigne dto
withstand.
If the underbod ypanelling is damaged, com-
bustibl ematerial ssuchasl eaves, grass or
twigs can gathe rbetween the underbod yand
the underbod ypanelling. If these materials
come into contact with hot parts of the
exhaust system ,the yc an catc hfire.
In such situations, have the vehicl echecked
and repaired immediatel yataqualified spe-
cialist workshop .If, on continuing your jour-
ney ,you notice tha tdrivin gsafety is impaired,
stop the vehicl eimmediately, paying atten-
tio ntor oada nd traffi cconditions. In such
cases, consul taqualified specialis twork-
shop. Declarations of conformity
Wireless vehicle components Th
ef ollowing information applies to all compo-
nentsoft he vehicle and the information sys-
tems and communication devices integrated in
the vehicle that receive and/or transmit radio
waves.
The components of this vehicle that receive
and/or transmit radio waves are compliant with
the basic requirement sand all other relevant condition
sofDirective 1999/5/EC .You can
obtain further information from any Mercedes-
Benz Service Centre.
Electromagneti ccom patibility The electromagnetic compatibilit
yofthe vehicle
components has been checked and certified
according to the currently valid version of Reg-
ulation ECE-R1 0.
Jack Copy and translation of the original declaration
of conformity:
EC declaration of conformity
2006/42/EC
We
WEBER-HYDRAULIK GMBH
Heilbronner Straße 30 —74363 Güglingen
declare that th eproduct "Weber hydraulic bottle
jack", types:
AADA DXAH AH XALATA TDATDX AT GATN
ATGX ATPX AT QAX
Capacity: 2,000 to 100,000 kg
Serial no.: from year of manufactur e01/2010
complie switht he relevan tessential healt hand
safety requirements of th eECDirective on
Machinery.
This EC declaration of conformity become sinva-
lid:
R in th eevent of modifications or repairs per-
formed by an unqualifie dperson
R if th eproduct sare used in suc haway that
does no tcom ply wit hintended applications
listed in th eoperatin ginstructions
R ther equired regular check sare no tper-
formed
Relevant EU Directives :ECDirective on Machi-
nery 2006/42/EC
Applicable standards :ISO 11530
Qualit yassurance: DI NENISO9001:2000
Güglingen ,01.07.2013 [signature] [signature]
Manager Representative of
Technical WEBER-HY
DRAULIK
GmbH Documentation
WEBER-HYDRAULIK GMBH22
Introduction
Page 55 of 261
Pets in the vehicle
G
WARNING
If you leave animals unsupervised or unse-
cured in the vehicle, they may push abutton
or as witch, for example.
They could:
R activate vehicl eequipment and become
trapped, for example
R switch vehicl esystems on or off, thus
endangering other road users
In the event of an accident, sudden braking or
abrupt changes of direction, unsecured ani-
mals coul dbeflung around the vehicle, injur-
ing the vehicl eoccupants. There is arisk of an
accident and injury.
Never leave animals unattended in the vehi-
cle. Always secure animals correctly during a
journey ,e.g. in an anima ltransport box. Driving safe
tysystems Drivin
gsafet ys ystems overview
In this section ,you will fin dinformati on about
th ef ollowin gdrivin gsafet ysystems:
R AB S(Anti-lock Braking System)
(Y page 52)
R BA S(Brake Assist System) (Y page 53)
R Adaptive brake lights (Y page 53)
R ESP ®
(Electronic Stability Program)
(Y page 53)
R EB D( electronic brak eforce distributi on)
(Y page 55)
R ADAPTIV EBRAKE (Y page 56) Important safety notes
If you fail to adapt your driving style or if you are
inattentive, th edriving safet ysystems can nei-
ther reduce th eriskofana ccidentnor override
th el aws of physics .Drivin gs afet ysystems are
merely aids designed to assist driving .You are
responsible for maintainin gthe distanc etothe
vehicl einfront,for vehicl espeed, for braking in
goo dtime, and for staying in lane. Always adapt
your driving style to suit th eprevailing road and weather conditions and maintain
asafe distance
fro mt hevehicle in front .Drive carefully.
The driving safet ysystems described work as
effectively as possible only when there is ade-
quate contac tbetween th etyres and th eroad
surface. Pay particular attention to th einforma-
tio nr egarding tyres, recommended minimum
tyr etread depths etc .inthe"Wheels and tyres"
sectio n(Ypage 235).
In wintry driving conditions ,always use winter
tyres (M+S tyres) and, if necessary, snow
chains. Only in this way will th edriving safety
systems described in this sectio nwork as effec-
tively as possible. ABS (Anti-lock Braking System)
Genera linformation AB
Sregulate sbrake pressure in such awaythat
the wheels do not lock when yo ubrake. This
allows yo utocontinue steering the vehicl ewhen
braking.
The yellow !ABS warning lamp in the instru-
ment cluster lights up when the ignition is
switched on. It goe soutwhen the engine is run-
ning.
ABS works from aspeed of abou t8km/h,
regardless of road-surface conditions. ABS
works on slippery surfaces ,evenw heny ou
brake onl ygently.
Important safety notes i
Observ
ethe "Important safety notes" sec-
tion (Y page 52). G
WARNING
If ABS is faulty, the wheels could lock when
braking. The steerability and braking charac-
teristics may be severely impaired.A ddition-
ally, further driving safety systems are deac-
tivated. There is an increased dange rofskid-
ding and accidents.
Drive on carefully.H ave ABS checked imme-
diately at aqualified specialist workshop.
If ABS is malfunctioning, other systems ,includ-
ing driving safety systems ,willa lsob ecome
inoperative. Observe the information on the ABS warning lamp (Y page158) and display mes- 52
Driving safety systemsSafety
Page 71 of 261
G
WARNING
You coul dlose control of the vehicl ewhile
driving if you:
R adjust the driver's seat, steering whee lor
mirrors
R fasten the seat belt
There is arisk of an accident.
Adjust the driver's seat, headr estraint, steer-
ing whee land mirrors and fasten yours eat
beltb efore starting the engine. G
WARNING
The headr estraints cannot provid ethe inten-
ded protection unless they are fitted and
adjusted correctly. There is an increased risk of injury to the heada nd neck in the event of
an accident or sudden braking, for example.
Always drive with the headr estraints fitted.
Ensure that the centre of the headr estraints
support the back of each vehicl eoccupant's
headate ye levelbefore driving off.
Make sure that you do not interchange the head restraints of the front and rear seats when
adjusting the headr estraints. Otherwise, you
cannot adjust the height and angle of the head
restraints correctly.
Adjust the headr estraint so that it is as close as
possible to yourh ead. G
WARNING
If the driver's seat is not correctly engaged, it coul dunexpectedly move while driving. This
coul dcausey ou to lose control of the vehicle.
There is arisk of an accident.
Always ensure that the driver's seat is
engaged before starting the vehicle. G
WARNING
If you adjust the seat height carelessly, you or other vehicl eoccupants coul dbetrappe dand
thereby injured .Childre ninparticular could
accidentally press the electrica lseat adjust-
ment buttons and become trapped. There is a
risk of injury.
Whil emoving the seats, make sure that your
hands or other body parts do not get under the lever assembly of the sea
tadjustmen tsys-
tem. G
WARNING
Whe nadjusting aseat, you or another vehicle
occupant coul dbecome trappe dbythe guide
rail of the seat, for instance. There is arisk of
injury.
Make sure that no one has any part of their
body withi nthe swee pofthe seat when
adjusting it. G
WARNING
If the seat beltisn ot in the seat beltg uide, it
no longer offers the intended leve lofprotec-
tion. An incorrectly fastened seat beltc an also
caus eadditiona linjuries. This poses an
increased risk of injury or even fatal injury.
Before starting ajourney ,alwaysm ake sure
that the seat beltisint he seat beltguide and
all vehicl eoccupants have fastened their seat
belts properly.
! To avoi
ddamage to the seats and the seat
heating, observe the following information:
R do not spil lany liquidsont he seats. If liquid
is spilled on the seats, dry them as soon as possible.
R if the seat covers are damp or wet, do not
switch on the seat heating. The seat heat-
ing should alson ot be used to dry the seats.
R clea nthe seat covers as recommended;
see "Interio rcare".
R do not transport heav yloads on the seats.
Do not place sharp objects on the seat
cushions, e.g. knives, nail sortools. The
seats should only be occupied by passen-
gers, if possible.
R when the seat heating is in operation, do
not cover the seats with insulating materi-
als,e .g. blankets, coats, bags, seat covers,
child seats or booster seats.
! Make sure that there are no objects in the
footwel lunder or behind the seats when mov-
ing the seats back. There is arisk that the
seats and/or the objects coul dbedamaged.
! When the rear bench seat is folde
dfor-
wards, the front seats cannot be moved to 68
SeatsSeats
,steering wheela nd mirrors
Page 72 of 261
their rearmost position. Yo
ucould otherwise
damage the seats and the rea rbench seat.
! Make sure tha
tthe su nvisor is folde dup
befor eadjusting the backrest and head
restraint height. The head restraint and sun
visor could otherwis ecollide when the head
restraint is full yextended.
i If the front door is open, the seats can be
adjusted for up to 30 minute safter the igni-
tio nh asbeen switched off.
i The rea
rseath eadr estraints can be
remove d(Ypage 70).
For mor einformation, contact aquali fied spe-
cialist workshop.
i Furthe
rinformation abou tenlarging the lug-
gage compartment (folding the rea rbench
seat forwards )(Ypage 202). Adjustin
gthe seats :
Seat cushion angle
; Seat height
= Backrest angle
? Seat fore-and-aft adjustment
X Sea tfore-and-aft adjustment: lift lever?
and slide the sea tforward sorbackwards.
X Releas elever ? again.
Ensur ethat the sea tengages audibly. Adjustin
gthe hea drestraints
Important safety notes G
WARNING
Th eh ead restraints cannot provid ethe inten-
ded protection unless they are fitted and
adjusted correctly. There is an increased risk of injury to the head and neck in the event of
an accident or sudden braking, for example.
Always drive with the head restraints fitted.
Ensure that the centre of the head restraints
support the back of each vehicl eoccupant's
head at eye leve lbefore driving off.
Observe the following when adjusting the head
restraints:
X Do not interchange the head restraints of the
front and rear seats.
Otherwise, you cannot adjust the height and
angle of the head restraints correctly.
X Adjust the head restraint so that it is as close
as possible to yourh ead.
Adjusting the head restraint height X
To raise: pull the head restraint up to the
desired position.
X To lower: push release button :in the direc-
tion of the arrow and push the head restraint down to the desired position. Seats
69Seats,steering wheela nd mirrors Z
Page 73 of 261
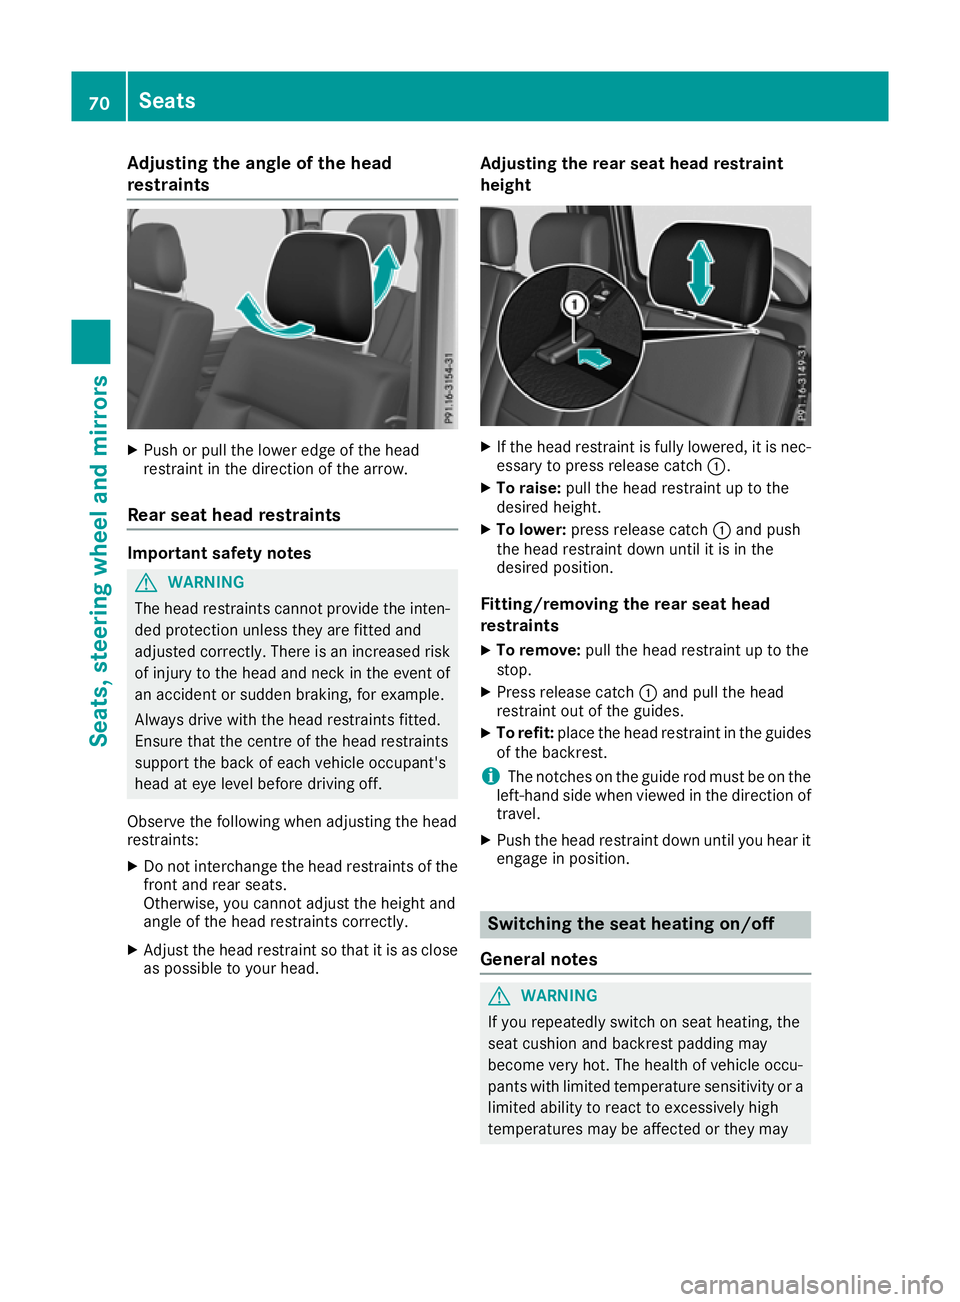
Adjusting th
eangle of th ehead
restraints X
Push or pull the lowe redge of the head
restraint in the direction of the arrow.
Rear seat head restraints Important safety notes
G
WARNING
The head restraints cannot provide the inten-
ded protection unless they are fitted and
adjusted correctly. Ther eisanincreased risk
of injury to the heada nd neck in the event of
an accident or sudden braking, for example.
Always drive with the headr estraints fitted.
Ensure that the centre of the headr estraints
support the back of each vehicl eoccupant's
headate ye levelbefore driving off.
Observe the following when adjusting the head
restraints:
X Do not interchange the headr estraints of the
front and rear seats.
Otherwise, you cannot adjust the height and
angle of the headr estraints correctly.
X Adjust the headr estraint so that it is as close
as possible to yourh ead. Ad
justing th erears eat hea drestraint
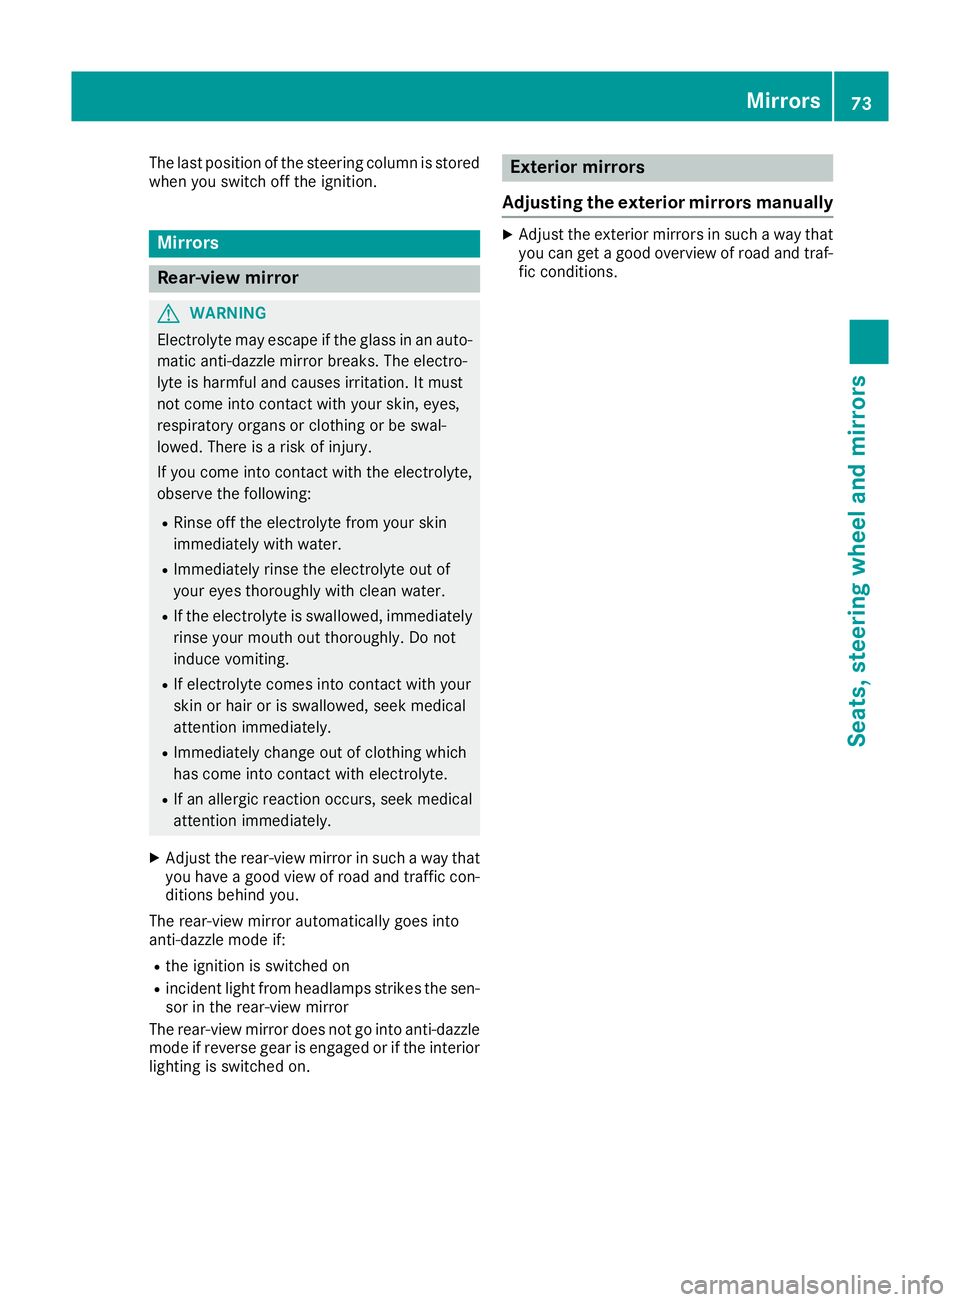
height X
If th ehead restraint is fullyl owered, it is nec-
essary to press release catch :.
X To raise: pullthe head restraint up to the
desire dheight.
X To lower: press release catch :and push
the head restraint down until it is in the
desire dposition.
Fitting/removin gthe rear seat head
restraints
X To remove: pullthe head restraint up to the
stop.
X Press release catch :and pullt he head
restraint out of the guides.
X To refit: place the head restraint in the guides
of the backrest.
i The notches on the guide rod must be on the
left-hand side when viewedint he direction of
travel.
X Push the head restraint down until you hear it
engage in position. Switching the seat heating on/off
General notes G
WARNING
If you repeatedly switch on seat heating, the
seat cushion and backrest padding may
become very hot. The health of vehicle occu-
pants with limited temperature sensitivity or a limited ability to react to excessively high
temperatures may be affected or they may 70
SeatsSeats, steerin
gwheela nd mirrors
Page 76 of 261
The last position of the steerin
gcolumn is stored
when you switch off the ignition. Mirrors
Rear-view mirror
G
WARNING
Electrolyte may escape if the glass in an auto- matic anti-dazzle mirro rbreaks. The electro-
lyte is harmfu land causes irritation. It must
not come into contact with yours kin, eyes,
respiratory organs or clothing or be swal-
lowed. There is arisk of injury.
If you come into contact with the electrolyte,
observe the following:
R Rinse off the electrolyte from yours kin
immediatel ywith water.
R Immediately rinse the electrolyte out of
youre yest horoughly with clea nwater.
R If the electrolyte is swallowed,i mmediately
rinse yourm outh out thoroughly.Don ot
induce vomiting.
R If electrolyte comes into contact with your
skin or hairoriss wallowed,seek medical
attention immediately.
R Immediately change out of clothing which
has come into contact with electrolyte.
R If an allergic reactio noccurs, seek medical
attention immediately.
X Adjust the rear-view mirror in such away that
you have agood view of road and traffic con-
ditions behind you.
The rear-view mirror automatically goes into
anti-dazzle mode if:
R the ignitio nisswitched on
R incident light from headlamps strikes the sen-
sor in the rear-view mirror
The rear-view mirror does not go into anti-dazzle
mode if reverse gearise ngaged or if the interior
lighting is switched on. Exterior mi
rrors
Adjusting th eexterio rmirror smanually X
Adjust th eexterio rmirrors in such awaythat
yo uc an get agoodo verview of roa dand traf-
fic conditions. Mirrors
73Seats, steering wheel and mirrors Z
Page 106 of 261
Shifting to drive position D
X
Make sure that the vehicle is stationary.
X Depress the brake pedal and keep it
depressed.
X Push the selector lever back past the first
point of resistance.
The automatic transmission shifts into D.
If the vehicle is braked to astandstill in trans-
mission position D,the ECO start/stop function
switches off the engine automatically
(Y page 97). Transmission positions
B Park
This safeguards the vehicle against
rolling away when stopped.
Only shift the transmission into posi-
tion Pwhen the vehicle is stationary
(Y page 101). The parking lock
should not be used as abrake when
parking. Always apply the parking
brake in addition to the parking lock
in order to secure the vehicle.
The key can only be removed if the
transmission is in position P.When
there is no key in the ignition lock, the selector lever is locked in position P.C Rev
erse gear
Only shift the transmission into posi- tion Rwhe nthe vehicle is stationary. A
!
Coasting in neutral
imay
caus edamage to the drive train.
Neutral
Do not shift the transmission to N
while driving. Otherwise, the auto-
matic transmission could be dam-
aged.
No power is transmitted from the
engine to the drive wheels.
Releasing the brakes will allow you to
move the vehicle freely, e.g. to push
it or tow it.
If ESP ®
is deactivated or faulty and
the vehicle is in danger of skidding
e.g. on icy roads: shift the transmis-
sion to position N.
If you engage the transfer case, shift briefly into N(Ypage 124). 7 Drive
The automatic transmission changes
gea rautomatically. Al lforward gears
are available. Changing gear
The automatic transmission shifts throug hthe
individua lgear sautomaticall ywhen it is in trans-
mission position D.Gearshiftin gisdetermined
by:
R as hiftrange restriction ,ifselected
R thep ositio nofthetransfer cas e(HIGH
RANGE orLOW RANGE)
R thep ositio noftheaccelerato rpedal
R ther oad speed Drivin
gtips
Accelerator pedal position Your drivi
ngstyle influences how the automatic
transmission shift sgear:
R little throttle: early upshifts
R more throttle: late upshifts Automatic transmission
103Driving and parking Z
Page 107 of 261
Kickdown
Use kickdown for maximu
macceleration:
X Depress the accelerator pedal beyond the
pressure point.
The automatic transmission shifts to alower
gear depending on the engine speed.
X Ease off the accelerator pedal once the
desired speed is reached.
The automatic transmission shifts back up.
Towing atrailer X
Drive in the middle of the engine speed range
on uphill gradients.
X Limit the shift range to 3or 2depending on
the uphill or downhill gradient (Y page 105).
X Shift the transfer case int ooff-roa ddriving
position LOWR ANGE on extreme uphill gra-
dients or stee pdownhil lgradients
(Y page 124). Progra
mselector button
General notes The program selector button allows you to
choose between drive programs with different
driving characteristics.
The automatic transmission switches to auto-
matic drive program Eeach time the engine is
started.
Available drive programs E
Economy Com
fortable, economical
driving S
Sport Sport
ydriving style M
Manual Manual gearshifting
Furthe
rinformation on the automatic drive pro-
gra m( Ypage 104). Select
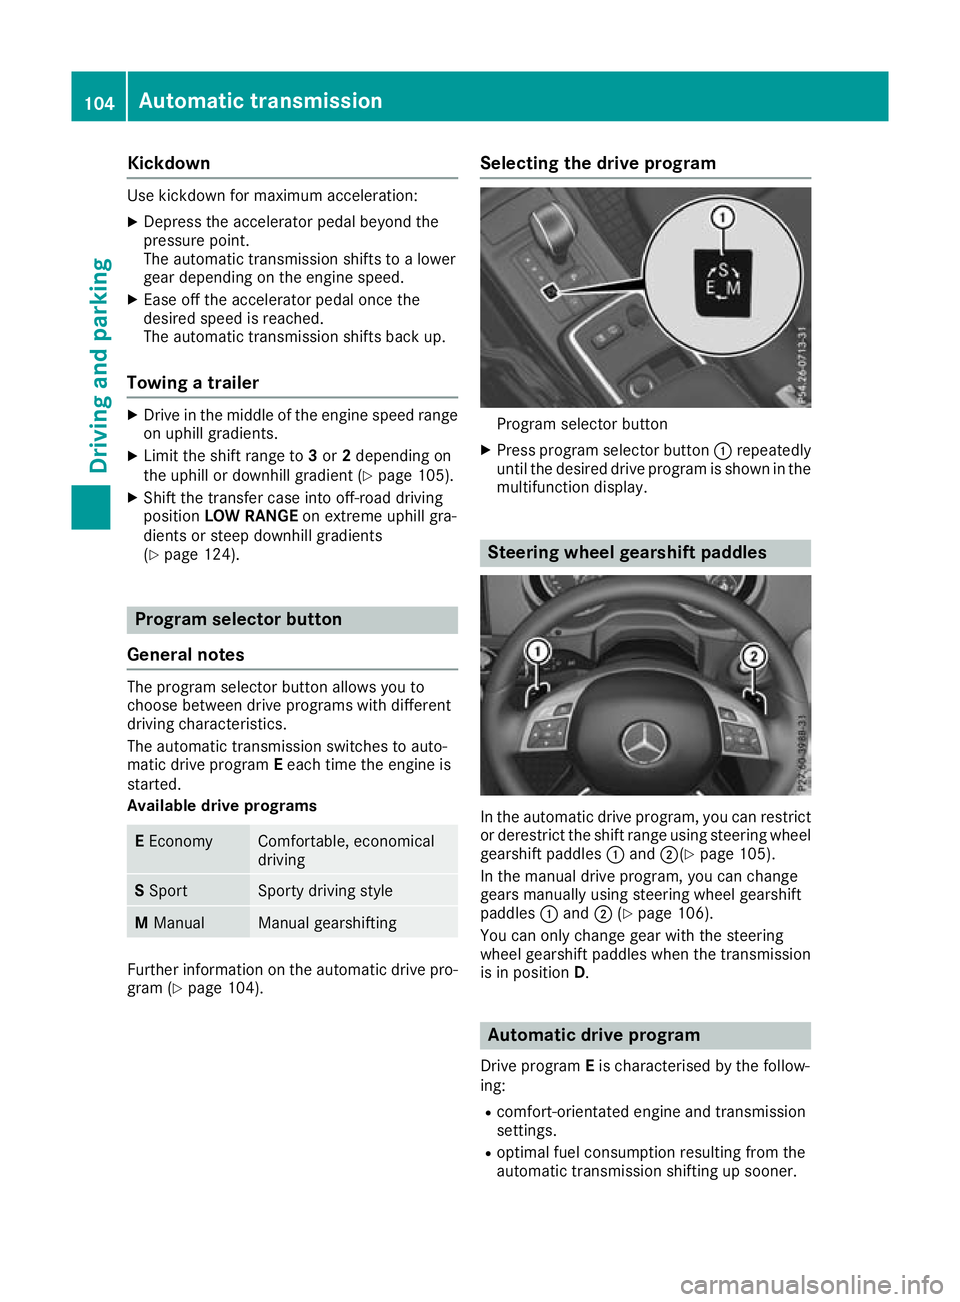
ing the drive program Program selector button
X Press program selector button :repeatedly
until the desired drive program is shown in the multifunction display. Steering wheel gearshift paddles
In the automatic drive program
,you can restrict
or derestrict the shift range using steering wheel gearshift paddles :and ;(Y page 105).
In the manuald rive program, you can change
gears manually using steering wheel gearshift
paddles :and ;(Ypage 106).
You can only change gear with the steering
wheel gearshift paddles when the transmission
is in position D. Automatic drive program
Drive program Eis characterised by the follow-
ing:
R comfort-orientated engine an dtransmission
settings.
R optimal fuel consumption resulting from the
automatic transmission shifting up sooner. 104
Auto
matictransmissionDriving and parking