2016 MERCEDES-BENZ G-Class wiper blades
[x] Cancel search: wiper bladesPage 6 of 302

Transmission position display ........ 119
Automatic transmission emer-
gency mode ....................................... 127
Axle load, permissible (trailer tow-
ing) ...................................................... 298
B
BabySmart™
Air bag deactivation system .............5 0
Backup lamp
Changing bulbs ................................ 96
BAS (Brake Assist System) ................. 56
Battery
Checking (SmartKey) ....................... 62
Important safety guidelines
(SmartKey) ....................................... 61
Replacing (SmartKey) ...................... 62
Battery (vehicle)
Charging ........................................ 252
Display message ............................ 193
Important safety notes .................. 250
Jump starting ................................. 254
Overview ........................................ 250
Blind Spot Assist
Activating/deactivating ................. 178
Activating/deactivating (on-
board computer) ............................ 178
Display message ............................ 196
Notes/function .............................. 155
Brake fluid
Display message ............................ 187
Notes ............................................. 293
Warning lamp ................................. 205
Brake fluid level ................................ 240
Brake lamps
Adaptive ........................................... 56
Display message ............................ 190
Brakes
ABS .................................................. 55
BAS .................................................. 56
Brake fluid (notes) ......................... 293
Display message ............................ 185
High-performance brake system .... 135
Important safety notes .................. 133
Maintenance .................................. 134
Parking brake ................................ 131
Riding tips ...................................... 133 Warning lamp ................................. 205
Breakdown
see Flat tire
see Towing away
Brightness control (instrument
cluster lighting) ................................... 27
Brush guard ....................................... 231
Bulbs
Backup lamp .................................... 96
Brake lamp ...................................... 95
Rear fog lamp .................................. 96
Tail lamp .......................................... 95
see Replacing bulbs
C
CaliforniaImportant notice for retail cus-
tomers and lessees .......................... 20
Calling up a malfunction
see Display messages
Care
Car wash ........................................ 241
Carpets .......................................... 247
Chrome parts ................................. 244
Display ........................................... 245
Gear or selector lever .................... 246
Headlamps ..................................... 244
Interior ........................................... 245
Matte finish ................................... 243
Notes ............................................. 241
Paint .............................................. 243
Plastic trim .................................... 245
Power washer ................................ 242
Rear view camera .......................... 244
Roof lining ...................................... 247
Seat belt ........................................ 246
Seat covers .................................... 246
Sensors ......................................... 244
Steering wheel ............................... 246
Tail pipes ....................................... 244
Trailer coupling .............................. 245
Trim strips ..................................... 246
Washing by hand ........................... 242
Wheels ........................................... 242
Windows ........................................ 243
Wiper blades .................................. 244
Wooden trim .................................. 246
4Index
Page 20 of 302

VentilationSetting the airflow ......................... 105
Video
Operating the DVD ......................... 176
VIN ...................................................... 288
W
Warning and indicator lamps
ABS ................................................ 206
Brakes ........................................... 205
Check Engine ................................. 210
Coolant .......................................... 210
Cruise control ................................ 142
Distance warning ........................... 212
DISTRONIC PLUS ........................... 212
ESP
®.............................................. 207
ESP®OFF ....................................... 208
Fuel tank ........................................ 210
LIM (DISTRONIC PLUS) .................. 149
LIM (variable SPEEDTRONIC) ......... 145
Overview .................................. 28, 202
Parking brake ................................ 209
PASSENGER AIR BAG OFF ............... 35
Reserve fuel ................................... 210
Restraint system ............................ 209
Seat belt ........................................ 204
Tire pressure monitor .................... 213
Warning triangle ................................ 248
Warranty .............................................. 20
Washer fluid
Display message ............................ 202
Wheel bolt tightening torque ........... 284
Wheels
Changing a wheel .......................... 281
Checking ........................................ 262
Cleaning ......................................... 242
Important safety notes .................. 262
Interchanging/changing ................ 281
Mounting a new wheel ................... 284
Mounting a wheel .......................... 282
Overview ........................................ 262
Removing a wheel .......................... 283
Storing ........................................... 282
Technical data ............................... 284
Tightening torque ........................... 284
Wheel size/tire size ....................... 284 Window curtain air bag
Display message ............................ 188
Operation ......................................... 43
Windows
see Side windows
Windows (cleaning instructions) ..... 243
Windshield
Defrosting ...................................... 105
Windshield heating ........................... 106
Windshield washer fluid
see Windshield washer system
Windshield washer system
Adding washer fluid ....................... 239
Notes ............................................. 295
Windshield wipers
Problem (malfunction) ..................... 98
Rear window wiper .......................... 97
Replacing the wiper blades .............. 97
Switching on/off .............................. 96
Winter
Driving in winter ............................. 136
Winter o
peration ............................ 264
Winter driving
Snow chains .................................. 264
Winter operation
Overview ........................................ 264
Winter tires
M+S tires ....................................... 264
Wiper blades
Cleaning ......................................... 244
Important safety notes .................... 97
Replacing ......................................... 97
18Index
Page 98 of 302

XSwitch off the lights.
XUnscrew screws:.
XRemove lens;.
=Turn signal
?Brake/tail lamp
ATail lamps/standing lamps
XTurn the corresponding bulb counter-clock-
wise, applying slight pressure, and remove it
from the bulb holder.
XInsert the new bulb into the bulb holder and,
applying slight pressure, turn it clockwise
until it engages.
XInstall lens;.
XReplace and tighten screws :.
XAMG vehicles:secure the protection grille
(Ypage 95).
Backup lamp/rear fog lamp
!Do not fasten the screws too tightly. You
could otherwise damage the lens.
Example: rear fog lamp
XSwitch off the lights.
XUnscrew screws ;.
XRemove lens:.
XTurn bulb=counter-clockwise, applying
slight pressure, and remove it from the bulb
holder.
XInsert the new bulb into the bulb holder and,
applying slight pressure, turn it clockwise
until it engages.
XInstall lens :.
XReplace and tighten screws ;.
Windshield wipers
Switching the windshield wipers
on/off
!
Do not operate the windshield wipers when
the windshield is dry, as this could damage
the wiper blades. Moreover, dust that has col-
lected on the windshield/rear window can
scratch the glass if wiping takes place when
the windshield/rear window is dry.
If it is necessary to switch on the windshield
wipers in dry weather conditions, always use
washer fluid when operating the windshield
wipers.
!If the windshield wipers leave smears on the
windshield/rear window after the vehicle has
been washed in an automatic car wash, this
may be due to wax or other residue. Clean the
windshield/rear window with washer fluid
after an automatic car wash.
!Intermittent wiping with rain sensor: due to
optical influences and the windshield becom-
ing dirty in dry weather conditions, the wind-
shield wipers may be activated inadvertently.
This could then damage the windshield wiper
blades or scratch the windshield.
For this reason, you should always switch off
the windshield wipers in dry weather.
96Windshield wipers
Lights and windshield wipers
Page 99 of 302

If the wiper blades are worn, the windshield will
no longer be wiped properly. This could prevent
you from observing the traffic conditions,
thereby causing an accident.
Combination switch
1
$Windshield wipers off
2ÄIntermittent wipe, low (rain sensor set
to low sensitivity)
3Å Intermittent wipe, high (rain sensor
set to high sensitivity)
4° Continuous wipe, slow
5¯Continuous wipe, fast
BíSingle wipe
CîTo wipe with washer fluid
XSwitch on the ignition.
XTurn the combination switch to the corre-
sponding position.
Intermittent wiping is interrupted if you stop the
vehicle and open a front door. This protects
people getting into and out of the vehicle from
being sprayed with water.
Intermittent wiping continues when all doors are
closed and:
Ryou shift the automatic transmission to drive
position Dor reverse gear R
or
Ryou change the wipe setting on the combina-
tion switch.
In the ÄorÅ position, the appropriate
wiping frequency is set automatically according
to the intensity of the rain. In the Åposition,
the rain sensor is more sensitive than in
the Ä position, causing the windshield wip-
ers to wipe more frequently.
Switching the rear window wiper on/
off
Combination switch
:
è Switch
2bWipes with washer fluid
3ISwitches on intermittent wiping
40 Switches off intermittent wiping
5b Wipes with washer fluid
XTurn the SmartKey to position 1or 2in the
ignition lock.
XTurn switch :on the combination switch to
the corresponding position.
When the rear window wiper is switched on,
the icon appears in the instrument cluster.
iThe rear window wiper comes on automati-
cally if you shift the selector lever to Rwhile
the windshield wiper are on.
Replacing the wiper blades
Important safety notes
GWARNING
If the windshield wipers begin to move while
you are changing the wiper blades, you could be trapped by the wiper arm. There is a risk of
injury.
Always switch off the windshield wipers and
ignition before changing the wiper blades.
!To avoid damaging the wiper blades, make
sure that you touch only the wiper arm of the
wiper.
!Never open the hood if a windshield wiper
arm has been folded away from the wind-
shield.
Windshield wipers97
Lights and windshield wipers
Z
Page 100 of 302
Never fold a windshield wiper arm without a
wiper blade back onto the windshield/rear
window.
Hold the windshield wiper arm firmly when
you change the wiper blade. If you release the
windshield wiper arm without a wiper blade
and it falls onto the windshield, the windshield
may be damaged by the force of the impact.
Mercedes-Benz recommends that you have
the wiper blades changed at a qualified spe-
cialist workshop.
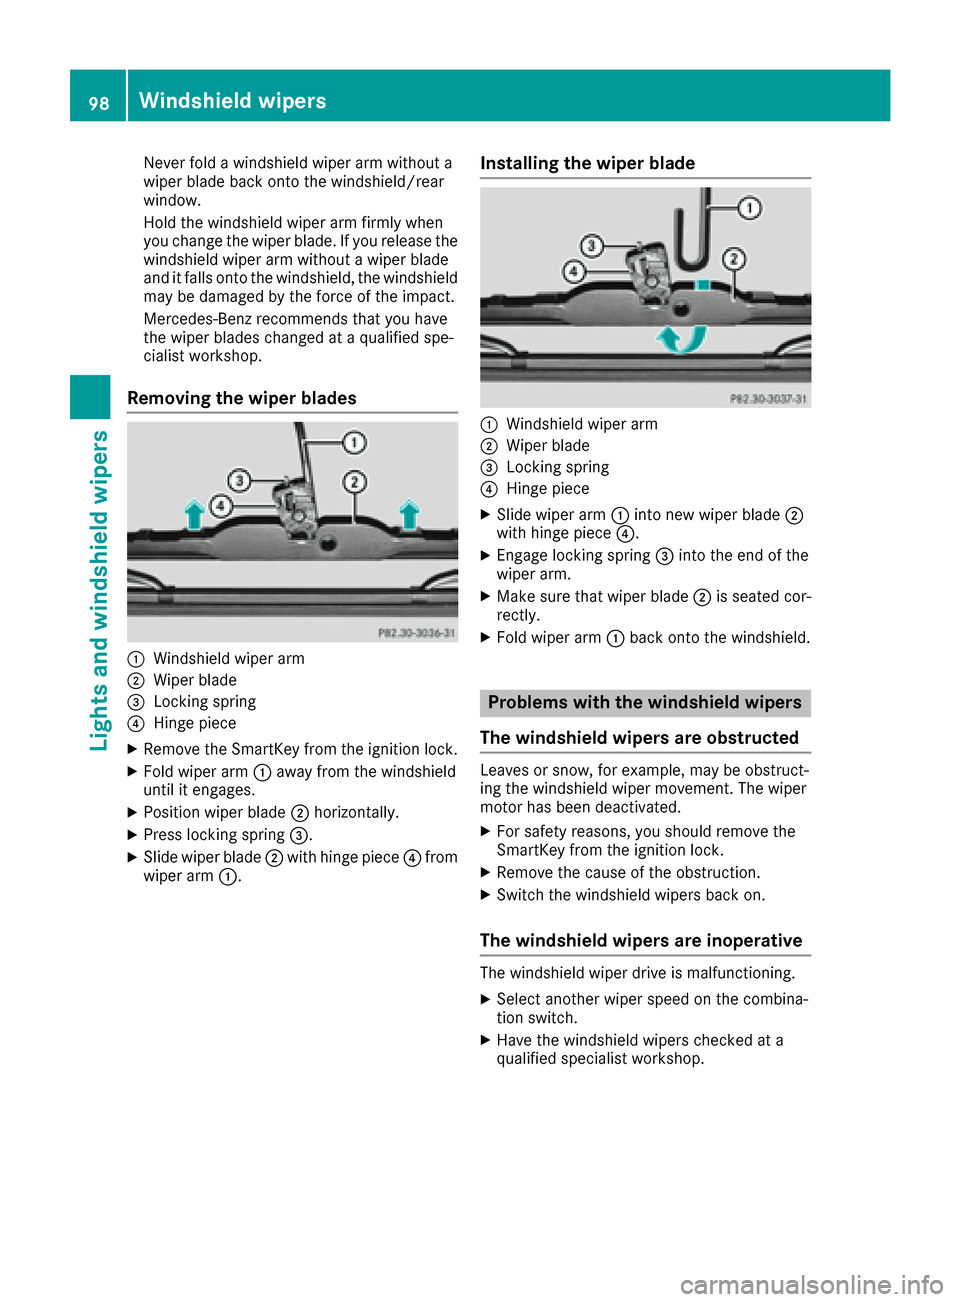
Removing the wiper blades
:Windshield wiper arm
;Wiper blade
=Locking spring
?Hinge piece
XRemove the SmartKey from the ignition lock.
XFold wiper arm:away from the windshield
until it engages.
XPosition wiper blade ;horizontally.
XPress locking spring =.
XSlide wiper blade;with hinge piece ?from
wiper arm :.
Installing the wiper blade
:Windshield wiper arm
;Wiper blade
=Locking spring
?Hinge piece
XSlide wiper arm :into new wiper blade ;
with hinge piece ?.
XEngage locking spring =into the end of the
wiper arm.
XMake sure that wiper blade ;is seated cor-
rectly.
XFold wiper arm :back onto the windshield.
Problems with the windshield wipers
The windshield wipers are obstructed
Leaves or snow, for example, may be obstruct-
ing the windshield wiper movement. The wiper
motor has been deactivated.
XFor safety reasons, you should remove the
SmartKey from the ignition lock.
XRemove the cause of the obstruction.
XSwitch the windshield wipers back on.
The windshield wipers are inoperative
The windshield wiper drive is malfunctioning.
XSelect another wiper speed on the combina-
tion switch.
XHave the windshield wipers checked at a
qualified specialist workshop.
98Windshield wipers
Lights and windshield wipers
Page 244 of 302
cleaning agents. These cleaning agents can
damage the paintwork or plastic parts.
!Make sure that the automatic car wash is
suitable for the size of the vehicle. Fold in the
exterior mirrors before the vehicle is washed.
The exterior mirrors could otherwise be dam-
aged.
!Make sure that the automatic transmission
is in position Nwhen washing your vehicle in
a tow-through car wash. The vehicle could be
damaged if the transmission is in another
position.
!Make sure that:
Rthe side windows and sliding sunroof are
closed completely.
Rthe blower for the ventilation/heating is
switched off (airflow control is turned to
position 0/the à andÁ buttons are
switched off).
Rthe windshield wiper switch is at position 0.
The vehicle could otherwise be damaged.
You can wash the vehicle in an automatic car
wash from the very start.
If the vehicle is very dirty, pre-wash it before
cleaning it in an automatic car wash.
After using an automatic car wash, wipe off wax
from the windshield and the wiper blades. This
will prevent smears and reduce wiping noises
caused by residue on the windshield.
Washing by hand
In some countries, washing by hand is only
allowed at specially equipped washing bays.
Observe the legal requirements in all countries
concerned.
When using the vehicle in winter, remove all
traces of road salt deposits carefully and as
soon as possible.
When washing the vehicle underbody, also clean the inside of the wheels.
XDo not use hot water and do not wash the
vehicle in direct sunlight.
XUse a soft sponge to clean.
XUse a mild cleaning agent, such as a car
shampoo approved by Mercedes-Benz.
XThoroughly hose down the vehicle with a gen-
tle jet of water.
XDo not point the water jet directly towards the
air inlets.
XUse plenty of water and rinse out the sponge
frequently.
XRinse the vehicle with clean water and dry
thoroughly with a chamois.
XDo not let the cleaning agent dry on the paint-
work.
Power washers
GWARNING
The water jet from a circular jet nozzle (dirt
blasters) can cause invisible exterior damage
to the tires or chassis components. Compo-
nents damaged in this way may fail unexpect-
edly. There is a risk of an accident.
Do not use power washers with circular jet
nozzles to clean the vehicle. Have damaged
tires or chassis components replaced imme-
diately.
!Always maintain a distance of at least
11.8 in (30 cm) between the vehicle and the
power washer nozzle. Information about the
correct distance is available from the equip-
ment manufacturer.
Move the power washer nozzle around when
cleaning your vehicle.
Do not aim directly at any of the following:
Rtires
Rdoor gaps, roof gaps, joints, etc.
Relectrical components
Rbattery
Rconnectors
Rlights
Rseals
Rtrim
Rventilation slots
Damaged seals or electrical components can
lead to leaks or failures.
Cleaning the wheels
!Do not use acidic wheel cleaning products
to remove brake dust. This could damage
wheel bolts and brake components.
!Do not park the vehicle for an extended
period straight after cleaning it, particularly
after having cleaned the wheels with wheel
cleaner. Wheel cleaners could cause
242Care
Maintenance and care
Page 245 of 302
increased corrosion of the brake discs and
brake pads/linings. For this reason, you
should drive for a few minutes after cleaning.
Braking heats the brake discs and the brake
pads/linings, thus drying them. The vehicle
can then be parked.
Cleaning the paintwork
!Do not affix:
Rstickers
Rfilms
Rmagnetic plates or similar items
to painted surfaces. You could otherwise
damage the paintwork.
Scratches, corrosive deposits, areas affected by corrosion and damage caused by inadequate
care cannot always be completely repaired. In
such cases, visit a qualified specialist workshop.
XRemove dirt immediately, where possible,
while avoiding rubbing too hard.
XSoak insect remains with insect remover and
rinse off the treated areas afterwards.
XSoak bird droppings with water and rinse off
the treated areas afterwards.
XRemove coolant, brake fluid, tree resin, oils,
fuels and greases by rubbing gently with a
cloth soaked in petroleum ether or lighter
fluid.
XUse tar remover to remove tar stains.
XUse silicone remover to remove wax.
If water no longer forms "beads" on the paint
surface, use the paint care products recommen-
ded and approved by Mercedes-Benz. This is the
case approximately every three to five months,
depending on the climate conditions and the
care product used.
If dirt has penetrated the paint surface or if the
paint has become dull, the paint cleaner recom-
mended and approved by Mercedes-Benz
should be used.
Do not use these care products in the sun or on
the hood while the hood is hot.
XUse a suitable touch-up stick, e.g. MB Touch-
Up Stick, to correct smaller areas of paint
damage quickly and provisionally.
Matte finish care
!Never polish the vehicle or the light alloy
wheels. Polishing causes the finish to shine.
!Never use paint cleaner, buffing or polishing
products, or gloss preserver, e.g. wax. These
products are only suitable for high-gloss sur-
faces. Their use on vehicles with matte finish
leads to considerable surface damage (shiny,
spotted areas).
Always have paintwork repairs carried out at a qualified specialist workshop.
!Do not use wash programs with a hot wax
treatment under any circumstances.
If your vehicle has a clear matte finish, observe
the following instructions in order to avoid dam-
age to the paintwork due to incorrect care.
These notes also apply to light alloy wheels with a clear matte finish.
iThe vehicle should preferably be washed by
hand using a soft sponge, car shampoo and
plenty of water.
iUse only insect remover and car shampoo
from the range of recommended and
approved Mercedes-Benz care products.
Cleaning the windows
GWARNING
You could become trapped by the windshield wipers if they start moving while cleaning the
windshield or wiper blades. There is a risk of
injury.
Always switch off the windshield wipers and
the ignition before cleaning the windshield or
wiper blades.
!Do not use dry cloths, abrasive products,
solvents or cleaning agents containing sol-
vents to clean the inside of the windows. Do
not touch the insides of the windows with
hard objects, e.g. an ice scraper or ring. There
is otherwise a risk of damaging the windows.
!Clean the water drainage channels of the
windshield and the rear window at regular
intervals. Deposits such as leaves, petals and pollen may under certain circumstances pre-
vent water from draining away. This can lead
Care243
Maintenance and care
Z
Page 246 of 302

to corrosion damage and damage to elec-
tronic components.
XClean the inside and outside of the windows
with a damp cloth and a cleaning product that
is recommended and approved by Mercedes-
Benz.
Cleaning wiper blades
GWARNING
You could become trapped by the windshield wipers if they start moving while cleaning the
windshield or wiper blades. There is a risk of
injury.
Always switch off the windshield wipers and
the ignition before cleaning the windshield or
wiper blades.
!Do not pull the wiper blade. Otherwise, the
wiper blade could be damaged.
!Do not clean wiper blades too often and do
not rub them too hard. Otherwise, the graph-
ite coating could be damaged. This could
cause wiper noise.
!Hold the wiper arm securely when folding
back. The windshield could be damaged if the
wiper arm smacks against it suddenly.
XFold the windshield wiper arms away from the
windshield.
XCarefully clean the wiper blades with a damp
cloth.
XFold the windshield wiper arms back again
before switching on the ignition.
Cleaning the headlamps
XClean the headlamp lenses with a damp
sponge and a mild cleaning agent, e.g.
Mercedes-Benz car shampoo or cleaning
cloths.
Cleaning the sensors
!If you clean the sensors with a power
washer, make sure that you keep a distance
of at least 11.8 in (30 cm) between the vehicle
and the power washer nozzle. Information
about the correct distance is available from
the equipment manufacturer.
XClean sensors :of the driving systems with
water, car shampoo and a soft cloth.
Cleaning the rear view camera
!Do not clean the camera lens and the area
around the rear view camera with a power
washer.
XUse clear water and a soft cloth to clean cam- era lens :.
Cleaning chrome parts
!Do not clean the exhaust pipe with acid-
based cleaning agents such as sanitary
cleansers or wheel cleaners.
244Care
Maintenance and care