2016 MERCEDES-BENZ G-Class trailer
[x] Cancel search: trailerPage 260 of 302
Transporting the vehicle
4MATIC vehicles/vehicles with auto-
matic transmission
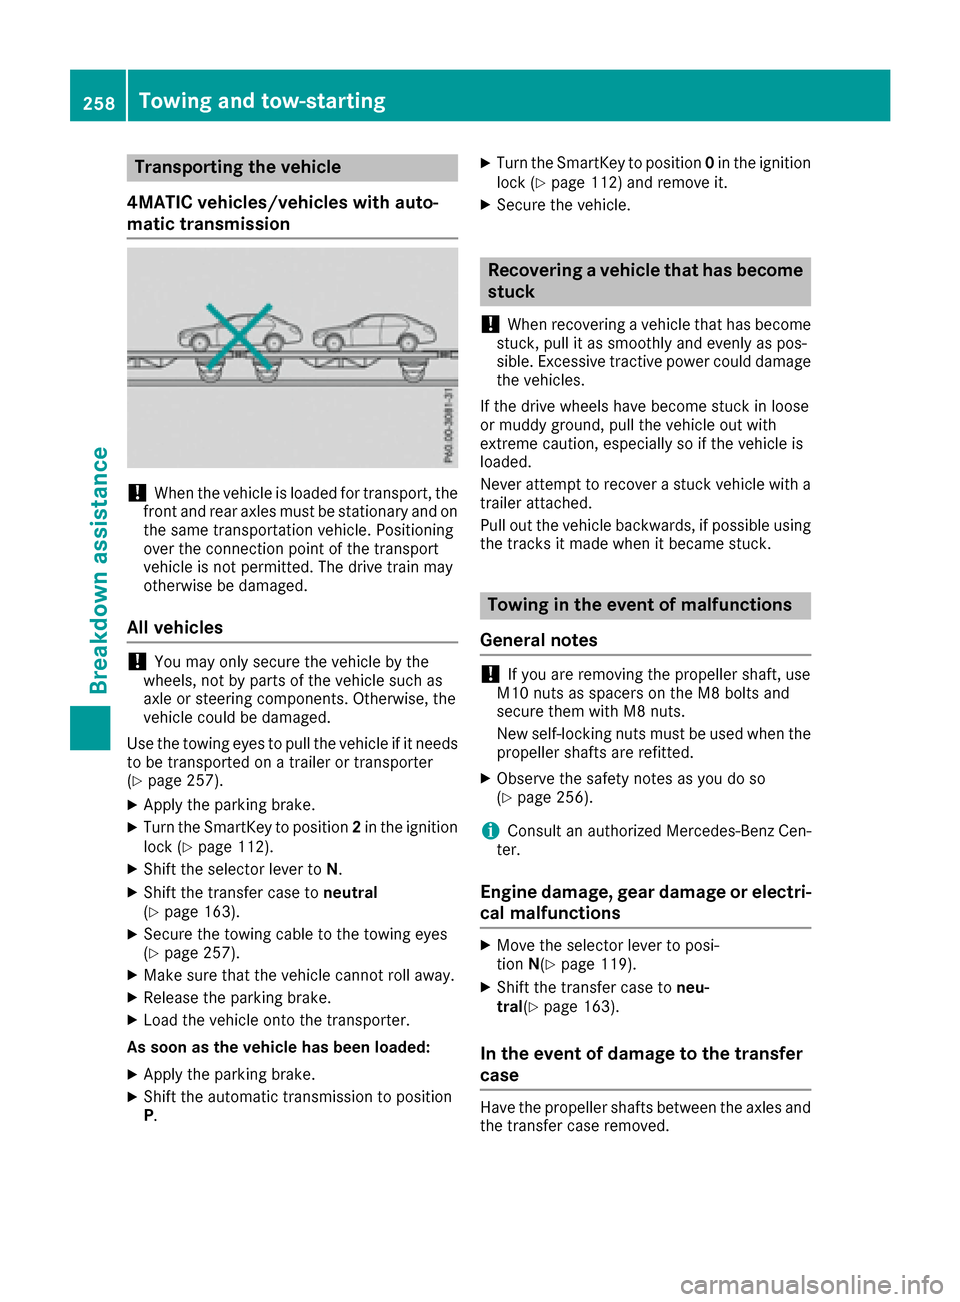
!When the vehicle is loaded for transport, the
front and rear axles must be stationary and on the same transportation vehicle. Positioning
over the connection point of the transport
vehicle is not permitted. The drive train may
otherwise be damaged.
All vehicles
!You may only secure the vehicle by the
wheels, not by parts of the vehicle such as
axle or steering components. Otherwise, the
vehicle could be damaged.
Use the towing eyes to pull the vehicle if it needs
to be transported on a trailer or transporter
(
Ypage 257).
XApply the parking brake.
XTurn the SmartKey to position 2in the ignition
lock (Ypage 112).
XShift the selector lever to N.
XShift the transfer case toneutral
(Ypage 163).
XSecure the towing cable to the towing eyes
(Ypage 257).
XMake sure that the vehicle cannot roll away.
XRelease the parking brake.
XLoad the vehicle onto the transporter.
As soon as the vehicle has been loaded:
XApply the parking brake.
XShift the automatic transmission to position
P .
XTurn the SmartKey to position 0in the ignition
lock (Ypage 112) and remove it.
XSecure the vehicle.
Recovering a vehicle that has become
stuck
!
When recovering a vehicle that has become
stuck, pull it as smoothly and evenly as pos-
sible. Excessive tractive power could damage
the vehicles.
If the drive wheels have become stuck in loose
or muddy ground, pull the vehicle out with
extreme caution, especially so if the vehicle is
loaded.
Never attempt to recover a stuck vehicle with a
trailer attached.
Pull out the vehicle backwards, if possible using the tracks it made when it became stuck.
Towing in the event of malfunctions
General notes
!If you are removing the propeller shaft, use
M10 nuts as spacers on the M8 bolts and
secure them with M8 nuts.
New self-locking nuts must be used when the
propeller shafts are refitted.
XObserve the safety notes as you do so
(Ypage 256).
iConsult an authorized Mercedes-Benz Cen-
ter.
Engine damage, gear damage or electri-
cal malfunctions
XMove the selector lever to posi-
tion N(Ypage 119).
XShift the transfer case to neu-
tral (Ypage 163).
In the event of damage to the transfer
case
Have the propeller shafts between the axles and
the transfer case removed.
258Towing and tow-starting
Breakdown assistance
Page 267 of 302
Observe the maximum permissible speed for
operation with snow chains.
!Information about the use of snow chain
compatible AMG winter tires is applicable for
AMG tires. Use of snow chains is only per-
missible with these tires.
!On some tire sizes there is not enough space
for snow chains. To avoid damage to the vehi- cle or tires, observe the "Wheel and tire com-
binations" section under "Tires and wheels".
!Check the snow chains for damage before
mounting them. Damaged or worn snow
chains may snap and damage the following
components:
Rwheel
Rwheel housing
Rwheel suspension
For this reason, you must use only snow
chains that are free of defects. Observe the
manufacturer's mounting instructions.
For safety reasons, Mercedes-Benz recom-
mends that you only use snow chains that have
been specially approved for your vehicle by
Mercedes-Benz, or are of a corresponding
standard of quality.
ROnly use snow chains when driving on roads
completely covered by snow. Remove the
snow chains as soon as possible when you
come to a road that is not snow-covered.
RLocal regulations may restrict the use of snow
chains. Observe the appropriate regulations if
you wish to mount snow chains.
RDo not exceed the maximum permissible
speed of 30 mph (50 km/h).
If you intend to mount snow chains, please bear
the following points in mind:
RSnow chains cannot be mounted on all
wheel/tire combinations (Ypage 284).
RMount snow chains only in pairs and only on
the rear wheels. Observe the manufacturer's
mounting instructions.
iYou may wish to deactivate ESP®when pull-
ing away with snow chains installed
(
Ypage 57). You can thereby allow the wheels
to spin in a controlled manner, achieving an
increased driving force (cutting action).
For more information, contact a qualified spe-
cialist workshop.
Tire pressure
Tire pressure specifications
Important safety notes
GWARNING
Underinflated or overinflated tires pose the
following risks:
Rthe tires may burst, especially as the load
and vehicle speed increase.
Rthe tires may wear excessively and/or
unevenly, which may greatly impair tire
traction.
Rthe driving characteristics, as well as steer-
ing and braking, may be greatly impaired.
There is a risk of an accident.
Follow recommended tire inflation pressures
and check the pressure of all the tires includ-
ing the spare wheel:
Rmonthly, at least
Rif the load changes
Rbefore beginning a long journey
Runder different operating conditions, e.g.
off-road driving
If necessary, correct the tire pressure.
iThe specifications on the sample Tire and
Loading Information placard and tire pressure
tables are examples. Tire pressure specifica-
tions are vehicle-specific and may deviate
from the data shown here. The tire pressure
specifications that are valid for your vehicle
can be found on the Tire and Loading Infor-
mation placard and tire pressure table on the
vehicle.
General notes
The recommended tire pressures for the tires
mounted at the factory can be found on the
labels described here.
Operation with a trailer: the applicable value
for the rear tires is the maximum tire pressure
value stated in the table inside the fuel filler flap.
Further information on tire pressures can be
obtained at a qualified specialist workshop.
Tire pressure265
Wheels and tires
Z
Page 274 of 302
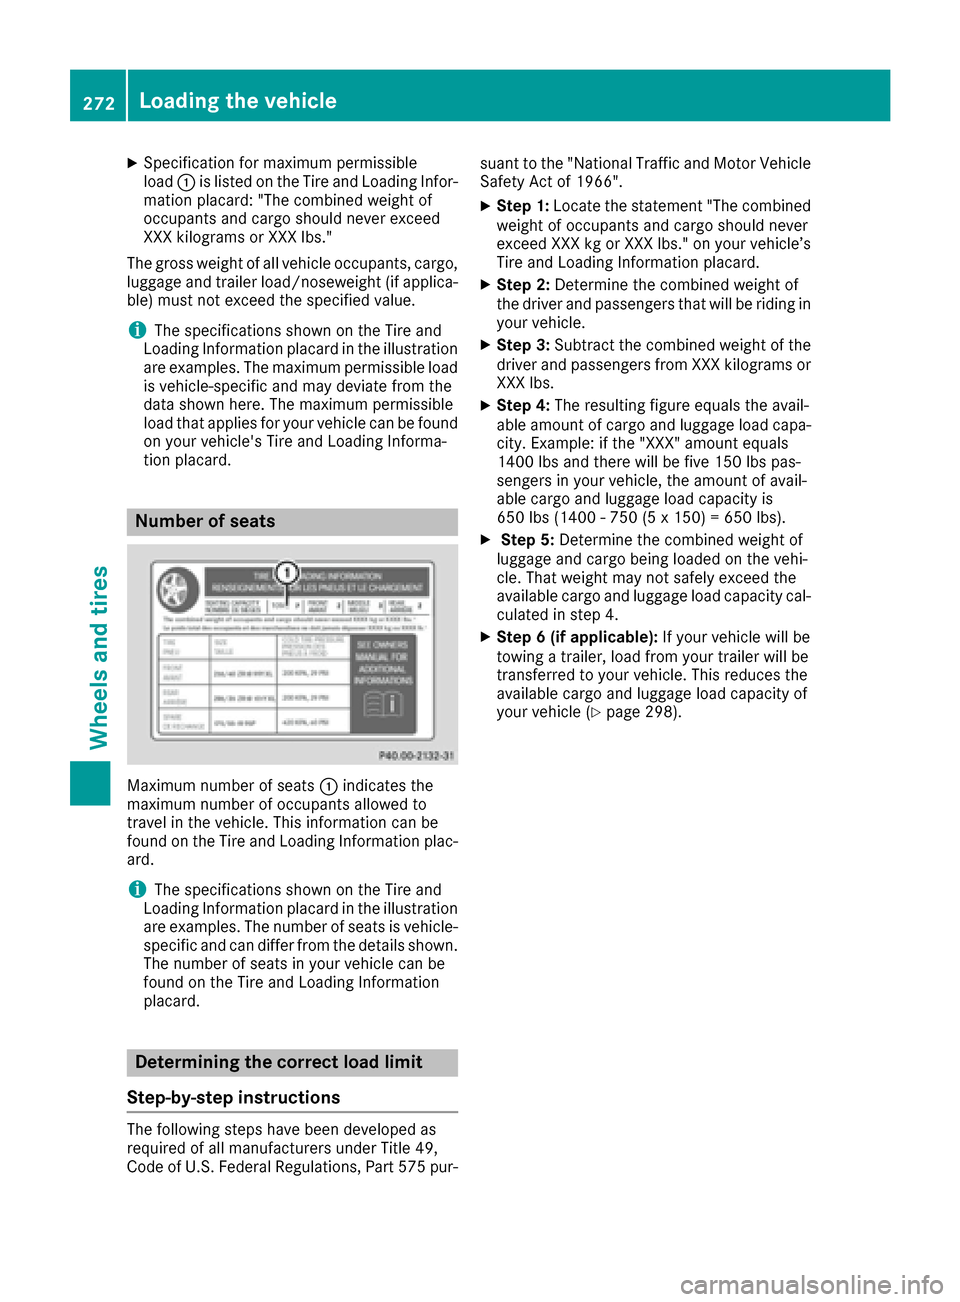
XSpecification for maximum permissible
load:is listed on the Tire and Loading Infor-
mation placard: "The combined weight of
occupants and cargo should never exceed
XXX kilograms or XXX lbs."
The gross weight of all vehicle occupants, cargo,
luggage and trailer load/noseweight (if applica-
ble) must not exceed the specified value.
iThe specifications shown on the Tire and
Loading Information placard in the illustration are examples. The maximum permissible load
is vehicle-specific and may deviate from the
data shown here. The maximum permissible
load that applies for your vehicle can be found
on your vehicle's Tire and Loading Informa-
tion placard.
Number of seats
Maximum number of seats :indicates the
maximum number of occupants allowed to
travel in the vehicle. This information can be
found on the Tire and Loading Information plac-
ard.
iThe specifications shown on the Tire and
Loading Information placard in the illustration
are examples. The number of seats is vehicle-
specific and can differ from the details shown.
The number of seats in your vehicle can be
found on the Tire and Loading Information
placard.
Determining the correct load limit
Step-by-step instructions
The following steps have been developed as
required of all manufacturers under Title 49,
Code of U.S. Federal Regulations, Part 575 pur- suant to the "National Traffic and Motor Vehicle
Safety Act of 1966".
XStep 1: Locate the statement "The combined
weight of occupants and cargo should never
exceed XXX kg or XXX lbs." on your vehicle’s
Tire and Loading Information placard.
XStep 2: Determine the combined weight of
the driver and passengers that will be riding in your vehicle.
XStep 3: Subtract the combined weight of the
driver and passengers from XXX kilograms or
XXX lbs.
XStep 4: The resulting figure equals the avail-
able amount of cargo and luggage load capa-
city. Example: if the "XXX" amount equals
1400 lbs and there will be five 150 lbs pas-
sengers in your vehicle, the amount of avail-
able cargo and luggage load capacity is
650 lbs (1400 - 750 (5 x 150) = 650 lbs).
XStep 5: Determine the combined weight of
luggage and cargo being loaded on the vehi-
cle. That weight may not safely exceed the
available cargo and luggage load capacity cal- culated in step 4.
XStep 6 (if applicable): If your vehicle will be
towing a trailer, load from your trailer will be
transferred to your vehicle. This reduces the
available cargo and luggage load capacity of
your vehicle (
Ypage 298).
272Loading the vehicle
Wheels and tires
Page 275 of 302
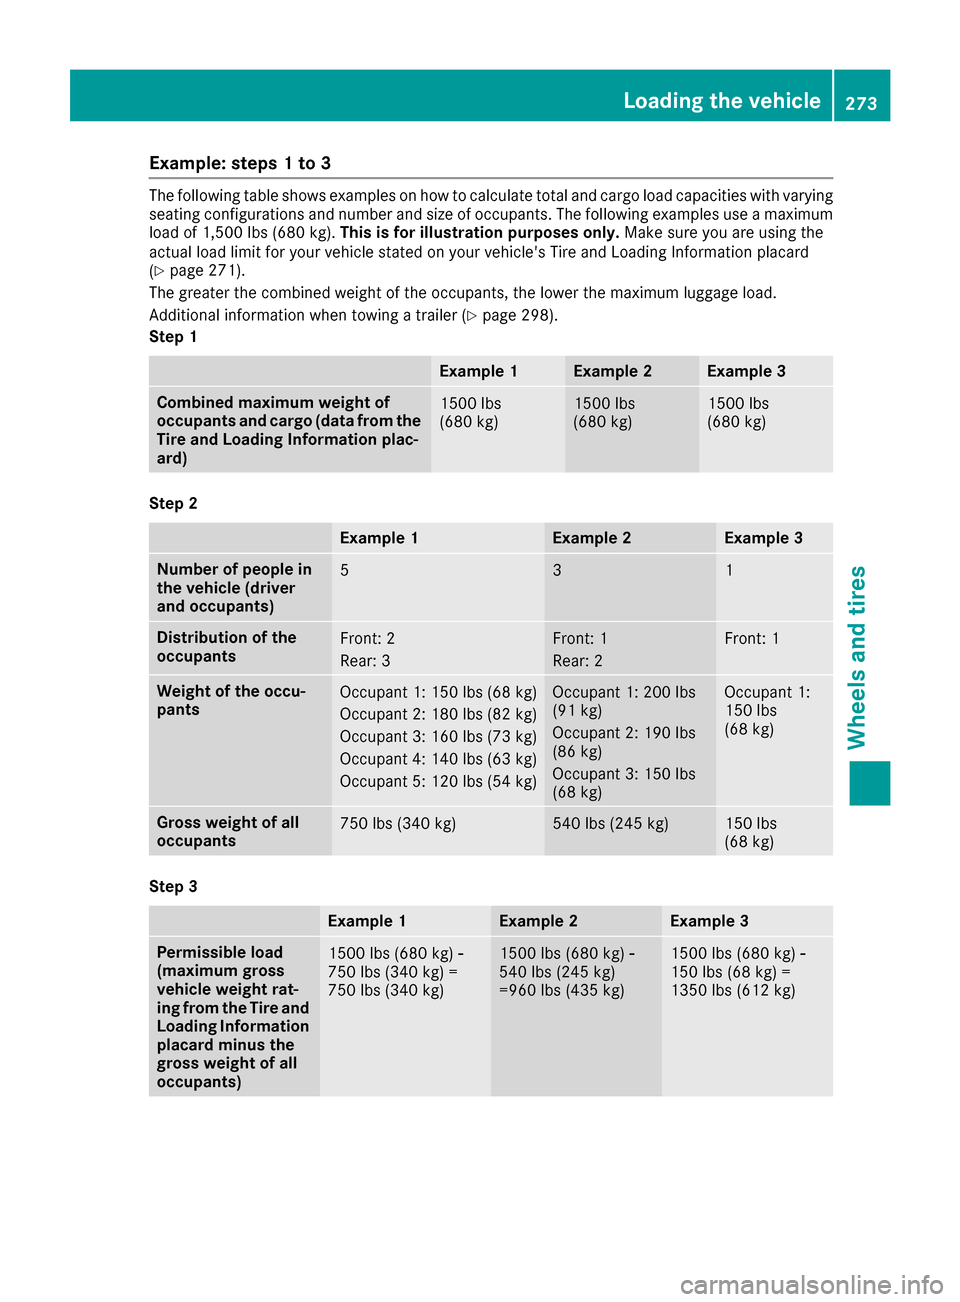
Example: steps 1 to 3
The following table shows examples on how to calculate total and cargo load capacities with varying
seating configurations and number and size of occupants. The following examples use a maximum
load of 1,500 lbs (680 kg). This is for illustration purposes only. Make sure you are using the
actual load limit for your vehicle stated on your vehicle's Tire and Loading Information placard
(
Ypage 271).
The greater the combined weight of the occupants, the lower the maximum luggage load.
Additional information when towing a trailer (
Ypage 298).
Step 1
Example 1Example 2Example 3
Combined maximum weight of
occupants and cargo (data from the
Tire and Loading Information plac-
ard)1500 lbs
(680 kg)1500 lbs
(680 kg)1500 lbs
(680 kg)
Step 2
Example 1Example 2Example 3
Number of people in
the vehicle (driver
and occupants)531
Distribution of the
occupantsFront: 2
Rear: 3Front: 1
Rear: 2Front: 1
Weight of the occu-
pantsOccupant 1: 150 lbs (68 kg)
Occupant 2: 180 lbs (82 kg)
Occupant 3: 160 lbs (73 kg)
Occupant 4: 140 lbs (63 kg)
Occupant 5: 120 lbs (54 kg)Occupant 1: 200 lbs
(91 kg)
Occupant 2: 190 lbs
(86 kg)
Occupant 3: 150 lbs
(68 kg)Occupant 1:
150 lbs
(68 kg)
Gross weight of all
occupants750 lbs (340 kg)540 lbs (245 kg)150 lbs
(68 kg)
Step 3
Example 1Example 2Example 3
Permissible load
(maximum gross
vehicle weight rat-
ing from the Tire and
Loading Information
placard minus the
gross weight of all
occupants)1500 lbs (680 kg) Ò
750 lbs (340 kg) =
750 lbs (340 kg)1500 lbs (680 kg) Ò
540 lbs (245 kg)
=960 lbs (435 kg)1500 lbs (680 kg) Ò
150 lbs (68 kg) =
1350 lbs (612 kg)
Loading the vehicle273
Wheels and tires
Z
Page 276 of 302
Vehicle identification plate
Even if you have calculated the total load care-
fully, you should still make sure that the gross
vehicle weight rating and the gross axle weight
rating are not exceeded. Details can be found on
the vehicle identification plate on the B-pillar on
the driver's side of the vehicle (
Ypage 271).
Gross vehicle weight rating: the gross weight
of the vehicle, all passengers, load and trailer
load/noseweight (if applicable) must not
exceed the gross vehicle weight rating.
Gross Axle Weight Rating (GAWR): the maxi-
mum permissible weight that can be carried by
one axle (front or rear axle).
To ensure that your vehicle does not exceed the
maximum permissible values (gross vehicle
weight and maximum gross axle weight rating),
have your loaded vehicle (including driver, occu-
pants, load and full trailer load if applicable)
weighed on a suitable vehicle weighbridge.
Trailer load/noseweight
The trailer load/noseweight affects the gross
weight of the vehicle. If a trailer is attached, the trailer load/noseweight is included in the load
along with occupants and luggage. The trailer
load/noseweight is usually approximately 10 %
of the gross weight of the trailer and its load.
Only use a trailer tow hitch that has been
approved for your vehicle by Mercedes-Benz.
Comply with the manufacturer's operating
instructions for operation, care and mainte-
nance.
Uniform Tire Quality Grading Stand-
ards
Overview of Tire Quality Grading
Standards
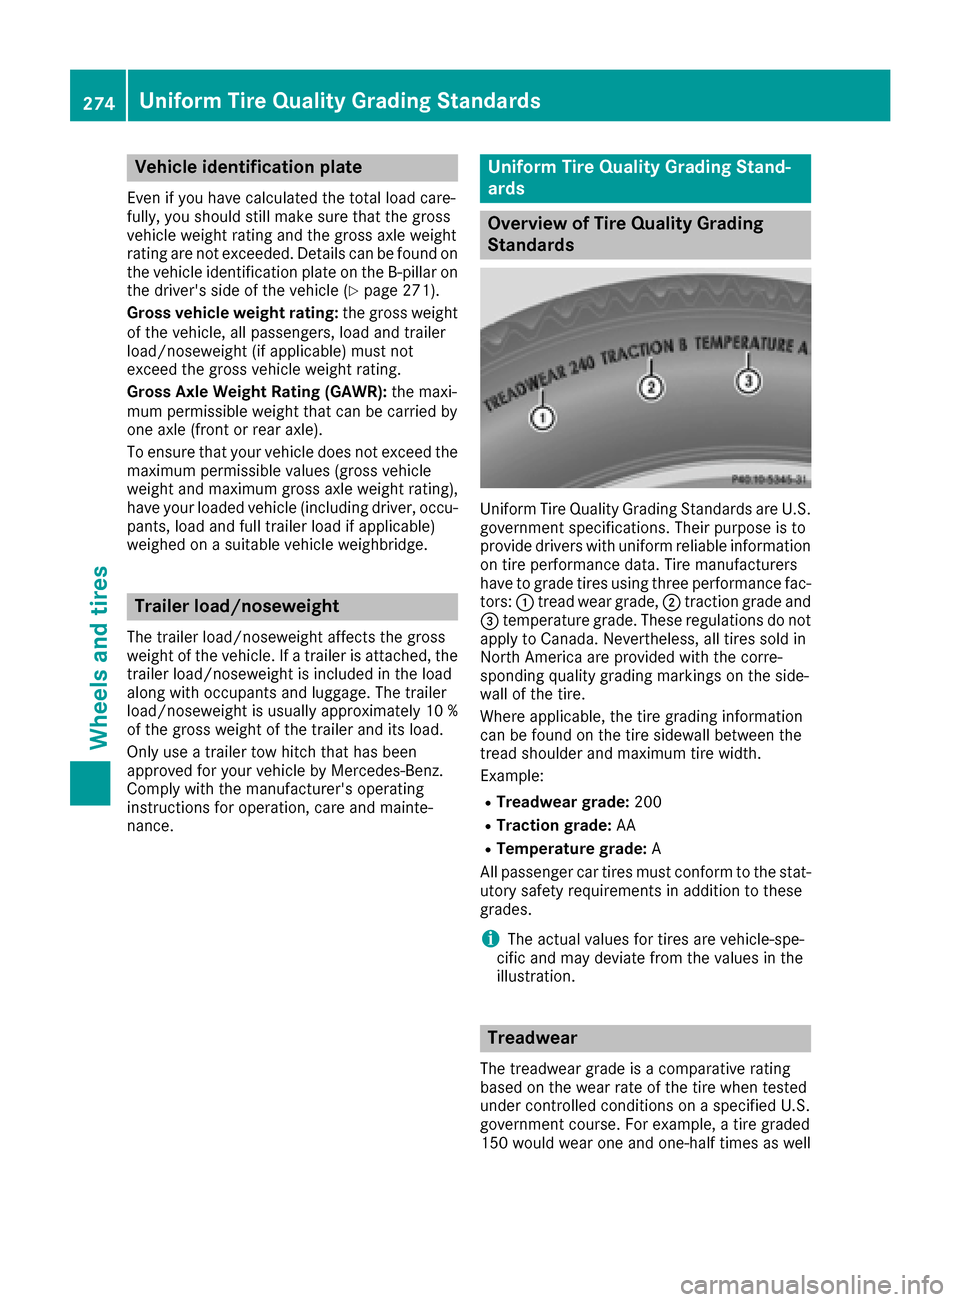
Uniform Tire Quality Grading Standards are U.S.
government specifications. Their purpose is to
provide drivers with uniform reliable informationon tire performance data. Tire manufacturers
have to grade tires using three performance fac-
tors: :tread wear grade, ;traction grade and
= temperature grade. These regulations do not
apply to Canada. Nevertheless, all tires sold in
North America are provided with the corre-
sponding quality grading markings on the side-
wall of the tire.
Where applicable, the tire grading information
can be found on the tire sidewall between the
tread shoulder and maximum tire width.
Example:
RTreadwear grade: 200
RTraction grade:AA
RTemperature grade: A
All passenger car tires must conform to the stat-
utory safety requirements in addition to these
grades.
iThe actual values for tires are vehicle-spe-
cific and may deviate from the values in the
illustration.
Treadwear
The treadwear grade is a comparative rating
based on the wear rate of the tire when tested
under controlled conditions on a specified U.S.
government course. For example, a tire graded
150 would wear one and one-half times as well
274Uniform Tire Quality Grading Standards
Wheels and tires
Page 281 of 302
Tire characteristics
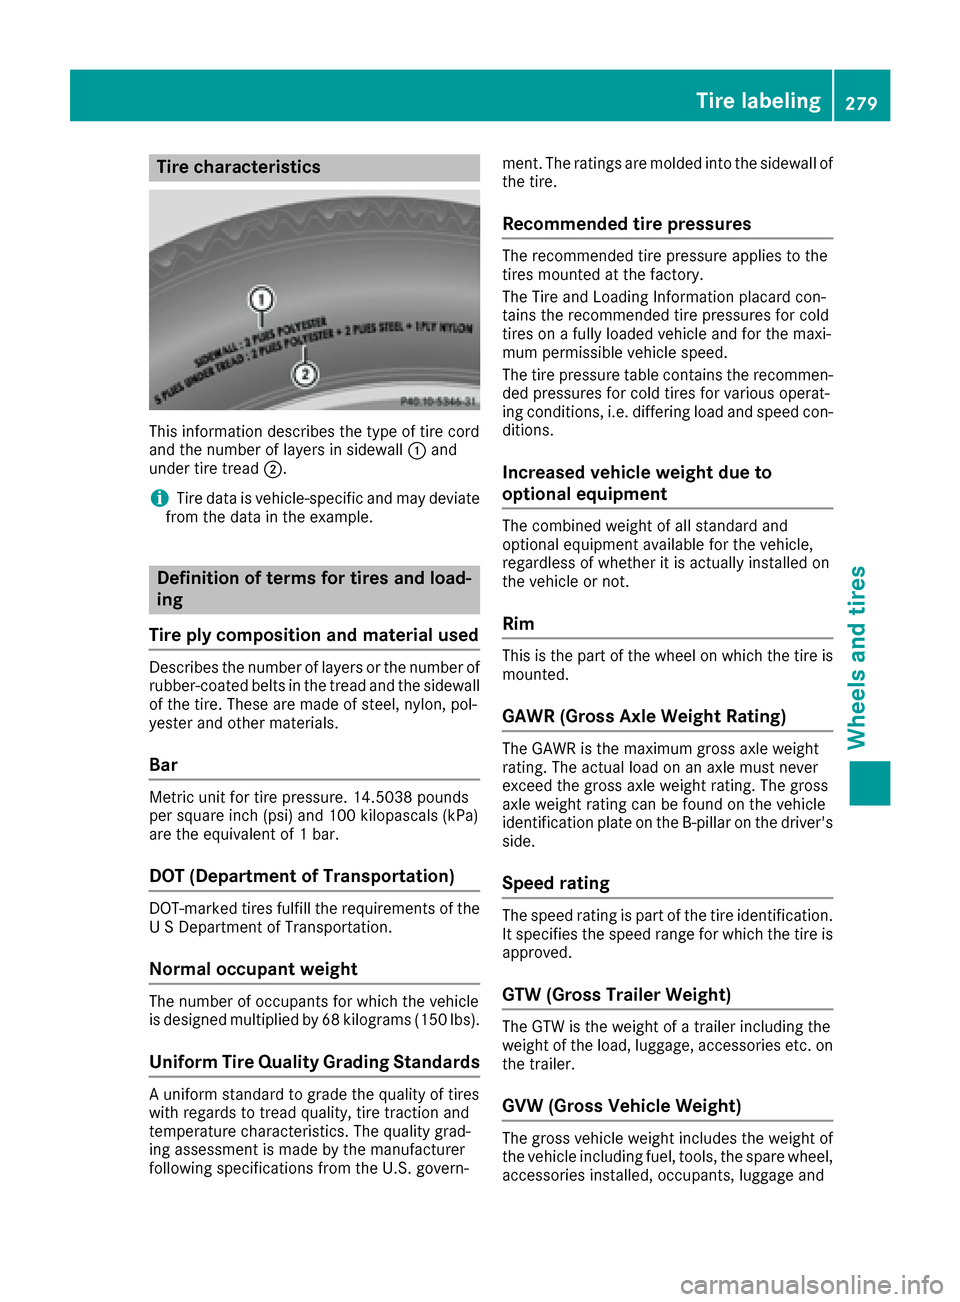
This information describes the type of tire cord
and the number of layers in sidewall:and
under tire tread ;.
iTire data is vehicle-specific and may deviate
from the data in the example.
Definition of terms for tires and load-
ing
Tire ply composition and material used
Describes the number of layers or the number of
rubber-coated belts in the tread and the sidewall
of the tire. These are made of steel, nylon, pol-
yester and other materials.
Bar
Metric unit for tire pressure. 14.5038 pounds
per square inch (psi) and 100 kilopascals (kPa)
are the equivalent of 1 bar.
DOT (Department of Transportation)
DOT-marked tires fulfill the requirements of the
U S Department of Transportation.
Normal occupant weight
The number of occupants for which the vehicle
is designed multiplied by 68 kilograms (150 lb s).
Uniform Tire Quality Grading Standards
A uniform standard to grade the quality of tires
with regards to tread quality, tire traction and
temperature characteristics. The quality grad-
ing assessment is made by the manufacturer
following specifications from the U.S. govern- ment. The ratings are molded into the sidewall of
the tire.
Recommended tire pressures
The recommended tire pressure applies to the
tires mounted at the factory.
The Tire and Loading Information placard con-
tains the recommended tire pressures for cold
tires on a fully loaded vehicle and for the maxi-
mum permissible vehicle speed.
The tire pressure table contains the recommen-
ded pressures for cold tires for various operat-
ing conditions, i.e. differing load and speed con-
ditions.
Increased vehicle weight due to
optional equipment
The combined weight of all standard and
optional equipment available for the vehicle,
regardless of whether it is actually installed on
the vehicle or not.
Rim
This is the part of the wheel on which the tire is
mounted.
GAWR (Gross Axle Weight Rating)
The GAWR is the maximum gross axle weight
rating. The actual load on an axle must never
exceed the gross axle weight rating. The gross
axle weight rating can be found on the vehicle
identification plate on the B-pillar on the driver's
side.
Speed rating
The speed rating is part of the tire identification.
It specifies the speed range for which the tire is
approved.
GTW (Gross Trailer Weight)
The GTW is the weight of a trailer including the
weight of the load, luggage, accessories etc. on
the trailer.
GVW (Gross Vehicle Weight)
The gross vehicle weight includes the weight of
the vehicle including fuel, tools, the spare wheel,
accessories installed, occupants, luggage and
Tire labeling279
Wheels and tires
Z
Page 283 of 302
Weight of optional extras
The combined weight of those optional extras
that weigh more than the replaced standard
parts and more than 2.3 kg (5 lbs). These
optional extras, such as high-performance
brakes, level control, a roof rack or a high-per-
formance battery, are not included in the curb
weight and the weight of the accessories.
TIN (Tire Identification Number)
This is a unique identifier which can be used by
a tire manufacturer to identify tires, for example
for a product recall, and thus identify the pur-
chasers. The TIN is made up of the manufactur- er's identity code, tire size, tire type code and
the manufacturing date.
Load bearing index
The load bearing index (also load index) is a code
that contains the maximum load bearing capa-
city of a tire.
Traction
Traction is the result of friction between the tires
and the road surface.
TWR (Tongue Weight Rating)
The TWR specifies the maximum permissible
weight that the ball coupling of the trailer tow
hitch can support.
Treadwear indicators
Narrow bars (tread wear bars) that are distrib-
uted over the tire tread. If the tire tread is level
with the bars, the wear limit of áin (1.6 mm)
has been reached.
Occupant distribution
The distribution of occupants in a vehicle at their
designated seating positions.
Total load limit
Nominal load and luggage load plus 150 lb
(68 kilograms) multiplied by the number of seats
in the vehicle.
Changing a wheel
Flat tire
The "Breakdown assistance" section
(Ypage 250) contains information and notes on
how to deal with a flat tire.
Rotating the wheels
GWARNING
Interchanging the front and rear wheels may
severely impair the driving characteristics if
the wheels or tires have different dimensions. The wheel brakes or suspension components
may also be damaged. There is a risk of acci-
dent.
Rotate front and rear wheels only if the wheels and tires are of the same dimensions.
!On vehicles equipped with a tire pressure
monitor, electronic components are located
in the wheel.
Tire-mounting tools should not be used near
the valve. This could damage the electronic
components.
Only have tires changed at a qualified spe-
cialist workshop.
Rotating front and rear wheels of differing
dimensions can render the general operating
permit invalid.
Always pay attention to the instructions and
safety notices in the section on "Changing a
wheel and mounting a spare wheel"
(
Ypage 282).
The wear patterns on the front and rear tires
differ, depending on the operating conditions.
Rotate the wheels before a clear wear pattern
has formed on the tires. Front tires typically
wear more on the shoulders and the rear tires in
the center.
If your vehicle's tire configuration allows, you
can rotate the wheels according to the intervals
in the tire manufacturer's warranty book in your
vehicle documents. If no warranty book is avail-
able, the tires should be rotated every 3,000 to
6,000 miles (5,000 to 10,000 km), or earlier if
tire wear requires. Do not change the direction
of wheel rotation.
Clean the contact surfaces of the wheel and the brake disc thoroughly every time a wheel is rota-
Changing a wheel281
Wheels and tires
Z
Page 294 of 302
The vehicle will use more fuel than usual in the
following situations:
Rat very low outside temperatures
Rin city traffic
Ron short journeys
Rin mountainous terrain
Rwhen towing a trailer
Engine oil
General notes
!Never use engine oil or an oil filter of a spec-
ification other than is necessary to fulfill the
prescribed service intervals. Do not change
the engine oil or oil filter in order to achieve
longer replacement intervals than those pre-
scribed. You could otherwise cause engine
damage or damage to the exhaust gas after-
treatment.
Follow the instructions in the service interval display regarding the oil change. Otherwise,
you may damage the engine and the exhaust
gas aftertreatment.
When handling engine oil, observe the important
safety notes on service products (
Ypage 289).
The engine oils are matched to the performance
of Mercedes-Benz engines and service intervals.
For this reason, only use engine oils and oil fil-
ters that are approved for vehicles with a service
system.
For a list of approved engine oils and oil filters,
consult an authorized Mercedes-Benz Center or
go to the Internet site
http://bevo.mercedes-benz.com (USA only).
The table shows which engine oils have been
approved for your vehicle.
ModelMB-Freigabe or MB
Approval
G 550229.3 / 229.5
G 63 AMG229.5
iThe MB-Freigabe or MB Approval is stated
on the oil containers.
Filling capacities
The following values refer to an oil change
including the oil filter.
Vehicle modelCapacity including oil filter
G 5502.4 US gal (9.0 l)
G 63 AMG2.25 US gal (8.5 l)
Additives
!Do not use any additives in the engine oil.
This could damage the engine.
Engine oil viscosity
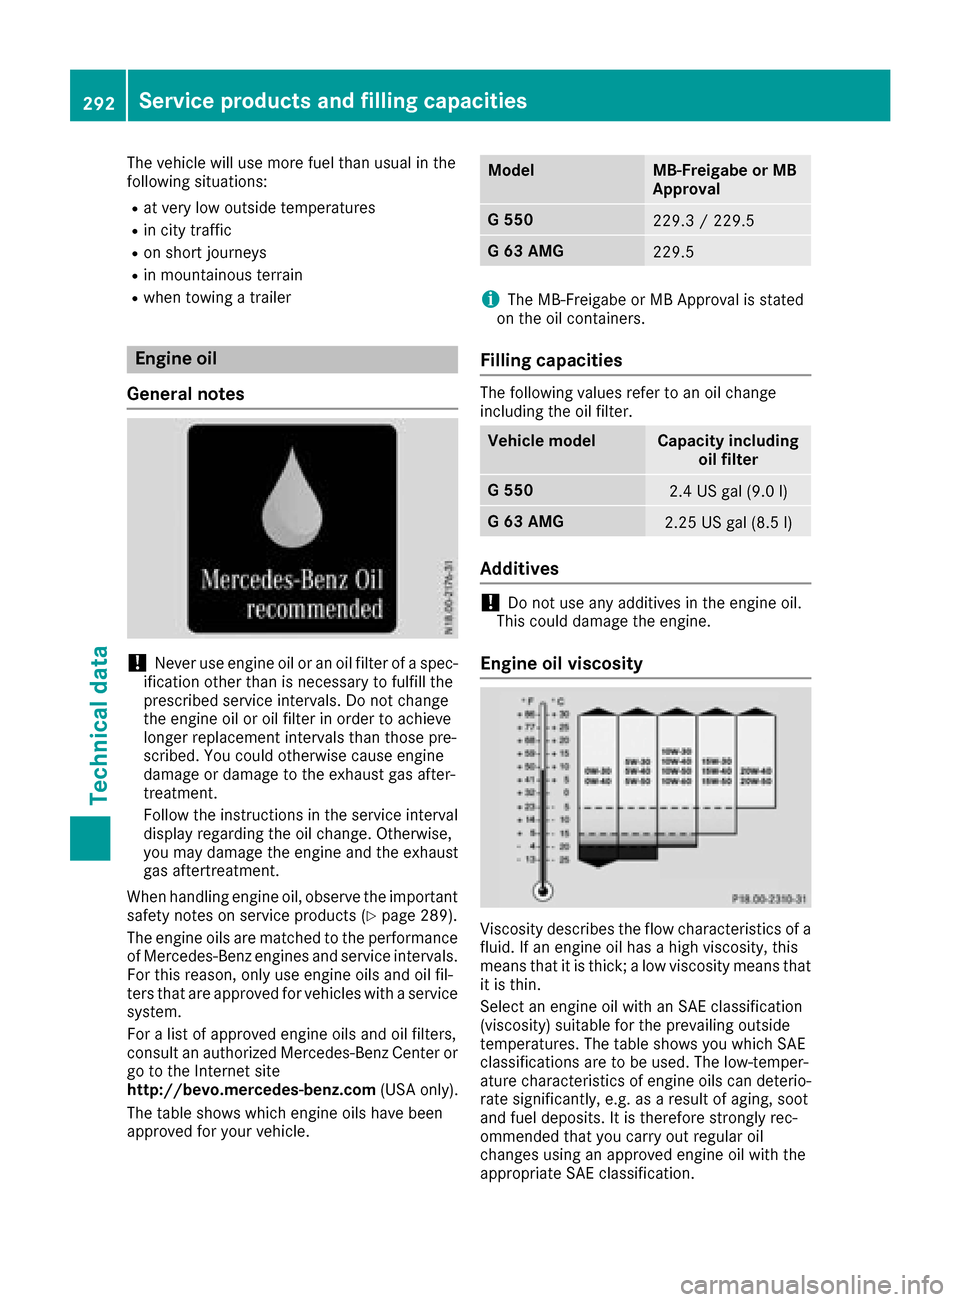
Viscosity describes the flow characteristics of a
fluid. If an engine oil has a high viscosity, this
means that it is thick; a low viscosity means that it is thin.
Select an engine oil with an SAE classification
(viscosity) suitable for the prevailing outside
temperatures. The table shows you which SAE
classifications are to be used. The low-temper-
ature characteristics of engine oils can deterio-
rate significantly, e.g. as a result of aging, soot
and fuel deposits. It is therefore strongly rec-
ommended that you carry out regular oil
changes using an approved engine oil with the
appropriate SAE classification.
292Service products and filling capacities
Technical data