2016 MERCEDES-BENZ G-Class mirror
[x] Cancel search: mirrorPage 182 of 302

Deactivating delayed switch-off of the exterior
lighting temporarily:
XBefore leaving the vehicle, turn the SmartKey
to position0(Ypage 112 )in the ignition lock.
XTurn the SmartKey to position 2in the ignition
lock (Ypage 112).
The exterior lighting delayed switch-off is
deactivated.
Delayed switch-off of the exterior lighting is
reactivated the next time you start the engine.
If you have activated the Surround Lighting
function and the light switch is set to Ã, the
following functions are activated when it is dark:
Rsurround lighting: the exterior lighting
remains lit for 40 seconds after unlocking
with the SmartKey. If you start the engine, the
surround lighting is switched off and auto-
matic headlamp mode is activated
(
Ypage 85).
Rexterior lighting delayed switch-off: the
exterior lighting remains lit for 60 seconds
after the engine is switched off. If you close all
the doors and the trunk lid, the exterior light- ing goes off after 15 seconds.
iDepending on your vehicle's equipment,
when the surround lighting and delayed
switch-off exterior lighting are on, the follow-
ing light up:
RParking lamps
RLow-beam headlamps
RDaytime running lamps
RSide marker lamps
RSurround lighting in the exterior mirrors
Activating/deactivating the interior light-
ing delayed switch-off
If you activate the Interior Lighting Delayfunction, the interior lighting remains on for
20 seconds after you remove the SmartKey from
the ignition lock.
XPress the=or; button on the steering
wheel to select the Sett.menu.
XPress the:or9 button to select the
Lightssubmenu.
XPress ato confirm.
XPress :or9 to select the InteriorLighting Delayfunction.
When the Interior Lighting Delayfunc-
tion is activated, the vehicle interior is dis-
played in red in the multifunction display.
XPress the abutton to save the setting.
Vehicle
Activating/deactivating the automatic
door locking mechanism
If you activate the AutomaticDoorLockfunc-
tion, the vehicle is centrally locked above a
speed of approximately 9 mph (15 km/h).
XPress the =or; button on the steering
wheel to select the Sett.menu.
XPress the:or9 button to select the
Vehiclesubmenu.
XPress ato confirm.
XPress the :or9 button to select the
Automatic Door Lockfunction.
When the Automatic Door Lockfunction is
activated, the vehicle doors are displayed in
red in the multifunction display.
XPress the abutton to save the setting.
For further information on the automatic locking
feature, see (
Ypage 66).
Activating/deactivating the acoustic
locking verification signal
If you switch on the AcousticLockfunction, an
acoustic signal sounds when you lock the vehi-
cle.
XPress the =or; button on the steering
wheel to select the Sett.menu.
XPress:or9 to select the Vehiclesubmenu.
XPressato confirm.
XPress the :or9 button to select the
Acoustic Lockfunction.
If the Acoustic Lockfunction is activated,
the & symbol in the multifunction display
lights up red.
XPress the abutton to save the setting.
180Menus and submenus
On-board computer and displays
Page 183 of 302
Convenience
Activating/deactivating the EASY-
ENTRY/EXIT feature
GWARNING
When the EASY-ENTRY/EXIT feature adjusts
the steering wheel, you and other vehicle
occupants – particularly children – could
become trapped. There is a risk of injury.
While the EASY-ENTRY/EXIT feature is mak-
ing adjustments, make sure that no one has
any body parts in the sweep of the steering
wheel.
If somebody becomes trapped:
Rpress one of the memory function position
buttons, or
Rmove the switch for steering wheel adjust-
ment in the opposite direction to that in
which the steering wheel is moving.
The adjustment process is stopped.
XPress the =or; button on the steering
wheel to select the Sett.menu.
XPress the:or9 button to select the
Conveniencesubmenu.
XPress ato confirm.
XPress the :or9 button to select the
Easy Entry/Exitfunction.
If the EasyEntry/Exitfunction is activated,
the vehicle steering wheel appears in red in
the multifunction display.
XPress the abutton to save the setting.
Further information on the EASY-ENTRY/EXIT
feature (
Ypage 79).
Switching the fold-in mirrors when lock-
ing feature on/off
When you activate the Auto.MirrorFoldingfunction, the exterior mirrors are folded in when
the vehicle is locked. If you unlock the vehicle
and then open a door, the exterior mirrors fold
out again.
XPress the=or; button on the steering
wheel to select the Sett.menu.
XPress the:or9 button to select the
Conveniencesubmenu.
XPress ato confirm.
XPress :or9 to select the Auto.Mir‐ror Foldingfunction.
If the Auto. Mirror Foldingfunction is
activated, the vehicle's exterior mirror is dis-
played in red in the multifunction display.
XPress the abutton to save the setting.
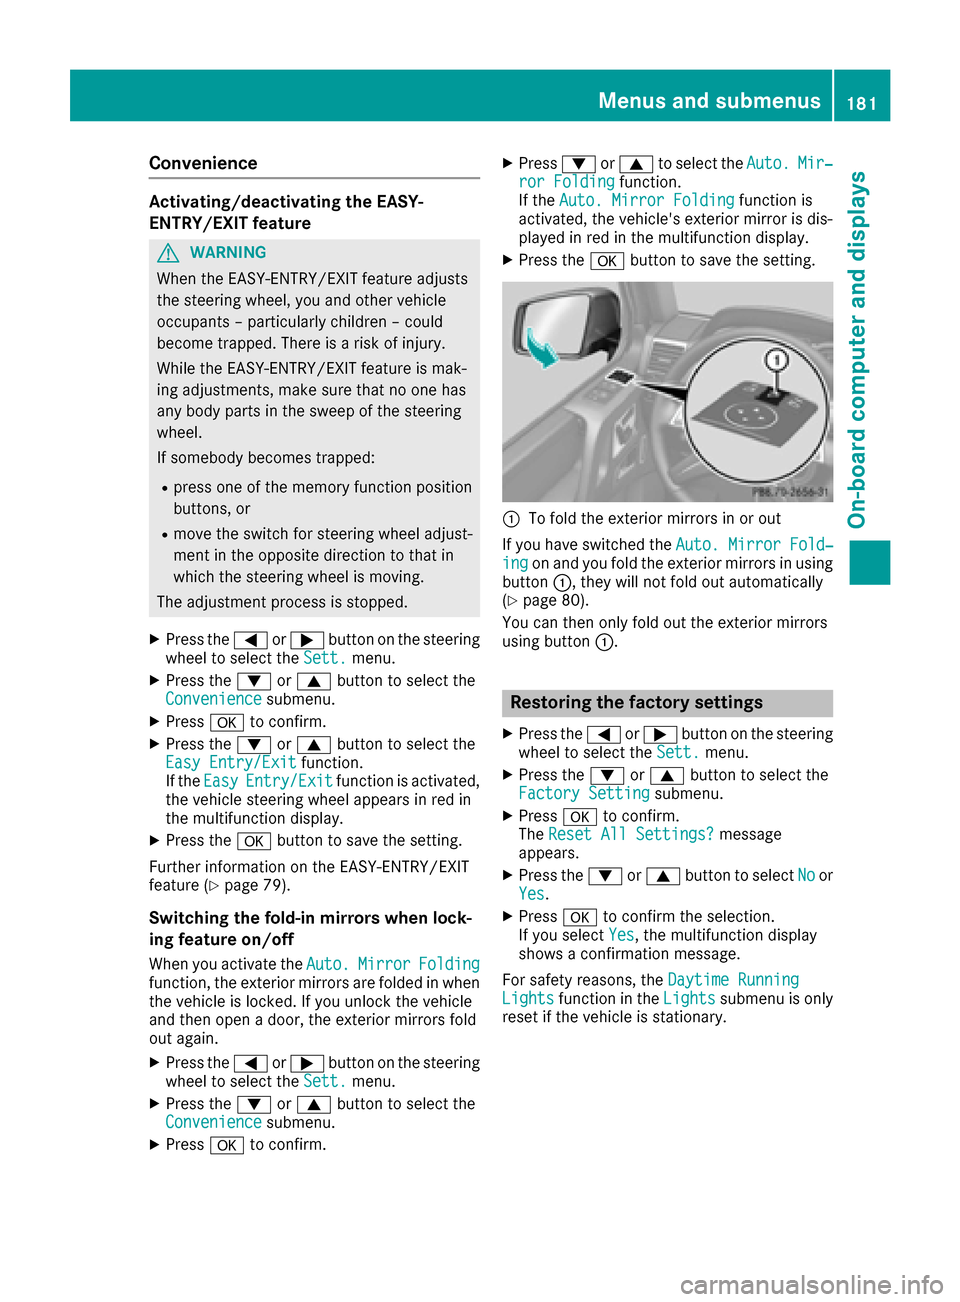
:To fold the exterior mirrors in or out
If you have switched the Auto. Mirror Fold‐
ingon and you fold the exterior mirrors in using
button :, they will not fold out automatically
(
Ypage 80).
You can then only fold out the exterior mirrors
using button :.
Restoring the factory settings
XPress the=or; button on the steering
wheel to select the Sett.menu.
XPress the:or9 button to select the
Factory Settingsubmenu.
XPress ato confirm.
The Reset All Settings?message
appears.
XPress the :or9 button to select Noor
Yes.
XPress ato confirm the selection.
If you select Yes, the multifunction display
shows a confirmation message.
For safety reasons, the Daytime Running
Lightsfunction in theLightssubmenu is only
reset if the vehicle is stationary.
Menus and submenus181
On-board computer and displays
Z
Page 192 of 302
Display messagesPossible causes/consequences andMSolutions
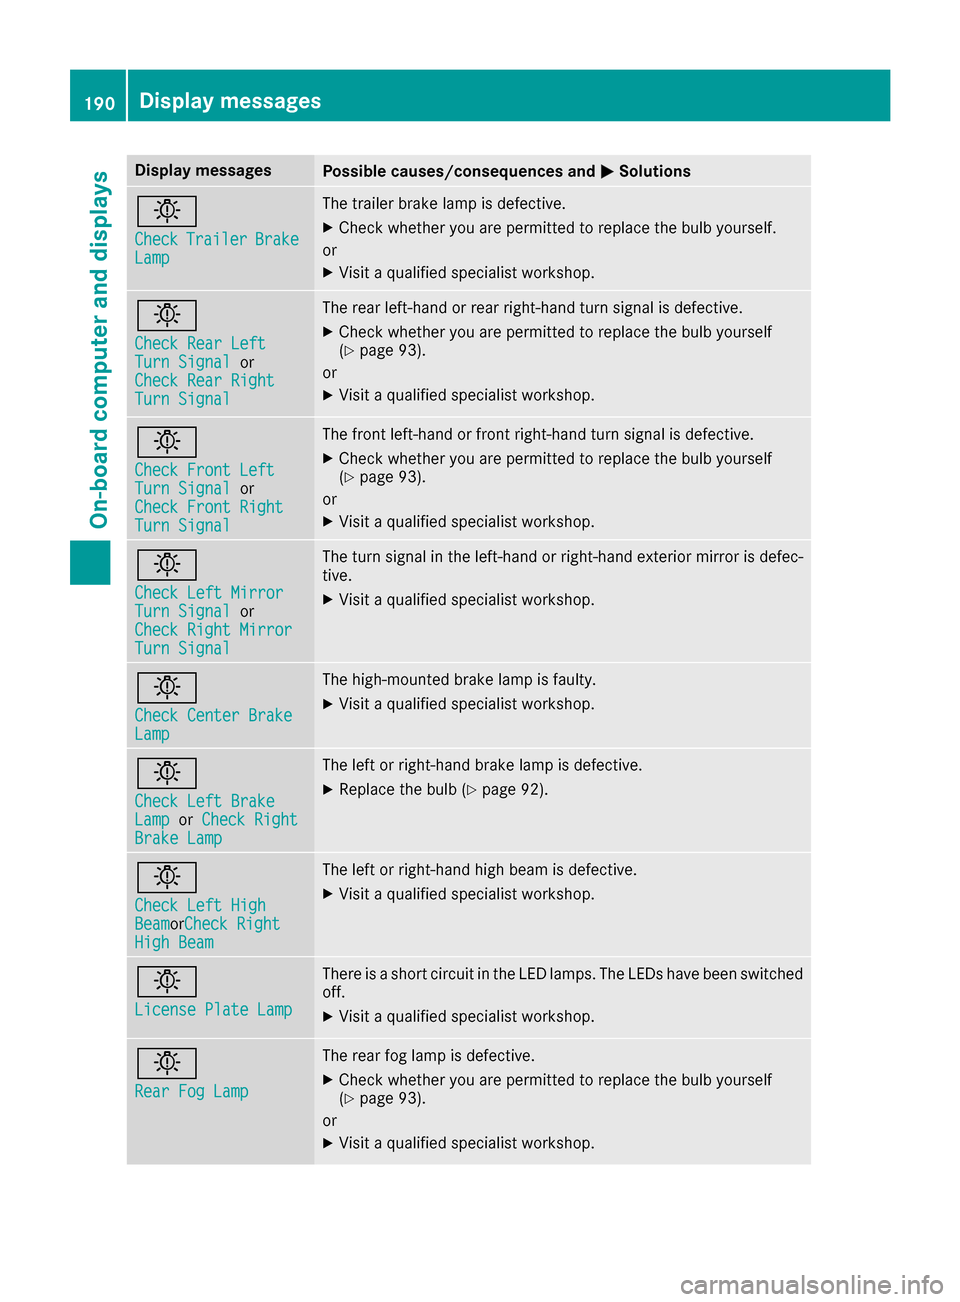
b
CheckTrailerBrakeLamp
The trailer brak elamp is defective.
XChec kwhether you are permitte dto replace th ebulb yourself .
or
XVisit aqualified specialist workshop .
b
Check RearLef tTurnSignalor
Check Rea rRight
Tur nSignal
The rear left-han dor rear right-hand tur nsignal is defective.
XChec kwhether you are permitte dto replace th ebulb yourself
(Ypage 93) .
or
XVisit aqualified specialist workshop .
b
Check Front LeftTurnSignalor
Check Front Right
Tur nSignal
The fron tleft-han dor fron tright-hand tur nsignal is defective.
XChec kwhether you are permitte dto replace th ebulb yourself
(Ypage 93) .
or
XVisit aqualified specialist workshop .
b
Check LeftMirrorTur nSignalor
Check Right Mirror
Tur nSignal
The tur nsignal in th eleft-han dor right-hand exterio rmirror is defec -
tive.
XVisit aqualified specialist workshop .
b
Check Center BrakeLamp
The high-mounte dbrak elamp is faulty.
XVisit aqualified specialist workshop .
b
Check LeftBrakeLam porCheck RightBrake Lam p
The leftor right-hand brak elamp is defective.
XReplac eth ebulb (Ypage 92) .
b
Check Lef tHig hBeamorCheck RightHig hBea m
The lef tor right-hand high beam is defective.
XVisit aqualified specialist workshop .
b
LicensePlate Lam p
There isashort circuit in th eLE Dlamps. The LEDs hav ebeen switched
off .
XVisit aqualified specialist workshop .
b
RearFog Lam p
The rear fog lamp is defective.
XCheckwhether you are permitte dto replace th ebulb yourself
(Ypage 93) .
or
XVisit aqualified specialist workshop .
190Display messages
On-board computer and displays
Page 198 of 302

Display messagesPossible causes/consequences andMSolutions
TC NEUTRAL
ON
The transfer cas eis in th eNeutral neutral position .
A warning tone will also soun dwhen th edriver's door is opened and
th ebrak epedal is no tdepressed.
XClos eth edriver's door .
XSecureth evehicl eagainst rollin gaway (Ypage 130).
XShift th etransfer cas eaccording to drivin gcondition s
(Ypage 162).
Preselected differ ‐ential lock
ESP unavailable
Adifferential loc khas been engaged. The differential gear has no tyet
locke dth erespective differential. The activation indicator lamp (yel-
low) (
Ypage 164) of th eswitch lights up.
ES Pis unavailable .
AB Sis still available.
Differential loc kactive
ABSandESPunavail‐able
Adifferential loc kwas engage dand th edifferential gear has locke d
th erespective differential. The activation indicator lamp (yellow) and
function indicator lamp (red) (
Ypage 164) on theswitch ligh tup.
AB Sand ES Pare unavailable .
Blind SpotAssistcurrently unavaila‐ble
See Operator' sMan ‐ual
Blind Spot Assis tis temporarily inoperative. Possibl ecauses are:
Ryou hav eestablished th eelectrical connection between th etrailer
and your vehicle.
Rth esensor sare dirty.
Rfunction is impaire ddue to heav yrain or snow.
Rth eradar sensor system is outside th eoperating temperature
range.
Rth eradar sensor system is temporarily inoperative, e.g. due to elec -
tromagneti cradiation emitted by nearby TV or radi ostation sor
other source sof electromagneti cradiation .
The yellow 9indicator lamp salso ligh tup in th eexterio rmirrors.
XWhe ntowin g atrailer ,confirm th edisplay message wit ha.
If you are drivin gwithout atrailer and th edisplay message does no t
disappear :
XPull overand stop th evehicl esafely as soo nas possible, payin g
attention to roa dand traffic conditions.
XApply th eparking brake.
XClean th esensor s (Ypage 244).
XRestart th eengine.
If th esystem detects that th esensor sare fully operational, th edisplay
message disappears.
Blind Spot Assis tis operational again .
Blind SpotAssistor
InoperativeBlind Spot Assis tis defective.
The yellow 9indicator lamp salso ligh tup in th eexterio rmirrors.
XVisit aqualified specialist workshop .
196Display messages
On-board computer and displays
Page 223 of 302
Sun visors
Overview
GWARNING
If the mirror cover of the vanity mirror is folded
up when the vehicle is in motion, you could be
blinded by incident light. There is a risk of an
accident.
Always keep the mirror cover folded down
while driving.
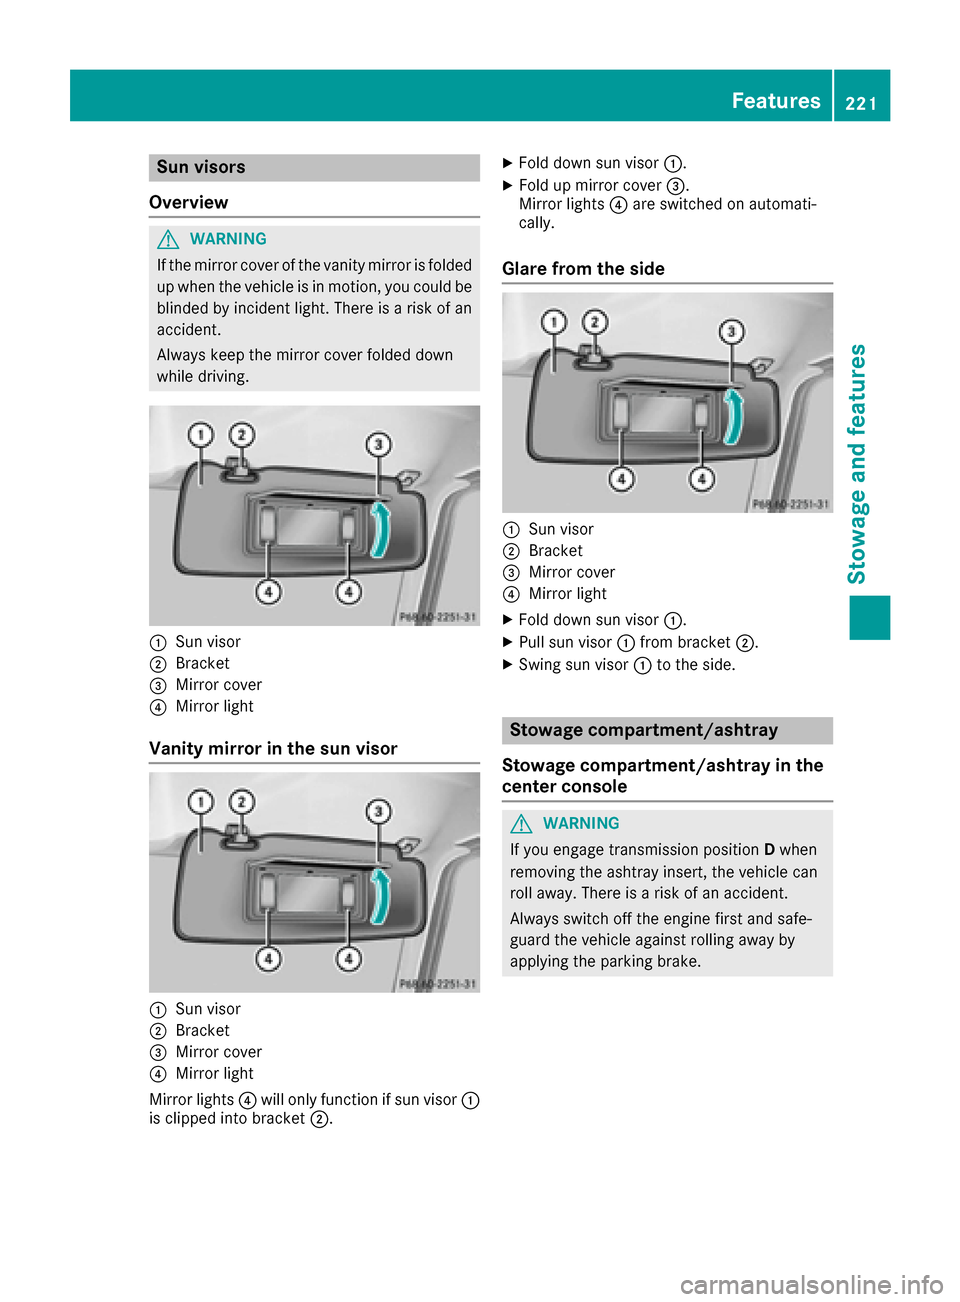
:Sun visor
;Bracket
=Mirror cover
?Mirror light
Vanity mirror in the sun visor
:Sun visor
;Bracket
=Mirror cover
?Mirror light
Mirror lights ?will only function if sun visor :
is clipped into bracket ;.
XFold down sun visor:.
XFold up mirror cover =.
Mirror lights ?are switched on automati-
cally.
Glare from the side
:Sun visor
;Bracket
=Mirror cover
?Mirror light
XFold down sun visor :.
XPull sun visor:from bracket ;.
XSwing sun visor :to the side.
Stowage compartment/ashtray
Stowage compartment/ashtray in the
center console
GWARNING
If you engage transmission position Dwhen
removing the ashtray insert, the vehicle can
roll away. There is a risk of an accident.
Always switch off the engine first and safe-
guard the vehicle against rolling away by
applying the parking brake.
Features221
Stowage and features
Z
Page 233 of 302
can specify up to ten areas simultaneously. Dif-
ferent settings are possible for each area.
USA only: these settings can be called up under
"Owners Online" at http://www.mbusa.com.
Alternatively, you can trigger an MB Info call and
inform the customer service representative that
you wish to activate geo fencing.
Currently inactive areas can be activated by text
message.
Triggering the vehicle alarm
With this function, you can trigger the vehicle's
panic alarm via text message. An alarm sounds
and the exterior lighting flashes. Depending on
the setting, the panic alarm lasts five or ten sec-
onds. Afterwards, the alarm switches off.
Brush guard (USA only)
If the brush guard has to be removed, contact a
qualified specialist workshop.
Garage door opener
General notes
You can use the HomeLink®garage door opener
integrated into the rear-view mirror to operate
up to three different gate/garage door opener
systems.
iCertain garage door drives are incompatible
with the integrated garage door opener. If you
have difficulty programing the integrated
garage door opener, contact an authorized
Mercedes-Benz Center. You can also contact the following service hotlines:
RUSA: Mercedes-Benz Customer Assistance
Center at 1-800-FOR-MERCedes
RCanada: Customer Service at
1-800-387-0100
iUSA only:
This device complies with Part 15 of the FCC Rules. Operation is subject to the following
two conditions:
1. This device may not cause harmful inter-
ference, and
2. this device must accept any interference
received, including interference that may
cause undesired operation. Any unauthorized modification to this device
could void the user's authority to operate the
equipment.
iCanada only:
This device complies with RSS-210 of Indus-
try Canada. Operation is subject to the fol-
lowing two conditions:
1. This device may not cause harmful inter-
ference, and
2. this device must accept any interference
received, including interference that may
cause undesired operation.
Any unauthorized mod ifica
tion to this device
could void the user's authority to operate the
equipment.
Important safety notes
GWARNING
When you operate or program the garage door
with the integrated garage door opener, per-
sons in the range of movement of the garage
door can become trapped or struck by the
garage door. There is a risk of injury.
When using the integrated garage door
opener, always make sure that nobody is
within the range of movement of the garage
door.
GWARNING
Combustion engines emit poisonous exhaust
gases such as carbon monoxide. Inhaling
these exhaust gases leads to poisoning. There
is a risk of fatal injury. Therefore never leave
the engine running in enclosed spaces with-
out sufficient ventilation.
When programming a garage door opener, park
the vehicle outside the garage. Do not run the
engine while programming.
Programming the remote control
Programming
Pay attention to the "Important safety notes"
(Ypage 231).
Features231
Stowag ean d features
Z
Page 234 of 302
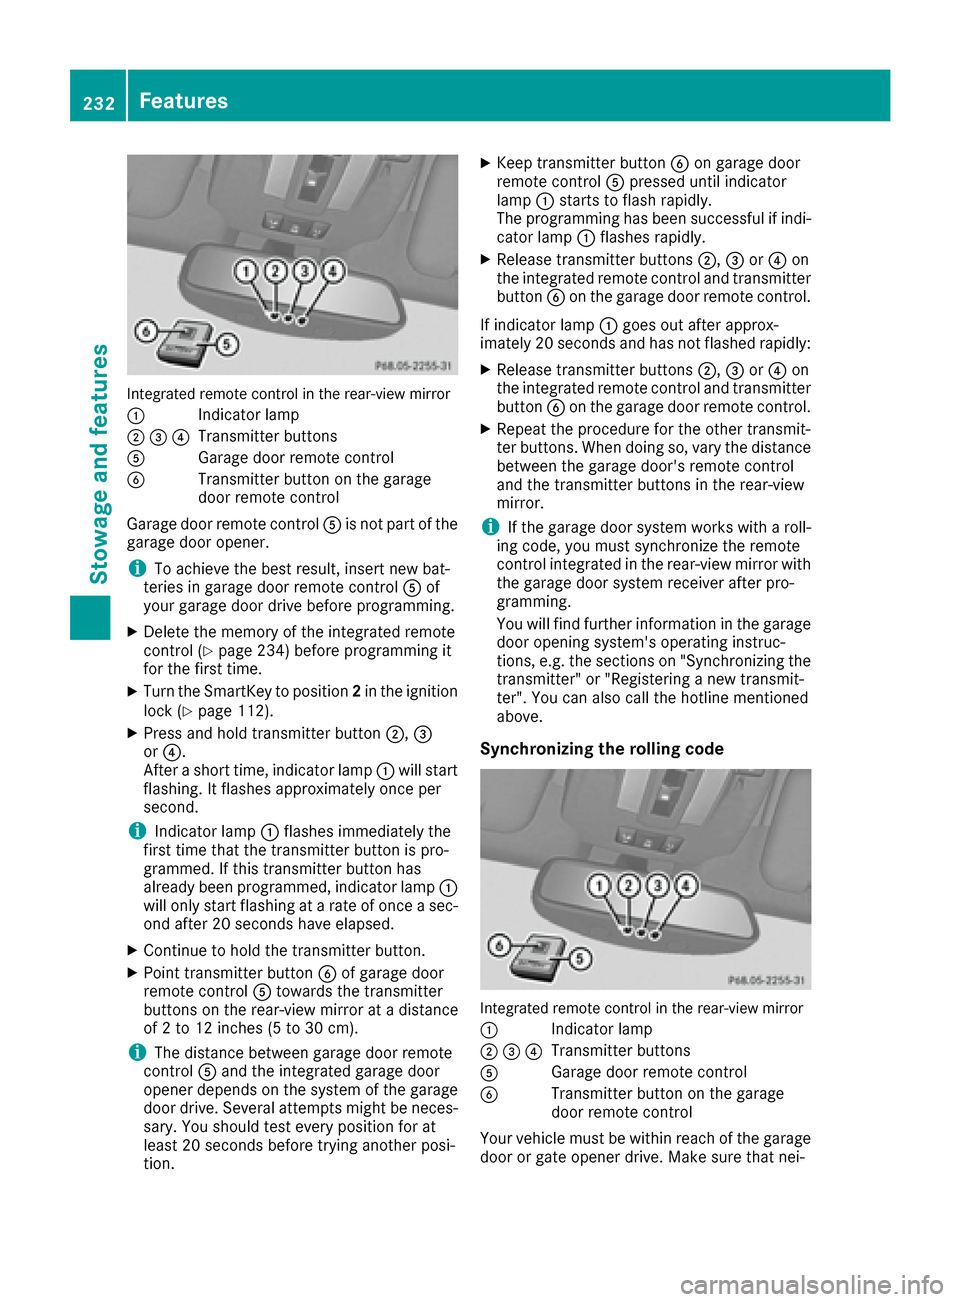
Integrated remote control in the rear-view mirror
:
Indicator lamp
;=?Transmitter buttons
AGarage door remote control
BTransmitter button on the garage
door remote control
Garage door remote control Ais not part of the
garage door opener.
iTo achieve the best result, insert new bat-
teries in garage door remote control Aof
your garage door drive before programming.
XDelete the memory of the integrated remote
control (Ypage 234) before programming it
for the first time.
XTurn the SmartKey to position 2in the ignition
lock (Ypage 112).
XPress and hold transmitter button ;,=
or ?.
After a short time, indicator lamp :will start
flashing. It flashes approximately once per
second.
iIndicator lamp :flashes immediately the
first time that the transmitter button is pro-
grammed. If this transmitter button has
already been programmed, indicator lamp :
will only start flashing at a rate of once a sec-
ond after 20 seconds have elapsed.
XContinue to hold the transmitter button.
XPoint transmitter button Bof garage door
remote control Atowards the transmitter
buttons on the rear-view mirror at a distance
of 2 to 12 inches (5 to 30 cm).
iThe distance between garage door remote
control Aand the integrated garage door
opener depends on the system of the garage
door drive. Several attempts might be neces-
sary. You should test every position for at
least 20 seconds before trying another posi-
tion.
XKeep transmitter button Bon garage door
remote control Apressed until indicator
lamp :starts to flash rapidly.
The programming has been successful if indi-
cator lamp :flashes rapidly.
XRelease transmitter buttons ;,=or? on
the integrated remote control and transmitter
button Bon the garage door remote control.
If indicator lamp :goes out after approx-
imately 20 seconds and has not flashed rapidly:
XRelease transmitter buttons ;,=or? on
the integrated remote control and transmitter button Bon the garage door remote control.
XRepeat the procedure for the other transmit-
ter buttons. When doing so, vary the distance
between the garage door's remote control
and the transmitter buttons in the rear-view
mirror.
iIf the garage door system works with a roll-
ing code, you must synchronize the remote
control integrated in the rear-view mirror with the garage door system receiver after pro-
gramming.
You will find further information in the garage
door opening system's operating instruc-
tions, e.g. the sections on "Synchronizing the
transmitter" or "Registering a new transmit-
ter". You can also call the hotline mentioned
above.
Synchronizing the rolling code
Integrated remote control in the rear-view mirror
:
Indicator lamp
;=?Transmitter buttons
AGarage door remote control
BTransmitter button on the garage
door remote control
Your vehicle must be within reach of the garage door or gate opener drive. Make sure that nei-
232Features
Stowage and features
Page 235 of 302
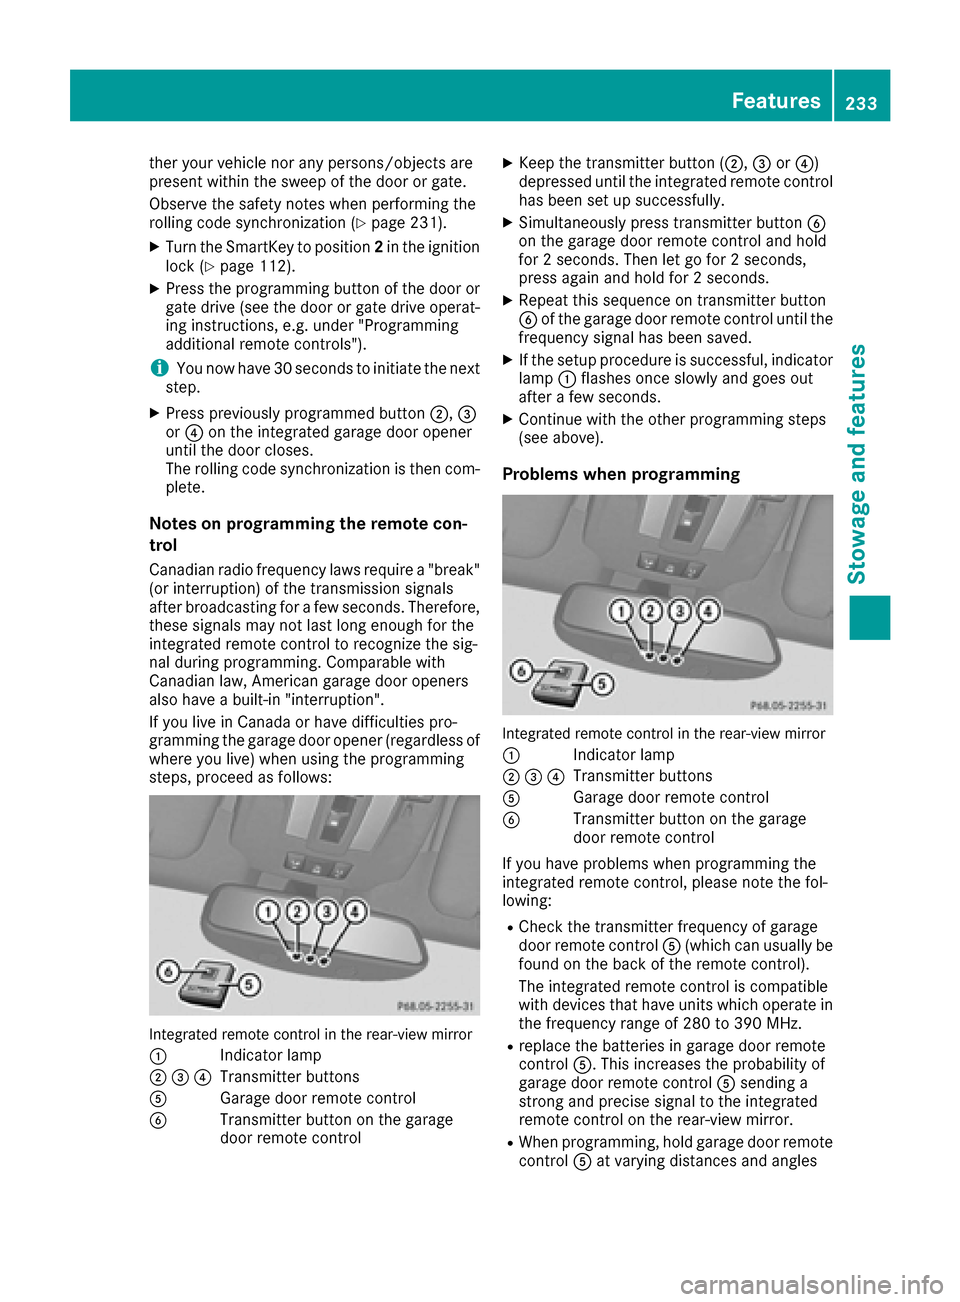
ther your vehicle nor any persons/objects are
present within the sweep of the door or gate.
Observe the safety notes when performing the
rolling code synchronization (
Ypage 231).
XTurn the SmartKey to position2in the ignition
lock (Ypage 112).
XPress the programming button of the door or
gate drive (see the door or gate drive operat-
ing instructions, e.g. under "Programming
additional remote controls").
iYou now have 30 second sto initiate the next
step.
XPress previously programmed button ;,=
or ? on the integrated garage door opener
until the door closes.
The rolling code synchronization is then com-
plete.
Notes on programming the remote con-
trol
Canadian radio frequency laws require a "break"
(or interruption) of the transmission signals
after broadcasting for a few seconds. Therefore,
these signals may not last long enough for the
integrated remote control to recognize the sig-
nal during programming. Comparable with
Canadian law, American garage door openers
also have a built-in "interruption".
If you live in Canada or have difficulties pro-
gramming the garage door opener (regardless of
where you live) when using the programming
steps, proceed as follows:
Integrated remote control in the rear-view mirror
:
Indicator lamp
;=?Transmitter buttons
AGarage door remote control
BTransmitter button on the garage
door remote control
XKeep the transmitter button ( ;,=or?)
depressed until the integrated remote control
has been set up successfully.
XSimultaneously press transmitter button B
on the garage door remote control and hold
for 2 seconds. Then let go for 2 seconds,
press again and hold for 2 seconds.
XRepeat this sequence on transmitter button
B of the garage door remote control until the
frequency signal has been saved.
XIf the setup procedure is successful, indicator
lamp :flashes once slowly and goes out
after a few seconds.
XContinue with the other programming steps
(see above).
Problems when programming
Integrated remote control in the rear-view mirror
:
Indicator lamp
;=?Transmitter buttons
AGarage door remote control
BTransmitter button on the garage
door remote control
If you have problems when programming the
integrated remote control, please note the fol-
lowing:
RCheck the transmitter frequency of garage
door remote control A(which can usually be
found on the back of the remote control).
The integrated remote control is compatible
with devices that have units which operate in the frequency range of 280 to 390 MHz.
Rreplace the batteries in garage door remote
control A. This increases the probability of
garage door remote control Asending a
strong and precise signal to the integrated
remote control on the rear-view mirror.
RWhen programming, hold garage door remote
control Aat varying distances and angles
Features233
Stowage and features
Z