2016 MERCEDES-BENZ G-Class mirror
[x] Cancel search: mirrorPage 236 of 302

from the transmitter button which you are
programming. Try various angles at a distance
between2and 12 inches (5 to 30 cm) or at the
same angle but at varying distances.
RIf there is another garage door remote control
for the same device, perform the program-
ming steps again using that garage door
opener. Before performing these steps, make
sure that new batteries have been installed in
the garage door remote control.
RAlign the antenna cable of the garage door
opener unit. This can improve signal trans-
mission.
Opening/closing the garage door
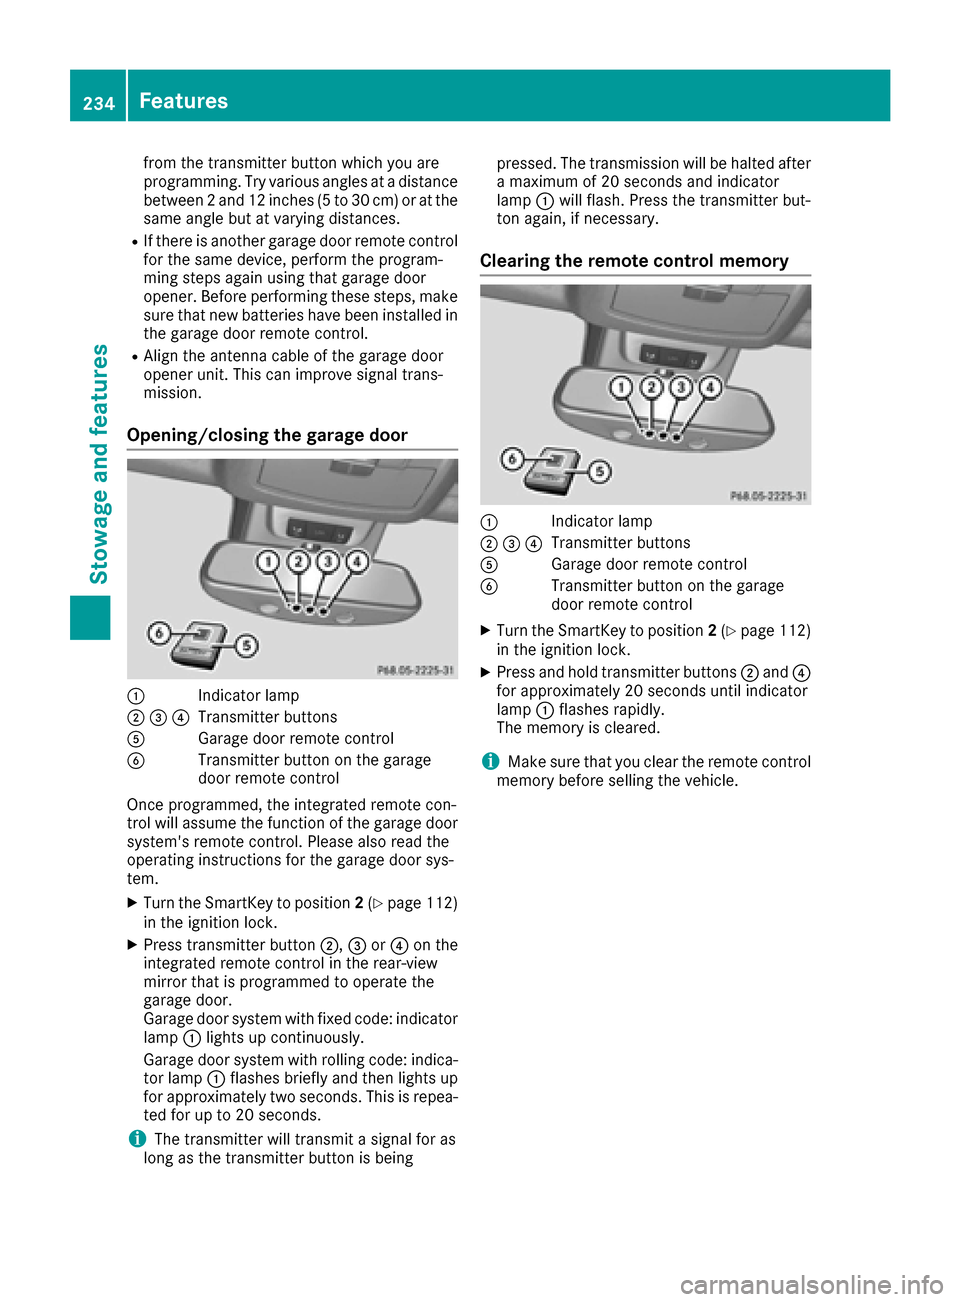
:Indicator lamp
;=?Transmitter buttons
AGarage door remote control
BTransmitter button on the garage
door remote control
Once programmed, the integrated remote con-
trol will assume the function of the garage door
system's remote control. Please also read the
operating instructions for the garage door sys-
tem.
XTurn the SmartKey to position 2(Ypage 112)
in the ignition lock.
XPress transmitter button ;,=or? on the
integrated remote control in the rear-view
mirror that is programmed to operate the
garage door.
Garage door system with fixed code: indicator
lamp :lights up continuously.
Garage door system with rolling code: indica-
tor lamp :flashes briefly and then lights up
for approximately two seconds. This is repea-
ted for up to 20 seconds.
iThe transmitter will transmit a signal for as
long as the transmitter button is being pressed. The transmission will be halted after
a maximum of 20 seconds and indicator
lamp
:will flash. Press the transmitter but-
ton again, if necessary.
Clearing the remote control memory
:Indicator lamp
;=?Transmitter buttons
AGarage door remote control
BTransmitter button on the garage
door remote control
XTurn the SmartKey to position 2(Ypage 112)
in the ignition lock.
XPress and hold transmitter buttons ;and ?
for approximately 20 seconds until indicator
lamp :flashes rapidly.
The memory is cleared.
iMake sure that you clear the remote control
memory before selling the vehicle.
234Features
Stowage and features
Page 244 of 302

cleaning agents. These cleaning agents can
damage the paintwork or plastic parts.
!Make sure that the automatic car wash is
suitable for the size of the vehicle. Fold in the
exterior mirrors before the vehicle is washed.
The exterior mirrors could otherwise be dam-
aged.
!Make sure that the automatic transmission
is in position Nwhen washing your vehicle in
a tow-through car wash. The vehicle could be
damaged if the transmission is in another
position.
!Make sure that:
Rthe side windows and sliding sunroof are
closed completely.
Rthe blower for the ventilation/heating is
switched off (airflow control is turned to
position 0/the à andÁ buttons are
switched off).
Rthe windshield wiper switch is at position 0.
The vehicle could otherwise be damaged.
You can wash the vehicle in an automatic car
wash from the very start.
If the vehicle is very dirty, pre-wash it before
cleaning it in an automatic car wash.
After using an automatic car wash, wipe off wax
from the windshield and the wiper blades. This
will prevent smears and reduce wiping noises
caused by residue on the windshield.
Washing by hand
In some countries, washing by hand is only
allowed at specially equipped washing bays.
Observe the legal requirements in all countries
concerned.
When using the vehicle in winter, remove all
traces of road salt deposits carefully and as
soon as possible.
When washing the vehicle underbody, also clean the inside of the wheels.
XDo not use hot water and do not wash the
vehicle in direct sunlight.
XUse a soft sponge to clean.
XUse a mild cleaning agent, such as a car
shampoo approved by Mercedes-Benz.
XThoroughly hose down the vehicle with a gen-
tle jet of water.
XDo not point the water jet directly towards the
air inlets.
XUse plenty of water and rinse out the sponge
frequently.
XRinse the vehicle with clean water and dry
thoroughly with a chamois.
XDo not let the cleaning agent dry on the paint-
work.
Power washers
GWARNING
The water jet from a circular jet nozzle (dirt
blasters) can cause invisible exterior damage
to the tires or chassis components. Compo-
nents damaged in this way may fail unexpect-
edly. There is a risk of an accident.
Do not use power washers with circular jet
nozzles to clean the vehicle. Have damaged
tires or chassis components replaced imme-
diately.
!Always maintain a distance of at least
11.8 in (30 cm) between the vehicle and the
power washer nozzle. Information about the
correct distance is available from the equip-
ment manufacturer.
Move the power washer nozzle around when
cleaning your vehicle.
Do not aim directly at any of the following:
Rtires
Rdoor gaps, roof gaps, joints, etc.
Relectrical components
Rbattery
Rconnectors
Rlights
Rseals
Rtrim
Rventilation slots
Damaged seals or electrical components can
lead to leaks or failures.
Cleaning the wheels
!Do not use acidic wheel cleaning products
to remove brake dust. This could damage
wheel bolts and brake components.
!Do not park the vehicle for an extended
period straight after cleaning it, particularly
after having cleaned the wheels with wheel
cleaner. Wheel cleaners could cause
242Care
Maintenance and care
Page 254 of 302

HEnvironmental note
Batteries contain dangerous
substances. It is against the
law to dispose of them with
the household rubbish. They
must be collected separatelyand recycled to protect the
environment.
Dispose of batteries in an
environmentally friendly
manner. Take discharged
batteries to a qualified spe-
cialist workshop or a special
collection point for used bat-
teries.
In order for the battery to achieve the maximum
possible service life, it must always be suffi-
ciently charged.
Comply with safety precautions and take pro-
tective measures when handling batteries.
Risk of explosion.
Fire, open flames and smoking are
prohibited when handling the bat-
tery. Avoid creating sparks.
Battery acid is caustic.
Avoid contact with skin, eyes or
clothing.
Wear eye protection.
Keep children away.
Observe this Operator's Manual.
The vehicle battery, like other batteries, can dis-
charge over time if you do not use the vehicle. In
this case, have the battery disconnected at a
qualified specialist workshop. You can also
charge the battery with a charger recommended by Mercedes-Benz. Contact a qualified special-
ist workshop for further information.
For safety reasons, Mercedes-Benz recom-
mends that you only use batteries which have
been tested and approved for your vehicle by
Mercedes-Benz. These batteries provide
increased impact protection to prevent vehicle
occupants from suffering acid burns should the
battery be damaged in the event of an accident.
Have the battery condition of charge checked
more frequently if you use the vehicle mainly for
short trips or if you leave it standing idle for a
lengthy period. Consult a qualified specialist
workshop if you wish to leave your vehicle
parked for a long period of time.
iRemove the SmartKey if you park the vehi-
cle and do not require any electrical consum-
ers. The vehicle will then use very little energy,
thus conserving battery power.
iIf the power supply has been interrupted,
e.g. due to a discharged battery, you will have
to:
Rset the clock. Information on setting the
clock can be found in the separate operat-
ing instructions.
On vehicles with COMAND and a navigation
system, the clock is set automatically.
Rreset the head restraints on the front seats
(Ypage 75)
Rreset the function for folding the exterior
mirrors in/out automatically, by folding the
mirrors out once (
Ypage 81).
Charging the battery
GWARNING
During charging and jump-starting, explosive
gases can escape from the battery. There is a risk of an explosion.
Particularly avoid fire, open flames, creating
sparks and smoking. Ensure there is sufficient
ventilation while charging and jump-starting.
Do not lean over a battery.
GWARNING
Battery acid is caustic. There is a risk of injury.
Avoid contact with skin, eyes or clothing. Do
not inhale any battery gases. Do not lean over
252Battery (vehicle)
Breakdown assistance
Page 298 of 302

G 550
Vehicle length187.6 in
(4764 mm)
Vehicle width including
exterior mirrors80.9 in
(2056 mm)
Vehicle height76.9 in
(1954 mm)
Vehicle height (sports sus-
pension)75.9 in
(1928 mm)
Wheelbase112.2 in
(2850 mm)
Minimum ground clear-
ance7.6 in
(193 mm)
Turning radius44.6 ft
(13.60 m)
Gross vehicle weight rat-
ing (GVWR)7054.8 lb
(3200 kg)
Gross axle weight rating
(GAWR), front3196.7 lb
(1450 kg)
Gross axle weight rating
(GAWR), rear4188.8 lb
(1900 kg)
G 63 AMG
Vehicle length187.8 in
(4769 mm)
Vehicle width including
exterior mirrors80.9 in
(2056 mm)
Vehicle height76.3 in
(1938 mm)
Wheelbase112.2 in
(2850 mm)
Minimum ground clear-
ance7.7 in
(196 mm)
Turning radius44.6 ft
(13.60 m)
Gross vehicle weight rat-
ing (GVWR)7054.8 lb
(3200 kg)
Gross axle weight rating
(GAWR), front3417.1 lb
(1550 kg)
Gross axle weight rating
(GAWR), rear4122.6 lb
(1870 kg)
iGVWR is the maximum permissible gross
weight of the vehicle. Gross vehicle weight
(GVW) is the vehicle weight including fuel,
service products, spare wheel, accessories
installed, load and, if applicable, trailer draw-
bar load. The GVW must never exceed the
GVWR.
iThe GAWR is the maximum permissible axle
weight.
Vehicle data for off-road driving
Fording depth
!
The depth of water must not exceed the
value specified in the table. Note that the
possible fording depth is less in flowing water.
The table shows fording depth :when loaded
and ready to drive.
Fording depth24 in (60 cm)
For more information about off-road fording, see
(Ypage 135).
Approach/departure angle
GWARNING
If you drive on a steep incline at an angle or
turn when driving on an incline, the vehicle
could slip sideways, tip and rollover. There is a risk of an accident.
Always drive on a steep incline in the line of
fall (straight up or down) and do not turn the
vehicle.
296Vehicle data for off-road driving
Technical data