2016 MERCEDES-BENZ G-Class turn signal
[x] Cancel search: turn signalPage 192 of 302

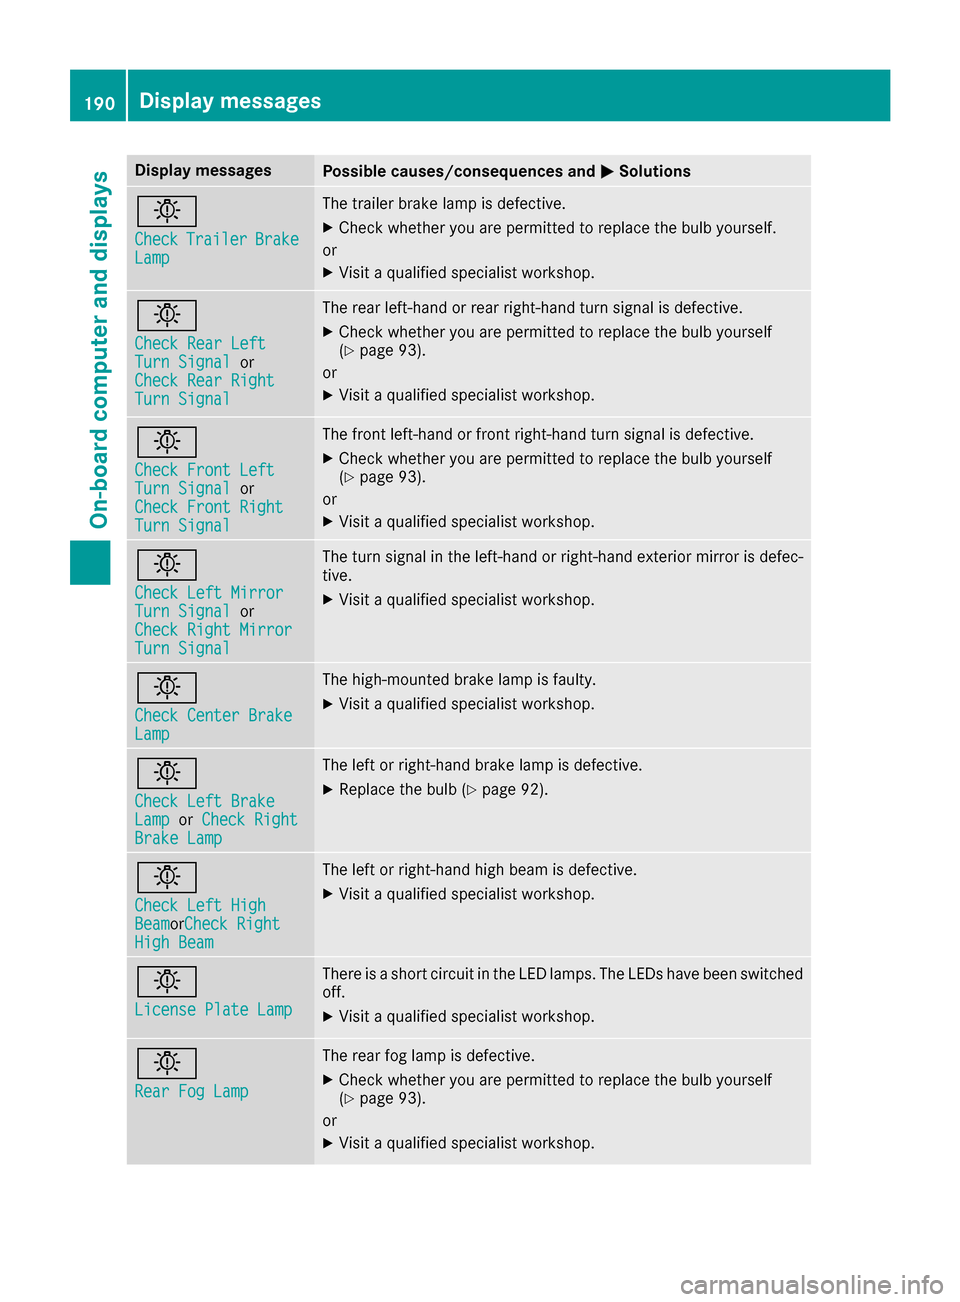
Display messagesPossible causes/consequences andMSolutions
b
CheckTrailerBrakeLamp
The trailer brak elamp is defective.
XChec kwhether you are permitte dto replace th ebulb yourself .
or
XVisit aqualified specialist workshop .
b
Check RearLef tTurnSignalor
Check Rea rRight
Tur nSignal
The rear left-han dor rear right-hand tur nsignal is defective.
XChec kwhether you are permitte dto replace th ebulb yourself
(Ypage 93) .
or
XVisit aqualified specialist workshop .
b
Check Front LeftTurnSignalor
Check Front Right
Tur nSignal
The fron tleft-han dor fron tright-hand tur nsignal is defective.
XChec kwhether you are permitte dto replace th ebulb yourself
(Ypage 93) .
or
XVisit aqualified specialist workshop .
b
Check LeftMirrorTur nSignalor
Check Right Mirror
Tur nSignal
The tur nsignal in th eleft-han dor right-hand exterio rmirror is defec -
tive.
XVisit aqualified specialist workshop .
b
Check Center BrakeLamp
The high-mounte dbrak elamp is faulty.
XVisit aqualified specialist workshop .
b
Check LeftBrakeLam porCheck RightBrake Lam p
The leftor right-hand brak elamp is defective.
XReplac eth ebulb (Ypage 92) .
b
Check Lef tHig hBeamorCheck RightHig hBea m
The lef tor right-hand high beam is defective.
XVisit aqualified specialist workshop .
b
LicensePlate Lam p
There isashort circuit in th eLE Dlamps. The LEDs hav ebeen switched
off .
XVisit aqualified specialist workshop .
b
RearFog Lam p
The rear fog lamp is defective.
XCheckwhether you are permitte dto replace th ebulb yourself
(Ypage 93) .
or
XVisit aqualified specialist workshop .
190Display messages
On-board computer and displays
Page 204 of 302

Display messagesPossible causes/consequences andMSolutions
D
Power Steering Mal‐function. See Oper‐ator's Manual
The powersteering is malfunctioning .
A warning tone also sounds.
GWARNIN G
You will need to use mor eforce to steer .
There is aris kof an accident.
XChec kwhether you are able to apply th eextr aforce required.
XIf you ar eabl eto steer safely: carefully drive on to aqualified
specialist workshop .
XIf you areunable to steer safely: do notdrive on .Contac tth e
neares tqualified specialist workshop .
TelephoneNoServiceYour vehicl eis outside th enetwork provider' stransmitter/receiver
range.
XWait until th emobile phone operational readiness symbol appear s
in th emultifunction display.
¥
Check Washer Fluid
The washer flui dlevel in th ewasher flui dreservoir has dropped belo w
th eminimum .
XAddwasher flui d (Ypage 239).
SmartKey
Display messagesPossible causes/consequences and MSolutions
Â
KeyDoesNotBelongto Vehicl e
You haveput th ewrong SmartKey in th eignition lock.
XUse th ecorrec tSmartKey.
Â
Tak eYou rKey fro mIgnition
The SmartKey is in th eignition lock.
XRemove th eSmartKey.
Â
Obtain aNew Key
The SmartKey needs to be replaced.
XVisit aqualified specialist workshop .
Warning and indicat orlamps in the
instrume nt cluster
Overview ofwarning and indicat or
lamps
L Low-beam headlamp s (Ypage 84)
#
! Turn signal
(
Ypage 88) K
High-beam headlamp s (
Ypage 88)
R Rear fog lamp (
Ypage 86)
ü Seat belts (
Ypage 204)
$
(USA) Brake
s (
Ypage 205)
J
(Can -
ada) Brake
s(yellow) (
Ypage 205)
202Warning and indicator lamps in the instrument cluster
On-board computer and displays
Page 235 of 302

ther your vehicle nor any persons/objects are
present within the sweep of the door or gate.
Observe the safety notes when performing the
rolling code synchronization (
Ypage 231).
XTurn the SmartKey to position2in the ignition
lock (Ypage 112).
XPress the programming button of the door or
gate drive (see the door or gate drive operat-
ing instructions, e.g. under "Programming
additional remote controls").
iYou now have 30 second sto initiate the next
step.
XPress previously programmed button ;,=
or ? on the integrated garage door opener
until the door closes.
The rolling code synchronization is then com-
plete.
Notes on programming the remote con-
trol
Canadian radio frequency laws require a "break"
(or interruption) of the transmission signals
after broadcasting for a few seconds. Therefore,
these signals may not last long enough for the
integrated remote control to recognize the sig-
nal during programming. Comparable with
Canadian law, American garage door openers
also have a built-in "interruption".
If you live in Canada or have difficulties pro-
gramming the garage door opener (regardless of
where you live) when using the programming
steps, proceed as follows:
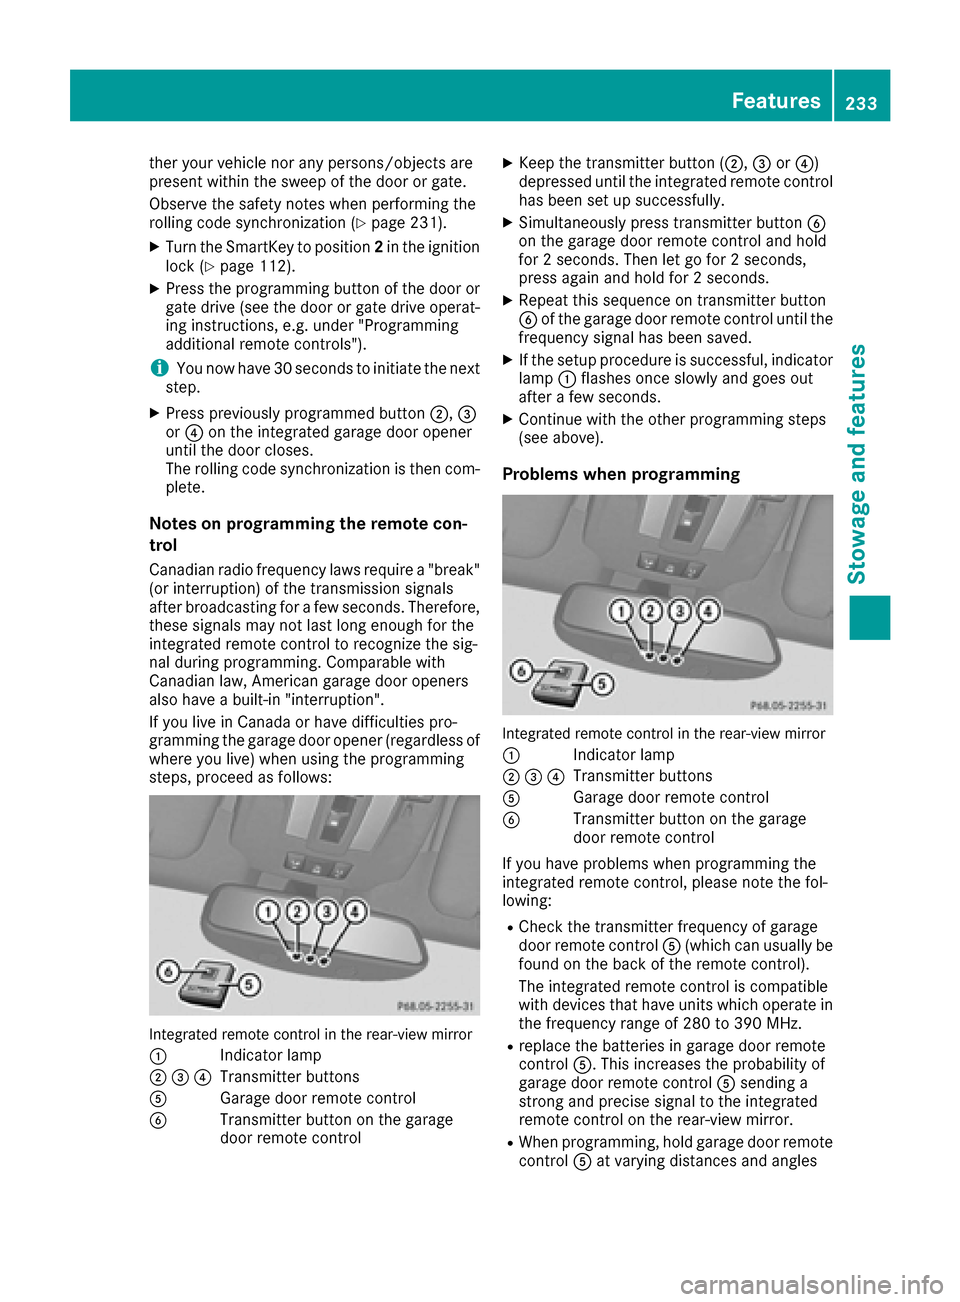
Integrated remote control in the rear-view mirror
:
Indicator lamp
;=?Transmitter buttons
AGarage door remote control
BTransmitter button on the garage
door remote control
XKeep the transmitter button ( ;,=or?)
depressed until the integrated remote control
has been set up successfully.
XSimultaneously press transmitter button B
on the garage door remote control and hold
for 2 seconds. Then let go for 2 seconds,
press again and hold for 2 seconds.
XRepeat this sequence on transmitter button
B of the garage door remote control until the
frequency signal has been saved.
XIf the setup procedure is successful, indicator
lamp :flashes once slowly and goes out
after a few seconds.
XContinue with the other programming steps
(see above).
Problems when programming
Integrated remote control in the rear-view mirror
:
Indicator lamp
;=?Transmitter buttons
AGarage door remote control
BTransmitter button on the garage
door remote control
If you have problems when programming the
integrated remote control, please note the fol-
lowing:
RCheck the transmitter frequency of garage
door remote control A(which can usually be
found on the back of the remote control).
The integrated remote control is compatible
with devices that have units which operate in the frequency range of 280 to 390 MHz.
Rreplace the batteries in garage door remote
control A. This increases the probability of
garage door remote control Asending a
strong and precise signal to the integrated
remote control on the rear-view mirror.
RWhen programming, hold garage door remote
control Aat varying distances and angles
Features233
Stowage and features
Z
Page 236 of 302

from the transmitter button which you are
programming. Try various angles at a distance
between2and 12 inches (5 to 30 cm) or at the
same angle but at varying distances.
RIf there is another garage door remote control
for the same device, perform the program-
ming steps again using that garage door
opener. Before performing these steps, make
sure that new batteries have been installed in
the garage door remote control.
RAlign the antenna cable of the garage door
opener unit. This can improve signal trans-
mission.
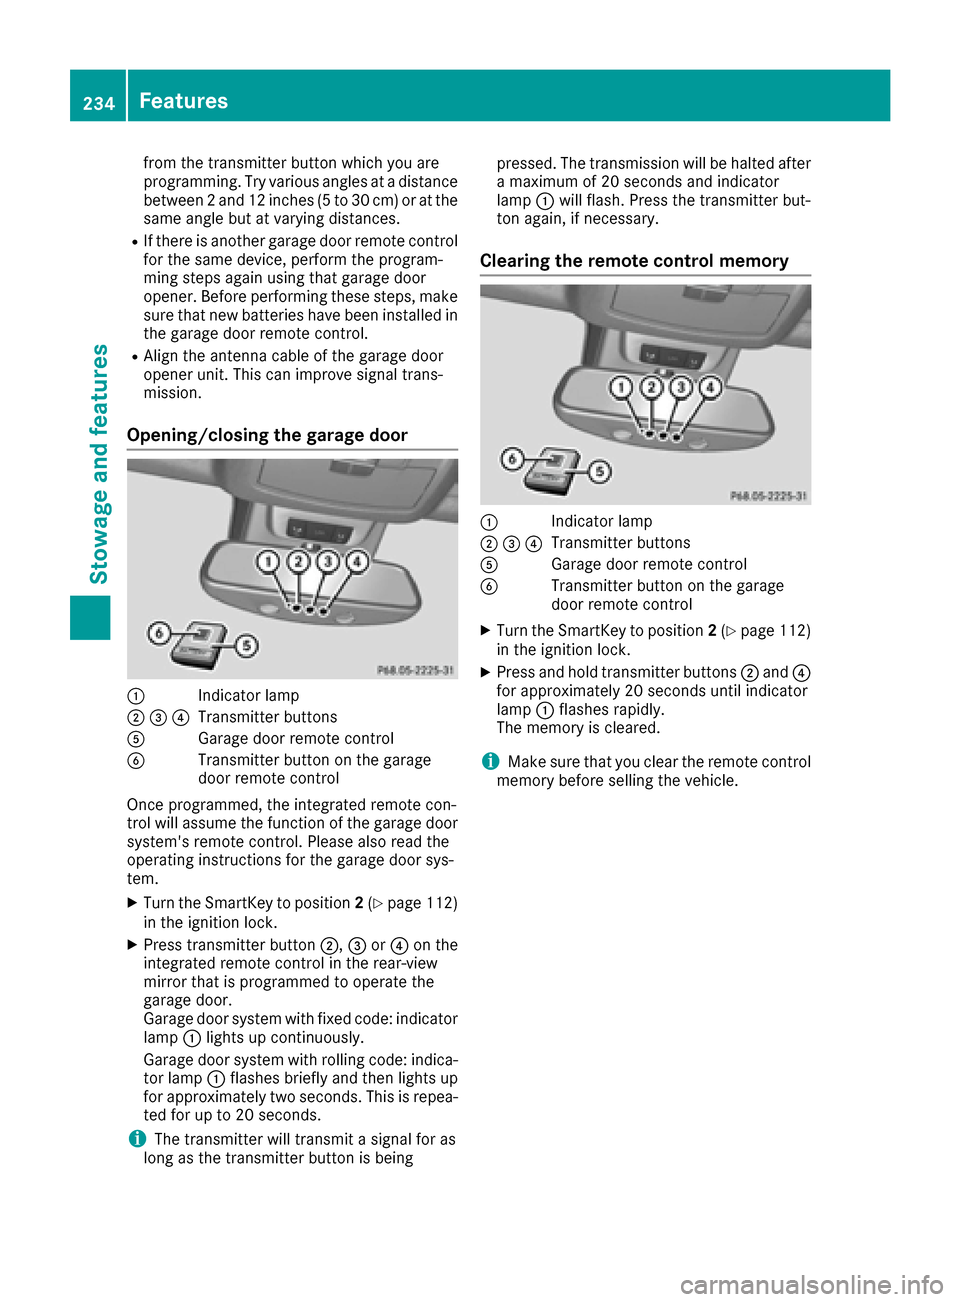
Opening/closing the garage door
:Indicator lamp
;=?Transmitter buttons
AGarage door remote control
BTransmitter button on the garage
door remote control
Once programmed, the integrated remote con-
trol will assume the function of the garage door
system's remote control. Please also read the
operating instructions for the garage door sys-
tem.
XTurn the SmartKey to position 2(Ypage 112)
in the ignition lock.
XPress transmitter button ;,=or? on the
integrated remote control in the rear-view
mirror that is programmed to operate the
garage door.
Garage door system with fixed code: indicator
lamp :lights up continuously.
Garage door system with rolling code: indica-
tor lamp :flashes briefly and then lights up
for approximately two seconds. This is repea-
ted for up to 20 seconds.
iThe transmitter will transmit a signal for as
long as the transmitter button is being pressed. The transmission will be halted after
a maximum of 20 seconds and indicator
lamp
:will flash. Press the transmitter but-
ton again, if necessary.
Clearing the remote control memory
:Indicator lamp
;=?Transmitter buttons
AGarage door remote control
BTransmitter button on the garage
door remote control
XTurn the SmartKey to position 2(Ypage 112)
in the ignition lock.
XPress and hold transmitter buttons ;and ?
for approximately 20 seconds until indicator
lamp :flashes rapidly.
The memory is cleared.
iMake sure that you clear the remote control
memory before selling the vehicle.
234Features
Stowage and features
Page 259 of 302

It is better to have the vehicle transported than
to have it towed away.
If the transfer case can be shifted into neutralN,
you can tow the vehicle.
If the transfer case cannot be shifted into neu-
tral N, you can tow the vehicle with one axle
raised. Please bear the following in mind:
Rremove the propeller shaft between the trans-
fer case and the rolling axle.
Rturn the SmartKey to position 1in the ignition
lock (Ypage 112).
The battery must be connected and charged.
Otherwise, you:
Rcannot turn the SmartKey to position 2in the
ignition lock (Ypage 112).
Rcannot shift the automatic transmission to
position N.
iDisarm the automatic locking feature before
the vehicle is towed (Ypage 66). You could
otherwise be locked out when pushing or tow-
ing the vehicle.
Towing eyes
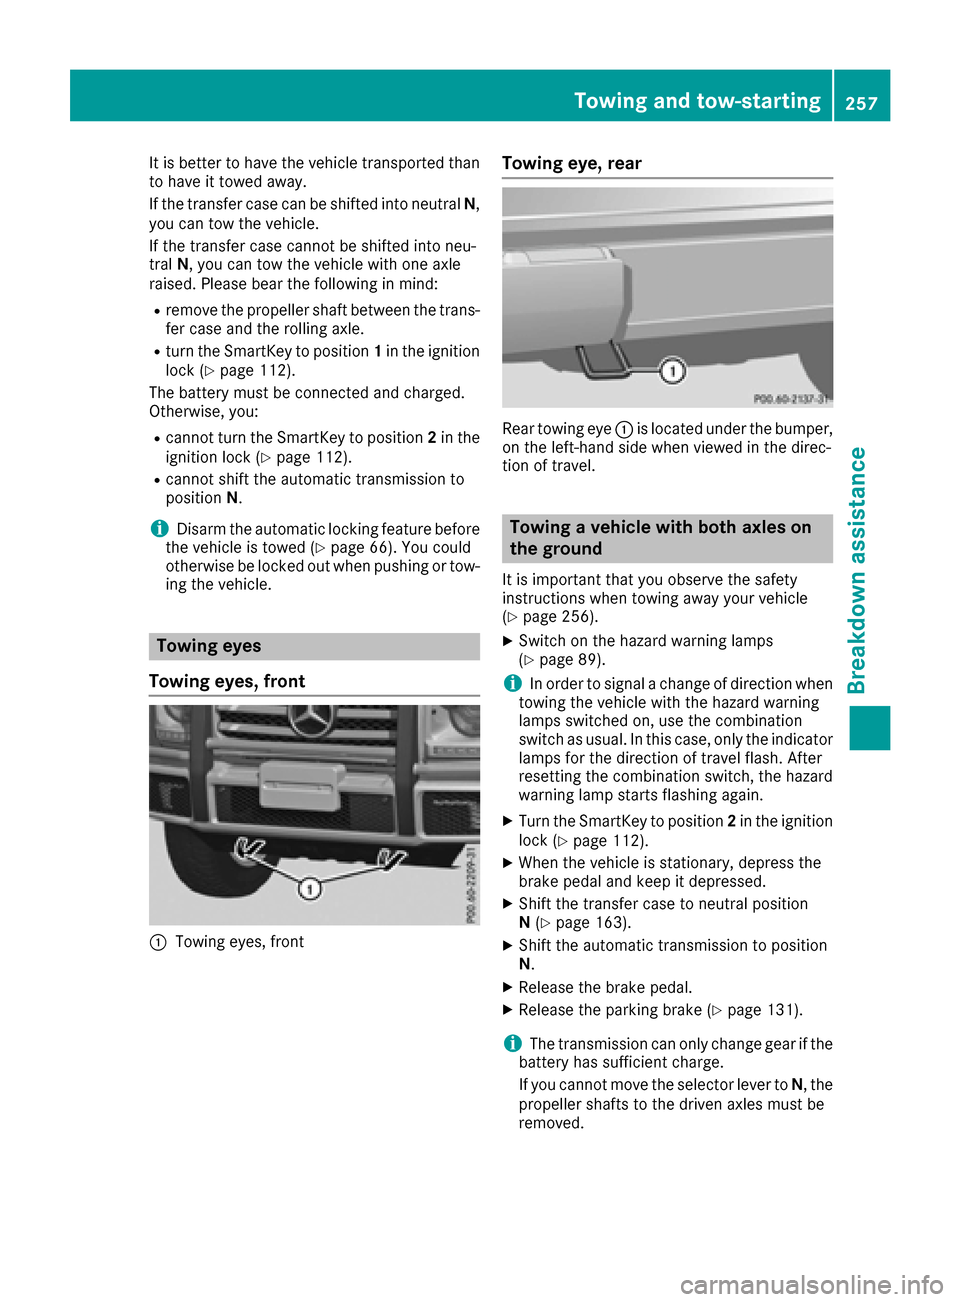
Towing eyes, front
:Towing eyes, front
Towing eye, rear
Rear towing eye :is located under the bumper,
on the left-hand side when viewed in the direc-
tion of travel.
Towing a vehicle with both axles on
the ground
It is important that you observe the safety
instructions when towing away your vehicle
(
Ypage 256).
XSwitch on the hazard warning lamps
(Ypage 89).
iIn order to signal a change of direction when
towing the vehicle with the hazard warning
lamps switched on, use the combination
switch as usual. In this case, only the indicator
lamps for the direction of travel flash. After
resetting the combination switch, the hazard
warning lamp starts flashing again.
XTurn the SmartKey to position 2in the ignition
lock (Ypage 112).
XWhen the vehicle is stationary, depress the
brake pedal and keep it depressed.
XShift the transfer case to neutral position
N (Ypage 163).
XShift the automatic transmission to position
N.
XRelease the brake pedal.
XRelease the parking brake (Ypage 131).
iThe transmission can only change gear if the
battery has sufficient charge.
If you cannot move the selector lever to N, the
propeller shafts to the driven axles must be
removed.
Towing and tow-starting257
Breakdown assistance
Z