2016 MERCEDES-BENZ G-Class brake
[x] Cancel search: brakePage 60 of 302

XTo deactivate:press button:until the
å warning lamp lights up in the instrument
cluster.
XTo activate: press button :until the å
warning lamp goes out in the instrument clus-
ter.
ESP
®is activated automatically when the engine
is started.
iVehicles with the ECO start/stop func-
tion: the ECO start/stop function automati-
cally switches the engine off when the vehicle comes to a stop. The engine starts automati-
cally when the driver wants to pull away again.
ESP
®remains in its previously selected sta-
tus. For example, if ESP®was deactivated
before the engine was switched off, ESP®
remains deactivated when the engine is
switched on again.
It may be best to deactivate ESP
®in the follow-
ing situations:
Rwhen using snow chains
Rin deep snow
Ron sand or gravel
If you deactivate ESP®:
RESP®no longer improves driving stability.
Rthe engine's torque is no longer limited and
the drive wheels can spin. The spinning of the wheels results in a cutting action, which pro-
vides better grip.
Rtraction control is still activated.
RESP®still provides support when you brake.
Rand are driving at above 37 mph (60 km/h)
(on AMG vehicles above 62 mph (100 km/h)),
ESP
®still intervenes when one wheel reaches
its grip limit even though it is deactivated.
iIf ESP®is deactivated and one or more
wheels start to spin, the ÷warning lamp in the instrument cluster flashes. In such situa-
tions, ESP
®will not stabilize the vehicle.
iIf ESP®is deactivated, it is reactivated auto-
matically if you are driving at above 37 mph
(60 km/h) (on AMG vehicles above 62 mph
(100 km/h)) or you exceed a certain lateral
acceleration.
Trailer stabilization
GWARNING
If road and weather conditions are poor,
trailer stabilization will not be able to prevent
the vehicle/trailer combination from swerv-
ing. Trailers with a high center of gravity can
tip over before ESP
®can detect this. There is
a risk of an accident.
Always adapt your driving style to the prevail-
ing road and weather conditions.
Trailer stabilization does not work if ESP
®is
deactivated because of a malfunction.
If your vehicle with trailer (vehicle/trailer com-
bination) begins to lurch, you can only stabilize
the vehicle/trailer combination by depressing
the brake firmly.
In this situation, ESP
®assists you and can
detect if the vehicle/trailer combination begins
to lurch. ESP
®slows the vehicle down by brak-
ing and limiting the engine output until the vehi-
cle/trailer combination has stabilized.
Trailer stabilization is active above speeds of
about 37 mph (60 km/h).
EBD (electronic brake force distribu-
tion)
i
Observe the "Important safety notes" sec-
tion (Ypage 55).
GWARNING
If EBD is malfunctioning, the rear wheels can
lock, e.g. under full braking. This increases the
risk of skidding and an accident.
You should therefore adapt your driving style
to the different handling characteristics. Have
the brake system checked at a qualified spe-
cialist workshop.
58Driving safety systems
Safety
Page 61 of 302

Observe information regarding indicator and
warning lamps (Ypage 206) as well as display
messages (Ypage 186).
EBD monitors and controls the brake pressure
on the rear wheels to improve driving stability
while braking.
ADAPTIVE BRAKE
ADAPTIVE BRAKE provides increased braking
safety. In addition to the braking function,
ADAPTIVE BRAKE also has the HOLD function
(
Ypage 157) and hill start assist (Ypage 114).
Theft deterrent locking system
Immobilizer
XTo activate: remove the SmartKey from the
ignition lock.
XTo deactivate: switch on the ignition.
The immobilizer prevents your vehicle from
being started without the correct SmartKey.
When leaving the vehicle, always take the
SmartKey with you and lock the vehicle. The
engine can be started by anyone with a valid
SmartKey that is left inside the vehicle.
iThe immobilizer is always deactivated when
you start the engine.
In the event that the engine cannot be started
when the starter battery is fully charged, the
immobilizer may be faulty. Contact an author-
ized Mercedes-Benz Center or call
1-800-FOR-MERCedes (in the USA) or
1-800-387-0100 (in Canada).
ATA (anti-theft alarm system)
XTo arm: lock the vehicle with the SmartKey.
Indicator lamp :flashes. The alarm system
is armed after approximately 15 seconds.
XTo disarm: unlock the vehicle with the Smart-
Key.
iIf you then do not open a side door or the
rear door, the alarm system switches back on
again after approximately 40 seconds.
XTo stop the alarm: insert the SmartKey into
the ignition lock.
The alarm is switched off.
or
XPress the %or& button on the Smart-
Key.
The alarm is switched off.
A visual and audible alarm is triggered if the
alarm system is armed and you open:
Ra door
Ra door using the mechanical key
Rthe rear door
Rthe hood
The alarm is also triggered if:
Rthe position of the vehicle is changed.
Ra window is smashed.
The alarm is not switched off, even if you close
the open door that triggered it, for example.
iIf the alarm stays on for more than
30 seconds, the mbrace emergency call sys-
tem (USA only) or Tele Aid system (Canada
only) initiates a call to the Customer Assis-
tance Center automatically. The mbrace
emergency call system initiates the call if:
Ryou have subscribed to the Tele Aid service.
Rthe Tele Aid service has been activated
properly.
Rthe required mobile phone, power supply
and GPS are available.
Theft deterrent locking system59
Safety
Z
Page 62 of 302

Useful information
i
This Operator's Manual describes all models
and all standard and optional equipment of
your vehicle available at the time of publica-
tion of the Operator's Manual. Country-spe-
cific differences are possible. Please note
that your vehicle may not be equipped with all
features described. This also applies to
safety-related systems and functions.
iRead the information on qualified specialist
workshops: (Ypage 23).
SmartKey
Important safety notes
GWARNING
If children are left unsupervised in the vehicle,
they could:
Ropen the doors, thus endangering other
people or road users.
Rget out and disrupt traffic.
Roperate the vehicle's equipment.
Additionally, children could set the vehicle in
motion if, for example, they:
Rrelease the parking brake.
Rshift the automatic transmission out of park
position P or shift manual transmission into
neutral.
Rstart the engine.
There is a risk of an accident and injury.
When leaving the vehicle, always take the
SmartKey with you and lock the vehicle. Never
leave children or animals unattended in the
vehicle. Always keep the SmartKey out of
reach of children.
GWARNING
If persons, particularly children are subjected to prolonged exposure to extreme heat or
cold, there is a risk of injury, possibly even
fatal. Never leave children unattended in the
vehicle.
GWARNING
If you attach heavy or large objects to the
SmartKey, the SmartKey could be uninten-
tionally turned in the ignition lock. This could
cause the engine to be switched off. There is a risk of an accident.
Do not attach any heavy or large objects to the
SmartKey. Remove any bulky key rings before
inserting the SmartKey into the ignition lock.
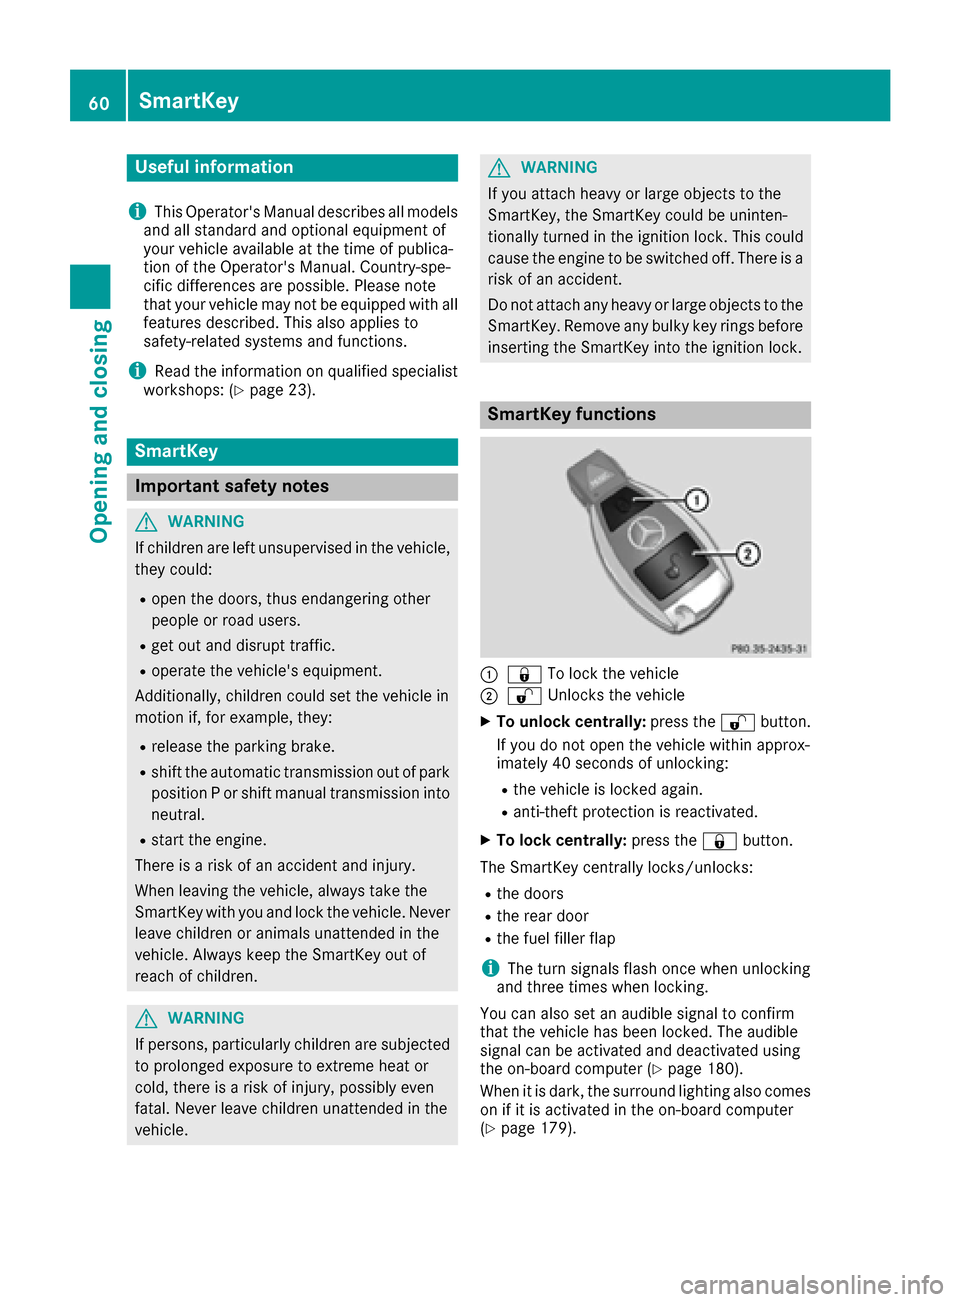
SmartKey functions
:& To lock the vehicle
;%Unlocks the vehicle
XTo unlock centrally: press the%button.
If you do not open the vehicle within approx-
imately 40 seconds of unlocking:
Rthe vehicle is locked again.
Ranti-theft protection is reactivated.
XTo lock centrally: press the&button.
The SmartKey centrally locks/unlocks:
Rthe doors
Rthe rear door
Rthe fuel filler flap
iThe turn signals flash once when unlocking
and three times when locking.
You can also set an audible signal to confirm
that the vehicle has been locked. The audible
signal can be activated and deactivated using
the on-board computer (
Ypage 180).
When it is dark, the surround lighting also comes
on if it is activated in the on-board computer
(
Ypage 179).
60SmartKey
Opening and closing
Page 66 of 302

Doors
Important safet ynotes
GWARNING
Whe nleavin gth evehicle, always remov eth e
SmartKey from th eignition lock. Always take
th eSmartKey wit hyou and loc kth evehicle.
Do no tleav echildren unsupervised in th e
vehicle, eve nif they are secure din achild
restrain tsystem, and do no tgiv ethem access
to an unlocke dvehicle. Achild' sunsupervised
access to avehicle could result in an acciden t
and/o rserious personal injury. The ycould:
Rinjure themselves on vehicle parts
Rbe seriously or fatally injured by extreme
heat or cold
Rinjure themselves or hav ean acciden twit h
vehicle equipmen tthat may still be in oper-
ation eve nafter th eSmartKey has bee n
removed from th eignition ,suc has th eseat
adjustment, steerin gwhee ladjustmen tor
memor yfunction .
If children ope n adoor, they could cause
severe or eve nfatal injury to other persons; if
they get out of th evehicle, they could injure
themselves when doin gso or be seriously or
eve nfatally injured by any passin gtraffic .
Do no texpos eth echild restrain tsyste mto
direc tsunlight. The child restrain tsystem' s
metal parts ,fo rexample, could becom ever y
hot ,and
achi
ld could be burne don these
parts .
GWARNING
Do no tcarry heav yor har dobjects in th e
passenger compartmen tor cargo compart -
men tunless they are firmly secure din place.
Unsecure dor improperly positioned cargo
increase s achild' sris kof injury in th eevent of
Rstrong braking maneuvers
Rsudden changes of direction
Ran acciden t
GWARNING
If children are lef tunsupervised in th evehicle,
they could:
Rope nth edoors ,thus endangerin gother
people or road users.
Rget out and disrup ttraffic .
Roperat eth evehicle' sequipment.
Additionally, children could set th evehicle in
motion if, fo rexample, they:
Rrelease th eparking brake .
Rshift theautomatic transmissio nout of par k
position Por shift manual transmissio ninto
neutral.
Rstart th eengine.
There is aris kof an acciden tand injury.
Whe nleavin gth evehicle, always take th e
SmartKey wit hyou and loc kth evehicle. Never
leav echildren or animals unattended in th e
vehicle. Always keep th eSmartKey out of
reach of children .
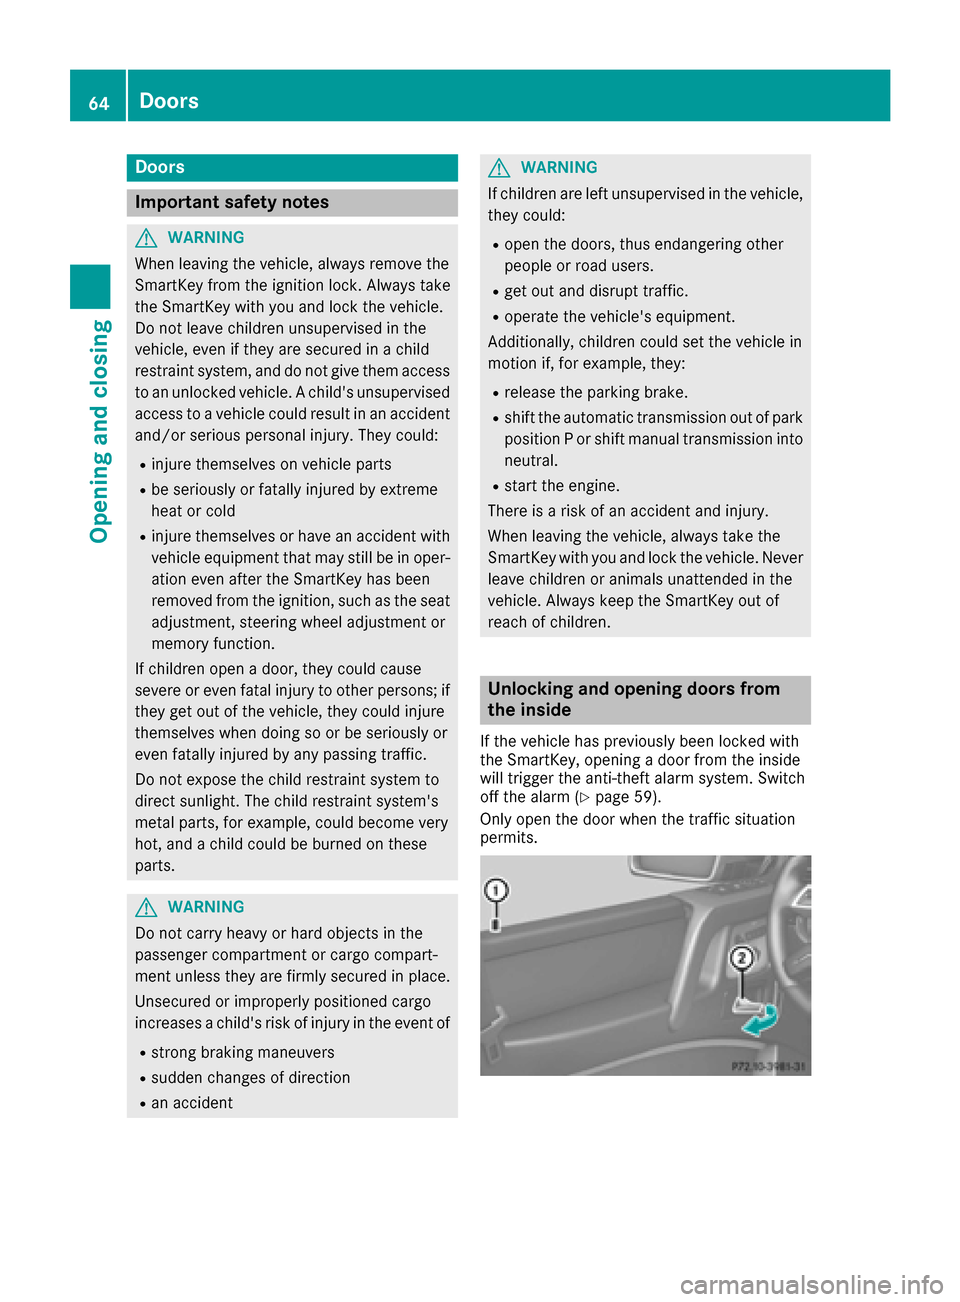
Unlockingan dopening doors from
th einside
If th evehicle has previously bee nlocke dwit h
th eSmartKey, opening adoo rfrom th einsid e
will trigger th eanti-thef talar msystem. Switc h
of fth ealar m (
Ypage 59).
Only ope nth edoo rwhen th etraffic situation
permits.
64Doors
Opening and closing
Page 67 of 302

XFront doors:pull door handle ;.
If the door is locked, locking knob :pops up.
The door is unlocked and can be opened.
XRear compartment doors: pull handle:
up.
The door is unlocked.
XPull door handle ;.
Centrally locking and unlocking the
vehicle from the inside
GWARNING
If children are left unsupervised in the vehicle,
they could:
Ropen the doors, thus endangering other
people or road users.
Rget out and disrupt traffic.
Roperate the vehicle's equipment.
Additionally, children could set the vehicle in
motion if, for example, they:
Rrelease the parking brake.
Rshift the automatic transmission out of park
position P or shift manual transmission into
neutral.
Rstart the engine.
There is a risk of an accident and injury.
When leaving the vehicle, always take the
SmartKey with you and lock the vehicle. Never
leave children or animals unattended in the
vehicle. Always keep the SmartKey out of
reach of children.
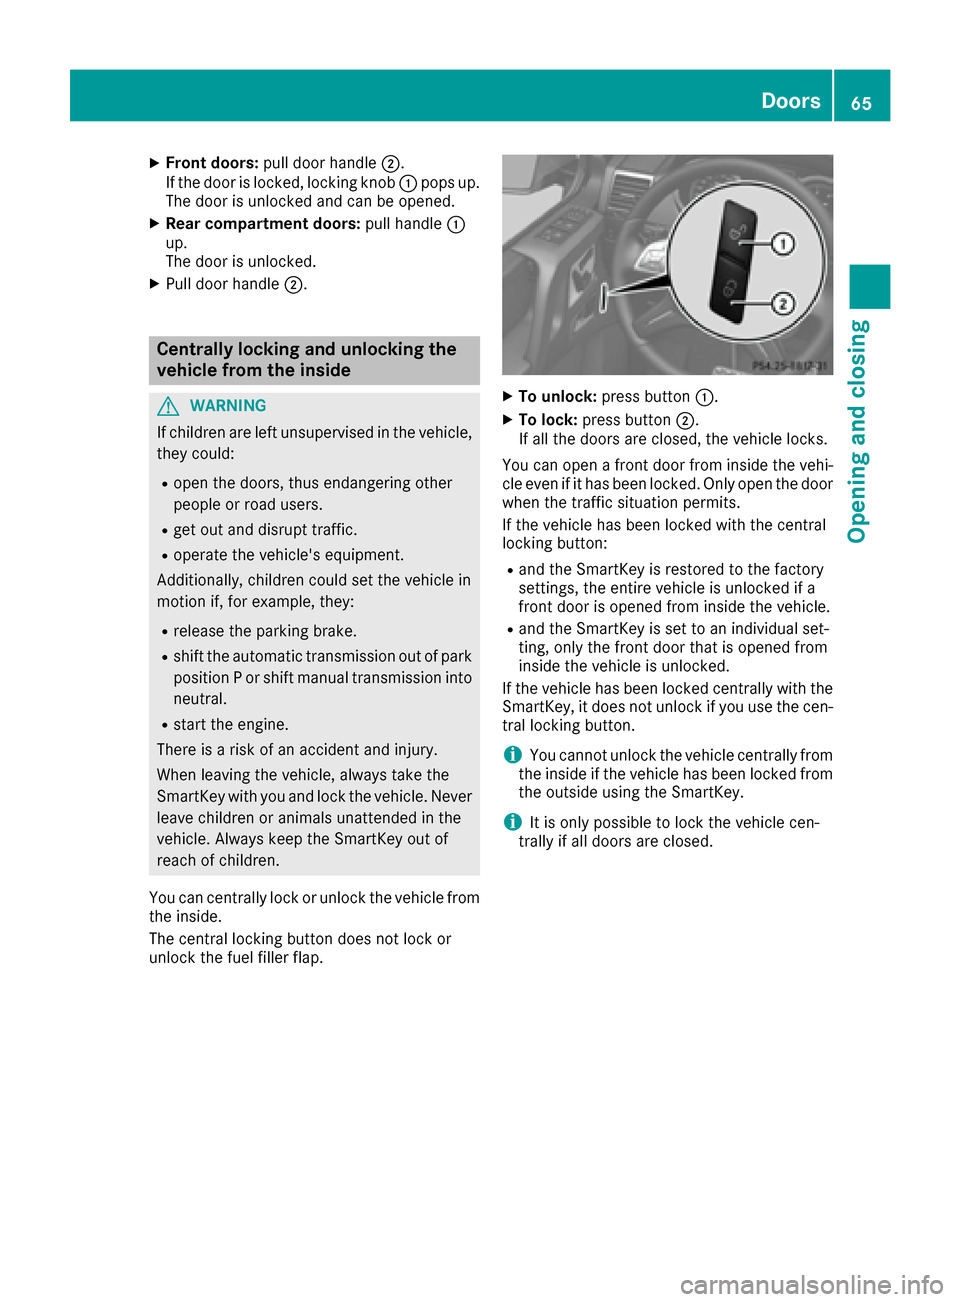
You can centrally lock or unlock the vehicle from
the inside.
The central locking button does not lock or
unlock the fuel filler flap.
XTo unlock: press button :.
XTo lock:press button ;.
If all the doors are closed, the vehicle locks.
You can open a front door from inside the vehi-
cle even if it has been locked. Only open the door
when the traffic situation permits.
If the vehicle has been locked with the central
locking button:
Rand the SmartKey is restored to the factory
settings, the entire vehicle is unlocked if a
front door is opened from inside the vehicle.
Rand the SmartKey is set to an individual set-
ting, only the front door that is opened from
inside the vehicle is unlocked.
If the vehicle has been locked centrally with the
SmartKey, it does not unlock if you use the cen-
tral locking button.
iYou cannot unlock the vehicle centrally from
the inside if the vehicle has been locked from
the outside using the SmartKey.
iIt is only possible to lock the vehicle cen-
trally if all doors are closed.
Doors65
Opening and closing
Z
Page 91 of 302

Hazard warning lamps
XTo switch on the hazard warning lamps:
press button:.
All turn signals flash. If you now switch on a
turn signal using the combination switch, only
the turn signal lamp on the corresponding
side of the vehicle will flash.
XTo switch off the hazard warning lamps:
press button :.
The hazard warning lamps automatically switch
on if:
Ran air bag is deployed or
Rthe Emergency Tensioning Devices are trig-
gered, or
Rthe vehicle decelerates rapidly from a speed
of above 45 mph (70 km/h) and comes to a
standstill
The hazard warning lamps switch on automati-
cally if an air bag or the Emergency Tensioning
Devices are triggered and the SmartKey is in
position 1in the ignition lock.
The hazard warning lamps switch off automati-
cally if the vehicle reaches a speed of above
6 mph (10 km/h) again after a full brake appli-
cation.
iThe hazard warning lamps still operate if the
ignition is switched off.
Headlamps and indicator lamps fog-
ged up on the inside
The headlamps and the indicator lamps in the
exterior mirrors may fog up on the inside if there
is high atmospheric humidity.
XDrive with the headlamps switched on.
The level of moisture diminishes, depending
on the length of the journey and the weather
conditions (humidity and temperature).
If the level of moisture does not diminish:
XHave the headlamps checked at a qualified
specialist workshop.
Interior lighting
Overview of interior lighting
Front overhead control panel
:
p Switches the left-hand front reading
lamp on/off
;c Switches the front interior lighting on
=tSwitches the cargo compartment
lamp/rear compartment lighting on/off
?| Switches the front interior lighting/
automatic interior lighting control off
Ap Switches the right-hand reading lamp
on/off
BSwitches the automatic interior lighting con-
trol on
Interior lighting89
Lights and windshield wipers
Z
Page 95 of 302

tube when cold with alcohol or spirit and rub it
off with a lint-free cloth.
Protect bulbs from moisture during operation.
Do not allow bulbs to come into contact with
liquids.
Xenon bulbs
Bulbs and lamps are an important aspect of
vehicle safety. You must therefore make sure
that these function correctly at all times. Have
the headlamp setting checked regularly.
LED modules
You can replace neither Xenon bulbs nor LED
bulbs. Have LED modules replaced at a qualified
specialist workshop.
Bulbs and lamps are an important aspect of
vehicle safety. You must therefore make sure
that these function correctly at all times. Have
the headlamp setting checked regularly.
Before changing bulbs
Have the following bulbs replaced at a qualified
specialist workshop:
RAdditional turn signals in the exterior mirrors
RHigh-mounted brake lamp
RHigh-beam/low-beam headlamps (Xenon
bulbs)
RDaytime running lamps
RParking lamps/standing lamps
RLicense plate lamp
iIndividual segments of the license plate
lamp LEDs may fail without a display message
appearing in the multifunction di splay
. Regu-
larly check the license plate lamp. If neces-
sary, visit a qualified specialist workshop.
You can replace the following bulbs:
RTurn signal lamp (front)
RBrake/tail lamp
RTurn signal lamp (rear)
RTail lamps/standing lamps
RBackup Light
RRear fog lamp
RSide marker lamps
Other bulbs
There are bulbs other than the Xenon bulbs that you cannot replace yourself. Only replace the
bulbs listed (
Ypage 93). Have the bulbs that
you cannot replace yourself replaced at a quali-
fied specialist workshop.
If you require assistance replacing bulbs, con-
sult a qualified specialist workshop. Do not touch the glass tube of new bulbs with
your bare hands. Even minor contamination can
burn into the glass surface and reduce the ser-
vice life of the bulbs. Always use a lint-free cloth
or only touch the base of the bulb when instal-
ling.
Only use bulbs of the correct type.
If the new bulb still does not light up, consult a
qualified specialist workshop.
Bulbs and lamps are an important aspect of
vehicle safety. You must therefore make sure
that these
function co
rrectly at all times. Have
the headlamp setting checked regularly.
Overview: changing bulbs/bulb types
Front bulbs
You can replace the following bulbs. The bulb
type can be found in the legend.
:Turn signal lamp: 1156 NA
;Side marker lamp: T 4 W
Rear bulbs
You can replace the following bulbs. The bulb
type can be found in the legend.
Replacing bulbs93
Lights and windshield wiper s
Z
Page 96 of 302

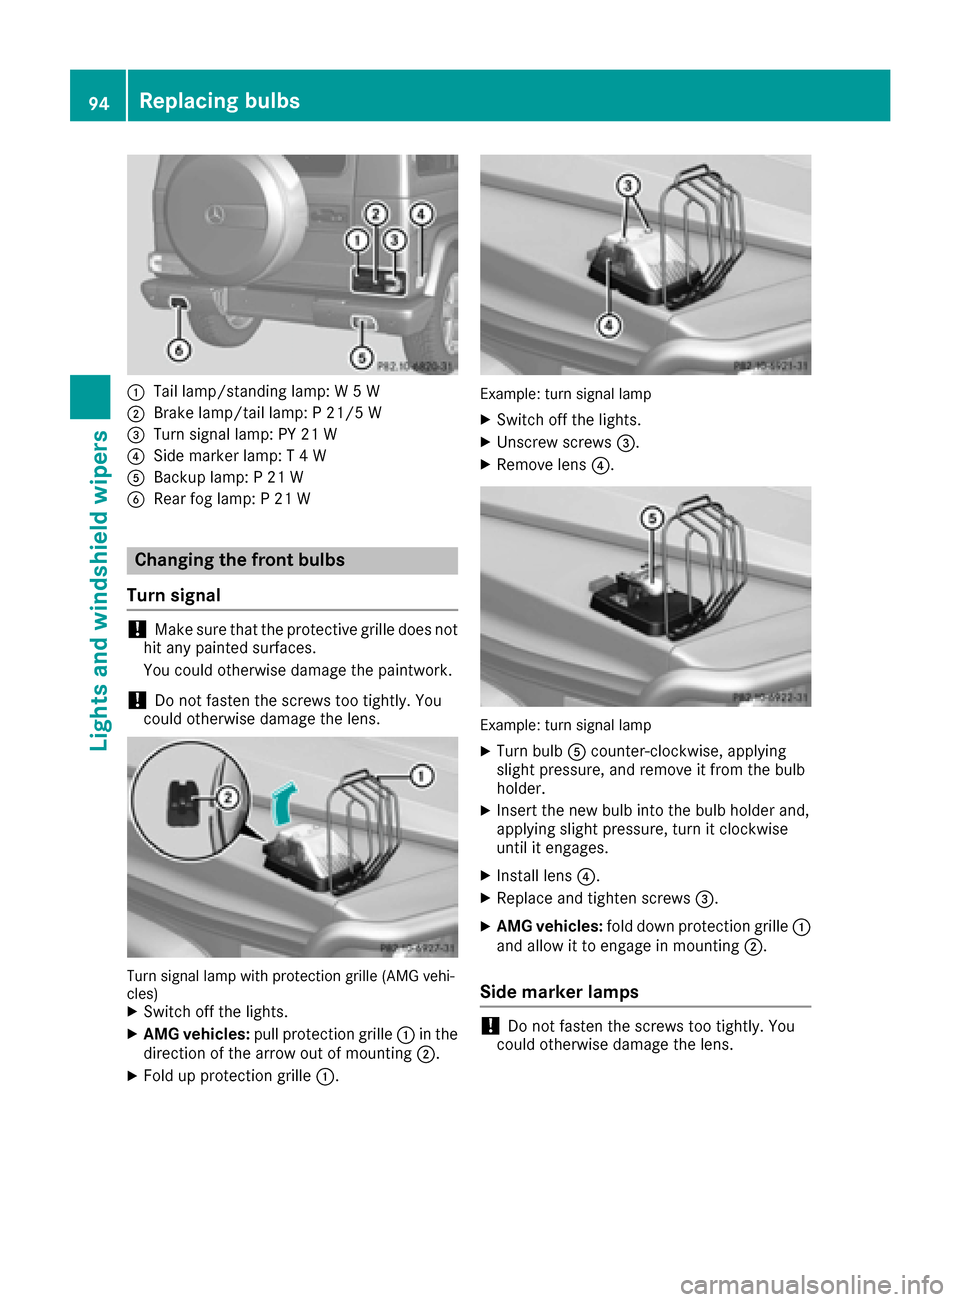
:Tail lamp/standing lamp: W 5 W
;Brake lamp/tail lamp: P 21/5 W
=Turn signal lamp: PY 21 W
?Side marker lamp: T 4 W
ABackup lamp: P 21 W
BRear fog lamp: P 21 W
Changing the front bulbs
Turn signal
!Make sure that the protective grille does not
hit any painted surfaces.
You could otherwise damage the paintwork.
!Do not fasten the screws too tightly. You
could otherwise damage the lens.
Turn signal lamp with protection grille (AMG vehi-
cles)
XSwitch off the lights.
XAMG vehicles: pull protection grille :in the
direction of the arrow out of mounting ;.
XFold up protection grille:.
Example: turn signal lamp
XSwitch off the lights.
XUnscrew screws=.
XRemove lens?.
Example: turn signal lamp
XTurn bulbAcounter-clockwise, applying
slight pressure, and remove it from the bulb
holder.
XInsert the new bulb into the bulb holder and,
applying slight pressure, turn it clockwise
until it engages.
XInstall lens ?.
XReplace and tighten screws =.
XAMG vehicles:fold down protection grille :
and allow it to engage in mounting ;.
Side marker lamps
!Do not fasten the screws too tightly. You
could otherwise damage the lens.
94Replacing bulbs
Lights and windshield wipers