2016 MERCEDES-BENZ E-CLASS ESTATE parking brake
[x] Cancel search: parking brakePage 386 of 565
Note
s on care of vehicle parts &
WARNING Risk of entrapment if the
windscreen wipers are swit ched on while
th e windscreen is being cleaned
If th e windscreen wipers are set in motion
while you are cleaning the windscreen or
wiper blades, you can be trapped bythe
wiper arm. #
Alw ays switch off the windscreen wip‐
ers and the ignition before cleaning the
windscreen or wiper blades. &
WARNING Risk of bu rns from tailpipes
and tailpipe trim
The tailpipe and tailpipe trim can become
ve ry hot. If you come into contact with these
parts of theve hicle, you could burn yourself. #
Alw ays be particular lycareful around
th eta ilpipe and theta ilpipe trim. #
Allow theve hicle parts tocool down
before youto uch them. Obser
vethefo llowing information: Information on cleaning and car
eAvoiding vehicle damage
Wheels/rims Usewate r and acid-free wheel cleaners. R
Do not use acidic wheel cleaners toremo vebrake dust.
This could damage wheel bolts and brake components.
R Toavoid cor rosion of the brake discs and brake linings,
drive theve hicle for a few minutes af ter cleaning before
parking it. The brake discs and brake linings warm up and
dried out.
Wi ndo ws
Cleanthe windo wsonthe inside and outside using a damp
clo thand cleaning products recommended byMercedes-
Benz. Do not use dry clo
ths, abrasive products or cleaning agents
containing sol vents toclean the inside of the windo ws. Maintenance and care
383
Page 402 of 565
If
th e indicator/warning lamps in the instrument
clus ter do not light up at low temp eratures, it is
ve ry likely that the dischar ged battery has fro‐
zen. &
WARNING Risk ofexplosion from a fro‐
zen battery
A dischar ged battery may freeze at temp era‐
tures slightly abo veor below freezing point.
During starting assis tance or battery charg‐
ing, bat tery gas may be released. #
Alw aysth aw a frozen bat tery out first
before charging it or per form ing start‐
ing assis tance. *
NO
TEShor tening the service life of the
battery bycharging the battery at low
te mp eratures Charging
the battery at very low temp era‐
tures may shor tenth e service life of the bat‐
te ry and ha vea negative ef fect on starting. #
Do not charge the battery at very low
te mp eratures. The service life of a battery
that has been
th awe d may be dramatically shor tened.
It is recommended that you ha veathaw ed bat‐
te ry checked at a qualified specialist workshop.
All vehicles
* NO
TEDama gecaused bynumerous or
ex tended attem ptsto start the engine Nume
rous or extended attem ptsto start the
engine may damage the catalytic con verter
due tonon-combu sted fuel. #
Avoid numerous and extended attem pts
to start the engine. Obser
vethefo llowing points during starting
assis tance and when charging the battery:
R Only use undamaged jump leads/charging
cables with a suf ficient cross-section and
insula tedte rm inal clamps.
R Non- insulated parts of thete rm inal clamps
must not come into con tact wi thother me tal
parts while the jump lead/charging cable is
connected tothe battery/jump-s tart connec‐
tion point. R
The jump lead/charging cable must not
come into contact wi thany parts which may
mo vewhen the engine is running.
R Alw ays make sure that nei ther you nor the
battery is elect rostatically charge d.
R Keep away from fire and naked flames.
R Do not lean overth e batter y.
R When charging: only use battery charge rs
te sted and appr ovedby Mercedes-Benz and
re ad the battery charge r's operating instruc‐
tions before charging the batter y.
Obser vethe additional following points during
st arting assis tance:
R Starting assis tance may only be pr ovided
using batteries with a nominal voltage of 12
V.
R The vehicles must not touch.
R Petrol engine: Only acce ptstarting assis‐
ta nce if the engine and exhaust sy stem are
cold. #
Secure theve hicle byapplying the electric
parking brake. Breakdown assis
tance 399
Page 405 of 565
#
Make sure that the battery is connected and
ch arge d.
When the battery is dischar ged:
R the engine cann otbe star ted.
R the electric parking brake cann otbe released
or applied.
R vehicles with automatic transmission: the
automatic transmission cannot be shif tedto
position iorj.
% Vehicles with automatic transmission: if
th e automatic transmission cann otbe shif‐
te dto position i, transport theve hicle
(→ page 403). A towing vehicle with lifting
equipment is requiredforve hicle transport.
* NO
TEDama gedue to to wing away at
exc essively high speeds or over long dis‐
ta nces The driv
etra in could be damaged when tow‐
ing at excessively high speeds or over long
dis tances. #
Atowing speed of 50 km/h must not
be exc eeded. #
Atowing dis tance of 50 km must not be
exc eeded. &
WARNING Risk of accident when towing
a ve hicle which is too heavy
If th eve hicle being tow- star ted or towed
aw ay is heavier than the permissible gross
mass, thefo llowing situations can occur:
R theto wing eye may become de tach ed.
R the car/t railer combination may swer ve
or eve nove rturn. #
If ano ther vehicle is tow- star ted or
to we daw ay, its weight must not exceed
th e permissible gross mass of your own
ve hicle. If a
vehicle must be tow- star ted or towe daw ay,
its weight must not exceed the permissible gross
mass of theto wing vehicle. #
Information on the permissible gross mass of
th eve hicle can be found on theve hicle iden‐
tification plate . #
Vehicles with automatic transmission: do
not open the driver's door or front passenger
door, otherwise the automatic transmission
automatically shifts toposition j. #
Fittheto wing eye (→ page 405). #
Attach theto w bar.
* NO
TEDama gedue toincor rect connec‐
tion #
Only connect theto w rope or tow bar to
th eto wing eyes. %
You can also attach theto w bar tothe trailer
hitch. #
Deactivate the automatic locking mechanism
(→ page 71). #
Do not activate the HOLD function. #
Deactivate tow- aw ay protection (→ page 89). #
Deactivate Active Brake Assi st (→page 198). 402
Breakdown assi stance
Page 406 of 565
#
Vehicles with automatic transmission:
shift the automatic transmission toposition
i. #
Vehicles with manual transmission: shift
to neutral i. #
Release the electric parking brake. #
Vehicles with manual transmission:
switch on the ignition, otherwise thesteering
wheel locking may engage. &
WARNING Risk of accident due tolimi‐
te d saf ety-re lated functions during the
to wing process
Saf ety-re lated functions are limited or no lon‐
ge rav ailable in thefo llowing situations:
R the ignition is switched off.
R the brake sy stem or po werst eering sys‐
te m is malfunctioning.
R the energy supply or the on-board electri‐
cal sy stem is malfunctioning.
When your vehicle is then towe daw ay, signif‐
icantly more ef fort may be requ ired tosteer
and brake than is no rmally requ ired. #
Use a tow bar. #
Make sure that thesteering wheel can
mo vefreely, before towing theve hicle
aw ay. *
NO
TEDama gedue toexcessive tracti ve
po wer If
yo u pull away sharpl y,the tractive po wer
may be too high and theve hicles could be
damaged. #
Pull away slowly and smoo thly. Loading the
vehicle for transport #
Obser vethe no tes on towing away
( → page 401). #
Connect theto w bar totheto wing eyeto
load theve hicle.
% You can also attach theto w bar tothe trailer
hitch. #
Vehicles with automatic transmission:
shift the automatic transmission toposition
i.
% Ve
hicles with automatic transmission:
th e automatic transmission may be loc ked in
position jintheeve nt of dama getothe
electrical sy stem. Toshift toi , pr ovide the
on-board electrical sy stem with po wer
( → page 398). #
Vehicles with manual transmission: shift
to neutral. #
Load theve hicle onto the transpor ter. #
Vehicles with automatic transmission:
shift the automatic transmission toposition
j. #
Vehicles with manual transmission:
engage firs t or reve rsege ar. #
Use the electric parking brake tosecure the
ve hicle and pr event it from rolling away. #
Only secure theve hicle bythe wheels. Breakdown assis
tance 403
Page 408 of 565
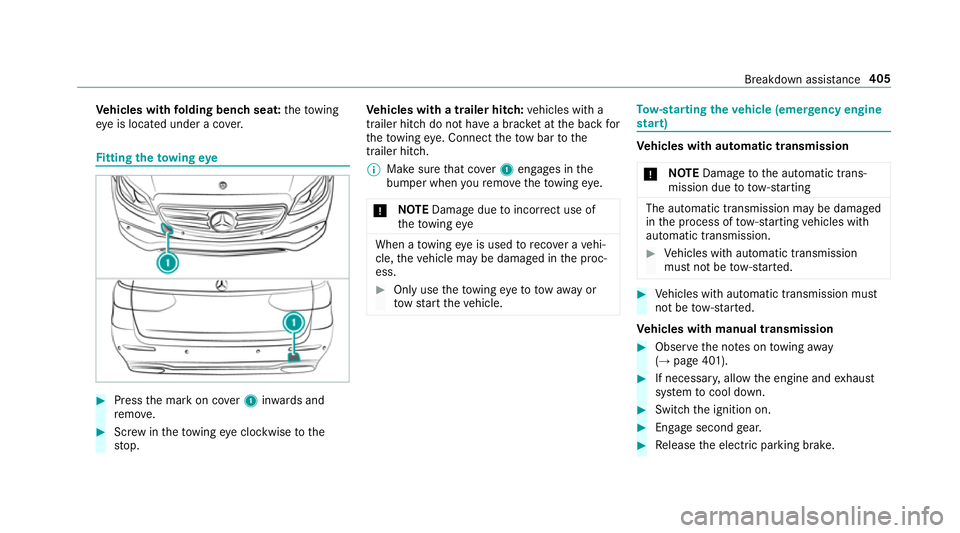
Ve
hicles with folding bench seat: theto wing
ey e is located under a co ver. Fi
tting the towing eye #
Press the mark on co ver1 inwa rds and
re mo ve. #
Screw intheto wing eyeclockwise tothe
st op. Ve
hicles with a trailer hitch: vehicles with a
trailer hitch do not ha vea brac ket at the back for
th eto wing eye. Connect theto w bar tothe
trailer hitch.
% Makesure that co ver1 engages in the
bumper when youre mo vetheto wing eye.
* NO
TEDama gedue toincor rect use of
th eto wing eye When a
towing eye is used toreco ver a vehi‐
cle, theve hicle may be damaged in the proc‐
ess. #
Only use theto wing eyeto to waw ay or
to w start theve hicle. To
w- starting theve hicle (eme rgency engine
st art) Ve
hicles with automatic transmission
* NO
TEDama getothe automatic trans‐
mission due to tow-starting The automatic transmission may be damaged
in the process of tow- starting vehicles with
automatic transmission. #
Vehicles with automatic transmission
must not be tow- star ted. #
Vehicles with automatic transmission must
not be tow- star ted.
Ve hicles with manual transmission #
Obser vethe no tes on towing away
( → page 401). #
If necessar y,allow the engine and exhaust
sy stem tocool down. #
Switch the ignition on. #
Enga gesecond gear. #
Release the electric parking brake. Breakdown assis
tance 405
Page 425 of 565
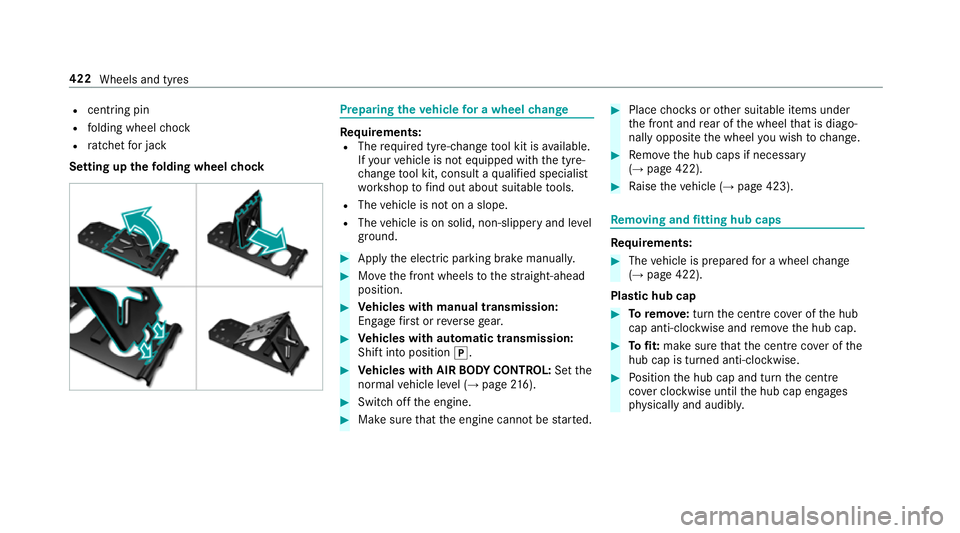
R
centring pin
R folding wheel chock
R ratchet for jack
Setting up thefo lding wheel chock Prepa
ring theve hicle for a wheel change Re
quirements:
R The requ ired tyre-change tool kit is available.
If yo ur vehicle is not equipped with the tyre-
ch ange tool kit, consult a qualified specialist
wo rkshop tofind out about suitable tools.
R The vehicle is not on a slope.
R The vehicle is on solid, non-slippery and le vel
ground. #
Apply the electric parking brake manually. #
Movethe front wheels tothest ra ight-ahead
position. #
Vehicles with manual transmission:
Engage firs t or reve rsege ar. #
Vehicles with automatic transmission:
Shift into position j. #
Vehicles with AIR BODY CONT ROL:Set the
normal vehicle le vel (→ page 216). #
Switch off the engine. #
Make sure that the engine cann otbe star ted. #
Place choc ks orother suitable items under
th e front and rear of the wheel that is diago‐
nally opposite the wheel you wish tochange. #
Remo vethe hub caps if necessary
(→ page 422). #
Raise theve hicle (→ page 423). Re
moving and fitting hub caps Re
quirements: #
The vehicle is prepared for a wheel change
(→ page 422).
Pla stic hub cap #
Toremo ve:turn the cent recover of the hub
cap anti-clockwise and remo vethe hub cap. #
Tofit: make sure that the cent recover of the
hub cap is turned anti-clockwise. #
Position the hub cap and turn the cent re
co ver clockwise until the hub cap engages
ph ysically and audibly. 422
Wheels and tyres
Page 426 of 565
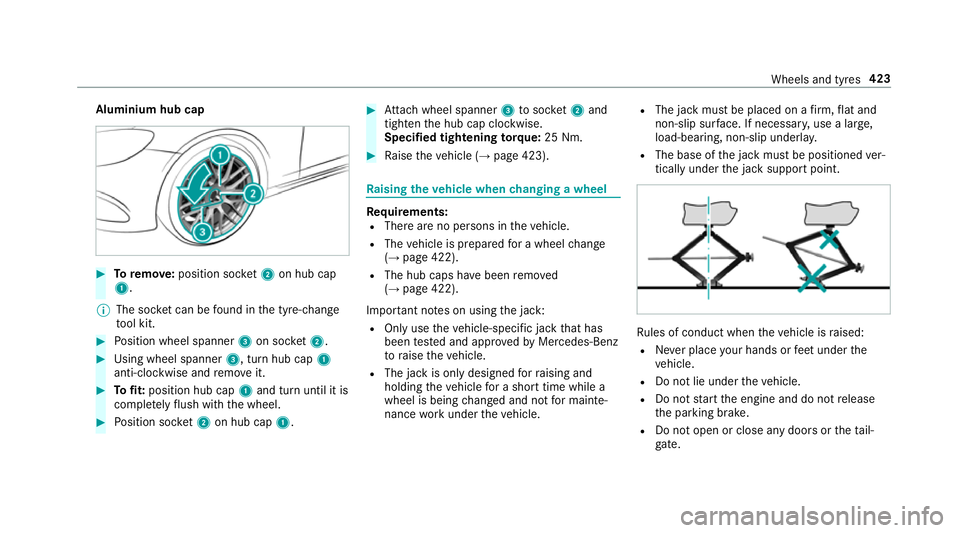
Aluminium hub cap
#
Toremo ve:position soc ket2 on hub cap
1.
% The soc ket can be found in the tyre-change
to ol kit. #
Position wheel spanner 3on soc ket2. #
Using wheel spanner 3, turn hub cap1
anti-clo ckwise and remo veit. #
Tofit: position hub cap 1and turn until it is
comple tely flush with the wheel. #
Position soc ket2 on hub cap 1. #
Attach wheel spanner 3tosoc ket2 and
tighten the hub cap clockwise.
Specified tightening torq ue: 25 Nm. #
Raise theve hicle (→ page 423). Ra
ising theve hicle when changing a wheel Re
quirements:
R There are no persons in theve hicle.
R The vehicle is prepared for a wheel change
(→ page 422).
R The hub caps ha vebeen remo ved
( → page 422).
Impor tant no tes on using the jack:
R Only use theve hicle-specific jack that has
been tested and appr oved byMercedes-Benz
to raise theve hicle.
R The jack is only designed forra ising and
holding theve hicle for a short time while a
wheel is being changed and not for mainte‐
nance workunder theve hicle. R
The jack must be placed on a firm ,fl at and
non-slip sur face. If necessar y,use a lar ge,
load-bearing, non-slip underla y.
R The base of the jack must be positioned ver‐
tically under the jack support point. Ru
les of conduct when theve hicle is raised:
R Never place your hands or feet under the
ve hicle.
R Do not lie under theve hicle.
R Do not start the engine and do not release
th e parking brake.
R Do not open or close any doors or theta il‐
ga te. Wheels and tyres
423
Page 453 of 565
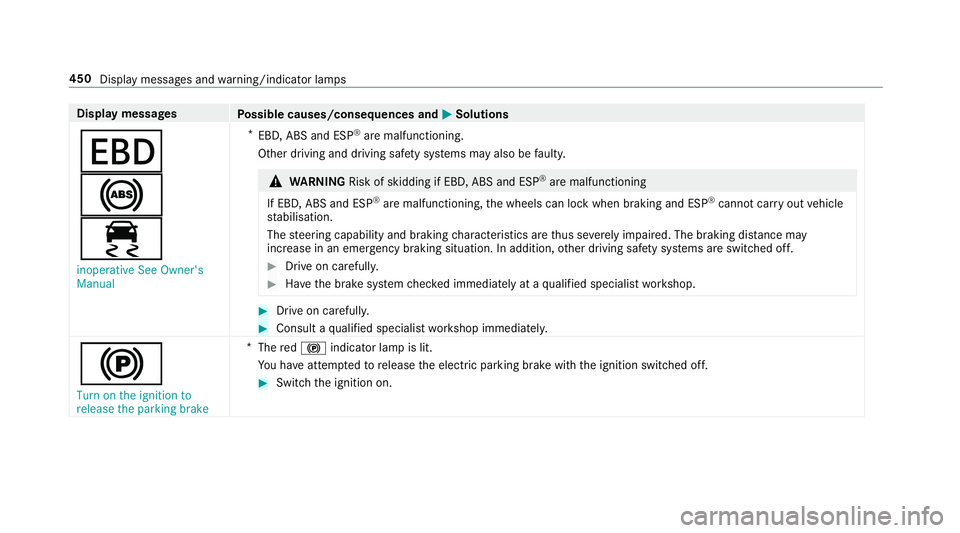
Display messages
Possible causes/consequences and M
MSolutions
T
!
÷ inoperative See Owner's
Manual *
EBD, ABS and ESP ®
are malfunctioning.
Other driving and driving saf ety sy stems may also be faulty. &
WARNING Risk of skidding if EBD, ABS and ESP ®
are malfunctioning
If EBD, ABS and ESP ®
are malfunctioning, the wheels can lock when braking and ESP ®
cann otcar ryout vehicle
st abilisation.
The steering capability and braking characteristics are thus se verely impaired. The br aking distance may
increase in an eme rgency braking situation. In addition, other driving saf ety sy stems are switched off. #
Drive on carefull y. #
Have the brake sy stem checked immediately at a qualified specialist workshop. #
Drive on carefully. #
Consult a qualified specialist workshop immediatel y.
!
Turn on the ignition to
release the parking brake *
The red! indicator lamp is lit.
Yo u ha veattem ptedto release the electric parking brake with the ignition switched off. #
Switch the ignition on. 450
Display messages and warning/indicator lamps