Page 108 of 565
#
Before starting the engine: adjust the
driver's seat, the head restra ints, the
st eering wheel or the mir ror and fasten
yo ur seat belt. &
WARNING Risk of entrapment forch il‐
dren when adjusting thesteering wheel
Children could injure themselves if they
adjust thesteering wheel. #
Never lea vechildren unat tended in the
ve hicle. #
When leaving theve hicle, alw aysta ke
th eke y with you and lock theve hicle.
This also applies tomobile phones if the
"Digital Car Key in the smartphone"
function is activated via the Mercedes
connect me web app. #
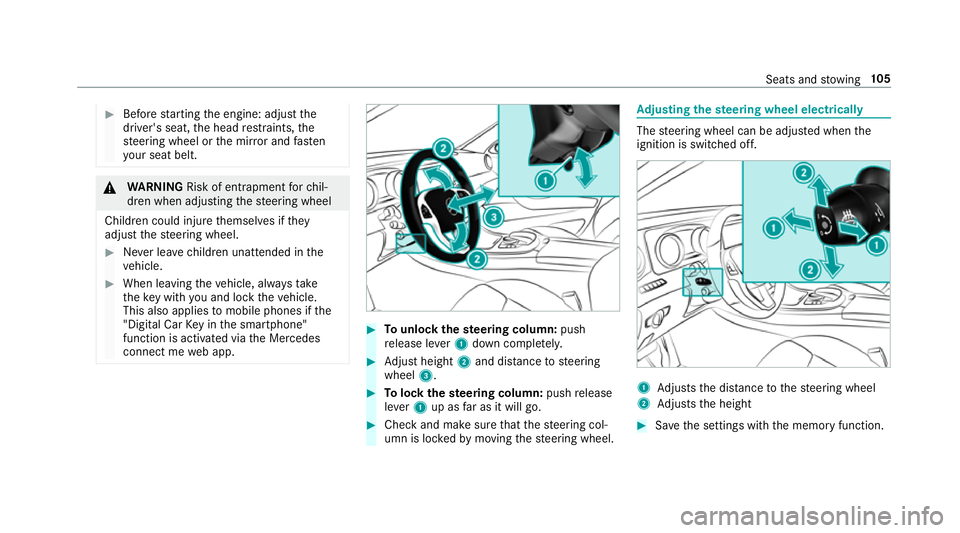
Tounlo ckthest eering column: push
re lease le ver1 down comple tely. #
Adjust height 2and di stance tosteering
wheel 3. #
Tolock thest eering column: pushrelease
le ve r1 up as far as it will go. #
Check and make sure that thesteering col‐
umn is loc kedby moving thesteering wheel. Ad
justing the steering wheel electrically The
steering wheel can be adjus ted when the
ignition is switched off. 1
Adjusts the dis tance tothesteering wheel
2 Adjusts the height #
Save the settings with the memory function. Seats and
stowing 105
Page 109 of 565
Switching
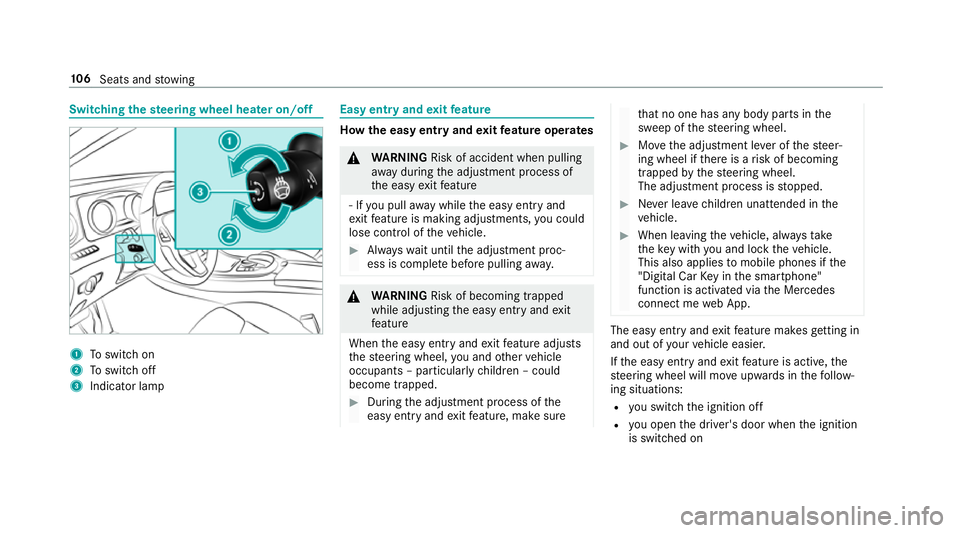
thest eering wheel heater on/off 1
Toswitch on
2 Toswitch off
3 Indicator lamp Easy entry and
exitfeature How
the easy entry and exitfeature operates &
WARNING Risk of accident when pulling
aw ay during the adjustment process of
th e easy exitfeature
‑ If you pull away while the easy entry and
ex itfeature is making adjustments, you could
lose cont rol of theve hicle. #
Alw ayswa it until the adjustment proc‐
ess is comple tebefore pulling away. &
WARNING Risk of becoming trapped
while adjusting the easy entry andexit
fe ature
When the easy entry andexitfeature adjusts
th esteering wheel, you and other vehicle
occupants – particularly children – could
become trapped. #
During the adjustment process of the
easy entry andexitfeature, make sure th
at no one has any body parts in the
sweep of thesteering wheel. #
Movethe adjustment le ver of thesteer‐
ing wheel if there is a risk of becoming
trapped bythesteering wheel.
The adjustment process is stopped. #
Never lea vechildren unat tended in the
ve hicle. #
When leaving theve hicle, alw aysta ke
th eke y with you and lock theve hicle.
This also applies tomobile phones if the
"Digital Car Key in the smartphone"
function is activated via the Mercedes
connect me web App. The easy ent
ryand exitfeature makes getting in
and out of your vehicle easier.
If th e easy entry andexitfeature is active, the
st eering wheel will mo veupwards in thefo llow‐
ing situations:
R you swit chthe ignition off
R you open the driver's door when the ignition
is switched on 106
Seats and stowing
Page 110 of 565
The
steering wheel mo ves back tothe last drive
position in thefo llowing cases:
R you swit ch the ignition on when the driver's
door is closed
R you close the driver's door when the ignition
is switched on
The last drive position of thesteering wheel is
st ored:
R when you swit choff the ignition
R using the last setting stored using the mem‐
ory function
If yo u press one of the memory function position
buttons, the adjustment process is stopped.
The crash-responsive exit aid only functions
when the easy entry andexitfeature is active.
Setting the easy entry and exitfeature
Multimedia sy stem:
, Vehicle .
î Vehicle set-
tings .
Easy Entry/Exit #
Activate Oor deacti vate ª the function. Using
the memory function &
WARNING Risk of an accident if memo ry
function is used while driving
If yo u use the memory function on the driv‐
er's side while driving, you could lose cont rol
of theve hicle as a result of the adjustments
being made. #
Only use the memory function on the
driver's side when theve hicle is station‐
ar y. &
WARNING Risk of entrapment when set‐
ting the seat with the memory function
If yo u use the memory function toset the
seat or thesteering wheel, you and other
ve hicle occupants, especially children, could
be ent rapped. – – #
During the setting procedure of the
memory function, ensure that no body
parts are in the sweep of the seat or
th esteering wheel. #
If somebody becomes trapped, immedi‐
ately release the memory function posi‐
tion button.
The adjustment process is stopped. &
WARNING Risk of entrapment if the
memory function is activated bychildren
Children could become trapped if they acti‐
va te the memory function, particularly when
unattended. #
Never lea vechildren unat tended in the
ve hicle. #
When leaving theve hicle, alw aysta ke
th eke y with you and lock theve hicle.
This also applies tomobile phones if the
"Digital Car Key in the smartphone"
function is activated via the Mercedes
connect me web app. The memory function can be used when
the igni‐
tion is switched off.
Seat comfort positions for up tothre e people
can be stored and called up using the memory
function. Seats and
stowing 107
Page 111 of 565
The
following sy stems can be set using the
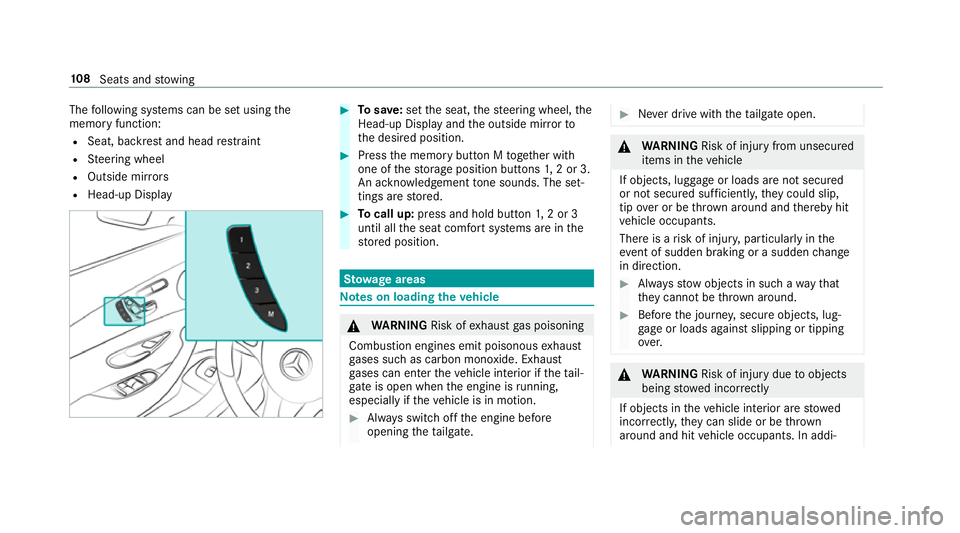
memory function:
R Seat, backrest and head restra int
R Steering wheel
R Outside mir rors
R Head-up Display #
Tosave :set the seat, thesteering wheel, the
Head-up Display and the outside mir rorto
th e desired position. #
Press the memory button M toge ther with
one of thestorage position buttons 1,2 or 3.
An acknowledgement tone sounds. The set‐
tings are stored. #
Tocall up: press and hold button 1,2 or 3
until all the seat comfort sy stems are in the
st ored position. St
ow age areas Note
s on loading theve hicle &
WARNING Risk ofexhaust gas poisoning
Combustion engines emit poisonous exhaust
ga ses such as carbon monoxide. Exhaust
ga ses can enter theve hicle interior if theta il‐
gate is open when the engine is running,
especially if theve hicle is in motion. #
Alw ays switch off the engine before
opening theta ilgate. #
Never drive with theta ilgate open. &
WARNING Risk of inju ryfrom unsecu red
items in theve hicle
If objects, luggage or loads are not secured
or not secured suf ficientl y,they could slip,
tip ove r or be throw n around and thereby hit
ve hicle occupants.
There is a risk of injur y,particularly in the
ev ent of sudden braking or a sudden change
in direction. #
Alw aysstow objects in such a wayth at
th ey cannot be thro wn around. #
Before the journe y,secure objects, lug‐
ga ge or loads against slipping or tipping
ove r. &
WARNING Risk of inju rydue toobjects
being stowed incor rectly
If objects in theve hicle interior are stowed
incor rectly, they can slide or be thrown
around and hit vehicle occupants. In addi‐ 108
Seats and stowing
Page 138 of 565
cou
rse of the lane in which you are driving
and adjusts the light in advance.
The function is active when the dipped beam is
switched on.
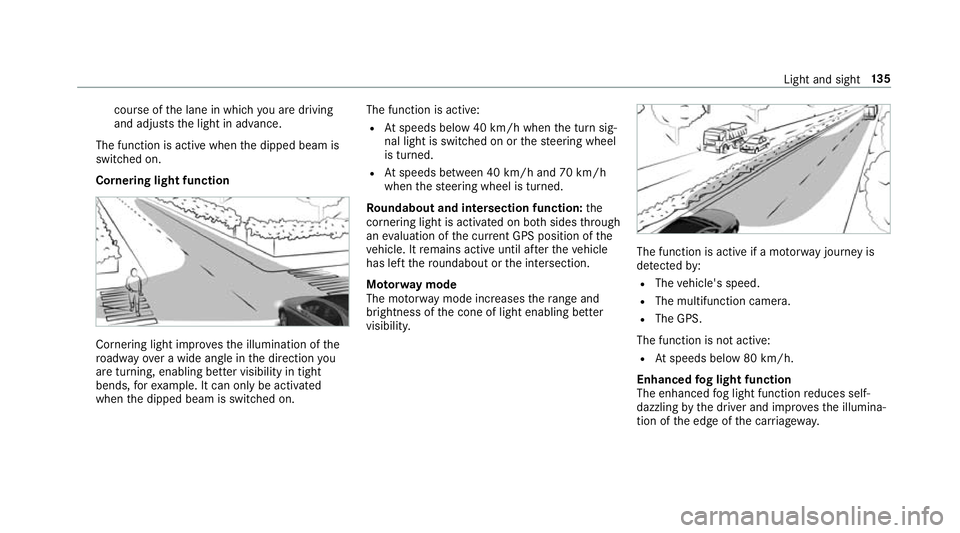
Cornering light function Cornering light impr
ovesth e illumination of the
ro adw ayove r a wide angle in the direction you
are turning, enabling better visibility in tight
bends, forex ample. It can on ly beactivated
when the dipped beam is switched on. The function is active:
R Atspeeds below 40 km/h when the turn sig‐
nal light is switched on or thesteering wheel
is turned.
R Atspeeds between 40 km/h and 70 km/h
when thesteering wheel is turned.
Ro undabout and intersection function: the
cornering light is acti vated on bo thsides thro ugh
an evaluation of the cur rent GPS position of the
ve hicle. It remains active until af terth eve hicle
has left thero undabout or the intersection.
Mo torw ay mode
The mo torw ay mode increases thera nge and
brightness of the cone of light enabling better
visibility. The function is active if a mo
torw ay jou rney is
de tected by:
R The vehicle's speed.
R The multifunction camera.
R The GPS.
The function is not active:
R Atspeeds below 80 km/h.
Enhanced fog light function
The enhanced fog light function reduces self-
dazzling bythe driver and impr ovesth e illumina‐
tion of the edge of the car riag ewa y. Light and sight
13 5
Page 143 of 565
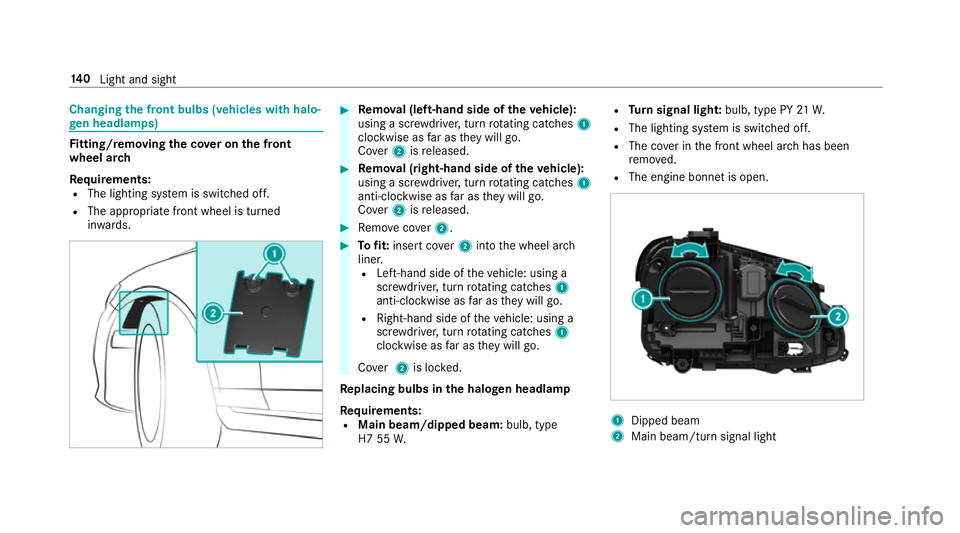
Changing
the front bulbs (vehicles with halo‐
ge n headla mps) Fi
tting/ removing the co ver on the front
wheel ar ch
Re quirements:
R The lighting sy stem is switched off.
R The appropriate front wheel is turned
in wa rds. #
Remo val (left-hand side of theve hicle):
using a scr ewdriver, turn rotating catches 1
clo ckwise as far as they will go.
Co ver2 isreleased. #
Remo val (right-hand side of theve hicle):
using a scr ewdriver, turn rotating catches 1
anti-clo ckwise as far as they will go.
Co ver2 isreleased. #
Remo vecover2. #
Tofit: inse rtco ver2 into the wheel ar ch
liner.
R Left-hand side of theve hicle: using a
scr ewdriver, turn rotating catches 1
anti-clo ckwise as far as they will go.
R Right-hand side of theve hicle: using a
scr ewdriver, turn rotating catches 1
clo ckwise as far as they will go.
Co ver2 is loc ked.
Re placing bulbs in the halo gen headla mp
Requ irements:
R Main beam/dipped beam: bulb, type
H7 55 W. R
Turn signal light: bulb, type PY 21W.
R The lighting sy stem is switched off.
R The co ver in the front wheel ar chhas been
re mo ved.
R The engine bonn etis open. 1
Dipped beam
2 Main beam/turn signal light 14 0
Light and sight
Page 144 of 565
#
Turn there leva nt housing co ver anti-clock‐
wise and remo veit. #
Main beam/dipped beam: turnthe soc ket
anti-clockwise and remo veit. #
Turn signal light: turnthe soc ket anti-clo ck‐
wise, unlock and remo veit. #
Pull the bulb out of the soc ket. #
Inse rtthe new bulb into the soc ket so that
th e entire base of the bulb is resting on the
bottom of the soc ket. #
Inse rtsoc ket and turn it clo ckwise. #
Press on the housing co ver and turn it clock‐
wise. #
Replace the co ver in the front wheel ar ch. Wi
ndscreen wipers and windscreen washer
sy stem Switching
the windscreen wipers on/off #
1 í Single wipe/ îwiping with
wa sher fluid #
1gWi ndscreen wipers off #
2 Ä Intermittent wiping, normal #
3 Å Intermittent wiping, frequent #
4 ° Continuous wiping, slow #
5 ¯ Continuous wiping, fast Switching
there ar window windsc reen wip‐
ers on/off #
1 è Switch Light and sight
141
Page 147 of 565
%
The duration of the colour change varies
depending on the usage conditions. Re
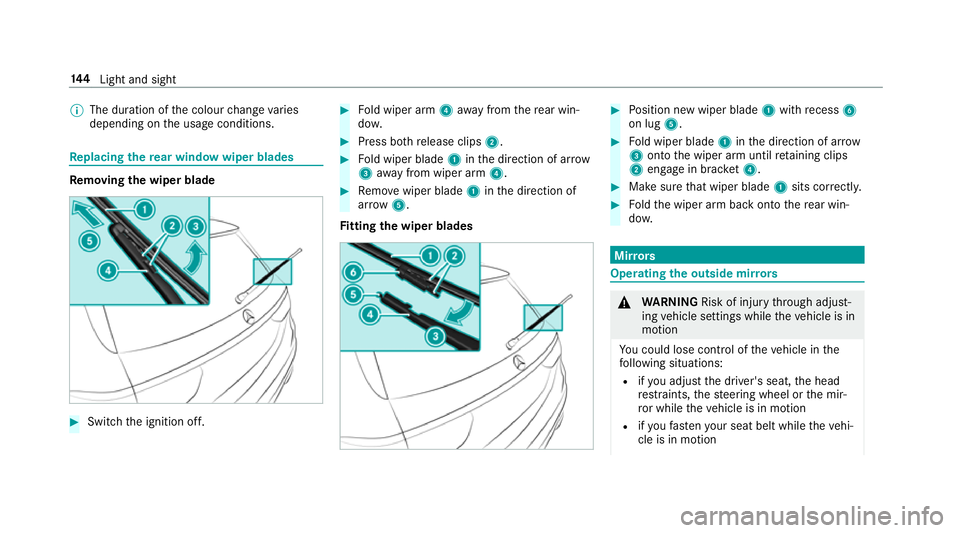
placing the rear window wiper blades Re
moving the wiper blade #
Switch the ignition off. #
Fold wiper arm 4away from there ar win‐
do w. #
Press bo threlease clips 2. #
Fold wiper blade 1inthe direction of ar row
3 away from wiper arm 4. #
Remo vewiper blade 1inthe direction of
ar row 5.
Fi tting the wiper blades #
Position new wiper blade 1with recess 6
on lug 5. #
Fold wiper blade 1inthe direction of ar row
3 onto the wiper arm until retaining clips
2 engage in brac ket4. #
Makesure that wiper blade 1sits cor rectl y. #
Foldthe wiper arm back onto there ar win‐
do w. Mir
rors Operating
the outside mir rors &
WARNING Risk of inju rythro ugh adjust‐
ing vehicle settings while theve hicle is in
motion
Yo u could lose cont rol of theve hicle in the
fo llowing situations:
R ifyo u adjust the driver's seat, the head
re stra ints, thesteering wheel or the mir‐
ro r while theve hicle is in motion
R ifyo ufast enyour seat belt while theve hi‐
cle is in motion 14 4
Light and sight