2016 MERCEDES-BENZ E-CLASS ESTATE tow bar
[x] Cancel search: tow barPage 98 of 565
#
Press button 1repeatedly until the indica‐
to r lamp in the button lights up.
The front passenger seat is selected. #
Adjust the front passenger seat using the
buttons in the door control panel on the driv‐
er's side. Ad
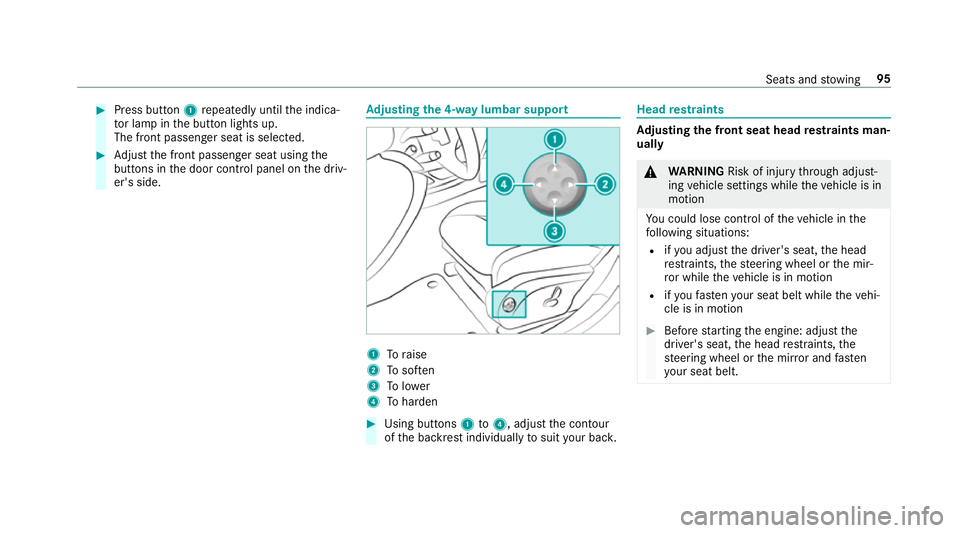
justing the 4-w aylumbar support 1
Toraise
2 Tosof ten
3 Tolower
4 Toharden #
Using buttons 1to4 , adjust the conto ur
of the backrest individually tosuit your bac k. Head
restra ints Ad
justing the front seat head restra ints man‐
ually &
WARNING Risk of inju rythro ugh adjust‐
ing vehicle settings while theve hicle is in
motion
Yo u could lose cont rol of theve hicle in the
fo llowing situations:
R ifyo u adjust the driver's seat, the head
re stra ints, thesteering wheel or the mir‐
ro r while theve hicle is in motion
R ifyo ufast enyour seat belt while theve hi‐
cle is in motion #
Before starting the engine: adjust the
driver's seat, the head restra ints, the
st eering wheel or the mir ror and fasten
yo ur seat belt. Seats and
stowing 95
Page 100 of 565
Ad
justing the gap between the head
re stra int and the back of your head: #
Tomo veforw ards: pullthe head restra int
fo rw ards. #
Tomo vebackwards: pressrelease knob 1
and push the head restra int backwards.
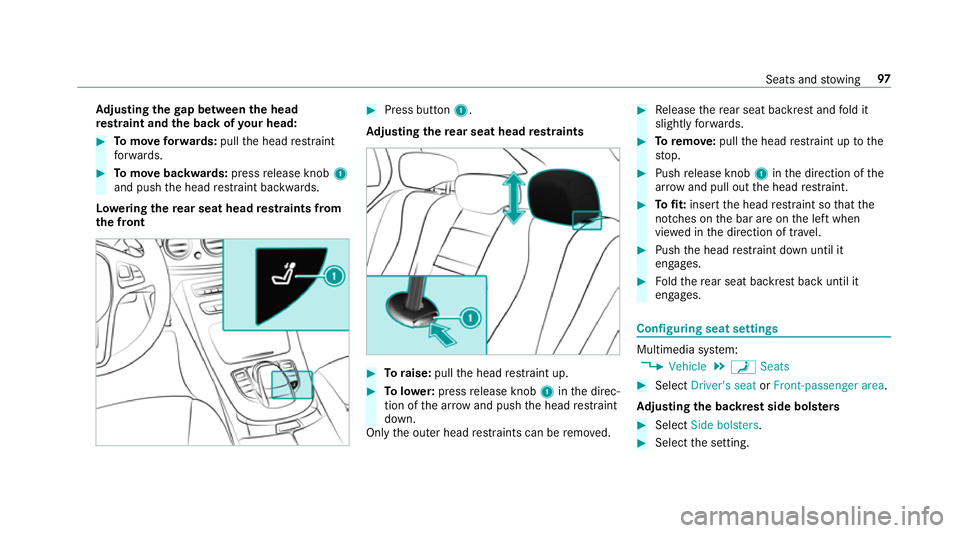
Lo weri ngthere ar seat head restra ints from
th e front #
Press button 1.
Ad justing the rear seat head restra ints #
Toraise: pullthe head restra int up. #
Tolowe r:press release knob 1inthe direc‐
tion of the ar row and push the head restra int
down.
Only the outer head restra ints can be remo ved. #
Release there ar seat backrest and fold it
slight lyforw ards. #
Toremo ve:pull the head restra int up tothe
st op. #
Push release knob 1inthe direction of the
ar row and pull out the head restra int. #
Tofit: inse rtthe head restra int so that the
notches on the bar are on the left when
vie we d in the direction of tra vel. #
Push the head restra int down until it
engages. #
Foldthere ar seat backrest back until it
engages. Configuring seat settings
Multimedia sy
stem:
, Vehicle .
a Seats #
Select Driver's seat orFront-passenger area.
Ad justing the backrest side bols ters #
Select Side bolsters . #
Select the setting. Seats and
stowing 97
Page 101 of 565
Ad
justing the seat contour in the lumbar
re gion of the seat backrest #
Select Lumbar . #
Adjust the air cushion. #
Save the settings with the memory function
(→ page 107). Ad
justing the dynamic multicon tour seat Multimedia sy
stem:
, Vehicle .
a Seats
The dynamic lateral cornering support can be
adjus ted using this function. #
Select Driver's seat orFront-passenger area. #
Select Dynamic seat. #
Select setting: Off,Level 1 orLevel 2. Overview of massage and
workout prog rams The
following massage prog rams can be selected: Massage prog
ram for the front seats Function
Hot Relaxing Massage for bac kR elaxing massage prog ram starting in the pelvic area. Warm pressure points can be felt, full back massage,
st re tching the pelvic area. Ending with gentle stroking motions.
Hot Relaxing Massage for shoulder sR elaxing massage prog ram starting in the shoulder area. Warm pressure points can be felt, full twin-w ave
back massage, stre tching the shoulder area. Ending with gentle stroking motions.
Ac tivating Massa ge Activating ba ckmassa gewith inc reasing twin-w aves and then soo thing mo vements.
Classic Massa ge Massage with increasing twin-w aves and soo thing mo vements. 98
Seats and stowing
Page 102 of 565
Massage prog
ram for the front seats Function
Wa veMassag eR elaxing and activating massage program, starting on your back and continuing in the cushion. Subse‐
qu ent stro king motions across the entire spinal column.
Mobilising Massag eM obilisation ofthe spinal column and upper body using pressure points in the lumbar and bac k.You can
inc rease the mobilisation ef fect by relaxing into the pressure points. This process helps toimpr oveyour
posture. Ac
tive Workout prog rams
The Active Workout programs requ ire your active
cooperation and are a co nvenient way of exercis‐ ing
your abdomen and back muscles during a
traf fic jam, forex ample, bytensing and releasing
th e specific muscle groups. Tensing and releas‐ ing also helps
toimpr oveblood flow inyour mus‐
cles. Press against a pressure point as soon as
yo ufe el it.
The following Active Workout prog rams can be selected: Wo
rkout prog ramF unction
Ac tive Workout backres tT ostimulate the muscles in your abdomen and back: press against the pressure points in the backrest.
Ke ep the pressure under your feet eve n. Continue tobreathe normally; do not hold your breath.
When the pressure in the seat backrest recedes, stop pressing against it and relax briefly.
Ac tive Workout cushion Tostimulate the muscles in your lo wer back: press against the pressure points in the seat cushion. Keep
th e pressure under your feet even. Continue tobreathe normall y;do not hold your breath.
When the pressure in the seat cushion recedes, stop pressing against it and relax briefly. Seats and
stowing 99
Page 117 of 565
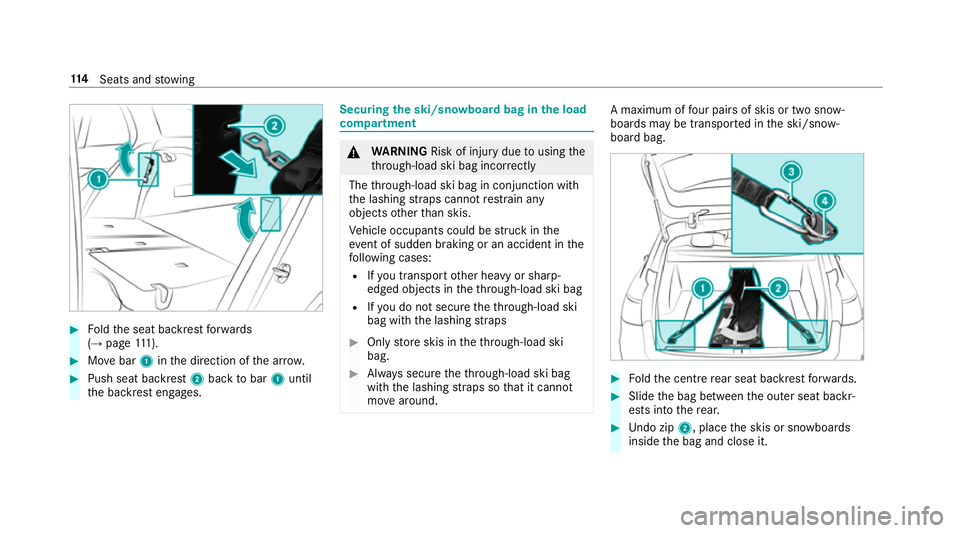
#
Foldthe seat backrest forw ards
(→ page 111). #
Movebar 1inthe direction of the ar row. #
Push seat backrest 2back tobar 1until
th e backrest engages. Securing
the ski/sn owboard bag in the load
compa rtment &
WARNING Risk of inju rydue tousing the
th ro ugh-load ski bag incor rectly
The thro ugh-load ski bag in conjunction with
th e lashing stra ps cann otrestra in any
objects other than skis.
Ve hicle occupants could be stru ck inthe
ev ent of sudden braking or an accident in the
fo llowing cases:
R Ifyo u transpo rtother heavy or sharp-
edged objects in theth ro ugh-load ski bag
R Ifyo u do not secure theth ro ugh-load ski
bag with the lashing stra ps #
Only store skis in theth ro ugh-load ski
bag. #
Alw ays secure theth ro ugh-load ski bag
with the lashing stra ps so that it cannot
mo vearound. A maximum of
four pairs of skis or two sn ow‐
boards may be transpor ted in the ski/snow‐
board bag. #
Foldthe cent re rear seat backrest forw ards. #
Slide the bag between the outer seat backr‐
ests into there ar. #
Undo zip 2, place the skis or snowboards
inside the bag and close it. 11 4
Seats and stowing
Page 398 of 565
#
Therefore, place thefilling hose in the
plastic bag that con tained the TIREFIT
kit. +
ENVIRONMEN
TALNO TEEnvironmental
pollution caused byenvironmen tally ir re‐
sponsible disposal Ty
re sealant contains polluta nts.#
Have the tyre sealant bottle disposed of
professionall y,e.g. at a Mercedes-Benz
service cent re. #
Switch off the tyre inflation compressor. #
Unscr ew thefilling hose from theva lve of the
defective tyre. #
Stow th e tyre sealant bottle, the tyre inflation
compressor and thewa rning triangle. #
Pull away immediatel y. #
Stop af ter driving for appro ximately ten
minutes and check the tyre pressure using
th e tyre inflation compressor.
The tyre pressure must now be at least
13 0 kPa (1.3 bar/19 psi). &
WARNING Risk of accident due tothe
specified tyre pressure not being ach‐
ie ved
If th e specified tyre pressure is not achie ved
af te r a brief drive, the tyre is too badly dam‐
aged. The tyre sealant cannot repair the tyre
in this ins tance.
Dama ged tyres and a tyre pressure that is
to o low can significantly impair braking and
handling characteristics. #
Do not drive on. #
Consult a qualified specialist workshop. Countries
that ha veMercedes-Benz
Service24h: ast icke r with the phone number
can also be found in your vehicle, e.g. on the
B‑pillar on the driver's side. #
Cor rect the tyre pressure if it is still at least
13 0 kPa (1.3 bar/19 psi). See the tyre pres‐
sure table on the fuel filler flap forva lues. #
Toincrease the ty repressure: switch on
th e tyre inflation compressor. #
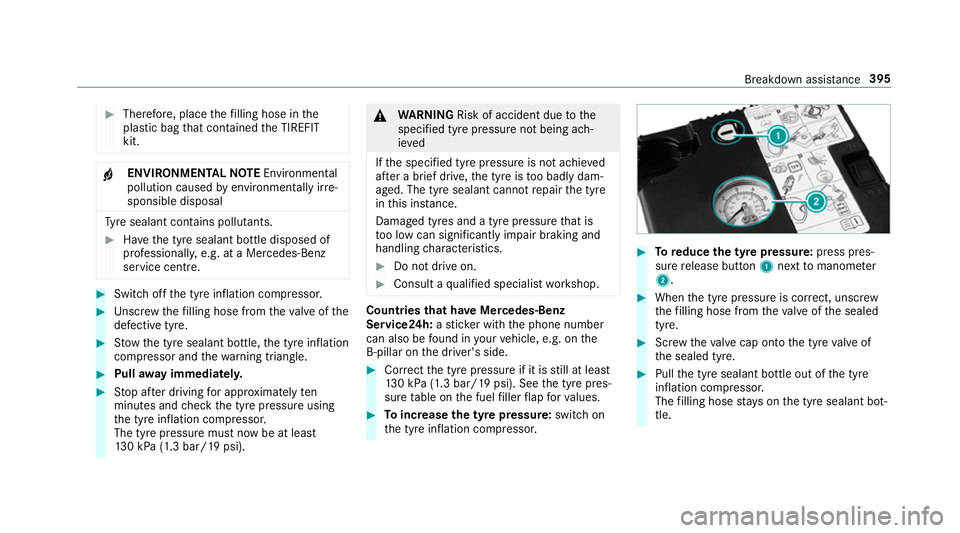
Toreduce the tyre pressure: press pres‐
su re re lease button 1next tomanome ter
2 . #
When the tyre pressure is cor rect, unscr ew
th efilling hose from theva lve of the sealed
tyre. #
Screw theva lve cap onto the tyre valve of
th e sealed tyre. #
Pull the tyre sealant bottle out of the tyre
inflation compressor.
The filling hose stay s on the tyre sealant bot‐
tle. Breakdown assis
tance 395
Page 405 of 565
#
Make sure that the battery is connected and
ch arge d.
When the battery is dischar ged:
R the engine cann otbe star ted.
R the electric parking brake cann otbe released
or applied.
R vehicles with automatic transmission: the
automatic transmission cannot be shif tedto
position iorj.
% Vehicles with automatic transmission: if
th e automatic transmission cann otbe shif‐
te dto position i, transport theve hicle
(→ page 403). A towing vehicle with lifting
equipment is requiredforve hicle transport.
* NO
TEDama gedue to to wing away at
exc essively high speeds or over long dis‐
ta nces The driv
etra in could be damaged when tow‐
ing at excessively high speeds or over long
dis tances. #
Atowing speed of 50 km/h must not
be exc eeded. #
Atowing dis tance of 50 km must not be
exc eeded. &
WARNING Risk of accident when towing
a ve hicle which is too heavy
If th eve hicle being tow- star ted or towed
aw ay is heavier than the permissible gross
mass, thefo llowing situations can occur:
R theto wing eye may become de tach ed.
R the car/t railer combination may swer ve
or eve nove rturn. #
If ano ther vehicle is tow- star ted or
to we daw ay, its weight must not exceed
th e permissible gross mass of your own
ve hicle. If a
vehicle must be tow- star ted or towe daw ay,
its weight must not exceed the permissible gross
mass of theto wing vehicle. #
Information on the permissible gross mass of
th eve hicle can be found on theve hicle iden‐
tification plate . #
Vehicles with automatic transmission: do
not open the driver's door or front passenger
door, otherwise the automatic transmission
automatically shifts toposition j. #
Fittheto wing eye (→ page 405). #
Attach theto w bar.
* NO
TEDama gedue toincor rect connec‐
tion #
Only connect theto w rope or tow bar to
th eto wing eyes. %
You can also attach theto w bar tothe trailer
hitch. #
Deactivate the automatic locking mechanism
(→ page 71). #
Do not activate the HOLD function. #
Deactivate tow- aw ay protection (→ page 89). #
Deactivate Active Brake Assi st (→page 198). 402
Breakdown assi stance
Page 406 of 565
#
Vehicles with automatic transmission:
shift the automatic transmission toposition
i. #
Vehicles with manual transmission: shift
to neutral i. #
Release the electric parking brake. #
Vehicles with manual transmission:
switch on the ignition, otherwise thesteering
wheel locking may engage. &
WARNING Risk of accident due tolimi‐
te d saf ety-re lated functions during the
to wing process
Saf ety-re lated functions are limited or no lon‐
ge rav ailable in thefo llowing situations:
R the ignition is switched off.
R the brake sy stem or po werst eering sys‐
te m is malfunctioning.
R the energy supply or the on-board electri‐
cal sy stem is malfunctioning.
When your vehicle is then towe daw ay, signif‐
icantly more ef fort may be requ ired tosteer
and brake than is no rmally requ ired. #
Use a tow bar. #
Make sure that thesteering wheel can
mo vefreely, before towing theve hicle
aw ay. *
NO
TEDama gedue toexcessive tracti ve
po wer If
yo u pull away sharpl y,the tractive po wer
may be too high and theve hicles could be
damaged. #
Pull away slowly and smoo thly. Loading the
vehicle for transport #
Obser vethe no tes on towing away
( → page 401). #
Connect theto w bar totheto wing eyeto
load theve hicle.
% You can also attach theto w bar tothe trailer
hitch. #
Vehicles with automatic transmission:
shift the automatic transmission toposition
i.
% Ve
hicles with automatic transmission:
th e automatic transmission may be loc ked in
position jintheeve nt of dama getothe
electrical sy stem. Toshift toi , pr ovide the
on-board electrical sy stem with po wer
( → page 398). #
Vehicles with manual transmission: shift
to neutral. #
Load theve hicle onto the transpor ter. #
Vehicles with automatic transmission:
shift the automatic transmission toposition
j. #
Vehicles with manual transmission:
engage firs t or reve rsege ar. #
Use the electric parking brake tosecure the
ve hicle and pr event it from rolling away. #
Only secure theve hicle bythe wheels. Breakdown assis
tance 403