2016 MERCEDES-BENZ CLA COUPE display
[x] Cancel search: displayPage 100 of 345

Correct driver's seat position
G
WARNING
You could lose control of the vehicle while
driving if you:
R adjust the driver's seat, steering wheel or
mirrors
R fasten the seat belt
There is a risk of an accident.
Adjust the driver's seat, head restraint, steer-
ing wheel and mirrors and fasten your seat
belt before starting the engine. Observe the following when adjusting steering
wheel
:, seat belt ;and driver's seat =:
R you are as far away from the driver's airbag as
possible
R you are sitting in an upright position
R your thighs are slightly supported by the seat
cushion
R your legs are not entirely stretched and you
can depress the pedals properly
R the back of your head is supported at eye level
by the centre of the head restraint
R you can hold the steering wheel with your
arms slightly bent
R you can move your legs freely
R you can see all the displays in the instrument
cluster clearly R
you have a good overview of traffic conditions
R the seat belt is pulled snugly against the body
and must be routed across the centre of your
shoulder and across your hips in the pelvic
area
Further related subjects:
R Adjusting the seats manually (Y page 98)
R Adjusting the seats electrically
(Y page 99)
R Adjusting the steering wheel manually
(Y page 102)
R Fastening the seat belt correctly
(Y page 43)
R Adjusting the rear-view mirror and exterior
mirrors (Y page 103)
R Vehicles with a memory function: save the
seat, steering wheel and exterior mirror set-
tings using the memory function
(Y page 106) Seats
Important safety notes
G
WARNING
If children adjust the seats, they could
become trapped, especially if they are unat-
tended. There is a risk of injury.
When leaving the vehicle, always take the key with you and lock the vehicle. Never leave
children unattended in the vehicle.
The seats can still be adjusted when there is no
key in the ignition lock. G
WARNING
When adjusting a seat, you or another vehicle occupant could become trapped by the guiderail of the seat, for instance. There is a risk of
injury.
Make sure that no one has any part of their
body within the sweep of the seat when
adjusting it.
Observe the safety notes on "Airbags"
(Y page 44) and "Children in the Vehicle"
(Y page 54). Seats
97Seats, steering wheel and mirrors Z
Page 113 of 345
Important safety notes
G
WARNING
Adaptive Highbeam Assist does not recognise road users:
R who have no lights, e.g. pedestrians
R who have poor lighting, e.g. cyclists
R whose lighting is blocked, e.g. by a barrier
On very rare occasions, Adaptive Highbeam
Assist may fail to recognise other road users
that have lights, or may recognise them too
late. In this, or in similar situations, the auto-
matic main-beam headlamps will not be deac-
tivated or will be activated despite the pres-
ence of other road users. There is a risk of an accident.
Always carefully observe the traffic conditionsand switch off the main-beam headlamps in
good time.
Adaptive Highbeam Assist cannot take into
account road, weather or traffic conditions.
Adaptive Highbeam Assist is only an aid. You are
responsible for adjusting the vehicle's lighting
to the prevailing light, visibility and traffic con-
ditions.
In particular, the detection of obstacles can be
restricted if there is:
R poor visibility, e.g. due to fog, heavy rain or
snow
R dirt on the sensors or if the sensors are
obscured
Switching Adaptive Highbeam Assist
on/off X
To switch on: turn the light switch to Ã.
X Press the combination switch beyond the
pressure point in the direction of arrow :.
The _ indicator lamp in the multifunction
display lights up when it is dark and the light
sensor switches on the dipped-beam head-
lamps.
If you are driving at speeds above approx-
imately 30 km/h and no other road users are recognised:
The main-beam headlamps are switched on
automatically. The Kindicator lamp in the
instrument cluster also lights up. If you are driving at speeds below 25 km/h or
other road users are recognised or the roads
are adequately lit:
the main-beam headlamps are switched off
automatically The Kindicator lamp in the
instrument cluster goes out. The _indi-
cator lamp in the multifunction display
remains lit.
X To deactivate:move the combination switch
back to its normal position.
The _ indicator lamp in the multifunction
display goes out. Headlamps misted up on the inside
Certain climatic and physical conditions may
cause moisture to form in the headlamp. This
moisture does not affect the functionality of the headlamp. Interior lighting
Overview of interior lighting
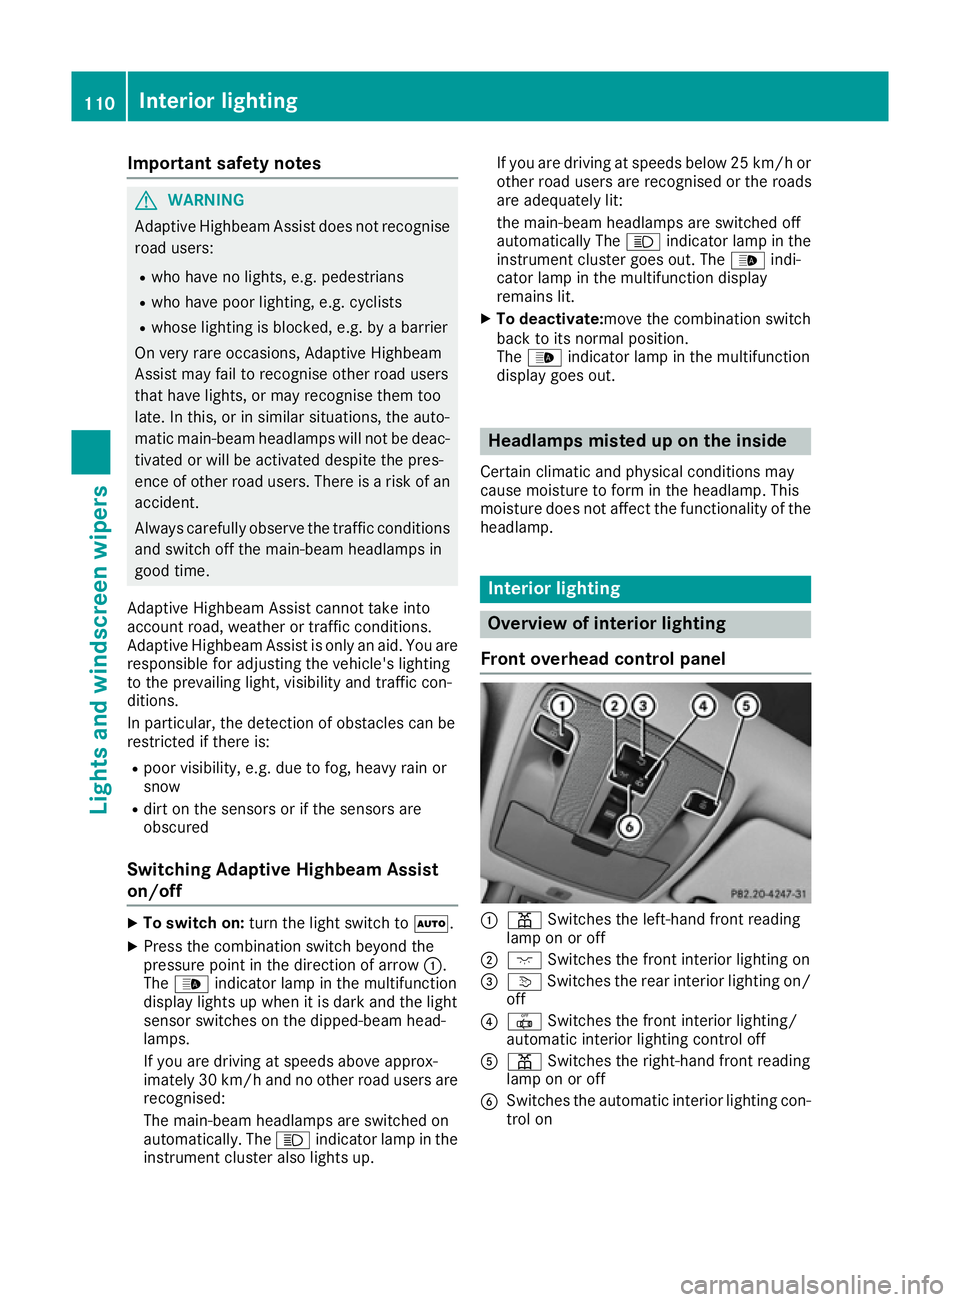
Front overhead control panel :
p Switches the left-hand front reading
lamp on or off
; c Switches the front interior lighting on
= v Switches the rear interior lighting on/
off
? | Switches the front interior lighting/
automatic interior lighting control off
A p Switches the right-hand front reading
lamp on or off
B Switches the automatic interior lighting con-
trol on 110
Interior lightingLights and windscreen wipers
Page 121 of 345
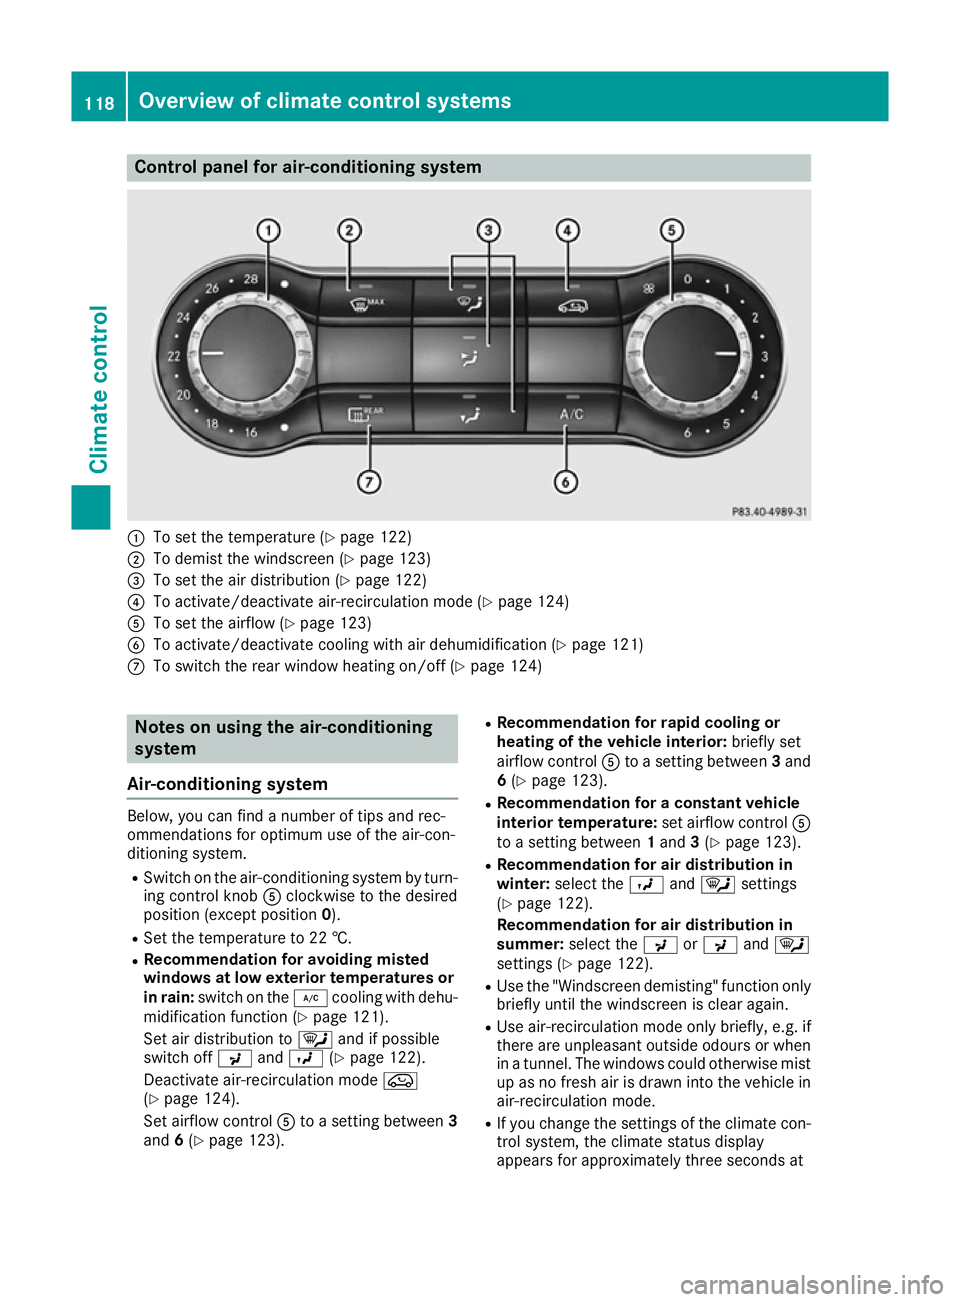
Control panel for air-conditioning system
:
To set the temperature (Y page 122)
; To demist the windscreen (Y page 123)
= To set the air distribution (Y page 122)
? To activate/deactivate air-recirculation mode (Y page 124)
A To set the airflow (Y page 123)
B To activate/deactivate cooling with air dehumidification (Y page 121)
C To switch the rear window heating on/off (Y page 124)Notes on using the air-conditioning
system
Air-conditioning system Below, you can find a number of tips and rec-
ommendations for optimum use of the air-con-
ditioning system.
R Switch on the air-conditioning system by turn-
ing control knob Aclockwise to the desired
position (except position 0).
R Set the temperature to 22 †.
R Recommendation for avoiding misted
windows at low exterior temperatures or
in rain: switch on the ¿cooling with dehu-
midification function (Y page 121).
Set air distribution to ¯and if possible
switch off PandO (Ypage 122).
Deactivate air-recirculation mode e
(Y page 124).
Set airflow control Ato a setting between 3
and 6(Y page 123). R
Recommendation for rapid cooling or
heating of the vehicle interior: briefly set
airflow control Ato a setting between 3and
6 (Y page 123).
R Recommendation for a constant vehicle
interior temperature: set airflow controlA
to a setting between 1and 3(Y page 123).
R Recommendation for air distribution in
winter: select the Oand¯ settings
(Y page 122).
Recommendation for air distribution in
summer: select the PorP and¯
settings (Y page 122).
R Use the "Windscreen demisting" function only
briefly until the windscreen is clear again.
R Use air-recirculation mode only briefly, e.g. if
there are unpleasant outside odours or when
in a tunnel. The windows could otherwise mist up as no fresh air is drawn into the vehicle inair-recirculation mode.
R If you change the settings of the climate con-
trol system, the climate status display
appears for approximately three seconds at 118
Overview of climate control systemsClimate control
Page 122 of 345
the bottom of the screen in the multimedia
system display (see separate operating
instructions). You will see the current settings
of the various climate control functions.
DYNAMIC SELECT button (except
Mercedes-AMG vehicles) You can choose between various drive programs
with the DYNAMIC SELECT button
(Y page 141).
If you have selected drive program E:
R when heating, the electrical heater booster is
deactivated and in the warming-up phase
heat output is reduced
R the rear window heating running time is
reduced Depending on the configuration, the climate set-
tings can also be influenced in drive program I.
If you have selected drive program Cor S, the
climate settings are not affected.
ECO start/stop function During automatic engine switch-off, the climate
control operates only at a reduced capacity. If
you require the full climate control output, you
can switch off the ECO start/stop function by
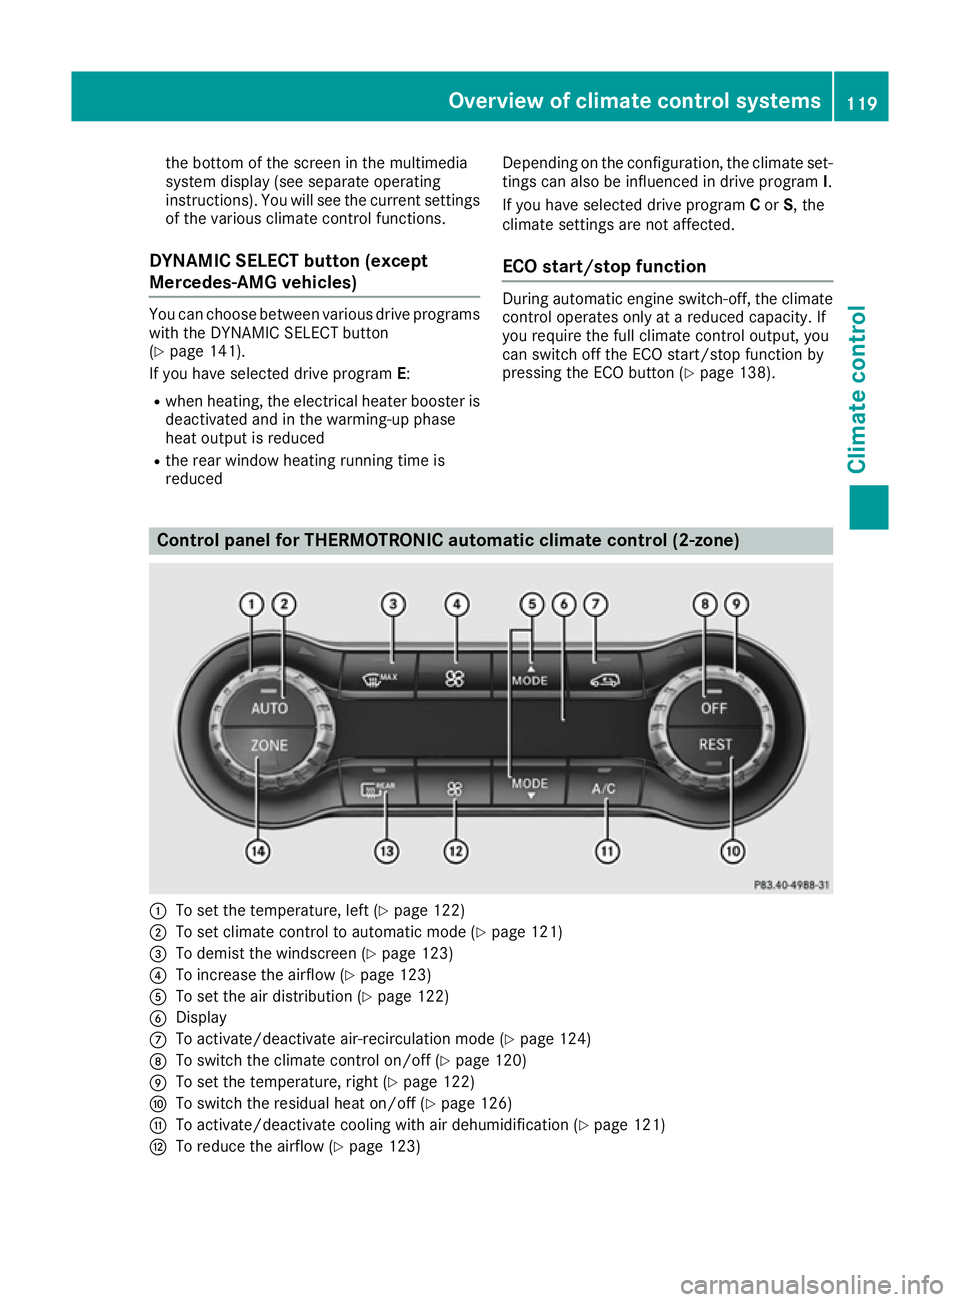
pressing the ECO button (Y page 138).Control panel for THERMOTRONIC automatic climate control (2-zone)
:
To set the temperature, left (Y page 122)
; To set climate control to automatic mode (Y page 121)
= To demist the windscreen (Y page 123)
? To increase the airflow (Y page 123)
A To set the air distribution (Y page 122)
B Display
C To activate/deactivate air-recirculation mode (Y page 124)
D To switch the climate control on/off (Y page 120)
E To set the temperature, right (Y page 122)
F To switch the residual heat on/off (Y page 126)
G To activate/deactivate cooling with air dehumidification (Y page 121)
H To reduce the airflow (Y page 123) Overvie
w of climate cont rol systems
119Climate control
Page 123 of 345
I
To switch the rear window heating on/off (Y page 124)
J To switch the ZONE function on/off (Y page 123)Information on using THERMOTRONIC
automatic climate control
Automatic climate control The following contains instructions and recom-
mendations to enable you to get the most out of
your THERMOTRONIC automatic climate con-
trol.
R Activate climate control using the Ãand
¿ buttons. The indicator lamps in the
à and¿ buttons light up.
R Set the temperature to 22 †.
R Use the "Windscreen demisting" function only
briefly until the windscreen is clear again.
R Use air-recirculation mode only briefly, e.g. if
there are unpleasant outside odours or when
in a tunnel. The windows could otherwise mist up as no fresh air is drawn into the vehicle in
air-recirculation mode.
R Use the ZONE function to adopt the temper-
ature settings on the driver's side for the
front-passenger side as well. The indicator
lamp in the ábutton goes out.
R Use the residual heat function if you want to
heat or ventilate the vehicle interior when the
ignition is switched off. The residual heat
function can be activated or deactivated only
with the ignition switched off.
R If you change the settings of the climate con-
trol system, the climate status display
appears for approximately three seconds at
the bottom of the screen in the multimedia
system display (see separate operating
instructions). You will see the current settings
of the various climate control functions.
DYNAMIC SELECT button (except
Mercedes-AMG vehicles) You can choose between various drive programs
with the DYNAMIC SELECT button
(Y page 141). If you have selected drive program
E:
R when heating, the electrical heater booster is
deactivated and in the warming-up phase
heat output is reduced
R the rear window heating running time is
reduced
Depending on the configuration, the climate set-
tings can also be influenced in drive program I.
If you have selected drive program Cor S, the
climate settings are not affected.
ECO start/stop function During automatic engine switch-off, the climate
control operates only at a reduced capacity. If
you require the full climate control output, you
can switch off the ECO start/stop function by
pressing the ECO button (Y page 138). Operating the climate control system
Switching the climate control on/off
General notes When climate control is switched off, the air
supply and air circulation are also switched off.
The windows could mist up. Therefore, switch
off climate control only briefly.
Air-conditioning system X
Turn the key to position 2in the ignition lock
(Y page 133).
X To switch on: turn controlAclockwise to
the desired position (except position 0)
(Y page 118).
X To switch off: turn controlAanti-clockwise
to position 0(Y page 118). 120
Operating the climate control systemClimate control
Page 131 of 345
R
the remote control being in an unfavourable
position in relation to the vehicle
R transmitting from an enclosed space
If the remote control battery is low, the battery
symbol on the left of the display is shown as
empty. Replace the remote control battery and
observe the important safety notes when doing so (Y page 129).
Activating/deactivating the auxiliary
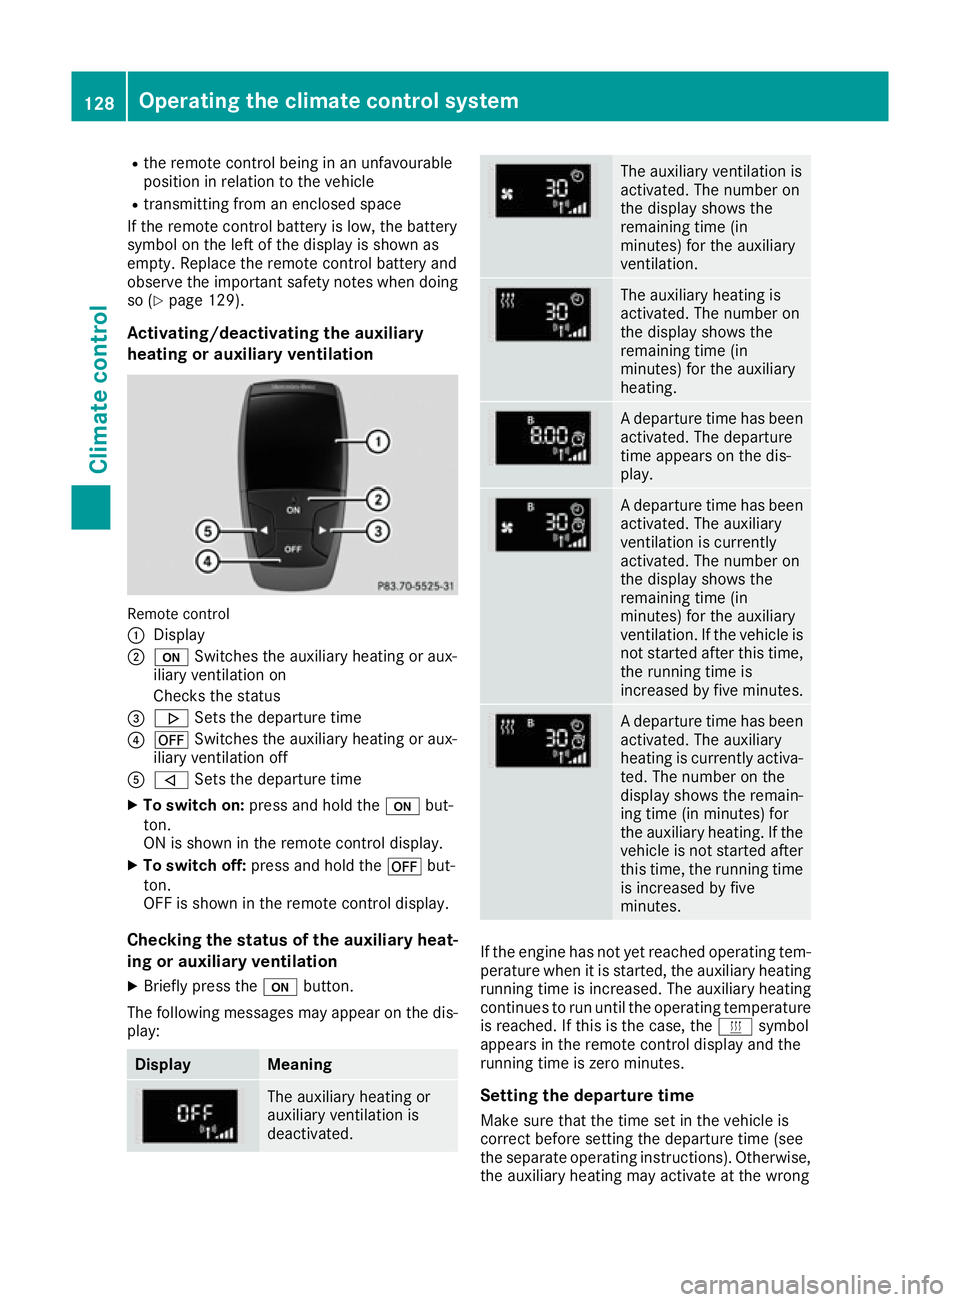
heating or auxiliary ventilation Remote control
:
Display
; u Switches the auxiliary heating or aux-
iliary ventilation on
Checks the status
= . Sets the departure time
? ^ Switches the auxiliary heating or aux-
iliary ventilation off
A , Sets the departure time
X To switch on: press and hold the ubut-
ton.
ON is shown in the remote control display.
X To switch off: press and hold the ^but-
ton.
OFF is shown in the remote control display.
Checking the status of the auxiliary heat-
ing or auxiliary ventilation
X Briefly press the ubutton.
The following messages may appear on the dis- play: Display Meaning
The auxiliary heating or
auxiliary ventilation is
deactivated. The auxiliary ventilation is
activated. The number on
the display shows the
remaining time (in
minutes) for the auxiliary
ventilation.
The auxiliary heating is
activated. The number on
the display shows the
remaining time (in
minutes) for the auxiliary
heating.
A departure time has been
activated. The departure
time appears on the dis-
play. A departure time has been
activated. The auxiliary
ventilation is currently
activated. The number on
the display shows the
remaining time (in
minutes) for the auxiliary
ventilation. If the vehicle is
not started after this time, the running time is
increased by five minutes. A departure time has been
activated. The auxiliary
heating is currently activa-
ted. The number on the
display shows the remain-
ing time (in minutes) for
the auxiliary heating. If the
vehicle is not started after this time, the running time
is increased by five
minutes. If the engine has not yet reached operating tem-
perature when it is started, the auxiliary heating running time is increased. The auxiliary heating
continues to run until the operating temperature
is reached. If this is the case, the ysymbol
appears in the remote control display and the
running time is zero minutes.
Setting the departure time
Make sure that the time set in the vehicle is
correct before setting the departure time (see
the separate operating instructions). Otherwise, the auxiliary heating may activate at the wrong 128
Operating the climate control systemClimate control
Page 132 of 345
time and at an unsuitable location. When setting
the departure time, observe the important
safety notes (Y page 126).
X Briefly press the ubutton.
X Press the ,or. button repeatedly
until the time to be changed appears in the
display.
X Press the uand^ buttons at the same
time.
The Îsymbol in the remote control display
flashes.
X Press the ,or. button to set the
desired departure time.
i The longer you press the
,or. but-
ton, the faster the time changes.
X Press the uand^ buttons at the same
time.
The new departure time is stored.
Activating the set departure time X Briefly press the ubutton.
X Press the ,or. button repeatedly
until the desired departure time appears in
the display.
X Press the ubutton.
The Ísymbol, the departure time and,
depending on the selected departure time,
the letter A, BorCappear in the display.
Deactivating the set departure time
X Briefly press the ubutton.
The status of the auxiliary heating is shown on
the display.
X Press the .button.
The first departure time stored appears on the
display.
X Press the ^button.
OFF is shown in the remote control display.
Replacing the remote control battery Important safety notes
G
WARNING
Batteries contain toxic and corrosive substan- ces. If batteries are swallowed, it can result in
severe health problems. There is a risk of fatal injury. Keep batteries out of the reach of children. If
a battery is swallowed, seek medical attention
immediately. H
Environmental note Batteries contain pollutants.
It is illegal to dispose of them
with the household rubbish.
They must be collected sep-
arately and disposed of in anenvironmentally responsible
recycling system. Dispose of batteries in an
environmentally responsible
manner. Take discharged
batteries to a qualified spe-
cialist workshop or to a col-
lection point for used batter-
ies.
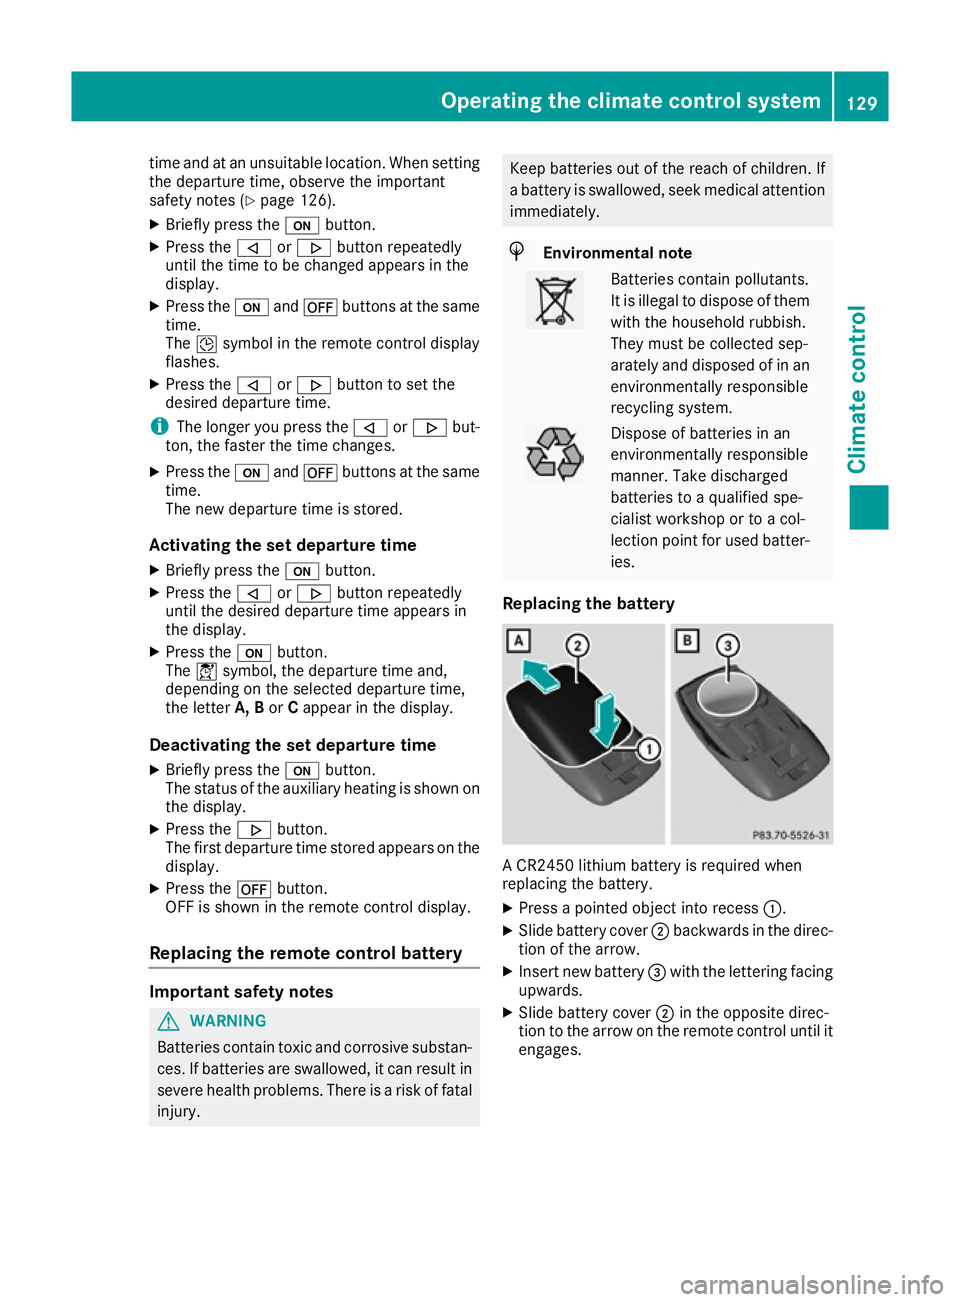
Replacing the battery A CR2450 lithium battery is required when
replacing the battery.
X Press a pointed object into recess :.
X Slide battery cover ;backwards in the direc-
tion of the arrow.
X Insert new battery =with the lettering facing
upwards.
X Slide battery cover ;in the opposite direc-
tion to the arrow on the remote control until it engages. Operating the climate control system
129Climate control Z
Page 138 of 345
G
WARNING
Combustion engines emit poisonous exhaust
gases such as carbon monoxide. Inhaling
these exhaust gases leads to poisoning. There is a risk of fatal injury. Therefore never leave
the engine running in enclosed spaces with-
out sufficient ventilation. G
WARNING
Flammable materials introduced through
environmental influence or by animals can
ignite if in contact with the exhaust system or parts of the engine that heat up. There is a risk
of fire.
Carry out regular checks to make sure that
there are no flammable foreign materials in
the engine compartment or in the exhaust
system.
General notes Vehicles with a petrol engine:
the engine runs
at a higher engine speed during the cold start
procedure so that the catalytic converter can
reach operating temperature more quickly. The
sound of the engine may change as a result.
Manual transmission You can only start the engine when the clutch
pedal is fully depressed.
X Depress the brake pedal and keep it
depressed.
X Depress the clutch pedal fully.
X Shift to neutral N.
Automatic transmission X
Shift the transmission to position
P(Y page 144).
The transmission position indicator in the
multifunction display shows P(Y page 144).
i You can start the engine in transmission
position Pand N. Starting procedure using the key To start the engine using the key instead of the
Start/Stop button, pull the Start/Stop button
out of the ignition lock.
X To start a diesel engine: turn the key to
position 2in the ignition lock (Y page 133).
The % preglow indicator lamp in the instru-
ment cluster lights up.
X Turn the key to position 3(Y page 133) in the
ignition lock and release it as soon as the
engine is running.
Starting procedure using the Start/
Stop button The Start/Stop button can be used to start the
vehicle manually without inserting the key in the ignition lock. The key must be in the vehicle and the Start/Stop button must be inserted in the
ignition lock. This mode for starting the engine
manually operates independently of the ECO
start/stop automatic engine start function.
You can start the engine if a valid key is in the
vehicle. Switch off the engine and always take
the key with you when leaving the vehicle, even
if you only leave it for a short time. Pay attention
to the important safety notes.
X Vehicles with automatic transmission:
depress the brake pedal and keep it
depressed.
X Vehicles with manual transmission:
depress the clutch pedal and keep it
depressed.
X Press the Start/Stop button once
(Y page 133).
Vehicles with a petrol engine: the engine
starts.
Vehicles with a diesel engine: preglow is
activated and the engine starts. Pulling away
General notes G
WARNING
Vehicles with automatic transmission:
If the engine speed is above the engine idling speed and you then engage transmission Driving
135Driving and parking
Z