2016 MERCEDES-BENZ CLA COUPE oil pressure
[x] Cancel search: oil pressurePage 7 of 345

1, 2, 3 ...
4ETS (Electronic Traction System) see ETS/4ETS (Electronic Trac-
tion System)
4MATIC
Display message ............................ 244
4MATIC (permanent four-wheel
drive) .................................................. 176
12 V socket
see Sockets A
ABS (Anti-lock Braking System) Display message ............................ 217
Function/notes ................................ 66
Important safety notes .................... 66
Warning lamp .................................2 50
Accident
Automatic measures after an acci-
dent ................................................. 53
Activating media mode
General notes ................................ 266
Activating/deactivating air-recir-
culation mode ................................... .124
Activating/deactivating cooling
with air dehumidification ................. 121
Active Brake Assist
Activating or deactivating .............. 209
Display message ............................ 223
Function/notes ................................ 67
ADAPTIVE BRAKE ................................. 73
Adaptive brake lights .......................... 69
Adaptive Damping System
Function/notes ............................ .176
Adaptive Highbeam Assist
Display message ............................ 231
Function/notes ............................ .109
Switching on/off ........................... 110
Additional speedometer ................... 210
Additives (engine oil) ........................ 331
Address book
See also Digital Owner's Manual ... 259
Adjusting the headlamp range ......... 108
Adjusting the volume
COMAND Online ............................ 260 Adjusting volume
Audio 20 ........................................ 260
Air conditioning
General notes ................................ 117
Air filter (white display message) .... 234
Air pressure
see Tyre pressure
Air vents
Important safety notes .................. 130
Rear ............................................... 131
Setting the centre air vents ........... 131
Setting the side air vents .............. .131
Air-conditioning system
see Climate control
Airbag
Automatic front-passenger front
airbag deactivatio n .......................... 47
Introduction ..................................... 44
PASSENGER AIR BAG indicator
lamps ............................................... 40
Airbags
Display message ............................ 226
Front airbag (driver, front
passenger) ....................................... 45
Important safety guidelines ............. 44
Kneebag .......................................... .46
Sidebag ............................................ 46
Triggering ......................................... 51
Windowbag ...................................... 46
Alarm
ATA (Anti-Theft Alarm system) ......... 73
Switching off (ATA) .......................... 73
Switching the function on/off
(ATA) ................................................ 73
Alarm system
see ATA (Anti-Theft Alarm system)
AMG
Performance Seat .......................... 101
RIDE CONTROL sports suspen-
sion ................................................ 175
AMG menu (on-board computer) ..... 213
AMG Performance exhaust sys-
tem ..................................................... 139
AMG RIDE CONTROL
General Information ....................... 175
Anti-glare film .................................... 279
Anti-lock braking system
see ABS (Anti-lock Braking System) 4
Index
Page 23 of 345
Installing the module .....................2
64
Introduction ................................... 263
Saving/deleting the PIN for the
SIM card ........................................ 266
Settings ......................................... 266
SIM card mode .............................. 265
Text messages ............................... 266
Transferring the phone book .......... 266
Temperature
Coolant .......................................... 201
Coolant (on-board computer,
Mercedes-AMG vehicles) .............. .213
Engine oil (on-board computer,
Mercedes-AMG vehicles) .............. .213
Outside temperature ..................... .200
Setting (climate control) ................ 122
Transmission oil (on-board com-
puter, Mercedes-AMG vehicles) ..... 213
TEMPOMAT
Function/notes ............................ .162
Text messages
Telephone module with Blue-
tooth ®
(SAP profile) ....................... 266
Through-loading ................................ 271
Timing (RACETIMER) ......................... 214
TIREFIT kit .......................................... 296
Declaration of conformity ................ 27
Important safety notes .................. 296
Storage location ............................ 294
Tyre pressure not reached ............. 297
Tyre pressure reached ................... 298
Top Tether ............................................ 56
Total distance recorder .................... 203
Tow-away protection
Activating ......................................... 74
Deactivating ..................................... 74
Function .......................................... .74
Tow-starting
Emergency engine starting ............ 307
Fitting the towing ey e.................... 305
Important safety notes .................. 304
Removing the towing eye ............... 305
Towing
Important safety notes .................. 304
Notes for 4MATIC vehicles ............ 307
Transporting the vehicle ................ 307 Towing a trailer
Axle load, permissibl e.................... 334
ESP ®
(Electronic Stability Pro-
gram) ............................................... 72
Failure check for LEDs ................... 199
General notes ................................ 196
Parking Pilot .................................. 180
Pulling away with a traile r.............. 136
Trailer tow hitch display message .. 245
Towing away
Fitting the towing ey e.................... 305
Removing the towing eye ............... 305
With both axles on the ground ....... 306
With front axle raised ..................... 306
Towing eye ......................................... 294
Traffic Sign Assist
Activating ....................................... 191
Activating/deactivating the warn- ing function .................................... 208
Display message ............................ 236
Function/note s............................. 190
Important safety notes .................. 191
Instrument cluster display ............. 191
Trailer
Folding the ball coupling in/out ..... 197
Trailer coupling
see Towing a trailer
Trailer towing
7-pin connecto r............................. 199
Blind Spot Assist ............................ 193
Cleaning the trailer tow hitch ......... 290
Coupling up a traile r...................... 198
Decoupling a trailer ....................... 198
Driving tip s.................................... 196
Folding in the ball coupling ............ 197
Folding out the ball coupling .......... 197
Important safety notes .................. 194
Lights display message .................. 228
Power supply ................................. 198
Trailer load s................................... 334
Transmission
see Automatic transmission
see Manual transmission
Transmission position display
(DIRECT SELECT lever) ...................... 144
Transporting the vehicle .................. 30720
Index
Page 151 of 345
Holding the vehicle stationary on uphill
gradients G
WARNING
If the clutch overheats, the electronic man-
agement system is automatically deactivated. This interrupts the power transmission. The
vehicle may, for example, roll backwards on
gradients. There is a risk of an accident.
Never hold the vehicle stationary on uphill
gradients by depressing the accelerator.
The clutch may overheat if you hold the vehicle
stationary on uphill gradients by depressing the accelerator pedal. If the clutch overheats, a
warning tone sounds.
All vehicles (except Mercedes-AMG vehi-
cles): theStop
Stop vehicle vehicle Shift
Shiftto
toP
PLeave
Leave
engine running
engine running display message appears in
the multifunction display. You will only be able to
continue your journey once the clutch has
cooled down and the display message in the
multifunction display has disappeared.
Mercedes-AMG vehicles: theTrans. oil Trans. oil
overheated Drive on with care
overheated Drive on with care display
message appears in the multifunction display.
Do not hold the vehicle stationary on uphill gra- dients by depressing the accelerator pedal.
Instead, only ever hold the vehicle stationary on
uphill gradients by:
R depressing the brake pedal
R activating the HOLD function
R applying the electric parking brake
Kickdown Use kickdown for maximum acceleration:
X Depress the accelerator pedal beyond the
pressure point.
The automatic transmission shifts to a lower
gear depending on the engine speed.
X Ease off the accelerator pedal once the
desired speed is reached.
The automatic transmission shifts back up.
Mercedes-AMG vehicles: it is only possible to
use kickdown in the automatic drive programs
and in temporary manual drive program M.
When manual drive program Mis selected per-
manently, kickdown is not possible. For further information on kickdown in manual
drive program
M(Y page 152).
Towing a trailer Towing a trailer is not possible with all models.
For further information, see (Y page 196).
X Drive in the middle of the engine speed range
on uphill gradients.
X Depending on the uphill or downhill gradient,
select a lower gear (Y page 160), even if
cruise control, Distance Pilot DISTRONIC or
the speed limiter are activated. Drive programs
All vehicles (except Mercedes-AMG
vehicles) Drive program C (Comfort)
Drive program Cis characterised by the follow-
ing:
R the vehicle exhibits comfortable, economical
driving characteristics.
R the vehicle pulls away more gently in forward
and reverse gears unless the accelerator
pedal is depressed fully.
R the vehicle has improved driving stability, e.g.
on slippery road surfaces.
R optimal fuel consumption resulting from the
automatic transmission shifting up sooner.
The vehicle is driven in the low engine speed
range and the wheels are less likely to spin.
Drive program S (Sport) Drive program Sis characterised by the follow-
ing:
R sporty engine settings.
R the automatic transmission shifts up later.
Fuel consumption may be higher as a result of
the later automatic transmission shift points.
Drive program I (Individual)
In drive program I, the following properties of
the drive program can be selected:
R the drive (engine and transmission manage-
ment)
R the suspension (vehicles with adjustable
damping or AMG RIDE CONTROL)
R the steering 148
Automatic transmissionDriving and parking
Page 155 of 345
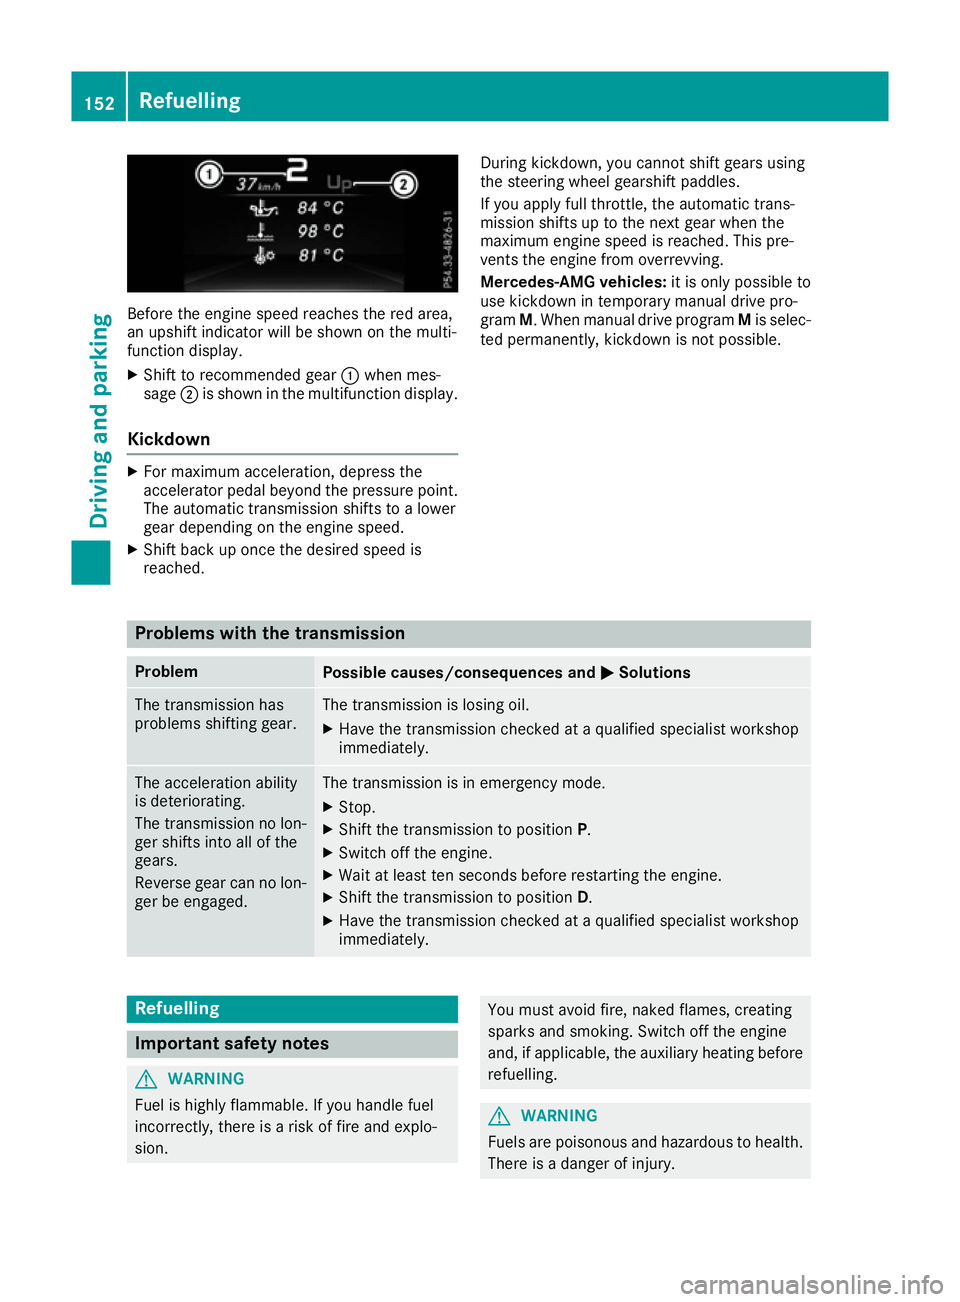
Before the engine speed reaches the red area,
an upshift indicator will be shown on the multi-
function display.
X Shift to recommended gear :when mes-
sage ;is shown in the multifunction display.
Kickdown X
For maximum acceleration, depress the
accelerator pedal beyond the pressure point.
The automatic transmission shifts to a lower
gear depending on the engine speed.
X Shift back up once the desired speed is
reached. During kickdown, you cannot shift gears using
the steering wheel gearshift paddles.
If you apply full throttle, the automatic trans-
mission shifts up to the next gear when the
maximum engine speed is reached. This pre-
vents the engine from overrevving.
Mercedes-AMG vehicles:
it is only possible to
use kickdown in temporary manual drive pro-
gram M. When manual drive program Mis selec-
ted permanently, kickdown is not possible. Problems with the transmission
Problem
Possible causes/consequences and
M MSolutions The transmission has
problems shifting gear. The transmission is losing oil.
X Have the transmission checked at a qualified specialist workshop
immediately. The acceleration ability
is deteriorating.
The transmission no lon-
ger shifts into all of the
gears.
Reverse gear can no lon-
ger be engaged. The transmission is in emergency mode.
X Stop.
X Shift the transmission to position P.
X Switch off the engine.
X Wait at least ten seconds before restarting the engine.
X Shift the transmission to position D.
X Have the transmission checked at a qualified specialist workshop
immediately. Refuelling
Important safety notes
G
WARNING
Fuel is highly flammable. If you handle fuel
incorrectly, there is a risk of fire and explo-
sion. You must avoid fire, naked flames, creating
sparks and smoking. Switch off the engine
and, if applicable, the auxiliary heating before refuelling. G
WARNING
Fuels are poisonous and hazardous to health. There is a danger of injury. 152
RefuellingDriving and parking
Page 286 of 345
Topping up engine oil
G
WARNING
Certain components in the engine compart-
ment could be very hot, e.g. the engine, the
radiator and parts of the exhaust system.
There is a risk of injury when accessing the
engine compartment.
As far as possible, allow the engine to cool
down and only touch the components descri- bed in the following. G
WARNING
If engine oil comes into contact with hot com- ponents in the engine compartment, it may
ignite. There is a risk of fire and injury.
Make sure that engine oil does not spill out
over the filler neck. Allow the engine to cool
down and thoroughly clean the components
that have come into contact with engine oil
before you start the engine. H
Environmental note
When topping up the oil, take care not to spill
any. If oil enters the soil or waterways, it is
harmful to the environment.
! Use only engine oils and oil filters that are
approved for vehicles with a service system. A
list of the engine oils and oil filters that have
been tested and approved in accordance with Mercedes-Benz Specifications for Service
Products is available at any Mercedes-Benz
Service Centre.
The following cause engine failure or damage
to the exhaust system:
R Use of engine oils and oil filters that have
not been expressly approved for the service system
R Replacement of engine oil and oil filter after
the replacement interval specified by the
service system has expired
R Use of engine oil additives
! Do not add too much oil. Topping up with too
much engine oil can result in damage to the
engine or to the catalytic converter. Have
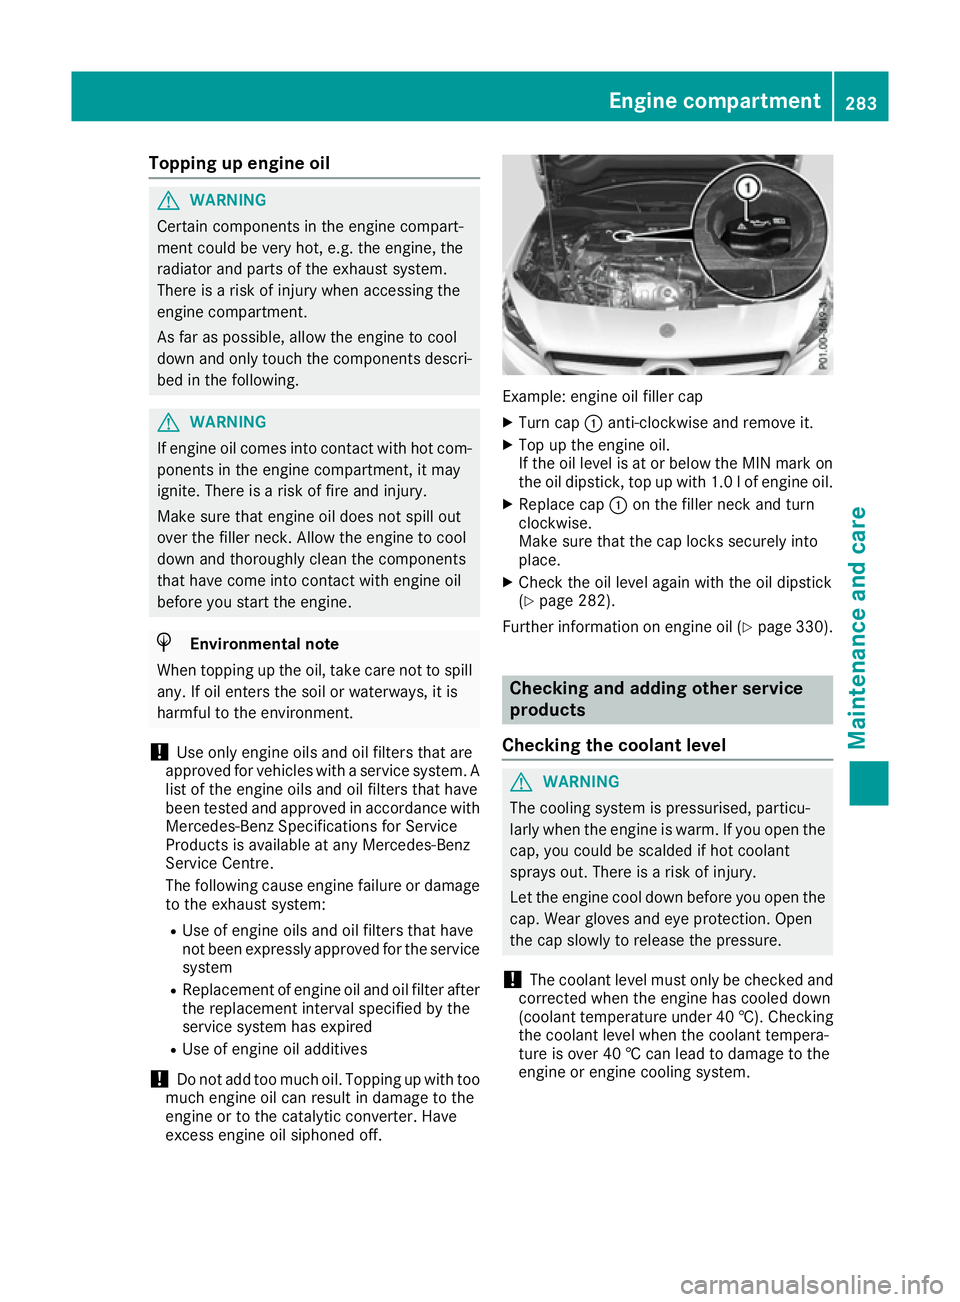
excess engine oil siphoned off. Example: engine oil filler cap
X Turn cap :anti-clockwise and remove it.
X Top up the engine oil.
If the oil level is at or below the MIN mark on
the oil dipstick, top up with 1.0 lof engine oil.
X Replace cap :on the filler neck and turn
clockwise.
Make sure that the cap locks securely into
place.
X Check the oil level again with the oil dipstick
(Y page 282).
Further information on engine oil (Y page 330). Checking and adding other service
products
Checking the coolant level G
WARNING
The cooling system is pressurised, particu-
larly when the engine is warm. If you open the cap, you could be scalded if hot coolant
sprays out. There is a risk of injury.
Let the engine cool down before you open the
cap. Wear gloves and eye protection. Open
the cap slowly to release the pressure.
! The coolant level must only be checked and
corrected when the engine has cooled down
(coolant temperature under 40 †). Checking
the coolant level when the coolant tempera-
ture is over 40 † can lead to damage to the
engine or engine cooling system. Engine compartment
283Maintenance and care Z
Page 287 of 345
X
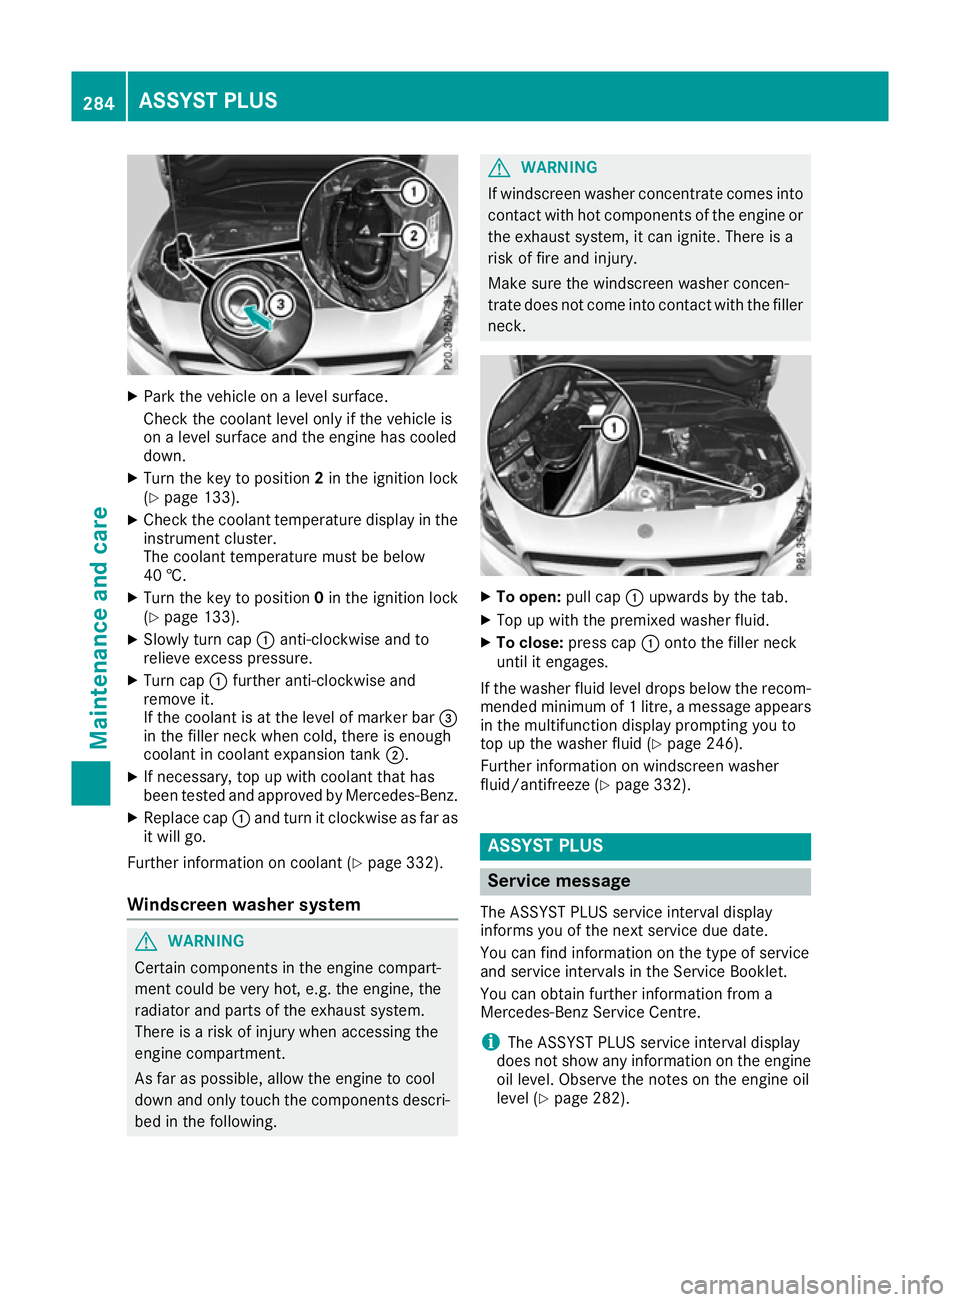
Park the vehicle on a level surface.
Check the coolant level only if the vehicle is
on a level surface and the engine has cooled
down.
X Turn the key to position 2in the ignition lock
(Y page 133).
X Check the coolant temperature display in the
instrument cluster.
The coolant temperature must be below
40 †.
X Turn the key to position 0in the ignition lock
(Y page 133).
X Slowly turn cap :anti-clockwise and to
relieve excess pressure.
X Turn cap :further anti-clockwise and
remove it.
If the coolant is at the level of marker bar =
in the filler neck when cold, there is enough
coolant in coolant expansion tank ;.
X If necessary, top up with coolant that has
been tested and approved by Mercedes-Benz.
X Replace cap :and turn it clockwise as far as
it will go.
Further information on coolant (Y page 332).
Windscreen washer system G
WARNING
Certain components in the engine compart-
ment could be very hot, e.g. the engine, the
radiator and parts of the exhaust system.
There is a risk of injury when accessing the
engine compartment.
As far as possible, allow the engine to cool
down and only touch the components descri- bed in the following. G
WARNING
If windscreen washer concentrate comes into contact with hot components of the engine or
the exhaust system, it can ignite. There is a
risk of fire and injury.
Make sure the windscreen washer concen-
trate does not come into contact with the filler neck. X
To open: pull cap:upwards by the tab.
X Top up with the premixed washer fluid.
X To close: press cap :onto the filler neck
until it engages.
If the washer fluid level drops below the recom- mended minimum of 1 litre, a message appears in the multifunction display prompting you to
top up the washer fluid (Y page 246).
Further information on windscreen washer
fluid/antifreeze (Y page 332). ASSYST PLUS
Service message
The ASSYST PLUS service interval display
informs you of the next service due date.
You can find information on the type of service
and service intervals in the Service Booklet.
You can obtain further information from a
Mercedes-Benz Service Centre.
i The ASSYST PLUS service interval display
does not show any information on the engine oil level. Observe the notes on the engine oil
level (Y page 282). 284
ASSYST PLUSMaintenance and care
Page 290 of 345
X
Rinse the vehicle with clean water and dry
thoroughly with a chamois.
X Do not let the cleaning agent dry on the paint-
work.
When using the vehicle in winter, remove all
traces of road salt deposits carefully and as
soon as possible.
High-pressure cleaning equipment G
WARNING
The water jet of circular-jet nozzles (dirt grind- ers) can cause damage not visible from the
outside to tyres or chassis components. Com-
ponents damaged in this way can unexpect-
edly fail. There is a risk of an accident.
Do not use high-pressure cleaners with circu-
lar-jet nozzles to clean the vehicle. Have dam- aged tyres or chassis components replaced
immediately.
! Always maintain a distance of at least 30 cm
between the vehicle and the high-pressure
cleaner nozzle. Information about the correct
distance is available from the equipment
manufacturer.
Move the high-pressure cleaner nozzle
around when cleaning your vehicle.
Do not aim directly at any of the following:
R tyres
R door gaps, roof gaps, joints etc.
R electrical components
R battery
R plug connectors
R lamps
R seals
R trim elements
R ventilation slots
Damage to seals or electrical components
can lead to leaks or failures.
! Vehicles with decorative film: parts of your
vehicle are covered with a decorative film.
Maintain a distance of at least 70 cm between
the parts of the vehicle covered with the film
and the nozzle of the high pressure cleaner.
Information about the correct distance is
available from the equipment manufacturer.
Move the high-pressure cleaner nozzle
around whilst cleaning. Cleaning the paintwork !
Do not affix:
R stickers
R films
R magnetic plates or similar items
to painted surfaces. You could otherwise
damage the paintwork.
Scratches, corrosive deposits, areas affected by
corrosion and damage caused by inadequate
care cannot always be completely repaired. In
such cases, visit a qualified specialist workshop.
X Remove impurities immediately, where pos-
sible, whilst avoiding rubbing too hard.
X Soak insect remains with insect remover and
rinse off the treated areas afterwards.
X Soak bird droppings with water and rinse off
the treated areas afterwards.
X Remove coolant, brake fluid, tree resins, oils,
fuels and greases by rubbing gently with a
cloth soaked in petroleum ether or lighter
fluid.
X Use tar remover to remove tar stains.
X Use silicone remover to remove wax.
Care and treatment of matt paintwork !
Never polish the vehicle or the light alloy
wheels. Polishing makes the paintwork shiny.
! The following may cause the paint to
become shiny and thus reduce the matt
effect:
R vigorous rubbing with unsuitable materials
R frequent use of car washes
R washing the vehicle in direct sunlight
! Never use paint cleaner, buffing or polishing
products, or gloss preserver, e.g. wax, for the purpose of paintwork care. These products
are only suitable for high-gloss surfaces. Their
use on vehicles with matt paintwork leads to
considerable surface damage or, more spe-
cifically, to shiny, spotted areas.
Always have paintwork repairs carried out at a
qualified specialist workshop.
! Do not use wash programs with a hot wax
treatment under any circumstances.
Observe these notes if your vehicle has a clear
matt finish. This will help you to avoid damage to the paintwork due to incorrect treatment. Care
287Maintenance and care Z
Page 293 of 345
Cleaning the exhaust tail pipes
G
WARNING
The exhaust tail pipe and tail pipe trim can
become very hot. If you come into contact
with these parts of the vehicle, you could burn
yourself. There is a risk of injury.
Always be particularly careful around the
exhaust tail pipe and the tail pipe trim. Allow
these components to cool down before touch-
ing them.
! Do not clean the exhaust pipe with acid-
based cleaning agents, such as sanitary
cleanser or wheel cleaner.
! Mercedes-AMG vehicles with black exhaust
pipes: the black-chrome tailpipe finishers
should not be polished with a chrome polish.
They will otherwise lose their black sheen. For optimal care, the finishers should be rubbed
with a lightly oiled cloth after every car wash.
Commercially available engine and care oils
are suitable for this.
For heavier soiling, you can apply a fine paint- work polish with a microfibre cloth. Remove
the excess polish residue after polishing.
Impurities combined with the effects of road grit and corrosive environmental factors may cause
flash rust to form on the surface. You can
restore the original shine of the exhaust pipe by
cleaning it regularly, especially in winter and
after washing the vehicle.
X Clean the exhaust pipe with a care product
tested and approved by Mercedes-Benz.
Cleaning the trailer tow hitch H
Environmental note
Dispose of oily and greasy cloths in an envi-
ronmentally-responsible manner.
! Do not clean the ball coupling with a high-
pressure cleaner. Do not use solvents.
! Please note the care instructions in the
trailer coupling manufacturer's operating
instructions. X
Remove rust, e.g. with a wire brush.
X Remove dirt with a clean, lint-free cloth or a
brush.
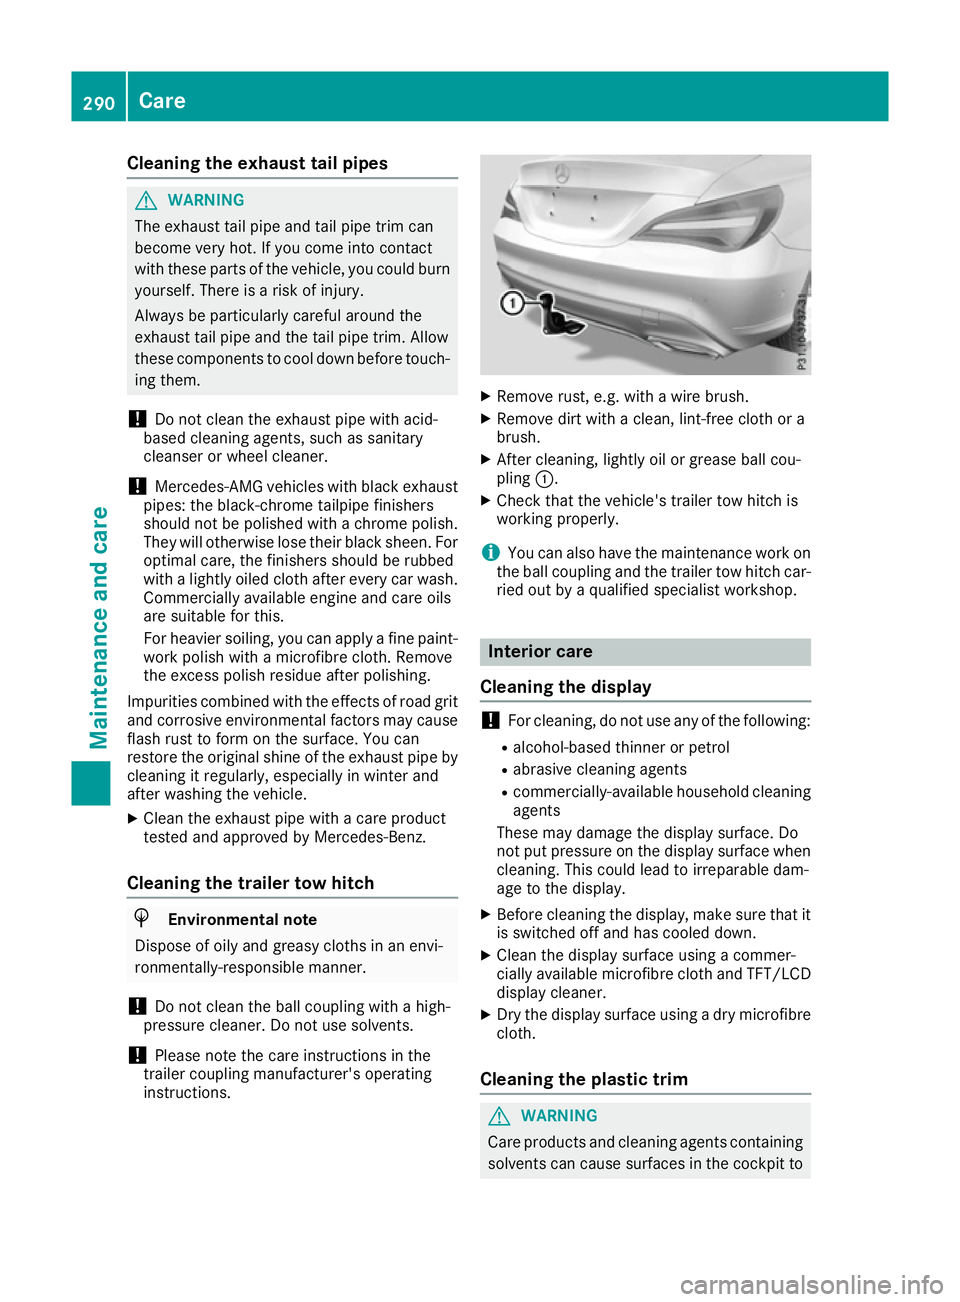
X After cleaning, lightly oil or grease ball cou-
pling :.
X Check that the vehicle's trailer tow hitch is
working properly.
i You can also have the maintenance work on
the ball coupling and the trailer tow hitch car-
ried out by a qualified specialist workshop. Interior care
Cleaning the display !
For cleaning, do not use any of the following:
R alcohol-based thinner or petrol
R abrasive cleaning agents
R commercially-available household cleaning
agents
These may damage the display surface. Do
not put pressure on the display surface when
cleaning. This could lead to irreparable dam-
age to the display.
X Before cleaning the display, make sure that it
is switched off and has cooled down.
X Clean the display surface using a commer-
cially available microfibre cloth and TFT/LCD
display cleaner.
X Dry the display surface using a dry microfibre
cloth.
Cleaning the plastic trim G
WARNING
Care products and cleaning agents containing solvents can cause surfaces in the cockpit to 290
CareMaintenance and care