2016 MERCEDES-BENZ CLA COUPE brake light
[x] Cancel search: brake lightPage 167 of 345
X
Accelerate the vehicle to the desired speed.
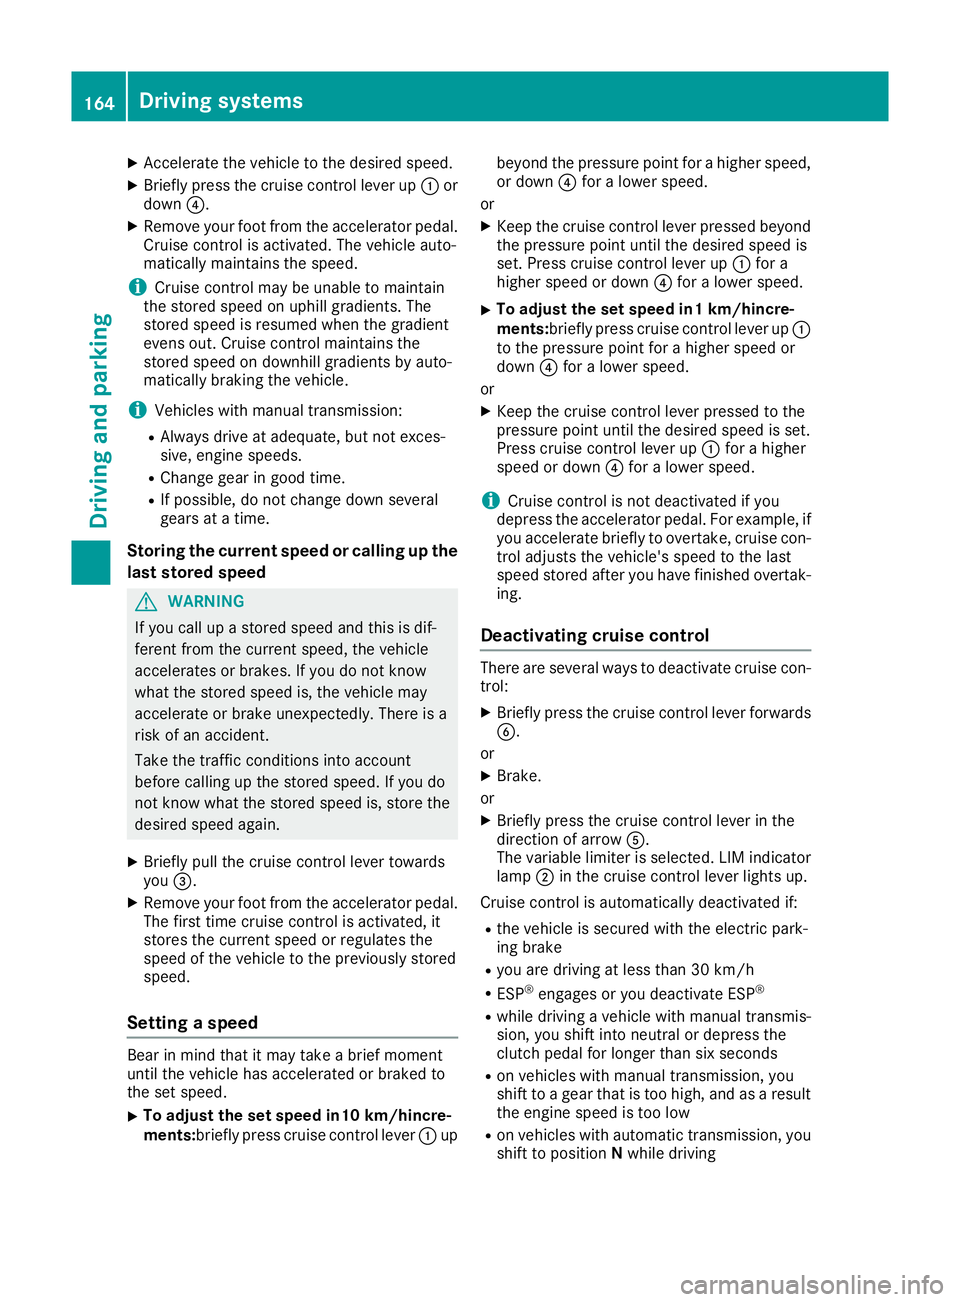
X Briefly press the cruise control lever up :or
down ?.
X Remove your foot from the accelerator pedal.
Cruise control is activated. The vehicle auto-
matically maintains the speed.
i Cruise control may be unable to maintain
the stored speed on uphill gradients. The
stored speed is resumed when the gradient
evens out. Cruise control maintains the
stored speed on downhill gradients by auto-
matically braking the vehicle.
i Vehicles with manual transmission:
R Always drive at adequate, but not exces-
sive, engine speeds.
R Change gear in good time.
R If possible, do not change down several
gears at a time.
Storing the current speed or calling up the
last stored speed G
WARNING
If you call up a stored speed and this is dif-
ferent from the current speed, the vehicle
accelerates or brakes. If you do not know
what the stored speed is, the vehicle may
accelerate or brake unexpectedly. There is a
risk of an accident.
Take the traffic conditions into account
before calling up the stored speed. If you do
not know what the stored speed is, store the
desired speed again.
X Briefly pull the cruise control lever towards
you =.
X Remove your foot from the accelerator pedal.
The first time cruise control is activated, it
stores the current speed or regulates the
speed of the vehicle to the previously stored
speed.
Setting a speed Bear in mind that it may take a brief moment
until the vehicle has accelerated or braked to
the set speed.
X To adjust the set speed in10 km/hincre-
ments:
briefly press cruise control lever :up beyond the pressure point for a higher speed,
or down ?for a lower speed.
or X Keep the cruise control lever pressed beyond
the pressure point until the desired speed is
set. Press cruise control lever up :for a
higher speed or down ?for a lower speed.
X To adjust the set speed in1 km/hincre-
ments:
briefly press cruise control lever up :
to the pressure point for a higher speed or
down ?for a lower speed.
or X Keep the cruise control lever pressed to the
pressure point until the desired speed is set.
Press cruise control lever up :for a higher
speed or down ?for a lower speed.
i Cruise control is not deactivated if you
depress the accelerator pedal. For example, if
you accelerate briefly to overtake, cruise con-
trol adjusts the vehicle's speed to the last
speed stored after you have finished overtak-
ing.
Deactivating cruise control There are several ways to deactivate cruise con-
trol:
X Briefly press the cruise control lever forwards
B.
or X Brake.
or X Briefly press the cruise control lever in the
direction of arrow A.
The variable limiter is selected. LIM indicator lamp ;in the cruise control lever lights up.
Cruise control is automatically deactivated if:
R the vehicle is secured with the electric park-
ing brake
R you are driving at less than 30 km/h
R ESP ®
engages or you deactivate ESP ®
R while driving a vehicle with manual transmis-
sion, you shift into neutral or depress the
clutch pedal for longer than six seconds
R on vehicles with manual transmission, you
shift to a gear that is too high, and as a result
the engine speed is too low
R on vehicles with automatic transmission, you
shift to position Nwhile driving 164
Driving systemsDriving an
d parking
Page 168 of 345

If cruise control is deactivated, you will hear a
warning tone. You will see the Cruise con‐
Cruise con‐
trol off
trol off message in the multifunction display
for approximately five seconds.
i The last speed stored is cleared when you
switch off the engine. Speed limiter
General notes The limiter restricts the speed of the vehicle. The
limiter brakes automatically in order to adjust
the vehicle's speed to the stored speed.
You must select a lower gear in good time on
long and steep downhill gradients, especially if
the vehicle is laden or towing a trailer. On vehi-
cles with automatic transmission, you need to
have selected the manual drive program
M (Y page 150). By doing so, you will make use
of the braking effect of the engine. This relieves
the load on the brake system and prevents the
brakes from overheating and wearing too
quickly.
You can set a variable or permanent limit speed:
R Variable for maximum permissible speeds,
e.g. in built-up areas
R Permanent for a technically permitted max-
imum vehicle speed, e.g. when driving with
winter tyres fitted (Y page 166)
i The speed indicated in the speedometer
may differ slightly from the stored maximum
permissible speed.
Important safety notes If you fail to adapt your driving style, the speed
limiter can neither reduce the risk of an accident
nor override the laws of physics. The limiter can-
not take into account road, weather or traffic
conditions. The limiter is only an aid. You are
responsible for the distance to the vehicle in
front, for vehicle speed, for braking in good time
and for staying in lane.
If a new driver takes over, advise the new driver of the speed stored. Variable speed limiter General notes
:
Activates or increases speed
; LIM indicator lamp
= Activates at the current speed/last stored
speed
? Activates or reduces speed
A Switches between cruise control and the
variable speed limiter
B Switches off the speed limiter
With the cruise control lever, you can operate
cruise control or Distance Pilot DISTRONIC and
the variable speed limiter.
The LIM indicator lamp on the cruise control
lever indicates which system you have selected:
R LIM indicator lamp off: cruise control or Dis-
tance Pilot DISTRONIC is selected.
R LIM indicator lamp on: variable speed lim-
iter is selected.
When the engine is running, you can use the
cruise control lever to limit the speed to any
speed between 30 km/h and the maximum
design speed of the vehicle. If the set value of
the permanent limiter is lower then this value
applies (Y page 166).
Selecting the variable speed limiter
X Check whether LIM indicator lamp ;is on.
If it is on, the variable speed limiter is already
selected.
If it is not, press the cruise control lever in the direction of arrow A.
LIM indicator lamp ;in the cruise control
lever lights up. The variable limiter is selected. Driving systems
165Driving and parking Z
Page 170 of 345
Distance Pilot DISTRONIC
General notes Distance Pilot DISTRONIC regulates the speed
and automatically helps you maintain the dis-
tance to the vehicle detected in front. The sys-
tem detects vehicles using the radar sensor sys-
tem. Distance Pilot DISTRONIC brakes automat- ically to avoid exceeding the set speed or to
maintain the designated distance from the vehi- cle in front.
If Distance Pilot DISTRONIC detects that there is
a risk of a collision, you will be warned visually
and acoustically. Without your intervention, Dis- tance Pilot DISTRONIC cannot prevent a colli-
sion. An intermittent warning tone will then
sound and the distance warning lamp will light
up in the instrument cluster. Brake immediately
to increase the distance to the vehicle in front,
or take evasive action, provided it is safe to do
so.
Distance Pilot DISTRONIC operates in the range between 0 km/h and 200 km/h.
Shift into a lower gear in good time on long andsteep downhill gradients. Take particular note of
this when driving a laden vehicle. By doing so,
you will make use of the braking effect of the
engine. This relieves the load on the brake sys-
tem and prevents the brakes from overheating
and wearing too quickly.
Do not use Distance Pilot DISTRONIC on roads
with steep gradients.
For Distance Pilot DISTRONIC to assist you
when driving, the radar sensor system must be
operational.
Important safety notes G
WARNING
Distance Pilot DISTRONIC does not recognise
R people or animals
R stationary objects on the road, e.g. stopped
or parked vehicles
R oncoming vehicles or crossing traffic
As a result, Distance Pilot DISTRONIC may
neither give warnings nor intervene in such
situations. There is a risk of an accident.
Always pay careful attention to the traffic sit-
uation and be ready to brake. G
WARNING
Distance Pilot DISTRONIC cannot always
clearly identify other road users and complex
traffic situations.
In such cases, Distance Pilot DISTRONIC may:
R give an unnecessary warning and then
brake the vehicle
R neither give a warning nor intervene
R accelerate or brake unexpectedly
There is a risk of an accident.
Continue to drive carefully and be ready to
brake, especially if Distance Pilot DISTRONIC
warns you. G
WARNING
Distance Pilot DISTRONIC brakes your vehicle with up to 50% of the maximum possible
deceleration. If this deceleration is not suffi-
cient, Distance Pilot DISTRONIC alerts you
with a visual and acoustic warning. There is a
risk of an accident.
Apply the brakes yourself in these situations
and try to take evasive action.
! When Distance Pilot DISTRONIC or the
HOLD function is activated, the vehicle
brakes automatically in certain situations.
To avoid damage to the vehicle, deactivate
Distance Pilot DISTRONIC and the HOLD
function in the following or similar situations:
R when towing away
R in a car wash
If you fail to adapt your driving style, Distance
Pilot DISTRONIC can neither reduce the risk of
an accident nor override the laws of physics.
Distance Pilot DISTRONIC cannot take into
account road, weather or traffic conditions. Dis-
tance Pilot DISTRONIC is only an aid. You are
responsible for the distance to the vehicle in
front, for vehicle speed, for braking in good time
and for staying in lane. Driving syste
ms
167Driving an d parking Z
Page 174 of 345
X
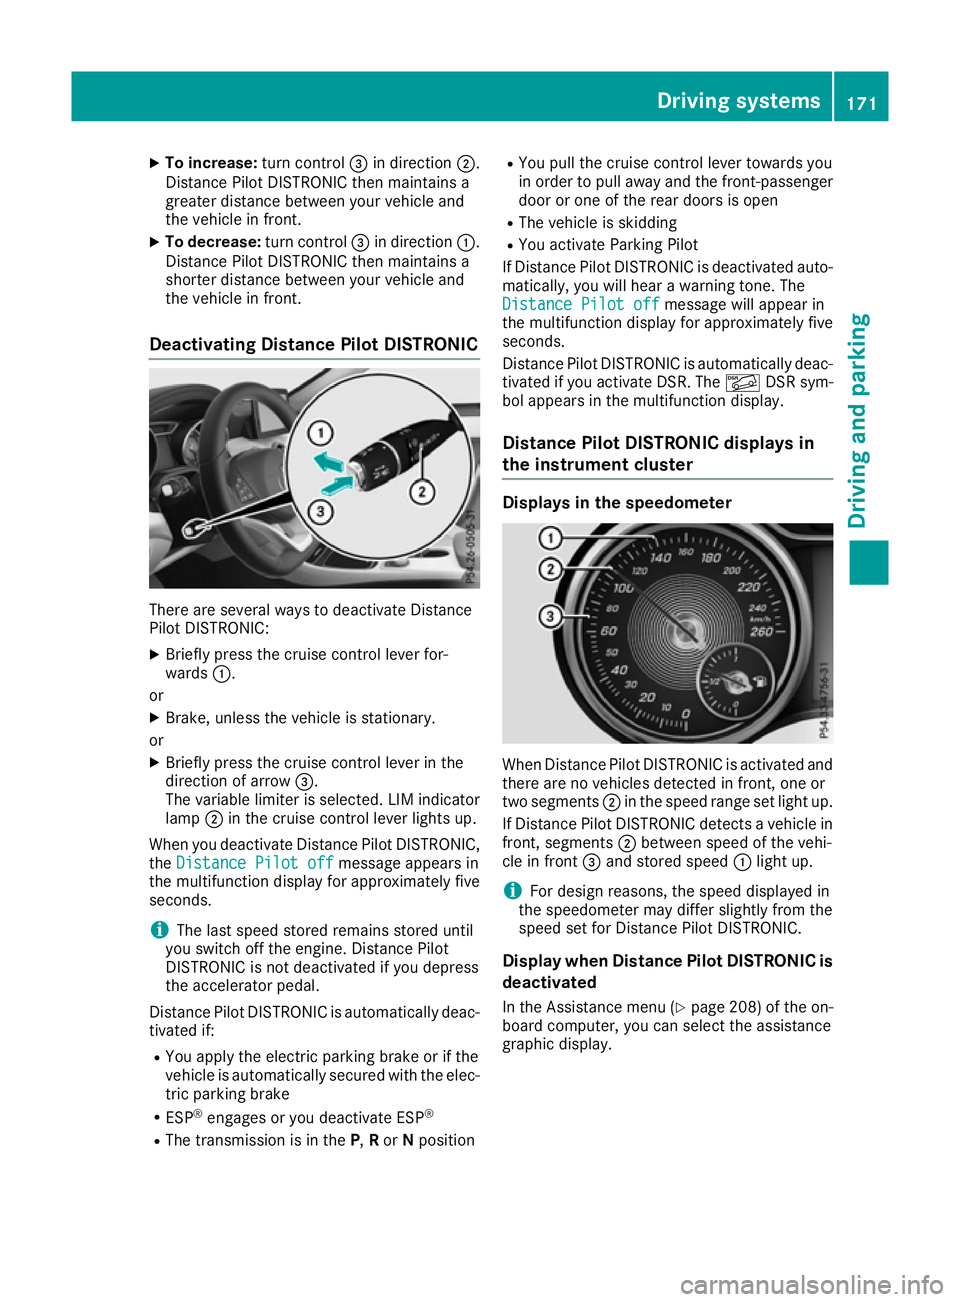
To increase: turn control=in direction ;.
Distance Pilot DISTRONIC then maintains a
greater distance between your vehicle and
the vehicle in front.
X To decrease: turn control=in direction :.
Distance Pilot DISTRONIC then maintains a
shorter distance between your vehicle and
the vehicle in front.
Deactivating Distance Pilot DISTRONIC There are several ways to deactivate Distance
Pilot DISTRONIC:
X Briefly press the cruise control lever for-
wards :.
or X Brake, unless the vehicle is stationary.
or X Briefly press the cruise control lever in the
direction of arrow =.
The variable limiter is selected. LIM indicator lamp ;in the cruise control lever lights up.
When you deactivate Distance Pilot DISTRONIC,
the Distance Pilot off
Distance Pilot off message appears in
the multifunction display for approximately five
seconds.
i The last speed stored remains stored until
you switch off the engine. Distance Pilot
DISTRONIC is not deactivated if you depress
the accelerator pedal.
Distance Pilot DISTRONIC is automatically deac- tivated if:
R You apply the electric parking brake or if the
vehicle is automatically secured with the elec-
tric parking brake
R ESP ®
engages or you deactivate ESP ®
R The transmission is in the P,Ror Nposition R
You pull the cruise control lever towards you
in order to pull away and the front-passenger
door or one of the rear doors is open
R The vehicle is skidding
R You activate Parking Pilot
If Distance Pilot DISTRONIC is deactivated auto- matically, you will hear a warning tone. The
Distance Pilot off
Distance Pilot off message will appear in
the multifunction display for approximately five
seconds.
Distance Pilot DISTRONIC is automatically deac- tivated if you activate DSR. The ÃDSR sym-
bol appears in the multifunction display.
Distance Pilot DISTRONIC displays in
the instrument cluster Displays in the speedometer
When Distance Pilot DISTRONIC is activated and
there are no vehicles detected in front, one or
two segments ;in the speed range set light up.
If Distance Pilot DISTRONIC detects a vehicle in
front, segments ;between speed of the vehi-
cle in front =and stored speed :light up.
i For design reasons, the speed displayed in
the speedometer may differ slightly from the
speed set for Distance Pilot DISTRONIC.
Display when Distance Pilot DISTRONIC is
deactivated
In the Assistance menu (Y page 208) of the on-
board computer, you can select the assistance
graphic display. Driving systems
171Driving and parking Z
Page 175 of 345
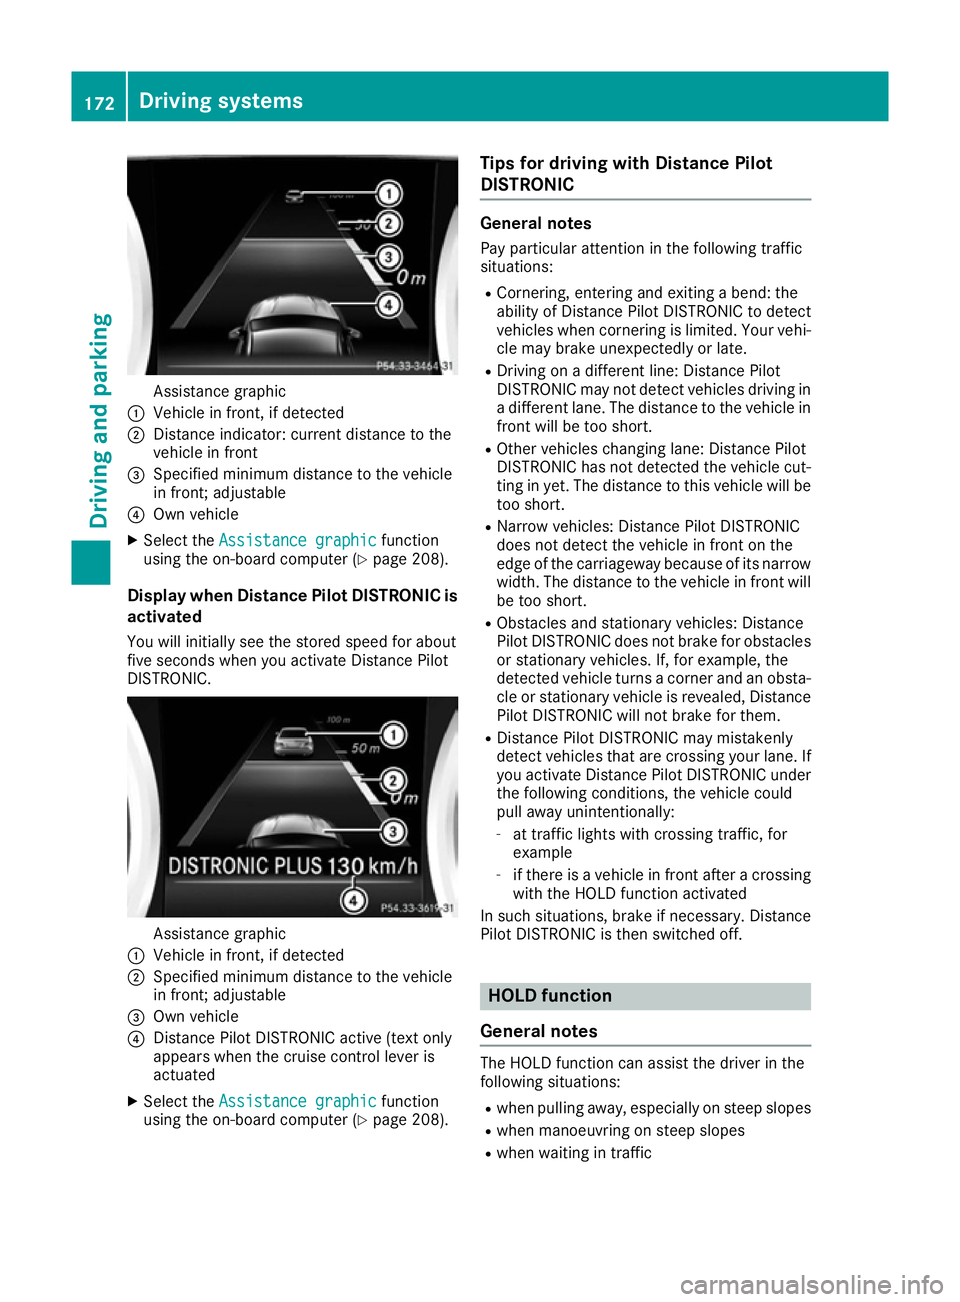
Assistance graphic
: Vehicle in front, if detected
; Distance indicator: current distance to the
vehicle in front
= Specified minimum distance to the vehicle
in front; adjustable
? Own vehicle
X Select the Assistance graphic
Assistance graphic function
using the on-board computer (Y page 208).
Display when Distance Pilot DISTRONIC is activated
You will initially see the stored speed for about
five seconds when you activate Distance Pilot
DISTRONIC. Assistance graphic
: Vehicle in front, if detected
; Specified minimum distance to the vehicle
in front; adjustable
= Own vehicle
? Distance Pilot DISTRONIC active (text only
appears when the cruise control lever is
actuated
X Select the Assistance graphic
Assistance graphic function
using the on-board computer (Y page 208).Tips for driving with Distance Pilot
DISTRONIC General notes
Pay particular attention in the following traffic
situations:
R Cornering, entering and exiting a bend: the
ability of Distance Pilot DISTRONIC to detect
vehicles when cornering is limited. Your vehi-
cle may brake unexpectedly or late.
R Driving on a different line: Distance Pilot
DISTRONIC may not detect vehicles driving in
a different lane. The distance to the vehicle in
front will be too short.
R Other vehicles changing lane: Distance Pilot
DISTRONIC has not detected the vehicle cut-
ting in yet. The distance to this vehicle will be
too short.
R Narrow vehicles: Distance Pilot DISTRONIC
does not detect the vehicle in front on the
edge of the carriageway because of its narrow
width. The distance to the vehicle in front will
be too short.
R Obstacles and stationary vehicles: Distance
Pilot DISTRONIC does not brake for obstacles
or stationary vehicles. If, for example, the
detected vehicle turns a corner and an obsta-
cle or stationary vehicle is revealed, Distance Pilot DISTRONIC will not brake for them.
R Distance Pilot DISTRONIC may mistakenly
detect vehicles that are crossing your lane. If
you activate Distance Pilot DISTRONIC under
the following conditions, the vehicle could
pull away unintentionally:
- at traffic lights with crossing traffic, for
example
- if there is a vehicle in front after a crossing
with the HOLD function activated
In such situations, brake if necessary. Distance Pilot DISTRONIC is then switched off. HOLD function
General notes The HOLD function can assist the driver in the
following situations:
R when pulling away, especially on steep slopes
R when manoeuvring on steep slopes
R when waiting in traffic 172
Driving systemsDriving an
d parking
Page 183 of 345
Problems with Parking Assist PARKTRONIC
Problem
Possible causes/consequences and
M
MSolutions Only the red segments in
the Parking Assist
PARKTRONIC warning
displays are lit. You also
hear a warning tone for
approximately two sec-
onds.
Parking Assist
PARKTRONIC is then
deactivated and the indi-
cator lamp on the
PARKTRONIC button
lights up. Parking Assist PARKTRONIC is malfunctioning and has been deacti-
vated.
X If problems persist, have Parking Assist PARKTRONIC checked at a
qualified specialist workshop. Only the red segments in
the Parking Assist
PARKTRONIC warning
displays are lit. Parking
Assist PARKTRONIC is
then deactivated. The Parking Assist PARKTRONIC sensors are dirty or malfunctioning.
X Clean the Parking Assist PARKTRONIC sensors (Y page 289).
X Switch the ignition back on. The problem may be caused by an external source of radio or ultra-
sound waves.
X Check to see if Parking Assist PARKTRONIC functions in a different
location. Parking Pilot
General notes Parking Pilot is an electronic parking aid with
ultrasound. It measures the road on both sides
of the vehicle. A parking symbol indicates a suit-
able parking space. Active steering intervention
and brake application can assist you during
parking and when exiting a parking space. Park- ing Assist PARKTRONIC is also available
(Y page 177).
i The active braking application is only avail-
able on vehicles with automatic transmission.
Important safety notes Parking Pilot is only an aid. It is not a substitute
for your attention to the immediate surround-
ings. The responsibility for safe manoeuvring
and parking remains with you. Make sure that no
persons, animals or objects are in the manoeu-
vring range.
When Parking Assist PARKTRONIC is deactiva-
ted, Parking Pilot is also unavailable. G
WARNING
While parking or pulling out of a parking
space, the vehicle swings out and can drive
onto areas of the oncoming lane. This could
cause you to collide with other road users.
There is a risk of an accident.
Pay attention to other road users. Stop the
vehicle if necessary or cancel the Parking Pilot parking procedure.
! If unavoidable, you should drive over obsta-
cles such as kerbs slowly and not at a sharp
angle. Otherwise, you may damage the
wheels or tyres.
Parking Pilot may also display spaces not suita- ble for parking, e.g.:
R in a zone where parking or stopping is pro-
hibited
R in front of driveways or entrances and exits
R on unsuitable surfaces 180
Driving systemsDriving and parking
Page 187 of 345
X
To cancel the procedure:press the %
button on the multifunction steering wheel or pull away.
or
X To exit a parking space using Parking
Pilot:
press the abutton on the multi-
function steering wheel.
The Parking Pilot active Accelerate
Parking Pilot active Accelerate
and brake
and brake Observe surroundings Observe surroundings mes-
sage appears in the multifunction display.
X Release the multifunction steering wheel.
X Pull away, being ready to brake at all times. Do
not exceed a maximum speed of approx-
imately 10 km/h when exiting a parking
space. Otherwise, Parking Pilot is cancelled.
X Vehicles with manual transmission: stop,
when Parking Assist PARKTRONIC sounds the continuous warning tone, if not before.
X Vehicles with automatic transmission:
depending on the message or as required,
shift the transmission to position
Dor R.
Vehicles with manual transmission:
depending on the message or as required,
engage forward or reverse gear.
Parking Pilot steers immediately in the other
direction. The Parking Pilot active
Parking Pilot active
Accelerate and brake
Accelerate and brake Observe sur‐ Observe sur‐
roundings
roundings message appears in the multi-
function display.
i You will achieve the best results by waiting
for the steering procedure to complete before
pulling away.
If you reverse after activation, the steering
wheel is moved to the straight-ahead posi-
tion.
X Drive forwards and reverse as prompted by
the Parking Assist PARKTRONIC warning dis-
plays, several times if necessary.
Once you have exited the parking space com-
pletely, the steering wheel is moved to the
straight-ahead position. You hear a tone and the
Parking
Parking Pilot Pilotended
endedmessage appears in the
multifunction display. You will then have to steer
and merge into traffic on your own. Parking
Assist PARKTRONIC is still available. You can
take over the steering before the vehicle has
exited the parking space completely. This is
useful, for example, when you recognise that it
is already possible to pull out of the parking
space. Cancelling Parking Pilot X
Stop the movement of the multifunction
steering wheel or steer yourself.
Parking Pilot is cancelled at once. The Park‐ Park‐
ing Pilot cancelled ing Pilot cancelled message appears in
the multifunction display.
or X Press the PARKTRONIC button (Y page 179).
Parking Assist PARKTRONIC is switched off
and Parking Pilot is immediately cancelled.
The Parking Pilot cancelled
Parking Pilot cancelled message
appears in the multifunction display.
Parking Pilot is cancelled automatically when:
R the electric parking brake is applied
R transmission position Pis selected in vehicles
with automatic transmission
R parking with Parking Pilot is no longer possi-
ble
R you are driving faster than 10 km/h
R a wheel spins and ESP ®
intervenes or fails. In
such cases the ÷warning lamp lights up in
the instrument cluster.
A warning tone sounds. The parking symbol dis-
appears and the multifunction display shows the
Parking Pilot cancelled Parking Pilot cancelled message.
When Parking Pilot is cancelled, you must steer
and brake again yourself.
If a system malfunction occurs, the vehicle is
braked to a standstill. To drive on, depress the
accelerator pedal again. Reversing camera
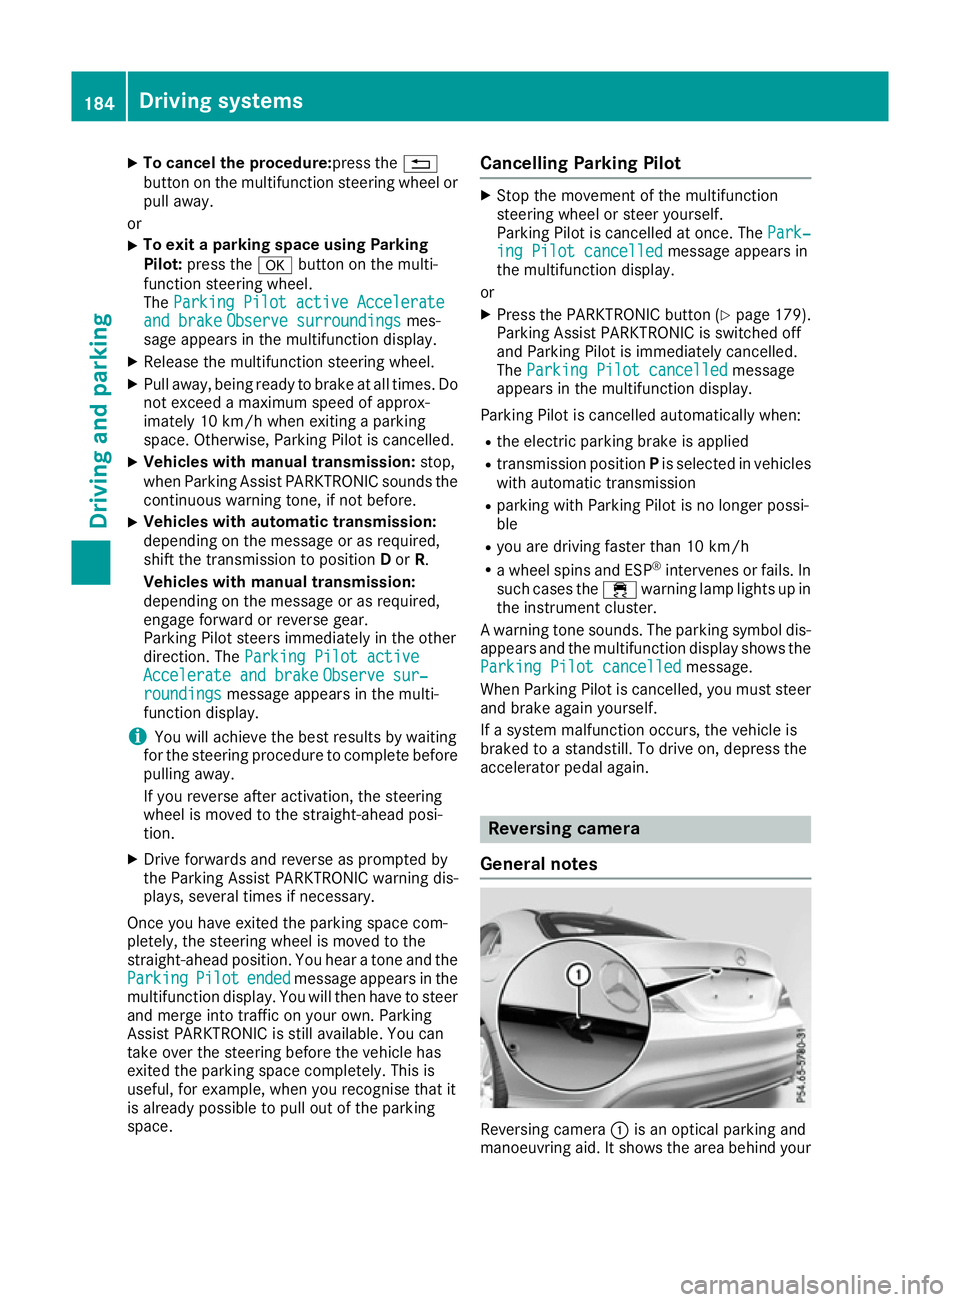
General notes Reversing camera
:is an optical parking and
manoeuvring aid. It shows the area behind your 184
Driving systemsDriving an
d parking
Page 201 of 345
there is an increased risk of an accident and
injury.
Only release the ball coupling if the pivoting
range is unobstructed. Always make sure that the ball coupling engages when folding in.
i Fold the ball coupling in if you are not using
the trailer tow hitch.
X Make sure that the vehicle is stationary and
the trailer cables are disconnected.
X Place the protective cap on the ball coupling.
i The release wheel is located behind the left-
hand side trim panel in the luggage compart- ment.
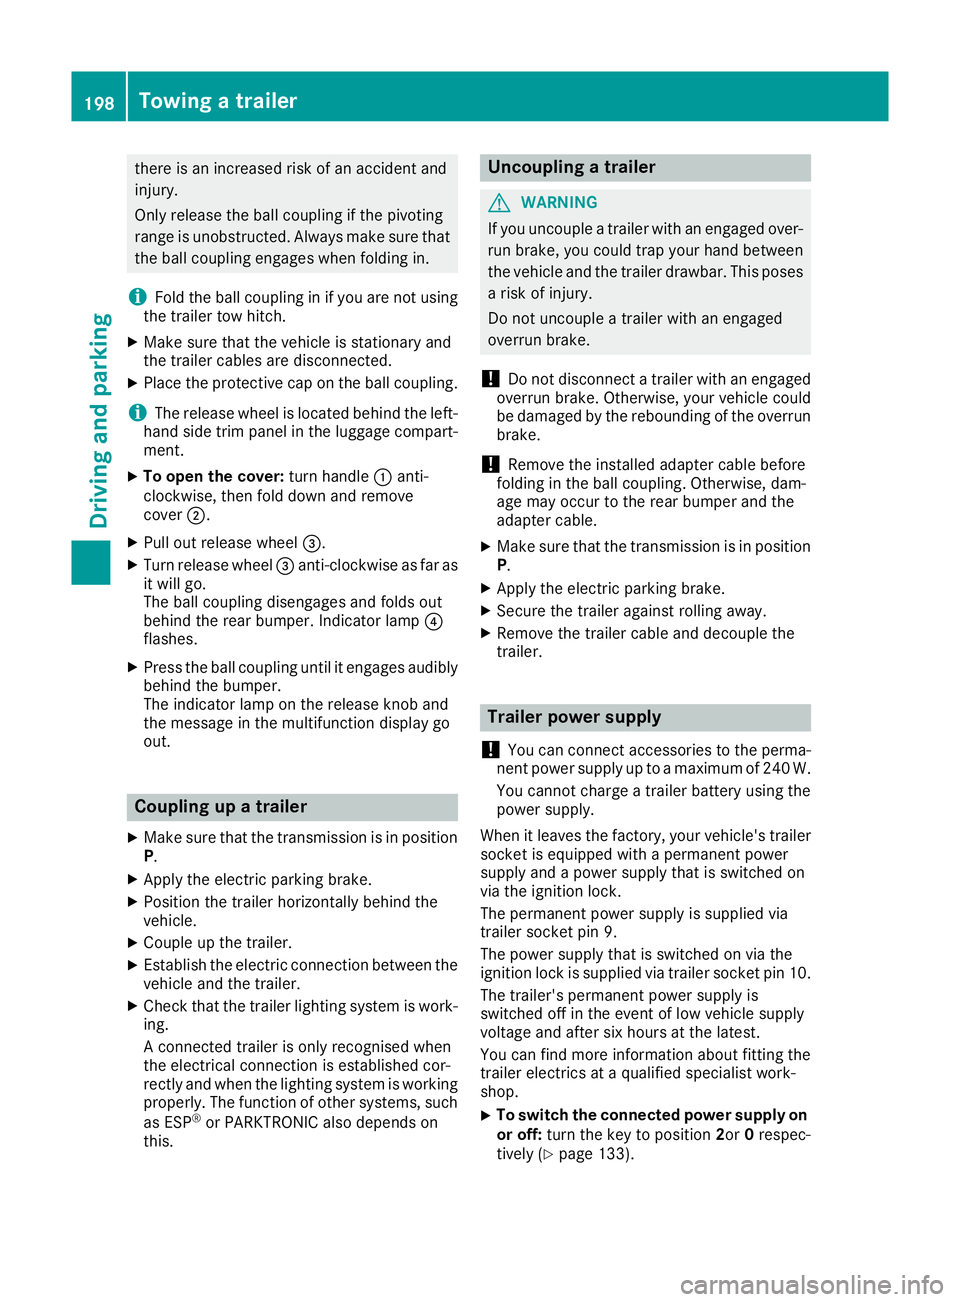
X To open the cover: turn handle:anti-
clockwise, then fold down and remove
cover ;.
X Pull out release wheel =.
X Turn release wheel =anti-clockwise as far as
it will go.
The ball coupling disengages and folds out
behind the rear bumper. Indicator lamp ?
flashes.
X Press the ball coupling until it engages audibly
behind the bumper.
The indicator lamp on the release knob and
the message in the multifunction display go
out. Coupling up a trailer
X Make sure that the transmission is in position
P.
X Apply the electric parking brake.
X Position the trailer horizontally behind the
vehicle.
X Couple up the trailer.
X Establish the electric connection between the
vehicle and the trailer.
X Check that the trailer lighting system is work-
ing.
A connected trailer is only recognised when
the electrical connection is established cor-
rectly and when the lighting system is working
properly. The function of other systems, such
as ESP ®
or PARKTRONIC also depends on
this. Uncoupling a trailer
G
WARNING
If you uncouple a trailer with an engaged over- run brake, you could trap your hand between
the vehicle and the trailer drawbar. This poses a risk of injury.
Do not uncouple a trailer with an engaged
overrun brake.
! Do not disconnect a trailer with an engaged
overrun brake. Otherwise, your vehicle could
be damaged by the rebounding of the overrun brake.
! Remove the installed adapter cable before
folding in the ball coupling. Otherwise, dam-
age may occur to the rear bumper and the
adapter cable.
X Make sure that the transmission is in position
P.
X Apply the electric parking brake.
X Secure the trailer against rolling away.
X Remove the trailer cable and decouple the
trailer. Trailer power supply
! You can connect accessories to the perma-
nent power supply up to a maximum of 240 W.
You cannot charge a trailer battery using the
power supply.
When it leaves the factory, your vehicle's trailer
socket is equipped with a permanent power
supply and a power supply that is switched on
via the ignition lock.
The permanent power supply is supplied via
trailer socket pin 9.
The power supply that is switched on via the
ignition lock is supplied via trailer socket pin 10.
The trailer's permanent power supply is
switched off in the event of low vehicle supply
voltage and after six hours at the latest.
You can find more information about fitting the
trailer electrics at a qualified specialist work-
shop.
X To switch the connected power supply on
or off: turn the key to position 2or0respec-
tively (Y page 133). 198
Towing a trailerDriving an
d parking