2016 MERCEDES-BENZ CLA COUPE wheel
[x] Cancel search: wheelPage 74 of 345
if the vehicle starts to skid or a wheel starts to
spin.
Activating/deactivating ESP ®
You can deactivate or activate ESP ®
via the on-
board computer (Y page 209).
ESP ®
deactivated:
The å ESP®
OFF warning lamp on the instru-
ment cluster lights up.
ESP ®
activated:
The å ESP®
OFF warning lamp on the instru-
ment cluster goes out.
Characteristics when ESP ®
is deactivated
If ESP ®
is deactivated and one or more wheels
start to spin, the ÷ESP®
warning lamp in the
instrument cluster flashes. In such situations,
ESP ®
will not stabilise the vehicle.
If you deactivate ESP ®
:
R ESP ®
no longer improves driving stability
R engine torque is no longer limited and the
drive wheels may start to spin
R traction control is still activated
R PRE-SAFE ®
is no longer available; it is not
activated even if you brake firmly with assis-
tance from ESP ®
R STEER CONTROL is no longer active
R ESP ®
still provides support when you brake
firmly.
Deactivating/activating ESP ®
(Mercedes ‑AMG vehicles) Important safety notes
i Read the "Important safety notes" section
(Y page 66).
You can select between the following ESP ®
sta-
tuses:
R ESP ®
is activated
R SPORT handling mode is activated
R ESP ®
is deactivated
ESP ®
is activated every time the engine is star-
ted, regardless of whether ESP ®
was deactiva-
ted before the engine was switched off. G
WARNING
When SPORT handling mode is activated,
there is a greater risk of skidding and acci-
dents.
Only activate SPORT handling mode in the sit- uations described in the following. G
WARNING
If you deactivate ESP ®
, ESP ®
no longer sta-
bilises the vehicle. There is an increased risk
of skidding and an accident.
Only deactivate ESP ®
in the situations descri-
bed in the following.
In the following situations, it may be better to
activate SPORT handling mode or deactivate
ESP ®
:
R when snow chains are used
R in deep snow
R on sand or gravel
R on specially designated roads when the vehi-
cle's own oversteering and understeering
characteristics are desired
Driving in SPORT handling mode or without
ESP ®
requires a highly qualified and experi-
enced driver.
i Activate ESP ®
as soon as the situations
described above no longer apply. ESP ®
will
otherwise not be able to stabilise the vehicle
if the vehicle starts to skid or a wheel starts to spin.
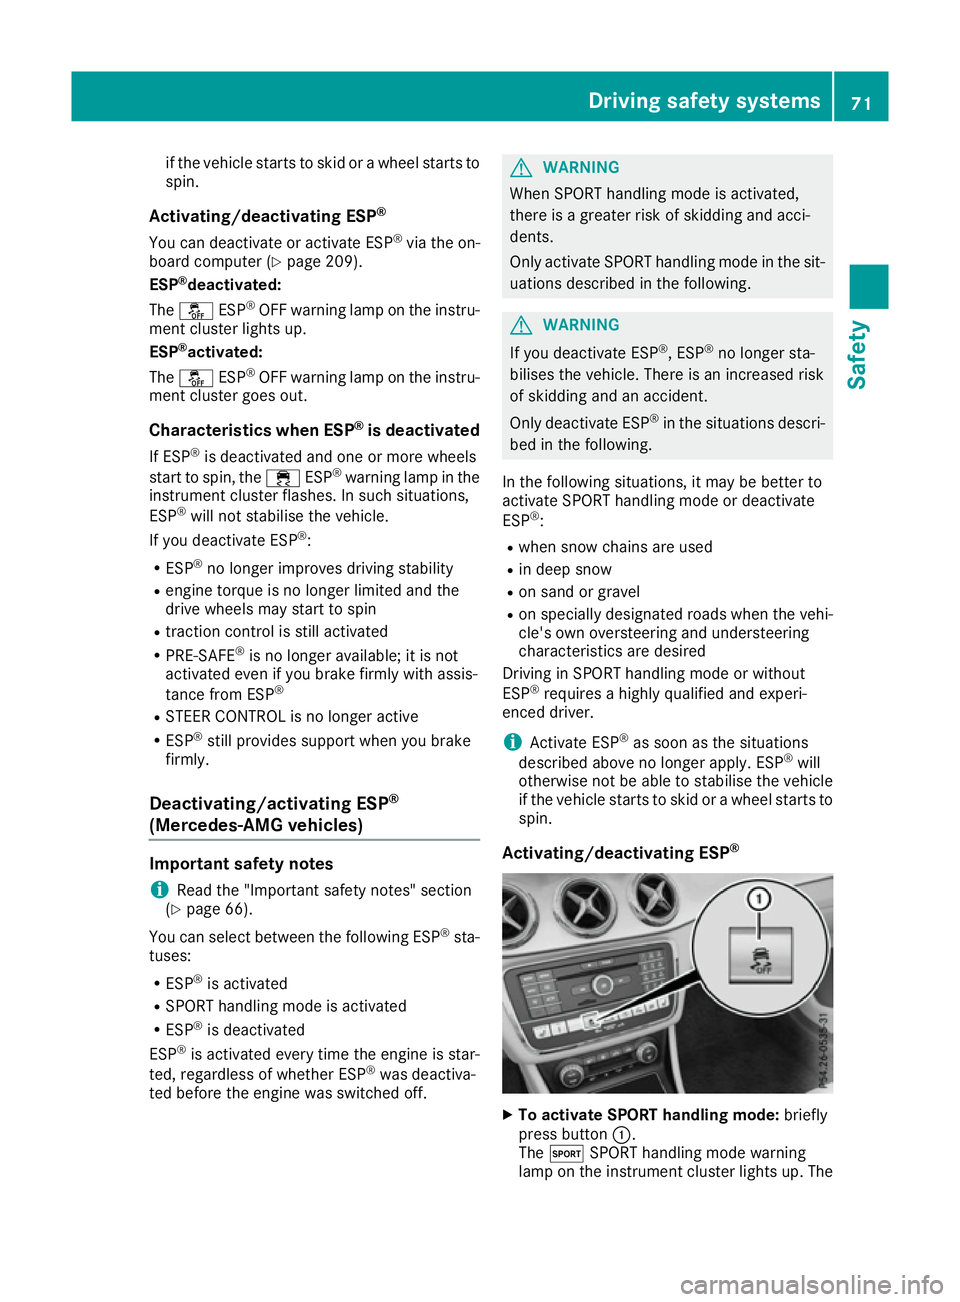
Activating/deactivating ESP ® X
To activate SPORT handling mode: briefly
press button :.
The M SPORT handling mode warning
lamp on the instrument cluster lights up. The Driving safety systems
71Safety Z
Page 75 of 345
SPORT handling mode
SPORT handling mode
message appears in
the multifunction display.
X To deactivate SPORT handling mode:
briefly press button :.
The M SPORT handling mode warning
lamp on the instrument cluster goes out.
X To deactivate ESP ®
:press button :until
the å ESP®
OFF warning lamp lights up in
the instrument cluster.
The ÷ OFF
OFF message appears in the multi-
function display.
X To activate ESP ®
:briefly press button :.
The å ESP®
OFF warning lamp on the
instrument cluster goes out. The ÷ESP®
ON
ON message appears in the multifunction dis-
play.
Characteristics when SPORT handling
mode is activated
If SPORT handling mode is activated and one or
more wheels start to spin, the ÷ESP®
warn-
ing lamp on the instrument cluster flashes. In
such situations, ESP ®
will stabilise the vehicle
only to a limited degree.
When SPORT handling mode is activated:
R ESP ®
improves driving stability only to a limi-
ted degree
R traction control is still activated
R the engine's torque is only restricted to a limi-
ted degree and the drive wheels may start to spin
The spinning of the wheels results in a cut for better traction on loose surfaces.
R ESP ®
still provides support when you brake
firmly.
Characteristics when ESP ®
is deactivated
If ESP ®
is deactivated and one or more wheels
start to spin, the ÷ESP®
warning lamp in the
instrument cluster does not flash. In such situa-
tions, ESP ®
will not stabilise the vehicle.
If you deactivate ESP ®
:
R ESP ®
no longer improves driving stability
R engine torque is no longer limited and the
drive wheels may start to spin
The spinning of the wheels results in a cut for
better traction on loose surfaces.
R traction control is still activated R
Active Brake Assist is no longer available; it is
not activated even if you brake firmly with
assistance from ESP ®
R PRE-SAFE ®
is no longer available; it is not
activated even if you brake firmly with assis-
tance from ESP ®
R ESP ®
still provides support when you brake
firmly.
ESP ®
trailer stabilisation General notes
If your vehicle/trailer combination begins to
lurch, ESP ®
assists you in this situation. ESP ®
slows the vehicle down by braking and limiting
the engine output until the vehicle/trailer com- bination has stabilised.
Important safety notes G
WARNING
If road and weather conditions are poor,
trailer stabilisation will not be able to prevent the vehicle/trailer combination from swerv-
ing. Trailers with a high centre of gravity can
tip over before ESP ®
can detect this. There is
a risk of an accident.
Always adapt your driving style to the prevail-
ing road and weather conditions.
If your vehicle/trailer combination begins to
lurch, you can only stabilise the vehicle/trailer
combination by depressing the brake firmly.
ESP ®
trailer stabilisation is active above speeds
of approximately 65 km/h.
ESP ®
trailer stabilisation does not work if ESP ®
is deactivated or disabled because of a malfunc- tion. EBD (electronic brake force distribu-
tion)
General notes EBD monitors and controls the brake pressure
on the rear wheels to improve driving stability
while braking. 72
Driving safety systemsSafety
Page 76 of 345

Important safety notes
i
Read the "Important safety notes" section
(Y page 66). G
WARNING
If EBD is malfunctioning, the rear wheels can
lock, e.g. under full braking. This increases the risk of skidding and an accident.
You should therefore adapt your driving style
to the different handling characteristics. Have the brake system checked at a qualified spe-
cialist workshop.
Observe information regarding indicator and
warning lamps (Y page 250) as well as display
messages (Y page 219). ADAPTIVE BRAKE
ADAPTIVE BRAKE enhances braking safety and
offers increased braking comfort. In addition to
the braking function, ADAPTIVE BRAKE also has the HOLD function (Y page 172) and hill start
assist (Y page 136). STEER CONTROL
General information STEER CONTROL helps you by transmitting a
noticeable steering force to the steering wheel
in the direction required for vehicle stabilisation.
This steering support is provided in particular if:
R both right wheels or both left wheels are on a
wet or slippery road surface when you brake
R the vehicle begins to skid
Important safety notes i
Read the "Important safety notes" section
(Y page 66).
No steering support is provided from STEER
CONTROL, if: R ESP ®
is malfunctioning
R the steering is malfunctioning
If ESP ®
is malfunctioning, you will be assisted
further by the electrical power steering. Protection against theft
Immobiliser
The immobiliser prevents your vehicle from
being started without the correct key.
X To activate with the key: remove the key
from the ignition lock.
X To activate with KEYLESS-GO start func-
tion or KEYLESS-GO:
switch the ignition off
and open the driver's door.
X To deactivate: switch on the ignition.
When leaving the vehicle, always take the key
with you and lock the vehicle. Anyone can start
the engine if a valid key has been left inside the
vehicle.
i The immobiliser is always deactivated when
you start the engine. ATA (Anti-Theft Alarm system)
X
To prime: lock the vehicle with the key or
KEYLESS-GO.
Indicator lamp :flashes. The alarm system
is primed after approximately 15 seconds.
X To deactivate: unlock the vehicle with the
key or KEYLESS-GO.
or X Insert the key into the ignition lock.
A visual and audible alarm is triggered if the
alarm system is primed and you open: R a door
R the vehicle with the emergency key element
R the boot lid
R the bonnet Protection against theft
73Safety Z
Page 88 of 345

Automatic locking feature
X
To deactivate: press and hold button :for
approximately five seconds until a tone
sounds.
X To activate: press and hold button ;for
approximately five seconds until a tone
sounds.
If you press one of the two buttons and do not
hear a tone, the relevant setting has already
been selected.
The vehicle is locked automatically when the
ignition is switched on and the wheels are turn-
ing.
You could therefore be locked out if:
R the vehicle is being pushed
R the vehicle is being towed
R the vehicle is being tested on a dynamometer
You can also activate and deactivate the auto-
matic locking function using the on-board com- puter (Y page 211). Unlocking the driver's door (emer-
gency key element)
If the vehicle can no longer be unlocked with the key or KEYLESS-GO, use the emergency key ele-
ment.
If you use the emergency key element to unlock
and open the driver's door, the anti-theft alarm
system will be triggered (Y page 73).
X Take the emergency key element out of the
key (Y page 78).
X Insert the emergency key element into the
lock of the driver's door as far as it will go. X
Turn the emergency key element anti-clock-
wise as far as it will go to position 1.
On right-hand-drive vehicles, turn the emer-
gency key element clockwise.
The door is unlocked.
X Turn the emergency key element back and
remove it.
X Insert the emergency key element into the
key (Y page 79). Locking the vehicle (emergency key
element)
If the vehicle can no longer be locked with the
key or KEYLESS-GO, use the emergency key ele-
ment.
X Open the driver's door.
X Close the front-passenger door, the rear
doors and the boot lid.
X Press the locking button on the driver’s door
(Y page 84).
X Check whether the locking knobs on the
front-passenger door and the rear doors are
still visible. Press the locking knobs down by
hand if necessary.
X Close the driver's door.
X Take the emergency key element out of the
key (Y page 78).
X Insert the emergency key element into the
lock of the driver's door as far as it will go. Doors
85Opening and closing Z
Page 100 of 345

Correct driver's seat position
G
WARNING
You could lose control of the vehicle while
driving if you:
R adjust the driver's seat, steering wheel or
mirrors
R fasten the seat belt
There is a risk of an accident.
Adjust the driver's seat, head restraint, steer-
ing wheel and mirrors and fasten your seat
belt before starting the engine. Observe the following when adjusting steering
wheel
:, seat belt ;and driver's seat =:
R you are as far away from the driver's airbag as
possible
R you are sitting in an upright position
R your thighs are slightly supported by the seat
cushion
R your legs are not entirely stretched and you
can depress the pedals properly
R the back of your head is supported at eye level
by the centre of the head restraint
R you can hold the steering wheel with your
arms slightly bent
R you can move your legs freely
R you can see all the displays in the instrument
cluster clearly R
you have a good overview of traffic conditions
R the seat belt is pulled snugly against the body
and must be routed across the centre of your
shoulder and across your hips in the pelvic
area
Further related subjects:
R Adjusting the seats manually (Y page 98)
R Adjusting the seats electrically
(Y page 99)
R Adjusting the steering wheel manually
(Y page 102)
R Fastening the seat belt correctly
(Y page 43)
R Adjusting the rear-view mirror and exterior
mirrors (Y page 103)
R Vehicles with a memory function: save the
seat, steering wheel and exterior mirror set-
tings using the memory function
(Y page 106) Seats
Important safety notes
G
WARNING
If children adjust the seats, they could
become trapped, especially if they are unat-
tended. There is a risk of injury.
When leaving the vehicle, always take the key with you and lock the vehicle. Never leave
children unattended in the vehicle.
The seats can still be adjusted when there is no
key in the ignition lock. G
WARNING
When adjusting a seat, you or another vehicle occupant could become trapped by the guiderail of the seat, for instance. There is a risk of
injury.
Make sure that no one has any part of their
body within the sweep of the seat when
adjusting it.
Observe the safety notes on "Airbags"
(Y page 44) and "Children in the Vehicle"
(Y page 54). Seats
97Seats, steering wheel and mirrors Z
Page 101 of 345
G
WARNING
If the driver's seat is not correctly engaged, it could unexpectedly move while driving. This
could cause you to lose control of the vehicle. There is a risk of an accident.
Always ensure that the driver's seat is
engaged before starting the vehicle. G
WARNING
You could lose control of the vehicle while
driving if you:
R adjust the driver's seat, steering wheel or
mirrors
R fasten the seat belt
There is a risk of an accident.
Adjust the driver's seat, head restraint, steer-
ing wheel and mirrors and fasten your seat
belt before starting the engine. G
WARNING
If you adjust the seat height carelessly, you or other vehicle occupants could be trapped andthereby injured. Children in particular could
accidentally press the electrical seat adjust-
ment buttons and become trapped. There is a
risk of injury.
While moving the seats, make sure that your
hands or other body parts do not get under the
lever assembly of the seat adjustment sys-
tem.
! To avoid damage to the seats and the seat
heating, observe the following information:
R do not spill any liquids on the seats. If liquid
is spilled on the seats, dry them as soon aspossible.
R if the seat covers are damp or wet, do not
switch on the seat heating. The seat heat-
ing should also not be used to dry the seats.
R clean the seat covers as recommended;
see the "Interior care" section.
R do not transport heavy loads on the seats.
Do not place sharp objects on the seat
cushions, e.g. knives, nails or tools. The seats should only be occupied by passen-
gers, if possible.
R when the seat heating is in operation, do
not cover the seats with insulating materi-
als, e.g. blankets, coats, bags, seat covers,
child seats or booster seats.
! Make sure that there are no objects in the
footwell under or behind the seats when mov-
ing the seats back. There is a risk that the
seats and/or the objects could be damaged.
i Further related subjects:
R Luggage compartment enlargement (fold-
ing down the rear seats) (Y page 271) Adjusting the seats manually
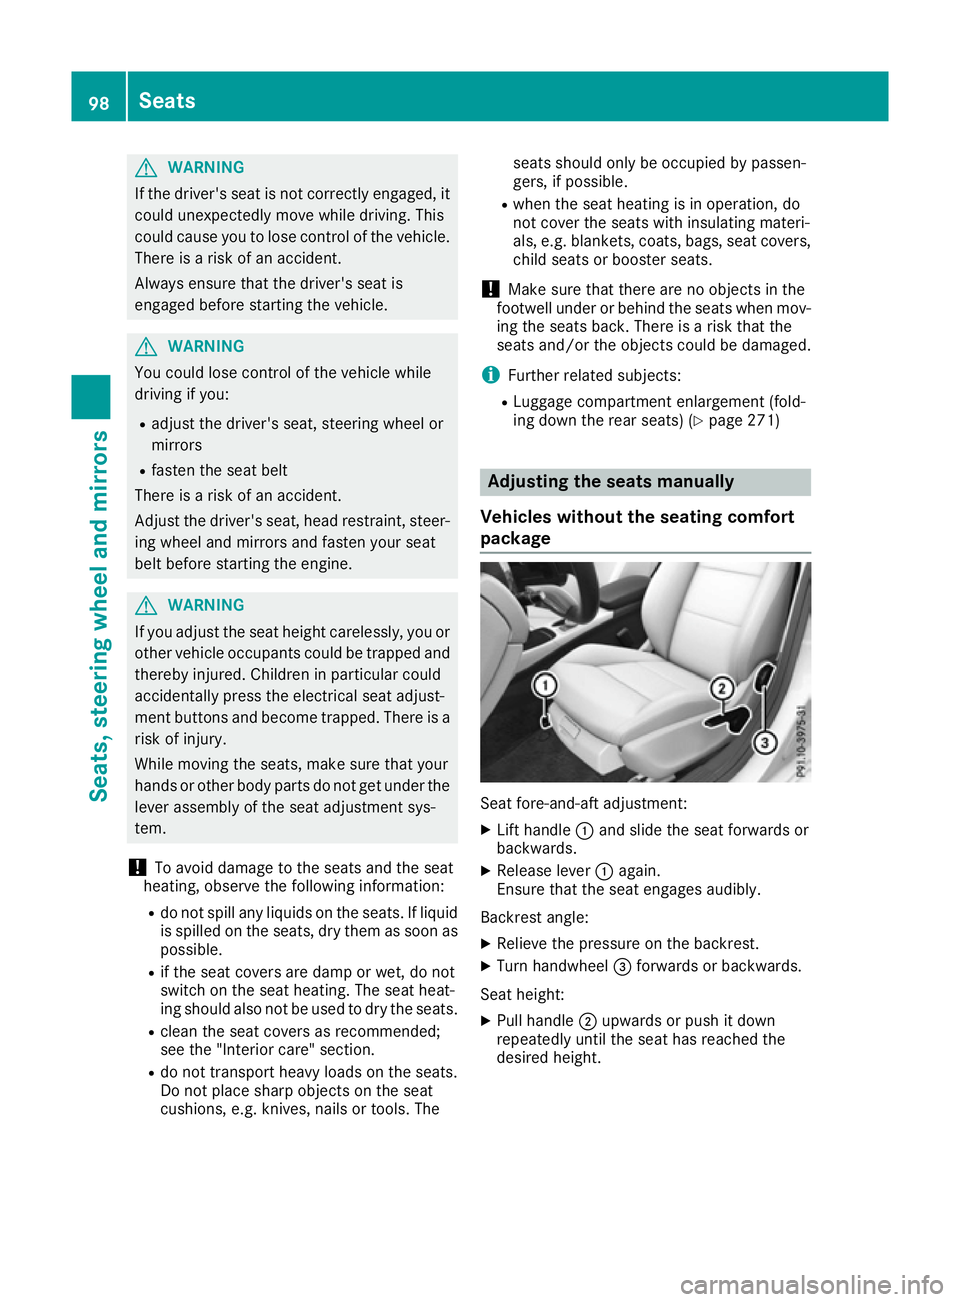
Vehicles without the seating comfort
package Seat fore-and-aft adjustment:
X
Lift handle :and slide the seat forwards or
backwards.
X Release lever :again.
Ensure that the seat engages audibly.
Backrest angle:
X Relieve the pressure on the backrest.
X Turn handwheel =forwards or backwards.
Seat height: X Pull handle ;upwards or push it down
repeatedly until the seat has reached the
desired height. 98
SeatsSeats, steering wheel and mirrors
Page 102 of 345
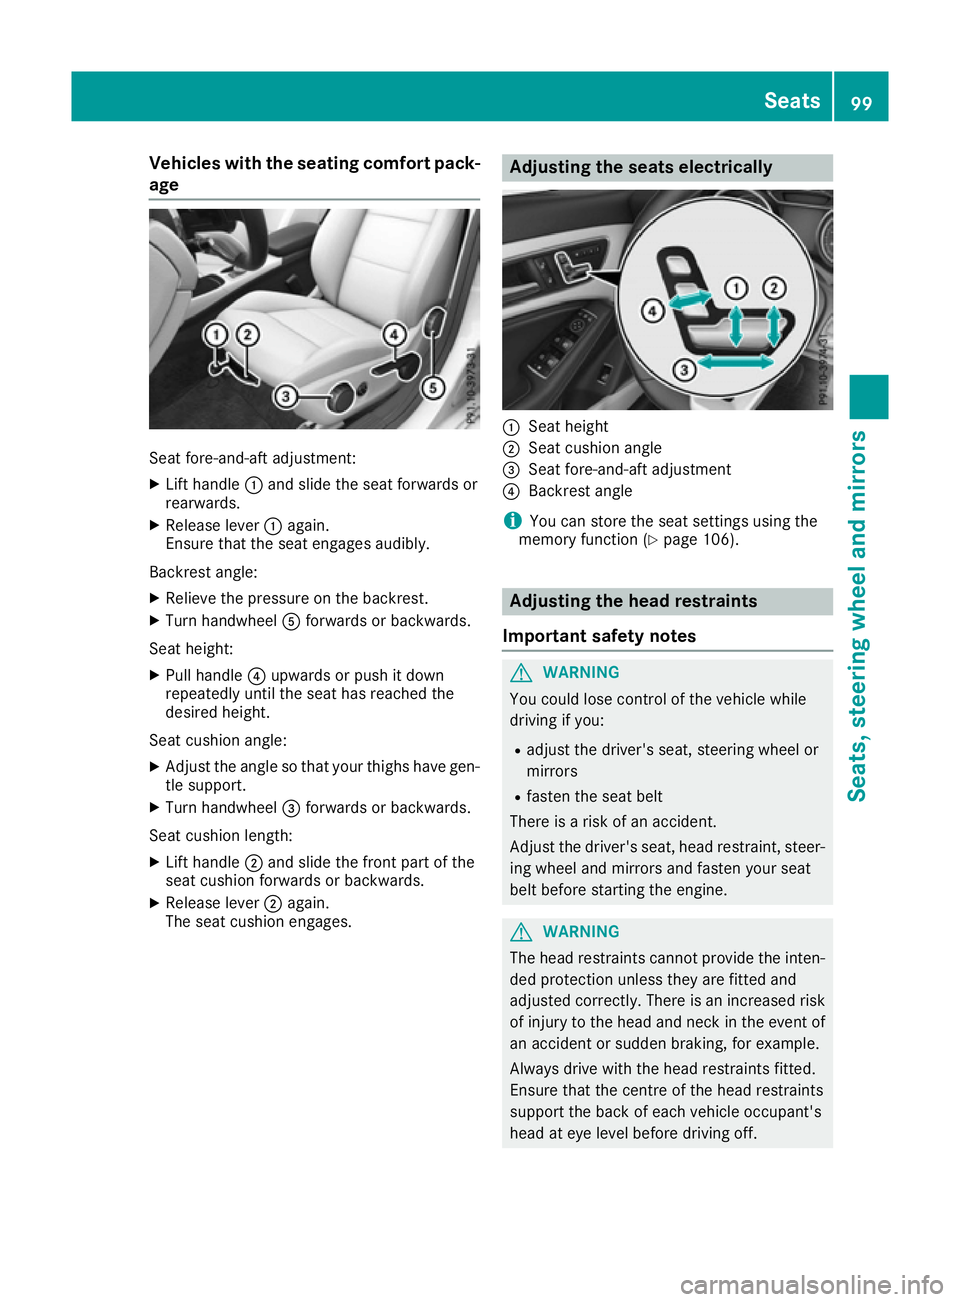
Vehicles with the seating comfort pack-
age Seat fore-and-aft adjustment:
X Lift handle :and slide the seat forwards or
rearwards.
X Release lever :again.
Ensure that the seat engages audibly.
Backrest angle:
X Relieve the pressure on the backrest.
X Turn handwheel Aforwards or backwards.
Seat height: X Pull handle ?upwards or push it down
repeatedly until the seat has reached the
desired height.
Seat cushion angle:
X Adjust the angle so that your thighs have gen-
tle support.
X Turn handwheel =forwards or backwards.
Seat cushion length: X Lift handle ;and slide the front part of the
seat cushion forwards or backwards.
X Release lever ;again.
The seat cushion engages. Adjusting the seats electrically
:
Seat height
; Seat cushion angle
= Seat fore-and-aft adjustment
? Backrest angle
i You can store the seat settings using the
memory function (Y page 106). Adjusting the head restraints
Important safety notes G
WARNING
You could lose control of the vehicle while
driving if you:
R adjust the driver's seat, steering wheel or
mirrors
R fasten the seat belt
There is a risk of an accident.
Adjust the driver's seat, head restraint, steer-
ing wheel and mirrors and fasten your seat
belt before starting the engine. G
WARNING
The head restraints cannot provide the inten-
ded protection unless they are fitted and
adjusted correctly. There is an increased risk of injury to the head and neck in the event of
an accident or sudden braking, for example.
Always drive with the head restraints fitted.
Ensure that the centre of the head restraints
support the back of each vehicle occupant's
head at eye level before driving off. Seats
99Seats, steering wheel and mirrors Z
Page 103 of 345

Adjust the head restraint fore-and-aft position
so that it is as close as possible to the back of
your head.
General notes For vehicles with sports seats you cannot adjust
the front head restraints or the outer rear head
restraints.
Adjusting the head restraints manually Adjusting the head restraint height
X
To raise: pull the head restraint up to the
desired position.
X To lower: press release catch :in the direc-
tion of the arrow and push the head restraint down to the desired position.
Adjusting the head restraint fore-and-aft
position This function allows you to adjust the distance
between the head restraint and the back of the
head.
X To move forwards: pull the head restraint
forwards in the direction of the arrow until it
engages.
There are a number of detents.
X To move backwards: press and hold release
button :and push the head restraint back-
wards.
X When the head restraint is in the desired posi-
tion, release the button and make sure that
the head restraint is engaged in position.
Rear seat head restraints Adjusting the rear seat head restraint
height
X
To raise: pull the head restraint up to the
desired height.
X To lower: press release catch :and push
the head restraint down until it is in the
desired position.
Removing and fitting the rear seat head
restraints
The rear head restraints on the outer seats can
be removed and refitted. For vehicles with
sports seats the rear head restraints cannot be
removed and refitted. 100
SeatsSeats, steering
wheel and mirrors