2016 MERCEDES-BENZ CLA COUPE turn signal bulb
[x] Cancel search: turn signal bulbPage 17 of 345
Locking (doors)
Automatic ........................................ 85
Emergency locking .......................... .85
From inside (central locking but-
ton) .................................................. 84
Locking centrally
see Central locking
Locking verification signal (on-
board computer) ............................... 211
Luggage compartment enlarge-
ment ................................................... 271
Lumbar support
Adjusting the 4-way lumbar sup-
port ................................................ 101 M
M+S tyres ........................................... 312
Main-beam headlamps
Adaptive Highbeam Assist ............. 109
Display messag e............................ 229
Replacing bulb s............................. 113
Switching on/of f........................... 109
Maintenance
see ASSYST PLUS
Manual transmission
Drive program ................................ 143
DYNAMIC SELECT button .............. 141
Engaging reverse gear ................... 142
Gear lever ...................................... 142
Pulling away ................................... 135
Shift recommendation ................... 143
Shifting to neutral .......................... 142
Starting the engine ........................ 135
Matt finish (cleaning instructions) .. 287
Memory card (audio) ......................... 206
Memory function ............................... 106
Mercedes-Benz emergency call
system
Switch in the overhead control
panel .............................................. 277
Mercedes-Benz Intelligent Drive
Traffic Sign Assist .......................... 190
Mercedes-Benz Service Centre
see Qualified specialist workshop
Message memory (on-board com-
puter) .................................................. 216 Messages
see Display messages
Mirror turn signal
Cleaning ......................................... 289
Mirrors
see Exterior mirrors
see Rear-view mirror
see Vanity mirror (in sun visor)
Mobile phone
Connecting (Bluetooth ®
inter-
face) .............................................. 262
Connecting another mobile
phone ............................................ 263
Connecting the telephone module
with Bluetooth ®
(SAP profile) ......... 265
Frequencies ................................... 325
Installation ..................................... 325
Menu (on-board computer) ............ 207
Notes/placing in the bracket ......... 277
Transmission output (maximum) .... 325
Mobile telephone
Pre-installed bracket ...................... 278
Modifying the programming (key) ..... 78
MOExtended tyres ............................. 295
MP3
Operating ....................................... 206
See also Digital Owner's Manua l... 259
Multifunction display
Function/note s............................. 202
Permanent display ......................... 210
Multifunction steering wheel
Operating the on-board compute r..2 01
Overview .......................................... 33
Music files
See also Digital Owner's Manual ... 259 N
Navigation Entering a destination .................... 261
Menu (on-board computer) ............ 205
See also Digital Owner's Manual ... 259
Notes on running in a new vehicle .. 132 O
Occupant safety Airbags ............................................ 44 14
Index
Page 20 of 345
Rear-compartment seat belt sta-
tus indicator
........................................ 44
Rear-view mirror
Anti-dazzle mode (automatic) ........ 104
Dipping (manual) ........................... 103
Refuelling
Fuel gaug e....................................... 32
Important safety notes .................. 152
Notes for Mercedes‑ AMG vehi-
cles ................................................ 329
Refuelling process ......................... 153
see Fuel
Remote control
Auxiliary heating/ventilation .......... 127
Changing the batteries (auxiliary
heating) ......................................... 129
Replacing bulbs
Brake lamp .................................... 113
Dipped-beam headlamp s............... 112
Fitting/removing the cover (front
wheel arch) .................................... 112
Important safety notes .................. 111
Main-beam headlamp s................... 113
Overview of bulb types .................. 112
Rear fog lamp ................................ 113
Turn signals (front) ......................... 113
Turn signals (rear) .......................... 113
Replacing the battery (auxiliary
heating remote control) .................... 129
Rescue card ......................................... 28
Reserve (fuel tank)
see Fuel
Reserve fuel
Display message ............................ 234
Warning lamp ................................. 255
Residual heat (climate control) ........ 126
Restraint system
Display message ............................ 225
Introduction ..................................... 39
Warning lamp ................................. 254
Warning lamp (function) ................... 40
Rev counter ........................................ 200
Reverse gear
Engaging (manual transmission) .... 142
Reverse gear (selector lever) ........... 146
Reversing camera
"Reverse parking" function ............ 186 Cleaning instructions ..................... 289
Coupling up a trailer function ........ 188
Display in the multimedia system .. 185
Function/note s............................. 184
General notes ................................ 184
Switching on/of f........................... 185
Reversing feature
Panorama sliding sunroo f................ 93
Side windows ................................... 89
Reversing function
Roller sunblind ................................. 94
Reversing lamps
Display message ............................ 230
Roller sunblind
Panorama sliding sunroo f................ 94
Roof carrier ........................................ 273
Roof lining and carpets (cleaning
instructions) ...................................... 292
Roof load (maximum) ........................ 333
Route guidance
See also Digital Owner's Manua l... 259 S
Safety Children in the vehicle ..................... 54
see Occupant safety
Safety system
see Driving safety systems
SD card
Inserting ........................................ 267
Inserting/removing ........................ 267
Removing ....................................... 267
SD memory card
See also Digital Owner's Manua l... 259
Seat
Adjusting (Performance Seat) ........ 101
Folding the backrest (rear com-
partment) forwards/back .............. 271
Seat belt
Correct usage .................................. 42
Switching belt adjustment on/off
(on-board computer) ...................... 212
Seat belts
Adjusting the driver's and front-
passenger seat belt ......................... 43
Adjusting the height ......................... 43
Cleaning ......................................... 291 Index
17
Page 24 of 345
Trim pieces (cleaning instruc-
tions)
.................................................. 291
Trip computer (on-board com-
puter) .................................................. 203
Trip meter
Calling up ....................................... 203
Resetting (on-board computer) ...... 204
Turn signal lamp
Replacing bulbs (rear ).................... 113
Turn signals
Replacing bulbs (front) ................... 113
Switching on/of f........................... 109
Two-way radio
Frequencies ................................... 325
Installation ..................................... 325
Transmission output (maximum) .... 325
Type identification plate
see Vehicle identification plate
Tyre inflation compressor
see TIREFIT kit
Tyre pressure
Calling up (on-board computer) ..... 315
Display message ............................ 239
Not reached (TIREFIT) .................... 297
Reached (TIREFIT) .......................... 298
Recommended ............................... 313
Tyre pressure loss warning
General notes ................................ 314
Important safety notes .................. 315
Restarting ...................................... 315
Tyre pressure monitor
Checking the tyre pressure elec-
tronically ........................................ 316
Function/note s............................. 315
General notes ................................ 315
Important safety notes .................. 316
Radio type approval for the tyre
pressure monitor ........................... 317
Restarting ...................................... 317
Warning lamp ................................. 258
Warning message .......................... 317
Tyres
Changing a whee l.......................... 318
Checking ........................................ 310
Direction of rotation ...................... 319
Display message ............................ 239
General notes ................................ 323
Important safety notes .................. 310 Information on driving .................... 310
M+S tyres ...................................... 312
MOExtended tyre
s......................... 312
Replacing ....................................... 318
Service life ..................................... 311
Storing ........................................... 319
Summer tyres ................................ 312
Tyre size (data ).............................. 323
Tyre tread ...................................... 311
see Flat tyre U
Unlocking Emergency unlocking ....................... 85
From inside the vehicle (central
unlocking button) ............................. 84
Upshift indicator (on-board com-
puter, Mercedes-AMG vehicles) ....... 213
USB devices
Connecting to the Media Inter-
face ............................................... 267 V
Vanity mirror (in sun visor) .............. 275
Vehicle
Correct use ...................................... 28
Data acquisition ............................... 28
Display message ............................ 241
Electronics ..................................... 325
Equipment ....................................... 25
Implied warranty .............................. 28
Individual settings .......................... 210
Leaving parked up ......................... 159
Locking (in an emergency) ............... 85
Locking (key) ................................... 76
Lowering ........................................ 322
Pulling away ................................... 135
Raising ........................................... 320
Registration ..................................... 28
Securing from rolling away ............ 319
Transporting .................................. 307
Unlocking (in an emergency) ........... 85
Unlocking (key) ................................ 76
Vehicle data ................................... 333
Vehicle data
Boot load (maximum) ..................... 333
Roof load (maximum) ..................... 333 Index
21
Page 115 of 345
Overview of bulb types
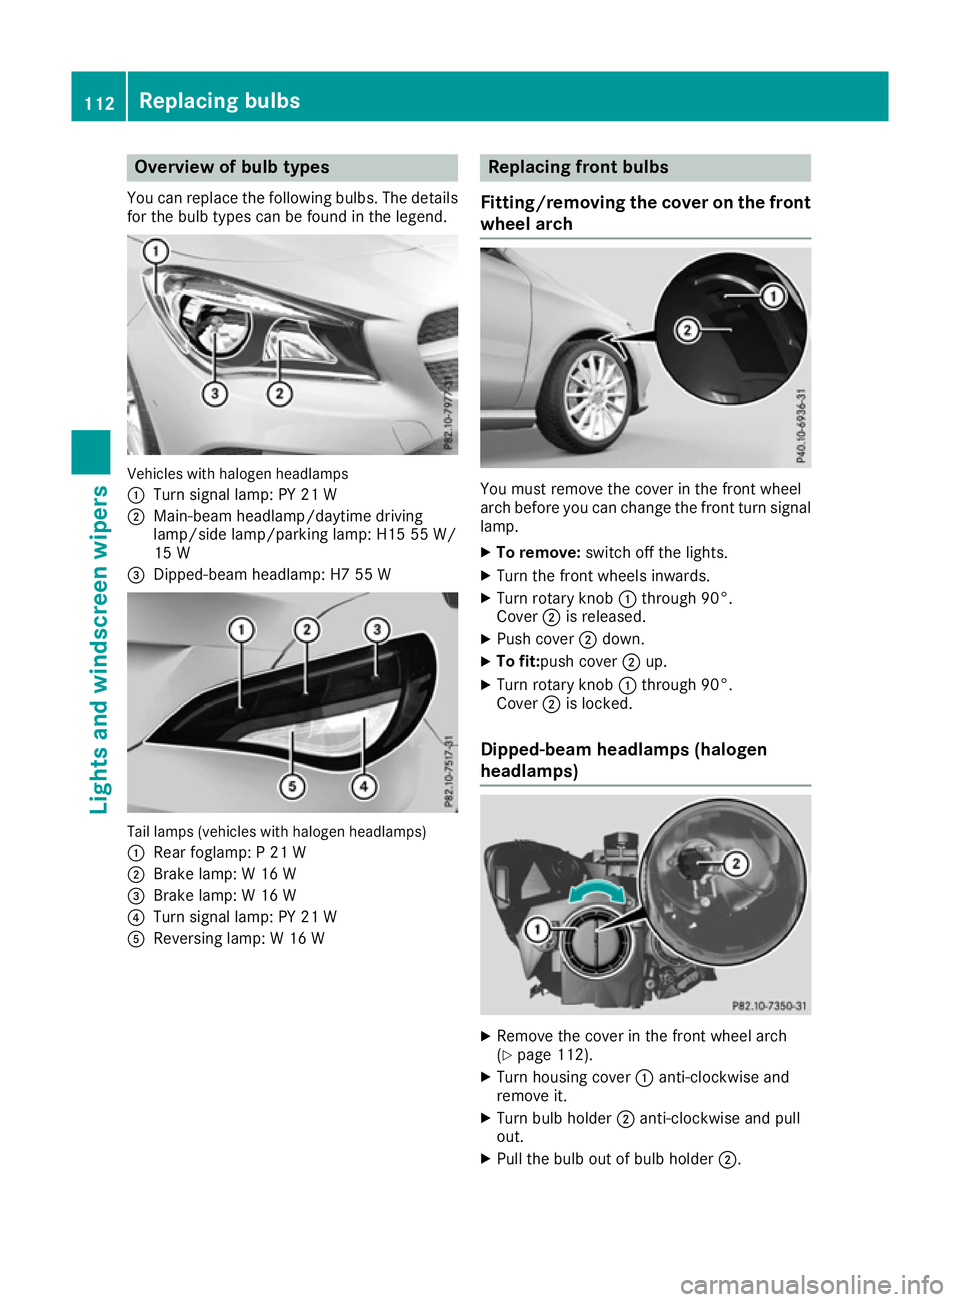
You can replace the following bulbs. The details
for the bulb types can be found in the legend. Vehicles with halogen headlamps
:
Turn signal lamp: PY 21 W
; Main-beam headlamp/daytime driving
lamp/side lamp/parking lamp: H15 55 W/
15 W
= Dipped-beam headlamp: H7 55 W Tail lamps (vehicles with halogen headlamps)
: Rear foglamp: P 21 W
; Brake lamp: W 16 W
= Brake lamp: W 16 W
? Turn signal lamp: PY 21 W
A Reversing lamp: W 16 W Replacing front bulbs
Fitting/removing the cover on the front wheel arch You must remove the cover in the front wheel
arch before you can change the front turn signal
lamp.
X To remove: switch off the lights.
X Turn the front wheels inwards.
X Turn rotary knob :through 90°.
Cover ;is released.
X Push cover ;down.
X To fit:push cover ;up.
X Turn rotary knob :through 90°.
Cover ;is locked.
Dipped-beam headlamps (halogen
headlamps) X
Remove the cover in the front wheel arch
(Y page 112).
X Turn housing cover :anti-clockwise and
remove it.
X Turn bulb holder ;anti-clockwise and pull
out.
X Pull the bulb out of bulb holder ;.112
Replacing bulbsLights and windscreen wipers
Page 116 of 345
X
Insert the new bulb into bulb holder ;.
X Insert bulb holder ;and turn it clockwise.
X Press on housing cover :and turn it to the
right.
X Replace the cover in the front wheel arch
(Y page 112).
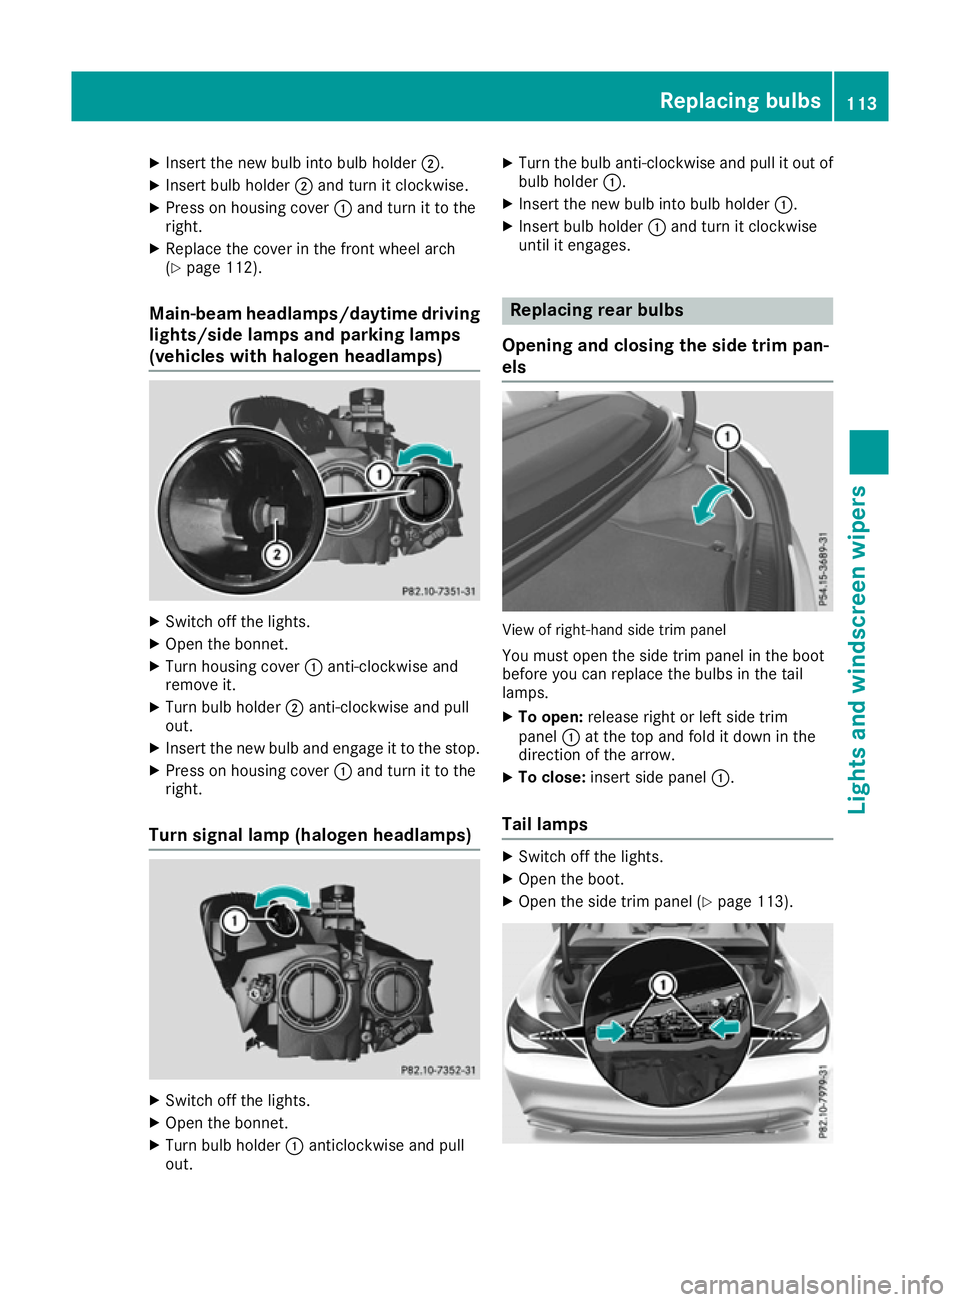
Main-beam headlamps/daytime driving
lights/side lamps and parking lamps
(vehicles with halogen headlamps) X
Switch off the lights.
X Open the bonnet.
X Turn housing cover :anti-clockwise and
remove it.
X Turn bulb holder ;anti-clockwise and pull
out.
X Insert the new bulb and engage it to the stop.
X Press on housing cover :and turn it to the
right.
Turn signal lamp (halogen headlamps) X
Switch off the lights.
X Open the bonnet.
X Turn bulb holder :anticlockwise and pull
out. X
Turn the bulb anti-clockwise and pull it out of
bulb holder :.
X Insert the new bulb into bulb holder :.
X Insert bulb holder :and turn it clockwise
until it engages. Replacing rear bulbs
Opening and closing the side trim pan-
els View of right-hand side trim panel
You must open the side trim panel in the boot
before you can replace the bulbs in the tail
lamps.
X To open: release right or left side trim
panel :at the top and fold it down in the
direction of the arrow.
X To close: insert side panel :.
Tail lamps X
Switch off the lights.
X Open the boot.
X Open the side trim panel (Y page 113). Replacing bulbs
113Lights and windscreen wipers Z
Page 117 of 345
X
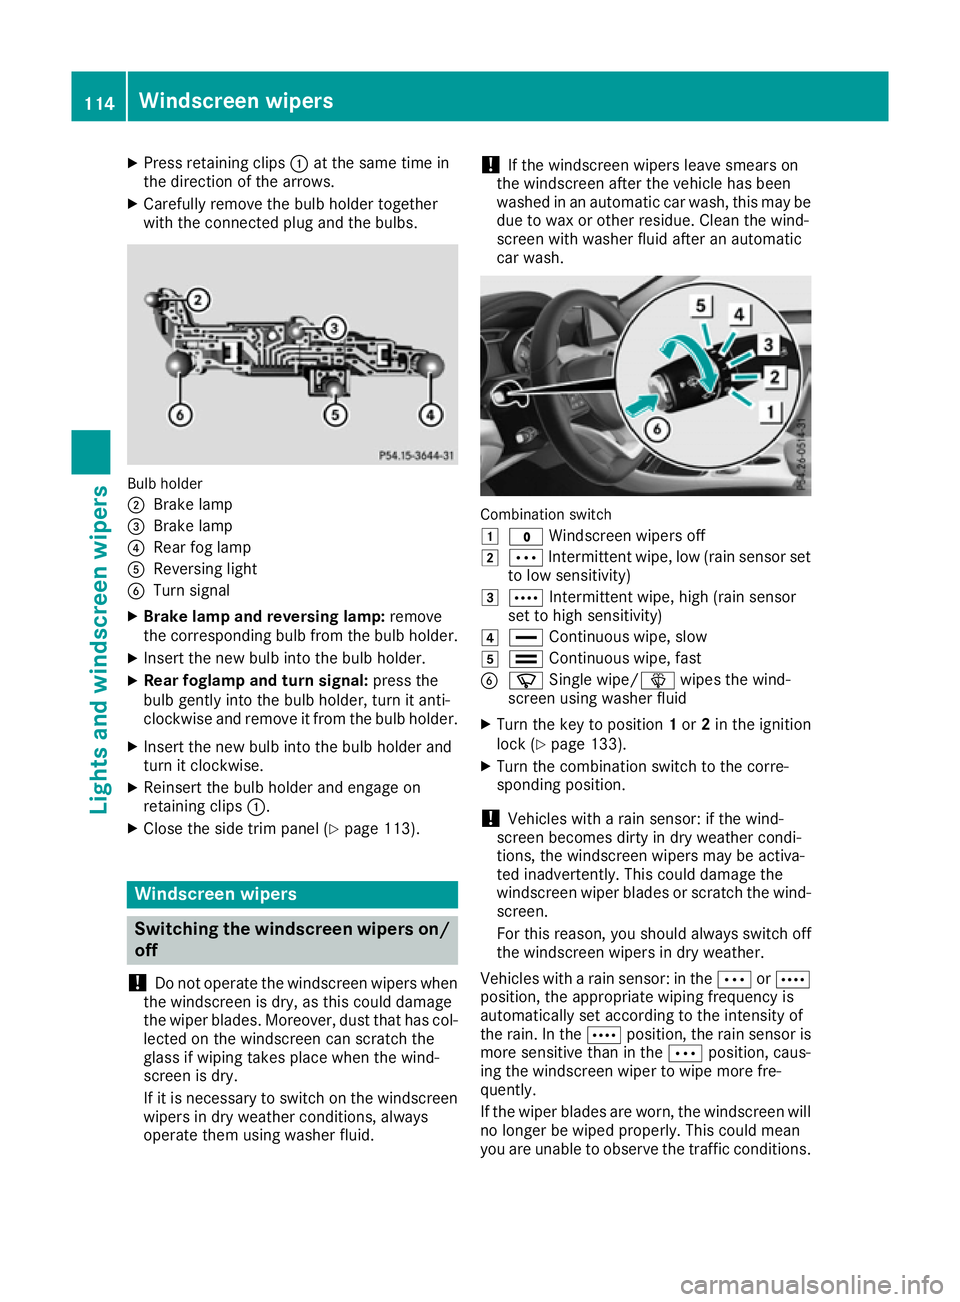
Press retaining clips :at the same time in
the direction of the arrows.
X Carefully remove the bulb holder together
with the connected plug and the bulbs. Bulb holder
;
Brake lamp
= Brake lamp
? Rear fog lamp
A Reversing light
B Turn signal
X Brake lamp and reversing lamp: remove
the corresponding bulb from the bulb holder.
X Insert the new bulb into the bulb holder.
X Rear foglamp and turn signal: press the
bulb gently into the bulb holder, turn it anti-
clockwise and remove it from the bulb holder.
X Insert the new bulb into the bulb holder and
turn it clockwise.
X Reinsert the bulb holder and engage on
retaining clips :.
X Close the side trim panel (Y page 113).Windscreen wipers
Switching the windscreen wipers on/
off
! Do not operate the windscreen wipers when
the windscreen is dry, as this could damage
the wiper blades. Moreover, dust that has col-
lected on the windscreen can scratch the
glass if wiping takes place when the wind-
screen is dry.
If it is necessary to switch on the windscreen wipers in dry weather conditions, always
operate them using washer fluid. !
If the windscreen wipers leave smears on
the windscreen after the vehicle has been
washed in an automatic car wash, this may be
due to wax or other residue. Clean the wind-
screen with washer fluid after an automatic
car wash. Combination switch
1
$ Windscreen wipers off
2 Ä Intermittent wipe, low (rain sensor set
to low sensitivity)
3 Å Intermittent wipe, high (rain sensor
set to high sensitivity)
4 ° Continuous wipe, slow
5 ¯ Continuous wipe, fast
B í Single wipe/î wipes the wind-
screen using washer fluid
X Turn the key to position 1or 2in the ignition
lock (Y page 133).
X Turn the combination switch to the corre-
sponding position.
! Vehicles with a rain sensor: if the wind-
screen becomes dirty in dry weather condi-
tions, the windscreen wipers may be activa-
ted inadvertently. This could damage the
windscreen wiper blades or scratch the wind- screen.
For this reason, you should always switch off
the windscreen wipers in dry weather.
Vehicles with a rain sensor: in the ÄorÅ
position, the appropriate wiping frequency is
automatically set according to the intensity of
the rain. In the Åposition, the rain sensor is
more sensitive than in the Äposition, caus-
ing the windscreen wiper to wipe more fre-
quently.
If the wiper blades are worn, the windscreen will
no longer be wiped properly. This could mean
you are unable to observe the traffic conditions. 114
Windscreen wipersLights and windscreen wipers
Page 231 of 345
Display messages
Possible causes/consequences and
M
MSolutions X
Consult a qualified specialist workshop immediately.
Further information on the automatic front-passenger front airbag
deactivation feature (Y page 47).Lights
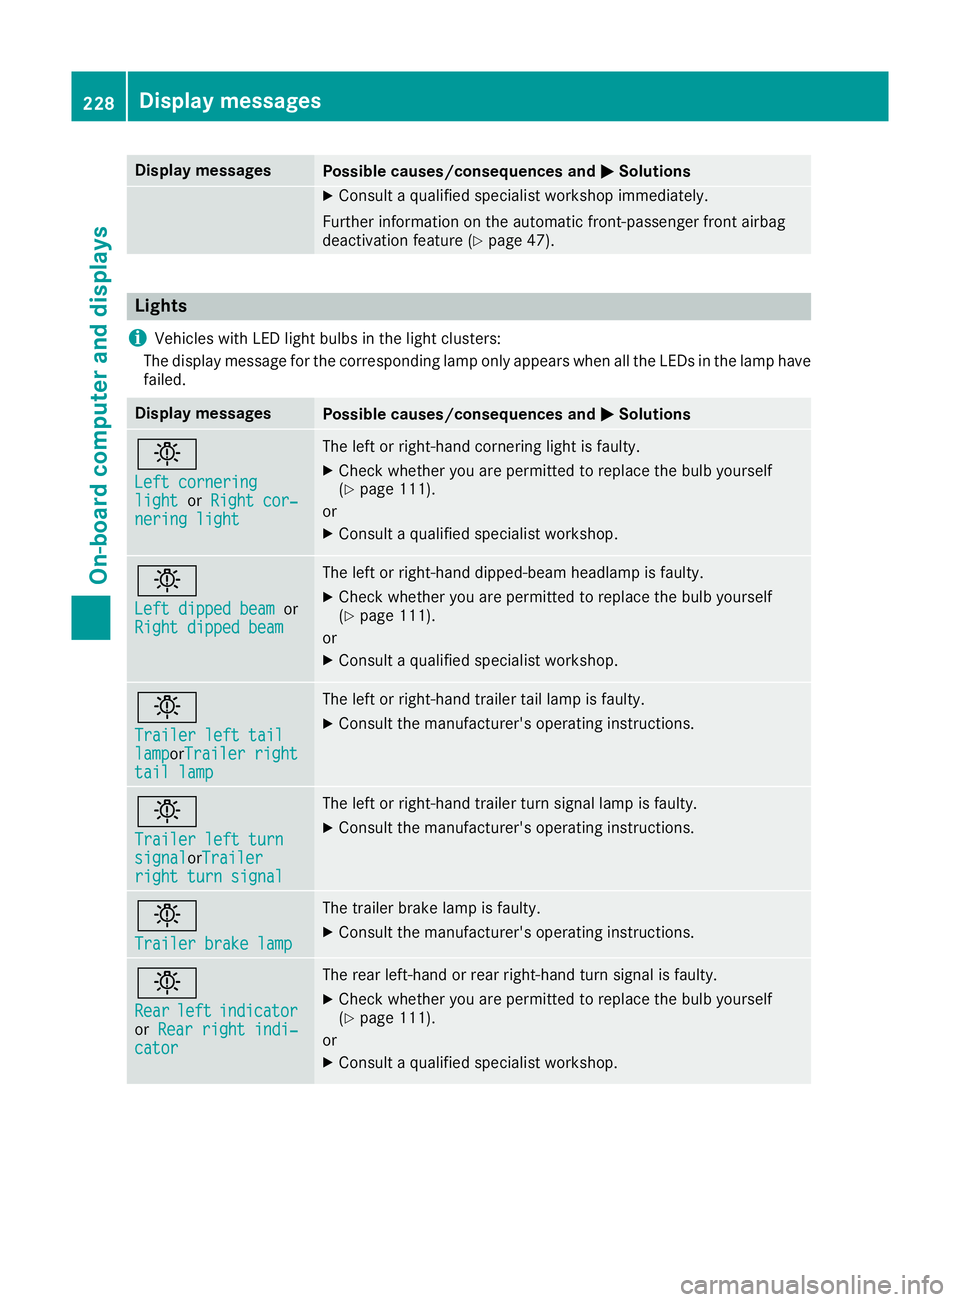
i Vehicles with LED light bulbs in the light clusters:
The display message for the corresponding lamp only appears when all the LEDs in the lamp have
failed. Display messages
Possible causes/consequences and
M
MSolutions b
Left cornering Left cornering
light light
orRight cor‐
Right cor‐
nering light
nering light The left or right-hand cornering light is faulty.
X Check whether you are permitted to replace the bulb yourself
(Y page 111).
or
X Consult a qualified specialist workshop. b
Left dipped beam Left dipped beam
or
Right dipped beam
Right dipped beam The left or right-hand dipped-beam headlamp is faulty.
X Check whether you are permitted to replace the bulb yourself
(Y page 111).
or
X Consult a qualified specialist workshop. b
Trailer left tail Trailer left tail
lamp lampor
Trailer right
Trailer right
tail lamp
tail lamp The left or right-hand trailer tail lamp is faulty.
X Consult the manufacturer's operating instructions. b
Trailer left turn Trailer left turn
signal signal
orTrailerTrailer
right turn signal
right turn signal The left or right-hand trailer turn signal lamp is faulty.
X
Consult the manufacturer's operating instructions. b
Trailer brake lamp Trailer brake lamp The trailer brake lamp is faulty.
X Consult the manufacturer's operating instructions. b
Rear Rear
left
leftindicator
indicator
or Rear right indi‐
Rear right indi‐
cator
cator The rear left-hand or rear right-hand turn signal is faulty.
X Check whether you are permitted to replace the bulb yourself
(Y page 111).
or
X Consult a qualified specialist workshop. 228
Display
messagesOn-board computer and displays
Page 232 of 345
Display messages
Possible causes/consequences and
M
MSolutions b
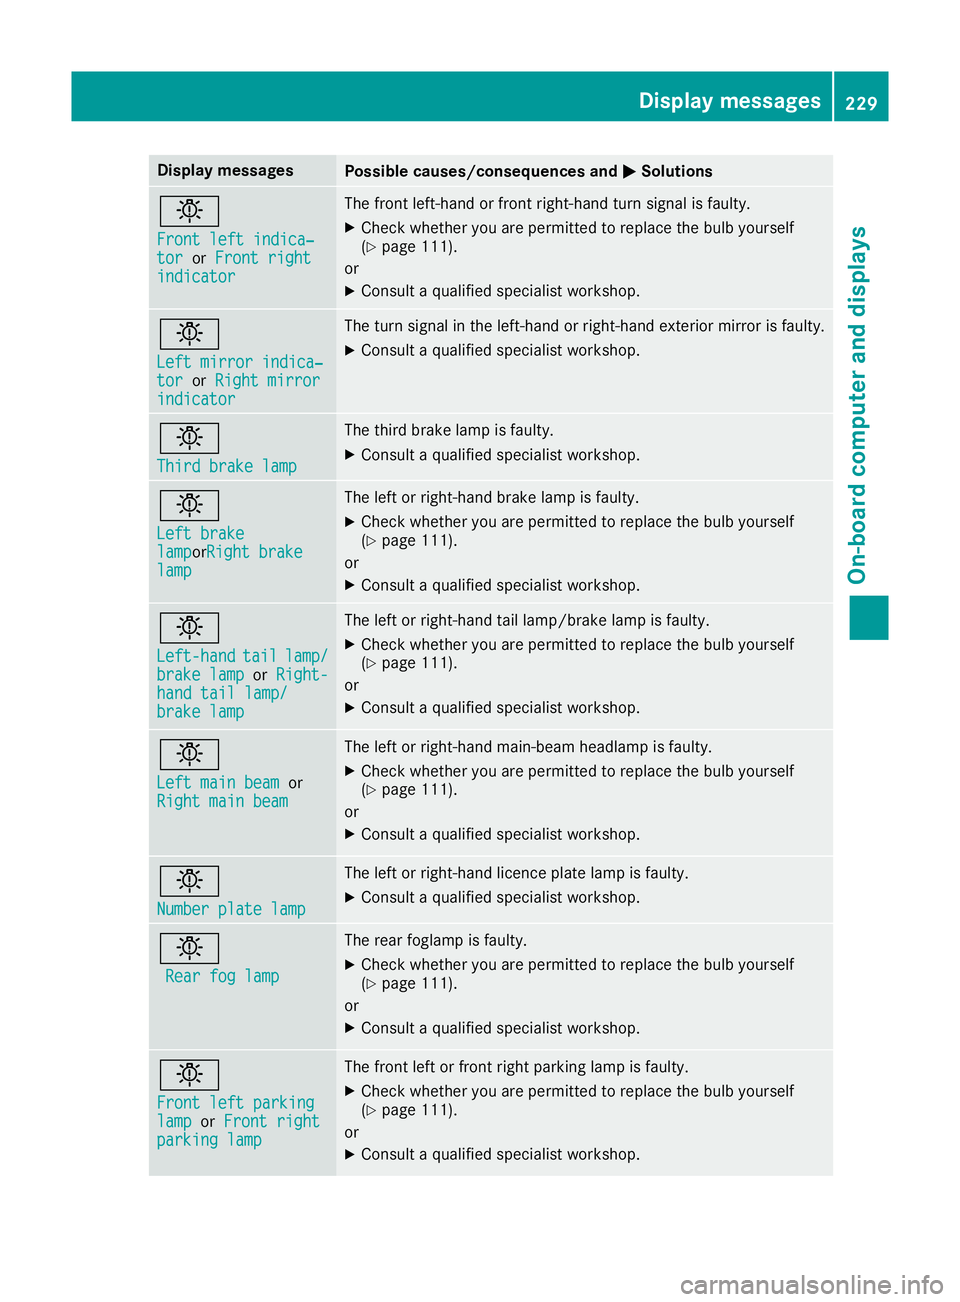
Front left indica‐ Front left indica‐
tor tor
orFront right
Front right
indicator
indicator The front left-hand or front right-hand turn signal is faulty.
X Check whether you are permitted to replace the bulb yourself
(Y page 111).
or
X Consult a qualified specialist workshop. b
Left mirror indica‐ Left mirror indica‐
tor tor
orRight mirror
Right mirror
indicator
indicator The turn signal in the left-hand or right-hand exterior mirror is faulty.
X Consult a qualified specialist workshop. b
Third brake lamp Third brake lamp The third brake lamp is faulty.
X Consult a qualified specialist workshop. b
Left brake Left brake
lamp lampor
Right brake
Right brake
lamp
lamp The left or right-hand brake lamp is faulty.
X Check whether you are permitted to replace the bulb yourself
(Y page 111).
or
X Consult a qualified specialist workshop. b
Left-hand Left-hand
tail
taillamp/
lamp/
brake lamp
brake lamp orRight-
Right-
hand tail lamp/
hand tail lamp/
brake lamp brake lamp The left or right-hand tail lamp/brake lamp is faulty.
X Check whether you are permitted to replace the bulb yourself
(Y page 111).
or X Consult a qualified specialist workshop. b
Left main beam Left main beam
or
Right main beam
Right main beam The left or right-hand main-beam headlamp is faulty.
X Check whether you are permitted to replace the bulb yourself
(Y page 111).
or X Consult a qualified specialist workshop. b
Number plate lamp Number plate lamp The left or right-hand licence plate lamp is faulty.
X Consult a qualified specialist workshop. b
Rear fog lamp
Rear fog lamp The rear foglamp is faulty.
X Check whether you are permitted to replace the bulb yourself
(Y page 111).
or X Consult a qualified specialist workshop. b
Front left parking Front left parking
lamp lamp
orFront right
Front right
parking lamp
parking lamp The front left or front right parking lamp is faulty.
X Check whether you are permitted to replace the bulb yourself
(Y page 111).
or X Consult a qualified specialist workshop. Display
messages
229On-board computer and displays Z