2016 MERCEDES-BENZ CLA COUPE lock
[x] Cancel search: lockPage 260 of 345
Warning/
indicator
lamp
N N
Signal type
Possible causes/consequences and M
MSolutions X
Make sure that the air supply to the engine radiator is not blocked, e.g. by frozen
slush.
X If the coolant temperature is below 120 †, you can continue driving to the
nearest qualified specialist workshop.
X Avoid heavy loads on the engine as you do so, e.g. driving in mountainous terrain
and stop-start traffic. Driving systems
Warning/
indicator
lamp
N N
Signal type
Possible causes/consequences and M
MSolutions ·
N
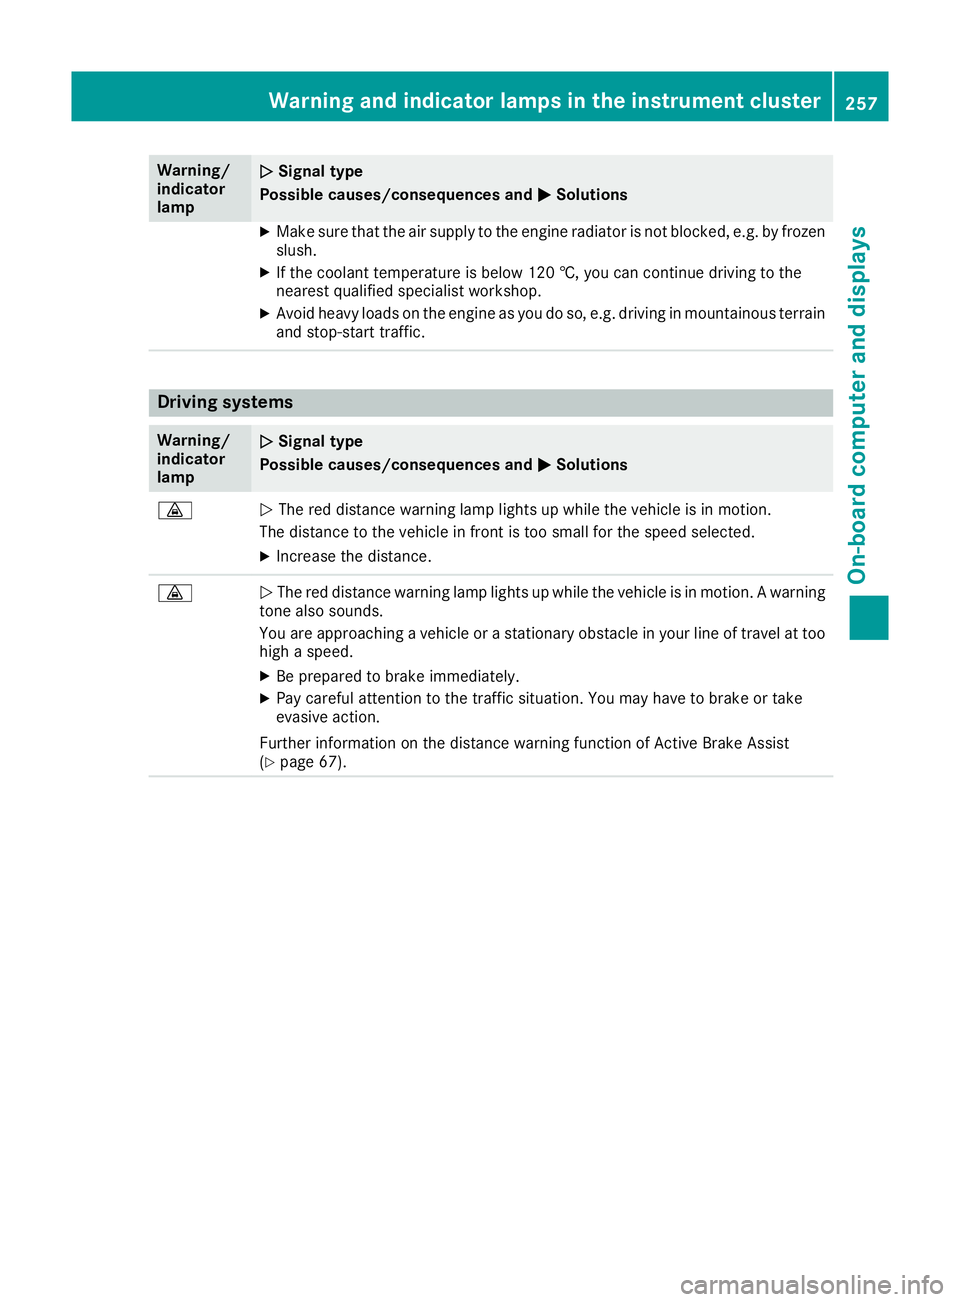
The red distance warning lamp lights up while the vehicle is in motion.
The distance to the vehicle in front is too small for the speed selected.
X Increase the distance. ·
N
The red distance warning lamp lights up while the vehicle is in motion. A warning
tone also sounds.
You are approaching a vehicle or a stationary obstacle in your line of travel at too high a speed.
X Be prepared to brake immediately.
X Pay careful attention to the traffic situation. You may have to brake or take
evasive action.
Further information on the distance warning function of Active Brake Assist
(Y page 67). Warning and indicator lamps in the instrument cluster
257On-board computer and displays Z
Page 271 of 345
Loading guidelines
G
WARNING
If objects, luggage or loads are not secured or not secured sufficiently, they could slip, tip
over or be flung around and thereby hit vehicle
occupants. There is a risk of injury, especially when braking or abruptly changing directions.
Always store objects so that they cannot be
flung around. Secure objects, luggage or
loads against slipping or tipping before the
journey. G
WARNING
Combustion engines emit poisonous exhaust
gases such as carbon monoxide. Exhaust
gases can enter the vehicle interior if the boot
lid is open when the engine is running, espe-
cially if the vehicle is in motion. There is a risk of poisoning.
Always switch off the engine before opening
the boot lid. Never drive with the boot lid
open. G
WARNING
The exhaust tail pipe and tail pipe trim can
become very hot. If you come into contact
with these parts of the vehicle, you could burn
yourself. There is a risk of injury.
Always be particularly careful around the
exhaust tail pipe and the tail pipe trim. Allow
these components to cool down before touch-
ing them.
The handling characteristics of a laden vehicle
are dependent on the distribution of the load
within the vehicle.
Observe the following notes when loading and
transporting a load:
R never exceed the maximum permissible gross
vehicle weight or the permissible axle loads
for the vehicle (including occupants).
R the boot is the preferred place to store
objects.
R position heavy loads as far forwards as pos-
sible and as low down in the boot as possible. R
the load must not protrude above the upper
edge of the seat backrests.
R always place the load against the rear or front
seat backrests. Make sure that the seat
backrests are securely locked into place.
R always place the load behind unoccupied
seats if possible.
R use the lashing eyelets and the luggage nets
to transport loads and luggage.
R only use lashing eyelets and fastening com-
ponents that are suitable for the weight and
size of the load.
R secure the load with sufficiently strong and
wear-resistant lashing material. Pad sharp
edges for protection. Stowage areas
Stowage compartments
Important safety notes G
WARNING
If objects in the passenger compartment are
stowed incorrectly, they can slide or be
thrown around and hit vehicle occupants. In
addition, cupholders, open stowage spaces
and mobile phone brackets cannot always
retain all objects they contain. There is a risk of injury, particularly in the event of sudden
braking or a sudden change in direction.
R Always stow objects so that they cannot be
thrown around in such situations.
R Always make sure that objects do not pro-
trude from stowage spaces, parcel nets or
stowage nets.
R Close the lockable stowage spaces before
starting a journey.
R Always stow and secure heavy, hard, poin-
ted, sharp-edged, fragile or bulky objects in
the boot.
Observe the loading guidelines (Y page 268).268
Stowage areasStowing and features
Page 274 of 345
Through-loading facility in the rear
compartment X
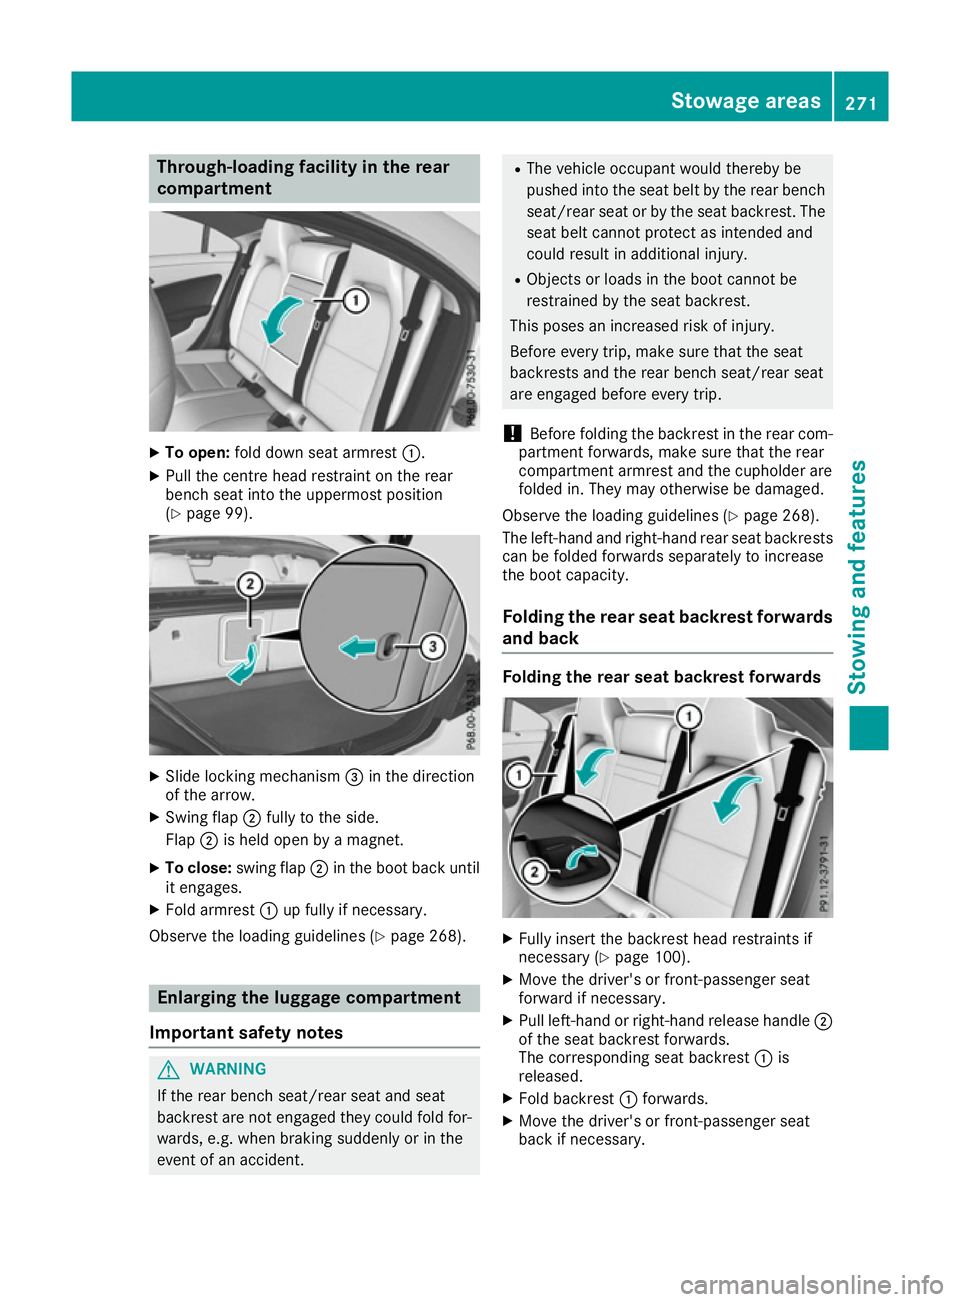
To open: fold down seat armrest :.
X Pull the centre head restraint on the rear
bench seat into the uppermost position
(Y page 99). X
Slide locking mechanism =in the direction
of the arrow.
X Swing flap ;fully to the side.
Flap ;is held open by a magnet.
X To close: swing flap ;in the boot back until
it engages.
X Fold armrest :up fully if necessary.
Observe the loading guidelines (Y page 268).Enlarging the luggage compartment
Important safety notes G
WARNING
If the rear bench seat/rear seat and seat
backrest are not engaged they could fold for- wards, e.g. when braking suddenly or in the
event of an accident. R
The vehicle occupant would thereby be
pushed into the seat belt by the rear bench
seat/rear seat or by the seat backrest. The
seat belt cannot protect as intended and
could result in additional injury.
R Objects or loads in the boot cannot be
restrained by the seat backrest.
This poses an increased risk of injury.
Before every trip, make sure that the seat
backrests and the rear bench seat/rear seat
are engaged before every trip.
! Before folding the backrest in the rear com-
partment forwards, make sure that the rear
compartment armrest and the cupholder are
folded in. They may otherwise be damaged.
Observe the loading guidelines (Y page 268).
The left-hand and right-hand rear seat backrests can be folded forwards separately to increase
the boot capacity.
Folding the rear seat backrest forwardsand back Folding the rear seat backrest forwards
X
Fully insert the backrest head restraints if
necessary (Y page 100).
X Move the driver's or front-passenger seat
forward if necessary.
X Pull left-hand or right-hand release handle ;
of the seat backrest forwards.
The corresponding seat backrest :is
released.
X Fold backrest :forwards.
X Move the driver's or front-passenger seat
back if necessary. Sto
wage areas
271Stowing and features Z
Page 275 of 345
X
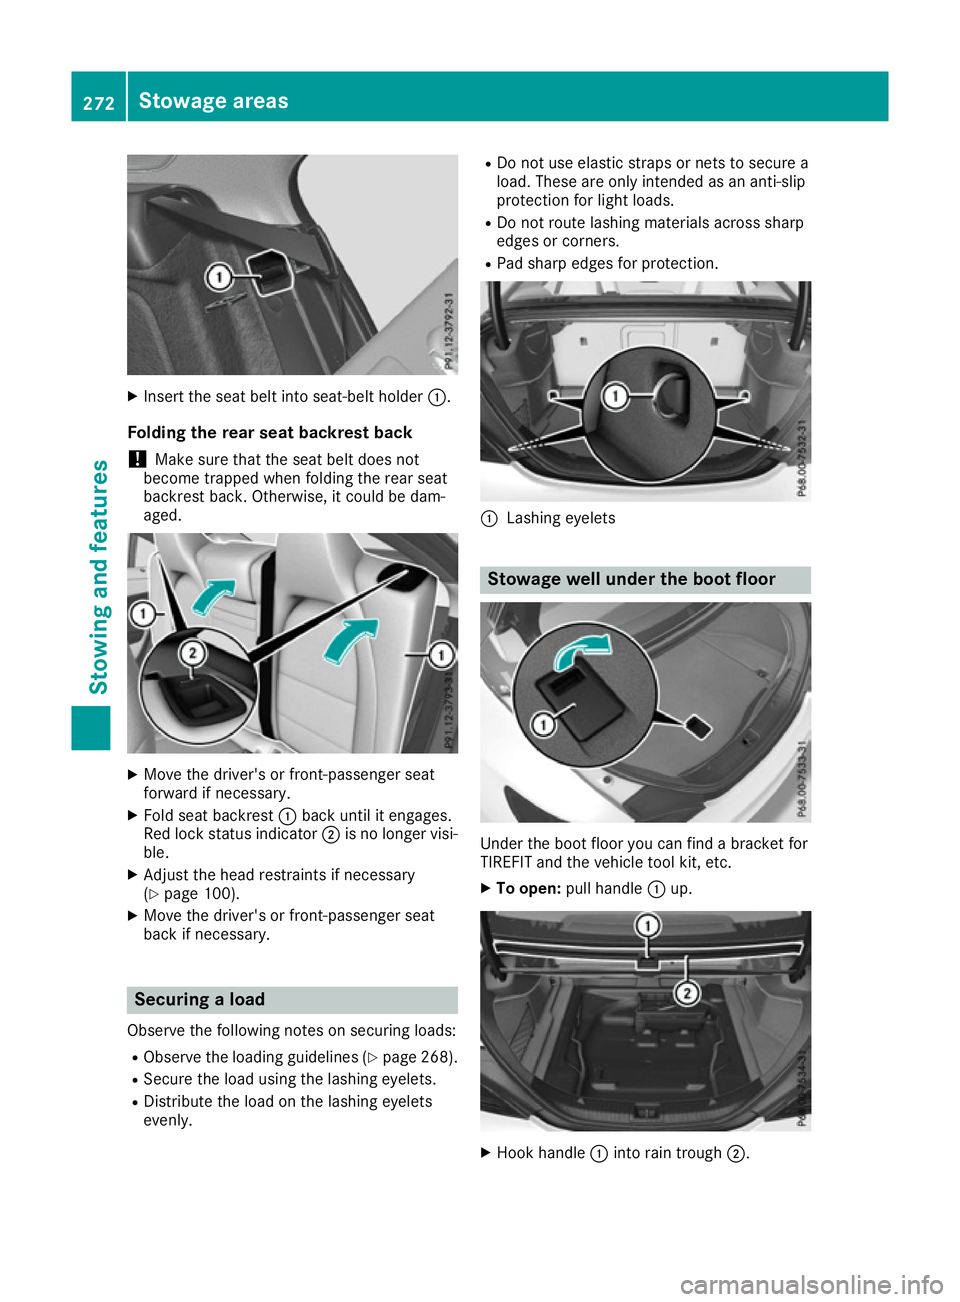
Insert the seat belt into seat-belt holder :.
Folding the rear seat backrest back
! Make sure that the seat belt does not
become trapped when folding the rear seat
backrest back. Otherwise, it could be dam-
aged. X
Move the driver's or front-passenger seat
forward if necessary.
X Fold seat backrest :back until it engages.
Red lock status indicator ;is no longer visi-
ble.
X Adjust the head restraints if necessary
(Y page 100).
X Move the driver's or front-passenger seat
back if necessary. Securing a load
Observe the following notes on securing loads: R Observe the loading guidelines (Y page 268).
R Secure the load using the lashing eyelets.
R Distribute the load on the lashing eyelets
evenly. R
Do not use elastic straps or nets to secure a
load. These are only intended as an anti-slip
protection for light loads.
R Do not route lashing materials across sharp
edges or corners.
R Pad sharp edges for protection. :
Lashing eyelets Stowage well under the boot floor
Under the boot floor you can find a bracket for
TIREFIT and the vehicle tool kit, etc.
X To open: pull handle :up. X
Hook handle :into rain trough ;.272
Stowage areasStowing and features
Page 277 of 345
size in the cup holder. Seal the container, in
particular when it contains hot liquid. G
WARNING
If objects in the passenger compartment are
stowed incorrectly, they can slide or be
thrown around and hit vehicle occupants. In
addition, cupholders, open stowage spaces
and mobile phone brackets cannot always
retain all objects they contain. There is a risk of injury, particularly in the event of sudden
braking or a sudden change in direction.
R Always stow objects so that they cannot be
thrown around in such situations.
R Always make sure that objects do not pro-
trude from stowage spaces, parcel nets or
stowage nets.
R Close the lockable stowage spaces before
starting a journey.
R Always stow and secure heavy, hard, poin-
ted, sharp-edged, fragile or bulky objects in
the boot.
! Only use the cup holders for containers of
the right size and which have lids. The drinks could otherwise spill.
Observe the loading guidelines (Y page 268).
The stowage compartments in the doors provide
space for bottles:
R front: capacity up to 1.0 l
R rear: capacity up to 0.5 l
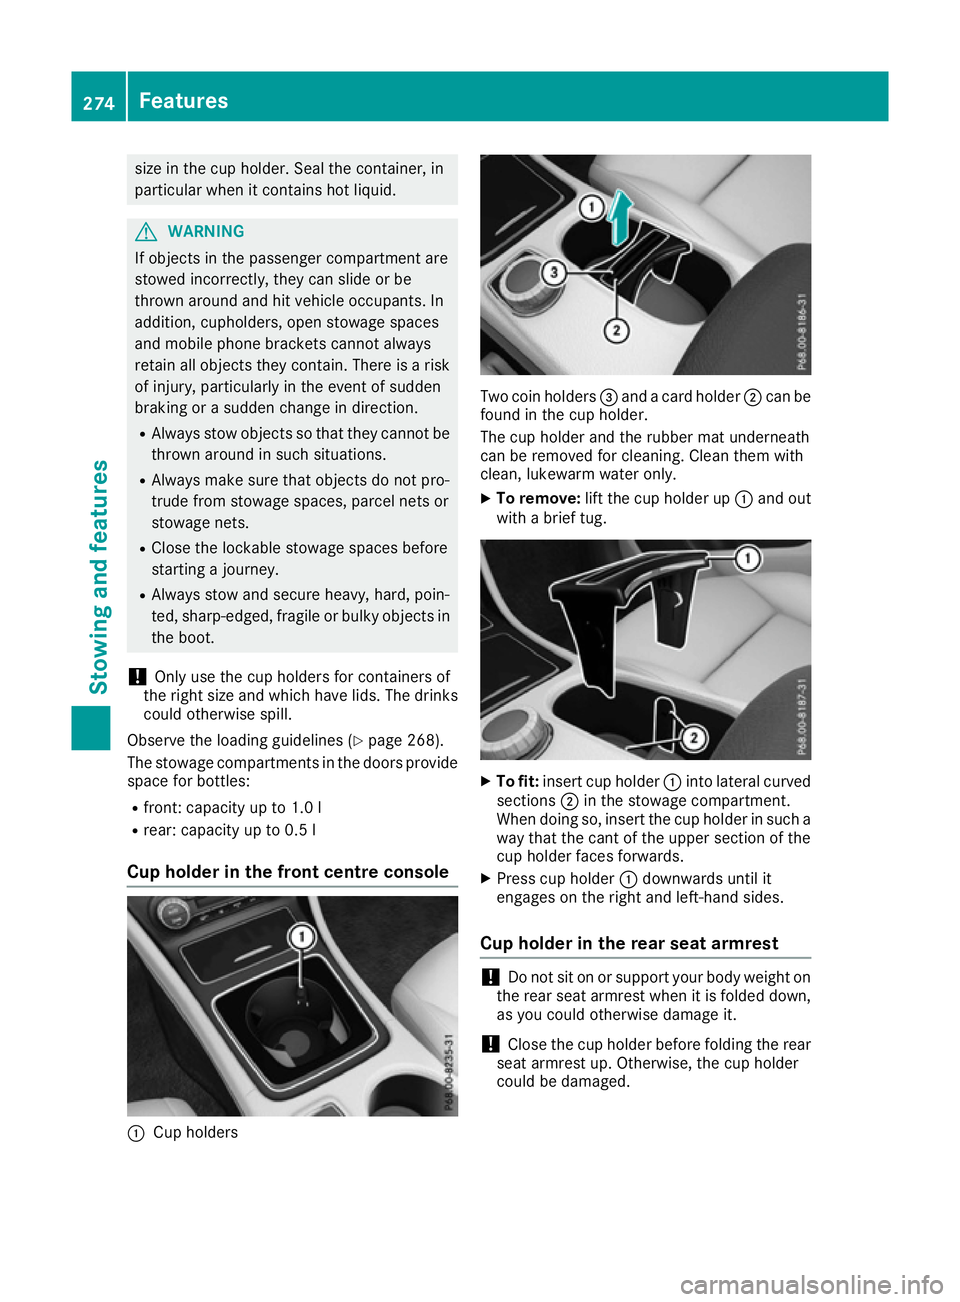
Cup holder in the front centre console :
Cup holders Two coin holders
=and a card holder ;can be
found in the cup holder.
The cup holder and the rubber mat underneath
can be removed for cleaning. Clean them with
clean, lukewarm water only.
X To remove: lift the cup holder up :and out
with a brief tug. X
To fit: insert cup holder :into lateral curved
sections ;in the stowage compartment.
When doing so, insert the cup holder in such a way that the cant of the upper section of the
cup holder faces forwards.
X Press cup holder :downwards until it
engages on the right and left-hand sides.
Cup holder in the rear seat armrest !
Do not sit on or support your body weight on
the rear seat armrest when it is folded down,
as you could otherwise damage it.
! Close the cup holder before folding the rear
seat armrest up. Otherwise, the cup holder
could be damaged. 274
FeaturesStowing and features
Page 279 of 345
X
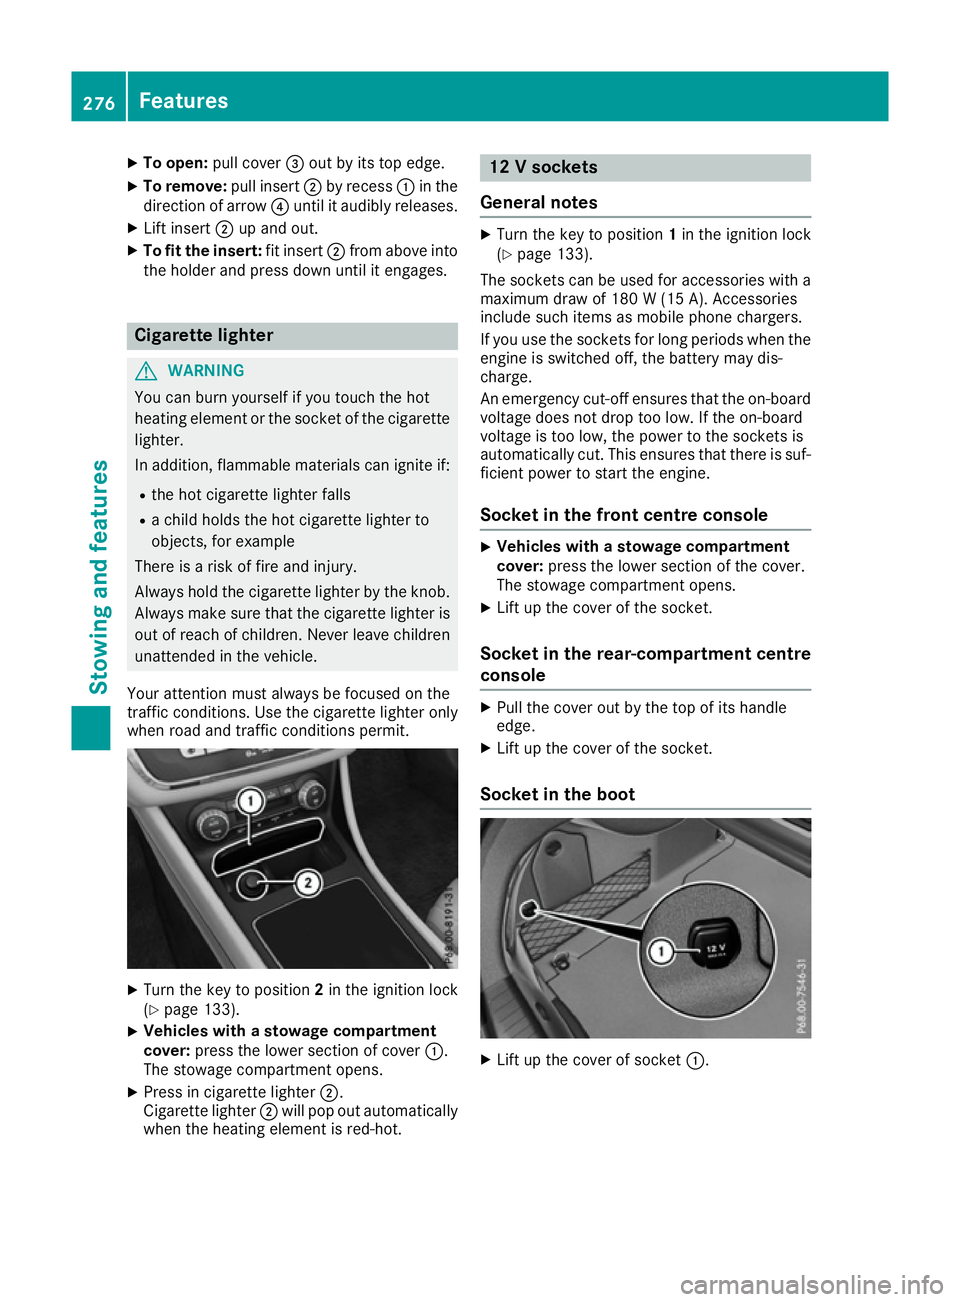
To open: pull cover =out by its top edge.
X To remove: pull insert;by recess :in the
direction of arrow ?until it audibly releases.
X Lift insert ;up and out.
X To fit the insert: fit insert;from above into
the holder and press down until it engages. Cigarette lighter
G
WARNING
You can burn yourself if you touch the hot
heating element or the socket of the cigarette lighter.
In addition, flammable materials can ignite if:
R the hot cigarette lighter falls
R a child holds the hot cigarette lighter to
objects, for example
There is a risk of fire and injury.
Always hold the cigarette lighter by the knob.
Always make sure that the cigarette lighter is
out of reach of children. Never leave children unattended in the vehicle.
Your attention must always be focused on the
traffic conditions. Use the cigarette lighter only when road and traffic conditions permit. X
Turn the key to position 2in the ignition lock
(Y page 133).
X Vehicles with a stowage compartment
cover: press the lower section of cover :.
The stowage compartment opens.
X Press in cigarette lighter ;.
Cigarette lighter ;will pop out automatically
when the heating element is red-hot. 12 V sockets
General notes X
Turn the key to position 1in the ignition lock
(Y page 133).
The sockets can be used for accessories with a
maximum draw of 180 W(15 A). Accessories
include such items as mobile phone chargers.
If you use the sockets for long periods when the engine is switched off, the battery may dis-
charge.
An emergency cut-off ensures that the on-boardvoltage does not drop too low. If the on-board
voltage is too low, the power to the sockets is
automatically cut. This ensures that there is suf-
ficient power to start the engine.
Socket in the front centre console X
Vehicles with a stowage compartment
cover: press the lower section of the cover.
The stowage compartment opens.
X Lift up the cover of the socket.
Socket in the rear-compartment centre
console X
Pull the cover out by the top of its handle
edge.
X Lift up the cover of the socket.
Socket in the boot X
Lift up the cover of socket :.276
FeaturesStowing and fea
tures
Page 281 of 345
X
Open the telephone compartment
(Y page 270).
X Place the mobile phone bracket into the pre-
installed fitting; see the separate installation
instructions for the mobile phone fitting.
X Insert the mobile phone into the mobile phone
bracket; see the separate installation instruc- tions for the mobile phone fitting.
i The mobile phone can also be operated
without being in the bracket. However, the
charging function and aerial function are not
available.
In order to use Bluetooth ®
(SAP profile) on your
telephone module, you must first insert the tele-
phone module into the pre-installed fitting. This connects it to the exterior aerial. If you wish to
charge the mobile phone, you must connect it to
a USB port.
Further information on the telephone module
with Bluetooth ®
(SAP profile) can be found in the
Digital Owner's Manual.
Operating the mobile phone You can operate the phone using the
6and
~ buttons on the multifunction steering
wheel. You can operate other mobile phone
functions via the on-board computer
(Y page 207).
When you remove the key from the ignition lock, the mobile phone is disconnected from the vehi-cle. You can then no longer make calls using the
hands-free system.
If a call is active and you remove the key from
the ignition lock, the conversation is transferred
over to the mobile phone. It is then possible to
continue the conversation on the mobile phone. Mobile phone bracket in the stowage
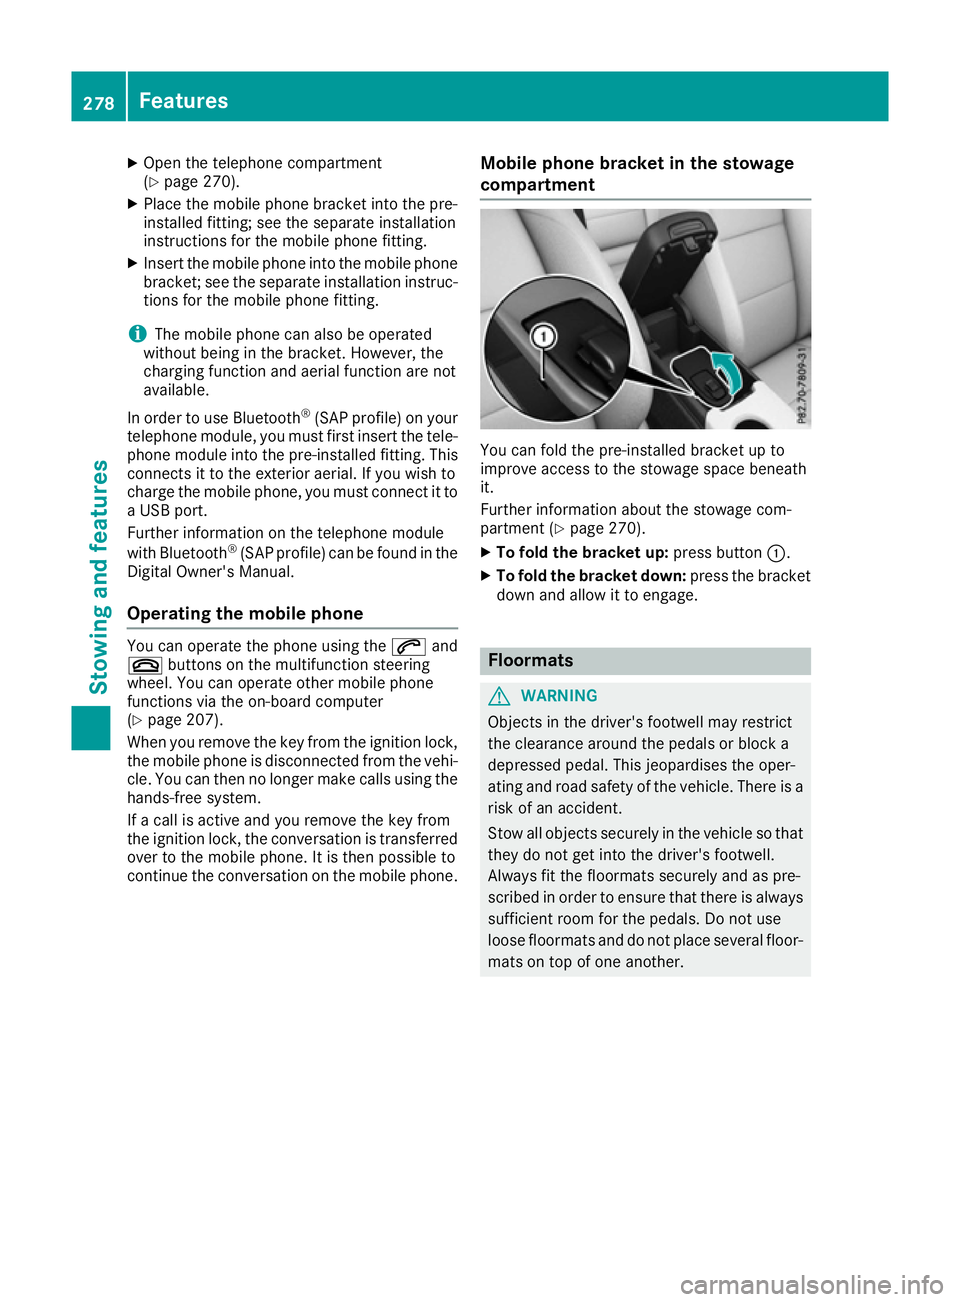
compartment You can fold the pre-installed bracket up to
improve access to the stowage space beneath
it.
Further information about the stowage com-
partment (Y page 270).
X To fold the bracket up: press button:.
X To fold the bracket down: press the bracket
down and allow it to engage. Floormats
G
WARNING
Objects in the driver's footwell may restrict
the clearance around the pedals or block a
depressed pedal. This jeopardises the oper-
ating and road safety of the vehicle. There is a risk of an accident.
Stow all objects securely in the vehicle so that
they do not get into the driver's footwell.
Always fit the floormats securely and as pre-
scribed in order to ensure that there is always sufficient room for the pedals. Do not use
loose floormats and do not place several floor-mats on top of one another. 278
FeaturesStowing and features
Page 283 of 345
Engine compartment
Bonnet
Important safety notes G
WARNING
An unlocked bonnet may open up when the
vehicle is in motion and block your view. There is a risk of an accident.
Never unlock the bonnet when driving. Before
every trip, ensure that the bonnet is locked. G
WARNING
When being opened and closed, the bonnet
may suddenly fall into the closed position.
There is a risk of injury to persons in the range of movement of the bonnet.
Open and close the bonnet only when nobody
is in the range of movement. G
WARNING
If you open the bonnet while the engine is
overheating or while there is a fire in the
engine compartment, you could come into
contact with hot gases or other leaking ser-
vice products. There is a danger of injury.
Allow an overheating engine to cool down
before opening the bonnet. If there is a fire in the engine compartment, leave the bonnet
closed and notify the fire brigade. G
WARNING
There are moving components in the engine
compartment. Certain components may con-
tinue to move or suddenly move again even
after the ignition has been switched off, e.g.
the radiator fan. There is a risk of injury.
If you have to carry out work in the engine
compartment:
R switch off the ignition
R never touch the dangerous areas surround-
ing moving components, e.g. the rotation
area of the fan R
remove jewellery and watches
R keep items of clothing and hair, for exam-
ple, away from moving parts. G
WARNING
The ignition system and the fuel injection sys- tem operate with a high voltage. If you touch
the live components, you could receive an
electric shock. There is a danger of injury.
Never touch components of the ignition sys-
tem or the fuel injection system when the
ignition is switched on.
Active bonnet (pedestrian protection) Operating principle
! An active bonnet that had been triggered
must be repaired at a qualified specialist
workshop. The active bonnet function will
then be available again. The additional pedes- trian protection provided by the active bonnet will then be restored.
The active bonnet is available only in certain
countries.
The active bonnet can reduce the risk of injury to
pedestrians in certain accident situations. Rais- ing the active bonnet increases the clearance tohard components, such as the engine.
If the active bonnet has been triggered, it is
raised at the rear in the area around the hinge byapproximately 60 mm.
For the drive to the workshop, reset the trig-
gered active bonnet yourself. If the active bon-
net has been triggered, pedestrian protection
may be limited.
Resetting G
WARNING
Certain components in the engine compart-
ment could be very hot, e.g. the engine, the
radiator and parts of the exhaust system.
There is a risk of injury when accessing the
engine compartment.
As far as possible, allow the engine to cool
down and only touch the components descri- bed in the following. 280
Engine compartmentMaintenance and care