2016 MERCEDES-BENZ CLA COUPE lock
[x] Cancel search: lockPage 157 of 345
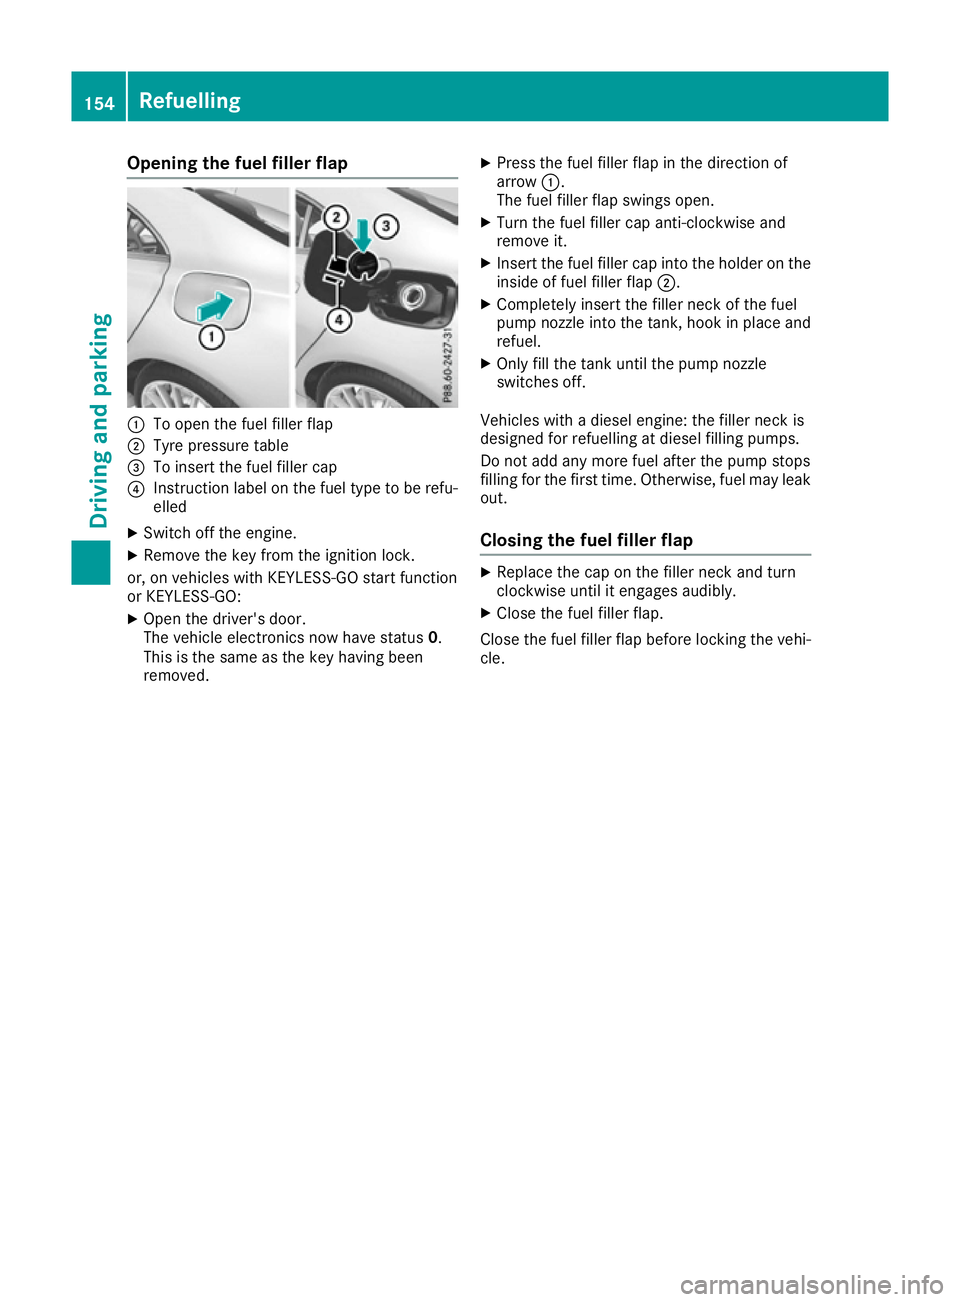
Opening the fuel filler flap
:
To open the fuel filler flap
; Tyre pressure table
= To insert the fuel filler cap
? Instruction label on the fuel type to be refu-
elled
X Switch off the engine.
X Remove the key from the ignition lock.
or, on vehicles with KEYLESS-GO start function
or KEYLESS‑GO: X Open the driver's door.
The vehicle electronics now have status 0.
This is the same as the key having been
removed. X
Press the fuel filler flap in the direction of
arrow :.
The fuel filler flap swings open.
X Turn the fuel filler cap anti-clockwise and
remove it.
X Insert the fuel filler cap into the holder on the
inside of fuel filler flap ;.
X Completely insert the filler neck of the fuel
pump nozzle into the tank, hook in place and refuel.
X Only fill the tank until the pump nozzle
switches off.
Vehicles with a diesel engine: the filler neck is
designed for refuelling at diesel filling pumps.
Do not add any more fuel after the pump stops
filling for the first time. Otherwise, fuel may leak out.
Closing the fuel filler flap X
Replace the cap on the filler neck and turn
clockwise until it engages audibly.
X Close the fuel filler flap.
Close the fuel filler flap before locking the vehi-
cle. 154
RefuellingDriving and parking
Page 158 of 345
Problems with the fuel and fuel tank
Problem
Possible causes/consequences and
M
MSolutions Fuel is leaking from the
vehicle. The fuel line or the fuel tank is faulty.
G WARNING
There is a risk of fire or explosion. X Apply the electric parking brake.
X Switch off the engine.
X Remove the key from the ignition lock.
or, on vehicles with KEYLESS-GO start function or KEYLESS ‑GO:
X Open the driver's door.
The vehicle electronics now have status 0. This is the same as the
key having been removed.
X Do not restart the engine under any circumstances.
X Consult a qualified specialist workshop. The engine does not
start. The fuel tank of a vehicle with a diesel engine has been run completely
dry.
X Refuel the vehicle with at least 5 litres of diesel.
X Turn the ignition on for approximately ten seconds (Y page 133).
X Start the engine continuously for a maximum of ten seconds until it
runs smoothly.
If the engine does not start: X Turn the ignition on again for a maximum of ten seconds
(Y page 133).
X Start the engine again continuously for a maximum of ten seconds
until it runs smoothly.
If the engine does not start after three attempts:
X Consult a qualified specialist workshop. The fuel filler flap cannot
be opened. The fuel filler flap is not unlocked.
X Unlock the vehicle (Y page 76). The key battery is weak or discharged.
X Unlock the vehicle using the emergency key element (Y page 78).The fuel filler flap is unlocked, but the opening mechanism is jammed.
X Consult a qualified specialist workshop. Parking
Important safety notes
G
WARNING
Flammable material such as leaves, grass or
twigs may ignite if they come into contact with hot parts of the exhaust system or exhaust
gas flow. There is a risk of fire.
Park the vehicle so that no flammable mate-
rial can come into contact with hot vehicle
components. In particular, do not park on dry
grassland or harvested grain fields. Parking
155Driving and parking Z
Page 159 of 345
G
WARNING
If you leave children unattended in the vehi-
cle, they may be able to set the vehicle in
motion if, for example, they:
R release the parking brake
R shift the automatic transmission out of park
position Por shift manual transmission into
neutral
R start the engine
In addition, they may operate vehicle equip-
ment and become trapped. There is a risk of
an accident and injury.
When leaving the vehicle, always take the key with you and lock the vehicle. Never leave
children unattended in the vehicle.
! Always secure the vehicle correctly against
rolling away. Otherwise, the vehicle or its driv-
etrain could be damaged.
To ensure that the vehicle is safeguarded
against rolling away unintentionally:
R the electric parking brake must be applied
R on vehicles with manual transmission, engage
1st gear or reverse gear
R on vehicles with automatic transmission, the
transmission must be in position Pand the
transmission position display must show Pin
the multifunction display.
R the key must be removed from the ignition
lock.
R on uphill or downhill gradients, the front
wheels must be turned towards the kerb. Switching off the engine
Important safety notes G
WARNING
The automatic transmission switches to neu-
tral position Nwhen you switch off the engine.
The vehicle may roll away. There is a risk of an
accident.
After switching off the engine, always switch
to parking position P. Prevent the parked vehi-
cle from rolling away by applying the parking
brake. Manual transmission X
Shift to either 1st gear or reverse gear R.
X With the key: turn the key to position 0in the
ignition lock and remove it.
The immobiliser is activated.
X With the Start/Stop button: press the
Start/Stop button (Y page 133).
The engine stops and all the indicator lamps
on the instrument cluster go out.
When the driver's door is closed, this corre-
sponds to key position 1. When the driver's
door is open, this corresponds to key position
0: "key removed".
X Apply the electric parking brake.
Automatic transmission X
Apply the electric parking brake.
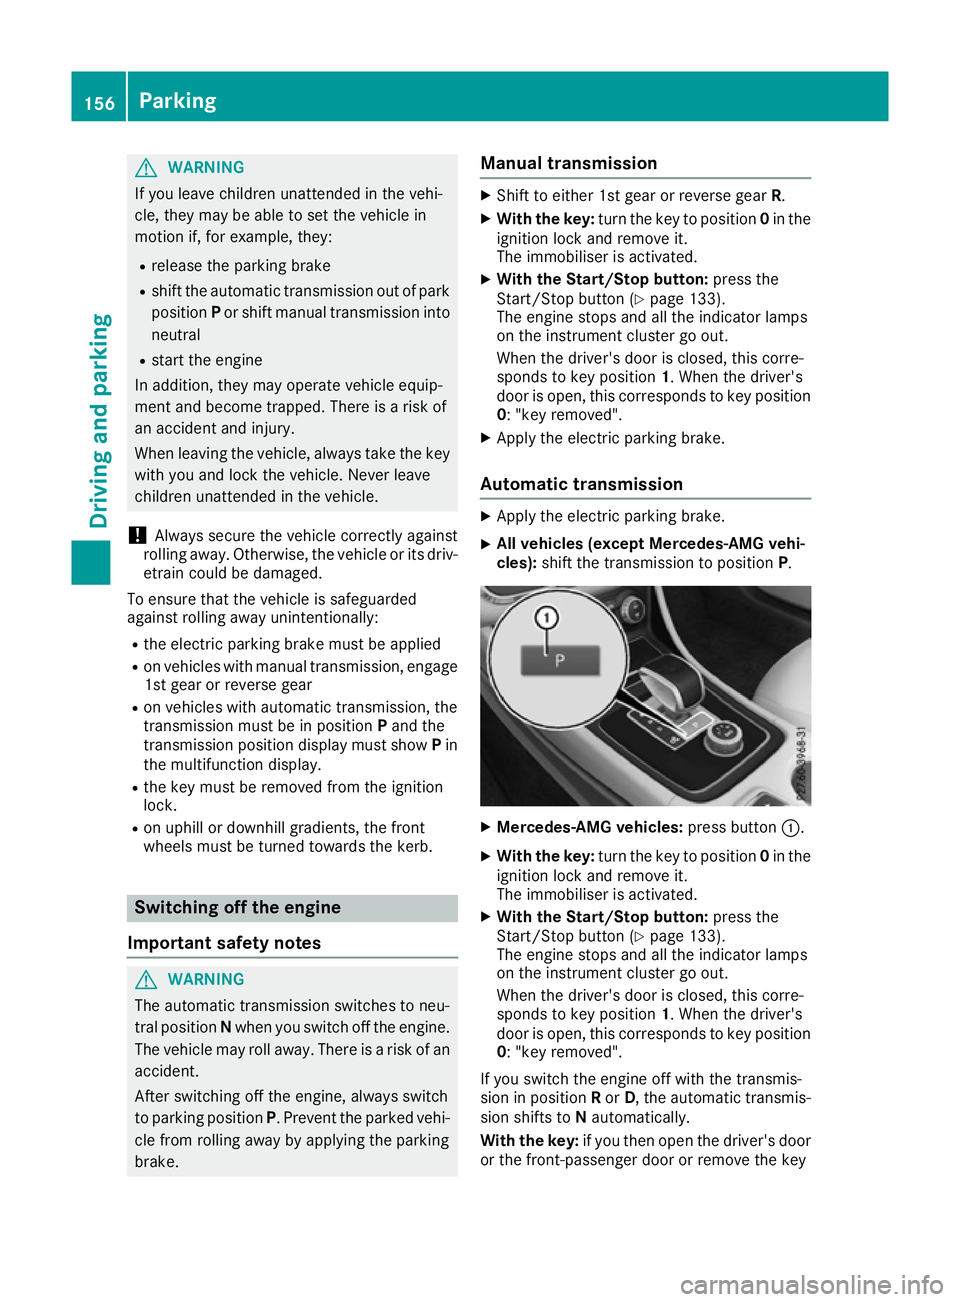
X All vehicles (except Mercedes-AMG vehi-
cles):
shift the transmission to position P. X
Mercedes-AMG vehicles: press button:.
X With the key: turn the key to position 0in the
ignition lock and remove it.
The immobiliser is activated.
X With the Start/Stop button: press the
Start/Stop button (Y page 133).
The engine stops and all the indicator lamps
on the instrument cluster go out.
When the driver's door is closed, this corre-
sponds to key position 1. When the driver's
door is open, this corresponds to key position
0: "key removed".
If you switch the engine off with the transmis-
sion in position Ror D, the automatic transmis-
sion shifts to Nautomatically.
With the key: if you then open the driver's door
or the front-passenger door or remove the key 156
ParkingDriving and parking
Page 160 of 345
from the ignition, the automatic transmission
shifts to Pautomatically.
With the Start/Stop button: if you then open
the driver's door or the front-passenger door,
the automatic transmission shifts to Pautomat-
ically.
If you want the automatic transmission to
remain in neutral N, e.g. when having the vehicle
cleaned in an automatic car wash with a towing
system:
X Vehicles with the Start-Stop button:
remove the Start-Stop button from the igni-
tion lock.
X Insert the key into the ignition lock.
X All vehicles: switch the ignition on.
X Depress the brake pedal and keep it
depressed.
X Shift to neutral N.
X Release the brake pedal.
X Release the electric parking brake.
X Switch off the ignition and leave the key in the
ignition lock. Electric parking brake
General notes G
WARNING
If you leave children unattended in the vehi-
cle, they may be able to set the vehicle in
motion if, for example, they:
R release the parking brake
R shift the automatic transmission out of park
position Por shift manual transmission into
neutral
R start the engine
In addition, they may operate vehicle equip-
ment and become trapped. There is a risk of
an accident and injury.
When leaving the vehicle, always take the key with you and lock the vehicle. Never leave
children unattended in the vehicle. The function of the electric parking brake is
dependent on the on-board voltage. If the on-
board voltage is low or if there is a malfunction
in the system, it may not be possible to apply the
released parking brake.
X If this is the case, park the vehicle only on
level ground and secure it to prevent it from
rolling away.
X Vehicles with automatic transmission:
shift the automatic transmission to position
P.
X Vehicles with manual transmission:
engage first gear.
It may not be possible to release an applied
parking brake if the on-board voltage is low or if
there is a malfunction in the system. Contact a
qualified specialist workshop.
The electric parking brake carries out a function check at regular intervals when the engine is
switched off. Noises that occur are normal.
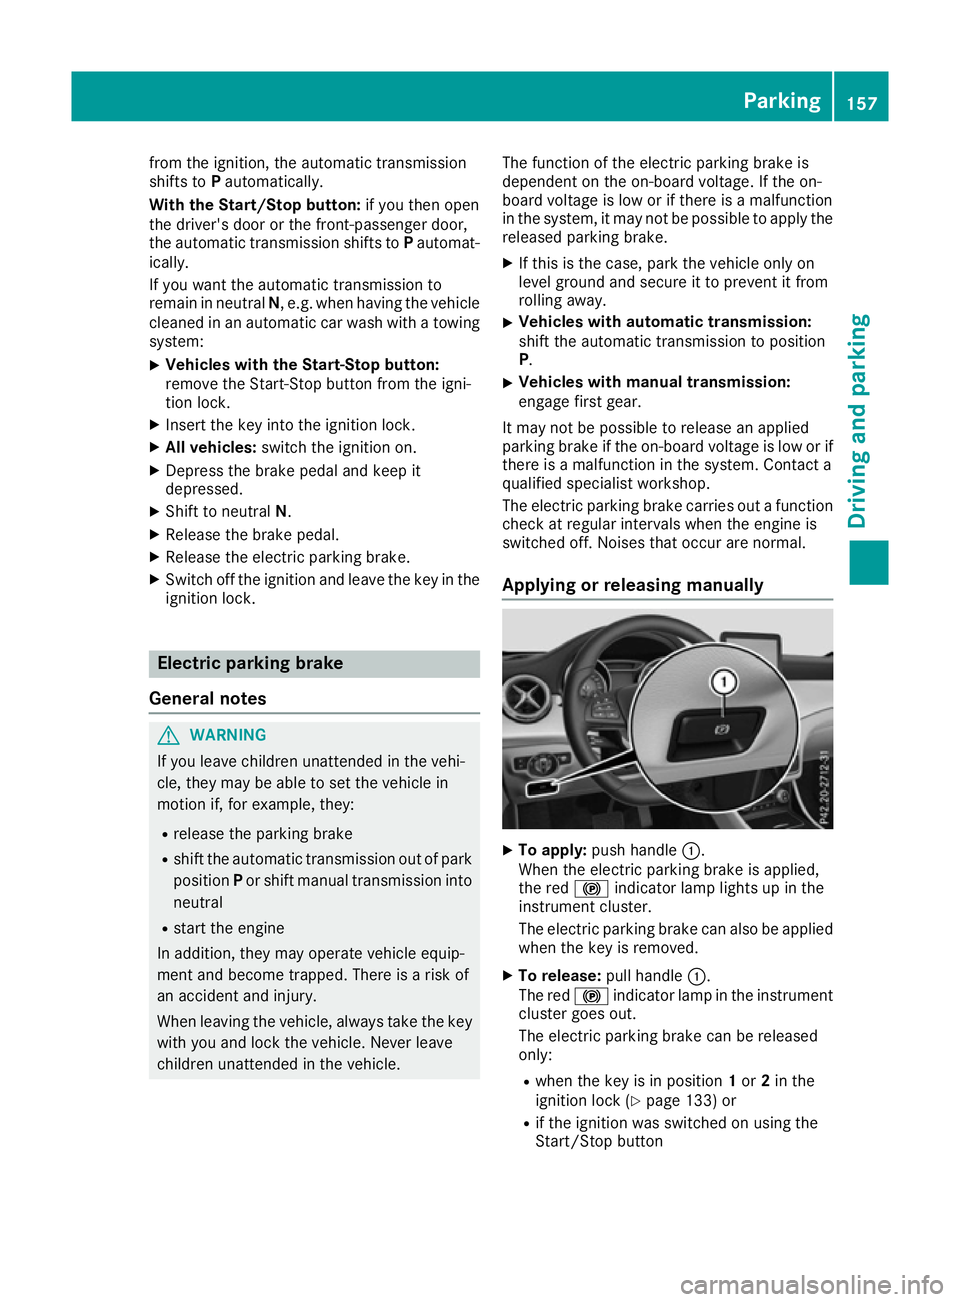
Applying or releasing manually X
To apply: push handle :.
When the electric parking brake is applied,
the red !indicator lamp lights up in the
instrument cluster.
The electric parking brake can also be applied when the key is removed.
X To release: pull handle:.
The red !indicator lamp in the instrument
cluster goes out.
The electric parking brake can be released
only:
R when the key is in position 1or 2in the
ignition lock (Y page 133) or
R if the ignition was switched on using the
Start/Stop button Parking
157Driving and parking Z
Page 165 of 345
For this reason, drive in the following manner in
the event of heavy rain or in conditions in which aquaplaning can occur:
R lower your speed
R avoid tyre ruts
R avoid sudden steering movements
R brake carefully
Driving on flooded roads !
Bear in mind that vehicles travelling in front
or in the opposite direction create waves. This may cause the maximum permissible water
depth to be exceeded.
These notes must be observed under all cir-
cumstances. You could otherwise damage
the engine, the electronics or the transmis-
sion.
If you must drive on stretches of road on which
water has collected, please bear in mind that:
R in the case of standing water, the water level
must be no higher than the lower edge of the
vehicle body
R you should drive no faster than walking pace Winter driving
G
WARNING
If you shift down on a slippery road surface in an attempt to increase the engine's braking
effect, the drive wheels could lose their grip.
This increases the risk of skidding and having
an accident.
Do not shift down for additional engine brak-
ing on a slippery road surface. G
DANGER
If the exhaust pipe is blocked or adequate
ventilation is not possible, poisonous gases
such as carbon monoxide (CO) may enter the vehicle. This is the case, e.g. if the vehicle
becomes trapped in snow. There is a risk of
fatal injury.
If you leave the engine or the auxiliary heating
running, make sure the exhaust pipe and area
around the vehicle are clear of snow. To
ensure an adequate supply of fresh air, open a window on the side of the vehicle that is not
facing into the wind.
Have your vehicle winterproofed at a qualified
specialist workshop at the onset of winter.
You should drive particularly carefully on slip-
pery road surfaces. Avoid sudden acceleration,
steering and braking manoeuvres. Do not use
cruise control or Distance Pilot DISTRONIC.
If the vehicle threatens to skid or cannot be
stopped when moving at low speed:
X Vehicles with manual transmission: shift
to neutral.
X Vehicles with automatic transmission:
shift the transmission to position
N.
X Try to bring the vehicle under control by using
corrective steering.
The outside temperature indicator is not
designed to serve as an ice-warning device and
is therefore unsuitable for that purpose.
Changes in the outside temperature are dis-
played after a short delay.
Indicated temperatures just above freezing
point do not guarantee that the road surface is
free of ice. The road may still be icy, especially in wooded areas or on bridges.
You should pay special attention to road condi-
tions when temperatures are around freezing
point.
Further information on driving with snow chains
(Y page 313).
Further information on driving with summer
tyres (Y page 312).
Observe the notes in the "Winter operation" sec-
tion (Y page 312). Driving systems
Cruise control
General notes Cruise control maintains a constant road speed
for you. It brakes automatically in order to avoid
exceeding the set speed. You must select a
lower gear in good time on long and steep down-
hill gradients, especially if the vehicle is laden or towing a trailer. On vehicles with automatic
transmission, you need to have selected the
manual drive program M(Y page 150). By doing
so, you will make use of the braking effect of the 162
Driving systemsDriving and parking
Page 177 of 345
The electric parking brake secures the vehicle
automatically if the HOLD function is activated,
the vehicle is stationary and:
R a system fault occurs
R the power supply is insufficient
Vehicles with manual transmission The electric parking brake secures the vehicle
automatically if the HOLD function is activated
and:
R the driver's seat belt is not fastened and the
driver's door is open
R the engine is switched off, unless it is auto-
matically switched off by the ECO start/stop
function
R a system fault occurs
R the power supply is insufficient
The Brake immediately
Brake immediately message may also
appear on the multifunction display.
X Immediately depress the brake pedal firmly
until the warning message on the multifunc-
tion display goes out.
The HOLD function is deactivated.
A horn will sound at regular intervals if you turn
off the engine, take off your seat belt or open the
driver's door when the HOLD function is activa- ted. The horn alerts you to the fact that the
HOLD function is still activated. If you attempt to
lock the vehicle, the tone becomes louder. The
vehicle cannot be locked until you have deacti-
vated the HOLD function.
i Once you have switched off the engine, you
cannot restart it until you have deactivated
the HOLD function. Start-off assist (except Mercedes-
AMG vehicles)
Important safety notes G
WARNING
If you use start-off assist, individual wheels
may start to spin and the vehicle may skid. If
ESP ®
is deactivated, there is a greater danger
of skidding and having an accident. Make sure that no persons or obstacles are in the area
around the vehicle. Start-off assist enables optimum acceleration
from a standstill. For this, a suitably high-grip
road surface is required; the tyres and vehicle
must also be in good condition.
Do not activate start-off assist on public roads.
Observe the safety notes on driving safety sys-
tems (Y page 66).
Be sure to read the safety notes and information
on ESP ®
(Y page 69).
Activating start-off assist X
Deactivate ESP ®
(Y page 209).
X Turn the steering wheel to the straight-ahead
position.
X Depress the brake pedal hard with your left
foot and keep it depressed.
X Shift the transmission to position D.
X Use the DYNAMIC SELECT button to select
the Sdrive program (Y page 141).
X Quickly depress the accelerator pedal fully.
X Take your foot off the brake, but keep the
accelerator pedal depressed.
The vehicle pulls away at maximum acceler-
ation.
i Activate ESP ®
as soon as the acceleration
process has ended. ESP ®
will otherwise not
be able to stabilise the vehicle if the vehicle
starts to skid or a wheel starts to spin.
Cancelling start-off assist
X Remove your foot from the accelerator pedal.
X Reactivate ESP ®
. RACE START (Mercedes-AMG vehi-
cles)
Important safety notes i
RACE START must not be used on normal
roads. RACE START must be activated and
used only on dedicated race circuits, not on
public roads.
i RACE START is only available in
Mercedes‑ AMG vehicles. G
WARNING
If you use RACE START, individual tyres may
get into a spin and the vehicle could skid.
Depending on the selected ESP ®
mode, there 174
Driving systemsDriving and parking
Page 182 of 345
Manual transmission:
Gear lever position Warning display
Forward gear
or
Neutral
Front area activated
Reverse gear
or the
vehicle is rolling
backwards Rear and front areas
activated
Automatic transmission:
Transmission posi-
tion Warning display
D
Front area activated
R,
Nor the vehicle is
rolling backwards Rear and front areas
activated
P
No areas activated
One or more segments light up as the vehicle
approaches an obstacle, depending on the vehi-
cle's distance from the obstacle.
From the:
R sixth segment onwards, you will hear an inter-
mittent warning tone for approximately two
seconds.
R seventh segment onwards, you will hear a
warning tone for approximately two seconds. This indicates that you have now reached the
minimum distance.
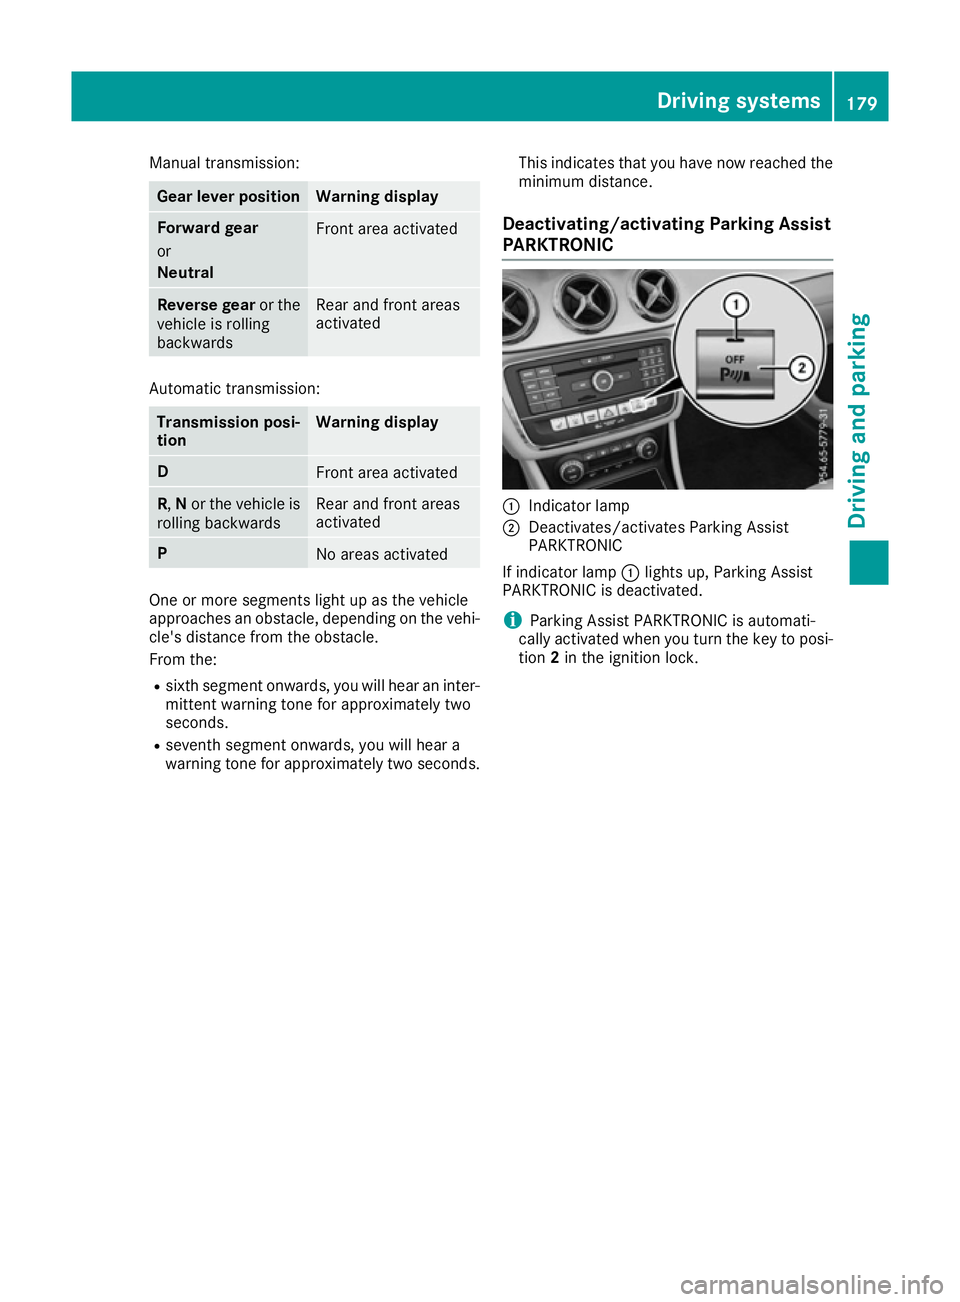
Deactivating/activating Parking Assist
PARKTRONIC :
Indicator lamp
; Deactivates/activates Parking Assist
PARKTRONIC
If indicator lamp :lights up, Parking Assist
PARKTRONIC is deactivated.
i Parking Assist PARKTRONIC is automati-
cally activated when you turn the key to posi- tion 2in the ignition lock. Driving systems
179Driving and parking Z
Page 184 of 345

Parking tips:
R on narrow roads, drive as closely as possible
past the parking space
R parking spaces that are littered or overgrown
might be identified or measured incorrectly
R parking spaces that are partially occupied by
trailer drawbars might not be identified as
such or be measured incorrectly
R snowfall or heavy rain may lead to a parking
space being measured inaccurately
R pay attention to the Parking Assist
PARKTRONIC warning messages
(Y page 178) during the parking procedure
R you can intervene in the steering procedure to
correct it at any time. Parking Pilot will then be cancelled
R when transporting a load that protrudes from
your vehicle, you should not use Parking Pilot
R never use Parking Pilot when snow chains are
fitted
R make sure that the tyre pressures are always
correct. This has a direct influence on the
parking characteristics of the vehicle
Use Parking Pilot for parking spaces that are:
R parallel or at right angles to the direction of
travel
R on straight roads, not bends
R on the same level as the road, e.g. not on the
pavement
For vehicles with the trailer tow hitch folded out,
the minimum length for parking spaces is
slightly longer.
If you have attached a trailer to your vehicle, you
should not use Parking Pilot. Once the electrical
connection is established between your vehicle
and the trailer, Parking Pilot is no longer availa- ble. Parking Assist PARKTRONIC is deactivated
for the rear area.
Detecting parking spaces Objects located above the detection range of
Parking Pilot will not be detected when the park-
ing space is measured. These are not taken into
account when the parking procedure is calcula- ted, e.g. overhanging loads, tail sections or load-
ing ramps of goods vehicles. G
WARNING
If there are objects above the detection range:
R Parking Pilot may steer in too early
R the vehicle may not stop in front of these
objects
This could cause a collision. There is a risk of
an accident.
If objects are located above the detection
range, stop and deactivate Parking Pilot.
Further information on the detection range
(Y page 177).
Parking Pilot does not assist you parking in
spaces at right angles to the direction of travel if:
R two parking spaces are located directly next
to one another
R the parking space is directly next to a low
obstacle such as a low kerb
R you forward-park
Parking Pilot does not assist you parking in
spaces parallel or at right angles to the direction of travel if:
R the parking space is on a kerb
R the system reads the parking space as being
blocked, such as by foliage or grass paving
blocks
R the area is too small for the vehicle to
manoeuvre into
R the parking space is bordered by an obstacle,
e.g. a tree, a post or a trailer :
Detected parking space on the left
; Parking symbol
= Detected parking space on the right
Parking Pilot is activated automatically when
driving forwards. The system is operational at
speeds of up to approximately 35 km/h. While
in operation, the system independently locates
and measures parking spaces on both sides of
the vehicle. Driving systems
181Driving and parking Z