2016 MERCEDES-BENZ CLA COUPE lock
[x] Cancel search: lockPage 286 of 345
Topping up engine oil
G
WARNING
Certain components in the engine compart-
ment could be very hot, e.g. the engine, the
radiator and parts of the exhaust system.
There is a risk of injury when accessing the
engine compartment.
As far as possible, allow the engine to cool
down and only touch the components descri- bed in the following. G
WARNING
If engine oil comes into contact with hot com- ponents in the engine compartment, it may
ignite. There is a risk of fire and injury.
Make sure that engine oil does not spill out
over the filler neck. Allow the engine to cool
down and thoroughly clean the components
that have come into contact with engine oil
before you start the engine. H
Environmental note
When topping up the oil, take care not to spill
any. If oil enters the soil or waterways, it is
harmful to the environment.
! Use only engine oils and oil filters that are
approved for vehicles with a service system. A
list of the engine oils and oil filters that have
been tested and approved in accordance with Mercedes-Benz Specifications for Service
Products is available at any Mercedes-Benz
Service Centre.
The following cause engine failure or damage
to the exhaust system:
R Use of engine oils and oil filters that have
not been expressly approved for the service system
R Replacement of engine oil and oil filter after
the replacement interval specified by the
service system has expired
R Use of engine oil additives
! Do not add too much oil. Topping up with too
much engine oil can result in damage to the
engine or to the catalytic converter. Have
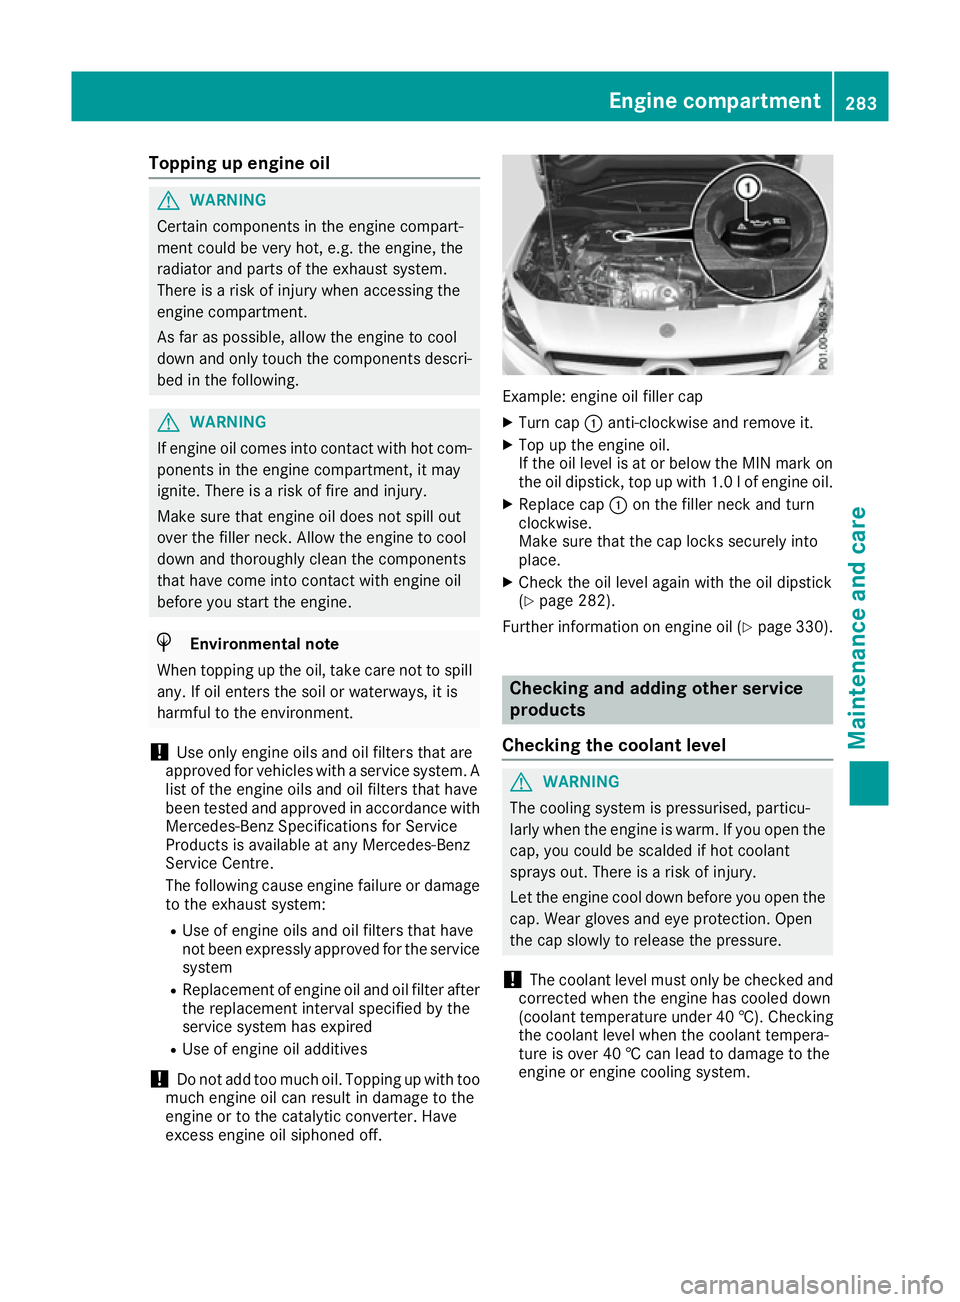
excess engine oil siphoned off. Example: engine oil filler cap
X Turn cap :anti-clockwise and remove it.
X Top up the engine oil.
If the oil level is at or below the MIN mark on
the oil dipstick, top up with 1.0 lof engine oil.
X Replace cap :on the filler neck and turn
clockwise.
Make sure that the cap locks securely into
place.
X Check the oil level again with the oil dipstick
(Y page 282).
Further information on engine oil (Y page 330). Checking and adding other service
products
Checking the coolant level G
WARNING
The cooling system is pressurised, particu-
larly when the engine is warm. If you open the cap, you could be scalded if hot coolant
sprays out. There is a risk of injury.
Let the engine cool down before you open the
cap. Wear gloves and eye protection. Open
the cap slowly to release the pressure.
! The coolant level must only be checked and
corrected when the engine has cooled down
(coolant temperature under 40 †). Checking
the coolant level when the coolant tempera-
ture is over 40 † can lead to damage to the
engine or engine cooling system. Engine compartment
283Maintenance and care Z
Page 287 of 345
X
Park the vehicle on a level surface.
Check the coolant level only if the vehicle is
on a level surface and the engine has cooled
down.
X Turn the key to position 2in the ignition lock
(Y page 133).
X Check the coolant temperature display in the
instrument cluster.
The coolant temperature must be below
40 †.
X Turn the key to position 0in the ignition lock
(Y page 133).
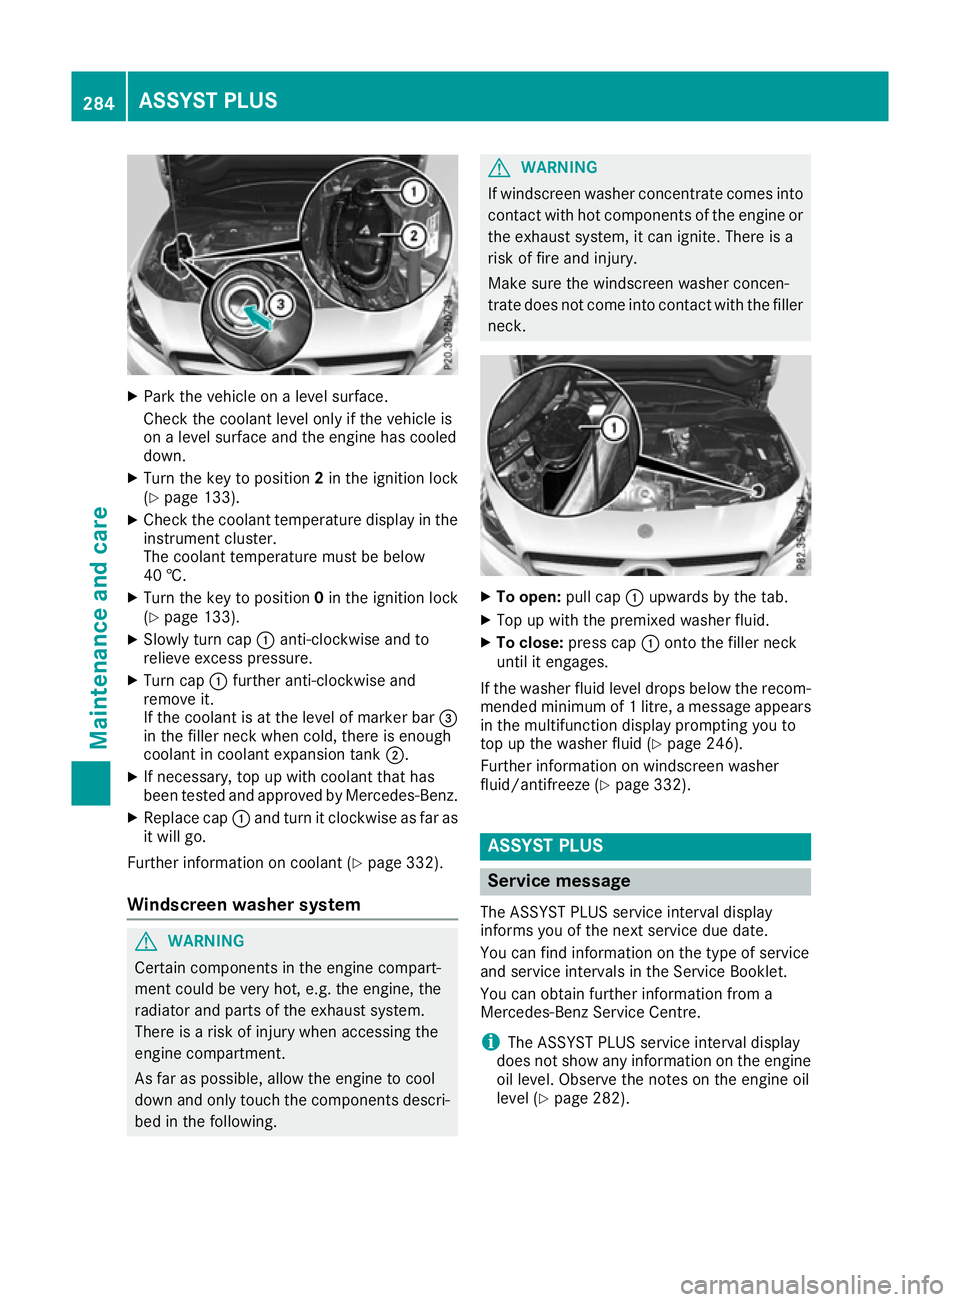
X Slowly turn cap :anti-clockwise and to
relieve excess pressure.
X Turn cap :further anti-clockwise and
remove it.
If the coolant is at the level of marker bar =
in the filler neck when cold, there is enough
coolant in coolant expansion tank ;.
X If necessary, top up with coolant that has
been tested and approved by Mercedes-Benz.
X Replace cap :and turn it clockwise as far as
it will go.
Further information on coolant (Y page 332).
Windscreen washer system G
WARNING
Certain components in the engine compart-
ment could be very hot, e.g. the engine, the
radiator and parts of the exhaust system.
There is a risk of injury when accessing the
engine compartment.
As far as possible, allow the engine to cool
down and only touch the components descri- bed in the following. G
WARNING
If windscreen washer concentrate comes into contact with hot components of the engine or
the exhaust system, it can ignite. There is a
risk of fire and injury.
Make sure the windscreen washer concen-
trate does not come into contact with the filler neck. X
To open: pull cap:upwards by the tab.
X Top up with the premixed washer fluid.
X To close: press cap :onto the filler neck
until it engages.
If the washer fluid level drops below the recom- mended minimum of 1 litre, a message appears in the multifunction display prompting you to
top up the washer fluid (Y page 246).
Further information on windscreen washer
fluid/antifreeze (Y page 332). ASSYST PLUS
Service message
The ASSYST PLUS service interval display
informs you of the next service due date.
You can find information on the type of service
and service intervals in the Service Booklet.
You can obtain further information from a
Mercedes-Benz Service Centre.
i The ASSYST PLUS service interval display
does not show any information on the engine oil level. Observe the notes on the engine oil
level (Y page 282). 284
ASSYST PLUSMaintenance and care
Page 292 of 345
X
Fold the wiper arms away from the wind-
screen.
X Clean the wiper blades carefully using a damp
cloth.
X Fold the windscreen wipers back again before
switching on the ignition.
Cleaning the exterior lighting !
Only use cleaning agents or cleaning cloths
that are suitable for plastic lenses. Unsuitable
cleaning agents or cleaning cloths could
scratch or damage the plastic lenses of the
exterior lighting.
X Clean the plastic lenses of the exterior light-
ing using a wet sponge and a mild cleaning
agent, e.g. Mercedes-Benz car shampoo or
cleaning cloths.
Cleaning the mirror turn signal !
Only use cleaning agents or cleaning cloths
that are suitable for plastic lenses. Unsuitable
cleaning agents or cleaning cloths could
scratch or damage the plastic lenses of the
mirror turn signals.
X Clean the plastic lenses of the mirror turn sig-
nals in the exterior mirror housing using a wet sponge and mild cleaning agent, e.g.
Mercedes-Benz car shampoo or cleaning
cloths.
Cleaning the sensors !
If you clean the sensors with a high-pressure
cleaner, make sure that you keep a distance
of at least 30 cm between the vehicle and the high-pressure cleaner nozzle. Information
about the correct distance is available from
the equipment manufacturer. X
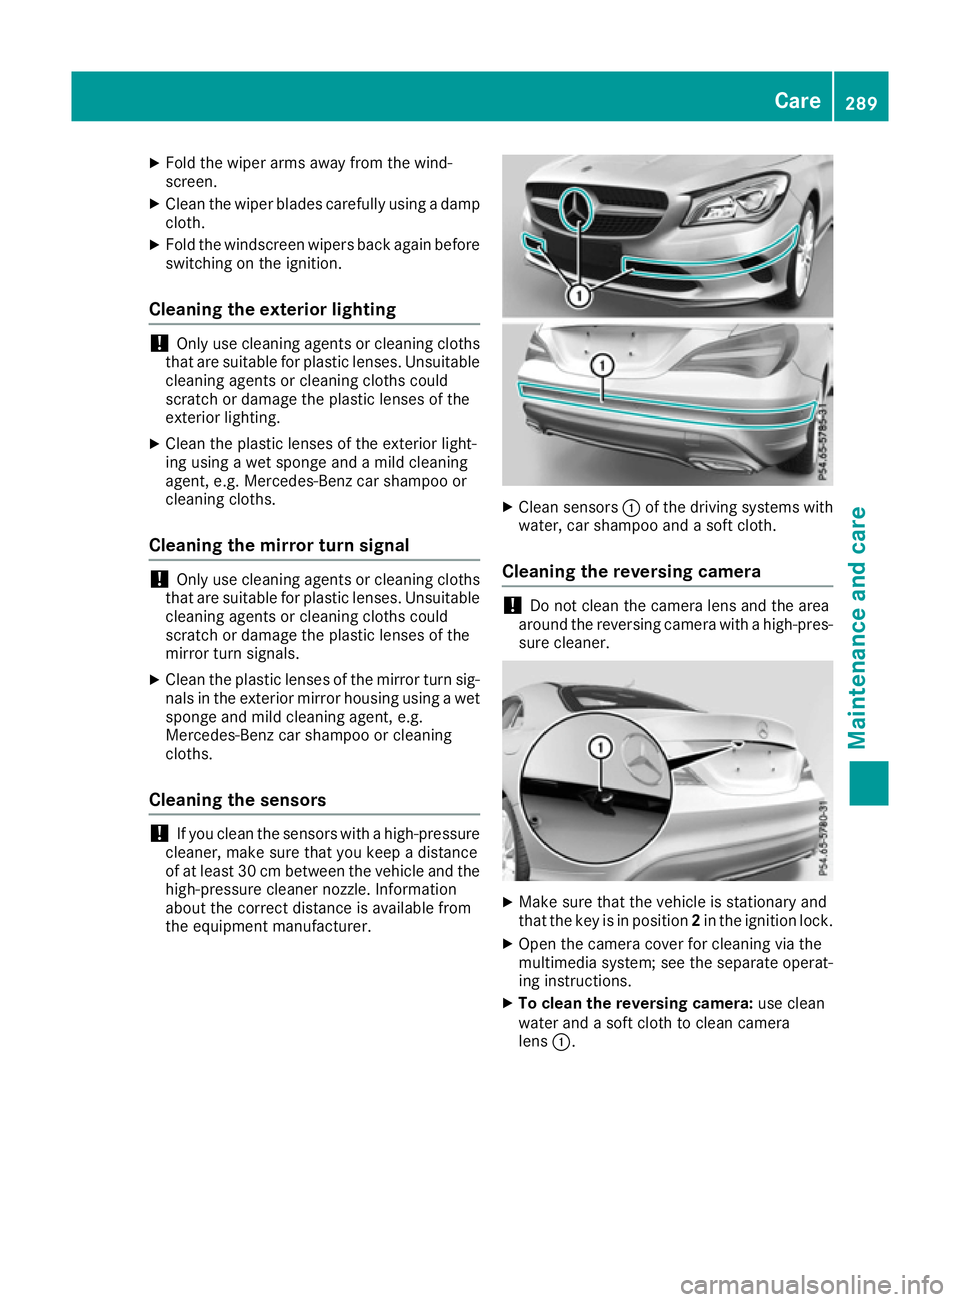
Clean sensors :of the driving systems with
water, car shampoo and a soft cloth.
Cleaning the reversing camera !
Do not clean the camera lens and the area
around the reversing camera with a high-pres-
sure cleaner. X
Make sure that the vehicle is stationary and
that the key is in position 2in the ignition lock.
X Open the camera cover for cleaning via the
multimedia system; see the separate operat-
ing instructions.
X To clean the reversing camera: use clean
water and a soft cloth to clean camera
lens :. Care
289Maintenance and care Z
Page 296 of 345
Where will I find...?
Warning triangle
Removing/replacing the warning trian-
gle X
To remove: open the boot lid.
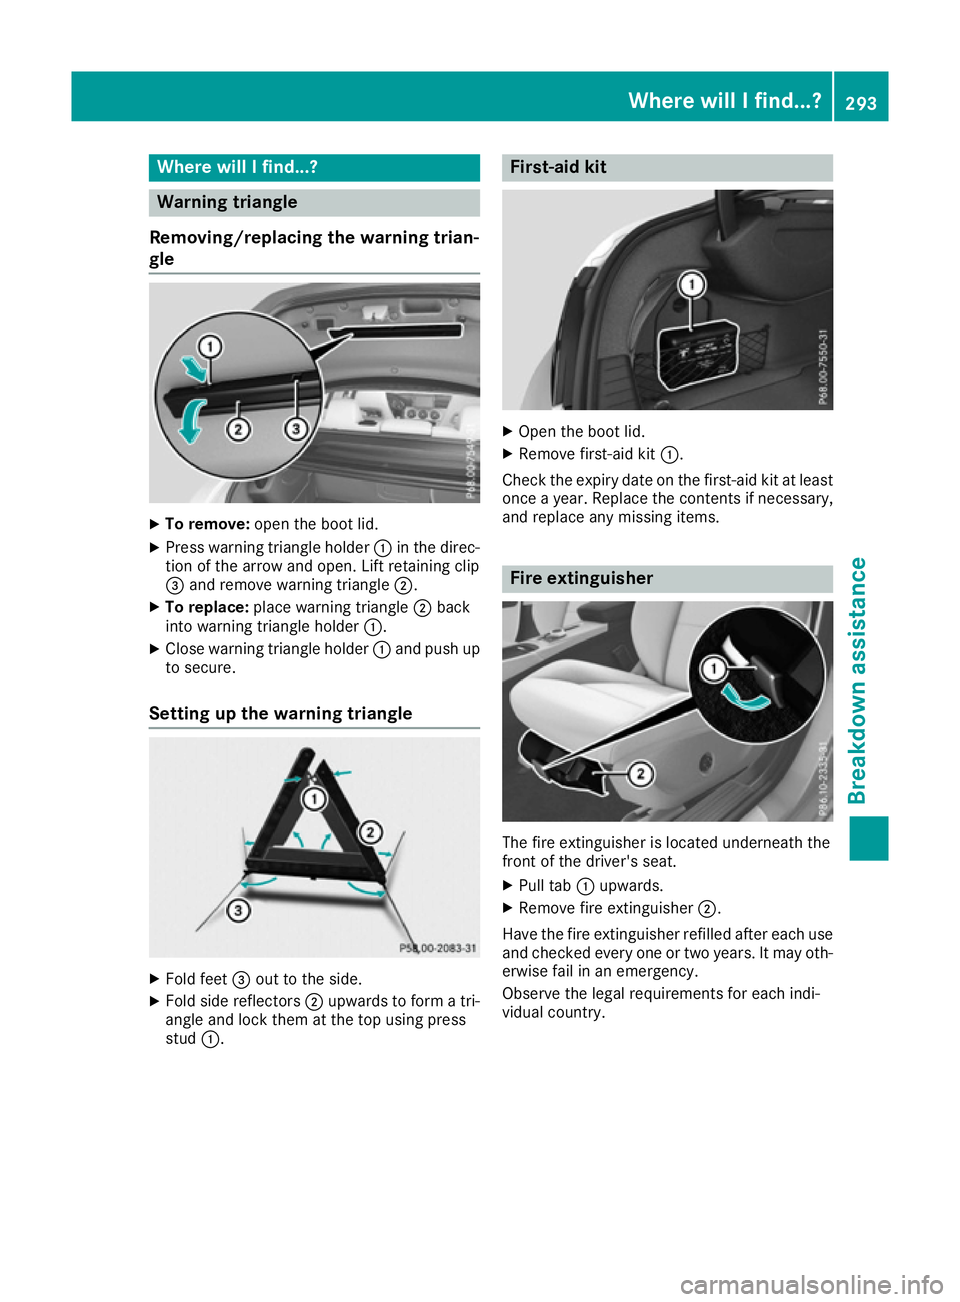
X Press warning triangle holder :in the direc-
tion of the arrow and open. Lift retaining clip
= and remove warning triangle ;.
X To replace: place warning triangle ;back
into warning triangle holder :.
X Close warning triangle holder :and push up
to secure.
Setting up the warning triangle X
Fold feet =out to the side.
X Fold side reflectors ;upwards to form a tri-
angle and lock them at the top using press
stud :. First-aid kit
X
Open the boot lid.
X Remove first-aid kit :.
Check the expiry date on the first-aid kit at least
once a year. Replace the contents if necessary,
and replace any missing items. Fire extinguisher
The fire extinguisher is located underneath the
front of the driver's seat.
X Pull tab :upwards.
X Remove fire extinguisher ;.
Have the fire extinguisher refilled after each use and checked every one or two years. It may oth-
erwise fail in an emergency.
Observe the legal requirements for each indi-
vidual country. Where will I find...?
293Breakdown assistance
Page 298 of 345
X
If possible, bring the front wheels into the
straight-ahead position.
X Switch off the engine.
X Vehicles without KEYLESS-GO: remove the
key from the ignition lock.
X Vehicles with KEYLESS-GO start-function
or KEYLESS-GO: open the driver's door.
The vehicle electronics now have status 0.
This is the same as the key having been
removed.
X Vehicles with KEYLESS-GO start function
or KEYLESS-GO: remove the Start/Stop but-
ton from the ignition lock (Y page 133).
X Make sure that the passengers are not endan-
gered as they get out of the vehicle. Make
sure that no one is near the danger area while
a wheel is being changed. Anyone who is not directly assisting in the wheel change should, for example, stand behind the barrier.
X Get out of the vehicle. Pay attention to traffic
conditions when doing so.
X Close the driver's door.
X Place the warning triangle a suitable distance
away (Y page 293). Observe legal require-
ments. MOExtended tyres (tyres with run-flat
characteristics)
General notes With MOExtended tyres (tyres with run-flat char-
acteristics), you can continue to drive your vehi- cle even if there is a total loss of pressure in one
or more tyres. The affected tyre must not show
any clearly visible damage.
You can recognise MOExtended tyres by the
"MOExtended" marking that appears on the tyre sidewall. You will find this marking next to the
tyre size designation, the load-bearing capacity
and the speed index.
MOExtended tyres may be used only in conjunc- tion with an activated tyre pressure loss warning
system or tyre pressure monitor.
If a pressure loss warning message appears in the multifunction display:
R observe the instructions in the display mes-
sages (Y page 239)
R check the tyre for damage
R if driving on, observe the following notes The driving distance possible in run-flat mode is
approximately 80 km when the vehicle is parti-
ally laden and approximately 30 km when the
vehicle is fully laden.
In addition to the vehicle load, the driving dis-
tance possible in run-flat mode depends on the:
R vehicle speed
R road condition
R outside temperature
The driving distance possible in run-flat mode
may be reduced by extreme driving conditions/ manoeuvres, or it can be increased through a
moderate style of driving.
The driving distance possible in run-flat mode is
counted from the moment the tyre pressure loss warning appears on the multifunction display.
You must not exceed a maximum speed of
80 km/h.
When replacing one or all tyres, observe the fol-
lowing specifications for your vehicle's tyres:
R size
R type and
R the "MOExtended" marking
If a tyre has gone flat and cannot be replaced
with an MOExtended tyre, a standard tyre may
be used as a temporary measure. Make sure
that you use the proper size and type (summer
or winter tyre).
Vehicles with MOExtended tyres are not equip-
ped with a TIREFIT kit at the factory. It is there-
fore recommended that you additionally equip
your vehicle with a TIREFIT kit if you fit tyres that do not feature run-flat characteristics, e.g. win-
ter tyres. A TIREFIT kit can be obtained from a
qualified specialist workshop.
Important safety notes G
WARNING
When driving in emergency mode, the driving characteristics deteriorate, e.g. when corner-
ing, accelerating quickly and when braking.
There is a risk of accident.
Do not exceed the stated maximum speed.
Avoid abrupt steering and driving manoeu-
vres, and driving over obstacles (kerbs, pot-
holes, off-road). This applies in particular to a laden vehicle. Flat tyre
295Breakdown assistance
Z
Page 300 of 345

X
Do not remove any foreign objects that have
penetrated the tyre, e.g. screws or nails.
X Remove the tyre sealant bottle, the accom-
panying TIREFIT sticker and the tyre inflation
compressor from the stowage space under
the boot floor (Y page 294).
X Affix part :of the TIREFIT sticker to the
instrument cluster within the driver's field of
vision.
X Affix part ;of the TIREFIT sticker near the
valve on the wheel with the defective tyre. X
Remove filler hose Band connector =from
the bottom section of tyre inflation compres- sor housing ;.
X Slide the yellow filler hose connector into the
mounting on yellow cap Aof tyre sealant
bottle :until the connector engages.
X With sealing rings in front, slide yellow cap A
of tyre sealant bottle :into the holder of tyre
inflation compressor ;.
Yellow cap Amust engage in both hooks. X
Remove cap from valve Con faulty tyre.
X Screw filler hose Donto valve C.
X Insert connector =into a 12 V socket in your
vehicle. Observe the notes on sockets (Y
page 276).
X Turn the key to position 1in the ignition lock
(Y page 133).
X Press on and off switch ?on the tyre inflation
compressor to ON.
The tyre inflation compressor is switched on.
The tyre is inflated.
First, tyre sealant is pumped into the tyre. The pressure may briefly rise to approximately
500 kPa (5 bar/73 psi).
Do not switch off the tyre inflation com-
pressor during this phase.
X Let the tyre inflation compressor run for a
maximum of ten minutes. The tyre should
then have attained a pressure of at least
200 kPa (2.0 bar/29 psi).
If a pressure of 200 kPa (2.0 bar/29 psi) has
been attained after ten minutes, see "Tyre pres- sure reached" (Y page 298).
If a tyre pressure of 200 kPa (2.0 bar/29 psi) has not been attained after ten minutes, see "Tyre
pressure not reached" (Y page 297).
If tyre sealant leaks out, make sure you clean the
affected area as quickly as possible. It is pref-
erable to use clear water.
If you get tyre sealant on your clothing, have it
cleaned as soon as possible with perchloroethy- lene.
Tyre pressure not reached If a tyre pressure of 200 kPa (2.0 bar/29 psi) has
not been attained after ten minutes:
X Switch off the tyre inflation compressor.
X Unscrew the filler hose from the valve of the
faulty tyre.
Please note that tyre sealant may leak out
when unscrewing the filler hose.
X Very slowly drive forwards or reverse approx-
imately 10 m.
X Pump up the tyre again.
After a maximum of ten minutes, the tyre
pressure must be at least 200 kPa (2.0 ba r/
29 psi). G
WA
RNING
If the required tyre pressure is not reached
after the specified time, the tyre is too badly
damaged. The tyre sealant cannot repair the
tyre in this instance. Damaged tyres and a tyre Flat tyre
297Breakdown assistance
Z
Page 301 of 345

pressure that is too low can significantly
impair the vehicle's braking and driving char-
acteristics. There is a risk of accident.
Do not continue driving. Contact a qualified
specialist workshop.
Tyre pressure reached G
WARNING
A tyre temporarily sealed with tyre sealant
impairs the driving characteristics and is not
suitable for higher speeds. There is a risk of
accident.
You should therefore adapt your driving style
accordingly and drive carefully. Do not exceed the specified maximum speed with a tyre that
has been repaired using tyre sealant.
The maximum permissible speed for a tyre
sealed with tyre sealant is 80 km/h. The upper
part of the TIREFIT sticker must be affixed to the
instrument cluster where it will be easily seen by
the driver.
If a tyre pressure of 200 kPa (2.0 bar/29 psi) has been attained after ten minutes:
X Switch off the tyre inflation compressor.
X Unscrew the filler hose from the valve of the
faulty tyre.
Please note that tyre sealant may leak out
when unscrewing the filler hose.
X Stow the tyre sealant bottle, the tyre inflation
compressor and the warning triangle.
X Pull away immediately.
X Stop after driving for approximately ten
minutes and check the tyre pressure with the
tyre inflation compressor.
The tyre pressure must now be at least
130 kPa (1.3 bar/19 psi). G
WARNING
If the required tyre pressure is not reached
after driving for a short period, the tyre is too badly damaged. The tyre sealant cannot
repair the tyre in this instance. Damaged tyres and a tyre pressure that is too low can signif-
icantly impair the vehicle's braking and driv-
ing characteristics. There is a risk of accident. Do not continue driving. Contact a qualified
specialist workshop.
i In your vehicle, you will find a sticker with
the Mercedes-Benz Service24h telephone
number, e.g. on the B-pillar on the driver's
side.
X Correct the tyre pressure if it is still at least
130 kPa (1.3 bar/19 psi). See the tyre pres-
sure table on the fuel filler flap for values.
X To increase the tyre pressure: switch on
the tyre inflation compressor. X
When the tyre pressure is correct, unscrew
the filler hose from the valve of the sealed
tyre.
Please note that tyre sealant may leak out
when unscrewing the filler hose.
X Screw the valve cap onto the tyre valve of the
sealed tyre. X
To remove the tyre sealant bottle from the
tyre inflation compressor, press together the
locking tabs on the yellow cap.
X Pull the tyre sealant bottle out of the tyre
inflation compressor.
The filler hose stays on the tyre sealant bottle. 298
Flat tyreBreakdown assistance
Page 302 of 345
X
Drive to the nearest qualified specialist work-
shop and have the tyre changed there.
X Have the tyre sealant bottle and the filler hose
replaced as soon as possible at a qualified
specialist workshop.
X Have the tyre sealant bottle replaced every
four years at a qualified specialist workshop. Battery (vehicle)
Important safety notes
Work on the battery, e.g. removing or fitting,
requires specialist knowledge and the use of
special tools. Therefore, always have work on
the battery carried out at a qualified specialist
workshop. G
WARNING
Work carried out incorrectly on the battery
can lead, for example, to a short circuit and
thus damage the vehicle electronics. This can lead to function restrictions applying to
safety-relevant systems, e.g the lighting sys-
tem, the ABS (anti-lock braking system) or the
ESP ®
(Electronic Stability Program). The oper-
ating safety of your vehicle may be restricted.
You could lose control of the vehicle, for
example:
R when braking
R in the event of abrupt steering manoeuvres
and/or when the vehicle's speed is not
adapted to the road conditions
There is a risk of an accident.
In the event of a short circuit or a similar inci- dent, contact a qualified specialist workshop
immediately. Do not drive any further. Always have work on the battery carried out at a
qualified specialist workshop.
Further information about ABS (Y page 66) and
ESP ®
(Y page 69). G
WARNING
Electrostatic build-up can lead to the creation of sparks, which could ignite the highly explo-
sive gases of a battery. There is a risk of an
explosion. Before handling the battery, touch the vehicle
body to remove any existing electrostatic
build-up.
The highly flammable gas mixture is created
while the battery is charging and when jump-
starting.
Always make sure that neither you nor the bat-
tery is electrostatically charged. Electrostatic
charge is created, for example:
R by wearing synthetic-fibre clothing
R by friction between clothing and the seat
R if you pull or push the battery across carpet or
other synthetic materials
R if you rub the battery with a cloth G
WARNING
During the charging process, a battery produ- ces hydrogen gas. If a short circuit occurs or
sparks are created, the hydrogen gas can
ignite. There is a risk of an explosion.
R Make sure that the positive terminal of a
connected battery does not come into con-
tact with vehicle parts.
R Never place metal objects or tools on a bat-
tery.
R It is important that you observe the descri-
bed order of the battery terminals when
connecting and disconnecting a battery.
R When jump-starting, make sure that the
battery poles with identical polarity are
connected.
R It is particularly important to observe the
described order when connecting and dis-
connecting the jump leads.
R Never connect or disconnect the battery
terminals while the engine is running. G
WARNING
Battery acid is caustic. There is a risk of injury. Avoid contact with the skin, eyes or clothing.
Do not breathe in any battery gases. Do not
lean over the battery. Keep the batteries out
of the reach of children. Immediately rinse off
battery acid thoroughly with plenty of clean
water and seek medical attention at once. Battery (vehicle)
299Breakdown assistance Z