2016 MERCEDES-BENZ B-Class ELECTRIC audio
[x] Cancel search: audioPage 174 of 342
XDrive forwards and back up as prompted bythe PARKTRONIC warning displays, several
times if necessary.
XStop when PARKTRONIC sounds the con-
tinuous warning tone, if not before.
Once you have exited the parking space com-
pletely, the steering wheel is moved to the
straight-ahead position. You hear a tone and
the Park Assist Finished
message
appears in the multifunction display. You will
then have to steer and merge into traffic on
your own. PARKTRONIC is still available. You
can take over the steering, before the vehicle
has exited the parking space completely. This
is useful, for example when you recognize
that it is already possible to pull out of the
parking space.
Canceling Active Parking Assist
XStop the movement of the multifunction
steering wheel or steer yourself.
Active Parking Assist will be canceled at
once. The Park Assist Canceled
mes-
sage appears in the multifunction display.
or
XPress the PARKTRONIC button
(
Ypage 167).
PARKTRONIC is switched off and Active
Parking Assist is immediately canceled.
The Park Assist Canceled
message
appears in the multifunction display.
Active Parking Assist is canceled automati-
cally if:
Rthe electric parking brake is engaged
Rtransmission position Pis selected
Rparking using Active Parking Assist is no
longer possible
Ryou are driving faster than 6 mph (10 km/h)
Ra wheel spins, ESP®intervenes or fails. The
÷ warning lamp lights up in the instru-
ment cluster
A warning tone sounds. The parking symbol
disappears and the multifunction display shows the
Park Assist Canceled
mes-
sage.
When Active Parking Assist is canceled, you
must steer and brake again yourself.
If a system malfunction occurs, the vehicle is
braked to a standstill. To drive on, depress the
accelerator again.
Rear view camera
General notes
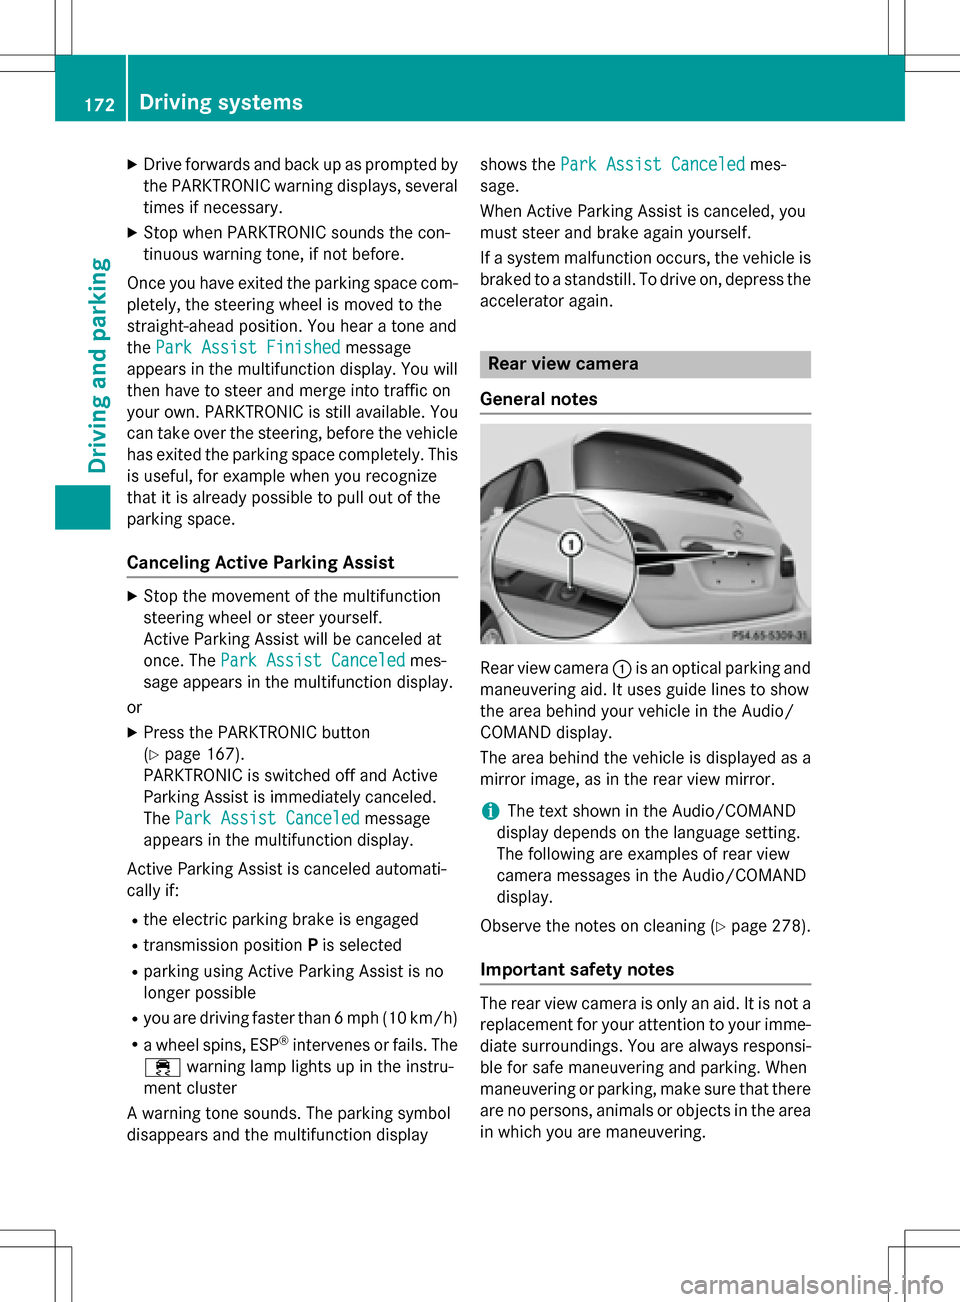
Rear view camera :is an optical parking and
maneuvering aid. It uses guide lines to show
the area behind your vehicle in the Audio/
COMAND display.
The area behind the vehicle is displayed as a
mirror image, as in the rear view mirror.
iThe text shown in the Audio/COMAND
display depends on the language setting.
The following are examples of rear view
camera messages in the Audio/COMAND
display.
Observe the notes on cleaning (
Ypage 278).
Important safety notes
The rear view camera is only an aid. It is not a
replacement for your attention to your imme- diate surroundings. You are always responsi-
ble for safe maneuvering and parking. When
maneuvering or parking, make sure that there
are no persons, animals or objects in the area
in which you are maneuvering.
172Driving systems
Driving and parking
Page 175 of 342
Under the following circumstances, the rear
view camera will not function, or will function
in a limited manner:
Rif the tailgate is open
Rin heavy rain, snow or fog
Rat night or in very dark places
Rif the camera is exposed to very bright light
Rif the area is lit by fluorescent bulbs or LED
lighting (the display may flicker)
Rif there is a sudden change in temperature,
e.g. when driving into a heated garage in
winter
Rif the camera lens is dirty or obstructed
Observe the notes on cleaning
(
Ypage 278)
Rif the rear of your vehicle is damaged. In this
event, have the camera position and setting
checked at a qualified specialist workshop
The field of vision and other functions of the
rear view camera may be restricted due to
additional accessories on the rear of the vehi-
cle (e.g. license plate holder, bicycle rack).
Activating/deactivating the rear view
camera
XTo activate: make sure that the SmartKey
is in position 2in the ignition lock.
XMake sure that the Activation by R
gearfunction is selected in Audio 20/
COMAND; see the Digital Operator's Man-
ual.
XEngage reverse gear.
The area behind the vehicle is shown with
guide lines in the Audio 20/COMAND dis-
play.
The image from the rear view camera is
available throughout the maneuvering
process.
To deactivate: the rear view camera deacti-
vates if you shift the transmission to Por after
driving forwards a short distance.
Displays in the Audio 20/COMAND dis-
play
The rear view camera may show a distorted
view of obstacles, show them incorrectly or
not at all. The rear view camera does not show
objects in the following positions:
Rvery close to the rear bumper
Runder the rear bumper
Rin the area immediately above the tailgate
handle
!Objects not at ground level may appear to
be further away than they actually are, e.g.:
Rthe bumper of a parked vehicle
Rthe drawbar of a trailer
Rthe ball coupling of a trailer tow hitch
Rthe rear section of an HGV
Ra slanted post
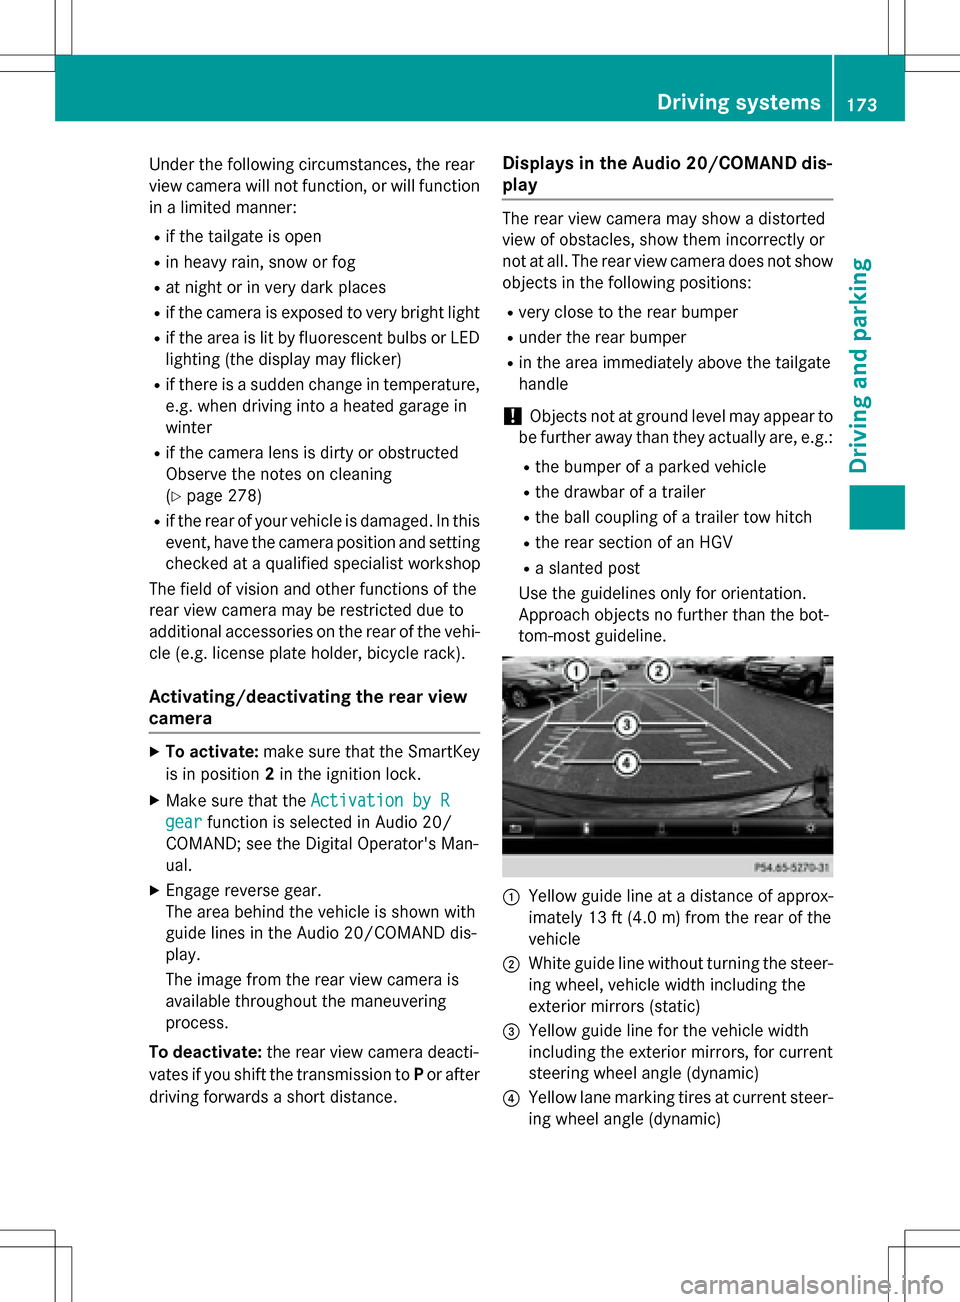
Use the guidelines only for orientation.
Approach objects no further than the bot-
tom-most guideline.
:Yellow guide line at a distance of approx-
imately 13 ft (4.0 m) from the rear of the
vehicle
;White guide line without turning the steer-
ing wheel, vehicle width including the
exterior mirrors (static)
=Yellow guide line for the vehicle width
including the exterior mirrors, for current
steering wheel angle (dynamic)
?Yellow lane marking tires at current steer-
ing wheel angle (dynamic)
Driving systems173
Driving and parking
Z
Page 176 of 342
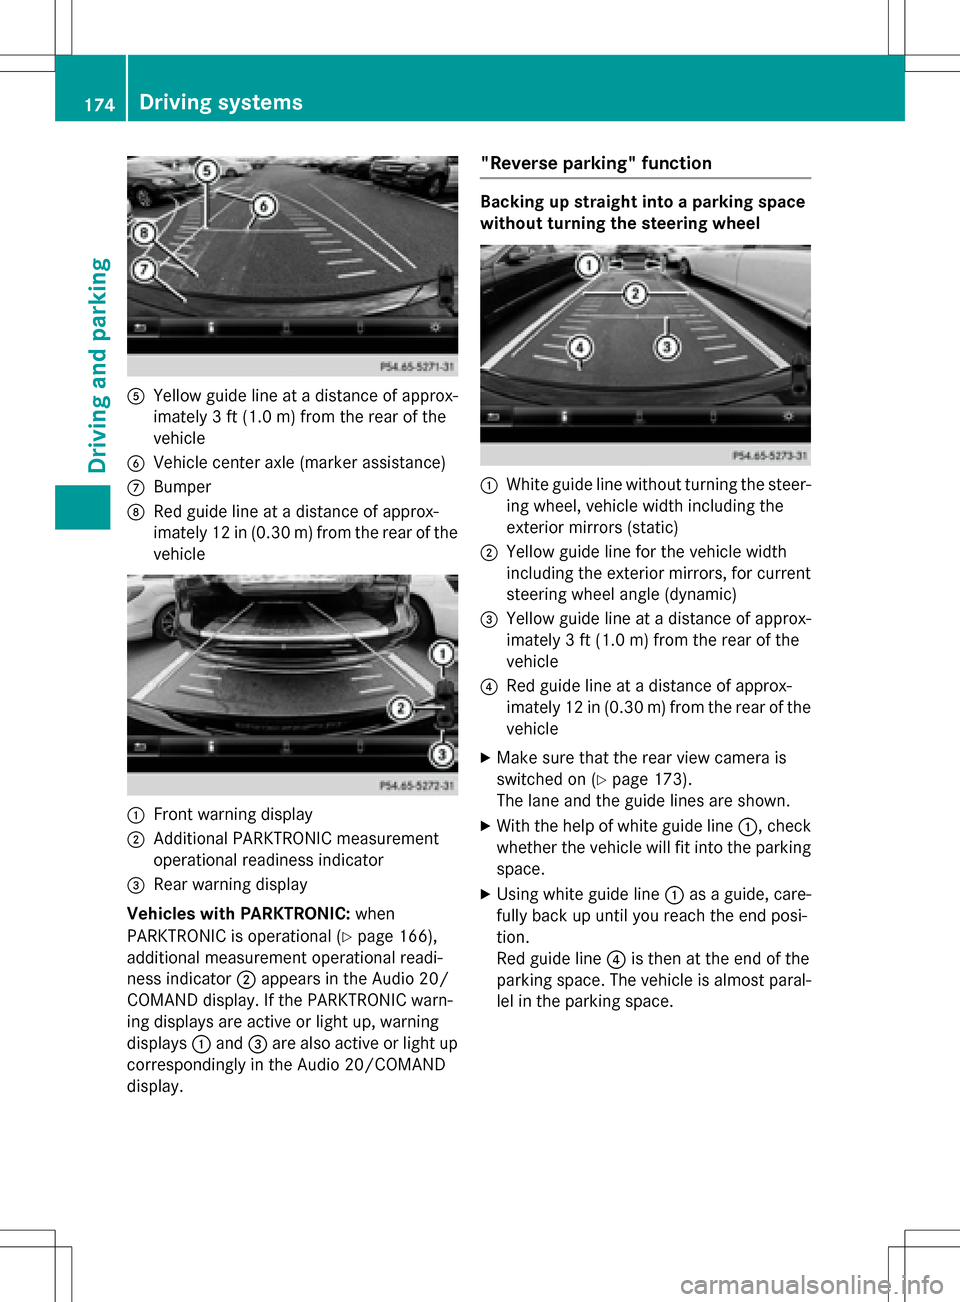
AYellow guide line at a distance of approx-
imately 3 ft (1.0 m) from the rear of the
vehicle
BVehicle center axle (marker assistance)
CBumper
DRed guide line at a distance of approx-
imately 12 in (0.30 m) from the rear of the
vehicle
:Front warning display
;Additional PARKTRONIC measurement
operational readiness indicator
=Rear warning display
Vehicles with PARKTRONIC: when
PARKTRONIC is operational (
Ypage 166),
additional measurement operational readi-
ness indicator ;appears in the Audio 20/
COMAND display. If the PARKTRONIC warn-
ing displays are active or light up, warning
displays :and =are also active or light up
correspondingly in the Audio 20/COMAND
display.
"Reverse parking" function
Backing up straight into a parking space
without turning the steering wheel
:White guide line without turning the steer-
ing wheel, vehicle width including the
exterior mirrors (static)
;Yellow guide line for the vehicle width
including the exterior mirrors, for current
steering wheel angle (dynamic)
=Yellow guide line at a distance of approx-
imately 3 ft (1.0 m) from the rear of the
vehicle
?Red guide line at a distance of approx-
imately 12 in (0.30 m) from the rear of the
vehicle
XMake sure that the rear view camera is
switched on (
Ypage 173).
The lane and the guide lines are shown.
XWith the help of white guide line :, check
whether the vehicle will fit into the parking
space.
XUsing white guide line :as a guide, care-
fully back up until you reach the end posi-
tion.
Red guide line ?is then at the end of the
parking space. The vehicle is almost paral-
lel in the parking space.
174Driving systems
Driving and parking
Page 186 of 342

The braking performance of the electric
motor using recuperative braking is, in some
operating modes, either reduced or not effec-
tive:
Rwhen the condition of charge of the high-
voltage battery increases
Rif the high-voltage battery is not yet at a
normal operating temperature
Rwhen driving close to the maximum speed
Rwhen the vehicle is almost stationary
Rin transmission positionN
Rduring and after ESP stability control
If necessary, counteract the reduced regen-
erative braking effect by applying the brake
yourself.
Condition of charge display
Condition of charge display :shows the
condition of charge of the high-voltage bat-
tery.
The charge value is shown as a percentage in
the Energy Flow
menu in the instrument
cluster (
Ypage 187).
iThe Energy Flowmenu can also be dis-
played in the COMAND/Audio display.
The condition of charge of the high-voltage
battery has dropped into the reserve range if
the drive system is running and:
Rthe DriveBatteryReserveLevelmes-
sage appears in the display
Rthe indicator lamp in the instrument cluster lights up Charge the high-voltage battery from a con-
dition of charge of less than 20% at:
Ran electrical outlet
Ra charging station
The braking performance of the electric
motor using recuperative braking is, in some
operating modes, either reduced or not effec-
tive:
Rwhen the condition of charge of the high-
voltage battery increases
Rif the high-voltage battery is not yet at a
normal operating temperature
Rwhen the vehicle is almost stationary
Rin transmission position N
Rduring and after ESP stability control
If you do not make an additional effort to
apply the brake yourself, the braking effect
may not be sufficient. If necessary, counter-
act the reduced regenerative braking effect
by applying the brake yourself.
Operating the on-board computer
Overview
:Multifunction display
;Vehicles with Audio 20: switches on
voice-operated control for navigation (see
manufacturer's operating instructions)
184Displays and operation
On-board computer and displays
Page 187 of 342

Vehicles with COMAND: switches on the
Voice Control System (see the separate
operating instructions)
=Right control panel
?Left control panel
ABack button
XTo activate the on-board computer:turn
the SmartKey to position 1in the ignition
lock.
You can control the multifunction display and
the settings in the on-board computer using
the buttons on the multifunction steering
wheel.
Left control panel
=
;RCalls up the menu and menu bar
9
:Press briefly:
RScrolls in lists
RSelects a submenu or function
RIn the Audiomenu: selects the
previous or next station, when
the preset list or station list is
active, or an audio track or video
scene
RIn the Tel(Telephone) menu:
switches to the phone book and
selects a name or telephone
number
9
:Press and hold:
RIn the Audiomenu: selects a pre-
set list or a station list in the
desired frequency range or an
audio track or video scene using
rapid scrolling
RIn the Tel(Telephone) menu:
starts rapid scrolling if the phone
book is open
aRConfirms the selection or display
message
RIn the Tel(Telephone) menu:
switches to the telephone book
and starts dialing the selected
number
Right control panel
8RMute
W
XRAdjusts the volume
~RRejects or ends a call
RExits the telephone book/redial
memory
6RMakes or accepts a call
RSwitches to the redial memory
Displays and operation185
On-board computer and displays
Z
Page 188 of 342
Back button
%Press briefly:
RBack
RVehicles with Audio 20:
Switches off voice-operated con-
trol for navigation (see manufac-
turer's operating instructions)
RVehicles with COMAND:
Switches off the Voice Control
System (see the separate oper-
ating instructions)
RHides display messages or calls
up the lastTrip
menu function
used
RExits the telephone book/redial
memory
%Press and hold:
RCalls up the standard display in
the Trip
menu
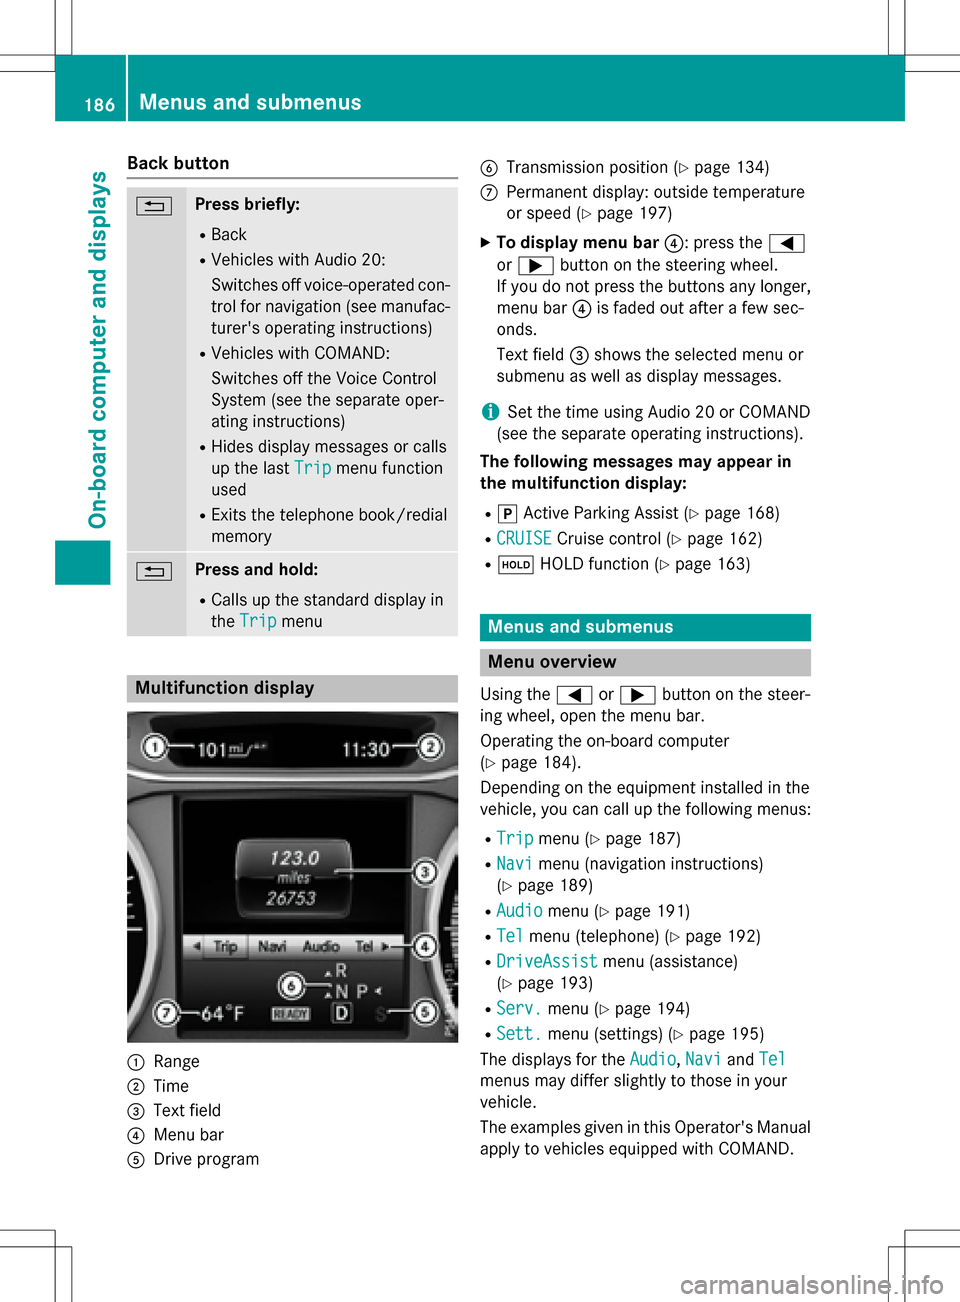
Multifunction display
:Range
;Time
=Text field
?Menu bar
ADrive program
BTransmission position (Ypage 134)
CPermanent display: outside temperature
or speed (
Ypage 197)
XTo display menu bar ?: press the=
or ; button on the steering wheel.
If you do not press the buttons any longer,
menu bar ?is faded out after a few sec-
onds.
Text field =shows the selected menu or
submenu as well as display messages.
iSet the time using Audio 20 or COMAND
(see the separate operating instructions).
The following messages may appear in
the multifunction display:
Rj Active Parking Assist (Ypage 168)
RCRUISECruise control (Ypage 162)
Rë HOLD function (Ypage 163)
Menus and submenus
Menu overview
Using the =or; button on the steer-
ing wheel, open the menu bar.
Operating the on-board computer
(
Ypage 184).
Depending on the equipment installed in the
vehicle, you can call up the following menus:
RTripmenu (Ypage 187)
RNavimenu (navigation instructions)
(
Ypage 189)
RAudiomenu (Ypage 191)
RTelmenu (telephone) (Ypage 192)
RDriveAssistmenu (assistance)
(
Ypage 193)
RServ.menu (Ypage 194)
RSett.menu (settings) (Ypage 195)
The displays for the Audio
,Naviand Tel
menus may differ slightly to those in your
vehicle.
The examples given in this Operator's Manual
apply to vehicles equipped with COMAND.
186Menus and submenus
On-board computer and displays
Page 189 of 342
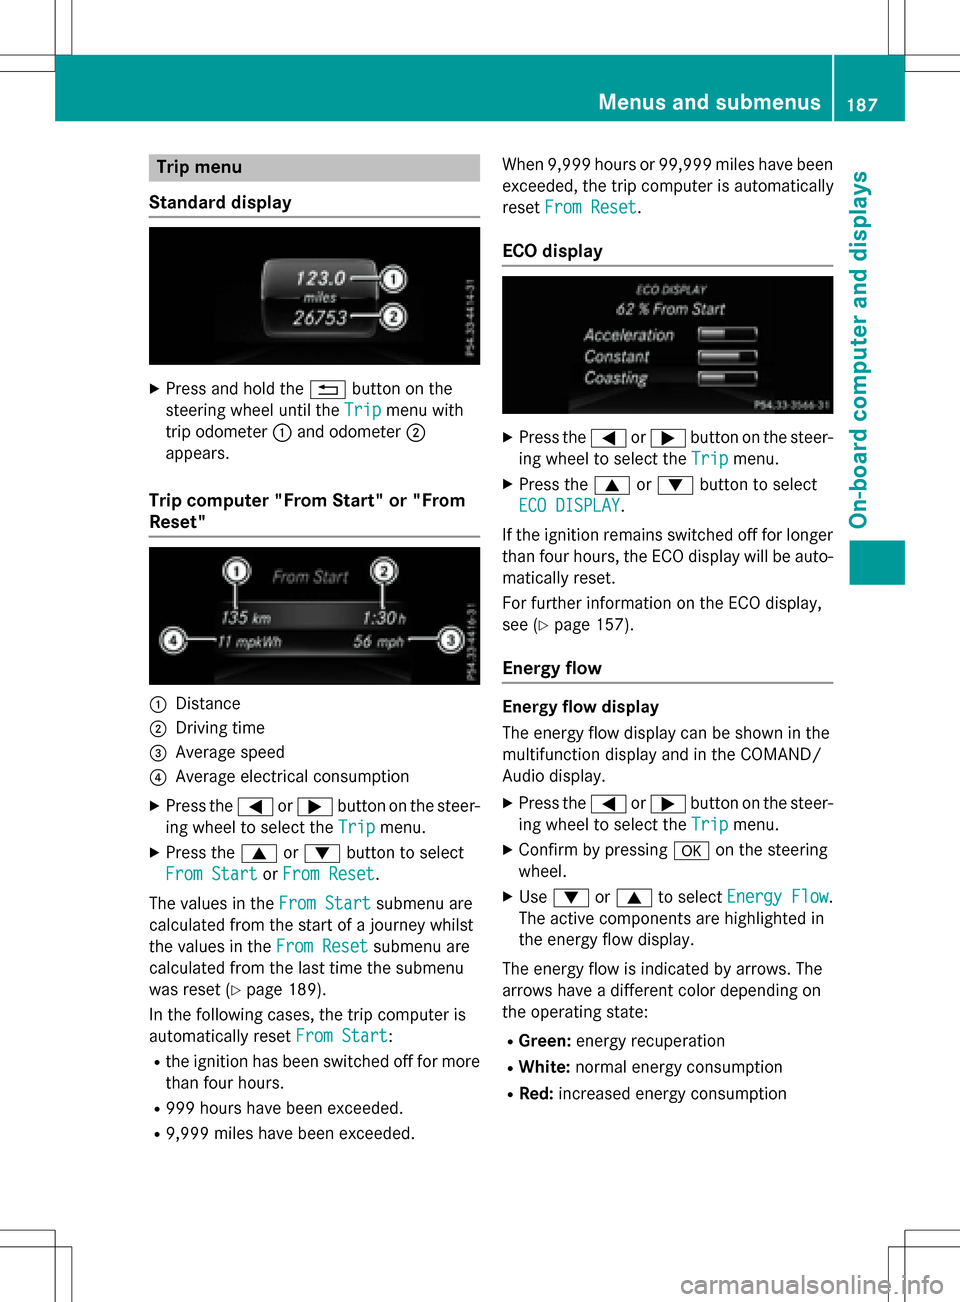
Trip menu
Standard display
XPress and hold the %button on the
steering wheel until the Trip
menu with
trip odometer :and odometer ;
appears.
Trip computer "From Start" or "From
Reset"
:Distance
;Driving time
=Average speed
?Average electrical consumption
XPress the =or; button on the steer-
ing wheel to select the Trip
menu.
XPress the9or: button to select
From Start
or From Reset.
The values in the From Start
submenu are
calculated from the start of a journey whilst
the values in the From Reset
submenu are
calculated from the last time the submenu
was reset (
Ypage 189).
In the following cases, the trip computer is
automatically reset From Start
:
Rthe ignition has been switched off for more
than four hours.
R999 hours have been exceeded.
R9,999 miles have been exceeded. When 9,999 hours or 99,999 miles have been
exceeded, the trip computer is automatically
reset
From Reset
.
ECO display
XPress the =or; button on the steer-
ing wheel to select the Trip
menu.
XPress the9or: button to select
ECO DISPLAY
.
If the ignition remains switched off for longer
than four hours, the ECO display will be auto- matically reset.
For further information on the ECO display,
see (
Ypage 157).
Energy flow
Energy flow display
The energy flow display can be shown in the
multifunction display and in the COMAND/
Audio display.
XPress the =or; button on the steer-
ing wheel to select the Trip
menu.
XConfirm by pressingaon the steering
wheel.
XUse : or9 to select Energy Flow.
The active components are highlighted in
the energy flow display.
The energy flow is indicated by arrows. The
arrows have a different color depending on
the operating state:
RGreen: energy recuperation
RWhite:normal energy consumption
RRed:increased energy consumption
Menus and submenus187
On-board computer and displays
Z
Page 191 of 342
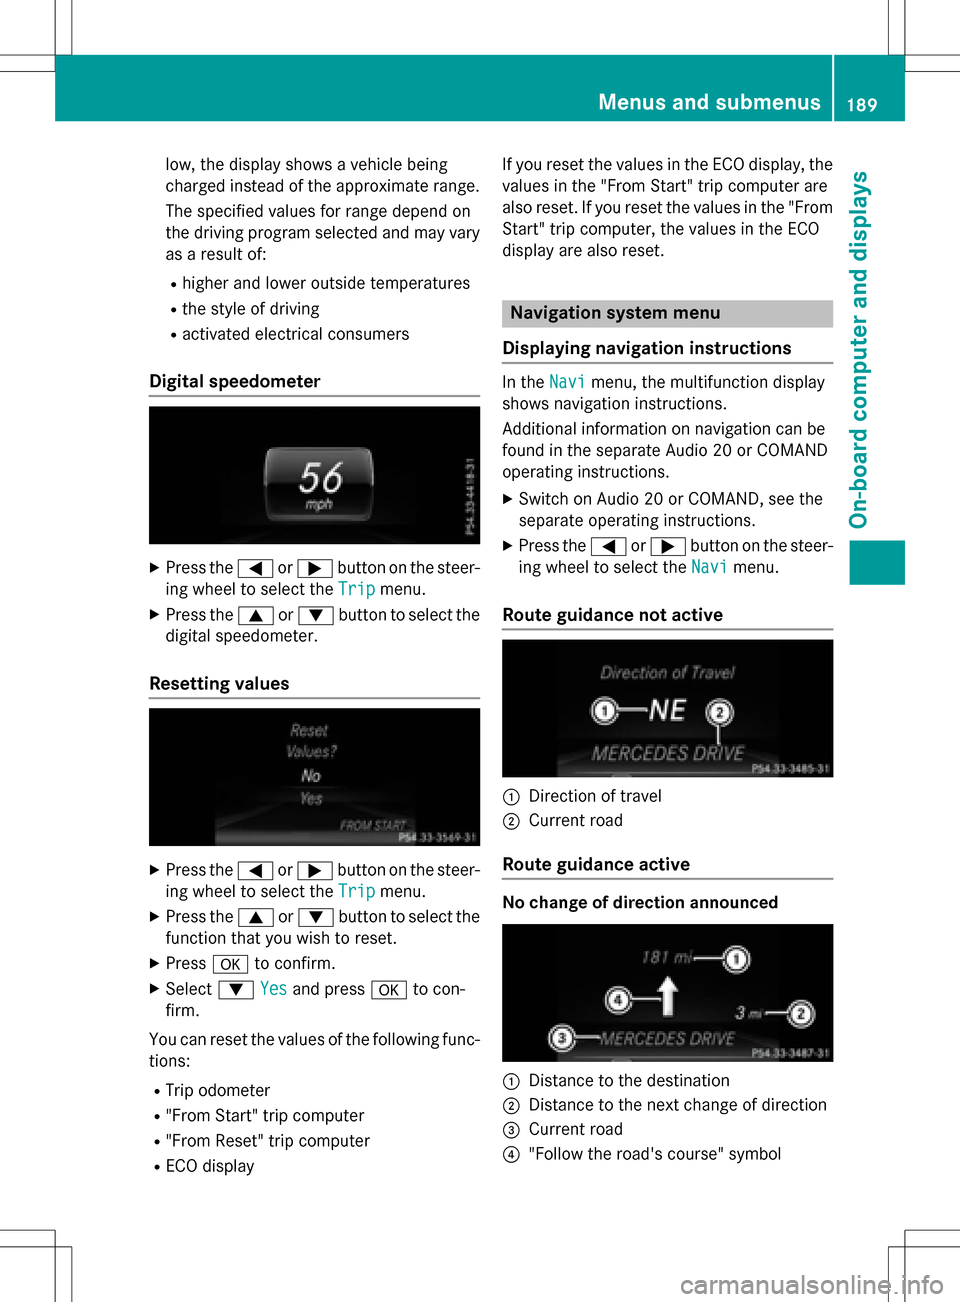
low, the display shows a vehicle being
charged instead of the approximate range.
The specified values for range depend on
the driving program selected and may vary
as a result of:
Rhigher and lower outside temperatures
Rthe style of driving
Ractivated electrical consumers
Digital speedometer
XPress the=or; button on the steer-
ing wheel to select the Trip
menu.
XPress the9or: button to select the
digital speedometer.
Resetting values
XPress the =or; button on the steer-
ing wheel to select the Trip
menu.
XPress the9or: button to select the
function that you wish to reset.
XPress ato confirm.
XSelect :Yesand press ato con-
firm.
You can reset the values of the following func- tions:
RTrip odometer
R"From Start" trip computer
R"From Reset" trip computer
RECO display If you reset the values in the ECO display, the
values in the "From Start" trip computer are
also reset. If you reset the values in the "From
Start" trip computer, the values in the ECO
display are also reset.
Navigation system menu
Displaying navigation instructions
In the Navimenu, the multifunction display
shows navigation instructions.
Additional information on navigation can be
found in the separate Audio 20 or COMAND
operating instructions.
XSwitch on Audio 20 or COMAND, see the
separate operating instructions.
XPress the =or; button on the steer-
ing wheel to select the Navi
menu.
Route guidance not active
:Direction of travel
;Current road
Route guidance active
No change of direction announced
:Distance to the destination
;Distance to the next change of direction
=Current road
?"Follow the road's course" symbol
Menus and submenus189
On-board computer and displays
Z