2016 MERCEDES-BENZ B-Class ELECTRIC change wheel
[x] Cancel search: change wheelPage 96 of 342

Problems with the seat heating
ProblemPossible causes/consequences andMSolutions
The seat heating has
switched off prema-
turely or cannot be
switched on.The on-board voltage is too low because too many electrical con-
sumers are switched on.
XSwitch off electrical consumers that you do not need, such as
the rear window defroster or interior lighting.
Once the battery is sufficiently charged, the seat heating will
switch back on automatically.
Steering wheel
Important safety notes
GWARNING
You could lose control of your vehicle if you do the following while driving:
Radjust the driver's seat, head restraint,
steering wheel or mirrors
Rfasten the seat belt
There is a risk of an accident.
Adjust the driver's seat, head restraint, steer-
ing wheel and mirror and fasten your seat belt before starting the vehicle's drive system.
GWARNING
Children could injure themselves if they
adjust the steering wheel. There is a risk of
injury.
When leaving the vehicle, always take the
SmartKey with you and lock the vehicle. Never
leave children unsupervised in the vehicle.
Adjusting the steering wheel
GWARNING
If the steering wheel is unlocked while the
vehicle is in motion, it could change position
unexpectedly. This could cause you to lose
control of the vehicle. There is a risk of an
accident.
Before starting off, make sure the steering
wheel is locked. Never unlock the steering
wheel while the vehicle is in motion.
:Release lever
;Adjusts the steering wheel height
=Adjusts the steering wheel position (fore-
and-aft adjustment)
XPush release lever :down completely.
The steering column is unlocked.
XAdjust the steering wheel to the desired
position.
XPush release lever :up completely.
The steering column is locked.
XCheck if the steering column is locked.
When doing so, try to push the steering
wheel up or down or try to move it in the
fore-and-aft direction.
94Steering wheel
Seats, steering wheel and mirrors
Page 98 of 342
Automatic anti-glare mirrors
GWARNING
Electrolyte may escape if the glass in an auto-
matic anti-glare mirror breaks. The electrolyte
is harmful and causes irritation. It mustno t
come int o contact with your skin, eyes, res-
piratory organs or clothing or be swallowed.
There is a risk of injury.
If you come into contact with the electrolyte,
observe the following:
RRinse off the electrolyte from your skin
immediately with water.
RImmediately rinse the electrolyte out of
your eyes thoroughly with clean water.
RIf th e electrolyte is swallowed, immediately
rinse your mouth out thoroughly. Do not
induce vomiting.
RIf electrolyte comes into contact with your
skin or hair or is swallowed, seek medical
attention immediately.
RImmediately change out of clothing which
has come into contact with electrolyte.
RIf an allergic reaction occurs, seek medical
attention immediately.
The "Automatic anti-glare mirrors" function is
only available if the vehicle is equipped with
th e "Mirrors package".
The rear-view mirror and the exterior mirror
on the driver's side automatically go into anti-
glare mode if:
Rth e ignition is switched on and
Rincident light from headlamps strikes the
sensor in the rear-view mirror
The mirrors do not go into anti-glare mode if
reverse gear is engaged or the interior lighting
is switched on.
Park ing position for the exterior mir-
ror on the front-passenger side
Gene ral notes
The "Parking position of the exterior mirror on
the front-passenger side" function is only
available if the vehicle is equipped with the
"Mirrors package".
Setting and stori ng the parking position
You can position the front-passenger side
exterior mirror in such a way that you can see
the rear wheel on that side as soon as you
engage reverse gear. You can store this posi-
tion .
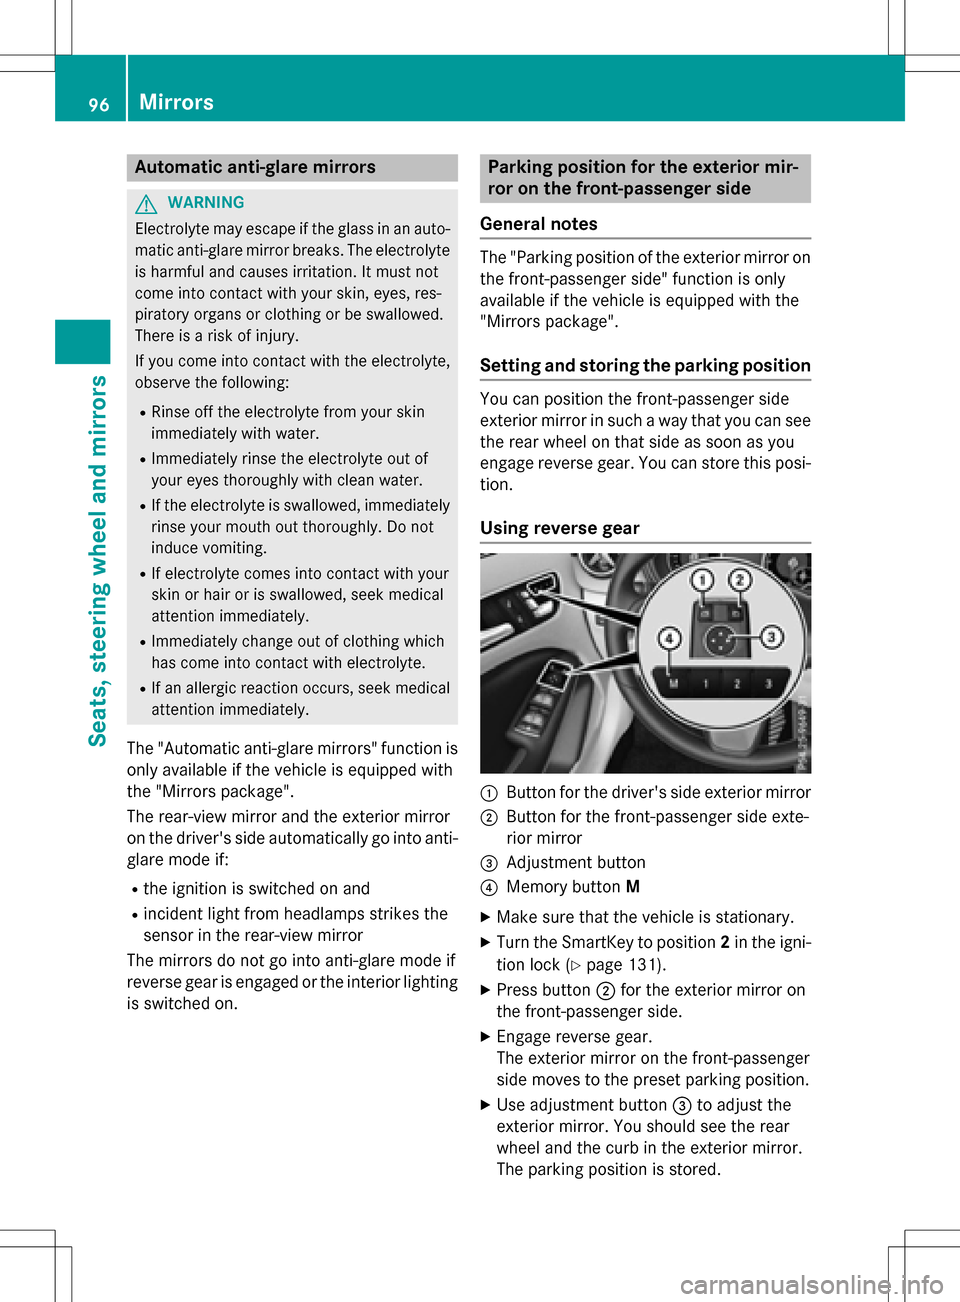
Using reverse gear
:Butto nfor th e driver's side exterior mirror
;Butto nfor th e front-passenger side exte-
rior mirror
=Adjustment button
?Memory button M
XMake surethat the vehicle is stationary.
XTurn the SmartKey to position 2in the igni-
tion lock(
Ypage 131).
XPress button ;for th e exterior mirror on
th e front-passenger side.
XEngage reverse gear.
The exterior mirror on the front-passenger
side moves to the preset parking position.
XUse adjustment button =to adjust the
exterior mirror. You should see the rear
wheel and the curb in the exterior mirror.
The parking position is stored.
96Mirrors
Seats, steering wheel and mirrors
Page 108 of 342
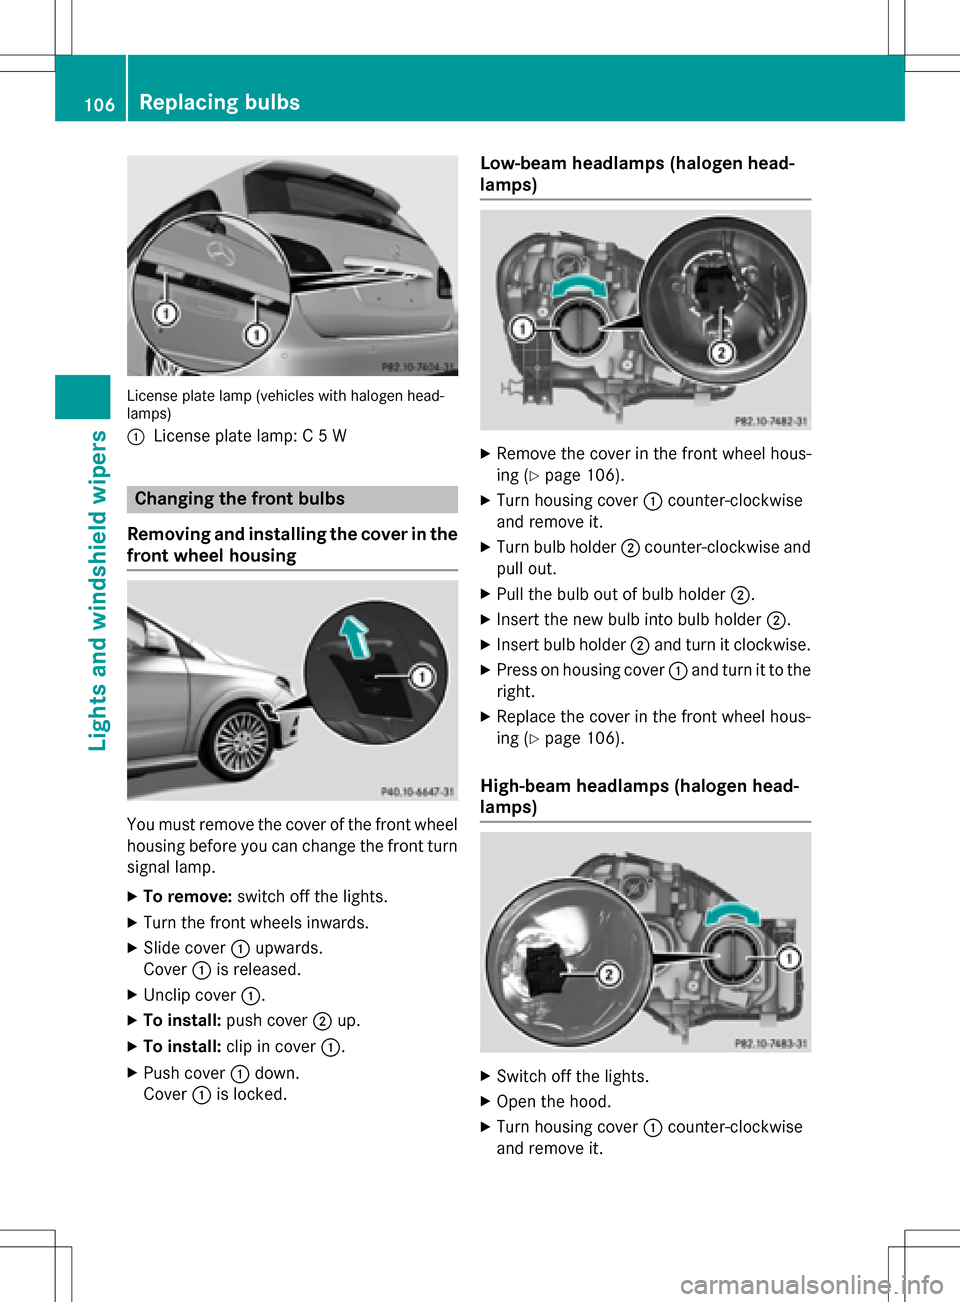
License plate lamp (vehicles with halogen head-
lamps)
:
License plate lamp: C 5 W
Changing the front bulbs
Removing and installing the cover in the
front wheel housing
You must remove the cover of the front wheel
housing before you can change the front turn signal lamp.
XTo remove: switch off the lights.
XTurn the front wheels inwards.
XSlide cover:upwards.
Cover :is released.
XUnclip cover :.
XTo install:push cover ;up.
XTo install: clip in cover :.
XPush cover:down.
Cover :is locked.
Low-beam headlamps (halogen head-
lamps)
XRemove the cover in the front wheel hous-
ing (
Ypage 106).
XTurn housing cover :counter-clockwise
and remove it.
XTurn bulb holder ;counter-clockwise and
pull out.
XPull the bulb out of bulb holder ;.
XInsert the new bulb into bulb holder ;.
XInsert bulb holder;and turn it clockwise.
XPress on housing cover :and turn it to the
right.
XReplace the cover in the front wheel hous-
ing (
Ypage 106).
High-beam headlamps (halogen head-
lamps)
XSwitch off the lights.
XOpen the hood.
XTurn housing cover :counter-clockwise
and remove it.
106Replacing bulbs
Lights and windshield wipers
Page 122 of 342
Problems with the "Cooling with air dehumidification" function
ProblemPossible causes/consequences andMSolutions
The indicator lamp in
the¿ button
flashes three times or
remains off. The "Cool-
ing with air dehumidifi-
cation" function cannot
be switched on.Cooling with air dehumidification has been deactivated due to a
malfunction.
XVisit a qualified specialist workshop.
Setting climate control to automatic
General notes
In automatic mode, the set temperature is
maintained automatically at a constant level.
The system automatically regulates the tem-
perature of the dispensed air, the airflow and
the air distribution.
The automatic mode functions optimally
when the "Cooling with air dehumidification"
function is activated. If necessary, cooling
with air dehumidification can be deactivated.
If you deactivate the "Cooling with air-dehu-
midification" function, the air inside the vehi-
cle will not be cooled. The air inside the vehi-
cle will also not be dehumidified. The win-
dows can fog up more quickly. Therefore, only
deactivate the "Cooling with air-dehumidifi-
cation" function briefly.
Setting climate control to automatic
XTurn the SmartKey to position 2in the igni-
tion lock (
Ypage 131).
XSet the desired temperature.
XTo activate: press theÃbutton.
The indicator lamp in the Ãbutton lights
up. Automatic air distribution and airflow
are activated.
XTo switch to manual mode: press the
É orË button.
or
XPress the KorI button.
The indicator lamp in the Ãbutton goes
out. Automatic air distribution and airflow
are deactivated.
Setting the temperature
Different temperatures can be set for the
driver's and front-passenger sides. The set
temperature is automatically maintained at a
constant level.
XTurn the SmartKey to position 2in the igni-
tion lock (
Ypage 131).
XTo increase/reduce: turn thumbwheel:
or E counter-clockwise or clockwise. Only
change the temperature setting in small
increments. Start at 72 ‡ (22 †).
Setting the air distribution
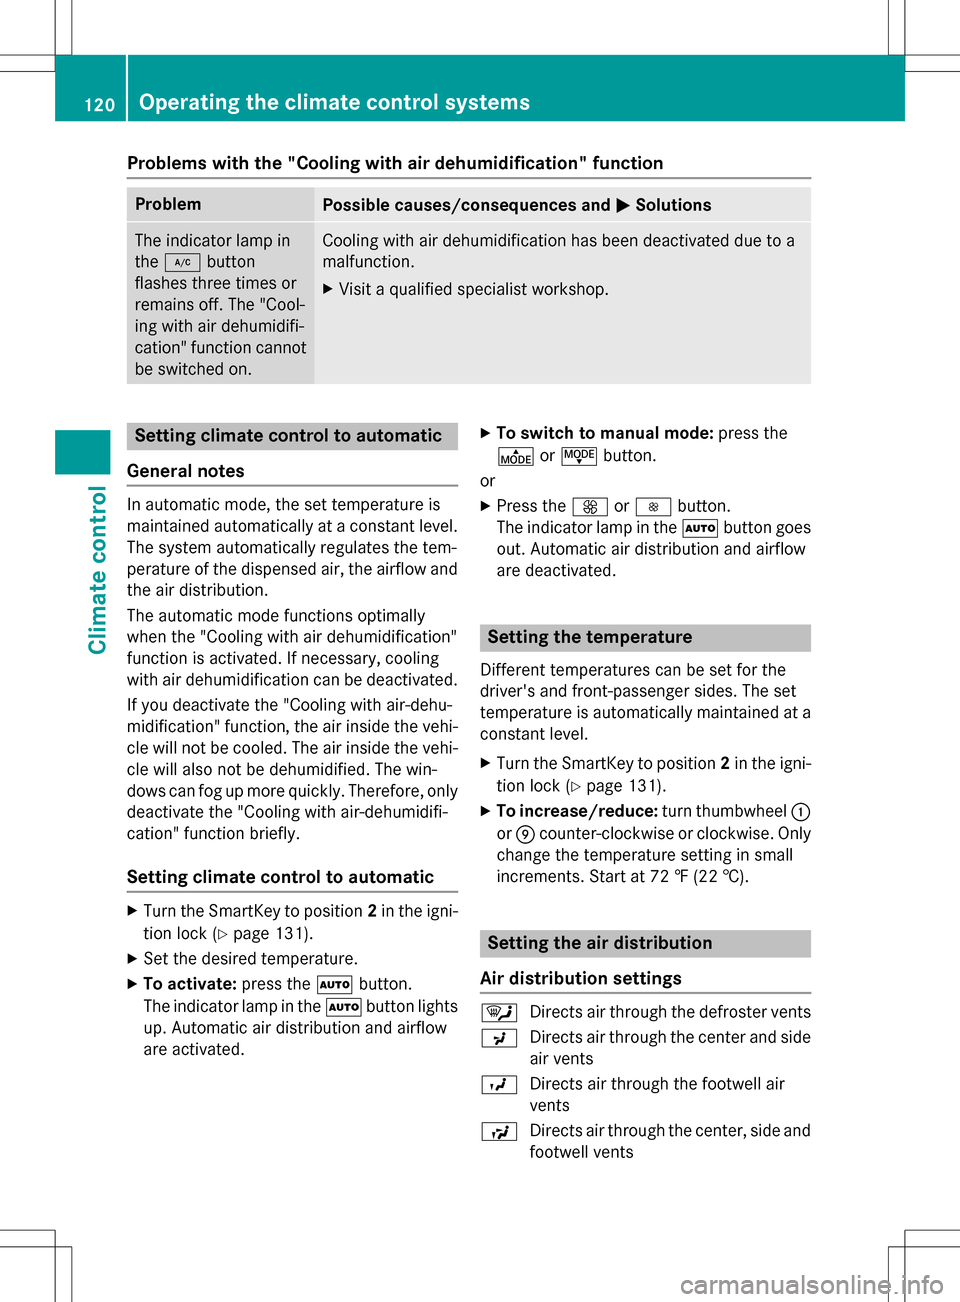
Air distribution settings
¯ Directs air through the defroster vents
P Directs air through the center and side
air vents
O Directs air through the footwell air
vents
S Directs air through the center, side and
footwell vents
120Operating the climate control systems
Climate control
Page 142 of 342

If you change between radar-based and man-
ual recuperation, the following levels are acti-
vated depending on the selection via the
steering wheel paddle shifters:
:Steering
wheel paddle
shifter -selects D-(maximum
recuperation)
; Steering
wheel paddle
shifter +selects D+(overrun)
In particular, the function of the radar sensors
can be impaired in the case of:
Rthere is dirt on the sensors or anything else
covering the sensors
Rthere is snow or heavy rain
Rthere is interference by other radar sources
Rthere are strong radar reflections, for
example in parking garages
Ra narrow vehicle traveling in front, e.g. a
motorbike
Ra vehicle traveling in front on a different line
relative to the center of your vehicle
Following damage to the front end of the vehi-
cle, have the radar sensor settings and oper-
ation checked at a qualified specialist work-
shop immediately. This also applies to colli-
sions at slow speeds where there is no visible
damage to the front of the vehicle.
If the radar sensors are not available, the sys-
tem switches automatically to level Dwith
moderate recuperation. Have the radar sen-
sors checked at a qualified specialist work-
shop immediately.
Automatic adjustment of recuperation
on downhill gradients
The vehicle can detect steep downhill gradi-
ents. To reduce acceleration downhill and to
charge the high-voltage battery, recuperation
is increased steplessly. This is comparable to
the engine brake in a combustion engine
when you downshift a gear on a downhill gra-
dient. Automatic adjustment of recuperation on
downhill gradients is available in level
D
AUTO
or on vehicles without steering wheel paddle
shifters in levelD.
Intelligent recuperation
The vehicle uses the map and camera data of
Traffic Sign Assist in addition to the sensors
of COLLISION PREVENTION ASSIST PLUS
during radar-based recuperation (D
AUTO). The
rate of recuperation is then automatically
adjusted to the current traffic situation, tak-
ing the current and future maximum speed
into account.
High-voltage battery
Important safety notes
GDANGER
The vehicle's high-voltage electrical system is under high voltage. If you modify components
in the vehicle's high-voltage electrical system
or touch damaged components, you may be
electrocuted. The components in the vehi-
cle's high-voltage electrical system may be
damaged in an accident, although the damage
is not visible. There is a risk of fatal injury.
Following an accident, do not touch any high-
voltage components and never modify the
vehicle's high-voltage electrical system. Have
the vehicle towed away after an accident and
the vehicle's high-voltage electrical system
checked by a qualified specialist workshop.
GWARNING
In the event of a vehicle fire, the internal pres- sure of the high-voltage battery can exceed a
critical value. In this case flammable gas
escapes through a ventilation valve on the
underbody. The gas can ignite. There is a risk
of injury.
Leave the danger zone immediately. Secure
the danger area at a suitable distance, whilst
observing legal requirements.
140High-voltage battery
Driving and parking
Page 160 of 342
The ECO display does not indicate the actual
fuel consumption. A fixed percentage count
in the ECO display does not indicate a fixed
consumption.
Apart from driving style, consumption is
dependent on many factors such as, e.g.:
Rload
RTire pressure
Rcold start
Rchoice of route
Relectrical consumers switched on
These factors are not included in the ECO dis-
play.
The evaluation of your driving style is carried out using the following three categories:
RAcceleration(evaluation of all accelera-
tion processes):
-The bar fills up: moderate acceleration,
especially at higher speeds
-The bar empties: sporty acceleration
RConstant(assessment of driving behavior
at all times)
-The bar fills up: constant speed and
avoidance of unnecessary acceleration
and deceleration
-The bar empties: fluctuations in speed
RCoasting(assessment of all deceleration
processes)
-The bar fills up: anticipatory driving,
keeping your distance and early release
of the accelerator. The vehicle can coast
without use of the brakes.
-The bar empties: frequent braking
To achieve a higher value in the categories
Acceleration
and Constant, drive the vehi-
cle in drive program E+orE.
On long journeys at a constant speed, e.g. on
the highway, only the bar for Constant
will
change.
The ECO display summarizes the driving char-
acteristics from the start of the journey to its
completion. For this reason, the bars change
dynamically at the beginning of the journey.
On longer journeys, there are fewer changes. For more dynamic changes, carry out a man-
ual reset.
For further information on the ECO display,
see (
Ypage 187).
Braking
Important safety notes
GWARNING
If you increase the recuperation level on slip-
pery road surfaces, the drive wheels may lose
their traction. There is an increased danger of
skidding and accidents.
Do not increase the recuperation level on slip-
pery road surfaces.
The braking performance of the electric
motor using recuperative braking is, in some
operating modes, either reduced or not effec- tive:
Rwhen the condition of charge of the high-
voltage battery increases
Rif the high-voltage battery is not yet at a
normal operating temperature
Rwhen driving close to the maximum speed
Rwhen the vehicle is almost stationary
Rin transmission position N
Rduring and after ESP stability control
If you do not make an additional effort to
apply the brake yourself, the braking effect
may not be sufficient. If necessary, counter-
act the reduced regenerative braking effect
by applying the brake yourself.
Downhill gradients
On long, steep gradients, you must reduce the
load on the brakes by selecting maximum
recuperation. This helps you to avoid over-
heating the brakes and wearing them out
excessively.
Recuperation allows the vehicle to be decel-
erated without placing a load on the braking
system.
158Driving tips
Driving and parking
Page 163 of 342

XHold test gageAvertically on brake
disc :and slide measuring pin ;onto
brake disc :.
XCheck which color field ?the arrow on
measuring pin ;is pointing to.
Green: the brake pad/lining thickness is
sufficient.
Red: the brake pad/lining thickness is not
sufficient. Have the brake pads/lining
checked at a qualified specialist workshop.
To avoid an inaccurate measurement:
Rmake sure you position the wheels suitably
Rdo not put the measuring pin on a recess in
the brake disc
Driving on wet roads
Hydroplaning
If water has accumulated to a certain depth
on the road surface, there is a danger of
hydroplaning occurring, even if:
Ryou drive at low speeds.
Rthe tires have adequate tread depth.
For this reason, in the event of heavy rain or in conditions in which hydroplaning may occur,
you must drive in the following manner:
Rlower your speed.
Ravoid ruts.
Ravoid sudden steering movements.
Rbrake carefully.
Driving on flooded roads
!Do not drive through flooded areas.
Check the depth of any water before driving through it. Drive slowly through standing
water. Otherwise, water may enter the
vehicle interior or the engine compartment.
This can damage the electronic compo-
nents in the engine or the automatic trans-
mission. Water can also be drawn in by the
engine's air suction nozzles and this can
cause engine damage.
Winter driving
GWARNING
If you increase the recuperation level on slip-
pery road surfaces, the drive wheels may lose
their traction. There is an increased danger of
skidding and accidents.
Do not increase the recuperation level on slip-
pery road surfaces.
Have your vehicle winter-proofed at a quali-
fied specialist workshop at the onset of win-
ter.
Drive particularly carefully on slippery road
surfaces. Avoid sudden acceleration, steering and braking maneuvers. Do not use cruise
control.
If the vehicle threatens to skid or cannot be
stopped when moving at low speed:
XShift the DIRECT SELECT lever to position
N.
The outside temperature indicator is not
designed to serve as an ice-warning device
and is therefore unsuitable for that purpose.
Changes in the outside temperature are dis-
played after a short delay.
Indicated temperatures just above the freez-
ing point do not guarantee that the road sur-
face is free of ice. The road may still be icy,
especially in wooded areas or on bridges.
You should pay special attention to road con-
ditions when temperatures are around freez-
ing point.
For more information on driving with snow
chains, see (
Ypage 305).
For more information on driving with summer
tires, see (
Ypage 304).
Observe the notes in the "Winter operation"
section (
Ypage 304).
Driving tips161
Driving and parking
Z
Page 164 of 342
Driving systems
Cruise Control
General notes
Cruise control maintainsaconstant road
speed for you. It brakes automatically in order to avoid exceeding the set speed. Change into
transmission position D
-(Ypage 138) on long
and steep downhill gradients. This increases
recuperation in overrun mode. This relieves
th e load on the brake system and prevents
th ebrake s from overheating and wearing too
quickly.
Use cruise control only if road and traffic con-
ditions make it appropriate to maintain a
steady speed foraprolonged period. You can
store any road speed above 20 mph
(30 km/ h).
The speed indicated in the speedometer may
differ slightly from the speed stored.
Important safety notes
If you fail to adapt your driving style, cruise
control can neither reduce the risk of an acci-
dent nor override the laws of physics. Cruise
control cannot take into account the road,
traffic and weather conditions. Cruise control
is only an aid. You are responsible for the dis-
tance to the vehicle in front, for vehicle speed,
for braking in good time and for staying in
your lane.
Do not use cruise control:
Rin road and traffic conditions which do not
allow you to maintain a constant speed e.g.
in heavy traffic or on winding roads
Ron slippery road surfaces. Braking or accel- erating could cause the drive wheels to lose
traction and the vehicle could then skid
Rwhen there is poor visibility, e.g. due to fog,
heavy rain or snow
If there is a change of drivers, advise the new
driver of the speed stored.
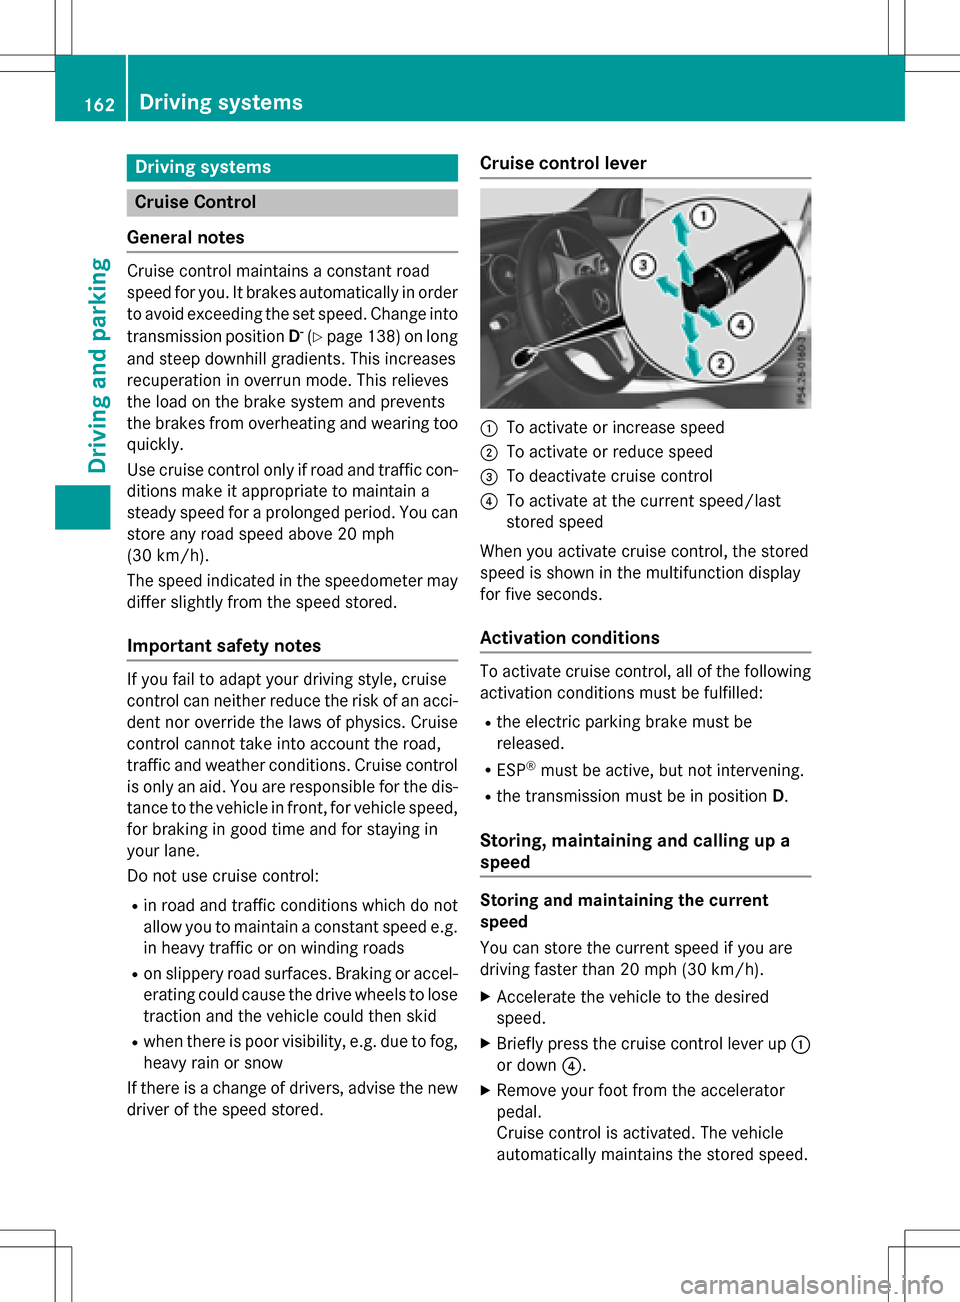
Cruise control lever
:To activate or increase speed
;To activate or reduce speed
=To deactivate cruise control
?To activate at the current speed/last
stored speed
When you activate cruise control, the stored
speed is shown in the multifunction display
for five seconds.
Activation conditions
To activate cruise control, all of the following
activation conditions must be fulfilled:
Rthe electric parking brake must be
released.
RESP®must be active, but not intervening.
Rthe transmission must be in position D.
Storing, maintaining and calling up a
speed
Storing and maintaining the current
speed
You can store the current speed if you are
driving faster than 20 mph (30 km/h).
XAccelerate the vehicle to the desired
speed.
XBriefly press the cruise control lever up :
or down ?.
XRemove your foot from the accelerator
pedal.
Cruise control is activated. The vehicle
automatically maintains the stored speed.
162Driving systems
Driving and parking