2016 MERCEDES-BENZ B-Class ELECTRIC hood open
[x] Cancel search: hood openPage 12 of 342

Display message ............................ 215
Switching on/off ........................... 102
High-voltage battery
Battery care ................................... 143
Charging (charging station) ............ 149
Charging (mains socket) ................ 146
Charging cable warming ................ 142
Cruise range .................................. 143
Discharged battery ........................ 143
Display message ............................ 219
Displaying energy consumption
(on-board computer) ...................... 188
Displaying the range (on-board
computer) ...................................... 188
Energy consumption ...................... 143
General notes ................................ 141
Method of operation ...................... 142
Outside temperatures .................... 143
Overvoltage protection .................. 142
Problems with the charging proc-
ess ................................................ .151
Reserve, warning lamp ................... 238
Terms of use .................................. 142
High-voltage disconnect device ......... 24
Hill start assist .................................. 134
HOLD function
Activating ....................................... 164
Deactivating ................................... 164
Display message ............................ 220
Function/notes ............................ .163
Hood
Closing .......................................... .271
Display message ............................ 226
Important safety notes .................. 270
Opening ......................................... 270
Horn ...................................................... 30
Hydroplaning ..................................... 161
I
Ignition lock
see Key positions
Immobilizer .......................................... 69
Indicator and warning lamps
COLLISION PREVENTION ASSIST
PLUS .............................................. 239
Indicator lamps
see Warning and indicator lamps Indicators
see Turn signals
Instrument cluster
Overview .......................................... 31
Power display ................................ 183
Settings ......................................... 197
Warning and indicator lamps ........... 32
Instrument cluster lighting .............. 182
Interior lighting
Control ........................................... 104
Emergency lighting ........................ 104
Overview ........................................ 103
Reading lamp ................................. 103
Internet connection
Via mobile service module ............. 153
J
JackStorage location ............................ 282
Using ............................................. 324
K
Key positionsStart/Stop button .......................... 131
KEYLESS-GO
Convenience closing feature ............ 84
Deactivation ..................................... 73
Locking ............................................ 73
Unlocking ......................................... 73
Kickdown
Driving tips .................................... 137
Knee bag .............................................. 48
L
Lamps
see Warning and indicator lamps
LATCH-type (ISOFIX) child seat
anchors ................................................ 58
License plate lamp
Changing bulbs .............................. 109
License plate lamp (display mes-
sage) ................................................... 215
Light function, active
Display message ............................ 217
Light sensor (display message) ....... 217
10Index
Page 32 of 342

Cockpit
FunctionPage
:Steering wheel paddle
shifters
138
;Combination switch102
=Instrument cluster31
?Horn
ADIRECT SELECT lever134
BPARKTRONIC warning dis-
play
165
COverhead control panel38
FunctionPage
DClimate control systems116
EIgnition lock131
FAdjusts the steering wheel94
GCruise control lever162
HElectric parking brake155
ILight switch100
JDiagnostics connection25
KOpens the hood270
30Cockpit
At a glance
Page 71 of 342

You can find information about manually
adjustable recuperation under "Steering
wheel paddle shifters" (
Ypage 138).
If the warning light in the instrument cluster is lit up, there is a motor malfunction or a brake
malfunction.
Observe information regarding indicator and
warning lamps (
Ypage 231) as well as dis-
play messages (
Ypage 201).
Protection against theft
Immobilizer
The immobilizer prevents your vehicle from
being started without the correct SmartKey.
XTo activate with the SmartKey: remove
the SmartKey from the ignition lock.
XTo activate with KEYLESS-GO start-
function or KEYLESS-GO: switch the igni-
tion off and open the driver's door.
XTo deactivate: switch on the ignition.
When leaving the vehicle, always take the
SmartKey with you and lock the vehicle. Any-
one can start the drive system if a valid Smart-
Key has been left inside the vehicle.
iThe immobilizer is always deactivated
when you start the drive system.
In the event that the engine cannot be star-
ted (yet the vehicle's battery is charged),
the system is not operational. The READY
display in the multifunction display does
not appear. Contact an authorized
Mercedes-Benz Center or call
1-800-FOR-MERCedes (in the USA) or
1-800-387-0100 (in Canada).
ATA (anti-theft alarm system)
XTo arm: lock the vehicle with the SmartKey
or KEYLESS-GO.
Indicator lamp :flashes. The alarm sys-
tem is armed after approximately
15 seconds.
XTo disarm: unlock the vehicle with the
SmartKey or KEYLESS-GO.
or
XInsert the SmartKey into the ignition lock.
A visual and audible alarm is triggered if the
alarm system is armed and you open:
Ra door
Rthe vehicle with the mechanical key
Rthe tailgate
Rthe hood
XTo turn the alarm off with the SmartKey:
press the %or& button on the
SmartKey.
The alarm is switched off.
or
XVehicles with KEYLESS-GO start-func-
tion or KEYLESS-GO: remove the Start/
Stop button from the ignition lock
(
Ypage 131).
XInsert the SmartKey into the ignition lock.
The alarm is switched off.
Protection against theft69
Safety
Z
Page 108 of 342

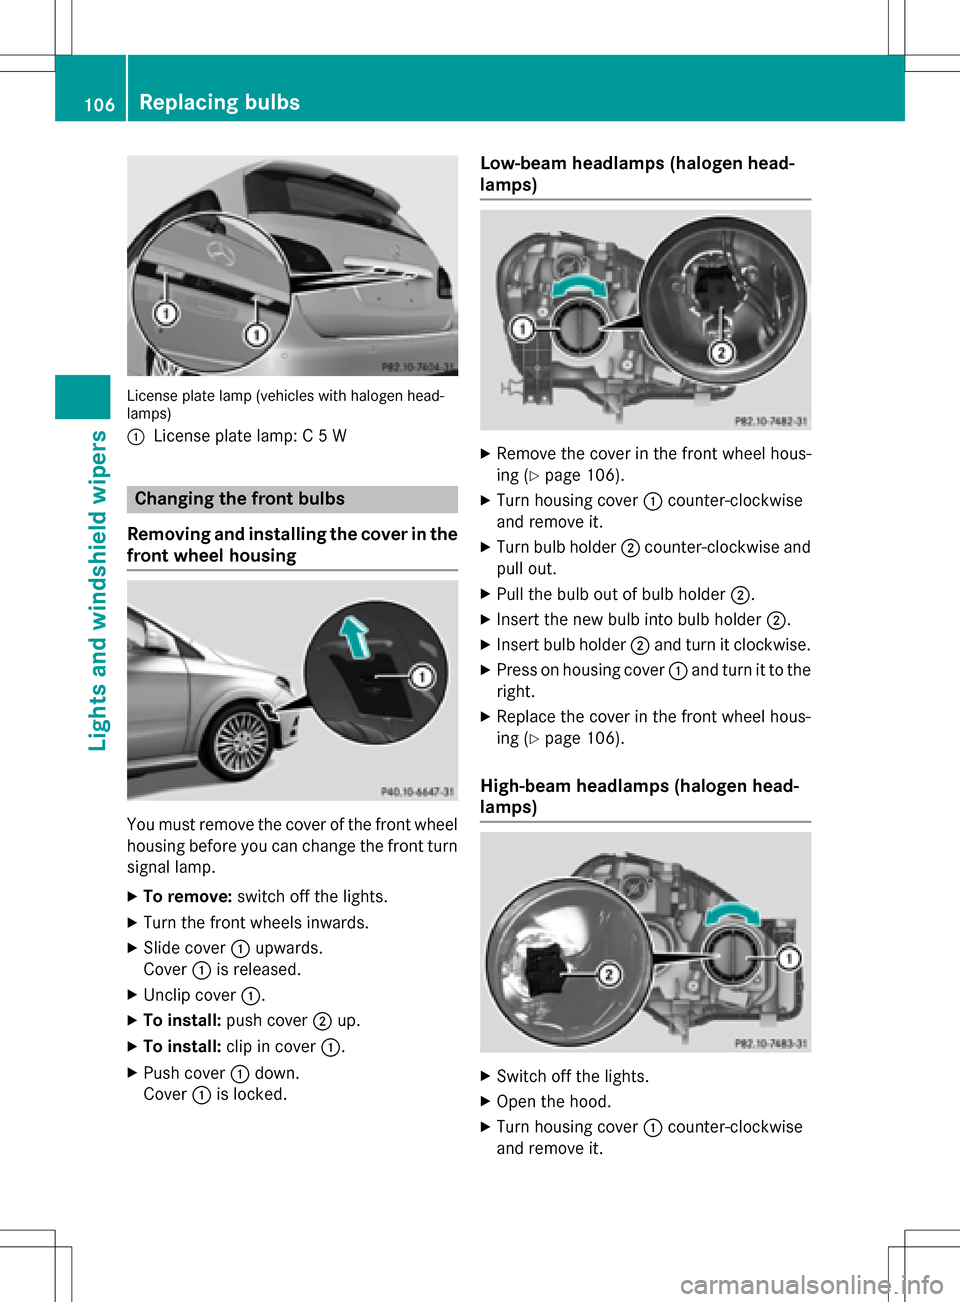
License plate lamp (vehicles with halogen head-
lamps)
:
License plate lamp: C 5 W
Changing the front bulbs
Removing and installing the cover in the
front wheel housing
You must remove the cover of the front wheel
housing before you can change the front turn signal lamp.
XTo remove: switch off the lights.
XTurn the front wheels inwards.
XSlide cover:upwards.
Cover :is released.
XUnclip cover :.
XTo install:push cover ;up.
XTo install: clip in cover :.
XPush cover:down.
Cover :is locked.
Low-beam headlamps (halogen head-
lamps)
XRemove the cover in the front wheel hous-
ing (
Ypage 106).
XTurn housing cover :counter-clockwise
and remove it.
XTurn bulb holder ;counter-clockwise and
pull out.
XPull the bulb out of bulb holder ;.
XInsert the new bulb into bulb holder ;.
XInsert bulb holder;and turn it clockwise.
XPress on housing cover :and turn it to the
right.
XReplace the cover in the front wheel hous-
ing (
Ypage 106).
High-beam headlamps (halogen head-
lamps)
XSwitch off the lights.
XOpen the hood.
XTurn housing cover :counter-clockwise
and remove it.
106Replacing bulbs
Lights and windshield wipers
Page 109 of 342

XTurn bulb;counter-clockwise and pull it
out.
XInsert the new bulb and engage it to the
stop.
XPress on housing cover :and turn it to the
right.
Parking lamps/standing lamps (halo-
gen headlamps)
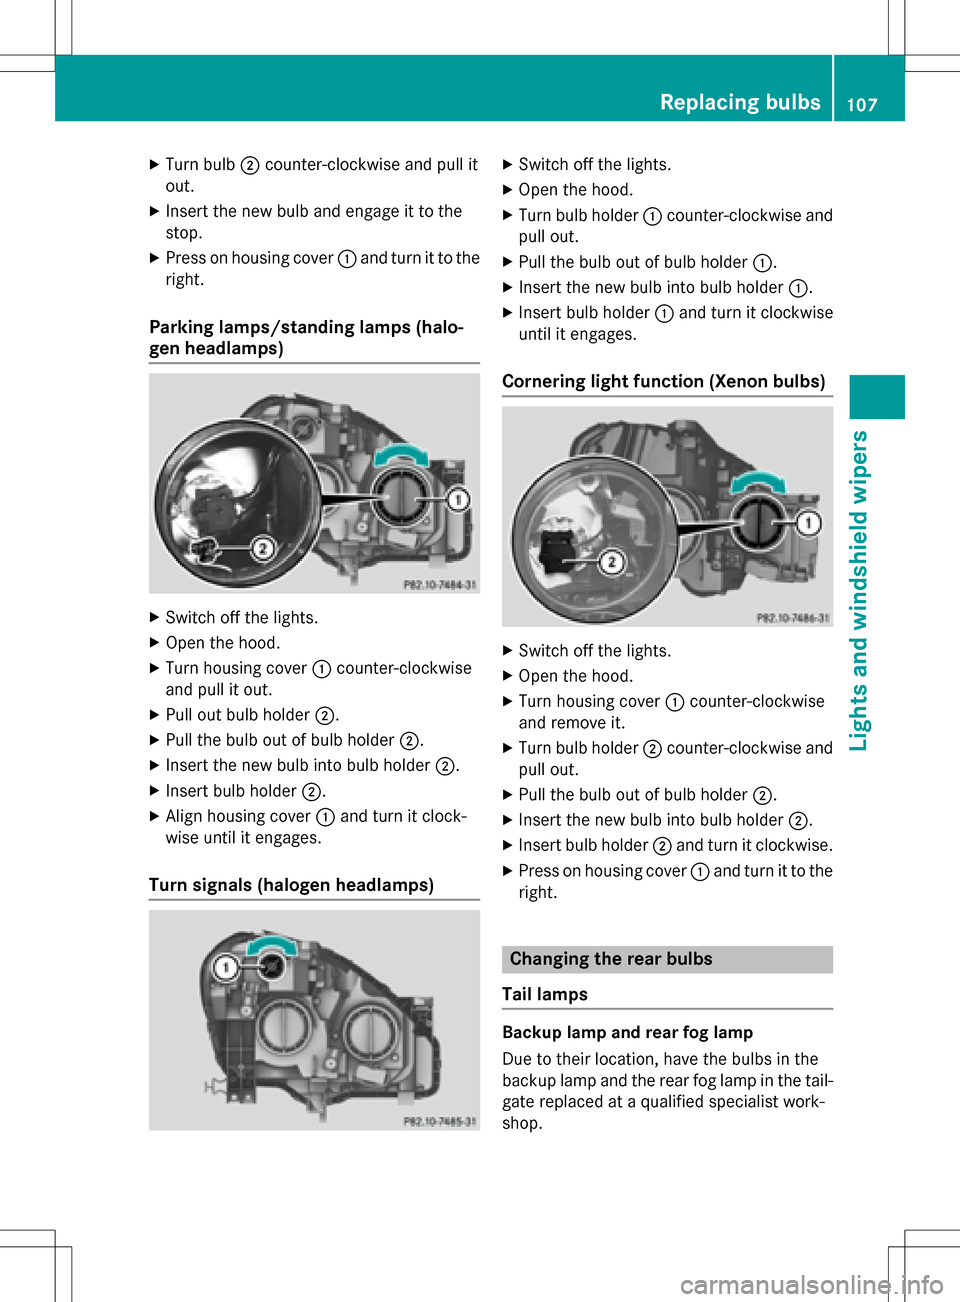
XSwitch off the lights.
XOpen the hood.
XTurn housing cover :counter-clockwise
and pull it out.
XPull out bulb holder ;.
XPull the bulb out of bulb holder ;.
XInsert the new bulb into bulb holder ;.
XInsert bulb holder;.
XAlign housing cover :and turn it clock-
wise until it engages.
Turn signals (halogen headlamps)
XSwitch off the lights.
XOpen the hood.
XTurn bulb holder :counter-clockwise and
pull out.
XPull the bulb out of bulb holder :.
XInsert the new bulb into bulb holder :.
XInsert bulb holder:and turn it clockwise
until it engages.
Cornering light function (Xenon bulbs)
XSwitch off the lights.
XOpen the hood.
XTurn housing cover :counter-clockwise
and remove it.
XTurn bulb holder ;counter-clockwise and
pull out.
XPull the bulb out of bulb holder ;.
XInsert the new bulb into bulb holder ;.
XInsert bulb holder;and turn it clockwise.
XPress on housing cover :and turn it to the
right.
Changing the rear bulbs
Tail lamps
Backup lamp and rear fog lamp
Due to their location, have the bulbs in the
backup lamp and the rear fog lamp in the tail-
gate replaced at a qualified specialist work-
shop.
Replacing bulbs107
Lights and windshield wipers
Z
Page 113 of 342

!Never open the hood/tailgate if a wiper
arm has been folded away from the wind-
shield/rear window.
Never fold a windshield wiper arm without a
wiper blade back onto the windshield/rear
window.
Hold the windshield wiper arm firmly when
you change the wiper blade. If you release
the wiper arm without a wiper blade and it
falls onto the windshield/rear window, the
windshield/rear window may be damaged
by the force of the impact.
Mercedes-Benz recommends that you have
the wiper blades changed at a qualified
specialist workshop.
Replacing the windshield wiper blades
(variant 1)
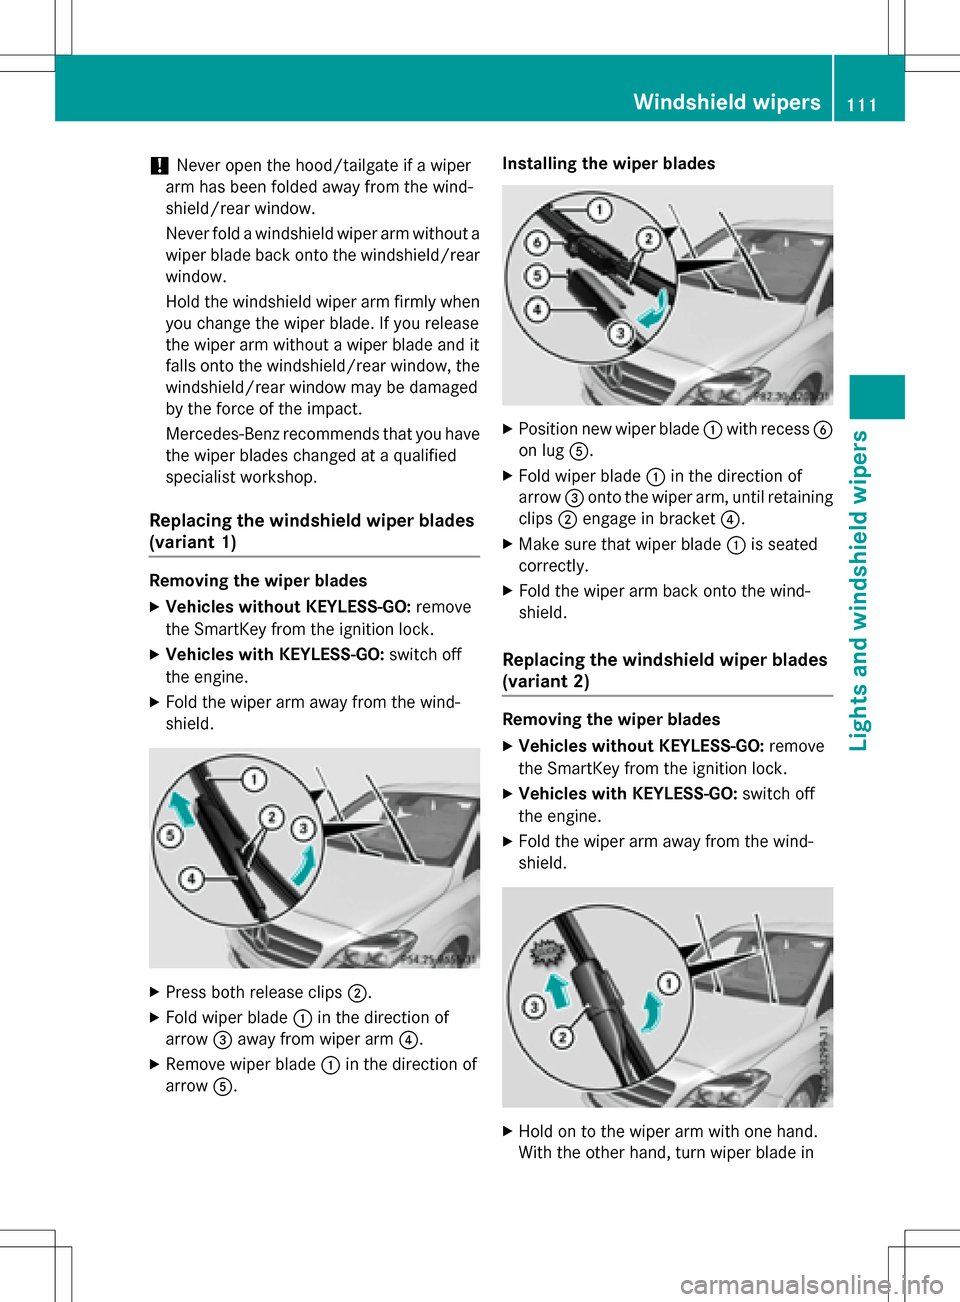
Removing the wiper blades
XVehicles without KEYLESS-GO: remove
the SmartKey from the ignition lock.
XVehicles with KEYLESS-GO: switch off
the engine.
XFold the wiper arm away from the wind-
shield.
XPress both release clips ;.
XFold wiper blade:in the direction of
arrow =away from wiper arm ?.
XRemove wiper blade:in the direction of
arrow A. Installing the wiper blades
XPosition new wiper blade
:with recess B
on lug A.
XFold wiper blade :in the direction of
arrow =onto the wiper arm, until retaining
clips ;engage in bracket ?.
XMake sure that wiper blade :is seated
correctly.
XFold the wiper arm back onto the wind-
shield.
Replacing the windshield wiper blades
(variant 2)
Removing the wiper blades
XVehicles without KEYLESS-GO: remove
the SmartKey from the ignition lock.
XVehicles with KEYLESS-GO: switch off
the engine.
XFold the wiper arm away from the wind-
shield.
XHold on to the wiper arm with one hand.
With the other hand, turn wiper blade in
Windshield wipers111
Lights and windshield wipers
Z
Page 128 of 342

To activate/deactivate "Immediate pre-
entry climate control"
XPress button:in the center console.
The blue or red indicator lamp in the button
lights up or goes out.
The colors of the indicator lamps in the button have the following meanings:
Re dH eating activated
Blue Cooling activated
Yellow Pre-entry climate control at depar- ture is preselected
Air vents
Important safety notes
GWARNING
Very hot or very cold air can flow from the air
vents. This could result in burns or frostbite in
the immediate vicinity of the air vents. There
is a risk of injury.
Make sure that all vehicle occupants always
maintain a sufficient distance to the air out-
lets. If necessary, redirect the airflow to
another area of the vehicle interior.
In order to ensure the direct flow of fresh air
through the air vents into the vehicle interior,
please observe the following notes:
Rkeep the air inlet between the windshield
and the hood free of blockages, such as ice, snow or leaves.
Rnever cover the air vents or air intake grillesin the vehicle interior.
iFor optimal climate control in the vehicle,
open the air vents completely and set the
adjusters to the central position.
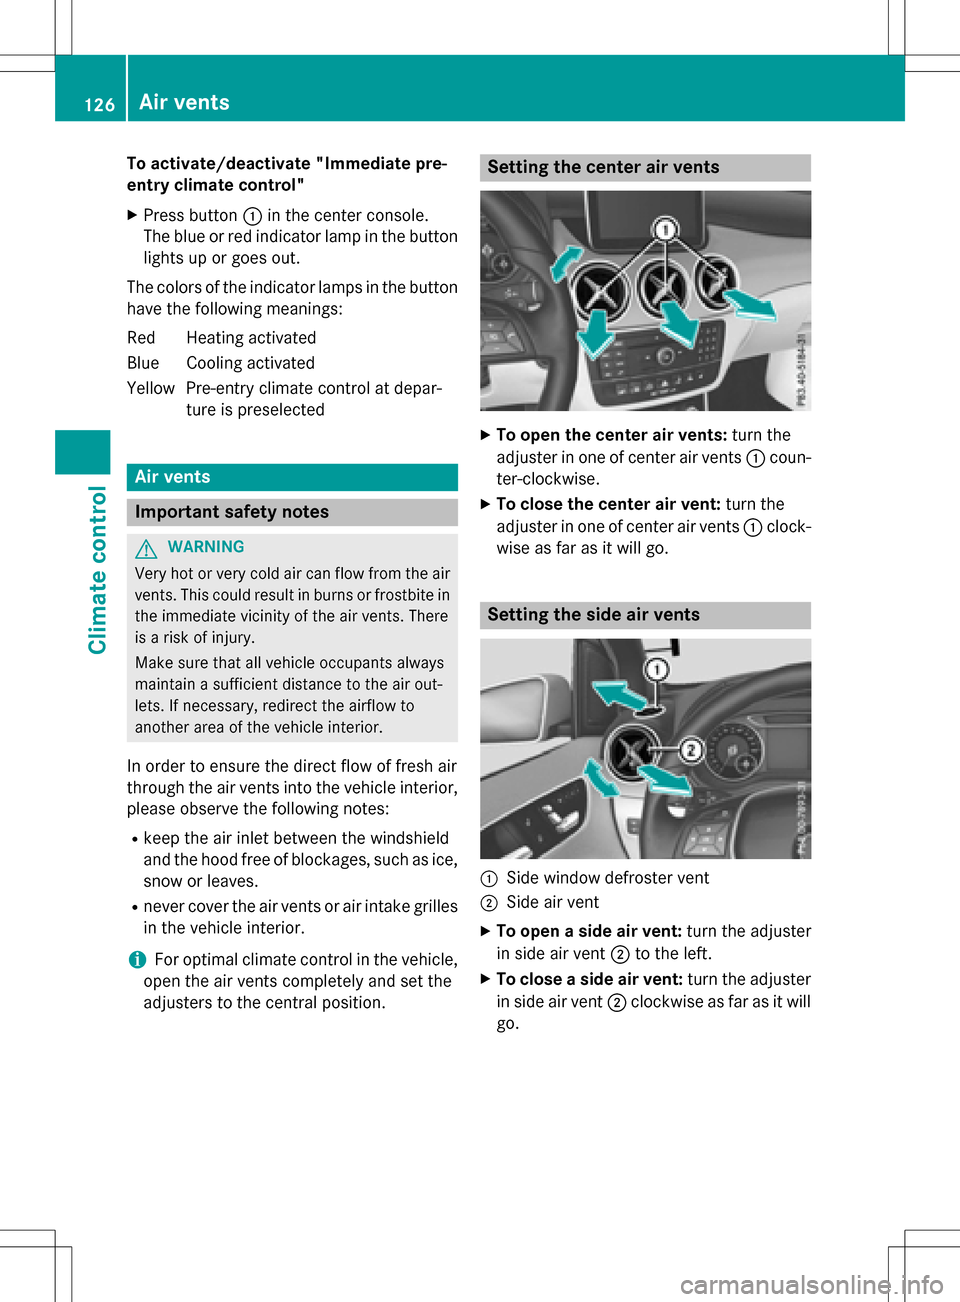
Setting the center air vents
XTo open the center air vents: turn the
adjuster in one of center air vents :coun-
ter-clockwise.
XTo close the center air vent: turn the
adjuster in one of center air vents :clock-
wise as far as it will go.
Setting the side air vents
:Side window defroster vent
;Side air vent
XTo open a side air vent: turn the adjuster
in side air vent ;to the left.
XTo close a side air vent: turn the adjuster
in side air vent ;clockwise as far as it will
go.
126Air vents
Climate control
Page 228 of 342

Display messagesPossible causes/consequences andMSolutions
Service Required
DoNotShiftGears
Visit Dealer
You cannotchangeth e transmission position due to a malfunction.
A warning tone also sounds.
If transmission position Dis selected:
XDrive to a qualified specialist workshop without shifting the
transmission from position D.
If transmission position R,N or Pis selected:
XSecur eth e vehicle against rolling away (Ypage 153).
XNotify a qualified specialist workshop or breakdown service.
XDo no tto w the vehicle.
Only Shift to 'P'
when Vehicle is
Stationary
The vehicle is moving.
XPull over and stop the vehicle safely as soon as possible, paying
attention to road and traffic conditions.
XShift th e transmission to position P.
AThe tailgate is open.
XClosethe tailgate.
?The hood is open.
A warning tone also sounds.
GWARNING
The open hood may block your view when the vehicle is in motion.
There is a risk of an accident.
XPull over and stop the vehicle safely as soon as possible, paying
attention to road and traffic conditions.
XSecur eth e vehicle against rolling away (Ypage 153).
XClose the hood.
CAt least one door is open.Awarning tone also sounds.
XClose all the doors.
226Display messages
On-board computer and displays