2016 MERCEDES-BENZ B-Class ELECTRIC audio
[x] Cancel search: audioPage 37 of 342

Center console
Center console, upper section
FunctionPage
:Audio 20/COMAND (see
separate operating instruc-
tions)
;cSeat heating92
=cPARKTRONIC165
?Activates RANGE PLUS144
FunctionPage
A£Hazard warning
lamps
102
BPASSENGER AIR BAG indi-
cator lamp
41
CSelects the drive program137
Center console35
At a glance
Page 38 of 342
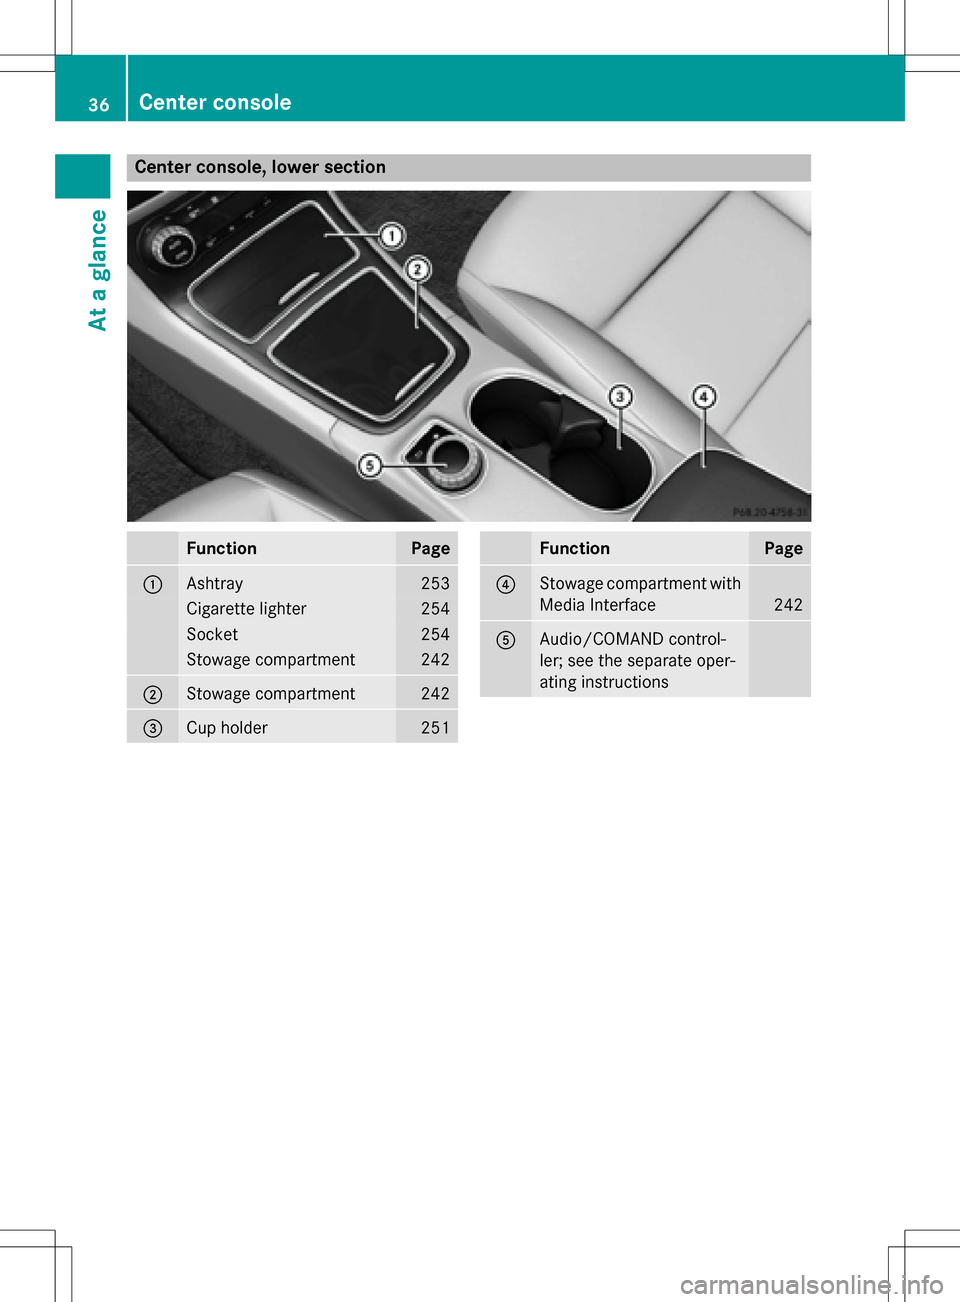
Center console, lower section
FunctionPage
:Ashtray253
Cigarette lighter254
Socket254
Stowage compartment242
;Stowage compartment242
=Cup holder251
FunctionPage
?Stowage compartment with
Media Interface
242
AAudio/COMAND control-
ler; see the separate oper-
ating instructions
36Center console
At a glance
Page 75 of 342
The SmartKey centrally locks/unlocks:
Rthe doors
Rthe tailgate
Rthe charge socket flap
The turn signals flash once when unlocking
and three times when locking.
When the locator lighting is activated in Audio
20/COMAND, it also lights up when it is dark after the vehicle is unlocked with the remote
control (see the separate operating instruc-
tions).
You can also set an audible signal to confirm
that the vehicle has been locked. The audible
signal can be activated and deactivated using
the on-board computer (
Ypage 198).
KEYLESS-GO
General notes
Bear in mind that the drive system can be
started by any of the vehicle occupants if
there is a key in the vehicle.
Locking and unlocking
You can start, lock or unlock the vehicle using
KEYLESS-GO. To do this, you only need carry the SmartKey with you. You can combine the
functions of KEYLESS-GO with those of a con-
ventional SmartKey. Unlock the vehicle by
using KEYLESS-GO, for instance, and lock it
using the &button on the SmartKey.
The driver's door and the door at which the
handle is used, must both be closed. The
SmartKey must be outside the vehicle. When locking or unlocking with KEYLESS-GO, the
distance between the SmartKey and the cor-
responding door handle must not be greater
than 3 ft (1 m).
A check which periodically establishes a radio
connection between the vehicle and the
SmartKey determines whether a valid Smart-
Key is in the vehicle. This occurs, for example:
Rwhen starting the drive system
Rwhilst driving
Rwhen the external door handles are
touched
Rduring convenience closing
XTo unlock the vehicle: touch the inner
surface of the door handle.
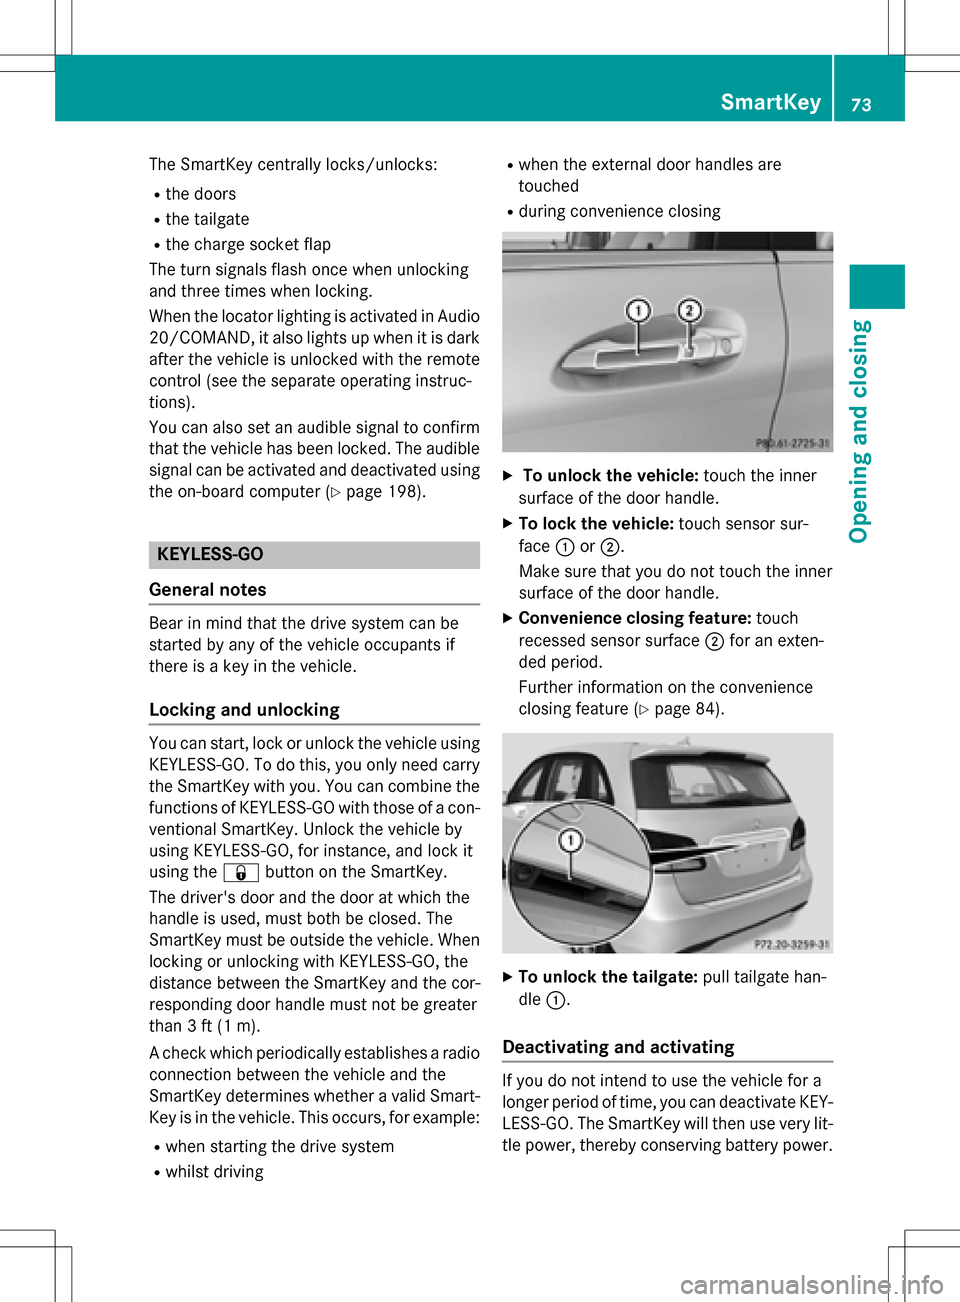
XTo lock the vehicle: touch sensor sur-
face :or;.
Make sure that you do not touch the inner
surface of the door handle.
XConvenience closing feature: touch
recessed sensor surface ;for an exten-
ded period.
Further information on the convenience
closing feature (
Ypage 84).
XTo unlock the tailgate: pull tailgate han-
dle :.
Deactivating and activating
If you do not intend to use the vehicle for a
longer period of time, you can deactivate KEY-
LESS-GO. The SmartKey will then use very lit-
tle power, thereby conserving battery power.
SmartKey73
Opening and closing
Z
Page 106 of 342
Interior lighting control
General notes
In order to prevent the vehicle's battery from discharging, the interior lighting functions are
automatically deactivated after some time
except when the key is in position 2in the
ignition lock.
The color and brightness for the ambient
lighting may be set using COMAND or Audio
20 (see the separate operating instructions).
Automatic interior lighting control
XTo switch on: set the switch to center
position B.
XTo switch off: set the switch to the |
position.
The interior lighting automatically swit ches
on if you:
Runlock the vehicle
Ropen a door
RRemove the Sm artKey from the ignition
lock.
The interior light is activated for a short while
when the SmartKey is removed from the igni-
tion lock. This delayed switch-off can be
adjusted using COMAND or Audio 20 (see the separate Operator's Manual).
Manual interior lighting control
XTo switch the front interior lighting on:
set the switch to the cposition.
XTo switch the front interior lighting off:
set the switch to the |position or (if the
door is closed) to the center position.
XTo switch the rear interior ligh ting on or
off: press the ubutton.
XTo switch the reading lamp on or off:
press the pbutton.
Crash-responsive emergency lighting
The interior lighting is activated automatically
if the vehicle is involved in an accident.
XTo switch off the crash-responsive
eme rgency lighti ng:press the hazard
warning lamp button.
or
XLock and then unlock the vehicle using the Sm artKey.
Replacing bulbs
Important safety notes
Xenon bulbs
GDANGER
Xenon bulbs carry a high voltage. You can get an electric shock if you remove the cover of
th e Xenon bulb and touch the electrical con-
tacts . There is a risk of fatal injury.
Never touch the parts or the electrical con-
tacts of th e Xenon bulb. Always have work on
th e Xenon bulbs carried out at a qualified spe-
cialist workshop.
If your vehicle is equipped with Xenon bulbs,
you can recognize th is by the following: the
cone of light from the Xenon bulbs moves
from the top to the bottom and back again
when you start the drive system. For this tobe
observed, the lights must be switched on
before the drive system is started.
Bulbs and lamps are an important aspect of
vehicle safety. You must therefore make sure
that these function correctly at all times.
Have the headlamp setting checked regularly.
Other bulbs
GWARNING
Bulbs, lamps and connectors can get very hot
when operating. If you changeabulb, you
could burn yourself on these components.
There is a risk of injury.
Allow these component s to cool down before
changing a bulb.
104Replacing bulbs
Lights and windshield wipers
Page 120 of 342

the front-passenger side as well. The indi-
cator lamp in theábutton goes out.
RIf you change the settings of the climate
control system, the climate status display
appears for approximately three seconds
at the bottom of the screen in the Audio/
COMAND display (see separate operating
instructions). You will see the current set-
tings of the various climate control func-
tions.
You can choose between various drive pro-
grams with the program selector button
(
Ypage 137).
If you have selected drive program E+:
Rthe cooling output is reduced when cooling
Rheat output is reduced when heating
Rthe time for which the rear window
defroster will run is reduced
If you have selected drive program Eor S, the
current climate settings are maintained.
Operating the climate control sys-
tems
Activating/deactivating climate con-
trol
General notes
When the climate control is switched off, the
air supply and air circulation are also
switched off. The windows could fog up.
Therefore, switch off climate control only
briefly
Dual-zone automatic climate control
XTurn the SmartKey to position 2in the igni-
tion lock (
Ypage 131).
XTo activate: press theÃbutton.
The indicator lamp in the Ãbutton lights
up. Airflow and air distribution are set to
automatic mode.
or
XPress the ^button.
The indicator lamp in the ^button goes
out. The previously selected settings are
restored.
XTo deactivate: press the^button.
The indicator lamp in the ^button lights
up.
iActivate climate control primarily using
the à button.
Switching cooling with air dehumidi-
fication on/off
General notes
If you deactivate the "Cooling with air-dehu-
midification" function, the air inside the vehi- cle will not be cooled. The air inside the vehi-
cle will also not be dehumidified. The win-
dows can fog up more quickly. Therefore, only
deactivate the "Cooling with air-dehumidifi-
cation" function briefly.
The "Cooling with air-dehumidification" func-
tion is operational when the vehicle is ready
to drive. The air inside the vehicle is cooled
and dehumidified according to the tempera-
ture selected.
Condensation may drip from the underside of
the vehicle when it is in cooling mode. This is
normal and not a sign that there is a malfunc- tion.
118Operating the climate control systems
Climate control
Page 146 of 342
As a result of its basic characteristics, the
amount of energy available from the high-
voltage battery decreases over the course of
its life.
This reduces:
Rthe maximum range that can be achieved
by the vehicle
Rthe maximum output (acceleration) of the
vehicle
You can actively reduce the energy consump-
tion of your vehicle in a number of ways, for
example, by:
Ran anticipatory driving style
Rreducing the use of electrical consumers
Rhaving the vehicle regularly maintained
The charging time of the high-voltage battery may change over the course of its life.
Observe the displays on energy usage
(
Ypage 188) and range (Ypage 188).
RANGE PLUS
If you activate RANGE PLUS, the operating
window of the battery will be extended at thenext charging process. An extended driving
range will be available to you for the next
journey.
Using RANGE PLUS shortens the service life
of the battery. Therefore, only use RANGE
PLUS if, for example:
Rlong journeys are planned or
Rthe availability of charging stations at the
destination is limited
The more often RANGE PLUS is used, the
more the extended range is reduced.
Therefore always check the range display
before every journey (
Ypage 188).
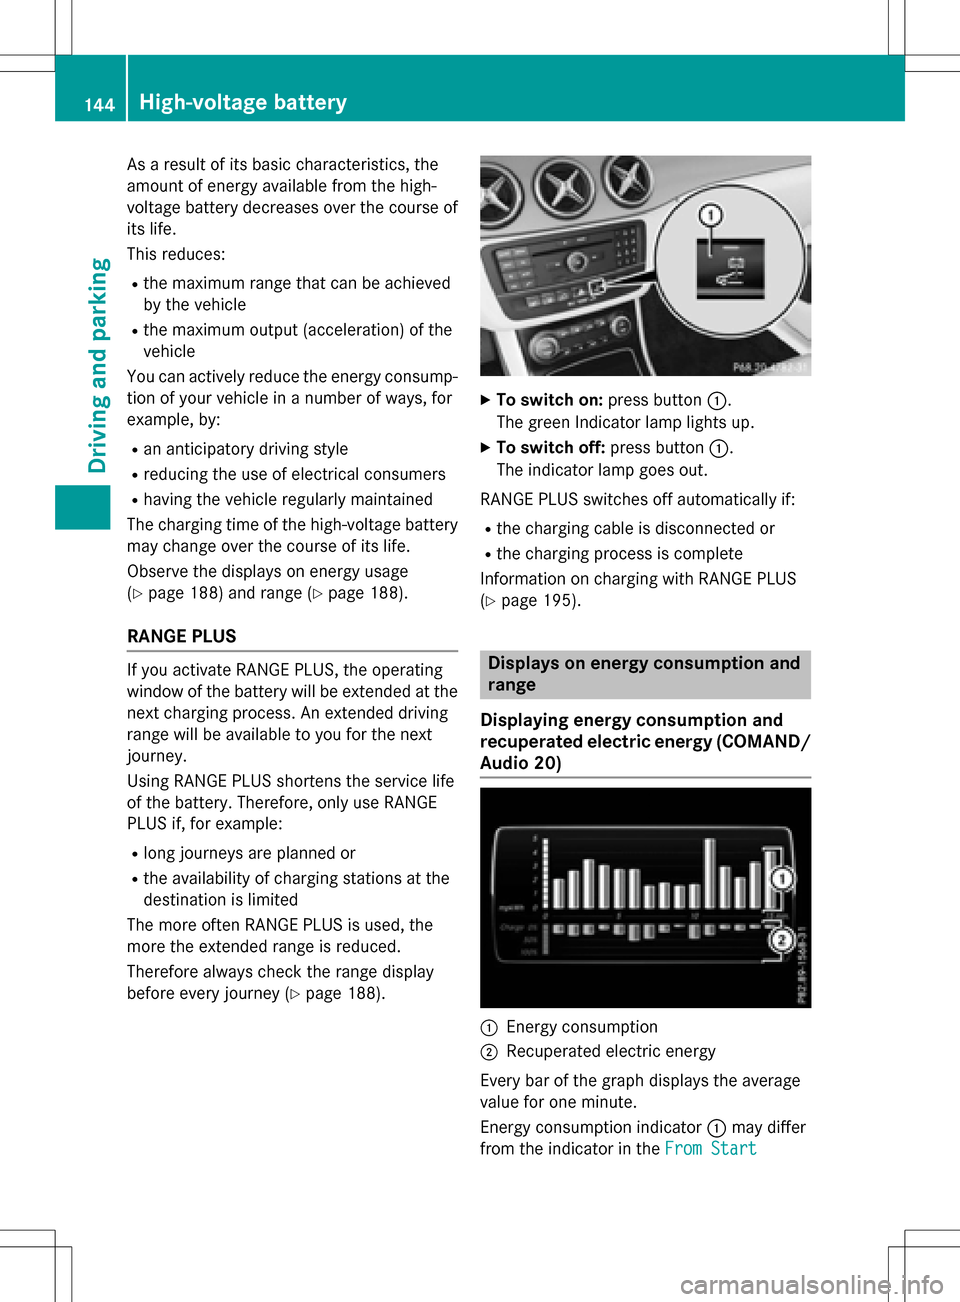
XTo switch on: press button:.
The green Indicator lamp lights up.
XTo switch off: press button:.
The indicator lamp goes out.
RANGE PLUS switches off automatically if:
Rthe charging cable is disconnected or
Rthe charging process is complete
Information on charging with RANGE PLUS
(
Ypage 195).
Displays on energy consumption and
range
Displaying energy consumption and
recuperated electric energy (COMAND/
Audio 20)
:Energy consumption
;Recuperated electric energy
Every bar of the graph displays the average
value for one minute.
Energy consumption indicator :may differ
from the indicator in the From Start
144High-voltage battery
Driving and parking
Page 147 of 342
(Ypage 187) trip computer in theTrip
menu.
Displaying energy consumption and recu-
perated electric energy:
XSwitch on Audio 20/COMAND (see the
separate operating instructions).
XTo select Vehiclefrom the main function
bar: turn and press the controller.
The vehicle menu is displayed.
XTo select Consumption: turn and press the
controller.
Energy consumption :and recuperated
electric energy ;for the last 15 minutes of
the journey are shown.
Exiting the vehicle settings:
XPress the %button on the controller.
or
XTo select %: slide 6and press the
controller.
To reset values: the values are reset along
with the From Start
trip computer
(
Ypage 189).
Displaying range on the map
(COMAND/Audio 20)
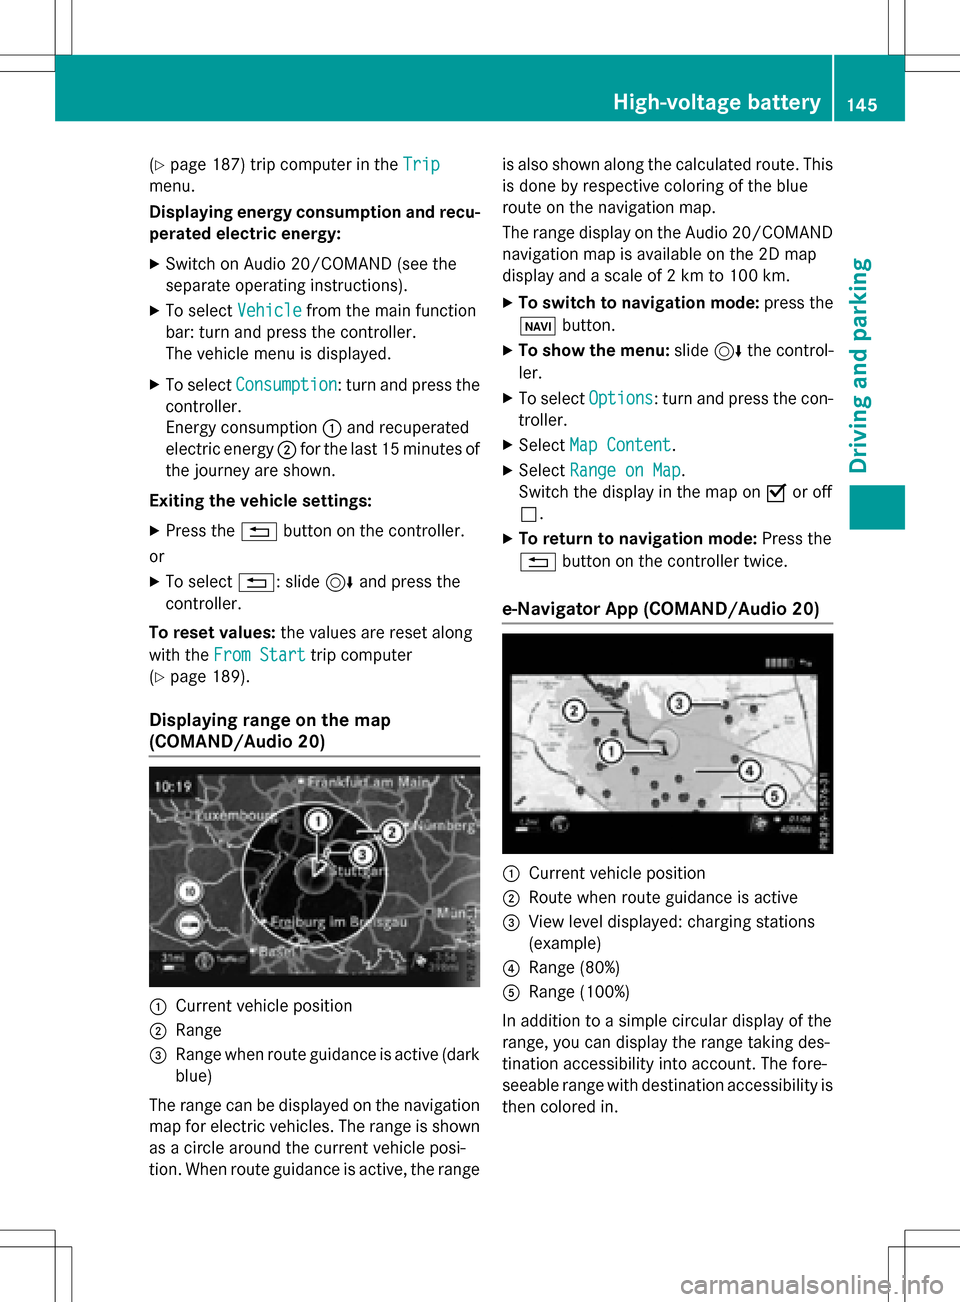
:Current vehicle position
;Range
=Range when route guidance is active (dark
blue)
The range can be displayed on the navigation
map for electric vehicles. The range is shown
as a circle around the current vehicle posi-
tion. When route guidance is active, the range is also shown along the calculated route. This
is done by respective coloring of the blue
route on the navigation map.
The range display on the Audio 20/COMAND
navigation map is available on the 2D map
display and a scale of 2 km to 100 km.
XTo switch to navigation mode:
press the
ß button.
XTo show the menu: slide6the control-
ler.
XTo select Options: turn and press the con-
troller.
XSelect Map Content.
XSelectRange on Map.
Switch the display in the map on Oor off
ª.
XTo return to navigation mode: Press the
% button on the controller twice.
e-Navigator App (COMAND/Audio 20)
:Current vehicle position
;Route when route guidance is active
=View level displayed: charging stations
(example)
?Range (80%)
ARange (100%)
In addition to a simple circular display of the
range, you can display the range taking des-
tination accessibility into account. The fore-
seeable range with destination accessibility is
then colored in.
High-voltage battery145
Driving and parking
Z
Page 148 of 342
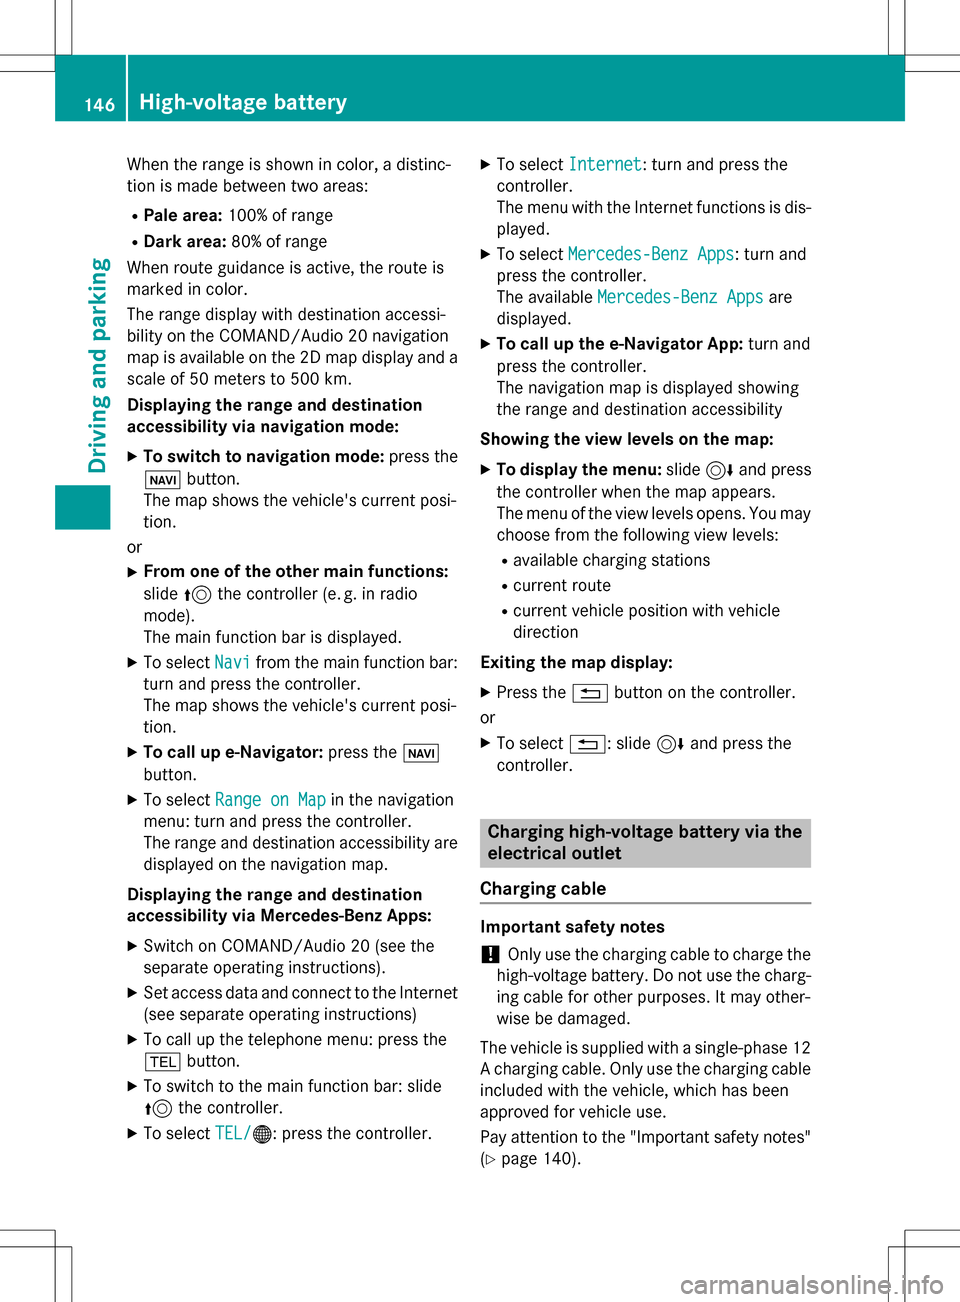
When the range is shown in color, a distinc-
tion is made between two areas:
RPale area:100% of range
RDark area: 80% of range
When route guidance is active, the route is
marked in color.
The range display with destination accessi-
bility on the COMAND/Audio 20 navigation
map is available on the 2D map display and a scale of 50 meters to 500 km.
Displaying the range and destination
accessibility via navigation mode:
XTo switch to navigation mode: press the
ß button.
The map shows the vehicle's current posi-
tion.
or
XFrom one of the other main functions:
slide 5the controller (e. g. in radio
mode).
The main function bar is displayed.
XTo select Navifrom the main function bar:
turn and press the controller.
The map shows the vehicle's current posi-
tion.
XTo call up e-Navigator: press theß
button.
XTo select Range on Mapin the navigation
menu: turn and press the controller.
The range and destination accessibility are
displayed on the navigation map.
Displaying the range and destination
accessibility via Mercedes-Benz Apps:
XSwitch on COMAND/Audio 20 (see the
separate operating instructions).
XSet access data and connect to the Internet
(see separate operating instructions)
XTo call up the telephone menu: press the
% button.
XTo switch to the main function bar: slide
5the controller.
XTo select TEL/®: press the controller.
XTo selectInternet: turn and press the
controller.
The menu with the Internet functions is dis-
played.
XTo select Mercedes-Benz Apps: turn and
press the controller.
The available Mercedes-Benz Apps
are
displayed.
XTo call up the e-Navigator App: turn and
press the controller.
The navigation map is displayed showing
the range and destination accessibility
Showing the view levels on the map:
XTo display the menu: slide6and press
the controller when the map appears.
The menu of the view levels opens. You may
choose from the following view levels:
Ravailable charging stations
Rcurrent route
Rcurrent vehicle position with vehicle
direction
Exiting the map display:
XPress the %button on the controller.
or
XTo select %: slide 6and press the
controller.
Charging high-voltage battery via the
electrical outlet
Charging cable
Important safety notes
!Only use the charging cable to charge the
high-voltage battery. Do not use the charg-
ing cable for other purposes. It may other-
wise be damaged.
The vehicle is supplied with a single-phase 12
A charging cable. Only use the charging cable
included with the vehicle, which has been
approved for vehicle use.
Pay attention to the "Important safety notes"
(
Ypage 140).
146High-voltage battery
Driving and parking