2016 MERCEDES-BENZ B-Class ELECTRIC Roof load
[x] Cancel search: Roof loadPage 16 of 342

Recharging statistics (COMAND)see Electrical energy generated
Recuperative Brake System
Driving safety systems ..................... 68
Refrigerant (air-conditioning sys-
tem)
Important safety notes .................. 337
Remote control
Garage door opener ....................... 263
Programming (garage door
opener) .......................................... 264
Replacing bulbs
Important safety notes .................. 104
Overview of bulb types .................. 105
Removing/replacing the cover
(front wheel arch) .......................... 106
Reporting safety defects .................... 26
Rescue card ......................................... 27
Reserve
High-voltage battery ...................... 238
Restraint system
Display message ............................ 210
Introduction ..................................... 40
Warning lamp ................................. 238
Warning lamp (function) ................... 41
Reverse gear
Engaging ........................................ 135
Reversing feature
Side windows ................................... 83
Roadside Assistance (breakdown) .... 22
Roof carrier ........................................ 251
Roof lining and carpets (cleaning
guidelines) ......................................... 280
Roof load (maximum) ........................ 338
S
Safety
Children in the vehicle ..................... 56
Safety system
see Driving safety systems
Seat belts
Adjusting the height ......................... 44
center rear-compartment seat ......... 45
Cleaning ......................................... 279
Correct usage .................................. 44
Fastening ......................................... 44
Important safety guidelines ............. 42 Introduction ..................................... 42
Releasing ......................................... 45
Warning lamp ................................. 229
Warning lamp (function) ................... 45
Seats
Adjusting (electrically) ..................... 91
Adjusting (manually) ........................ 90
Adjusting the 4-way lumbar sup-
port .................................................. 92
Adjusting the head restraint ............ 91
Cleaning the cover ......................... 279
Correct driver's seat position ........... 88
Folding the backrest (rear com-
partment) forwards/back .............. 246
Important safety notes .................... 89
Seat heating problem ...................... 94
Storing settings (memory func-
tion) ................................................. 98
Switching seat heating on/off ......... 92
Securing a load
see Securing cargo
Securing cargo .................................. 247
Selector lever
Cleaning ......................................... 278
see DIRECT SELECT lever
Sensors (cleaning instructions) ....... 277
Service menu (on-board com-
puter) .................................................. 194
Service message
see ASSYST PLUS
Service products
Brake fluid ..................................... 335
Coolant (engine) ............................ 336
Important safety notes .................. 335
Refrigerant (air-conditioning sys-
tem) ............................................... 337
Washer fluid ................................... 336
Setting the air distribution ............... 120
Setting the airflow ............................ 121
Setting the maximum charge cur-
rent (Control system) ........................ 196
Settings
Factory (on-board computer) ......... 198
On-board computer ....................... 195
Side impact air bag ............................. 48
Si de marker lamp (display mes-
sage) ................................................... 216
14Index
Page 20 of 342

Securing from rolling away ............ 324
Starting .......................................... 132
Transporting .................................. 297
Unlocking (in an emergency) ........... 80
Unlocking (SmartKey) ...................... 72
Vehicle data ................................... 338
Vehicle data
Roof load (maximum) ..................... 338
Trunk load (maximum) ................... 338
Vehicle dimensions ........................... 338
Vehicle emergency locking ................ 81
Vehicle Homepage
Data protection .............................. 152
Functions ....................................... 153
General information ....................... 152
Internet connection ....................... 153
Vehicle identification number
see VIN
Vehicle identification plate .............. 334
Vehicle tool kit .................................. 282
Ventilation
Setting the vents ........................... 126
Video
Operating the DVD ......................... 191
VIN
Seat ............................................... 334
Type plate ...................................... 334
W
Warning and indicator lampsABS ................................................ 232
Brakes ........................................... 231
Distance warning ........................... 239
ESP
®.............................................. 235
ESP®OFF ....................................... 236
Overview .......................................... 32
PASSENGER AIR BAG ...................... 41
RBS (Recuperative Brake Sys-
tem) ............................................... 231
Restraint system ............................ 238
Seat belt ........................................ 229
Tire pressure monitor .................... 240
Warranty .............................................. 21
Washer fluid
Display message ............................ 227
Wheel and tire combinations
Tires ............................................... 329 Wheel bolt tightening torque
........... 326
Wheel chock ...................................... 324
Wheels
Changing a wheel .......................... 323
Checking ........................................ 303
Cleaning ......................................... 276
General notes ................................ 327
Important safety notes .................. 302
Information on driving .................... 302
Interchanging/changing ................ 323
Mounting a new wheel ................... 326
Removing a wheel .......................... 326
Storing ........................................... 323
Tightening torque ........................... 326
Wheel size/tire size ....................... 327
Window curtain air bag
Display message ............................ 211
Operation ......................................... 49
Windows
see Side windows
Windshield
Defrosting ...................................... 121
Windshield washer system
Adding washer fluid ....................... 272
Important safety notes .................. 336
Windshield wipers
Display message ............................ 227
Problem (malfunction) ................... 114
Rear window wiper ........................ 110
Replacing the wiper blades ............ 110
Switching on/off ........................... 109
Winter driving
Slippery road surfaces ................... 161
Snow chains .................................. 305
Winter operation
General notes ................................ 304
Winter tires
M+S tires ....................................... 304
Wiper blades
Cleaning ......................................... 277
Important safety notes .................. 110
Replacing (rear window) ................ 112
Replacing (windshield) ................... 111
Woode n trim (cleaning instruc-
tions) .................................................. 278
Workshop
see Qualified specialist workshop
18Index
Page 51 of 342

Window curtain air bags
Window curtain air bags:are integrated
into the side of the roof frame and deployed in
the area from the A-pillar to the C-pillar.
When deployed, the window curtain air bag
enhances the level of protection for the head.
However, it does not protect the chest or
arms.
In the event of a side impact, the window cur-
tain air bag is deployed on the side on which
the impact occurs.
If the system determines that they can offer
additional protection to that provided by the
seat belt, a window curtain air bag may be
deployed in other accident situations
(
Ypage 54).
Occupant Classification System
(OCS)
Introduction
The Occupant Classification System (OCS)
categorizes the person in the front-passenger
seat. Depending on that result, the front-
passenger front air bag is either enabled or
deactivated.
The system does not disable:
Rthe side impact air bag
Rthe window curtain air bag
Rthe Emergency Tensioning Devices
Prerequisites
To be classified correctly, the front passenger
must sit:
Rwith the seat belt fastened correctly
Rin an almost upright position with their
back against the seat backrest
Rwith their feet resting on the floor, if possi-
ble
If the front passenger does not observe these
conditions, OCS may produce a false classi-
fication, e.g. because the front passenger:
Rtransfers their weight by supporting them-
selves on a vehicle armrest
Rsits in such a way that their weight is raised from the seat cushion
If it is absolutely necessary to install a child
restraint system on the front-passenger seat,
be sure to observe the correct positioning of
the child restraint system. Never place
objects under or behind the child restraint
system, e.g. cushions. The entire base of the
child restraint system must always rest on the
seat cushion of the front-passenger seat. The
backrest of the forward-facing child restraint system must lie as flat as possible against the
backrest of the front-passenger seat.
The child restraint system must not touch the
roof or be subjected to a load by the head
restraint. Adjust the angle of the seat back-
rest and the head restraint position accord-
ingly.
Only then can OCS be guaranteed to function
correctly. Always observe the child restraint
system manufacturer's installation instruc-
tions.
Occupant safety49
Safety
Z
Page 62 of 342

Make sure that:
RTop Tether hookAis hooked into Top
Tether anchorage ?as shown.
RTop Tether belt Bis not twisted.
RTop Tether belt Bis routed between rear
seat backrest =and cargo compart-
ment cover ;if cargo compartment
cover ;is installed.
RTop Tether belt Bis routed between the
rear seat backrest =and the cargo net if
the cargo net is installed.
XSwing back rear seat backrest =until it
engages.
The red lock verification indicator is no lon-
ger visible.
XInstall the LATCH-type (ISOFIX) child
restraint system with Top Tether. Always
comply with the child restraint system
manufacturer's installation instructions
when doing so.
XTension Top Tether belt B. Always comply
with the child restraint system manufactur-
er's installation instructions when doing so.
XMove head restraint :back down again
slightly if necessary (
Ypage 92). Make
sure that you do not interfere with the cor-
rect routing of Top Tether belt B.
Child restraint system on the front-
passenger seat
General notes
Accident statistics show that children
secured in the rear seats are safer than chil-
dren secured in the front-passenger seat. For
this reason, Mercedes-Benz strongly advises
that you install the child restraint system on a
rear seat.
If it is absolutely necessary to install a child
restraint system on the front-passenger seat,
always observe the instructions and safety
notes on the "Occupant Classification System (OCS)" (
Ypage 49). You can thus avoid the risks that could arise
as a result of:
Ran incorrectly categorized person in the
front-passenger seat
Rthe unintentional deactivation of the front-
passenger front air bag
Rthe unsuitable positioning of the child
restraint system, e.g. too close to the dash-
board
Rearward-facing child restraint system
If it is absolutely necessary to install a rear-
ward-facing child restraint system on the
front-passenger seat, always make sure that
the front-passenger front air bag is deactiva-
ted. Only if the PASSENGER AIR BAG OFF
indicator lamp is permanently lit (
Ypage 41)
is the front-passenger front air bag deactiva-
ted.
Always observe the child restraint system
manufacturer's installation and operating
instructions.
Forward-facing child restraint system
If it is absolutely necessary to install a
forward-facing child restraint system on the
front-passenger seat, always move the front-
passenger seat as far back as possible. Fully
retract the seat cushion length. The entire
base of the child restraint system must
always rest on the seat cushion of the front-
passenger seat. The backrest of the child
restraint system must lie as flat as possible
against the backrest of the front-passenger
seat. The child restraint system must not
touch the roof or be subjected to a load by the
head restraint. Adjust the angle of the seat
backrest and the head restraint position
accordingly. Always make sure that the shoul- der belt strap is correctly routed from the
vehicle belt outlet to the shoulder belt guide
on the child restraint system. The shoulder
belt strap must be routed forwards and down-
wards from the vehicle belt outlet. If neces-
sary, adjust the vehicle belt outlet and the
front-passenger seat accordingly.
60Children in the vehicle
Safety
Page 81 of 342

ProblemPossible causes/consequences andMSolutions
You have lost a Smart-
Key.XHave the SmartKey deactivated at a qualified specialist work-
shop.
XReport the loss immediately to the vehicle insurers.
XIf necessary, have the locks changed as well.
You have lost the
mechanical key.XReport the loss immediately to the vehicle insurers.
XIf necessary, have the locks changed as well.
Doors
Important safety notes
GWARNING
If children are left unsupervised in the vehicle,
they could:
Ropen the doors, thus endangering other
people or road users.
Rget out and disrupt traffic.
Roperate the vehicle's equipment.
Additionally, children could set the vehicle in
motion if, for example, they:
Rrelease the parking brake.
Rshift the transmission out of park position P
Rstart the vehicle's drive system.
There is a risk of an accident and injury.
When leaving the vehicle, always take the
SmartKey with you and lock the vehicle. Never
leave children or animals unattended in the
vehicle. Always keep the SmartKey out of
reach of children.
You should preferably place luggage or loads
in the cargo compartment. Observe the load- ing guidelines (
Ypage 242).
Unlocking and opening doors from
the inside
XTo unlock and open a front door: pull
door handle ;.
If the door is locked, locking knob :pops
up. The door is unlocked and opens.
XTo unlock a rear door: pull up locking
knob :.
The door is unlocked and can be opened.
XTo open a rear door: pull door handle;.
You can open a door from inside the vehicle
even if it has been locked. You can only open the rear doors from inside the vehicle if they
are not secured by the child-proof locks
(
Ypage 61).
If the vehicle has previously been locked with
the SmartKey from the outside, opening a
door from the inside will trigger the anti-theft
alarm system. Switch off the alarm
(
Ypage 69).
Doors79
Opening and closing
Z
Page 159 of 342

Drivingtips
General notes
Important safety notes
GWARNING
If you switch off the ignition while driving,
safety-relevant functions are only available
with limitations, or not at all. This could affect, fo r example, the power steering and thebrake
boosting effect. You will require considerably
more effort to steer and brake. There is a risk
of an accident.
Do no t switch off the ignition while driving.
GWARNING
If you operate mobile communication equip-
ment while driving, you will be distracted from traffic conditions. You could also lose control
of the vehicle. There is a risk of an accident.
Only operate this equipment when the vehicle
is stationary.
Observe the legal requirements fo rth ecoun-
tr y in which you are driving. Some jurisdic-
tion s prohibit the driver from usingamobile
phone while drivin gavehicle.
If you makeacall while driving, always use
hands-free mode. Only operate the telephone
when the traffic situation permits. If you are
unsure, pull over to a safe location and stop
before operating the telephone.
Bear in mind that at a speed of only 30 mph
(approximately 50 km/h), the vehicle covers
a distance of 44 ft (approximately 14 m) per
second.
Drive sensibly – save energy
Observe the following tips to save energy:
RThe tires should always be inflated to the
recommended tire pressure.
RRemove unnecessary loads.
RRemove roof racks when they are not nee-
ded.
RAvoid frequent acceleration or braking. Energ
y consumption also increases when
driving in low or high outside temperatures, in
stop-start traffic, on short journeys and in
hilly terrain .
Drinking and driving
GWARNING
Drinking and drivin gand/o rtaking drugs and
driving are very dangerous combinations.
Even a small amount of alcohol or drugs can
affect your reflexes, perceptions and judg-
ment.
The possibility of a serious or even fatal acci-
dent is greatly increased when you drink or
take drugs and drive.
Do no t drink or take drugs and drive or allow
anyone to drive who has been drinkingor tak-
ing drugs.
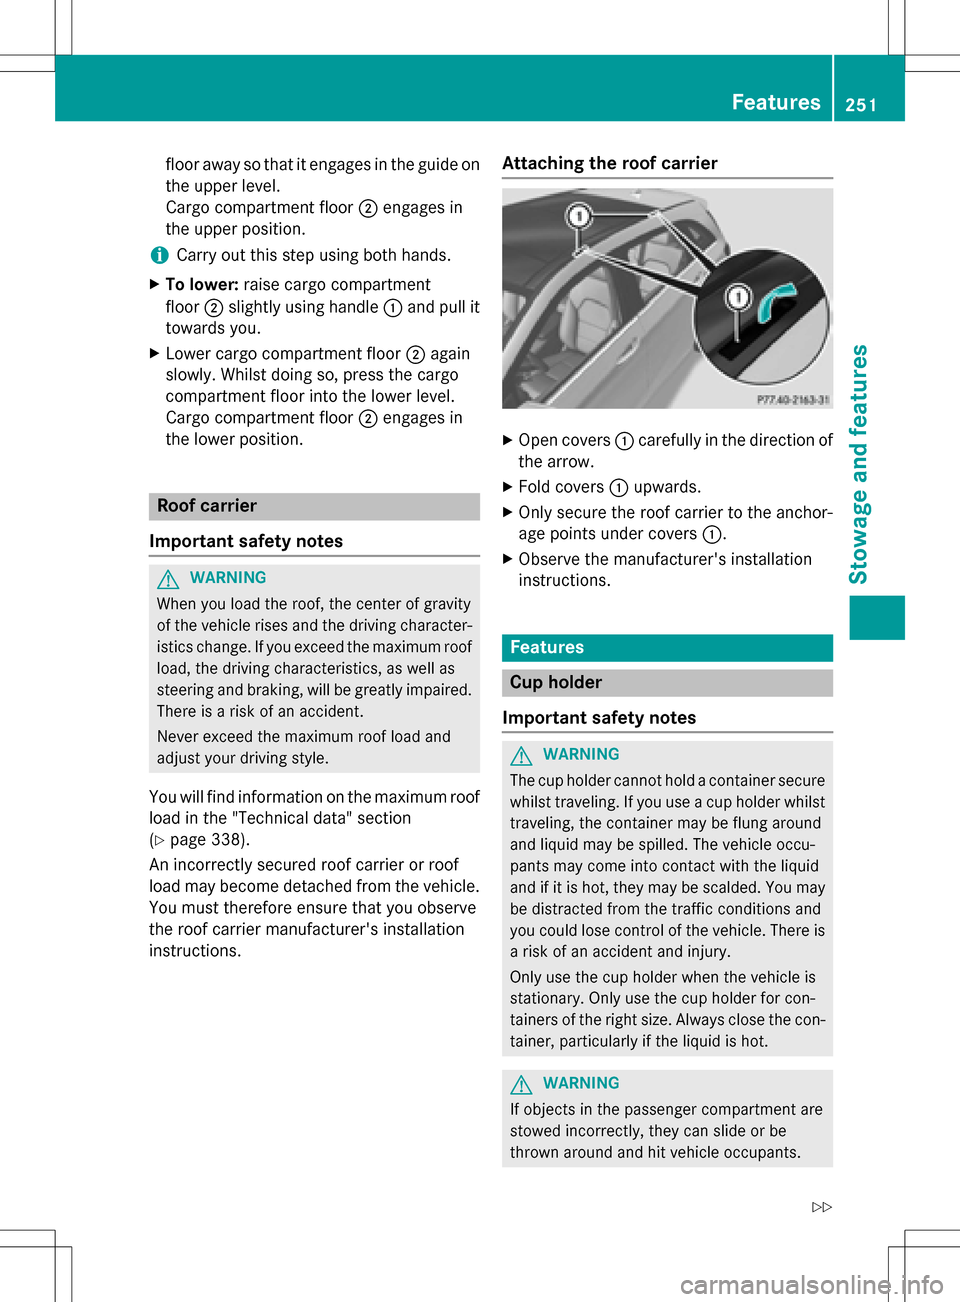
ECO display
The ECO display provides feedback on how
economical your driving characteristics are.
The ECO display assists you in achieving the
most economical driving style for the selec-
te d settings and prevailing conditions. Your
driving style can significantly influence the
vehicle's consumption .
The ECO display consists of three bars:
RAcceleration
RConstant
RCoasting
The percent value is the average value of the
three bars. The three bars and the mean value
begin at the value of 50%. A higher percent-
age indicates a more economical driving
style.
Driving tips157
Driving and parking
Z
Page 253 of 342

floor away so that it engages in the guide on
the upper level.
Cargo compartment floor;engages in
the upper position.
iCarry out this step using both hands.
XTo lower: raise cargo compartment
floor ;slightly using handle :and pull it
towards you.
XLower cargo compartment floor ;again
slowly. Whilst doing so, press the cargo
compartment floor into the lower level.
Cargo compartment floor ;engages in
the lower position.
Roof carrier
Important safety notes
GWARNING
When you load the roof, the center of gravity
of the vehicle rises and the driving character-
istics change. If you exceed the maximum roof
load, the driving characteristics, as well as
steering and braking, will be greatly impaired.
There is a risk of an accident.
Never exceed the maximum roof load and
adjust your driving style.
You will find information on the maximum roof
load in the "Technical data" section
(
Ypage 338).
An incorrectly secured roof carrier or roof
load may become detached from the vehicle.
You must therefore ensure that you observe
the roof carrier manufacturer's installation
instructions.
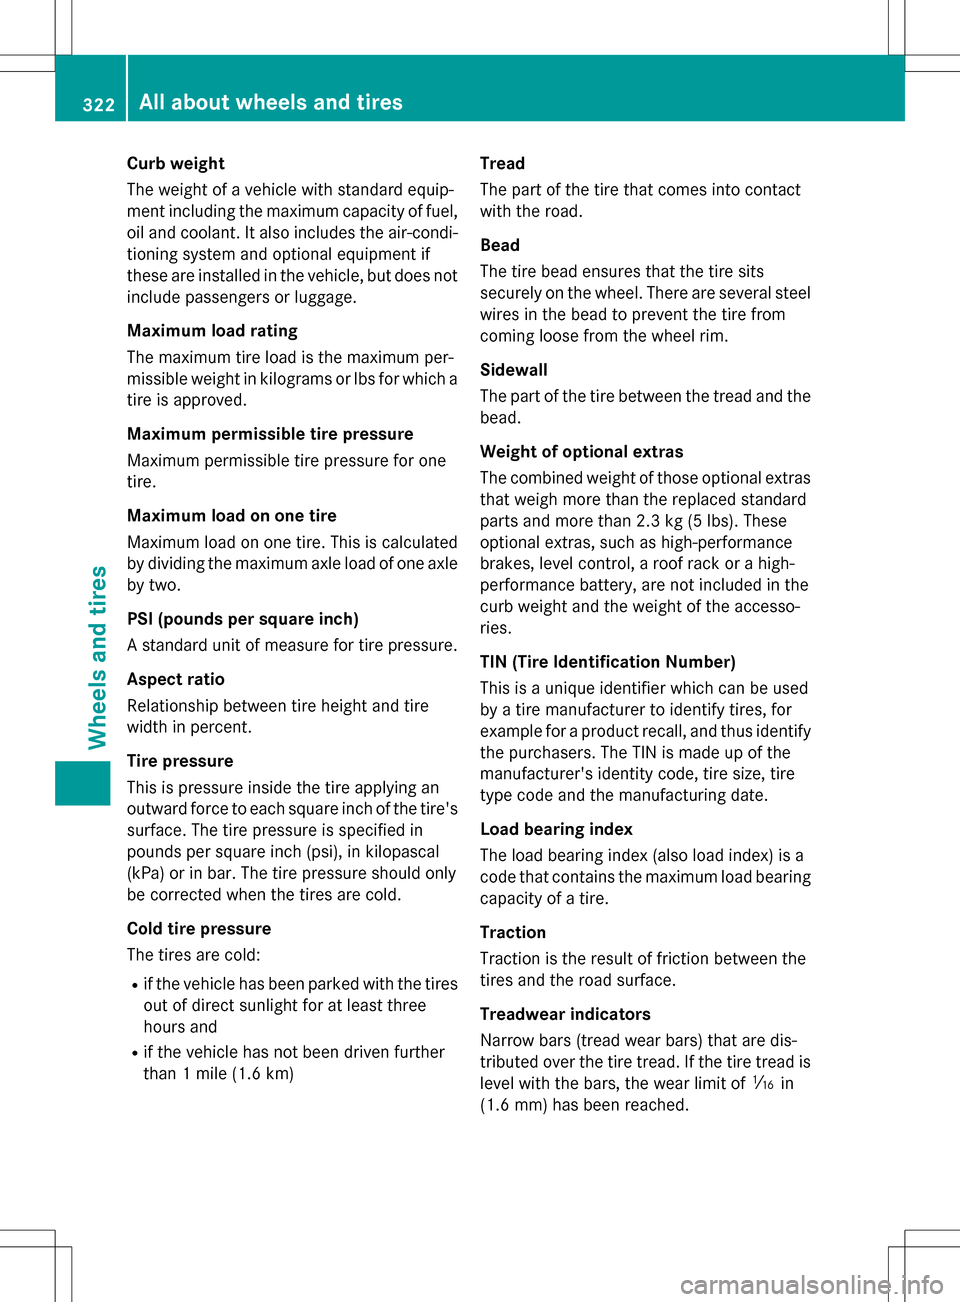
Attaching the roof carrier
XOpen covers :carefully in the direction of
the arrow.
XFold covers :upwards.
XOnly secure the roof carrier to the anchor-
age points under covers :.
XObserve the manufacturer's installation
instructions.
Features
Cup holder
Important safety notes
GWARNING
The cup holder cannot hold a container secure
whilst traveling. If you use a cup holder whilst
traveling, the container may be flung around
and liquid may be spilled. The vehicle occu-
pants may come into contact with the liquid
and if it is hot, they may be scalded. You may
be distracted from the traffic conditions and
you could lose control of the vehicle. There is a risk of an accident and injury.
Only use the cup holder when the vehicle is
stationary. Only use the cup holder for con-
tainers of the right size. Always close the con-
tainer, particularly if the liquid is hot.
GWARNING
If objects in the passenger compartment are
stowed incorrectly, they can slide or be
thrown around and hit vehicle occupants.
Features251
Stowage and features
Z
Page 324 of 342

Curb weight
The weight of a vehicle with standard equip-
ment including the maximum capacity of fuel,
oil and coolant. It also includes the air-condi-
tioning system and optional equipment if
these are installed in the vehicle, but does not
include passengers or luggage.
Maximum load rating
The maximum tire load is the maximum per-
missible weight in kilograms or lbs for which a
tire is approved.
Maximum permissible tire pressure
Maximum permissible tire pressure for one
tire.
Maximum load on one tire
Maximum load on one tire. This is calculated
by dividing the maximum axle load of one axle
by two.
PSI (pounds per square inch)
A standard unit of measure for tire pressure.
Aspect ratio
Relationship between tire height and tire
width in percent.
Tire pressure
This is pressure inside the tire applying an
outward force to each square inch of the tire's
surface. The tire pressure is specified in
pounds per square inch (psi), in kilopascal
(kPa) or in bar. The tire pressure should only
be corrected when the tires are cold.
Cold tire pressure
The tires are cold:
Rif the vehicle has been parked with the tires
out of direct sunlight for at least three
hours and
Rif the vehicle has not been driven further
than 1 mile (1.6 km) Tread
The part of the tire that comes into contact
with the road.
Bead
The tire bead ensures that the tire sits
securely on the wheel. There are several steel
wires in the bead to prevent the tire from
coming loose from the wheel rim.
Sidewall
The part of the tire between the tread and the
bead.
Weight of optional extras
The combined weight of those optional extras
that weigh more than the replaced standard
parts and more than 2.3 kg (5 lbs). These
optional extras, such as high-performance
brakes, level control, a roof rack or a high-
performance battery, are not included in the
curb weight and the weight of the accesso-
ries.
TIN (Tire Identification Number)
This is a unique identifier which can be used
by a tire manufacturer to identify tires, for
example for a product recall, and thus identify
the purchasers. The TIN is made up of the
manufacturer's identity code, tire size, tire
type code and the manufacturing date.
Load bearing index
The load bearing index (also load index) is a
code that contains the maximum load bearing
capacity of a tire.
Traction
Traction is the result of friction between the
tires and the road surface.
Treadwear indicators
Narrow bars (tread wear bars) that are dis-
tributed over the tire tread. If the tire tread is
level with the bars, the wear limit of áin
(1.6 mm) has been reached.
322All about wheels and tires
Wheels and tires