2016 MERCEDES-BENZ B-Class ELECTRIC ECO mode
[x] Cancel search: ECO modePage 25 of 342

the Service and Guarantee booklet or simply
call the Mercedes-Benz Customer Assistance
Center (USA) at the hotline number
1-800-FOR-MERCedes(1-800-367-6372) or
Customer Service (Canada) at
1-800-387-0100.
Vehicle operation outside the USA
If you drive your vehicle abroad, please note
that service facilities or replacement parts
may not be immediately available.
Some Mercedes-Benz models are available
for delivery in Europe through our European
Delivery Program. Please consult an author-
ized Mercedes-Benz Center for further infor-
mation, or write to the following address:
Mercedes-Benz USA, LLC
European Delivery Department
One Mercedes Drive
Montvale, NJ 07645-0350
Operating safety
Important safety notes
Important safety notes
GWARNING
If you do not have the prescribed service/
maintenance work or any required repairs
carried out, this can result in malfunctions or system failures. There is a risk of an accident.
Always have the prescribed service/mainte-
nance work as well as any required repairs
carried out at a qualified specialist workshop.
GWARNING
Modifications to electronic components, their software as well as wiring can impair their
function and/or the function of other net-
worked components. In particular, systems
relevant to safety could also be affected. As a
result, these may no longer function as inten-
ded and/or jeopardize the operating safety of
the vehicle. There is an increased risk of an
accident and injury.
Never tamper with the wiring as well as elec-
tronic components or their software. You
should have all work to electrical and elec-
tronic equipment carried out at a qualified
specialist workshop.
!There is a risk of damage to the vehicle if:
Rthe vehicle becomes stuck, e.g. on a highcurb or an unpaved road
Ryou drive too fast over an obstacle, e.g. a
curb or a hole in the road
Ra heavy object strikes the undercarriage
or parts of the chassis
In situations like this, the body, the under-
carriage, chassis parts, wheels or tires
could be damaged without the damage
being visible. Components damaged in this
way can unexpectedly fail or, in the case of
an accident, no longer withstand the strain
they are designed to.
In such situations, have the vehicle
checked and repaired immediately at a
qualified specialist workshop. If on con-
tinuing your journey you notice that driving
safety is impaired, pull over and stop the
vehicle immediately, paying attention to
road and traffic conditions. In such cases,
consult a qualified specialist workshop.
Danger of electric shock
GDANGER
The vehicle's high-voltage electrical system is under high voltage. If you modify components
in the vehicle's high-voltage electrical system
or touch damaged components, you may be
electrocuted. The components in the vehi-
cle's high-voltage electrical system may be
damaged in an accident, although the damage
is not visible. There is a risk of fatal injury.
Following an accident, do not touch any high-
voltage components and never modify the
vehicle's high-voltage electrical system. Have
the vehicle towed away after an accident and
Introduction23
Z
Page 42 of 342
Useful information
i
This Operator's Manual describes all
models and all standard and optional equip-
ment of your vehicle available at the time of
publication of the Operator's Manual.
Country-specific differences are possible.
Please note that your vehicle may not be
equipped with all features described. This
also applies to safety-related systems and
functions.
iRead the information on qualified special-
ist workshops (
Ypage 26).
Panic alarm
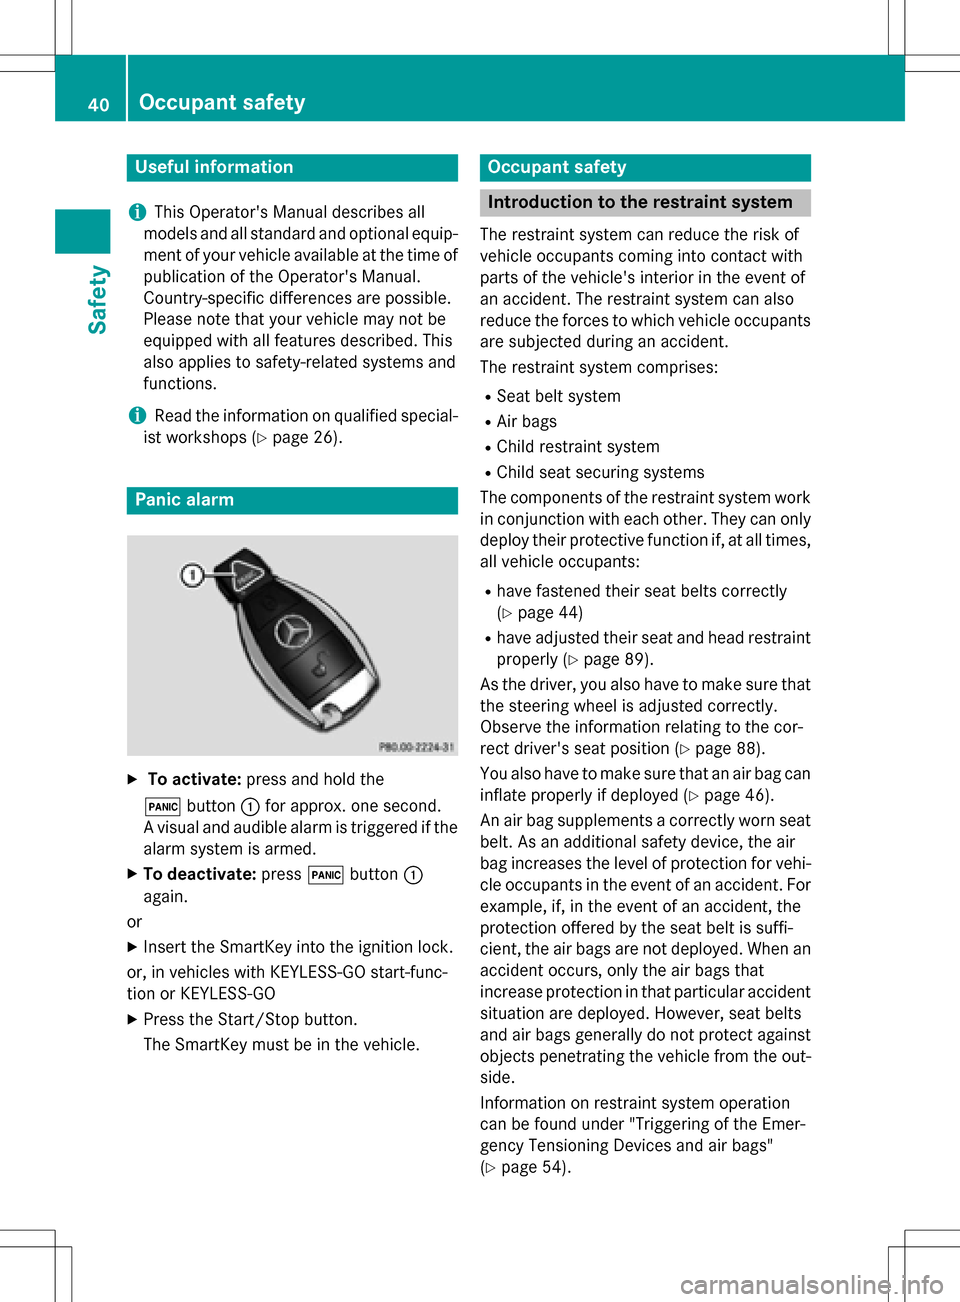
XTo activate: press and hold the
! button :for approx. one second.
A visual and audible alarm is triggered if the
alarm system is armed.
XTo deactivate: press!button :
again.
or
XInsert the SmartKey into the ignition lock.
or, in vehicles with KEYLESS-GO start-func-
tion or KEYLESS ‑GO
XPress the Start/Stop button.
The SmartKey must be in the vehicle.
Occupant safety
Introduction to the restraint system
The restraint system can reduce the risk of
vehicle occupants coming into contact with
parts of the vehicle's interior in the event of
an accident. The restraint system can also
reduce the forces to which vehicle occupants
are subjected during an accident.
The restraint system comprises:
RSeat belt system
RAir bags
RChild restraint system
RChild seat securing systems
The components of the restraint system work in conjunction with each other. They can only
deploy their protective function if, at all times,
all vehicle occupants:
Rhave fastened their seat belts correctly
(
Ypage 44)
Rhave adjusted their seat and head restraint
properly (
Ypage 89).
As the driver, you also have to make sure that
the steering wheel is adjusted correctly.
Observe the information relating to the cor-
rect driver's seat position (
Ypage 88).
You also have to make sure that an air bag can inflate properly if deployed (
Ypage 46).
An air bag supplements a correctly worn seat
belt. As an additional safety device, the air
bag increases the level of protection for vehi-
cle occupants in the event of an accident. For
example, if, in the event of an accident, the
protection offered by the seat belt is suffi-
cient, the air bags are not deployed. When an
accident occurs, only the air bags that
increase protection in that particular accident situation are deployed. However, seat belts
and air bags generally do not protect against
objects penetrating the vehicle from the out-
side.
Information on restraint system operation
can be found under "Triggering of the Emer-
gency Tensioning Devices and air bags"
(
Ypage 54).
40Occupant safety
Safety
Page 74 of 342

Useful information
i
This Operator's Manual describes all
models and all standard and optional equip-
ment of your vehicle available at the time of
publication of the Operator's Manual.
Country-specific differences are possible.
Please note that your vehicle may not be
equipped with all features described. This
also applies to safety-related systems and
functions.
iRead the information on qualified special-
ist workshops (
Ypage 26).
SmartKey
Important safety notes
GWARNING
If children are left unsupervised in the vehicle,
they could:
Ropen the doors, thus endangering other
people or road users.
Rget out and disrupt traffic.
Roperate the vehicle's equipment.
Additionally, children could set the vehicle in
motion if, for example, they:
Rrelease the parking brake.
Rshift the transmission out of park position P
Rstart the vehicle's drive system.
There is a risk of an accident and injury.
When leaving the vehicle, always take the
SmartKey with you and lock the vehicle. Never
leave children or animals unattended in the
vehicle. Always keep the SmartKey out of
reach of children.
GWARNING
If you attach heavy or large objects to the
SmartKey, the SmartKey could be uninten-
tionally turned in the ignition lock. This could
cause the engine to be switched off. There is a risk of an accident.
Do not attach any heavy or large objects to theSmartKey. Remove any bulky key rings before
inserting the SmartKey into the ignition lock.
!Keep the SmartKey away from strong
magnetic fields. Otherwise, the remote
control function could be affected.
Strong magnetic fields can occur in the
vicinity of powerful electrical installations.
Do not keep the SmartKey:
Rwith electronic devices, e.g. a mobile
phone or another SmartKey.
Rwith metallic objects, e.g. coins or metal
foil.
Rinside metallic objects, e.g. a metal case.
Vehicles with KEYLESS-GO start function:
do not keep the SmartKey in the cargo com-
partment. Otherwise, the SmartKey may not
be detected, e.g. when starting the drive sys-
tem using the Start/Stop button.
SmartKey functions
:& To lock the vehicle
;%To unlock the vehicle
XTo unlock centrally: press the%but-
ton.
If you do not open the vehicle within
approximately 40 seconds of unlocking:
Rthe vehicle is locked again.
Rprotection against theft is reactivated.
XTo lock: press the &button.
72SmartKey
Opening and closing
Page 102 of 342
Useful information
i
This Operator's Manual describes all
models and all standard and optional equip-
ment of your vehicle available at the time of
publication of the Operator's Manual.
Country-specific differences are possible.
Please note that your vehicle may not be
equipped with all features described. This
also applies to safety-related systems and
functions.
iRead the information on qualified special-
ist workshops (
Ypage 26).
Exterior lighting
General notes
For reasons of safety, Mercedes-Benz recom-
mends that you drive with the lights switched
on even during the daytime. In some coun-
tries, operation of the headlamps varies due
to legal requirements and self-imposed obli-
gations.
Setting the exterior lighting
Setting options
Exterior lighting can be set using the:
Rlight switch
Rcombination switch (Ypage 102)
Ron-board computer (Ypage 198)
Light switch
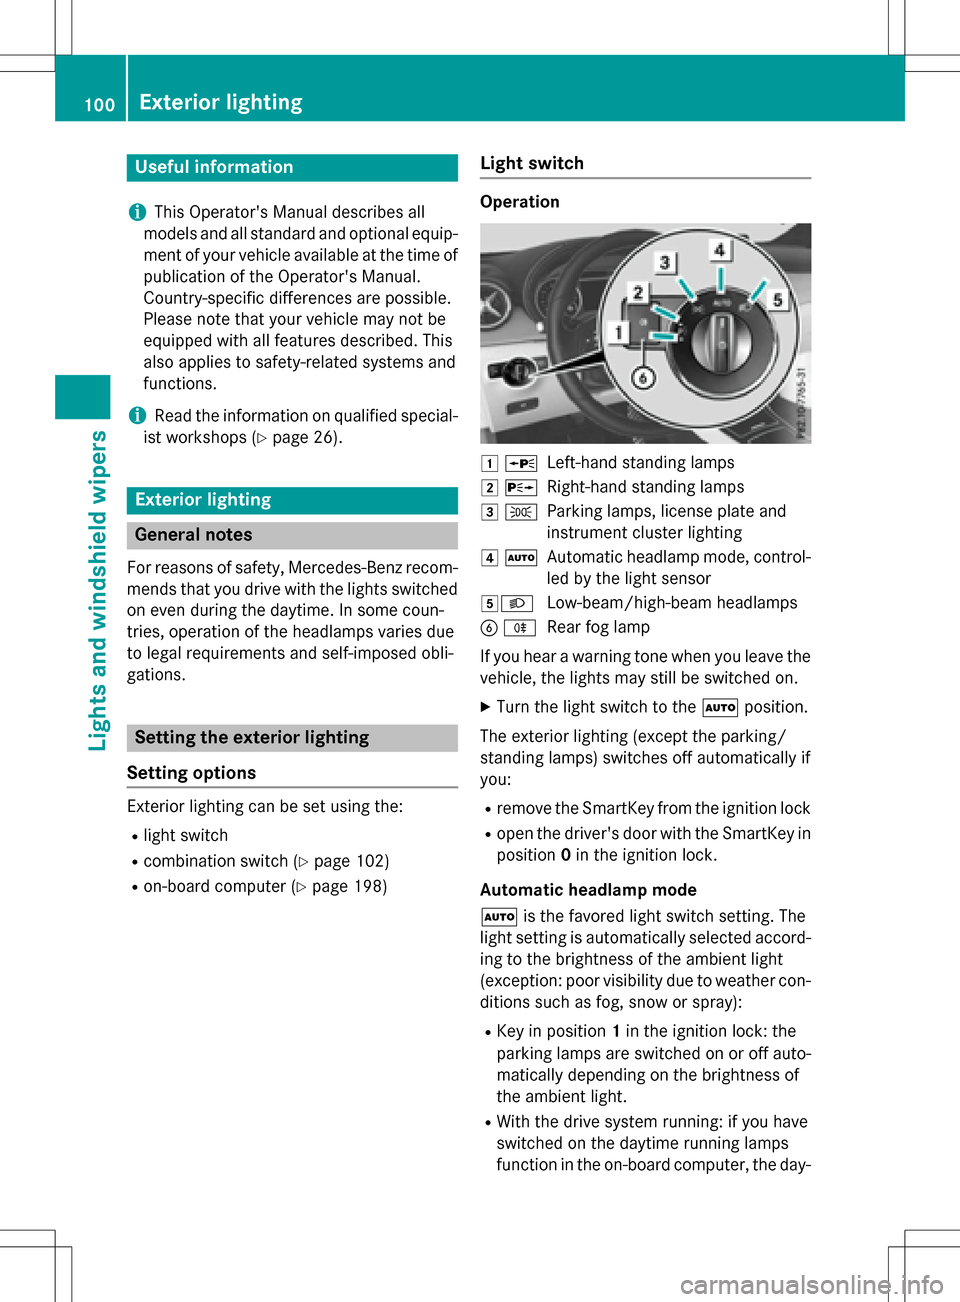
Operation
1 WLeft-hand standing lamps
2XRight-hand standing lamps
3TParking lamps, license plate and
instrument cluster lighting
4ÃAutomatic headlamp mode, control-
led by the light sensor
5LLow-beam/high-beam headlamps
BRRear fog lamp
If you hear a warning tone when you leave the
vehicle, the lights may still be switched on.
XTurn the light switch to the Ãposition.
The exterior lighting (except the parking/
standing lamps) switches off automatically if
you:
Rremove the SmartKey from the ignition lock
Ropen the driver's door with the SmartKey in
position 0in the ignition lock.
Automatic headlamp mode
à is the favored light switch setting. The
light setting is automatically selected accord-
ing to the brightness of the ambient light
(exception: poor visibility due to weather con-
ditions such as fog, snow or spray):
RKey in position 1in the ignition lock: the
parking lamps are switched on or off auto-
matically depending on the brightness of
the ambient light.
RWith the drive system running: if you have
switched on the daytime running lamps
function in the on-board computer, the day-
100Exterior lighting
Lights and windshield wipers
Page 118 of 342
Useful information
i
This Operator's Manual describes all
models and all standard and optional equip-
ment of your vehicle available at the time of
publication of the Operator's Manual.
Country-specific differences are possible.
Please note that your vehicle may not be
equipped with all features described. This
also applies to safety-related systems and
functions.
iRead the information on qualified special-
ist workshops (
Ypage 26).
Overview of climate control systems
General notes
Observe the settings recommended on the
following pages. The windows could other-
wise fog up.
To prevent the windows from fogging up:
Rswitch off climate control only briefly
Rswitch on air-recirculation mode only
briefly
Rswitch on the cooling with air dehumidifi-
cation function
Rswitch on the defrost windshield function
briefly, if required
The automatic climate control regulates the
temperature and the humidity in the vehicle
interior and filters undesirable substances
out of the air.
Dual-zone automatic climate control is only
operational when the vehicle is ready to drive.
Optimum operation is only achieved with the
side windows closed.
Always keep the ventilation flaps behind the
side paneling in the cargo compartment clear.
Otherwise the vehicle will not be ventilated
correctly.
iVentilate the vehicle for a brief period
during warm weather, e.g. using the con-
venience opening feature (
Ypage 84). This
will speed up the cooling process and the desired interior temperature will be
reached more quickly.
iThe integrated filter filters out most par-
ticles of dust and soot and completely fil-
ters out pollen. It also reduces gaseous pol-
lutants and odors. A clogged filter reduces
the amount of air supplied to the vehicle
interior. For this reason, you should always
observe the interval for replacing the filter,
which is specified in the Maintenance
Booklet. As it depends on environmental
conditions, e.g. heavy air pollution, the
interval may be shorter than stated in the
Maintenance Booklet.
iIt is possible that under certain circum-
stances the residual heat function may be
activated automatically an hour after the
SmartKey has been removed in order to dry the automatic climate control. The vehicle
is then ventilated for 30 minutes.
116Overview of climate control systems
Climate control
Page 120 of 342

the front-passenger side as well. The indi-
cator lamp in theábutton goes out.
RIf you change the settings of the climate
control system, the climate status display
appears for approximately three seconds
at the bottom of the screen in the Audio/
COMAND display (see separate operating
instructions). You will see the current set-
tings of the various climate control func-
tions.
You can choose between various drive pro-
grams with the program selector button
(
Ypage 137).
If you have selected drive program E+:
Rthe cooling output is reduced when cooling
Rheat output is reduced when heating
Rthe time for which the rear window
defroster will run is reduced
If you have selected drive program Eor S, the
current climate settings are maintained.
Operating the climate control sys-
tems
Activating/deactivating climate con-
trol
General notes
When the climate control is switched off, the
air supply and air circulation are also
switched off. The windows could fog up.
Therefore, switch off climate control only
briefly
Dual-zone automatic climate control
XTurn the SmartKey to position 2in the igni-
tion lock (
Ypage 131).
XTo activate: press theÃbutton.
The indicator lamp in the Ãbutton lights
up. Airflow and air distribution are set to
automatic mode.
or
XPress the ^button.
The indicator lamp in the ^button goes
out. The previously selected settings are
restored.
XTo deactivate: press the^button.
The indicator lamp in the ^button lights
up.
iActivate climate control primarily using
the à button.
Switching cooling with air dehumidi-
fication on/off
General notes
If you deactivate the "Cooling with air-dehu-
midification" function, the air inside the vehi- cle will not be cooled. The air inside the vehi-
cle will also not be dehumidified. The win-
dows can fog up more quickly. Therefore, only
deactivate the "Cooling with air-dehumidifi-
cation" function briefly.
The "Cooling with air-dehumidification" func-
tion is operational when the vehicle is ready
to drive. The air inside the vehicle is cooled
and dehumidified according to the tempera-
ture selected.
Condensation may drip from the underside of
the vehicle when it is in cooling mode. This is
normal and not a sign that there is a malfunc- tion.
118Operating the climate control systems
Climate control
Page 125 of 342
Problems with the rear window defroster
ProblemPossible causes/consequences andMSolutions
The rear window
defroster has deactiva-
ted prematurely or can-
not be activated.The battery has not been sufficiently charged.
XSwitch off any consumers that are not required, e.g. reading
lamps, interior lighting or the seat heating.
When the battery is sufficiently charged, the rear window
defroster can be activated again.
Switching air-recirculation mode
on/off
General notes
You can deactivate the flow of fresh air if
unpleasant odors are entering the vehicle
from outside. The air already inside the vehi-
cle will then be recirculated.
If you switch on air-recirculation mode, the
windows can fog up more quickly, in particu-
lar at low temperatures. Only use air-recircu-
lation mode briefly to prevent the windows
from fogging up.
Switching on/off
XTurn the SmartKey to position 2in the igni-
tion lock (
Ypage 131).
XTo activate: press theebutton.
The indicator lamp in the ebutton lights
up.
Air-recirculation mode switches on automat-
ically:
Rat high outside temperatures
Rat high levels of pollution
When air-recirculation mode is activated
automatically, the indicator lamp in the e
button is not lit. Outside air is added after
about 30 minutes.
XTo deactivate: press theebutton.
The indicator lamp in the ebutton goes
out.
iAir-recirculation mode deactivates auto-
matically:
Rafter approximately five minutes at out-
side temperatures below approximately
45 ‡ (7 †)
Rafter approximately five minutes if the
"Cooling with air dehumidification" func-
tion is deactivated
Rafter approximately 30 minutes at out-
side temperatures above approximately
45 ‡ (7 †) if the cooling with air dehu-
midification function is activated
Convenience opening or closing using
the air-recirculation button
GWARNING
When using the convenience closing feature,
parts of the body could be trapped in the clos-
ing area when a side window is being closed.
There is a risk of injury.
Observe the complete closing procedure
when the convenience closing feature is oper-
ating. Make sure that no body parts are in
close proximity during the closing procedure.
GWARNING
During convenience opening parts of the body could be drawn in or become trapped
between the side window and window frame.
There is a risk of injury.
Make sure that nobody touches the side win-
dow during the opening procedure. If some-
one becomes trapped, immediately press
Operating the climate control systems123
Climate control
Z
Page 126 of 342
theW switch in the door to stop the move-
ment of the side windows. To continue closing
the side window, pull on the Wswitch.
XConvenience closing feature: press and
hold the ebutton until the side win-
dows are closed.
The indicator lamp in the ebutton lights
up. Air-recirculation mode is activated.
If parts of the body are in the closing area
during convenience closing, proceed as fol-
lows:
XPress the Wbutton for opening/closing
the side windows.
The side window stops.
XTo then open the side windows, press the
W button again.
or
XPress the ebutton for longer than two
seconds.
The side windows move in the opposite
direction.
XConvenience opening feature: press and
hold the ebutton until the side win-
dows are opened. The side windows move
back to their original positions.
The indicator lamp in the ebutton goes
out. Air-recirculation mode is deactivated.
Notes on the automatic reversing feature for
the side windows (
Ypage 83).
If you open the side windows manually after
closing them with the convenience closing
feature, they will remain in this position when
opened using the convenie nce opening fea-
ture.
Pre-entry climate control via Smart-
Key
Before getting in, the vehicle interior can be
briefly warmed or ventilated in advance. In
addition, the air from the air vent can be pre-
cooled. The high-voltage battery must be sufficiently
charged before the "Pre-entry climate control
via key" function can be activated.
Activating/deactivating the pre-entry cli-
mate control (via key)
When the vehicle is unlocked using the Smart-
Key or KEYLESS-GO, the climate control func-
tions are activated.
The pre-cooling and pre-heating climate con-
trol functions last 5 minutes.
When the vehicle is pre-cooled, the following functions are activated as necessary:
RClimate control system
RCooling with air dehumidification
RBlower
When the vehicle is pre-heated, the following
functions are activated as necessary:
RClimate control system
RBlower
RSeat heating
RWindshield heating
RRear window defroster
Pre-entry climate control is automatically
switched off when operational readiness
mode is requested.
Activating/deactivating pre-entry cli-
mate control (via key)
You can activate and deactivate the pre-entry
climate control (via key) function using the
on-board comp uter in theE-CELL
submenu
(
Ypage 196).
iIf the condition of charge of the high-volt-
age battery is below the specified minimum
condition of charge, pre-entry climate con-
trol will not be activated even if it has been
set.
124Operating the climate control systems
Climate control