Page 17 of 50
15
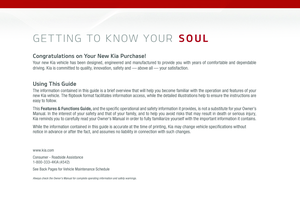
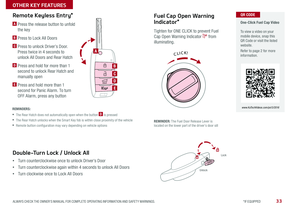
On Rear Wipers, intermittent wipe function is not adjustable
To o p e r a t e :
• Move lever Up/Down to change Wiper modes
• Rotate INT switch to adjust Intermittent Wipe Speed
• Pull lever to spray and wipe
Windshield Wipers & Washers Rear Wiper & Washer*
To operate:
• Rotate Rear Wiper switch to change Wiper modes
• Push lever to spray and wipe
ON: Normal wipe
INT: Intermittent wipe*
OFF: Wiper offMIST: Single wipe
OFF: Wiper off
INT: Intermittent wipe
LO: Slow wipe
HI: Fast wipe
QUICK TIP
Rotating INT switch up increases Intermittent wipe
frequency and wipe speed Rotating INT switch down
decreases frequency of wipes
QUICK TIP
ALWAYS CHECK THE OWNER’S MANUAL FOR COMPLETE OPER ATING INFORMATION AND SAFET Y WARNINGS. *IF EQUIPPED
STEERING WHEEL CONTROLS
Page 18 of 50
16
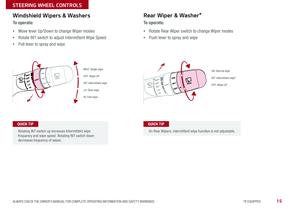
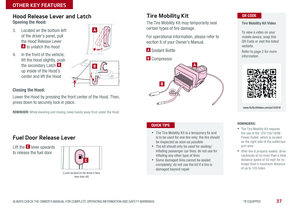
FlexSteer™ Steering Wheel Mode
Select the desired steering mode by toggling through
the steering modes
• Press FlexSteer™ Steering Wheel Mode button
A
to display the steering mode on the LCD screen*
• Then press the button
A again within 4 seconds
to switch modes
(Button located on Steering Wheel)
A
FlexSteer™ Steering
Wheel Mode Video
To view a video on your
mobile device, snap this
QR Code or visit the listed
website
Refer to page 2 for more
information
www. KuTechVideo s.c om/p s13/2016
QR CODE
Your vehicle’s steering wheel buttons may differ from those in the illustrations. See your Owner’s Manual for more details
SOUL FEATURES & FUNCTIONS GUIDE
*IF EQUIPPED
STEERING WHEEL CONTROLS
Page 19 of 50
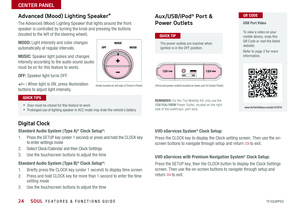
 modes
B Seek/Preset buttons
Radio Mode: Press to adv")
17
Cruise Control*
Audio Controls
A Audio MODE button: Press to cycle through FM/AM/Sirius®/Media
(USB, iPod®, Aux, BT Audio, My Music) modes
B Seek/Preset buttons
Radio Mode: Press to advance through Preset Stations
Press and hold to Auto Seek
Media Mode: Press to move track up/down Press & hold to fast
forward/rewind
C Volume buttons: Press / to raise/lower volume
Your vehicle’s steering wheel buttons may differ from those in the illustrations. See your Owner’s
Manual for more details. For other audio system operations, refer to pages 20-2 3.
Driving while distracted is dangerous and should be avoided. Drivers should remain attentive to
driving and always exercise caution when using the steering-wheel-mounted controls while driving .
AB
C
E
GD
F
•Cruise Control is designed to function above 25 mph
•The Cruise Control system will not activate until the brake pedal has been
depressed at least once after ignition ON or engine starting
QUICK TIPS
•Mute audio - To mute the audio system, hold the button C
•Pressing the Audio Mode button for more than 1 second will turn Audio Mode ON/OFF
QUICK TIPS
D CRUISE Control On/Off button: Press to turn the Cruise Control on/off
E Resume Cruising Speed button: Press to resume or increase
Cruising Speed
F SET Cruising Speed button: Press to set or decrease Cruising Speed
G Cruise Control CANCEL button: To cancel Cruise Control, do one of
the following:
• Press the brake pedal
• Press the CANCEL button
G
ALWAYS CHECK THE OWNER’S MANUAL FOR COMPLETE OPER ATING INFORMATION AND SAFET Y WARNINGS. *IF EQUIPPED
STEERING WHEEL CONTROLS
Page 20 of 50

18
A Volume button: Press up/down to raise/lower speaker volume
B Talk button: Press to activate voice recognition / bring up menus / place
calls with minimal voice command prompts from the system
C Receive/Place Call button: Press to receive/place/transfer calls Press to
place a call using vocal command prompts from the system, or to answer
an incoming call
D End Call button: Press to end a call or cancel a function
Bluetooth® Wireless Technology
REMINDER: Microphone is located in the overhead console
A
B
C
D
•
Mute audio - To mute the audio system, hold the button A
•When using the voice command feature, wait for the system BEEP before speaking
the command
• Phonebook transfer upload time varies by phone model and with number of phone
book entries
•Because of differences in phone quality, service providers and Bluetooth® Wireless
Technology chip programming, functionality may differ from one phone to another
QUICK TIPS
Your vehicle’s steering wheel buttons may differ from those in the illustrations. Standard Audio Systems * - See your Owner’s Manual for more details. UVO eServices with Premium Navigation System* -
For more information, refer to the Car Multimedia System User’s Manual. UVO eServices System* - For more information, refer to the UVO System User’s Manual.
For Bluetooth
® Wireless Technology FAQs, go to www.kia.com, Owners section, or call Consumer Information for Bluetooth® Technology at (800) 333-4KIA.
Driving while distracted is dangerous and should be avoided. Drivers should remain attentive to driving and always exercise caution when using the steering-wheel-mounted controls while driving.
SOUL FEATURES & FUNCTIONS GUIDE
*IF EQUIPPED
STEERING WHEEL CONTROLS
Page 21 of 50

19
Voice Recognition and Phone Contact Tips
The Kia Voice Recognition System may
have difficulty understanding some accents
or uncommon names When using Voice
Recognition to place a call, speak in a
moderate tone, with clear pronunciation
Help your Bluetooth
® Wireless Technology
Voice Recognition performance by making a
few simple changes to your phone contacts:
• Use full names vs short or single syllable
names (“John Smith” vs “Dad”, “Smith
Residence” vs “Home”)
• Avoid using special characters or hyphens
(@, &, #, /, -, *, +, etc )
• Avoid using acronyms (“In Case
Emergency” vs “ICE”)
• Spell words completely, no abbreviations
(“Doctor Goodman” vs “Dr Goodman”)
Bluetooth® Wireless Technology
Pairing a Phone
For instructions on how to pair a phone, refer to the audio system’s user’s
guide or your vehicle’s Quick Start Guide
How to Place a Call
When using the voice command feature, wait for the system BEEP before
speaking the command
There are two options for placing a call using the Steering Wheel controls:
Standard Audio Systems*
• Option 1: Press the Receive/Place Call button
C (system will prompt you
through call process)
• Option 2: Press the Talk button
B (system will BEEP to indicate it is
ready for call placement) Then say the command “Call {name}” or “Dial
{number}”
UVO eServices System*
• Option 1: Press the Receive/Place Call button
C (displays the phone
screen with number keypad)
• Option 2: Press the Talk button
B Then say the command “Call {name}”
or “Dial {number}”
UVO eServices with Premium Navigation System*
• Option 1: Press the Receive/Place Call button
C (displays the phone
screen with number keypad)
• Option 2: Press the Talk button
B Then say the command “Call {name}”
or “Dial {number}”
Voice Recognition Tips
Video
To view a video on your
mobile device, snap this
QR Code or visit the listed
website
Refer to page 2 for more
information
www. KuTechVideo s.c om/p s13/2016
During the pairing process, be sure to accept the connection requests on the
phone for phonebook download and to allow acceptance of all future Bluetooth
®
connection requests
QUICK TIP
QR CODE
ALWAYS CHECK THE OWNER’S MANUAL FOR COMPLETE OPER ATING INFORMATION AND SAFET Y WARNINGS. *IF EQUIPPED
STEERING WHEEL CONTROLS
Page 22 of 50

20
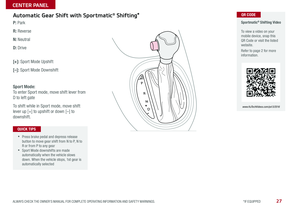
Standard Audio System
Videos
To view a video on your
mobile device, snap this
QR Code or visit the listed
website
Refer to page 2 for more
information
KuTechVideos.com/audio/base_system
QR CODEStandard Audio System (Type A)*
– FM/AM/SiriusXM®/Media (USB, iPod®, Aux, BT Audio, My Music)
Audio System Set-up Options
Press the SETUP button, then use the TUNE knob to cycle through the
available settings for each equipped audio option Press the TUNE knob to
adjust the audio option selected Audio options may include the following:
• Display settings - Mode Popup, Media Display
• Sound settings - Sound Settings, Speed Dependent Volume Control,
Voice Recognition Volume
• Clock settings - Clock Settings, Calendar Settings, Time Format, Clock
Display (when power is off)
• System settings - Memory Information, Prompt Feedback, Language To adjust the Sound settings (bass, middle, treble, fader, balance) –
Select Sound settings in the SETUP menu
Then use the TUNE knob to cycle
to the selection and then press the TUNE knob to select Turn the TUNE knob
left /right to adjust sound setting
Your vehicle’s audio system may differ from that in the illustration. For further audio system
operations, refer to pages 21-23. See your Owner’s Manual for more details.
Press to select FM/AM/
Sirius®XM modes
Press to Power ON/OFF
Rotate to adjust Volume
Press Preset buttons (1-6) to select Radio/Sirius
®XM
stations Press and hold to save Radio/Sirius®XM stations
Press to select Repeat playback
Press and hold button to select Repeat playback of all songs in Media file/folder Press button to select Random playback
Press and hold button to
select Random playback of all songs in Media tracks/songs/files
Press to select MEDIA modes
Press to play each Radio station for 5
seconds or each Media song/file for 10
seconds
To cancel SCAN Play, press again
Press to enter PHONE Mode
Press to enter SE TUP/ CLOCK mode
Press to select previous/next Radio/Sirius® station/channel/Media track/song/file Press to enter MENU mode
Press to go to previous screen
Rotate to change Radio/Sirius
®XM
Stations/Media tracks/songs/files Press to turn the LCD display
and backlight ON/OFF
Press to move Up/Down one category/file folder
SOUL FEATURES & FUNCTIONS GUIDE
*IF EQUIPPED
AUDIO SYSTEMS
Page 23 of 50
*
– FM/AM/Sirius®/Media (USB, iPod®, AUX, My Music, BT Audio)
Press to select FM/AM/Sirius® modes
Press to Power ON/OFF
Rotate to adjust Volume
Press to disp")
21
Standard Audio System (Type B)*
– FM/AM/Sirius®/Media (USB, iPod®, AUX, My Music, BT Audio)
Press to select FM/AM/Sirius® modes
Press to Power ON/OFF
Rotate to adjust Volume
Press to display time screen Press and
hold to enter Clock setting mode
Press to select MEDIA mode
Press to play each Radio/Sirius® station/channel
for 5 seconds or each Media song/file for 10
seconds To cancel SCAN Play, press again
Press to enter PHONE mode
Press to select previous/next Radio/Sirius
®
station/channel/Media song/file. Press and hold to quickly move through the stations/channels/ songs/files. Release to play selection Press to enter SE TUP mode
Press to RESE T the system settings
Rotate to change Radio/Sirius
®
station/channel/Media songs/files Press to turn the LCD display ON/OFF
Press to move Up/Down one category/file folder
Audio System Set-up Options
Press the SETUP key, then using the touchscreen, press the menu item to enter
(Display, Sound, Clock /Calendar, Phone, System) Adjust the available settings for
each equipped audio system setup option by pressing the on screen buttons/arrows
Audio system setup options may include the following:
• Display settings - Adjusting the Brightness, Mode Popup, MP3 Information
Display
• Sound settings - Sound Settings, Speed Dependent Volume Control, Voice
Recognition Volume, Touchscreen Beep
• Clock/Calendar settings - Clock Settings, Calendar Settings, Clock Display
• System settings - Memory Information, Prompt Feedback, Language To adjust the Sound settings (bass, middle, treble, fader,
balance) – When in the SETUP menu, select Sound and then Sound
Setting
Adjust the settings by pressing the on screen arrows and then
return
to exit
Your vehicle’s audio system may differ from that in the illustration. For further audio
system operations, refer to pages 20-2 3. See your Owner’s Manual for more details.
ALWAYS CHECK THE OWNER’S MANUAL FOR COMPLETE OPER ATING INFORMATION AND SAFET Y WARNINGS. *IF EQUIPPED
AUDIO SYSTEMS
Page 24 of 50

22
Press to display PHONE mode
Press to display SE TUP mode
Press to RESE T the system settings Press to display UVO eServices mode
In Sirius
® mode, press to move
to the previous/next category
Press to select next /previous station/track/
channel/song/file Press and hold to move quickly
through stations/tracks/songs/files Press to display
CLOCK setup
Press knob to turn POWER
ON/OFF Rotate knob to
adjust Volume Up/Down
Press to select MEDIA mode
Then
press again to toggle through the Media modes
Press to select Sirius
® mode
Press to select FM/AM
modes
In Radio/Sirius
®/Media modes,
rotate knob to search for stations/
channels/tracks/songs/files. Press
knob to receive the selected
station/channel/track/song/file
UVO eServices System*
– FM/AM/Sirius®/Media (USB, iPod®, Jukebox, Aux, BT Audio, Pandora®)
Your vehicle’s audio system may differ from that in the illustration. For further UVO eServices System operations, refer to the UVO System User’s Manual. For other audio system operations,
refer to pages 20-23.
UVO eServices System
Videos
To view a video on your
mobile device, snap this
QR Code or visit the listed
website
Refer to page 2 for more
information
KuTechVideos.com/audio/UVO_eServices
•
•When using the voice command feature, wait for the system BEEP before speaking the command
•Only MP3 or WMA files may be played or copied to Jukebox Commercial CDs or CDs with a CDDA audio format (compact disc digital audio) cannot be copied to Jukebox
•At any time, you can interrupt UVO eServices System Command Feedback by pressing the TALK button on the Steering Wheel
•Prolonged use of the UVO eServices System in ACC mode may drain the vehicle’s battery
QUICK TIPS
UVO eServices Registration/Activation – To use UVO eServices:
1 On your Smartphone, go to an app store or marketplace to download the UVO
eServices App and log in to the app using your MyUVO com account credentials
2 Register through your UVO eServices App or at MyUVO com
3 Follow the Apps phone pairing and activation steps
QR CODE
To adjust the Sound settings (fader, balance, treble, middle,
bass) - Press the SETUP key, and select the on-screen SOUND
button on the audio mode screen Then press the on-screen
CHANGE button of the selection (FADER /BAL ANCE, TONE) To
adjust, press the on-screen arrows and then return
to exit
SOUL FEATURES & FUNCTIONS GUIDE
*IF EQUIPPED
AUDIO SYSTEMS