Page 25 of 50

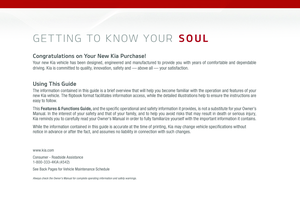
Press to Power ON/OFF
Rotate to adjust Volume
Press to enter UVO eServices")
23
UVO eServices System with Premium Navigation System*
ŌĆō FM/AM/SiriusXM┬«/Media (Aux, USB, iPod┬«, BT Audio, My Music)
Press to Power ON/OFF
Rotate to adjust Volume
Press to enter UVO eServices mode
Press to select FM/AM/
Sirius
®XM modes
Press to select MEDIA mode
Rotate to change Radio/Sirius
®XM
Stations/Media tracks/files Press to display the Map screen for
the current position / VOICE mode Press to RESE T the system settings
SD Card Insert Slot
Press to display the Destination menu screen
Press to enter PHONE mode
Press to display the SE TUP mode Press to display INFO mode
Press to change Radio/Sirius
®XM
Stations/Media tracks/files
Press to select previous/next
Radio/Sirius
®XM stations/Media
tracks/files. Press and hold to
move quickly through stations/ tracks/files
Your vehicleŌĆÖs audio system may differ from that in the illustration. For more information, refer to the Car Multimedia System UserŌĆÖs Manual. For other audio system operations, refer to pages 20-22.
UVO eServices with
Premium Navigation
System Videos
To view a video on your
mobile device, snap this
QR Code or visit the listed
website
Refer to page 2 for more
information
www.KuTechVideos.com/audio/avn4
ŌĆó
ŌĆóWhen using the voice command feature, wait for the system BEEP before speaking the command
ŌĆóAt any time, you can interrupt the Command Feedback by pressing the TALK button on the Steering Wheel
ŌĆóProlonged use of the UVO eServices with Premium Navigation System in ACC mode may drain the vehicleŌĆÖs battery A warning screen may appear periodically to remind users that the
UVO eServices with with Premium Navigation System should be operated with the engine running to prevent battery discharge
QUICK TIPS
UVO eServices Registration/Activation ŌĆō To use UVO eServices:
1 On your Smartphone, go to an app store or marketplace to download the UVO
eServices App and log in to the app using your MyUVO com account credentials
2 Register through your UVO eServices App or at MyUVO com
3 Follow the Apps phone pairing and activation steps
QR CODE
To adjust the Sound settings (bass,
middle, treble, fader, balance) - Press
the SETUP key, and select the on-screen
SOUND button Select the item and use
the on-screen arrows to adjust Press
return
to exit
ALWAYS CHECK THE OWNERŌĆÖS MANUAL FOR COMPLETE OPER ATING INFORMATION AND SAFET Y WARNINGS. *IF EQUIPPED
AUDIO SYSTEMS
Page 26 of 50
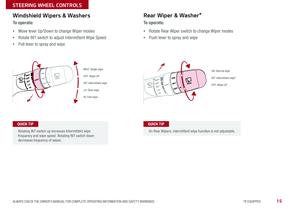
 Lighting Speaker that lights around the front
speaker is controlled by turning the knob and pressing the buttons
(located to the left of the steering wheel)
MOOD: Light inten")
24
The Advanced (Mood) Lighting Speaker that lights around the front
speaker is controlled by turning the knob and pressing the buttons
(located to the left of the steering wheel)
MOOD: Light intensity and color changes
automatically at regular intervals
MUSIC: Speaker light pulses and changes
intensity according to the audio sound (audio
must be on for this feature to work)
OFF: Speaker light turns OFF
+/ŌĆō : When light is ON, press illumination
buttons to adjust light intensity
Aux/USB/iPod® Port &
Power Outlets
Digital Clock
Standard Audio System (Type A)* Clock Setup*:
1 Press the SETUP key (under 1 second) or press and hold the CLOCK key
to enter settings mode
2 Select Clock /Calendar and then Clock Settings
3 Use the touchscreen buttons to adjust the time
Standard Audio System (Type B)* Clock Setup*:
1 Briefly press the CLOCK key (under 1 second) to display time screen
2 Press and hold CLOCK key for more than 1 second to enter the time
setting mode
3 Use the touchscreen buttons to adjust the time
Advanced (Mood) Lighting Speaker*
OFF MOOD
MUSIC
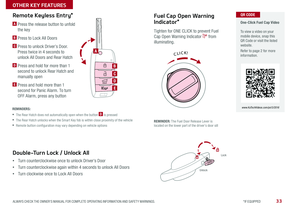
REMINDER: For the Tire Mobility Kit, only use the
12V/15A/180W
Power Outlet, located on the right
side of the outlet /aux port area
(Ports and power outlets located on lower part of Center Panel)
(Knob located on left side of DriverŌĆÖs Panel)
UVO eServices System* Clock Setup:
Press the CLOCK key to display the Clock setting screen Then use the on-
screen buttons to navigate through setup and return
to exit
UVO eServices with Premium Navigation System* Clock Setup:
Press the SETUP key, then the CLOCK button to display the Clock Settings
screen Then use the on-screen buttons to navigate through setup and
return
to exit
ŌĆó
ŌĆóDoor must be closed for this feature to work
ŌĆóProlonged use of lighting speaker in ACC mode may drain the vehicleŌĆÖs battery
The power outlets are inactive when
ignition is in the OFF position
USB Port Video
To view a video on your
mobile device, snap this
QR Code or visit the listed
website
Refer to page 2 for more
information
www. KuTechVideo s.c om/p s13/2016
QUICK TIP
QUICK TIPS
QR CODE
SOUL FEATURES & FUNCTIONS GUIDE
*IF EQUIPPED
CENTER PANEL
Page 27 of 50

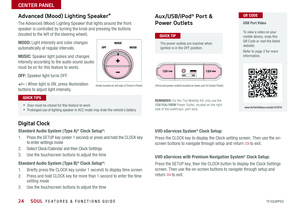
Climate Control Auto Function:
1 Press AUTO to select Full Auto Operation - The Auto setting
automatically controls the airflow modes, fan speeds, air intake")
25
Automatic Climate Control*
(Type B)
Climate Control Auto Function:
1 Press AUTO to select Full Auto Operation - The Auto setting
automatically controls the airflow modes, fan speeds, air intake
and air conditioning according to the temperature setting selected
2 Set desired Temperature
REMINDERS:
ŌĆó Warm air may flow in through vents if Recirculated Air button
is not pressed ON (LED lit)
ŌĆó Pressing any button during AUTO operation will deactivate
the AUTO function and switch to manual mode, except for
Temperature Control
Air Flow Modes
To select Air Flow Modes, press
the mode selection buttons:
Face-Level
Bi-Level
F lo o r- L evel
Floor/Defrost-Level
Fan Speed Control buttons Mode Selection button
Display CLIMATE control information
Rear Windshield Defroster button Automatic Climate
Control button Recirculated Air button
Front Windshield Defroster button
Air Conditioning ON/OFF button
Temperature Control knob
System OFF button
ŌĆó
ŌĆóKeep inside glass as clean as possible to reduce
window fogging
ŌĆóDefrost mode activates A /C and opens Fresh
Air Vent
ŌĆóDuring Auto Operation the A /C indicator will NOT
illuminate The fan speed, air intake, air flow and
air conditioning may automatically engage at any
time to reach desired temperature and reduce
humidity
QUICK TIPS
Defrost Outside Windshield:
1 Set Fan Speed to the
highest position
2 Set Temperature to Hot
3 Press the Defrost button Defog Inside Windshield:
1 Set desired Fan Speed
2 Set desired Temperature
3 Press the Defrost button
Your Automatic Climate Control system may differ from those in the illustrations. See your OwnerŌĆÖs Manual for more details
ALWAYS CHECK THE OWNERŌĆÖS MANUAL FOR COMPLETE OPER ATING INFORMATION AND SAFET Y WARNINGS. *IF EQUIPPED
CENTER PANEL
Page 28 of 50

26
Manual Climate Control*
Defrost Outside Windshield:
1 Set Fan Speed to the highest position
2 Set Temperature to Hot
3 Rotate knob to the Front Defroster mode Defog Inside Windshield:
1 Set Fan Speed to desired position
2 Set desired Temperature
3 Rotate knob to the Front Defroster mode
Fan Speed
Control knob Recirculated Air button
Mode Selection knobRear Defroster button Temperature Control knob
Air Conditioning
ON/OFF button
REMINDER: Warm air may flow in through vents if Recirculated Air button is not pressed ON (LED lit)
Your Manual Climate Control system may differ from those in the illustrations. See your OwnerŌĆÖs Manual for
more details
Air Flow Modes
To select Air Flow Modes, press
the Mode selection buttons:Face-Level
Bi-Level
F lo o r- L evel
Floor/Defrost-Level
ŌĆó
ŌĆóDefrost Mode activates A /C and opens Fresh Air Vent
ŌĆóMA X A /C Mode automatically engages Recirculated Air
ŌĆóKeep inside glass as clean as possible to reduce window fogging
QUICK TIPS
SOUL FEATURES & FUNCTIONS GUIDE
*IF EQUIPPED
CENTER PANEL
Page 29 of 50
27
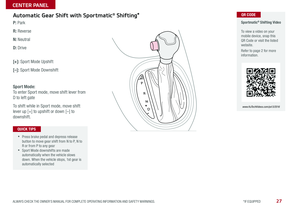
Automatic Gear Shift with Sportmatic® Shifting*
P: Park
R: Reverse
N: Neutral
D: Drive
[+]: Sport Mode Upshift
[ŌĆō]: Sport Mode Downshift
Sport Mode:
To enter Sport mode, move shift lever from
D to left gate
To shift while in Sport mode, move shift
lever up [+] to upshift or down [ŌĆō] to
downshift
Sportmatic
® Shifting Video
To view a video on your
mobile device, snap this
QR Code or visit the listed
website
Refer to page 2 for more
information
www. KuTechVideo s.c om/p s13/2016
ŌĆó
ŌĆóPress brake pedal and depress release
button to move gear shift from N to P, N to
R or from P to any gear
ŌĆóSport Mode downshifts are made
automatically when the vehicle slows
down When the vehicle stops, 1st gear is
automatically selected
QUICK TIPS
QR CODE
ALWAYS CHECK THE OWNERŌĆÖS MANUAL FOR COMPLETE OPER ATING INFORMATION AND SAFET Y WARNINGS. *IF EQUIPPED
CENTER PANEL
Page 30 of 50
28
When shifting into gears 1-6, the Shift Lever can be moved without pulling the Shift Lever Ring
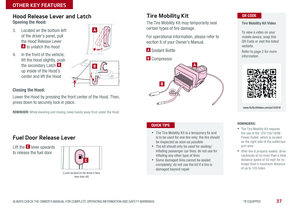
Manual Gear Shift*
Starting the Engine
1 Pull up to apply Parking Brake
A
2 Depress Clutch fully
B
3 Shift into Neutral
C
4 Turn Ignition to START
Shifting into Reverse
1 Depress Clutch fully
B
2 Shift into Neutral
C
3 Pull up on Shift Lever Ring
D
4 Shift into Reverse
E
A
DC
B
E
QUICK TIP
SOUL FEATURES & FUNCTIONS GUIDE
*IF EQUIPPED
CENTER PANEL
Page 31 of 50
 Press button twice for low setting
(1 LED lit) Press again to turn OFF
Seat Warmers / Ventilated Seats*
Seat Warmers ŌĆō Press")
29
Seat Warmers*
Press button once for high setting (2 LEDs
lit) Press button twice for low setting
(1 LED lit) Press again to turn OFF
Seat Warmers / Ventilated Seats*
Seat Warmers ŌĆō Press top of button once
for high setting (3 LEDs lit) Press button
twice for medium setting (2 LEDs lit) Press
a third time for low setting (1 LED lit) and
again to turn OFF
Ventilated Seats ŌĆō Press bottom of button
once for high setting (3 LEDs lit) Press
twice for medium setting (2 LEDs lit) Press
a third time for low setting (1 LED lit) and
again to turn OFF
Warming ( Yellow LED)
( Type B)
(Button located on Center Panel)
(Button located on Center Panel)
Ventilating (Blue LED)
ŌĆó
ŌĆóSystem turns OFF when ignition is cycled To turn system ON, press the seat
warmer switch
ŌĆóWith the seat warmer switch in the ON position, the heating system in the seat
turns off or on automatically depending on the seat temperature
QUICK TIPS
Power Adjustable DriverŌĆÖs Seat*
Move/Press controls to adjust Seat forward/backward, Seat
Cushion height, Seatback recline or Lumbar forward/backward
A
AABC
B
C
SeatbackLumbar
Seat Seat Cushion
ALWAYS CHECK THE OWNERŌĆÖS MANUAL FOR COMPLETE OPER ATING INFORMATION AND SAFET Y WARNINGS. *IF EQUIPPED
SEATING
Page 32 of 50
30
6-Way Manual Adjustable DriverŌĆÖs Seat*
Pull lever A to slide Seat forward/backward
Pull/press lever
B to adjust Seat Height
Pull lever
C to adjust Seatback Recline
AB
C
When adjusting seat forward or backwards, ensure seat clicks or locks into
place before driving the vehicle
QUICK TIP
Front Seat Headrest Adjustment
To adjust headrest forward*: Pull headrest forward to one of
several positions
To adjust headrest back*: Pull headrest completely forward,
then release
To raise headrest: Pull headrest up
To lower headrest: Press lock, then press the headrest down
.
.
For easy adjustments, hold a headrest post with one hand while using the other hand
to pull the headrest from underneath
.QUICK TIP
SOUL FEATURES & FUNCTIONS GUIDE
*IF EQUIPPED
SEATING


![KIA SOUL 2016 Features and Functions Guide 27
Automatic Gear Shift with Sportmatic® Shifting*
P: Park
R: Reverse
N: Neutral
D: Drive
[+]: Sport Mode Upshift
[ŌĆō]: Sport Mode Downshift
Sport Mode:
To enter Sport mode, move shift lever fr](/manual-img/2/54642/w960_54642-28.png "KIA SOUL 2016 Features and Functions Guide 27
Automatic Gear Shift with Sportmatic® Shifting*
P: Park
R: Reverse
N: Neutral
D: Drive
[+]: Sport Mode Upshift
[ŌĆō]: Sport Mode Downshift
Sport Mode:
To enter Sport mode, move shift lever fr")

