2016 FORD POLICE INTERCEPTOR SEDAN check transmission fluid
[x] Cancel search: check transmission fluidPage 6 of 358
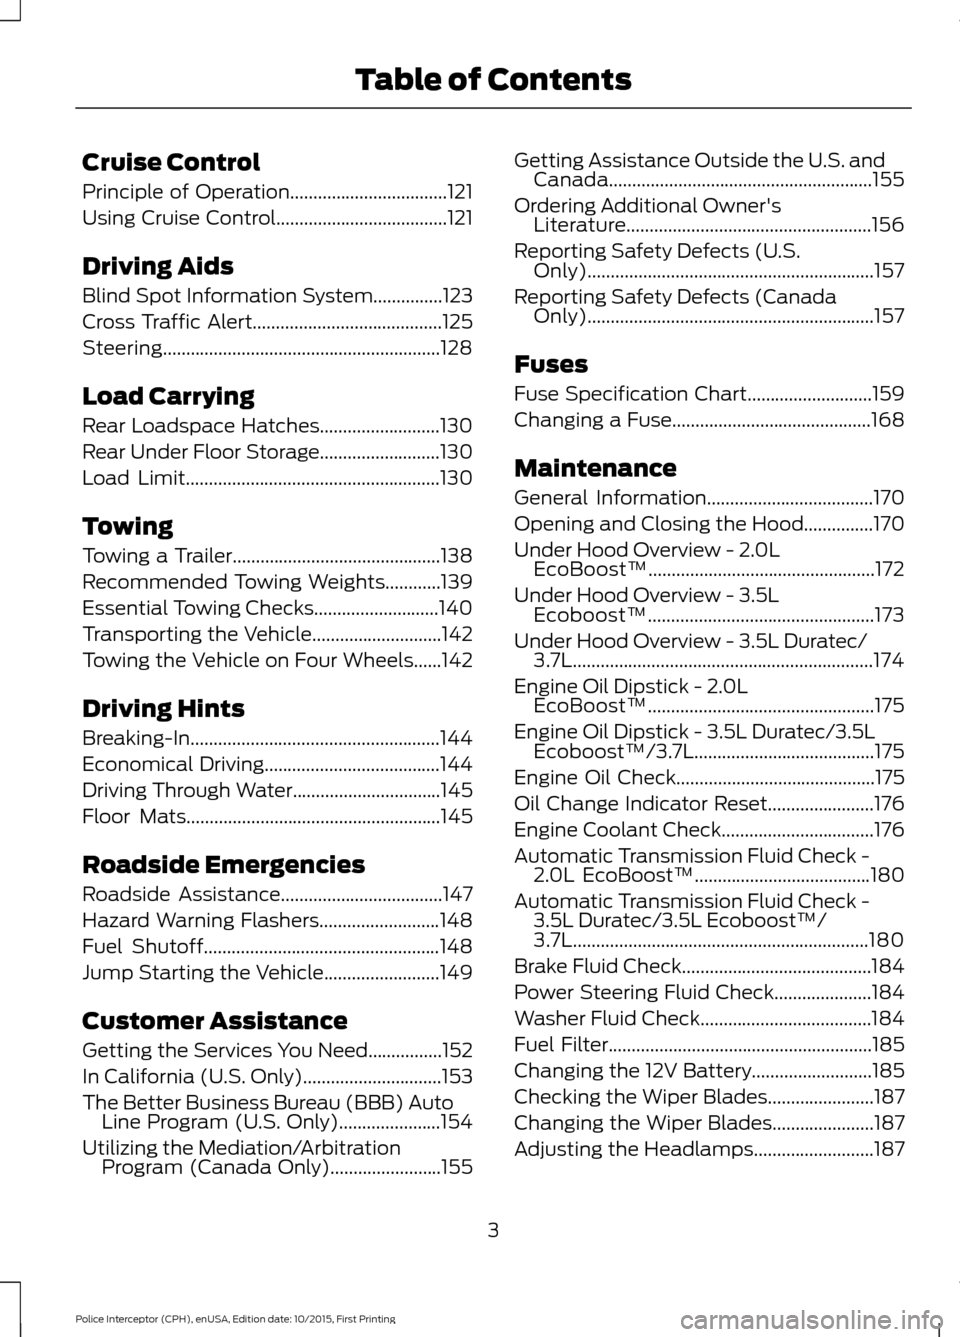
Cruise Control
Principle of Operation..................................121
Using Cruise Control.....................................121
Driving Aids
Blind Spot Information System...............123
Cross Traffic Alert.........................................125
Steering............................................................128
Load Carrying
Rear Loadspace Hatches..........................130
Rear Under Floor Storage
..........................130
Load Limit
.......................................................130
Towing
Towing a Trailer.............................................138
Recommended Towing Weights............139
Essential Towing Checks...........................140
Transporting the Vehicle............................142
Towing the Vehicle on Four Wheels......142
Driving Hints
Breaking-In......................................................144
Economical Driving......................................144
Driving Through Water
................................145
Floor Mats
.......................................................145
Roadside Emergencies
Roadside Assistance...................................147
Hazard Warning Flashers
..........................148
Fuel Shutoff
...................................................148
Jump Starting the Vehicle
.........................149
Customer Assistance
Getting the Services You Need
................152
In California (U.S. Only)..............................153
The Better Business Bureau (BBB) Auto Line Program (U.S. Only)......................154
Utilizing the Mediation/Arbitration Program (Canada Only)........................155 Getting Assistance Outside the U.S. and
Canada.........................................................155
Ordering Additional Owner's Literature.....................................................156
Reporting Safety Defects (U.S. Only)..............................................................157
Reporting Safety Defects (Canada Only)..............................................................157
Fuses
Fuse Specification Chart...........................159
Changing a Fuse
...........................................168
Maintenance
General Information
....................................170
Opening and Closing the Hood
...............170
Under Hood Overview - 2.0L EcoBoost™.................................................172
Under Hood Overview - 3.5L Ecoboost™.................................................173
Under Hood Overview - 3.5L Duratec/ 3.7L.................................................................174
Engine Oil Dipstick - 2.0L EcoBoost™.................................................175
Engine Oil Dipstick - 3.5L Duratec/3.5L Ecoboost™/3.7L.......................................175
Engine Oil Check
...........................................175
Oil Change Indicator Reset.......................176
Engine Coolant Check.................................176
Automatic Transmission Fluid Check - 2.0L EcoBoost™
......................................180
Automatic Transmission Fluid Check - 3.5L Duratec/3.5L Ecoboost™/
3.7L................................................................180
Brake Fluid Check.........................................184
Power Steering Fluid Check.....................184
Washer Fluid Check.....................................184
Fuel Filter
.........................................................185
Changing the 12V Battery..........................185
Checking the Wiper Blades
.......................187
Changing the Wiper Blades
......................187
Adjusting the Headlamps..........................187
3
Police Interceptor (CPH), enUSA, Edition date: 10/2015, First Printing Table of Contents
Page 79 of 358
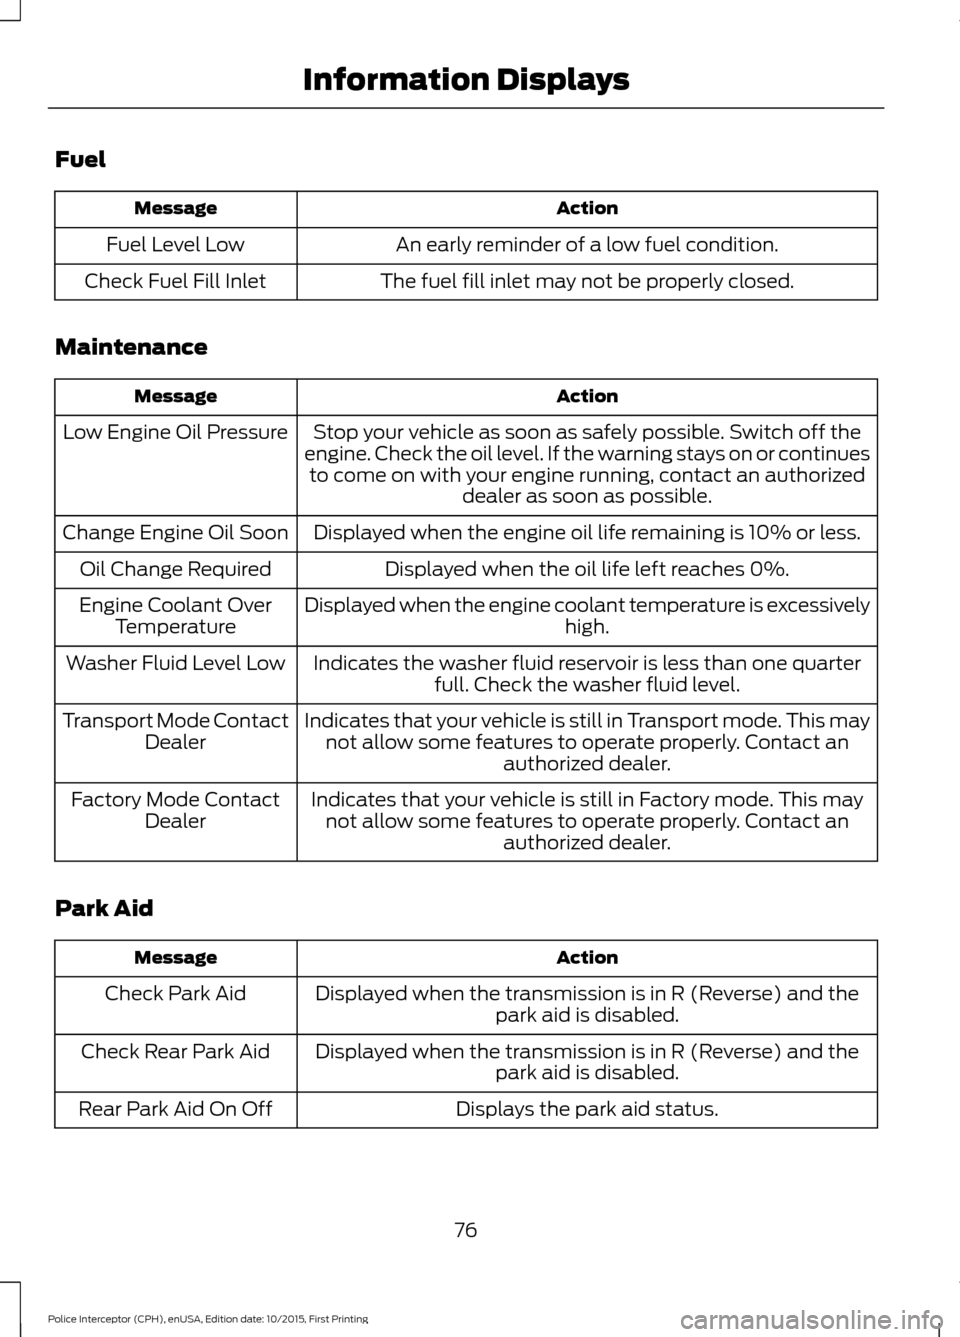
Fuel
Action
Message
An early reminder of a low fuel condition.
Fuel Level Low
The fuel fill inlet may not be properly closed.
Check Fuel Fill Inlet
Maintenance Action
Message
Stop your vehicle as soon as safely possible. Switch off the
engine. Check the oil level. If the warning stays on or continues to come on with your engine running, contact an authorized dealer as soon as possible.
Low Engine Oil Pressure
Displayed when the engine oil life remaining is 10% or less.
Change Engine Oil Soon
Displayed when the oil life left reaches 0%.
Oil Change Required
Displayed when the engine coolant temperature is excessively high.
Engine Coolant Over
Temperature
Indicates the washer fluid reservoir is less than one quarterfull. Check the washer fluid level.
Washer Fluid Level Low
Indicates that your vehicle is still in Transport mode. This maynot allow some features to operate properly. Contact an authorized dealer.
Transport Mode Contact
Dealer
Indicates that your vehicle is still in Factory mode. This maynot allow some features to operate properly. Contact an authorized dealer.
Factory Mode Contact
Dealer
Park Aid Action
Message
Displayed when the transmission is in R (Reverse) and thepark aid is disabled.
Check Park Aid
Displayed when the transmission is in R (Reverse) and thepark aid is disabled.
Check Rear Park Aid
Displays the park aid status.
Rear Park Aid On Off
76
Police Interceptor (CPH), enUSA, Edition date: 10/2015, First Printing Information Displays
Page 93 of 358
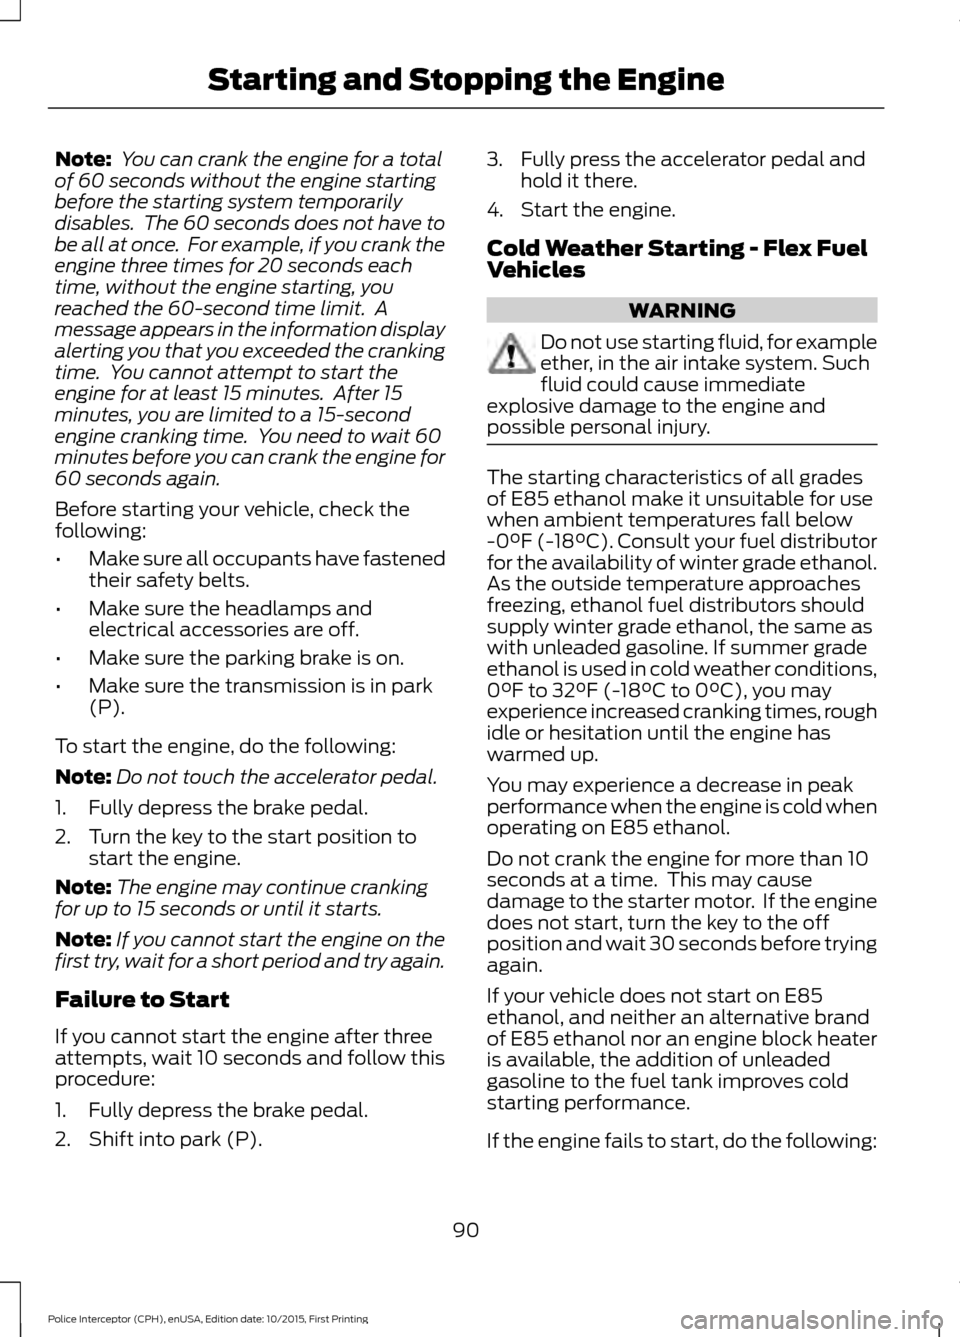
Note:
You can crank the engine for a total
of 60 seconds without the engine starting
before the starting system temporarily
disables. The 60 seconds does not have to
be all at once. For example, if you crank the
engine three times for 20 seconds each
time, without the engine starting, you
reached the 60-second time limit. A
message appears in the information display
alerting you that you exceeded the cranking
time. You cannot attempt to start the
engine for at least 15 minutes. After 15
minutes, you are limited to a 15-second
engine cranking time. You need to wait 60
minutes before you can crank the engine for
60 seconds again.
Before starting your vehicle, check the
following:
• Make sure all occupants have fastened
their safety belts.
• Make sure the headlamps and
electrical accessories are off.
• Make sure the parking brake is on.
• Make sure the transmission is in park
(P).
To start the engine, do the following:
Note: Do not touch the accelerator pedal.
1. Fully depress the brake pedal.
2. Turn the key to the start position to start the engine.
Note: The engine may continue cranking
for up to 15 seconds or until it starts.
Note: If you cannot start the engine on the
first try, wait for a short period and try again.
Failure to Start
If you cannot start the engine after three
attempts, wait 10 seconds and follow this
procedure:
1. Fully depress the brake pedal.
2. Shift into park (P). 3. Fully press the accelerator pedal and
hold it there.
4. Start the engine.
Cold Weather Starting - Flex Fuel
Vehicles WARNING
Do not use starting fluid, for example
ether, in the air intake system. Such
fluid could cause immediate
explosive damage to the engine and
possible personal injury. The starting characteristics of all grades
of E85 ethanol make it unsuitable for use
when ambient temperatures fall below
-0°F (-18°C). Consult your fuel distributor
for the availability of winter grade ethanol.
As the outside temperature approaches
freezing, ethanol fuel distributors should
supply winter grade ethanol, the same as
with unleaded gasoline. If summer grade
ethanol is used in cold weather conditions,
0°F to 32°F (-18°C to 0°C), you may
experience increased cranking times, rough
idle or hesitation until the engine has
warmed up.
You may experience a decrease in peak
performance when the engine is cold when
operating on E85 ethanol.
Do not crank the engine for more than 10
seconds at a time. This may cause
damage to the starter motor. If the engine
does not start, turn the key to the off
position and wait 30 seconds before trying
again.
If your vehicle does not start on E85
ethanol, and neither an alternative brand
of E85 ethanol nor an engine block heater
is available, the addition of unleaded
gasoline to the fuel tank improves cold
starting performance.
If the engine fails to start, do the following:
90
Police Interceptor (CPH), enUSA, Edition date: 10/2015, First Printing Starting and Stopping the Engine
Page 176 of 358
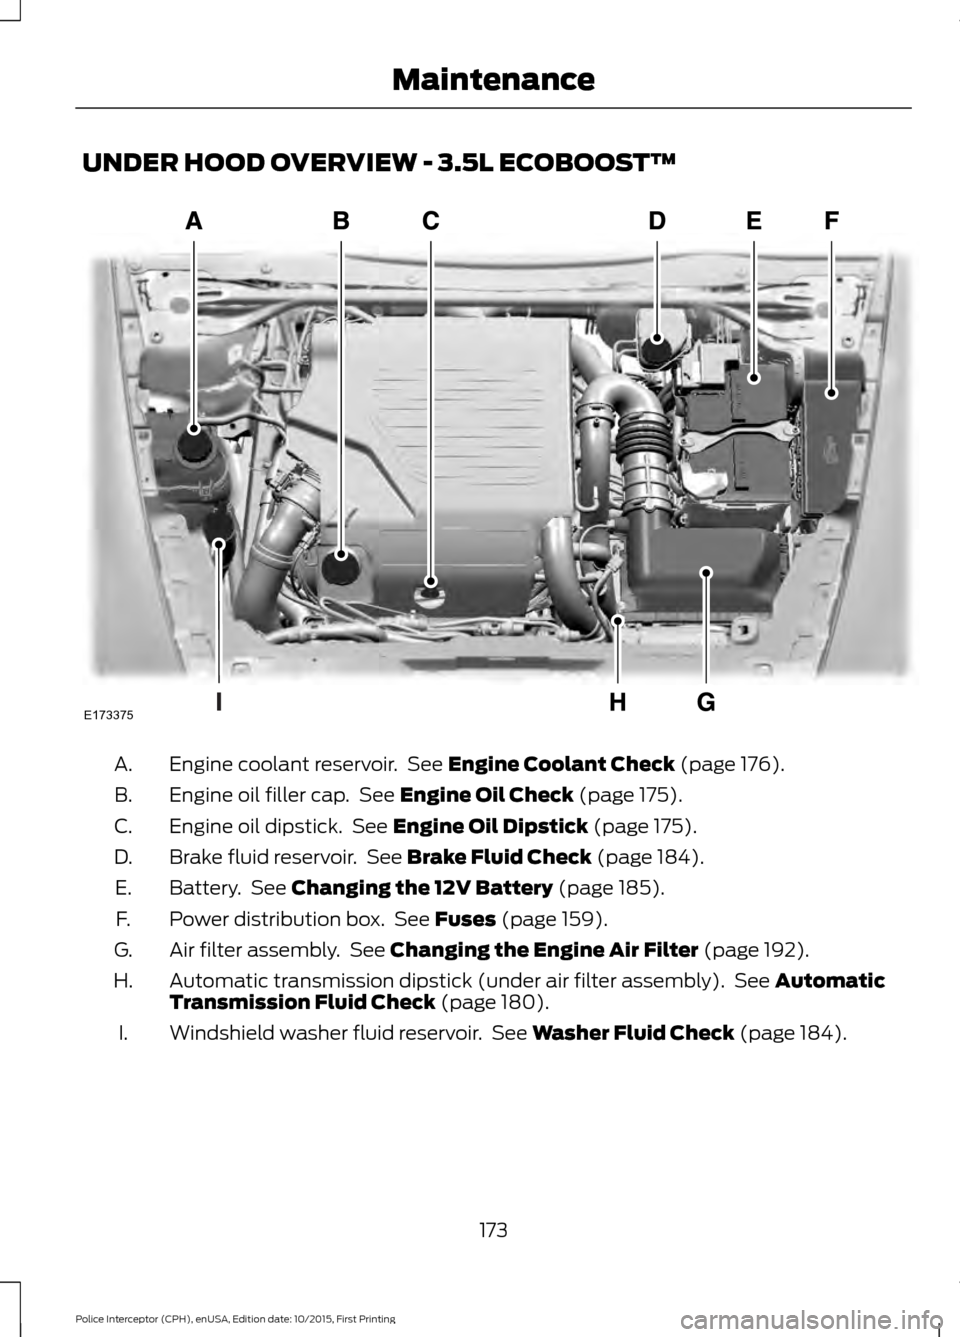
UNDER HOOD OVERVIEW - 3.5L ECOBOOST™
Engine coolant reservoir. See Engine Coolant Check (page 176).
A.
Engine oil filler cap. See
Engine Oil Check (page 175).
B.
Engine oil dipstick. See
Engine Oil Dipstick (page 175).
C.
Brake fluid reservoir. See
Brake Fluid Check (page 184).
D.
Battery. See
Changing the 12V Battery (page 185).
E.
Power distribution box. See
Fuses (page 159).
F.
Air filter assembly. See
Changing the Engine Air Filter (page 192).
G.
Automatic transmission dipstick (under air filter assembly). See
Automatic
Transmission Fluid Check (page 180).
H.
Windshield washer fluid reservoir. See
Washer Fluid Check (page 184).
I.
173
Police Interceptor (CPH), enUSA, Edition date: 10/2015, First Printing MaintenanceE173375
Page 177 of 358
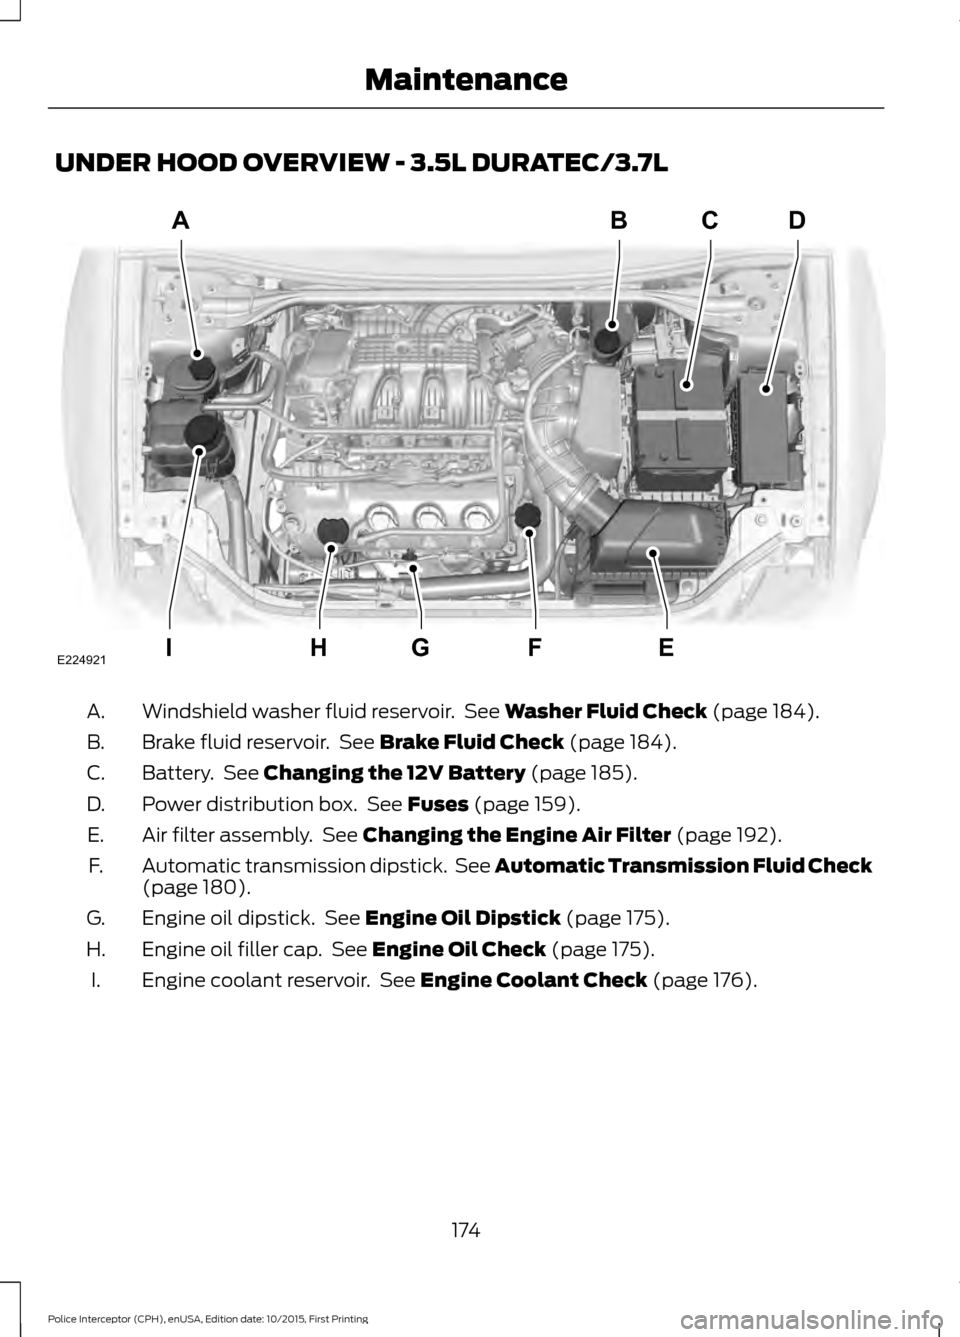
UNDER HOOD OVERVIEW - 3.5L DURATEC/3.7L
Windshield washer fluid reservoir. See Washer Fluid Check (page 184).
A.
Brake fluid reservoir. See
Brake Fluid Check (page 184).
B.
Battery. See
Changing the 12V Battery (page 185).
C.
Power distribution box. See
Fuses (page 159).
D.
Air filter assembly. See
Changing the Engine Air Filter (page 192).
E.
Automatic transmission dipstick. See Automatic Transmission Fluid Check
(page
180).
F.
Engine oil dipstick. See
Engine Oil Dipstick (page 175).
G.
Engine oil filler cap. See
Engine Oil Check (page 175).
H.
Engine coolant reservoir. See
Engine Coolant Check (page 176).
I.
174
Police Interceptor (CPH), enUSA, Edition date: 10/2015, First Printing MaintenanceA
IEFGH
BCD
E224921
Page 183 of 358
At this time, you may notice your engine
coolant temperature gauge needle move
toward the H and the POWER REDUCED
TO LOWER TEMP message may appear
in the information display.
You may notice a reduction in vehicle
speed caused by reduced engine power.
In order to manage the engine fluid
temperatures, your vehicle may enter this
mode if certain high-temperature and
high-load conditions take place. The
amount of speed reduction depends on
many factors such as vehicle loading,
towing, grade and ambient temperature.
If this occurs, there is no need to pull off
the road. You can continue to drive your
vehicle while this message is active.
The air conditioning may also cycle on and
off during severe operating conditions to
protect overheating of the engine. When
the engine coolant temperature decreases
to a normal operating temperature, the air
conditioning will turn on once again.
If the engine coolant temperature gauge
moves fully into the red (hot) area, or if the
coolant temperature warning or service
engine soon messages appear in your
information display:
1. Pull off the road as soon as safely possible and shift the transmission into
P
.
2. Leave the engine running until the coolant temperature gauge needle
moves away from the red (hot) area.
After several minutes, if the
temperature does not drop, follow the
remaining steps.
3. Switch the engine off and wait for it to
cool before checking the coolant level.
4. If the coolant level is normal, restart your engine and continue. 5. If the coolant is low, add coolant, and
restart the engine. See Adding Engine
Coolant
or How Fail-Safe Cooling
Works in this chapter for more
information.
AUTOMATIC TRANSMISSION
FLUID CHECK - 2.0L
ECOBOOST™
6F35 Transmission
The automatic transmission does not have
a transmission fluid dipstick.
The automatic transmission does not
consume fluid. If the transmission is not
working correctly, for example, the
transmission slips, shifts slowly or there
are signs of fluid leakage, have the system
checked by an authorized dealer.
Change the automatic transmission fluid
and filter at the correct service interval.
Do not use supplemental automatic
transmission fluid additives because they
are unnecessary and could lead to
transmission damage that may not be
covered by the vehicle Warranty.
AUTOMATIC TRANSMISSION
FLUID CHECK - 3.5L DURATEC/
3.5L ECOBOOST™/3.7L
6F50/6F55 Transmission (If Equipped) WARNINGS
The dipstick cap and surrounding
components may be hot, use gloves.
Use gloves when moving the air filter
assembly. Components will be hot.
180
Police Interceptor (CPH), enUSA, Edition date: 10/2015, First Printing Maintenance
Page 184 of 358
Note:
Automatic transmission fluid
expands when warmed. To obtain an
accurate fluid check, drive your vehicle until
you warm it up, approximately 20 mi
(30 km). If you operate your vehicle for an
extended period at high speeds, in city traffic
during hot weather or pulling a trailer, switch
your vehicle off until it reaches normal
operating temperatures to allow the fluid
to cool before checking. Depending on
vehicle use, cooling times could take up to
30 minutes or longer.
Refer to your scheduled maintenance
information for scheduled intervals for fluid
checks and changes. Your transmission
does not consume fluid. However, you
should check the fluid level if the
transmission is not working properly. For
example, if the transmission slips or shifts
slowly or if you notice some sign of a fluid
leak.
1. Drive your vehicle 20 mi (30 km) or until it reaches normal operating
temperature.
2. Park your vehicle on a level surface and
engage the parking brake.
3. With the parking brake engaged and your foot on the brake pedal, start the
engine and move the gearshift lever
through all of the gear ranges. Allow a
minimum of 10 seconds for each gear
to engage.
4. Put the gearshift lever in park (P) and leave the engine running.
Note: For vehicles with the EcoBoost
engine, move the air filter assembly aside
to access the transmission dipstick. See
Moving the Air Filter Assembly for more
information.
5. Remove the dipstick and wipe it clean with a dry, lint free clean rag. If
necessary, refer to the Under hood
overview in this chapter for the location
of the dipstick. 6. Install the dipstick making sure you
fully seat it in the filler tube by turning
it to the locked position.
7. Remove the dipstick and inspect the fluid level. The fluid should be in the
designated areas for normal operating
temperature.
Moving the Air Filter Assembly
(Accessing the Dipstick) WARNING
Do not run engine with the air filter
disconnected.
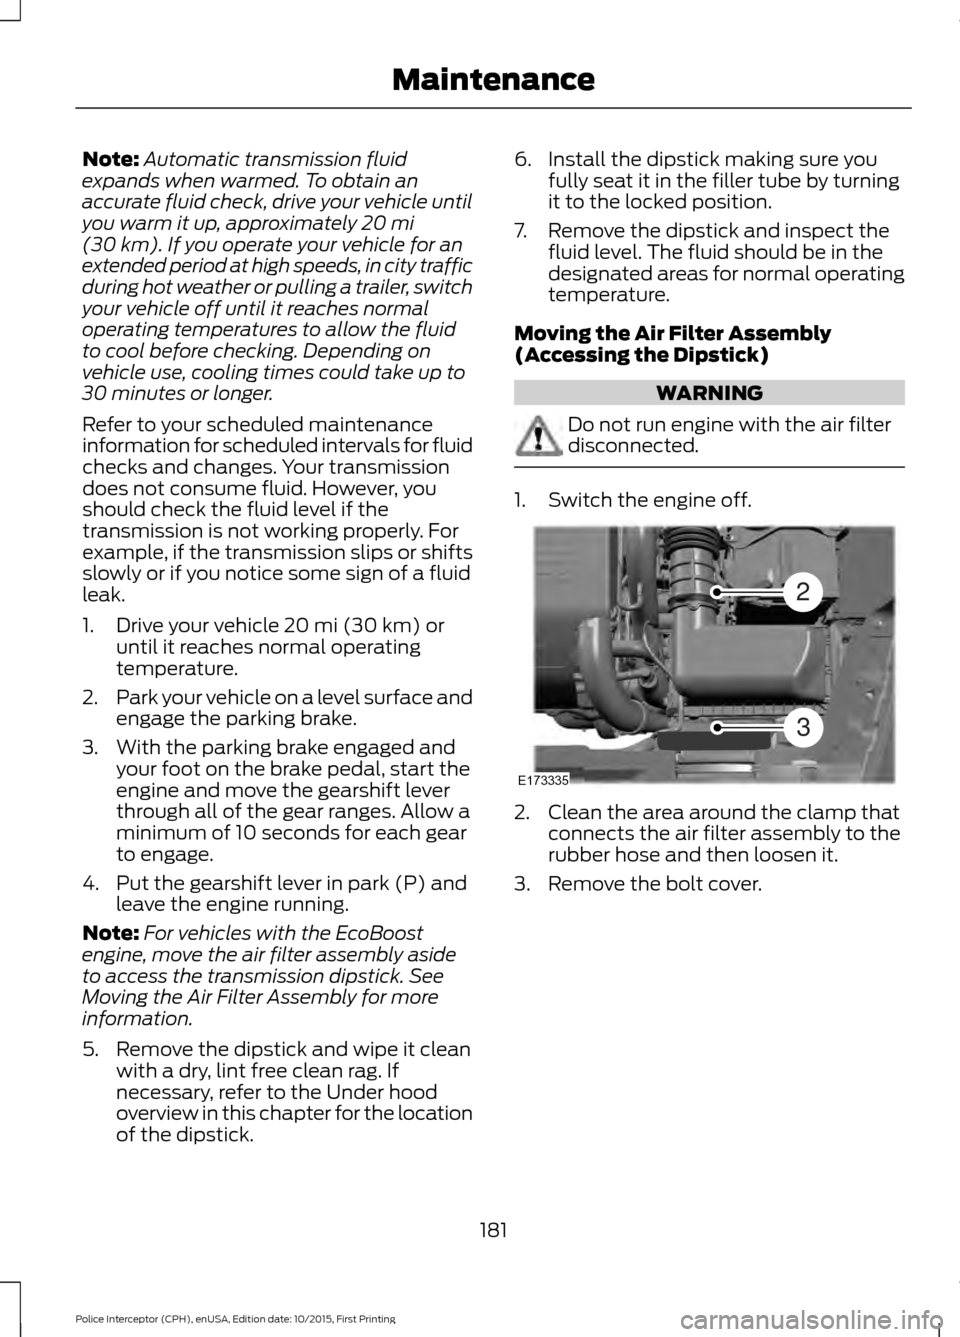
1. Switch the engine off.
2. Clean the area around the clamp that
connects the air filter assembly to the
rubber hose and then loosen it.
3. Remove the bolt cover.
181
Police Interceptor (CPH), enUSA, Edition date: 10/2015, First Printing MaintenanceE173335
2
3
Page 185 of 358

4. Remove two bolts that attach the air
filter assembly to the front of the
vehicle.
5. Remove the harness retaining clip by pulling up.
6. Do not disconnect the sensor. 7. Pull the air filter assembly up to
disconnect it from the seated
grommets located under the air filter
assembly.
8. Rotate the air filter assembly 90 degrees counterclockwise. Make sure
the rubber hose is still connected to the
air filter assembly.
9. Tighten the clamp.
You can now access the transmission fluid
level indicator.
Checking the fluid level
Low fluid level If the fluid level is below the MIN range of
the dipstick, add fluid to reach the hash
mark level.
Note:
If the fluid level is below the MIN
level, do not drive the vehicle. An underfill
condition may cause shift or engagement
concerns or possible damage.
Correct fluid level 182
Police Interceptor (CPH), enUSA, Edition date: 10/2015, First Printing MaintenanceE173334
654 E173400 E158842 E158843