2016 FORD POLICE INTERCEPTOR SEDAN hood open
[x] Cancel search: hood openPage 6 of 358
Cruise Control
Principle of Operation..................................121
Using Cruise Control.....................................121
Driving Aids
Blind Spot Information System...............123
Cross Traffic Alert.........................................125
Steering............................................................128
Load Carrying
Rear Loadspace Hatches..........................130
Rear Under Floor Storage
..........................130
Load Limit
.......................................................130
Towing
Towing a Trailer.............................................138
Recommended Towing Weights............139
Essential Towing Checks...........................140
Transporting the Vehicle............................142
Towing the Vehicle on Four Wheels......142
Driving Hints
Breaking-In......................................................144
Economical Driving......................................144
Driving Through Water
................................145
Floor Mats
.......................................................145
Roadside Emergencies
Roadside Assistance...................................147
Hazard Warning Flashers
..........................148
Fuel Shutoff
...................................................148
Jump Starting the Vehicle
.........................149
Customer Assistance
Getting the Services You Need
................152
In California (U.S. Only)..............................153
The Better Business Bureau (BBB) Auto Line Program (U.S. Only)......................154
Utilizing the Mediation/Arbitration Program (Canada Only)........................155 Getting Assistance Outside the U.S. and
Canada.........................................................155
Ordering Additional Owner's Literature.....................................................156
Reporting Safety Defects (U.S. Only)..............................................................157
Reporting Safety Defects (Canada Only)..............................................................157
Fuses
Fuse Specification Chart...........................159
Changing a Fuse
...........................................168
Maintenance
General Information
....................................170
Opening and Closing the Hood
...............170
Under Hood Overview - 2.0L EcoBoost™.................................................172
Under Hood Overview - 3.5L Ecoboost™.................................................173
Under Hood Overview - 3.5L Duratec/ 3.7L.................................................................174
Engine Oil Dipstick - 2.0L EcoBoost™.................................................175
Engine Oil Dipstick - 3.5L Duratec/3.5L Ecoboost™/3.7L.......................................175
Engine Oil Check
...........................................175
Oil Change Indicator Reset.......................176
Engine Coolant Check.................................176
Automatic Transmission Fluid Check - 2.0L EcoBoost™
......................................180
Automatic Transmission Fluid Check - 3.5L Duratec/3.5L Ecoboost™/
3.7L................................................................180
Brake Fluid Check.........................................184
Power Steering Fluid Check.....................184
Washer Fluid Check.....................................184
Fuel Filter
.........................................................185
Changing the 12V Battery..........................185
Checking the Wiper Blades
.......................187
Changing the Wiper Blades
......................187
Adjusting the Headlamps..........................187
3
Police Interceptor (CPH), enUSA, Edition date: 10/2015, First Printing Table of Contents
Page 43 of 358

WARNINGS
Do not attempt to service, repair, or
modify the curtain airbags, its fuses,
the A, B, or C pillar trim, or the
headliner on a vehicle containing curtain
airbags as you could be seriously injured
or killed. Contact your authorized dealer
as soon as possible. All occupants of your vehicle
including the driver should always
wear their safety belts even when an
airbag supplemental restraint system and
curtain airbag is provided. Failure to
properly wear your safety belt could
seriously increase the risk of injury or death. To reduce risk of injury, do not
obstruct or place objects in the
deployment path of the curtain
airbag. If the curtain airbags have deployed,
the curtain airbags will not function
again. The curtain airbags (including
the A, B and C pillar trim and headliner)
must be inspected and serviced by an
authorized dealer. If the curtain airbag is
not replaced, the unrepaired area will
increase the risk of injury in a crash. The Safety Canopy will deploy during
significant side crashes or when a certain
likelihood of a rollover event is detected
by the rollover sensor. The Safety Canopy
is mounted to the roof side-rail sheet
metal, behind the headliner, above each
row of seats. In certain sideways crashes
or rollover events, the Safety Canopy will
be activated, regardless of which seats are
occupied. The Safety Canopy is designed
to inflate between the side window area
and occupants to further enhance
protection provided in side impact crashes
and rollover events. The system consists of the following:
•
Safety canopy curtain airbags located
above the trim panels over the front
and rear side windows identified by a
label or wording on the headliner or
roof-pillar trim.
• A flexible headliner which opens above
the side doors to allow air curtain
deployment · Crash sensors and monitoring
system with a readiness
indicator. See Crash Sensors
and Airbag Indicator (page 41).
Children 12 years old and under should
always be properly restrained in the rear
seats. The Safety Canopy will not interfere
with children restrained using a properly
installed child or booster seat because it
is designed to inflate downward from the
headliner above the doors along the side
window opening.
The design and development of the Safety
Canopy included recommended testing
procedures that were developed by a
group of automotive safety experts known
as the Side Airbag Technical Working
Group. These recommended testing
procedures help reduce the risk of injuries
related to the deployment of side airbags
(including the Safety Canopy).
40
Police Interceptor (CPH), enUSA, Edition date: 10/2015, First Printing Supplementary Restraints SystemE75004
Page 52 of 358
Press and hold both the lock and unlock
buttons on the remote control for three
seconds to change between driver door or
all doors unlock mode. The direction
indicators will flash twice to indicate a
change to the unlocking mode. Driver door
mode only unlocks the driver door when
you press the unlock button once. All door
mode unlocks all doors when you press
the unlock button once. The unlocking
mode applies to the remote control.
Locking the Doors
Press the button to lock all
doors. The direction indicators
will flash. Press the button again
within three seconds to confirm that all
the doors are closed.
The doors will lock again, the horn will
sound and the direction indicators will
flash if all the doors and the luggage
compartment are closed.
Note: If any door or the luggage
compartment is open, or if the hood is open
on vehicles with an anti-theft alarm or
remote start, the horn will sound twice and
the direction indicators will not flash.
Locking and Unlocking the Doors
with the Key Blade
Locking the Doors
Turn the top of the key toward the front of
your vehicle.
Unlocking the Doors
Turn the top of the key toward the rear of
your vehicle.
Note: If the child safety locks are on and
you pull the interior handle, you only switch
off the emergency locking, not the child
safety lock. You can only open the doors
using the external door handle. Opening a Rear Door From the
Inside
Pull the interior door handle twice to
unlock and open a rear door. The first pull
unlocks the door and the second pull
opens the door.
Illuminated Entry (If Equipped)
The interior lamps and some exterior
lamps illuminate when you unlock the
doors with the remote control.
The lamps turn off if:
• The ignition is on.
• You press the remote control lock
button.
• 25 seconds have elapsed.
The lamps do not turn off if:
• You switch them on with the lighting
control.
• Any door is open.
Illuminated Exit
(If Equipped)
The interior lamps and some exterior
lamps illuminate when all doors are closed
and you switch the ignition off.
The lamps will turn off if all the doors
remain closed and:
• 25 seconds have elapsed.
• You lock your vehicle from the outside.
Battery Saver
If you leave the courtesy lamps, interior
lamps or headlamps on, the battery saver
shuts them off 10 minutes after you switch
the ignition off.
49
Police Interceptor (CPH), enUSA, Edition date: 10/2015, First Printing LocksE138623
Page 55 of 358
ANTI-THEFT ALARM (If Equipped)
Alarm System
The perimeter alarm is a deterrent against
unauthorized access to your vehicle
through the doors, luggage compartment
and the hood.
Triggering the Alarm
Once armed, the alarm is triggered in any
of the following ways:
• If someone opens a door, cargo area
or the hood without a valid key or
remote control.
• If you switch the ignition on without a
valid key.
If the alarm is triggered, the horn will sound
for 30 seconds and the hazard warning
flasher will flash for five minutes.
Any further attempts to perform one of the
above will trigger the alarm again.
Arming the Alarm
To arm the alarm, lock your vehicle. See
Locks
(page 48).
Disarming the Alarm
Disarm and silence the alarm by unlocking
the doors with the key and switching the
ignition on within 12 seconds, or by
unlocking the doors or the cargo area with
the remote control.
52
Police Interceptor (CPH), enUSA, Edition date: 10/2015, First Printing Security
Page 94 of 358
1. Press the accelerator pedal down
one-third to one-half of its travel, and
then crank the engine.
2. When the engine starts, release the key, then gradually release the
accelerator pedal as the engine speed
increases. If the engine still does not
start, repeat Step 1.
Stopping the Engine When Your
Vehicle is Stationary
1. Shift into park (P).
2. Turn the key to the off position.
3. Apply the parking brake.
Stopping the Engine When Your
Vehicle is Moving WARNING
Switching off the engine when the
vehicle is still moving will result in a
loss of brake and steering assistance.
The steering will not lock, but higher effort
will be required. When the ignition is
switched off, some electrical circuits,
including air bags, warning lamps and
indicators may also be off. If the ignition
was turned off accidentally, you can shift
into neutral (N) and re-start the engine. 1.
Shift into neutral and use the brakes to
bring your vehicle to a safe stop.
2. When your vehicle has stopped, shift into park (P) and switch the ignition
off.
3. Apply the parking brake. Guarding Against Exhaust Fumes WARNING
If you smell exhaust fumes inside
your vehicle, have your vehicle
checked by your authorized dealer
immediately. Do not drive your vehicle if
you smell exhaust fumes. Carbon
monoxide is present in exhaust fumes.
Take precautions to avoid its dangerous
effects. Important Ventilating Information
If you stop your vehicle and then leave the
engine idling for long periods, we
recommend that you do one of the
following:
•
Open the windows at least 1 in (3 cm).
• Set your climate control to outside air.
ENGINE BLOCK HEATER (If
Equipped) WARNINGS
Failure to follow engine block heater
instructions could result in property
damage or serious personal injury.
Do not use your heater with
ungrounded electrical systems or
two-pronged adapters. There is a risk
of electrical shock. Do not fully close the hood, or allow
it to drop under its own weight when
using the engine block heater. This
could damage the power cable and may
cause an electrical short resulting in fire,
injury and property damage. Note:
The heater is most effective when
outdoor temperatures are below 0°F
(-18°C).
91
Police Interceptor (CPH), enUSA, Edition date: 10/2015, First Printing Starting and Stopping the Engine
Page 173 of 358
GENERAL INFORMATION
Have your vehicle serviced regularly to help
maintain its roadworthiness and resale
value. There is a large network of
authorized dealers that are there to help
you with their professional servicing
expertise. We believe that their specially
trained technicians are best qualified to
service your vehicle properly and expertly.
They are supported by a wide range of
highly specialized tools developed
specifically for servicing your vehicle.
If your vehicle requires professional service,
an authorized dealer can provide the
necessary parts and service. Check your
warranty information to find out which
parts and services are covered.
Use only recommended fuels, lubricants,
fluids and service parts conforming to
specifications. Motorcraft® parts are
designed and built to provide the best
performance in your vehicle.
Precautions
•
Do not work on a hot engine.
• Make sure that nothing gets caught in
moving parts.
• Do not work on a vehicle with the
engine running in an enclosed space,
unless you are sure you have enough
ventilation.
• Keep all open flames and other burning
material (such as cigarettes) away
from the battery and all fuel related
parts.
Working with the Engine Off
1. Set the parking brake and shift to park
(P).
2. Switch off the engine.
3. Block the wheels. Working with the Engine On WARNING
To reduce the risk of vehicle damage
and/or personal burn injuries, do not
start your engine with the air cleaner
removed and do not remove it while the
engine is running. 1.
Set the parking brake and shift to park
(P).
2. Block the wheels.
OPENING AND CLOSING THE
HOOD
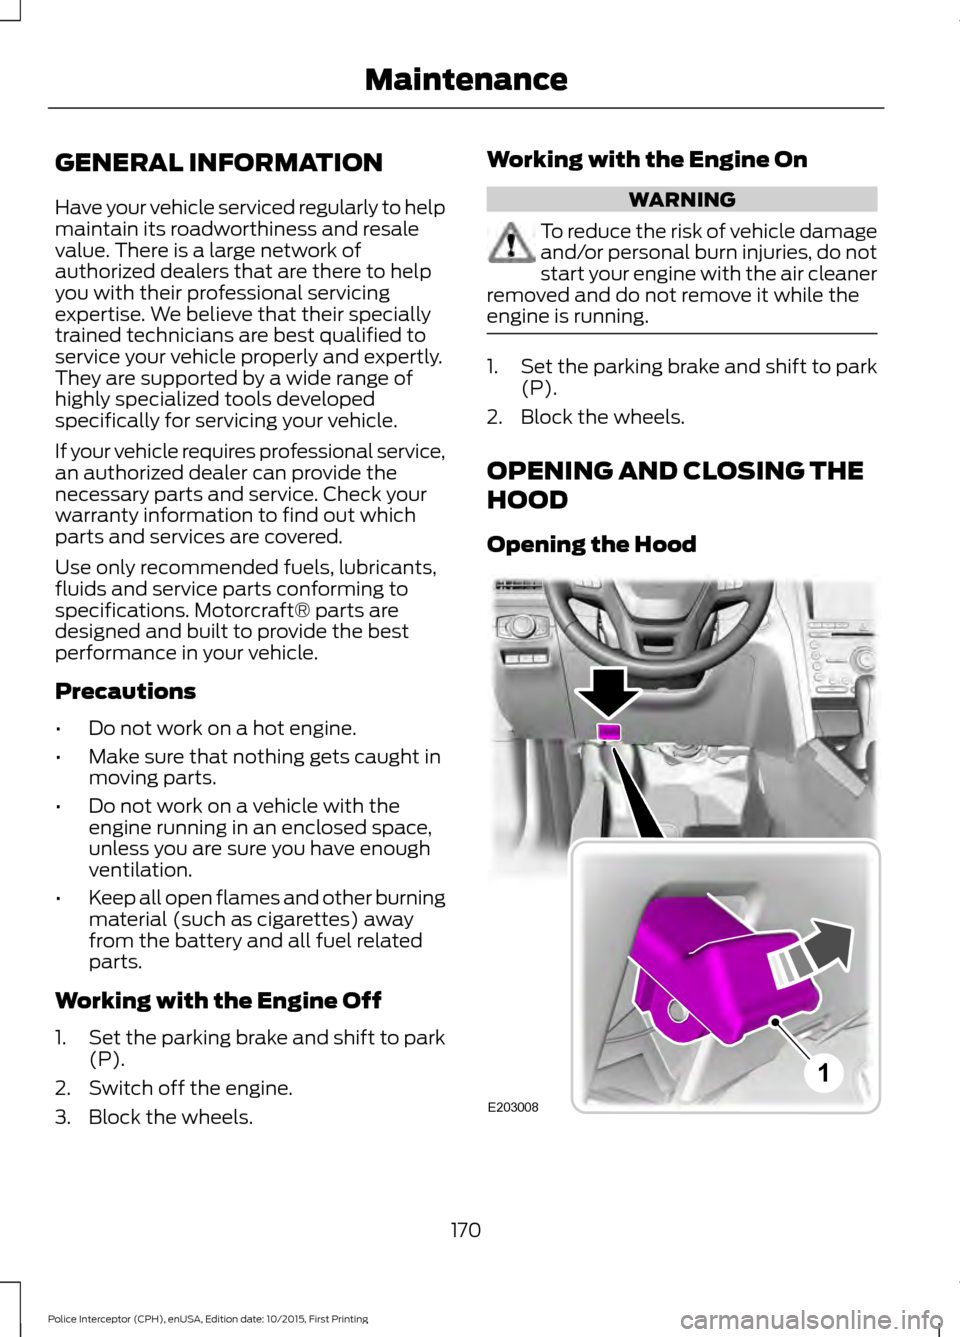
Opening the Hood 170
Police Interceptor (CPH), enUSA, Edition date: 10/2015, First Printing MaintenanceE203008
1
Page 174 of 358
1.
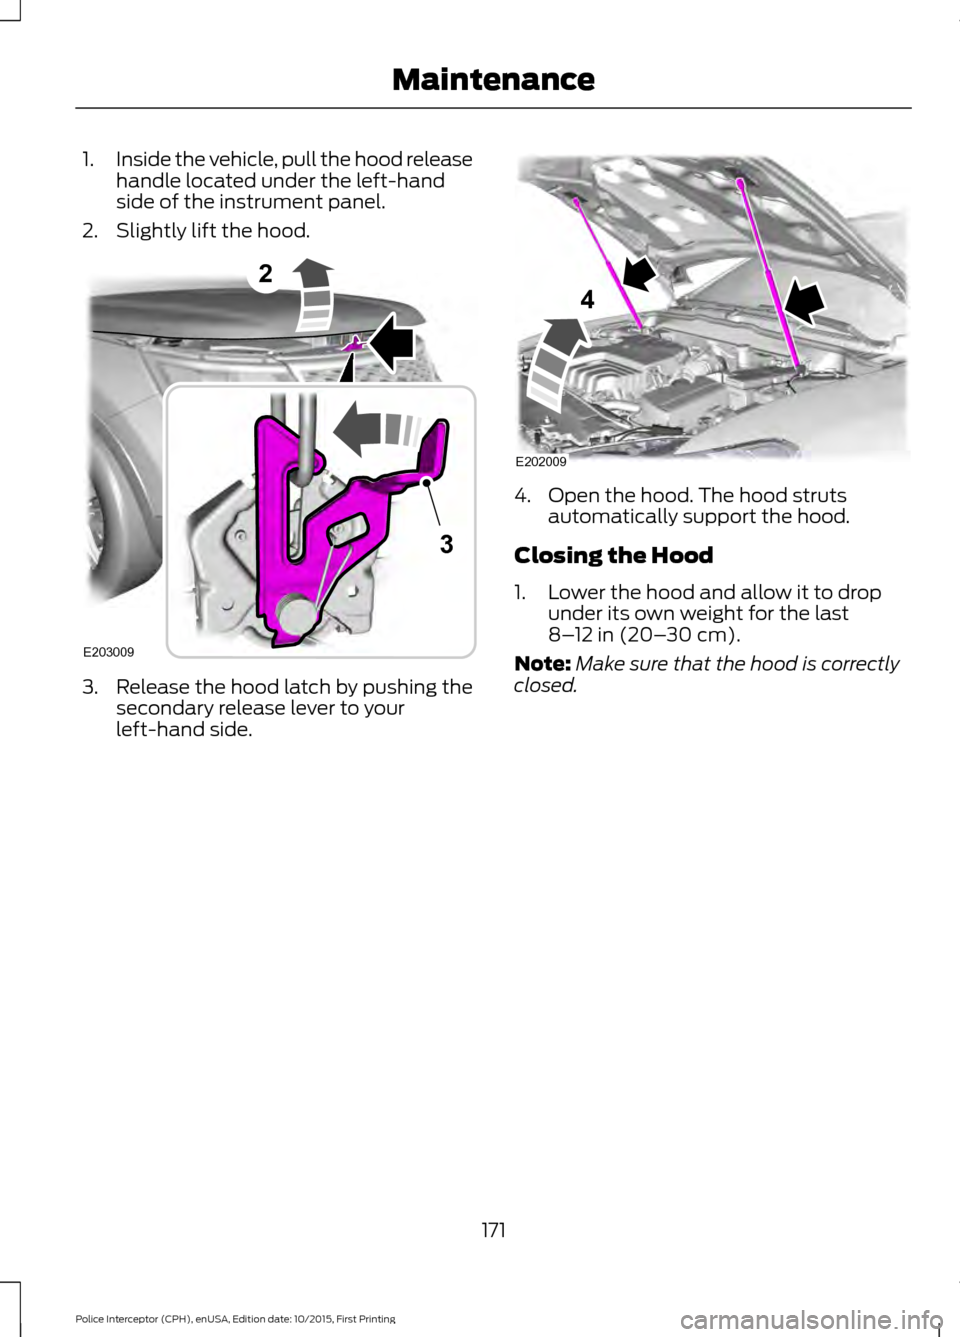
Inside the vehicle, pull the hood release
handle located under the left-hand
side of the instrument panel.
2. Slightly lift the hood. 3. Release the hood latch by pushing the
secondary release lever to your
left-hand side. 4. Open the hood. The hood struts
automatically support the hood.
Closing the Hood
1. Lower the hood and allow it to drop under its own weight for the last
8–12 in (20– 30 cm).
Note: Make sure that the hood is correctly
closed.
171
Police Interceptor (CPH), enUSA, Edition date: 10/2015, First Printing Maintenance2
E203009
3 E202009
4
Page 191 of 358
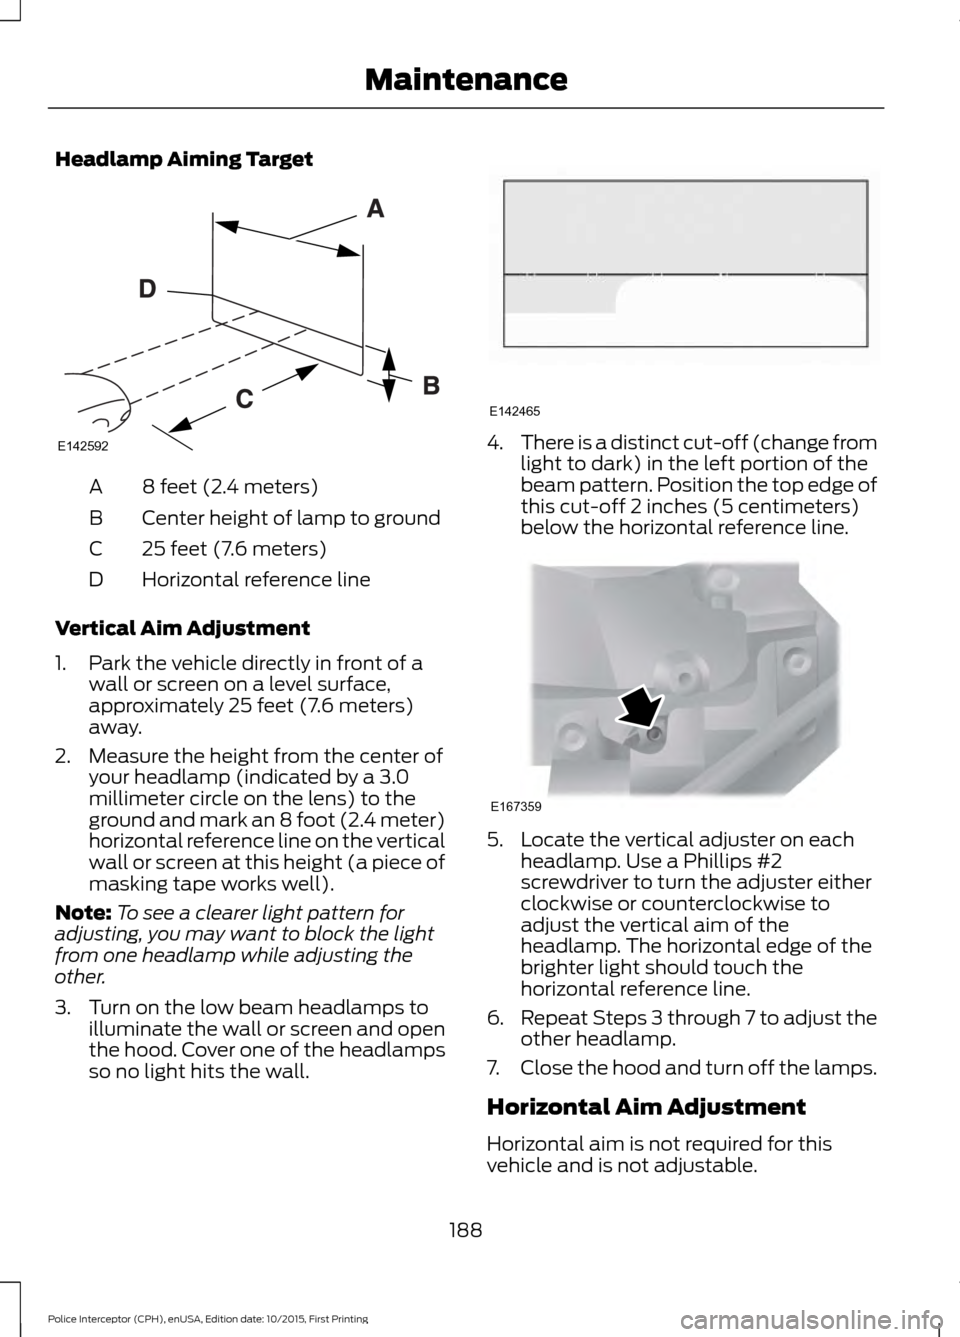
Headlamp Aiming Target
8 feet (2.4 meters)
A
Center height of lamp to ground
B
25 feet (7.6 meters)
C
Horizontal reference line
D
Vertical Aim Adjustment
1. Park the vehicle directly in front of a wall or screen on a level surface,
approximately 25 feet (7.6 meters)
away.
2. Measure the height from the center of your headlamp (indicated by a 3.0
millimeter circle on the lens) to the
ground and mark an 8 foot (2.4 meter)
horizontal reference line on the vertical
wall or screen at this height (a piece of
masking tape works well).
Note: To see a clearer light pattern for
adjusting, you may want to block the light
from one headlamp while adjusting the
other.
3. Turn on the low beam headlamps to illuminate the wall or screen and open
the hood. Cover one of the headlamps
so no light hits the wall. 4.
There is a distinct cut-off (change from
light to dark) in the left portion of the
beam pattern. Position the top edge of
this cut-off 2 inches (5 centimeters)
below the horizontal reference line. 5. Locate the vertical adjuster on each
headlamp. Use a Phillips #2
screwdriver to turn the adjuster either
clockwise or counterclockwise to
adjust the vertical aim of the
headlamp. The horizontal edge of the
brighter light should touch the
horizontal reference line.
6. Repeat Steps 3 through 7 to adjust the
other headlamp.
7. Close the hood and turn off the lamps.
Horizontal Aim Adjustment
Horizontal aim is not required for this
vehicle and is not adjustable.
188
Police Interceptor (CPH), enUSA, Edition date: 10/2015, First Printing MaintenanceE142592 E142465 E167359