2016 FORD POLICE INTERCEPTOR SEDAN spare wheel
[x] Cancel search: spare wheelPage 77 of 358
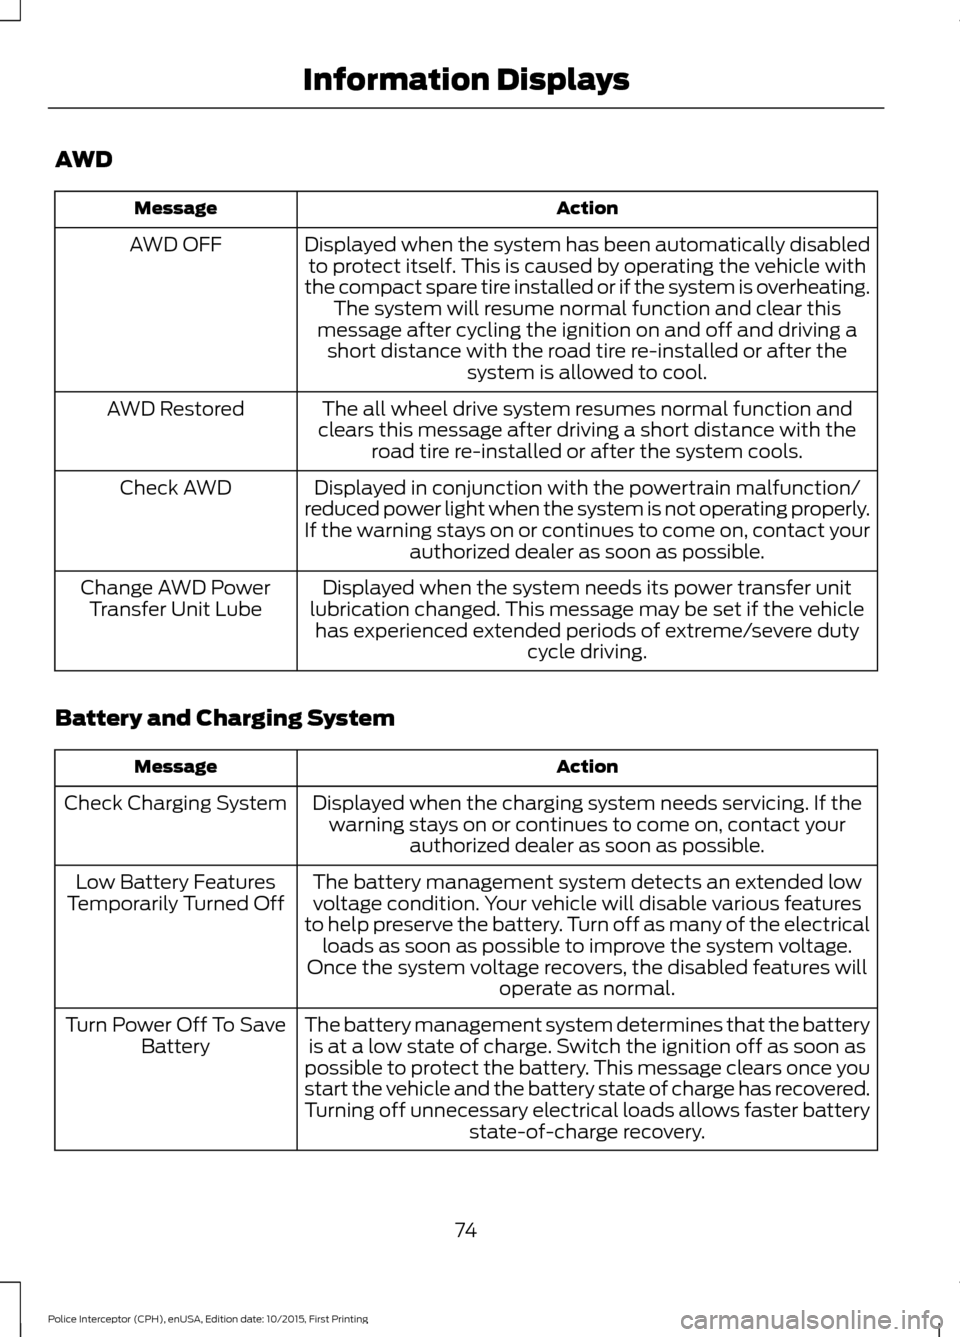
AWD
Action
Message
Displayed when the system has been automatically disabledto protect itself. This is caused by operating the vehicle with
the compact spare tire installed or if the system is overheating. The system will resume normal function and clear this
message after cycling the ignition on and off and driving a short distance with the road tire re-installed or after the system is allowed to cool.
AWD OFF
The all wheel drive system resumes normal function and
clears this message after driving a short distance with the road tire re-installed or after the system cools.
AWD Restored
Displayed in conjunction with the powertrain malfunction/
reduced power light when the system is not operating properly.
If the warning stays on or continues to come on, contact your authorized dealer as soon as possible.
Check AWD
Displayed when the system needs its power transfer unit
lubrication changed. This message may be set if the vehicle has experienced extended periods of extreme/severe duty cycle driving.
Change AWD Power
Transfer Unit Lube
Battery and Charging System Action
Message
Displayed when the charging system needs servicing. If thewarning stays on or continues to come on, contact your authorized dealer as soon as possible.
Check Charging System
The battery management system detects an extended lowvoltage condition. Your vehicle will disable various features
to help preserve the battery. Turn off as many of the electrical loads as soon as possible to improve the system voltage.
Once the system voltage recovers, the disabled features will operate as normal.
Low Battery Features
Temporarily Turned Off
The battery management system determines that the batteryis at a low state of charge. Switch the ignition off as soon as
possible to protect the battery. This message clears once you
start the vehicle and the battery state of charge has recovered.
Turning off unnecessary electrical loads allows faster battery state-of-charge recovery.
Turn Power Off To Save
Battery
74
Police Interceptor (CPH), enUSA, Edition date: 10/2015, First Printing Information Displays
Page 98 of 358
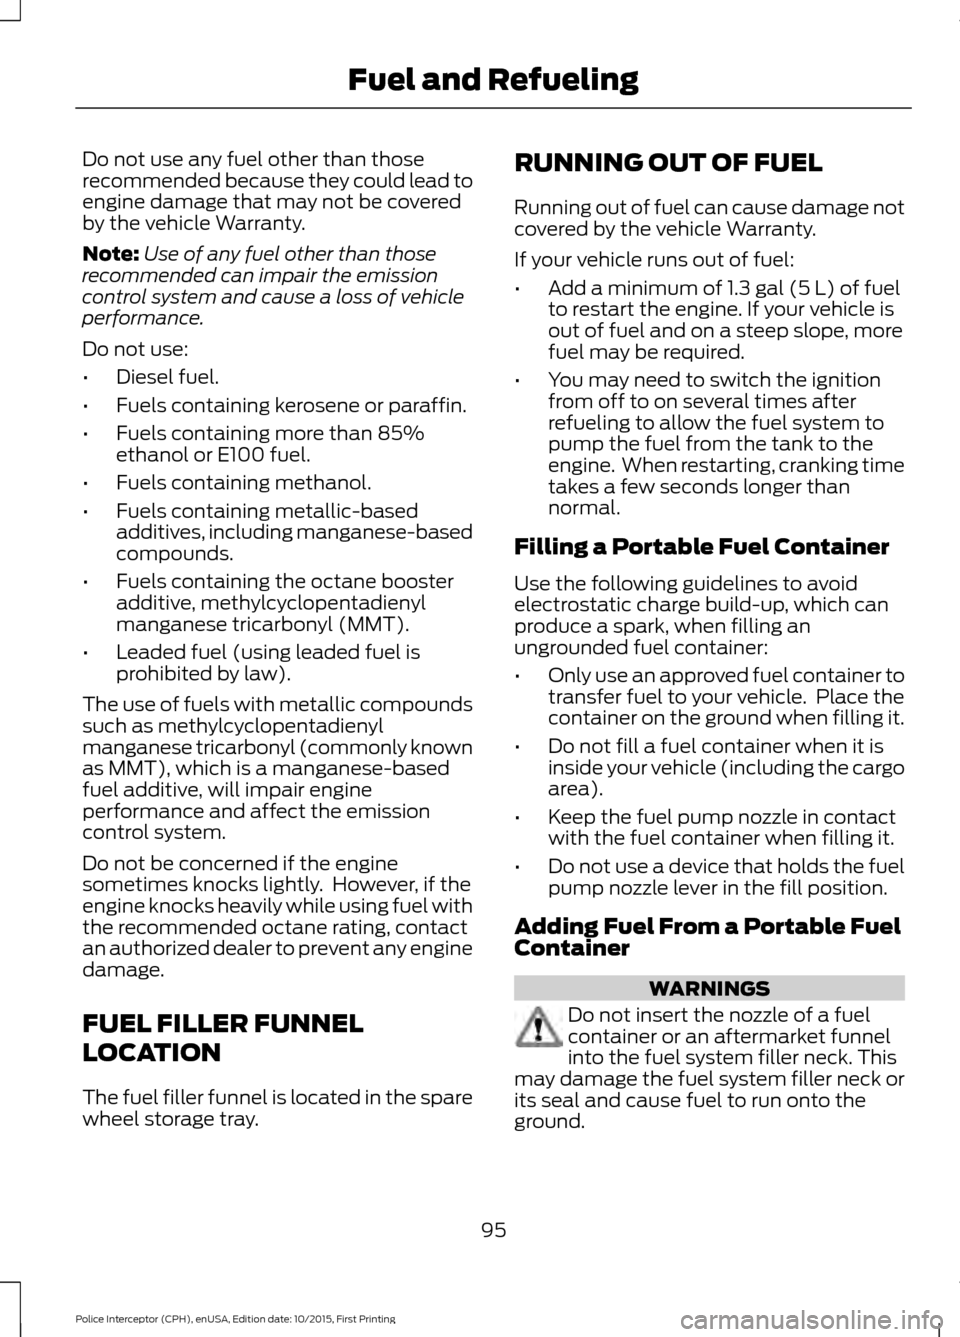
Do not use any fuel other than those
recommended because they could lead to
engine damage that may not be covered
by the vehicle Warranty.
Note:
Use of any fuel other than those
recommended can impair the emission
control system and cause a loss of vehicle
performance.
Do not use:
• Diesel fuel.
• Fuels containing kerosene or paraffin.
• Fuels containing more than 85%
ethanol or E100 fuel.
• Fuels containing methanol.
• Fuels containing metallic-based
additives, including manganese-based
compounds.
• Fuels containing the octane booster
additive, methylcyclopentadienyl
manganese tricarbonyl (MMT).
• Leaded fuel (using leaded fuel is
prohibited by law).
The use of fuels with metallic compounds
such as methylcyclopentadienyl
manganese tricarbonyl (commonly known
as MMT), which is a manganese-based
fuel additive, will impair engine
performance and affect the emission
control system.
Do not be concerned if the engine
sometimes knocks lightly. However, if the
engine knocks heavily while using fuel with
the recommended octane rating, contact
an authorized dealer to prevent any engine
damage.
FUEL FILLER FUNNEL
LOCATION
The fuel filler funnel is located in the spare
wheel storage tray. RUNNING OUT OF FUEL
Running out of fuel can cause damage not
covered by the vehicle Warranty.
If your vehicle runs out of fuel:
•
Add a minimum of 1.3 gal (5 L) of fuel
to restart the engine. If your vehicle is
out of fuel and on a steep slope, more
fuel may be required.
• You may need to switch the ignition
from off to on several times after
refueling to allow the fuel system to
pump the fuel from the tank to the
engine. When restarting, cranking time
takes a few seconds longer than
normal.
Filling a Portable Fuel Container
Use the following guidelines to avoid
electrostatic charge build-up, which can
produce a spark, when filling an
ungrounded fuel container:
• Only use an approved fuel container to
transfer fuel to your vehicle. Place the
container on the ground when filling it.
• Do not fill a fuel container when it is
inside your vehicle (including the cargo
area).
• Keep the fuel pump nozzle in contact
with the fuel container when filling it.
• Do not use a device that holds the fuel
pump nozzle lever in the fill position.
Adding Fuel From a Portable Fuel
Container WARNINGS
Do not insert the nozzle of a fuel
container or an aftermarket funnel
into the fuel system filler neck. This
may damage the fuel system filler neck or
its seal and cause fuel to run onto the
ground.
95
Police Interceptor (CPH), enUSA, Edition date: 10/2015, First Printing Fuel and Refueling
Page 109 of 358
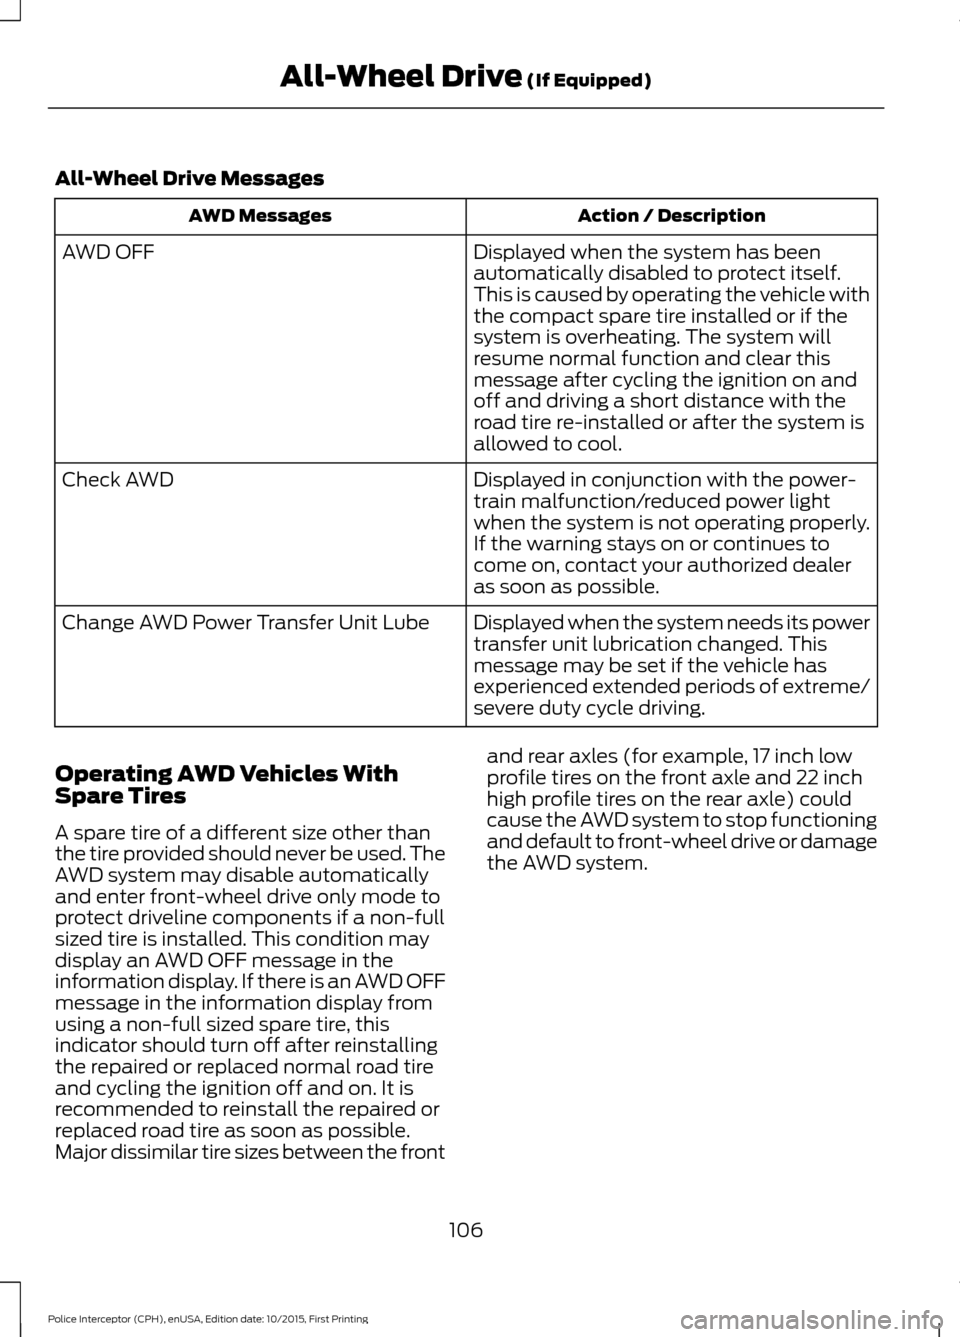
All-Wheel Drive Messages
Action / Description
AWD Messages
Displayed when the system has been
automatically disabled to protect itself.
This is caused by operating the vehicle with
the compact spare tire installed or if the
system is overheating. The system will
resume normal function and clear this
message after cycling the ignition on and
off and driving a short distance with the
road tire re-installed or after the system is
allowed to cool.
AWD OFF
Displayed in conjunction with the power-
train malfunction/reduced power light
when the system is not operating properly.
If the warning stays on or continues to
come on, contact your authorized dealer
as soon as possible.
Check AWD
Displayed when the system needs its power
transfer unit lubrication changed. This
message may be set if the vehicle has
experienced extended periods of extreme/
severe duty cycle driving.
Change AWD Power Transfer Unit Lube
Operating AWD Vehicles With
Spare Tires
A spare tire of a different size other than
the tire provided should never be used. The
AWD system may disable automatically
and enter front-wheel drive only mode to
protect driveline components if a non-full
sized tire is installed. This condition may
display an AWD OFF message in the
information display. If there is an AWD OFF
message in the information display from
using a non-full sized spare tire, this
indicator should turn off after reinstalling
the repaired or replaced normal road tire
and cycling the ignition off and on. It is
recommended to reinstall the repaired or
replaced road tire as soon as possible.
Major dissimilar tire sizes between the front and rear axles (for example, 17 inch low
profile tires on the front axle and 22 inch
high profile tires on the rear axle) could
cause the AWD system to stop functioning
and default to front-wheel drive or damage
the AWD system.
106
Police Interceptor (CPH), enUSA, Edition date: 10/2015, First Printing All-Wheel Drive
(If Equipped)
Page 133 of 358
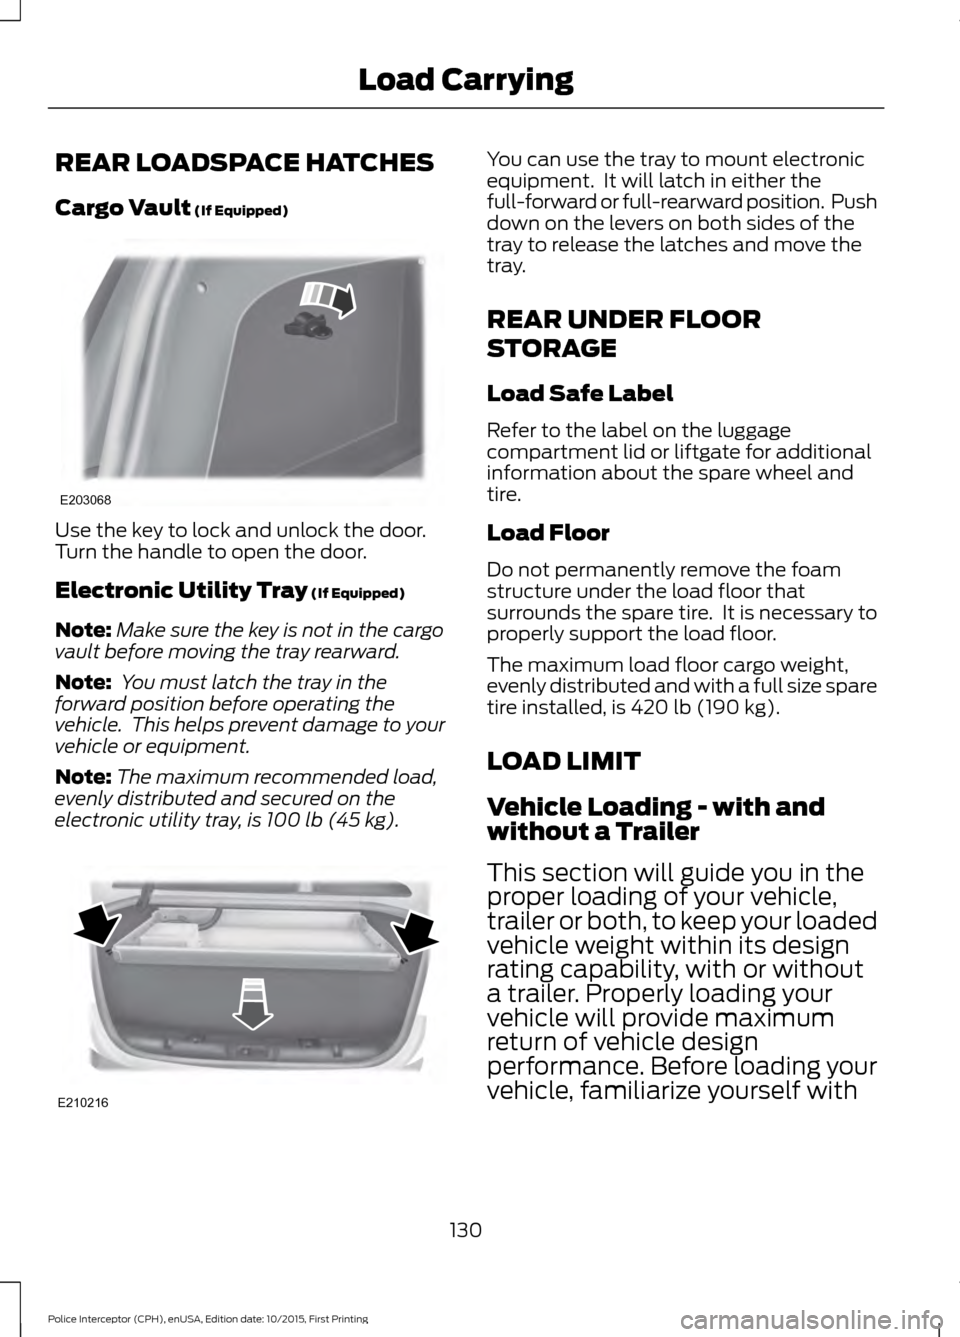
REAR LOADSPACE HATCHES
Cargo Vault (If Equipped)
Use the key to lock and unlock the door.
Turn the handle to open the door.
Electronic Utility Tray
(If Equipped)
Note: Make sure the key is not in the cargo
vault before moving the tray rearward.
Note: You must latch the tray in the
forward position before operating the
vehicle. This helps prevent damage to your
vehicle or equipment.
Note: The maximum recommended load,
evenly distributed and secured on the
electronic utility tray, is
100 lb (45 kg). You can use the tray to mount electronic
equipment. It will latch in either the
full-forward or full-rearward position. Push
down on the levers on both sides of the
tray to release the latches and move the
tray.
REAR UNDER FLOOR
STORAGE
Load Safe Label
Refer to the label on the luggage
compartment lid or liftgate for additional
information about the spare wheel and
tire.
Load Floor
Do not permanently remove the foam
structure under the load floor that
surrounds the spare tire. It is necessary to
properly support the load floor.
The maximum load floor cargo weight,
evenly distributed and with a full size spare
tire installed, is
420 lb (190 kg).
LOAD LIMIT
Vehicle Loading - with and
without a Trailer
This section will guide you in the
proper loading of your vehicle,
trailer or both, to keep your loaded
vehicle weight within its design
rating capability, with or without
a trailer. Properly loading your
vehicle will provide maximum
return of vehicle design
performance. Before loading your
vehicle, familiarize yourself with
130
Police Interceptor (CPH), enUSA, Edition date: 10/2015, First Printing Load CarryingE203068 E210216
Page 169 of 358
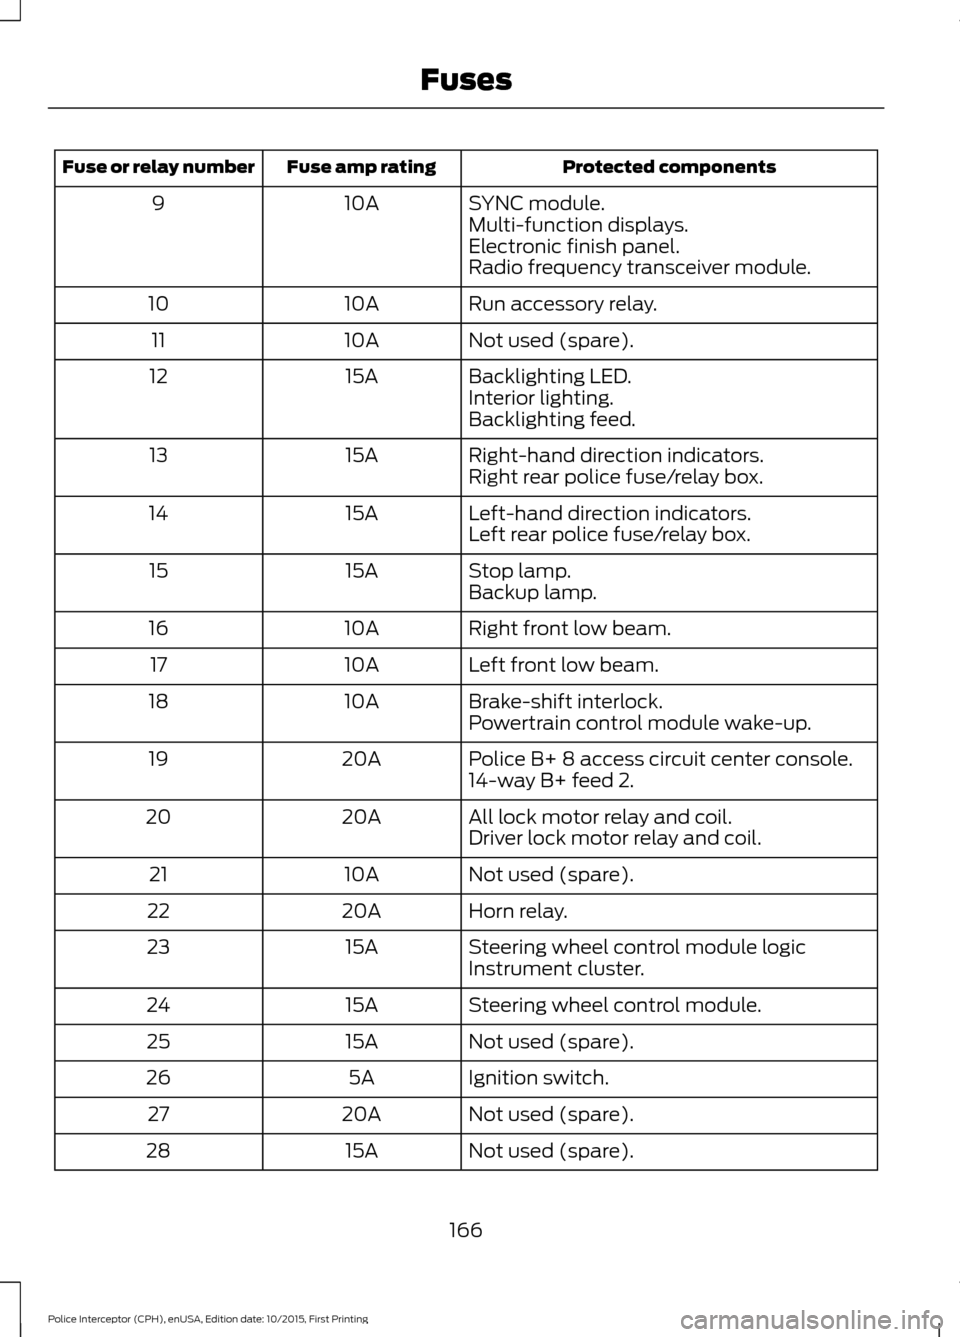
Protected components
Fuse amp rating
Fuse or relay number
SYNC module.
10A
9
Multi-function displays.
Electronic finish panel.
Radio frequency transceiver module.
Run accessory relay.
10A
10
Not used (spare).
10A
11
Backlighting LED.
15A
12
Interior lighting.
Backlighting feed.
Right-hand direction indicators.
15A
13
Right rear police fuse/relay box.
Left-hand direction indicators.
15A
14
Left rear police fuse/relay box.
Stop lamp.
15A
15
Backup lamp.
Right front low beam.
10A
16
Left front low beam.
10A
17
Brake-shift interlock.
10A
18
Powertrain control module wake-up.
Police B+ 8 access circuit center console.
20A
19
14-way B+ feed 2.
All lock motor relay and coil.
20A
20
Driver lock motor relay and coil.
Not used (spare).
10A
21
Horn relay.
20A
22
Steering wheel control module logic
15A
23
Instrument cluster.
Steering wheel control module.
15A
24
Not used (spare).
15A
25
Ignition switch.
5A
26
Not used (spare).
20A
27
Not used (spare).
15A
28
166
Police Interceptor (CPH), enUSA, Edition date: 10/2015, First Printing Fuses
Page 170 of 358

Protected components
Fuse amp rating
Fuse or relay number
Radio.
20A
29
Global positioning system module.
Front park lamps.
15A
30
Brake signal for police equipment.
5A
31
Master window and mirror switch.
15A
32
Lock switch illumination.
Police console inline delayed accessory
feed.
Delayed accessory feed.
Not used (spare).
10A
33
Reverse park aid module.
10A
34
Blind spot monitor module.
Rear video camera.
Motorized humidity sensor.
5A
35
Overdrive cancel switch (Low gear switch
feed).
Column shift – low gear.
Not used (spare).
10A
36
Not used (spare).
10A
37
Auto–dimming mirror.
10A
38
Rear camera display mirror.
High beam headlamp shutters.
15A
39
Rear park lamps.
10A
40
Restraints run/start.
7.5A
41
Police 4-button steering wheel control
module.
5A
42
Not used (spare).
10A
43
Not used (spare).
10A
44
Not used (spare).
5A
45
Climate control module.
10A
46
167
Police Interceptor (CPH), enUSA, Edition date: 10/2015, First Printing Fuses
Page 205 of 358
•
When inflating a tire or other objects,
use the black air hose only. Do not use
the transparent hose which is designed
for sealant application only.
• Operating the kit could cause an
electrical disturbance in radio, CD, and
DVD player operation.
What to do when a Tire Is
Punctured
A tire puncture within the tire tread area
can be repaired in two stages with the kit.
• In the first stage, the tire will be
reinflated with a sealing compound
and air. After the tire has been
reinflated, you will need to drive the
vehicle a short distance 4 mi (6 km) to
distribute the sealant in the tire.
• In the second stage, you will need to
check the tire pressure and adjust, if
necessary, to the vehicle tire inflation
pressure.
First Stage: Reinflating the Tire
with Sealing Compound and Air WARNINGS
Do not stand directly over the kit
while inflating the tire. If you notice
any unusual bulges or deformations
in the tire sidewall during inflation, stop
and call roadside assistance. If the tire does not inflate to the
recommended tire pressure within
15 minutes, stop and call roadside
assistance. Preparation: Park the vehicle in a safe, level
and secure area, away from moving traffic.
Turn the hazard lights on. Apply the parking
brake and turn the engine off. Inspect the
flat tire for visible damage. Sealant compound contains latex. To
avoid any allergic reactions, use the
non-latex gloves located in the accessory
box on the underside of the kit housing.
Do not remove any foreign object that has
pierced the tire. If a puncture is located in
the tire sidewall, stop and call roadside
assistance.
1. Remove the valve cap from the tire
valve.
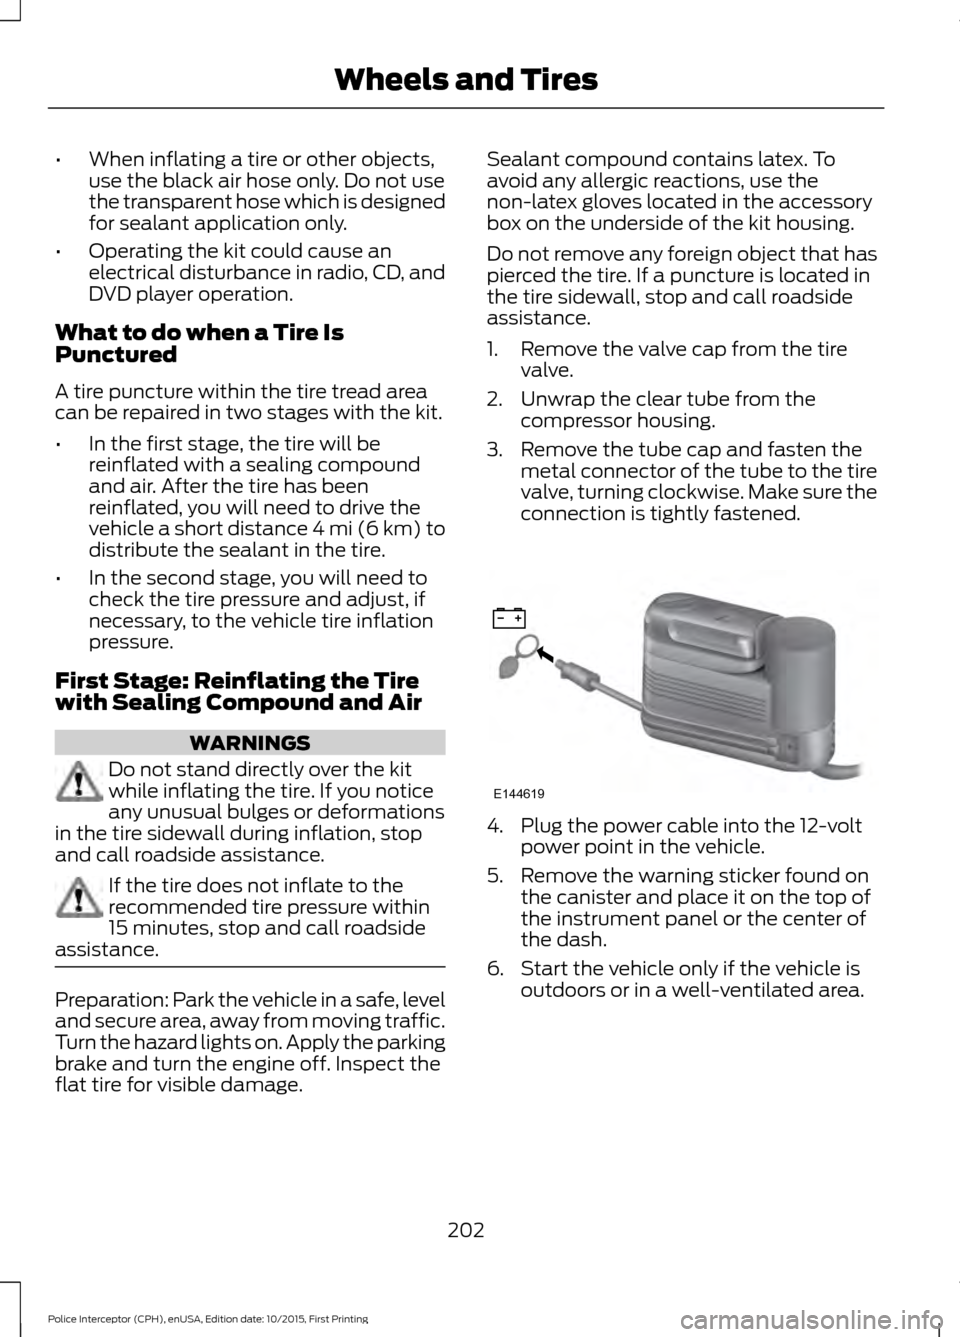
2. Unwrap the clear tube from the compressor housing.
3. Remove the tube cap and fasten the metal connector of the tube to the tire
valve, turning clockwise. Make sure the
connection is tightly fastened. 4. Plug the power cable into the 12-volt
power point in the vehicle.
5. Remove the warning sticker found on the canister and place it on the top of
the instrument panel or the center of
the dash.
6. Start the vehicle only if the vehicle is outdoors or in a well-ventilated area.
202
Police Interceptor (CPH), enUSA, Edition date: 10/2015, First Printing Wheels and TiresE144619
Page 207 of 358

2. Unhook the black hose from the side
of the compressor and fasten firmly on
the valve stem by turning clockwise.
3. Push and turn the dial clockwise to the
air position. Turn on the kit by pressing
the on button. 4. Adjust the tire to the recommended
inflation pressure from the tire label
located on the driver's door or door
jamb area. The tire pressure has to be
checked with the compressor in the
OFF position to get the correct tire
pressure reading.
5. Turn the compressor off by pressing the on/off button.
6. When the tire pressure reading with the
compressor in the off position is
correct, disconnect the hose, re-install
the valve cap on the tire valve, unplug
the compressor, and return the kit to
the stowage area. What to do after the Tire has been
Sealed
After using the kit to seal your tire, you will
need to replace the sealant canister and
clear tube (hose). You can obtain and
replace sealing compound and spare parts
at an authorized Ford dealer or tire dealer.
Empty sealant bottles may be disposed of
at home. However, liquid residue from the
sealing compound should be disposed by
your local authorized Ford dealer or tire
dealer, or in accordance with local waste
disposal regulations.
Note:
After the sealing compound has been
used, the maximum vehicle speed is 50 mph
(80 km/h) and the maximum driving
distance is 120 mi (200 km). The sealed tire
should be inspected immediately.
Note: After sealant use, the tire pressure
monitoring system sensor and valve stem
on the wheel must be replaced by an
authorized Ford dealer.
You can check the tire pressure any time
within the 120 mi (200 km) by performing
the procedure from Second stage:
Checking tire pressure listed previously.
Removal of the sealant canister from
the kit 1. Unwrap the clear tube from the
compressor housing.
204
Police Interceptor (CPH), enUSA, Edition date: 10/2015, First Printing Wheels and TiresE144622 E144623