2016 FORD F250 SUPER DUTY ECU
[x] Cancel search: ECUPage 287 of 507
If your vehicle is equipped withdual rear wheels it isrecommended that the front andrear tires (in pairs) be rotated onlyside to side. We do notrecommend splitting up the dualrear wheels. Rotate them side toside as a set. After tire rotation,inflation pressures must beadjusted for the tires newpositions in accordance withvehicle requirements.
USING SNOW CHAINS
WARNING
Snow tires must be the same size,load index, speed rating as thoseoriginally provided by Ford. Use ofany tire or wheel not recommended byFord can affect the safety andperformance of your vehicle, which couldresult in an increased risk of loss of vehiclecontrol, vehicle rollover, personal injury anddeath. Additionally, the use ofnon-recommended tires and wheels couldcause steering, suspension, axle, transfercase or power transfer unit failure.
Note:Do not use snow chains on vehicleswith 20 inch wheels and tires.
The tires on your vehicle have all-weathertreads to provide traction in rain and snow.However, in some climates, you may needto use snow tires and cables. If you needto use cables, it is recommended that steelwheels (of the same size andspecifications) be used, as cables may chipaluminum wheels.
Note:The suspension insulation andbumpers will help prevent vehicle damage.Do not remove these components from yourvehicle when using snow tires and chains.
Follow these guidelines when using snowtires and chains:
•If possible, avoid fully loading yourvehicle
•Use only SAE Class S chains.
•Install chains securely, verifying thatthe chains do not touch any wiring,brake lines or fuel lines.
•Drive cautiously. If you hear the chainsrub or bang against your vehicle, stopand retighten the chains. If this doesnot work, remove the chains to preventdamage to your vehicle.
•Remove the tire chains when they areno longer needed. Do not use tirechains on dry roads.
If you have any questions regarding snowchains or cables, please contact yourauthorized dealer.
TIRE PRESSURE MONITORING
SYSTEM
WARNING
The tire pressure monitoring systemis not a substitute for manuallychecking the tire pressure. The tirepressure should be checked periodically(at least monthly) using a tire pressuregauge. Failure to properly maintain yourtire pressure could increase the risk of tirefailure, loss of control, vehicle rollover andpersonal injury.
284
Super Duty (TFA) Canada/United States of America, enUSA, First Printing
Wheels and Tires
Page 299 of 507
7. Stow the jack, jack handle and lugwrench. Make sure the jack is securelyfastened so it does not rattle whendriving.
8. Unblock the wheels.
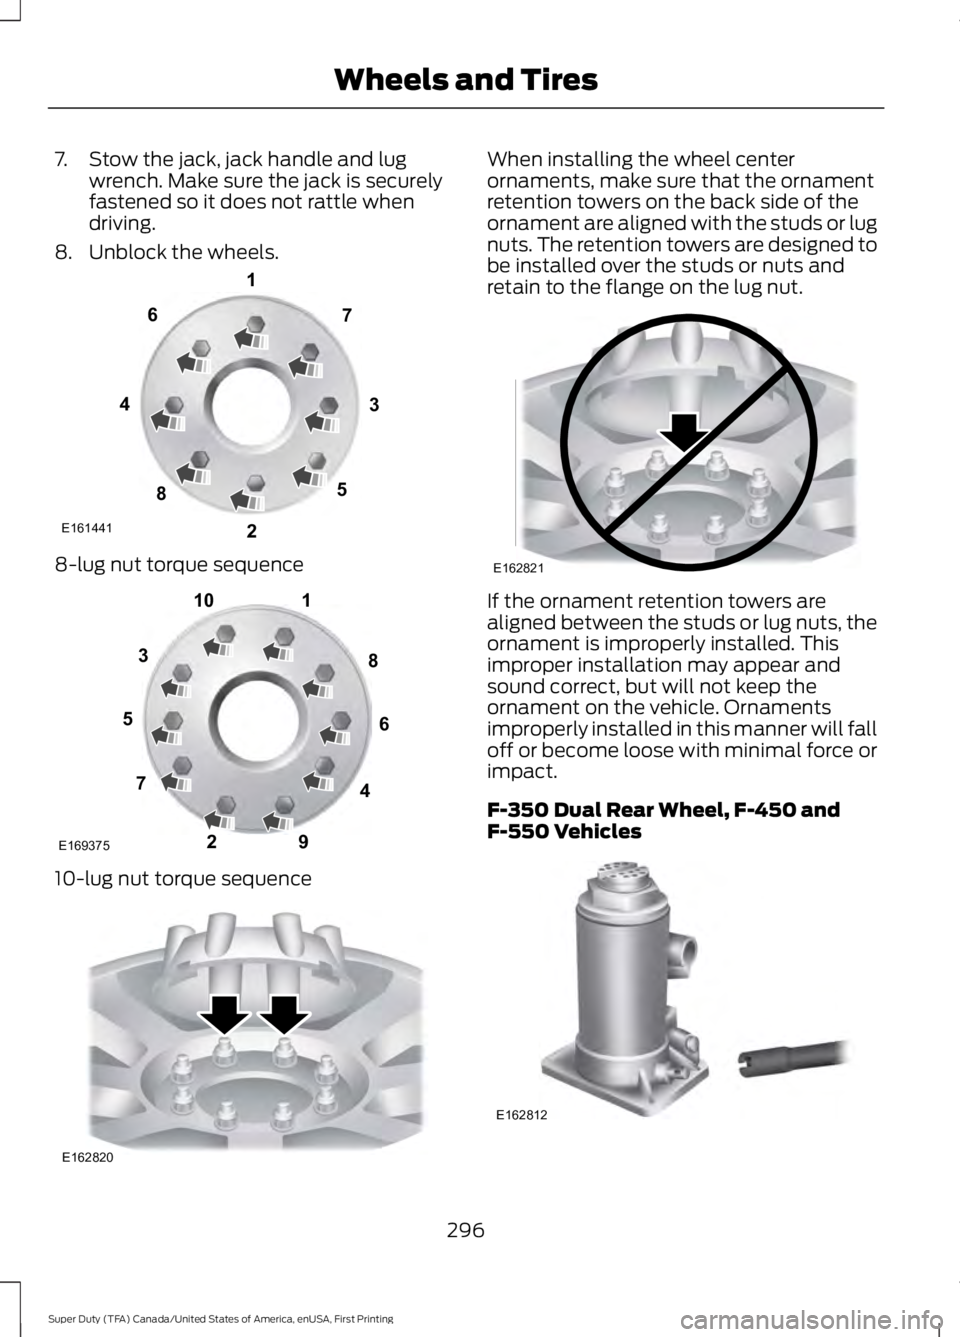
8-lug nut torque sequence
10-lug nut torque sequence
When installing the wheel centerornaments, make sure that the ornamentretention towers on the back side of theornament are aligned with the studs or lugnuts. The retention towers are designed tobe installed over the studs or nuts andretain to the flange on the lug nut.
If the ornament retention towers arealigned between the studs or lug nuts, theornament is improperly installed. Thisimproper installation may appear andsound correct, but will not keep theornament on the vehicle. Ornamentsimproperly installed in this manner will falloff or become loose with minimal force orimpact.
F-350 Dual Rear Wheel, F-450 andF-550 Vehicles
296
Super Duty (TFA) Canada/United States of America, enUSA, First Printing
Wheels and TiresE161441
13
4
27
6
5
8 1
2
3
4
5
6
7 8
9
10
E169375 E162820 E162821 E162812
Page 301 of 507

Rear: F-350 dual rear wheel
Rear: F-450 and F-550
Jacking the Vehicle
1. Insert the jack handle into the pumplinkage.
2. Use an up-and-down motion with thejack handle to raise the wheelcompletely off the ground.
Note:Hydraulic jacks are equipped with apressure release valve that prevents liftingloads which exceed the jack's ratedcapacity.
3. Remove the lug nuts with the lugwrench.
4.Replace the flat tire with the spare tire,making sure the valve stem is facingoutward on all front an inboard rearwheels. If you are replacing theoutboard wheel, the valve stem mustbe facing inward. Reinstall the lug nutsuntil the wheel is snug against the hub.Do not fully tighten the lug nuts untilthe wheel has been lowered.
5. Lower the wheel by slowly turning therelease valve counterclockwise.Opening the release valve slowly willprovide a more controlled rate ofdescent.
6. Remove the jack and fully tighten thelug nuts in the order shown. SeeTechnical Specifications (page 301).
7. Stow the flat tire. See Stowing the flator spare tire if the vehicle is equippedwith a spare tire carrier.
8. Stow the jack, jack handle and lugwrench. Make sure the jack is securelyfastened so it does not rattle whendriving.
9. Unblock the wheels.
298
Super Duty (TFA) Canada/United States of America, enUSA, First Printing
Wheels and TiresE162817 E162818 E162819
Page 304 of 507

7.Repeat this tightness check procedurewhen servicing the spare tire pressure(every six months, per scheduledmaintenance information), or at anytime that the spare tire is disturbed
through service of other components.
8. If removed, install the spare tire lockinto the bumper drive tube with thespare tire lock key and jack handle.
TECHNICAL SPECIFICATIONS
Wheel Lug Nut Torque Specifications
WARNING
When a wheel is installed, always remove any corrosion, dirt or foreign materialspresent on the mounting surfaces of the wheel or the surface of the wheel hub,brake drum or brake disc that contacts the wheel. Make sure that any fastenersthat attach the rotor to the hub are secured so they do not interfere with the mountingsurfaces of the wheel. Installing wheels without correct metal-to-metal contact at thewheel mounting surfaces can cause the wheel nuts to loosen and the wheel to come offwhile the vehicle is in motion, resulting in loss of control.
lb.ft (Nm)Bolt size
165 lb.ft (224 Nm)M14 x 1.5
*Torque specifications are for nut and bolt threads free of dirt and rust. Use only Fordrecommended replacement fasteners.
On vehicles equipped with single rear wheels, retighten the lug nuts to the specified torqueat 100 miles (160 kilometers) after any wheel disturbance (such as tire rotation, changinga flat tire, wheel removal).
On vehicles equipped with dual rear wheels, retighten the wheel lug nuts to the specifiedtorque at 100 miles (160 kilometers), and again at 500 miles (800 kilometers) of newvehicle operation and after any wheel disturbance (such as tire rotation, changing a flattire, wheel removal).
It is important to follow the proper wheel mounting and lug nut torque procedures.
On all two-piece flat wheel nuts, apply one drop of motor oil between the flat washerand the nut. Do not apply motor oil to the wheel nut threads or the wheel stud threads.
301
Super Duty (TFA) Canada/United States of America, enUSA, First Printing
Wheels and TiresE161443
Page 338 of 507
Depending on your cell phone's capabilityand your market, the system may promptyou with questions, such as setting thecurrent cell phone as the primary cellphone (the cell phone SYNC automaticallytries to connect with first upon vehiclestart-up) and downloading yourphonebook.
Pairing Subsequent Cell Phones
Note:To scroll through the menus, pressthe up and down arrows on your audiosystem.
Note:Make sure to switch on the ignitionand the radio. Put the transmission inposition park (P) (automatic transmission)or neutral with the parking brake applied(manual transmission).
Press the phone button, then scroll to:
ActionMessage
Press the OK button.Phone settings
Press the OK button.Bluetooth device
Press the OK button. When the following message appearsin the display.Add
Find SYNC1. Press the OK button.
2. Put your cell phone into Bluetooth discovery mode. Seeyour device's manual if necessary.
3. When prompted on your cell phone's display, enter thesix-digit PIN provided by SYNC in the radio display. Thedisplay indicates when the pairing is successful.
The system then prompts with questions, such as if you would like to set the current cellphone as the primary cell phone (the cell phone SYNC automatically tries to connectwith first upon vehicle start-up) or download your phonebook.
Phone Voice Commands
Press the voice icon and say:
Voice Commands
Phone
You can then say any of the followingcommands.
Call History Incoming
Call History Missed
Call History Outgoing
Voice Commands
Phonebook ___
Phonebook ___ at Home
Phonebook ___ at Work
Phonebook ___ in Office
Phonebook ___ on Cell
___ is a dynamic listing that should be thename of a contact in your phonebook. Forexample you could say "Call Mom".
335
Super Duty (TFA) Canada/United States of America, enUSA, First Printing
SYNC™ (If Equipped)
Page 349 of 507
Action and DescriptionMessage
Press the OK button and scroll to select. Press the OK buttonto confirm.
Access the Auto Version number as well as the FDN number.System infoPress the OK button to select.
Exit the current menu.Return
SYNC™ APPLICATIONS AND
SERVICES
In order for the following features to work,your cell phone must be compatible withSYNC. To check your phone'scompatibility, visit www.SYNCMyRide.com,www.SYNCMyRide.ca orwww.syncmaroute.ca.
•SYNC Services*: Provides access totraffic, directions and information suchas travel, horoscopes, stock prices andmore.
•911 Assist: Can alert 911 in the event ofan emergency.
•Vehicle Health Report*: Provides adiagnostic and maintenance reportcard of your vehicle.*This is an optional feature and availablein the United States only.
911 Assist (If Equipped)
WARNINGS
Unless the 911 Assist setting is set onbefore a crash, the system will notdial for help which could delayresponse time, potentially increasing therisk of serious injury or death after a crash.
WARNINGS
Do not wait for 911 Assist to make anemergency call if you can do ityourself. Dial emergency servicesimmediately to avoid delayed responsetime which could increase the risk ofserious injury or death after a crash. If youdo not hear 911 Assist within five secondsof the crash, the system or phone may bedamaged or non-functional.
Always place your phone in a securelocation in your vehicle so it does notbecome a projectile or get damagedin a crash. Failure to do so may causeserious injury to someone or damage thephone which could prevent 911 Assist fromworking properly.
Note:The SYNC 911 Assist feature must beset on before the incident.
Note:Before setting this feature on, makesure that you read the 911 Assist PrivacyNotice later in this section for importantinformation.
Note:If any user turns 911 Assist on or off,that setting applies for all paired phones. If911 Assist is turned off, either a voicemessage plays or a display message (oricon) comes on (or both) when your vehicleis started after a previously paired phoneconnects.
Note:Every phone operates differently.While SYNC 911 Assist works with mostcellular phones, some may have troubleusing this feature.
346
Super Duty (TFA) Canada/United States of America, enUSA, First Printing
SYNC™ (If Equipped)
Page 369 of 507
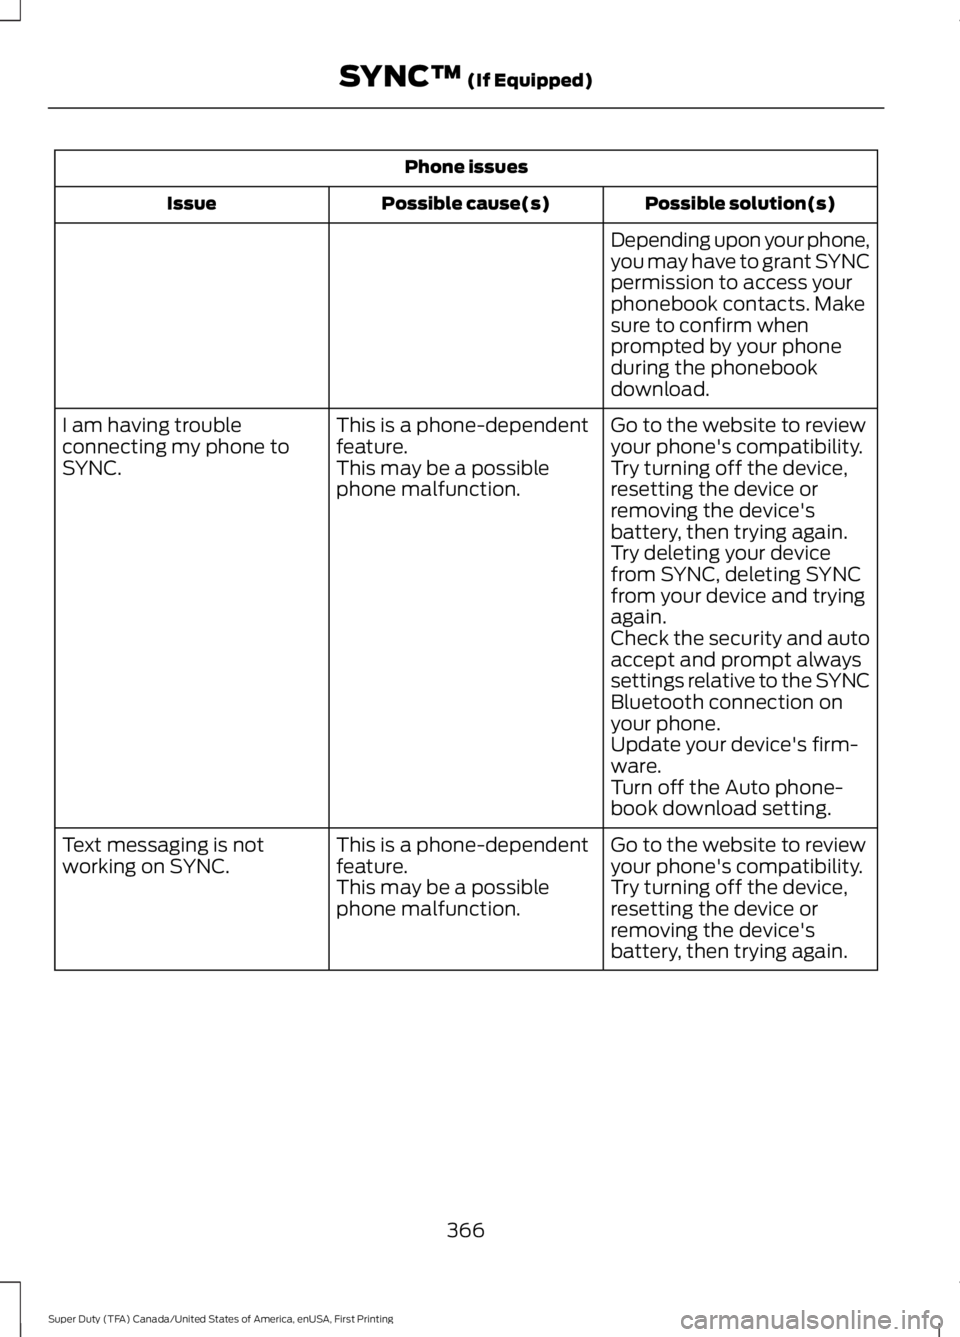
Phone issues
Possible solution(s)Possible cause(s)Issue
Depending upon your phone,you may have to grant SYNCpermission to access yourphonebook contacts. Makesure to confirm whenprompted by your phoneduring the phonebookdownload.
Go to the website to reviewyour phone's compatibility.This is a phone-dependentfeature.I am having troubleconnecting my phone toSYNC.Try turning off the device,resetting the device orremoving the device'sbattery, then trying again.
This may be a possiblephone malfunction.
Try deleting your devicefrom SYNC, deleting SYNCfrom your device and tryingagain.Check the security and autoaccept and prompt alwayssettings relative to the SYNCBluetooth connection onyour phone.Update your device's firm-ware.Turn off the Auto phone-book download setting.
Go to the website to reviewyour phone's compatibility.This is a phone-dependentfeature.Text messaging is notworking on SYNC.Try turning off the device,resetting the device orremoving the device'sbattery, then trying again.
This may be a possiblephone malfunction.
366
Super Duty (TFA) Canada/United States of America, enUSA, First Printing
SYNC™ (If Equipped)
Page 370 of 507

USB and media issues
Possible solution(s)Possible cause(s)Issue
Try turning off the device,resetting the device,removing the device'sbattery, then trying again.
This may be a possibledevice malfunction.I am having troubleconnecting my device.
Make sure you are using themanufacturer's cable.Make sure you insert theUSB cable correctly into thedevice and the USB port.Make sure that the devicedoes not have an auto-install program or activesecurity settings.
Make sure you are notleaving the device in yourvehicle during very hot orcold temperatures.
This is a device limitation.SYNC does not recognizemy device when I turn on thecar.
Review the device compatib-ility chart on the SYNCwebsite to confirm yourphone supports theBluetooth audio streamingfunction.
This is a phone-dependentfeature.The device is not connected.
Bluetooth audio does notstream.
Make sure you correctlyconnect the device to SYNC,and that you have pressedplay on your device.
Make sure that all songdetails are populated.Your music files may notcontain the correct artist,song title, album or genreinformation.
SYNC does not recognizemusic that is on my device.Some devices require you tochange the USB settingsfrom mass storage to MTPclass.The file may be corrupted.The song may have copy-right protection, which doesnot allow it to play.
367
Super Duty (TFA) Canada/United States of America, enUSA, First Printing
SYNC™ (If Equipped)