2016 FORD EXPLORER tow
[x] Cancel search: towPage 271 of 541

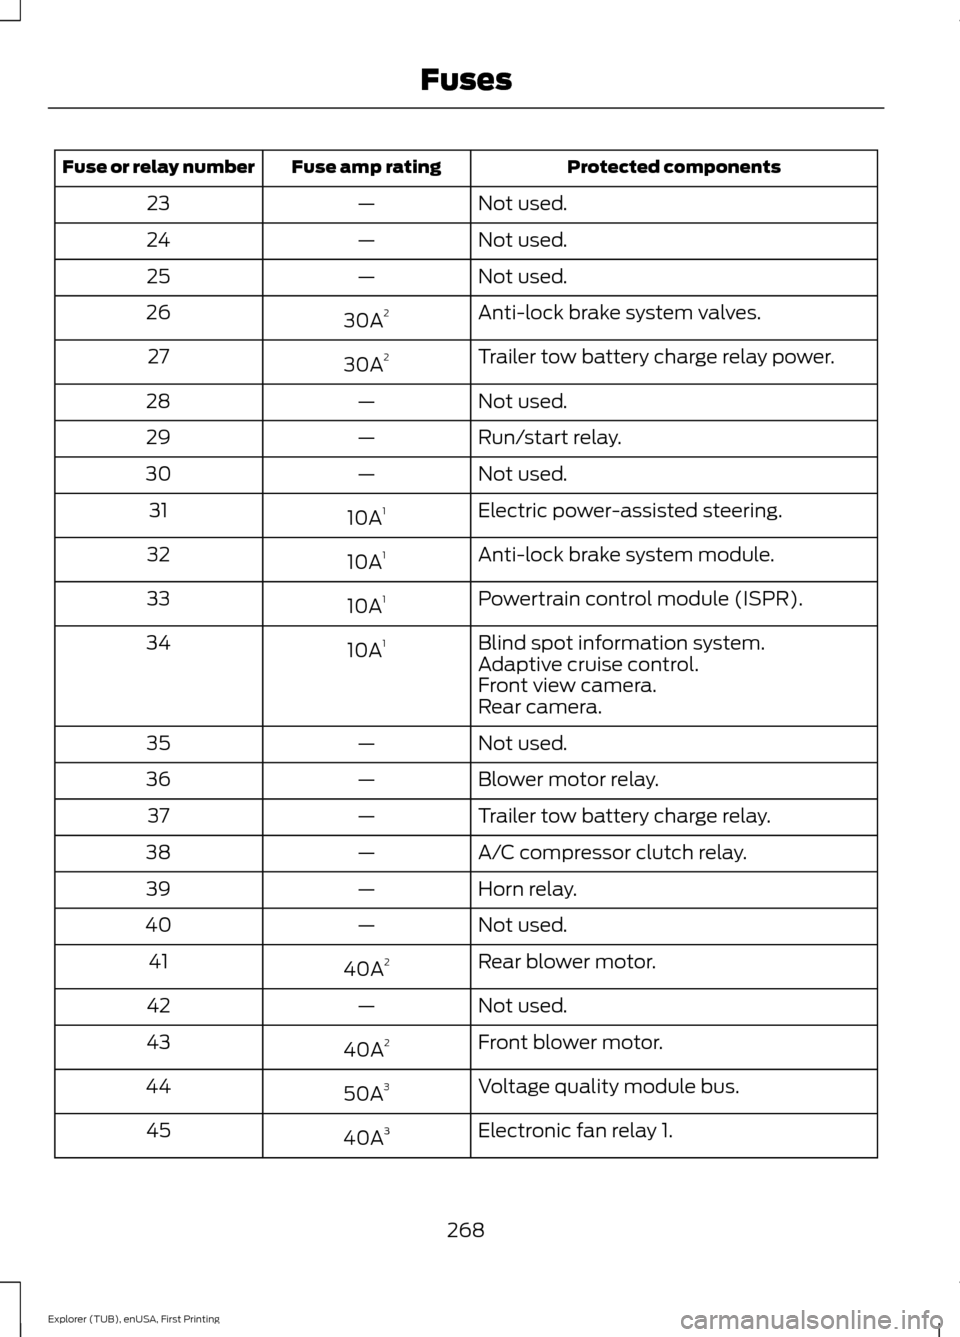
Protected components
Fuse amp rating
Fuse or relay number
Not used.
—
23
Not used.
—
24
Not used.
—
25
Anti-lock brake system valves.
30A 2
26
Trailer tow battery charge relay power.
30A 2
27
Not used.
—
28
Run/start relay.
—
29
Not used.
—
30
Electric power-assisted steering.
10A 1
31
Anti-lock brake system module.
10A 1
32
Powertrain control module (ISPR).
10A 1
33
Blind spot information system.
10A 1
34
Adaptive cruise control.
Front view camera.
Rear camera.
Not used.
—
35
Blower motor relay.
—
36
Trailer tow battery charge relay.
—
37
A/C compressor clutch relay.
—
38
Horn relay.
—
39
Not used.
—
40
Rear blower motor.
40A 2
41
Not used.
—
42
Front blower motor.
40A 2
43
Voltage quality module bus.
50A 3
44
Electronic fan relay 1.
40A 3
45
268
Explorer (TUB), enUSA, First Printing Fuses
Page 272 of 541

Protected components
Fuse amp rating
Fuse or relay number
Trailer tow brake controller.
30A 3
46
Not used.
—
47
Body control module RP1 bus.
50A 3
48
Not used.
—
49
Body control module RP2 bus.
50A 3
50
Electronic fan relay 3.
50A 3
51
Anti-lock brake system pump.
60A 3
52
Not used.
—
53
Not used.
—
54
Not used.
—
55
Power inverter.
40A 2
56
Not used.
—
57
Not used.
—
58
Not used.
—
59
Power point (front console bin).
20A 2
60
Not used.
—
61
Power point (instrument panel).
20A 2
62
Fuel pump.
30A 2
63
Not used.
—
64
Power point (2nd row) (without USB
charger).
20A
2
65
Not used.
—
66
Power point (cargo area).
20A 2
67
Not used.
—
68
Power liftgate.
30A 2
69
269
Explorer (TUB), enUSA, First Printing Fuses
Page 273 of 541

Protected components
Fuse amp rating
Fuse or relay number
Trailer tow left-hand and right-hand stop
and direction indicator lamps.
20A
2
70
Not used.
—
71
Heated/cooled seats.
30A 2
72
Driver seat module.
30A 2
73
Driver seat power.
Passenger seat power.
30A 2
74
Front wiper motor.
30A 2
75
Not used.
—
76
Not used.
—
77
3rd row power folding seat module relay.
30A 2
78
Starter relay.
30A 2
79
Not used.
—
80
Trailer tow back-up lamp relay.
10A 1
81
Not used.
—
82
Brake on/off switch.
10A 1
83
Not used.
—
84
2nd row USB charger (if equipped).
5A 1
85
Not used.
—
86
Not used.
—
87
Not used.
—
88
Not used.
—
89
Not used.
—
90
Not used.
—
91
Multi-contour seat module relay.
15A 1
92
270
Explorer (TUB), enUSA, First Printing Fuses
Page 274 of 541

Protected components
Fuse amp rating
Fuse or relay number
Alternator sense.
10A 1
93
Rear washer relay.
15A 1
94
Rear wiper relay.
15A 1
95
Powertrain control module relay coil
power.
10A
1
96
Rain sensor.
5A 1
97
2nd row seat motors.
20A 1
98
Trailer tow parking lamp relay.
20A 1
99
1 Micro fuse.
2 M-type fuse.
3 J-type fuse.
Passenger Compartment Fuse
Panel
The fuse panel is located under the
instrument panel to the left of the steering
column. Note:
It may be easier to access the fuse
panel if you remove the finish trim piece.
271
Explorer (TUB), enUSA, First Printing Fuses
Page 276 of 541

Protected components
Fuse amp rating
Fuse or relay number
Instrument cluster.
7.5A 2
13
Smart data link.
Steering column control module.
Not used.
—
14
Smart datalink connector power.
10A 2
15
Heads up display.
Not used.
—
16
Electronic finish panel.
5A 2
17
Push button start switch.
5A 2
18
Ignition switch.
Key inhibit.
Transmission control switch (tow haul).
7.5A 2
19
Not used.
—
20
Terrain management switch.
5A 2
21
Heads up display.
Humidity sensor.
Occupant classification sensor.
5A 2
22
Delayed accessory power.
10A 1
23
Power windows.
Moonroof.
Folding mirror relay.
DC inverter.
Window/moonroof switch illumination.
Central lock relay.
20A 1
24
Left-hand front smart window motor.
30A 1
25
Door zone module.
Right-hand front smart window motor.
30A 1
26
Door zone module.
Moonroof.
30A 1
27
Sony amplifier - 10 channel.
20A 1
28
Sony amplifier - 14 channel.
30A 1
29
273
Explorer (TUB), enUSA, First Printing Fuses
Page 288 of 541

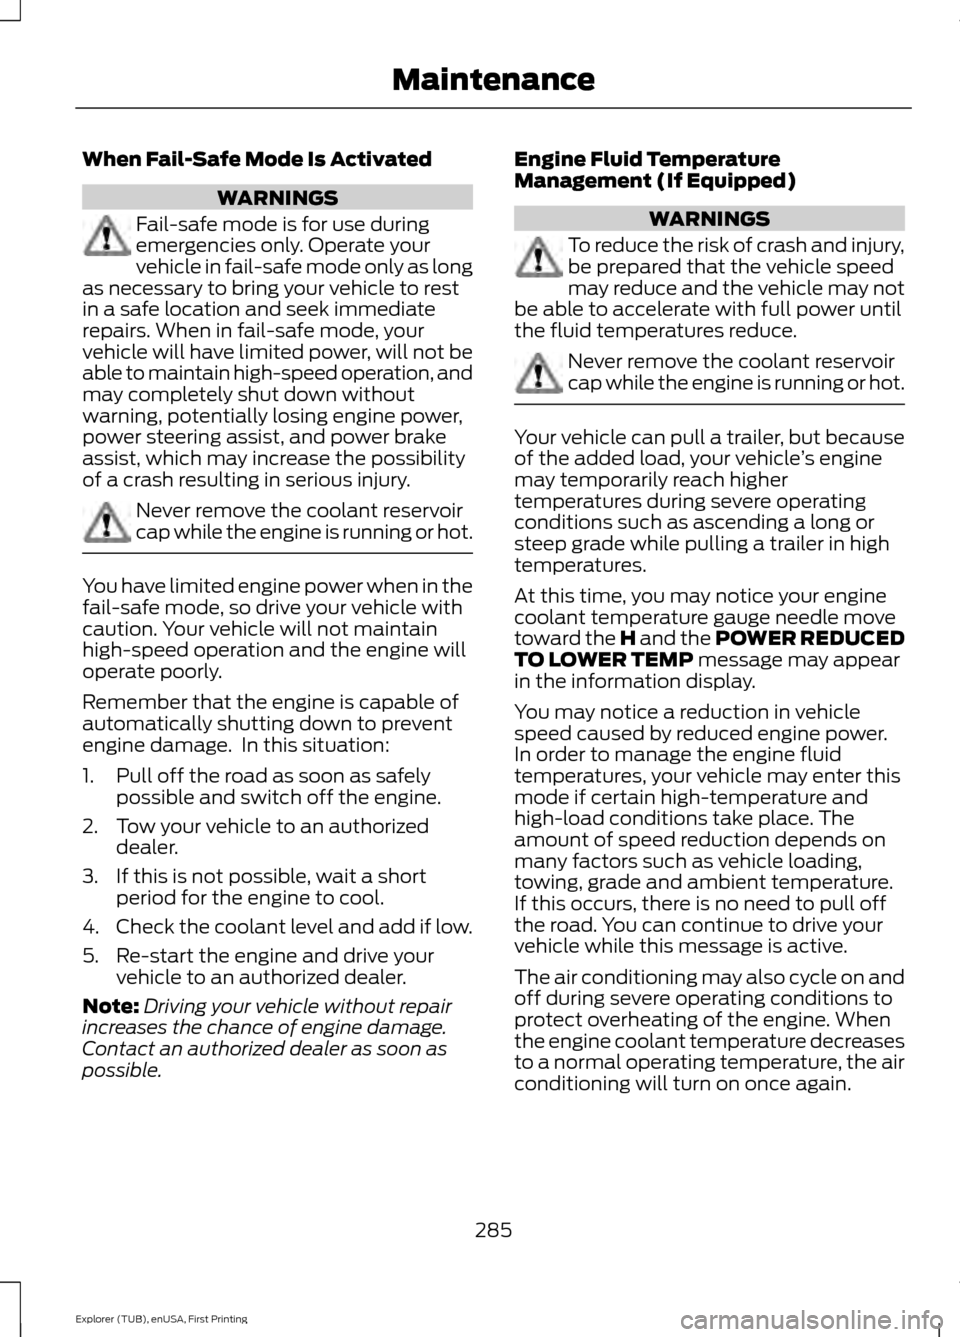
When Fail-Safe Mode Is Activated
WARNINGS
Fail-safe mode is for use during
emergencies only. Operate your
vehicle in fail-safe mode only as long
as necessary to bring your vehicle to rest
in a safe location and seek immediate
repairs. When in fail-safe mode, your
vehicle will have limited power, will not be
able to maintain high-speed operation, and
may completely shut down without
warning, potentially losing engine power,
power steering assist, and power brake
assist, which may increase the possibility
of a crash resulting in serious injury. Never remove the coolant reservoir
cap while the engine is running or hot.
You have limited engine power when in the
fail-safe mode, so drive your vehicle with
caution. Your vehicle will not maintain
high-speed operation and the engine will
operate poorly.
Remember that the engine is capable of
automatically shutting down to prevent
engine damage. In this situation:
1. Pull off the road as soon as safely
possible and switch off the engine.
2. Tow your vehicle to an authorized dealer.
3. If this is not possible, wait a short period for the engine to cool.
4. Check the coolant level and add if low.
5. Re-start the engine and drive your vehicle to an authorized dealer.
Note: Driving your vehicle without repair
increases the chance of engine damage.
Contact an authorized dealer as soon as
possible. Engine Fluid Temperature
Management (If Equipped) WARNINGS
To reduce the risk of crash and injury,
be prepared that the vehicle speed
may reduce and the vehicle may not
be able to accelerate with full power until
the fluid temperatures reduce. Never remove the coolant reservoir
cap while the engine is running or hot.
Your vehicle can pull a trailer, but because
of the added load, your vehicle
’s engine
may temporarily reach higher
temperatures during severe operating
conditions such as ascending a long or
steep grade while pulling a trailer in high
temperatures.
At this time, you may notice your engine
coolant temperature gauge needle move
toward the H and the POWER REDUCED
TO LOWER TEMP message may appear
in the information display.
You may notice a reduction in vehicle
speed caused by reduced engine power.
In order to manage the engine fluid
temperatures, your vehicle may enter this
mode if certain high-temperature and
high-load conditions take place. The
amount of speed reduction depends on
many factors such as vehicle loading,
towing, grade and ambient temperature.
If this occurs, there is no need to pull off
the road. You can continue to drive your
vehicle while this message is active.
The air conditioning may also cycle on and
off during severe operating conditions to
protect overheating of the engine. When
the engine coolant temperature decreases
to a normal operating temperature, the air
conditioning will turn on once again.
285
Explorer (TUB), enUSA, First Printing Maintenance
Page 290 of 541

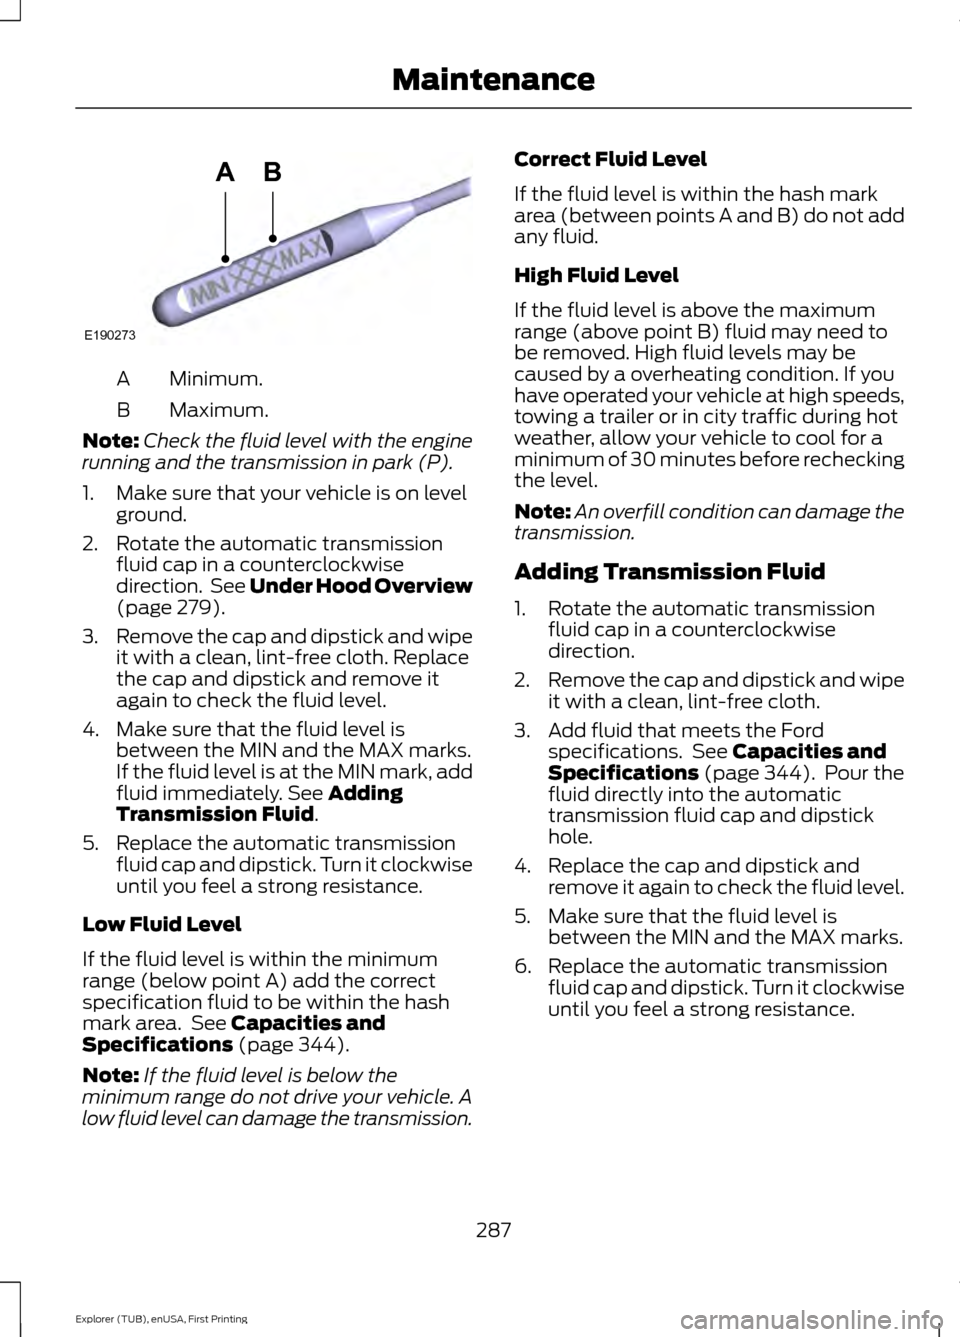
Minimum.
A
Maximum.
B
Note: Check the fluid level with the engine
running and the transmission in park (P).
1. Make sure that your vehicle is on level ground.
2. Rotate the automatic transmission fluid cap in a counterclockwise
direction. See Under Hood Overview
(page 279).
3. Remove the cap and dipstick and wipe
it with a clean, lint-free cloth. Replace
the cap and dipstick and remove it
again to check the fluid level.
4. Make sure that the fluid level is between the MIN and the MAX marks.
If the fluid level is at the MIN mark, add
fluid immediately. See
Adding
Transmission Fluid.
5. Replace the automatic transmission fluid cap and dipstick. Turn it clockwise
until you feel a strong resistance.
Low Fluid Level
If the fluid level is within the minimum
range (below point A) add the correct
specification fluid to be within the hash
mark area. See
Capacities and
Specifications (page 344).
Note: If the fluid level is below the
minimum range do not drive your vehicle. A
low fluid level can damage the transmission. Correct Fluid Level
If the fluid level is within the hash mark
area (between points A and B) do not add
any fluid.
High Fluid Level
If the fluid level is above the maximum
range (above point B) fluid may need to
be removed. High fluid levels may be
caused by a overheating condition. If you
have operated your vehicle at high speeds,
towing a trailer or in city traffic during hot
weather, allow your vehicle to cool for a
minimum of 30 minutes before rechecking
the level.
Note:
An overfill condition can damage the
transmission.
Adding Transmission Fluid
1. Rotate the automatic transmission fluid cap in a counterclockwise
direction.
2. Remove the cap and dipstick and wipe
it with a clean, lint-free cloth.
3. Add fluid that meets the Ford specifications. See
Capacities and
Specifications (page 344). Pour the
fluid directly into the automatic
transmission fluid cap and dipstick
hole.
4. Replace the cap and dipstick and remove it again to check the fluid level.
5. Make sure that the fluid level is between the MIN and the MAX marks.
6. Replace the automatic transmission fluid cap and dipstick. Turn it clockwise
until you feel a strong resistance.
287
Explorer (TUB), enUSA, First Printing MaintenanceE190273
AB
Page 303 of 541

GENERAL INFORMATION
Your Ford or Lincoln authorized dealer has
many quality products available to clean
your vehicle and protect its finishes.
CLEANING PRODUCTS
For best results, use the following products
or products of equivalent quality:
•
Motorcraft Bug and Tar Remover
(ZC-42)
• Motorcraft Custom Bright Metal
Cleaner (ZC-15)
• Motorcraft Detail Wash (ZC-3-A)
• Motorcraft Dusting Cloth (ZC-24)
• Motorcraft Engine Shampoo and
Degreaser (U.S. only) (ZC-20)
• Motorcraft Engine Shampoo (Canada
only) (CXC-66-A)
• Motorcraft Multi-Purpose Cleaner
(Canada only) (CXC-101)
• Motorcraft Premium Glass Cleaner
(Canada only) (CXC-100)
• Motorcraft Premium Quality
Windshield Washer Fluid (Canada
only) [CXC-37-(A, B, D or F)]
• Motorcraft Premium Windshield Wash
Concentrate with Bitterant (U.S. only)
(ZC-32-B2)
• Motorcraft Professional Strength
Carpet & Upholstery Cleaner (ZC-54)
• Motorcraft Premium Leather and Vinyl
Cleaner (ZC-56)
• Motorcraft Spot and Stain Remover
(U.S. only) (ZC-14)
• Motorcraft Ultra-Clear Spray Glass
Cleaner (ZC-23)
• Motorcraft Wheel and Tire Cleaner
(ZC-37-A) CLEANING THE EXTERIOR
Wash your vehicle regularly with cool or
lukewarm water and a neutral pH
shampoo, we recommend Motorcraft
Detail Wash.
•
Never use strong household detergents
or soap, for example dish washing or
laundry liquid. These products can
discolor and spot painted surfaces.
• Never wash your vehicle when is hot to
the touch, or during strong or direct
sunlight.
• Dry your vehicle with a chamois or soft
terry cloth towel to eliminate water
spotting.
• Immediately remove fuel spillages, bird
droppings, insect deposits and road tar.
These may cause damage to your
vehicle ’s paintwork or trim over time.
We recommend Motorcraft Bug and
Tar Remover.
• Remove any exterior accessories, for
example antennas, before entering a
car wash.
Note: Suntan lotions and insect repellents
can damage painted surfaces. If these
substances come in contact with your
vehicle, wash the affected area as soon as
possible.
Exterior Chrome Parts
• Apply a high quality-cleaning product
to bumpers and other chrome parts.
Follow the manufacturer ’s instructions.
We recommend Motorcraft Custom
Bright Metal Cleaner.
• Do not apply the cleaning product to
hot surfaces. Do not leave the cleaning
product on chrome surfaces longer
than the time recommended.
• Using other non-recommended
cleaners can result in severe and
permanent cosmetic damage.
300
Explorer (TUB), enUSA, First Printing Vehicle Care