2016 FORD EXPEDITION ignition
[x] Cancel search: ignitionPage 215 of 421
The controller shows gain setting, output
bar graph, and trailer connectivity status
in the information display. They appear in
the information display as follows:
•
Trailer Brake Controller Gain (without
trailer connected): Shows the current
gain setting during a given ignition cycle
and when adjusting the gain. This also
displays if you use the manual control
lever or make gain adjustments with
no trailer connected.
• Trailer Brake Controller Gain Output:
Displays when you push your vehicle's
brake pedal, or upon use of the manual
control. Bar indicators illuminate in the
information display to indicate the
amount of power going to the trailer
brakes relative to the brake pedal or
manual control input. One bar indicates
the least amount of output; six bars
indicate maximum output.
• Trailer Connected: Displays when the
system senses a correct trailer wiring
connection (a trailer with electric trailer
brakes) during a given ignition cycle.
• Trailer Disconnected: Displays,
accompanied by a single audible time,
when the system senses a trailer
connection and then a disconnection,
either intentional or unintentional,
during a given ignition cycle. It also
displays if a truck or trailer-wiring fault
occurs causing the trailer to appear
disconnected. This message can also
display if you use the manual control
lever without a trailer connected. After
disconnecting the trailer connector,
press the brake pedal for
approximately five seconds to allow
the system to detect and update the
trailer status. B: Manual control lever: Slide the control
lever to the left to turn on the trailer's
electric brakes independent of the tow
vehicle's. See the following Procedure for
adjusting gain section for instructions on
proper use of this feature. If you use the
manual control while the brake is also
applied, the greater of the two inputs
determines the power sent to the trailer
brakes.
• Stop lamps: Using the manual control
lever illuminates both the trailer brake
lamps and your vehicle brake lamps
except the center high-mount stop
lamp, if you make the proper electrical
connection to the trailer. Pressing your
vehicle brake pedal also illuminates
both trailer and vehicle brake lamps.
Procedure for Adjusting Gain
Note: Only perform this procedure in a
traffic-free environment at speeds of
approximately 20-25 mph (30-40 km/h).
The gain setting sets the trailer brake
controller for the specific towing condition.
You should change the setting as towing
conditions change. Changes to towing
conditions include trailer load, vehicle load,
road conditions and weather.
The gain should be set to provide the
maximum trailer braking assistance while
making sure the trailer wheels do not lock
when using the brakes. Locked trailer
wheels may lead to trailer instability.
1. Make sure the trailer brakes are in good
working condition, functioning normally
and properly adjusted. See your trailer
dealer if necessary.
2. Hook up the trailer and make the electrical connections according to the
trailer manufacturer's instructions.
3. When you plug in a trailer with electric or electric-over-hydraulic brakes, a
message confirming connection
appears in the information display.
212
Expedition (TB7) Canada/United States of America, enUSA, First Printing Towing
Page 217 of 421
•
Your vehicle's brake system and the
trailer brake system work
independently of each other. Changing
the gain setting on the controller does
not affect the operation of your
vehicle's brakes whether you attach a
trailer or not.
• When you switch the engine off, the
controller output is disabled and the
display and module shut down. The
controller module and display turn on
when you switch the ignition on.
• The trailer brake controller is only a
factory-installed or dealer-installed
item. Ford is not responsible for
warranty or performance of the
controller due to misuse or customer
installation.
Trailer Lamps WARNING
Never connect any trailer lamp wiring
to the vehicle's tail lamp wiring; this
may damage the electrical system
resulting in fire. Contact your authorized
dealer as soon as possible for assistance
in proper trailer tow wiring installation.
Additional electrical equipment may be
required. Trailer lamps are required on most towed
vehicles. Make sure all running lights, brake
lights, turn signals and hazard lights are
working.
Before Towing a Trailer
Practice turning, stopping and backing up
to get the feel of your vehicle-trailer
combination before starting on a trip.
When turning, make wider turns so the
trailer wheels clear curbs and other
obstacles. When Towing a Trailer
•
Do not drive faster than 70 mph (113
km/h) during the first 500 miles (800
kilometers).
• Do not make full-throttle starts.
• Check your hitch, electrical connections
and trailer wheel lug nuts thoroughly
after you have traveled 50 miles (80
kilometers).
• When stopped in congested or heavy
traffic during hot weather, place the
gearshift in position P to aid engine and
transmission cooling and to help A/C
performance.
• Turn off the speed control with heavy
loads or in hilly terrain. The speed
control may turn off automatically
when you are towing on long, steep
grades.
• Shift to a lower gear when driving down
a long or steep hill. Do not apply the
brakes continuously, as they may
overheat and become less effective.
• If your transmission is equipped with a
Grade Assist or Tow/Haul feature, use
this feature when towing. This provides
engine braking and helps eliminate
excessive transmission shifting for
optimum fuel economy and
transmission cooling.
• If your vehicle is equipped with
AdvanceTrac with RSC, this system
may turn on during typical cornering
maneuvers with a heavily loaded trailer.
This is normal. Turning the corner at a
slower speed while towing may reduce
this tendency.
• If you are towing a trailer frequently in
hot weather, hilly conditions, at the
gross combined weight rating (or any
combination of these factors), consider
refilling your rear axle with synthetic
gear lubricant (if the axle is not already
filled with it). See Capacities and
Specifications (page 303).
214
Expedition (TB7) Canada/United States of America, enUSA, First Printing Towing
Page 220 of 421
It is acceptable to have your two-wheel
drive vehicle towed with the front wheels
on the ground (without dollies) and the
rear wheels off the ground.
We recommend towing a four-wheel drive
vehicle with all wheels off the ground, such
as using a wheel lift and dollies or flatbed
equipment.
TOWING THE VEHICLE ON
FOUR WHEELS
WARNING
If your vehicle has a steering wheel
lock make sure the ignition is in the
accessory or on position when being
towed. Emergency Towing
If your vehicle becomes inoperable
(without access to wheel dollies,
car-hauling trailer, or flatbed transport
vehicle), it can be flat-towed (all wheels
on the ground, regardless of the powertrain
and transmission configuration) under the
following conditions:
•
Your vehicle is facing forward for
towing in a forward direction.
• Place the transmission in position N. If
you cannot move the transmission into
N
, you may need to override it. See
Transmission (page 159).
• Maximum speed is 35 mph (56 km/h).
• Maximum distance is
50 mi (80 km).
Recreational Towing
Note: Put your climate control system in
recirculated air mode to prevent exhaust
fumes from entering your vehicle. See
Climate Control
(page 113). Follow these guidelines if you have a need
for recreational towing, for example towing
your vehicle behind a motorhome. These
guidelines prevent damage to your
transmission.
Two Wheel Drive Vehicles
You cannot tow a two wheel drive vehicle
with any wheels on the ground as vehicle
or transmission damage may occur. You
must tow your vehicle with all four wheels
off the ground, for example when using a
car-hauling trailer.
Four Wheel Drive Vehicles
You can only tow a four wheel drive vehicle
with all wheels on the ground by placing
the transfer case in its neutral position and
engaging the four-wheel-down towing
feature. Perform the steps outlined in the
following section after positioning your
vehicle behind the tow vehicle and properly
securing them together.
Four-wheel-down Towing
Note:
Make sure you properly secure your
vehicle to the tow vehicle.
Entering Four-wheel-down Towing
1. Put the ignition in the on position, but do not start the engine. If your vehicle
has an ignition key, turn the key to on.
If your vehicle has intelligent access,
press the engine START/STOP button
twice without pressing the brake pedal.
2. Press and hold the brake pedal.
3. Rotate the four-wheel drive switch to 2H
.
4. Shift the transmission to position
N.
5. Rotate the four-wheel drive switch from
2H to 4L and back to 2H five
times within seven seconds.
217
Expedition (TB7) Canada/United States of America, enUSA, First Printing Towing
Page 221 of 421
Note:
If completed successfully, the
information display shows NEUTRAL TOW
LEAVE IN N or NEUTRAL TOW ENABLED
LEAVE TRANSMISSION IN NEUTRAL.
This indicates that your vehicle is safe to
tow with all wheels on the ground.
Note: If you do not see the message in the
display, you must perform the procedure
again from the beginning.
Note: You may hear an audible noise as the
transfer case shifts into its neutral position.
This is normal.
6. Leave the transmission in position
N
and turn the ignition as far as it will go
toward the off position (it will not turn
fully off when the transmission is in
position
N). If your vehicle has an
ignition key, you must leave the key in
the ignition while towing. To lock and
unlock your vehicle, use the keyless
entry keypad or extra set of keys. If your
vehicle has intelligent access, press the
engine
START/STOP button once
without pressing the brake pedal. You
do not need to leave your keys in the
vehicle. You can lock and unlock your
vehicle as you normally do.
7. Release the brake pedal. WARNINGS
Do not disconnect the battery during
recreational towing. Doing so will
prevent the transfer case from
shifting properly and may cause the vehicle
to roll even if the transmission is in P
(Park). Shifting the transfer case to its
neutral position for recreational
towing may cause the vehicle to be
able to roll even if the transmission is in P
(Park). The driver or others could be
injured. Make sure the foot brake is
depressed and the vehicle is in a secure
and safe position while the transfer case
is being shifted to its neutral position. WARNINGS
Failing to put the transfer case in its
neutral position will damage vehicle
components.
Note:
You can check four-wheel-down
towing status at any time by opening the
driver's door or turning the ignition to the
accessory or on position and verifying the
NEUTRAL TOW ENABLED
message
displays in the cluster.
Exiting Four-wheel-down Towing
To exit four-wheel-down towing and return
the transfer case to its
2H position:
1. With your vehicle still properly secured
to the tow vehicle, put the ignition in
the on position, but do not start the
engine. If your vehicle has an ignition
key, turn the key to on. If your vehicle
has intelligent access, press the engine
START/STOP
button twice without
pressing the brake pedal.
2. Press and hold the brake pedal.
3. Shift the transmission out of N and into
any gear.
4. Release the brake pedal.
Note: If completed successfully, the
instrument cluster displays
4X2, and
NEUTRAL TOW DISABLED.
Note: If the indicator light and message do
not display, you must perform the procedure
again from the beginning.
Note: You may hear an audible noise as the
transfer case shifts out of its neutral
position. This is normal.
Note: If
SHIFT DELAY PULL FORWARD
displays in the instrument cluster, transfer
case gear tooth blockage is present. See the
instructions after this section.
5. Apply the parking brake, and then disconnect the vehicle from the tow
vehicle.
218
Expedition (TB7) Canada/United States of America, enUSA, First Printing Towing
Page 227 of 421
Canadian roadside coverage and benefits
may differ from the U.S. coverage. If you
require more information, please refer to
the coverage section of your warranty
guide, call us in Canada at
1-800-665-2006, or visit our website at
www.ford.ca.
Sykes Assistance Services Corporation
administers the Roadside Assistance
program. You must receive covered
services in Canada or the continental
United States. Coverage extends to
vehicles that use public, non-seasonal,
annually traveled roadways. Roadside
Assistance coverage does not extend to
vehicles involved in cross-country driving,
logging, autocross and any other form of
off-road use. Well maintained roads and
surfaces help ensure safe travel for the
supplier, and allow their representatives
to perform service as per the standard
operating procedures.
In Remote Locations
If our supplier cannot take your vehicle by
road to the nearest authorized dealership,
transportation by rail or water may be
necessary. The program covers a tow to
the dock or rail terminal and also to the
dealership at the end of the trip.
For rail or water transportation, however,
contact your authorized dealer to confirm
if you are eligible for additional coverage
before you authorize or pay for the service.
Call Ford Roadside Assistance at
1-800-665-2006 for additional
information.
HAZARD WARNING FLASHERS
Note:
If used when the vehicle is not
running, the battery will lose charge. There
may be insufficient power to restart your
vehicle. The hazard warning button is
located on the instrument panel.
Use it when your vehicle is
creating a safety hazard for other
motorists.
• Press the button to turn on the hazard
warning function, and the front and
rear direction indicators will flash.
• Press the button again to turn them
off.
FUEL SHUTOFF WARNING
Failure to inspect and, if necessary,
repair fuel leaks after a collision may
increase the risk of fire and serious
injury. Ford Motor Company recommends
that the fuel system be inspected by an
authorized dealer after any collision. In the event of a moderate to severe
collision, this vehicle includes a fuel pump
shutoff feature that stops the flow of fuel
to the engine. Not every impact will cause
a shutoff.
Should your vehicle shut off after a
collision, you may restart your vehicle. For
vehicles equipped with a key system:
1. Switch off the ignition.
2. Switch on the ignition.
3. Repeat Steps 1 and 2 to re-enable the
fuel pump.
For vehicles equipped with a push button
start system:
1. Press the START/STOP button to
switch off the ignition.
2. Press the brake pedal and press the START/STOP
button to switch on the
ignition.
224
Expedition (TB7) Canada/United States of America, enUSA, First Printing Roadside Emergencies
Page 228 of 421

3.
Remove your foot from the brake pedal
and press the START/STOP button
to switch off the ignition.
4. You can either attempt to start the engine by pressing the brake pedal and
the
START/STOP button, or switch
on the ignition only by pressing the
START/STOP
button without
pressing the brake pedal. Both ways
re-enable the fuel system.
Note: When you try to restart your vehicle
after a fuel shutoff, the vehicle makes sure
that various systems are safe to restart.
Once your vehicle determines that the
systems are safe, then the vehicle will allow
you to restart.
Note: In the event that your vehicle does
not restart after your third attempt, contact
an authorized dealer.
JUMP STARTING THE VEHICLE WARNINGS
Batteries normally produce explosive
gases which can cause personal
injury. Therefore, do not allow
flames, sparks or lighted substances to
come near the battery. When working near
the battery, always shield your face and
protect your eyes. Always provide correct
ventilation. Keep batteries out of reach of
children. Batteries contain sulfuric
acid. Avoid contact with skin, eyes or
clothing. Shield your eyes when working
near the battery to protect against possible
splashing of acid solution. In case of acid
contact with skin or eyes, flush
immediately with water for a minimum of
15 minutes and get prompt medical
attention. If acid is swallowed, call a
physician immediately. Use only adequately sized cables
with insulated clamps. Preparing Your Vehicle
Do not attempt to push-start your
automatic transmission vehicle.
Note:
Attempting to push-start a vehicle
with an automatic transmission may cause
transmission damage.
Note: Use only a 12-volt supply to start your
vehicle.
Note: Do not disconnect the battery of the
disabled vehicle as this could damage the
vehicle electrical system.
Park the booster vehicle close to the hood
of the disabled vehicle, making sure the
two vehicles do not touch.
Connecting the Jumper Cables WARNINGS
Do not attach the cables to fuel lines,
engine rocker covers, the intake
manifold or electrical components
as grounding points. Stay clear of moving
parts. To avoid reverse polarity
connections, make sure that you correctly
identify the positive (+) and negative (-)
terminals on both the disabled and booster
vehicles before connecting the cables. Do not attach the end of the positive
cable to the studs or L-shaped eyelet
located above the positive (+)
terminal of your vehicle ’s battery. High
current may flow through and cause
damage to the fuses. Do not connect the end of the
second cable to the negative (-)
terminal of the battery to be jumped.
A spark may cause an explosion of the
gases that surround the battery. Note:
In the illustration, the bottom vehicle
represents the booster vehicle.
225
Expedition (TB7) Canada/United States of America, enUSA, First Printing Roadside Emergencies
Page 240 of 421

Protected components
Fuse amp rating
Fuse or relay number
Blower motor run/start.
5A**
57
Not used.
—
58
Heated mirrors.
15A**
59
Not used.
—
60
Not used.
—
61
Not used.
—
62
Electronic fan.
25A*
63
Moonroof.
30A*
64
Not used.
—
65
Auxiliary power point (rear of center
console).
20A*
66
Front row climate controlled seats.
40A*
67
Anti-lock brake system valves.
30A*
68
Anti-lock brake system pump.
60A*
69
Third row power fold seat.
30A*
70
Auxiliary power point/cigar lighter.
20A*
71
Auxiliary power point (right rear quarter
panel).
20A*
72
Rear seat climate module.
20A*
73
Driver power seat.
30A*
74
Vehicle power 1 – powertrain control
module.
25A**
75
Vehicle power 2 – powertrain control
module.
20A**
76
Vehicle power 4 – ignition coils.
20A**
77
Not used.
—
78
Vehicle power 3 – powertrain control
module.
15A**
79
Not used.
—
80
237
Expedition (TB7) Canada/United States of America, enUSA, First Printing Fuses
Page 244 of 421
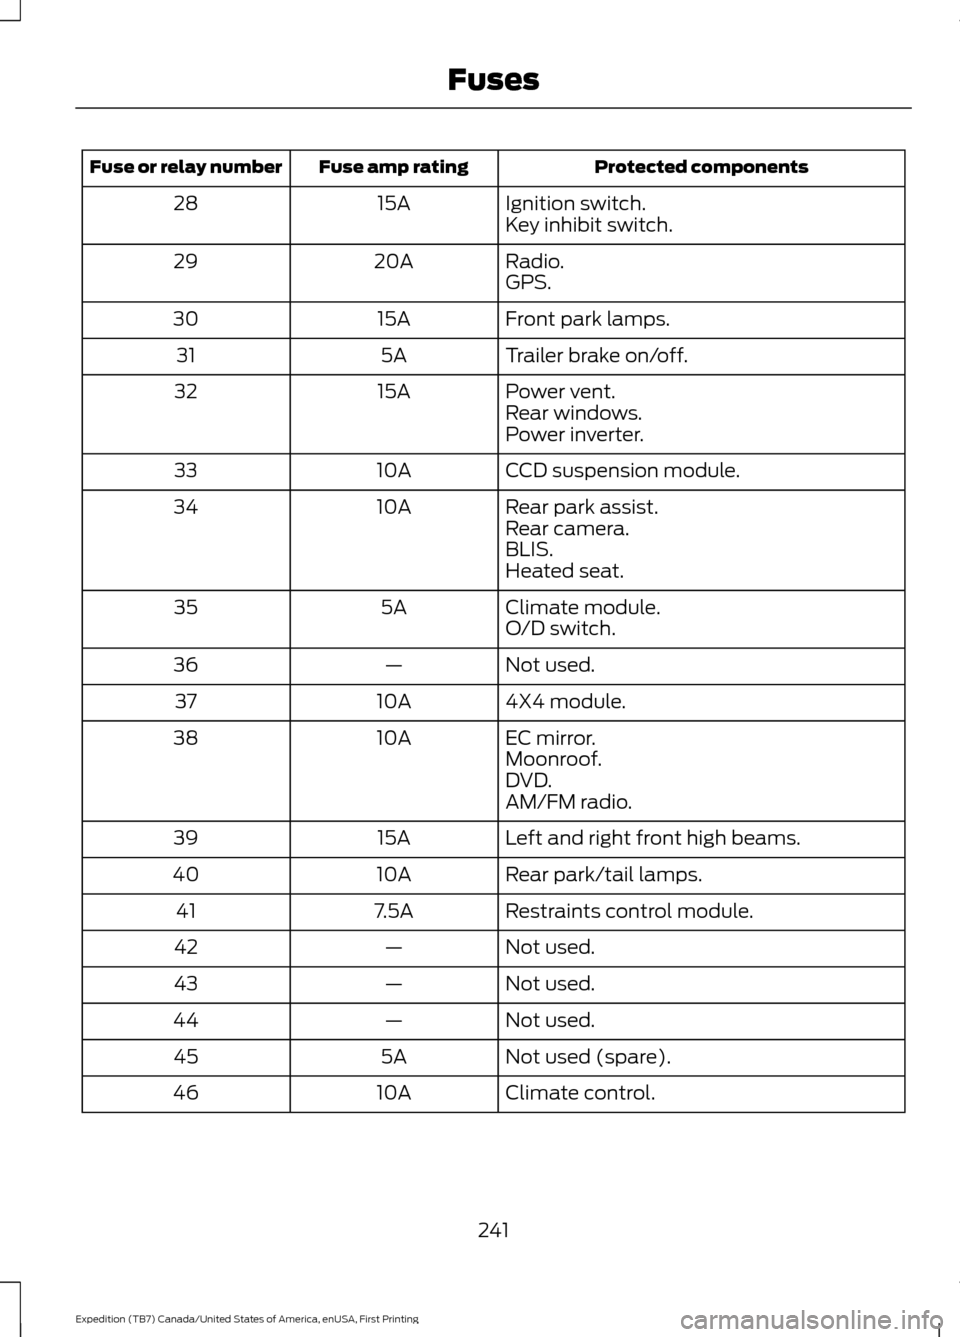
Protected components
Fuse amp rating
Fuse or relay number
Ignition switch.
15A
28
Key inhibit switch.
Radio.
20A
29
GPS.
Front park lamps.
15A
30
Trailer brake on/off.
5A
31
Power vent.
15A
32
Rear windows.
Power inverter.
CCD suspension module.
10A
33
Rear park assist.
10A
34
Rear camera.
BLIS.
Heated seat.
Climate module.
5A
35
O/D switch.
Not used.
—
36
4X4 module.
10A
37
EC mirror.
10A
38
Moonroof.
DVD.
AM/FM radio.
Left and right front high beams.
15A
39
Rear park/tail lamps.
10A
40
Restraints control module.
7.5A
41
Not used.
—
42
Not used.
—
43
Not used.
—
44
Not used (spare).
5A
45
Climate control.
10A
46
241
Expedition (TB7) Canada/United States of America, enUSA, First Printing Fuses