2016 FORD EXPEDITION mirror
[x] Cancel search: mirrorPage 5 of 421

Adjusting the Steering Wheel - Vehicles
With: Power Adjustable Steering
Column...........................................................67
Audio Control..................................................68
Voice Control...................................................69
Cruise Control..................................................70
Information Display Control
.......................70
Heated Steering Wheel
................................70
Pedals
Adjusting the Pedals
......................................71
Wipers and Washers
Windshield Wipers.........................................72
Autowipers
........................................................72
Windshield Washers......................................73
Rear Window Wiper and Washers...........73
Lighting
General Information......................................74
Lighting Control...............................................74
Autolamps .........................................................
75
Instrument Lighting Dimmer
......................76
Daytime Running Lamps
.............................76
Front Fog Lamps.............................................77
Direction Indicators
........................................77
Interior Lamps
.................................................78
Ambient Lighting
............................................79
Windows and Mirrors
Power Windows
.............................................80
Exterior Mirrors
.................................................81
Interior Mirror
...................................................82
Childminder Mirror.........................................82
Rear Quarter Windows
................................83
Sun Visors
.........................................................83
Moonroof...........................................................83
Instrument Cluster
Gauges...............................................................85 Warning Lamps and Indicators................88
Audible Warnings and Indicators..............91
Information Displays
General Information......................................92
Information Messages
................................103
Climate Control
Manual Climate Control..............................113
Manual Climate Control - Vehicles With: Electronic Manual Temperature
Control (EMTC)
..........................................114
Automatic Climate Control
.......................116
Hints on Controlling the Interior Climate..........................................................117
Rear Passenger Climate Controls..........120
Heated Windows and Mirrors
....................121
Remote Start
...................................................121
Seats
Sitting in the Correct Position..................122
Head Restraints.............................................122
Manual Seats.................................................124
Power Seats
....................................................125
Memory Function.........................................126
Rear Seats
........................................................127
Heated Seats
..................................................134
Climate Controlled Seats
..........................135
Universal Garage Door Opener
Universal Garage Door Opener................137
Auxiliary Power Points
Auxiliary Power Points................................142
Storage Compartments
Center Console
..............................................144
Overhead Console
.......................................144
2
Expedition (TB7) Canada/United States of America, enUSA, First Printing Table of Contents
Page 48 of 421

To start your vehicle remotely:
1. Press the lock button to lock all the
doors.
2. Press the remote start button twice. The exterior lamps flash twice.
The horn sounds if the system fails to start,
unless quiet start is on. Quiet start runs the
blower fan at a slower speed to reduce
noise. You can switch this feature on or off
in the information display. See General
Information (page 92).
Note: If you remote start your vehicle with
an integrated keyhead transmitter, you must
switch the ignition on before driving your
vehicle. If you remote start your vehicle with
an intelligent access transmitter, you must
press the push button ignition switch on the
instrument panel once while applying the
brake pedal before driving your vehicle.
The power windows do not work during
remote start and the radio does not turn
on automatically.
The parking lamps remain on and the
vehicle runs for 5, 10 or 15 minutes,
depending on the setting.
Extending the Engine Running Time
To extend the engine running time duration
of your vehicle during remote start, repeat
steps 1 and 2 while the engine is running.
If the duration is set to 10 minutes, the
duration extends by another 10 minutes.
For example, if your vehicle had been
running from the first remote start for 5
minutes, your vehicle continues to run now
for a total of 20 minutes. You can extend
the remote start up to a maximum of 35
minutes.
Wait at least five seconds before remote
starting after the engine stops running. Turning Your Vehicle Off After Remote
Starting Press the button once. The
parking lamps turn off.
You may have to be closer to your vehicle
to remotely switch off your vehicle after
remote starting. This is due to the added
noise of your running vehicle.
You can switch this feature on or off in the
information display. See General
Information (page 92).
Memory Feature
(If Equipped)
You can use the remote control to recall
memory settings for the driver seat, power
mirrors, power steering column and power
adjustable foot pedals. Press the unlock
button on the remote control or unlock
your vehicle with the intelligent access key
to recall the memory positions. You can
program the remote control or intelligent
access key to recall memory positions. See
Memory Function
(page 126).
REPLACING A LOST KEY OR
REMOTE CONTROL
Replacement keys or remote controls can
be purchased from an authorized dealer.
Authorized dealers can program remote
controls for your vehicle. See
Passive
Anti-Theft System (page 62).
45
Expedition (TB7) Canada/United States of America, enUSA, First Printing Keys and Remote ControlsE138625
Page 75 of 421

WINDSHIELD WIPERS
Note:
Fully defrost the windshield before
you switch the windshield wipers on.
Note: Make sure you switch the windshield
wipers off before entering a car wash.
Note: Clean the windshield and wiper
blades if they begin to leave streaks or
smears. If that does not resolve the issue,
install new wiper blades. See Changing
the Wiper Blades (page 255).
Note: Do not operate the wipers on a dry
windshield. This may scratch the glass,
damage the wiper blades or cause the wiper
motor to burn out. Always use the
windshield washers before wiping a dry
windshield. Rotate the end of the control:
•
Away from you to increase the wiper
speed.
• Toward you to decrease the wiper
speed.
Speed Dependent Wipers
When your vehicle speed increases, the
interval between wipes decreases.
AUTOWIPERS
(If Equipped)
Note: Fully defrost the windshield before
switching on the windshield wipers.
Note: Make sure you switch off the
windshield wipers before entering a car
wash. Note:
Clean the windshield and wiper
blades if they begin to leave streaks or
smears. If that does not resolve the issue,
install new wiper blades. See
Changing
the Wiper Blades (page 255).
Wet or winter driving conditions with ice,
snow or salty road mist can cause
inconsistent and unexpected wiping or
smearing. In these conditions, you can do
the following to help keep your windshield
clear:
• Lower the sensitivity of the autowipers
to reduce the amount of smearing.
• Switch to normal or high-speed wipe.
• Switch the autowipers off.
The autowipers feature uses a rain sensor,
located in the area around the interior
mirror. The rain sensor monitors the
amount of moisture on the windshield and
automatically turns on the wipers. It
adjusts the wiper speed by the amount of
moisture that the sensor detects on the
windshield.
Note: This autowiper feature is
automatically set to on and remains on until
you switch it off in the information display.
You can also switch the feature back on at
any time. See
General Information (page
92).
Use the rotary control to adjust the
sensitivity of the rain sensor. Set the
control to low sensitivity, and the wipers
will turn on when the rain sensor detects
a large amount of moisture on the
windshield. Set the control to high
sensitivity, and the wipers will turn on when
the rain sensor detects a small amount of
moisture on the windshield.
Note: When you set the wiper system to
intermittent wipe and the autowiper system
is on, the autowiper sensitivity setting
adjusts the wiper speed according to the
moisture on the windshield only. Use the
wiper lever to wipe the windshield
on-demand.
72
Expedition (TB7) Canada/United States of America, enUSA, First Printing Wipers and WashersE205527
Page 76 of 421

Keep the outside of the windshield clean.
The rain sensor is very sensitive. If the area
around the mirror is dirty, then the wipers
may operate if dirt, mist or insects hit the
windshield.
WINDSHIELD WASHERS
Note:
Do not operate the wipers on a dry
windshield. This may scratch the glass,
damage the wiper blades or cause the wiper
motor to burn out. Always use the
windshield washers before wiping a dry
windshield.
Note: Do not operate the washers when
the washer reservoir is empty. This may
cause the washer pump to overheat. Press the end of the wiper lever to activate
the washer:
•
A brief press causes a single wipe
without washer fluid.
• A quick press and hold causes the
wipers to swipe the windshield three
times with washer fluid.
• A long press and hold activates the
wipers and washer fluid for up to 10
seconds.
A wipe occurs a few seconds after washing
to clear any remaining washer fluid. You
can switch this feature on and off through
the information display. See Information
Displays (page 92). REAR WINDOW WIPER AND
WASHERS
Rear Window Wiper
Note:
Make sure you switch off the wiper
system before using an automatic car wash. Rotate the control to select:
Intermittent operation - the
shortest pause between wipes.
2
Intermittent operation - the
longest pause between wipes.
1
Off.0
Rear Window Washer Rotate and hold the control to the top or
bottom position to activate the rear
washer. The control returns to the
2 or 0
position when you release it.
73
Expedition (TB7) Canada/United States of America, enUSA, First Printing Wipers and WashersE205528 E205529 E205529
Page 83 of 421

POWER WINDOWS
WARNINGS
Do not leave children unattended in
your vehicle and do not let them play
with the power windows. They may
seriously injure themselves. When closing the power windows,
you should verify they are free of
obstructions and make sure that
children and pets are not in the proximity
of the window openings. Note:
You may hear a pulsing noise when
just one of the windows is open. Lower the
opposite window slightly to reduce this
noise.
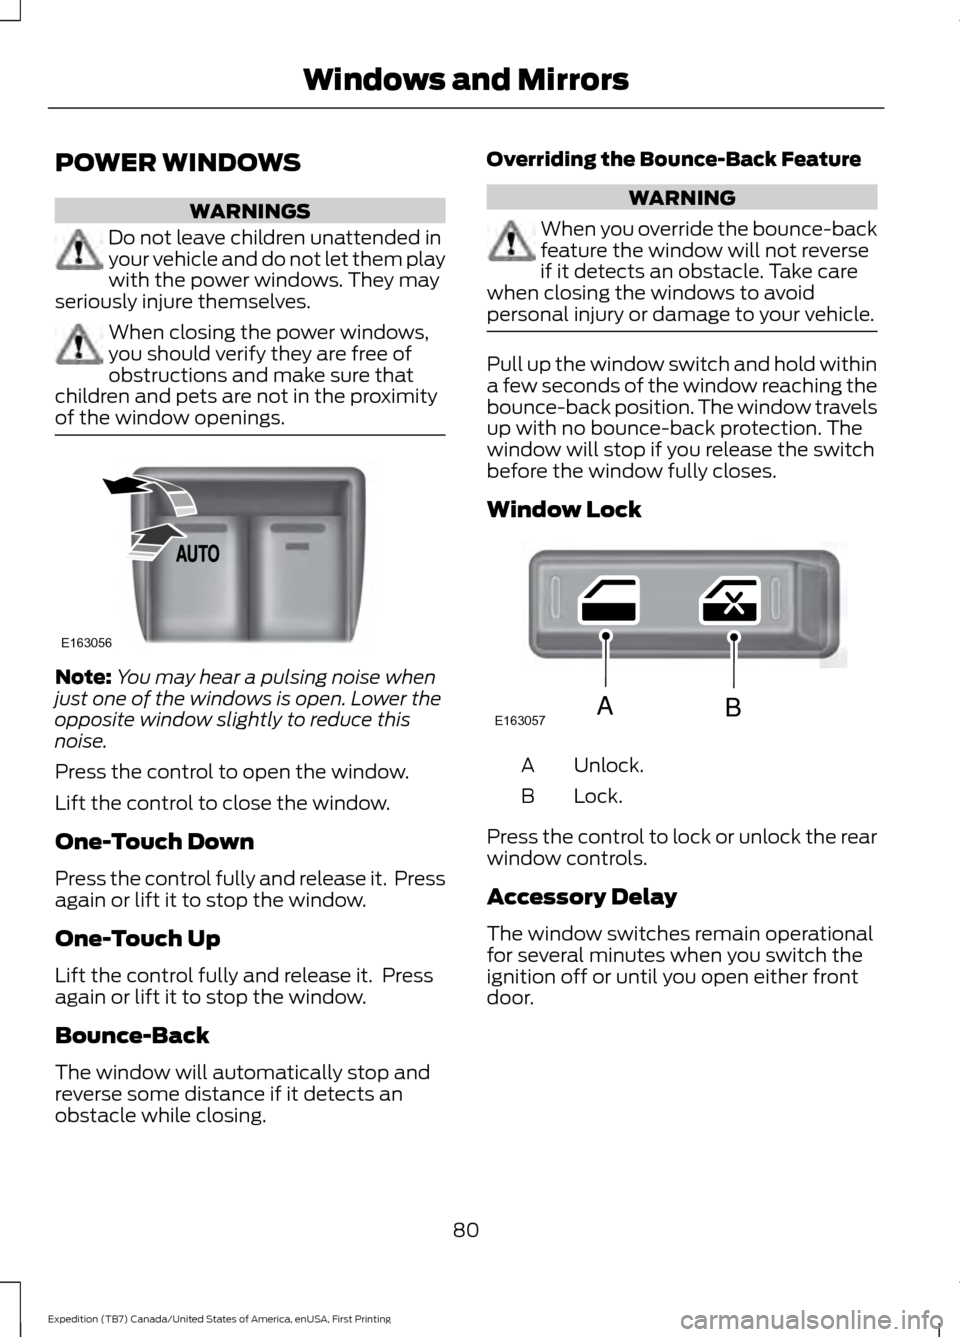
Press the control to open the window.
Lift the control to close the window.
One-Touch Down
Press the control fully and release it. Press
again or lift it to stop the window.
One-Touch Up
Lift the control fully and release it. Press
again or lift it to stop the window.
Bounce-Back
The window will automatically stop and
reverse some distance if it detects an
obstacle while closing. Overriding the Bounce-Back Feature WARNING
When you override the bounce-back
feature the window will not reverse
if it detects an obstacle. Take care
when closing the windows to avoid
personal injury or damage to your vehicle. Pull up the window switch and hold within
a few seconds of the window reaching the
bounce-back position. The window travels
up with no bounce-back protection. The
window will stop if you release the switch
before the window fully closes.
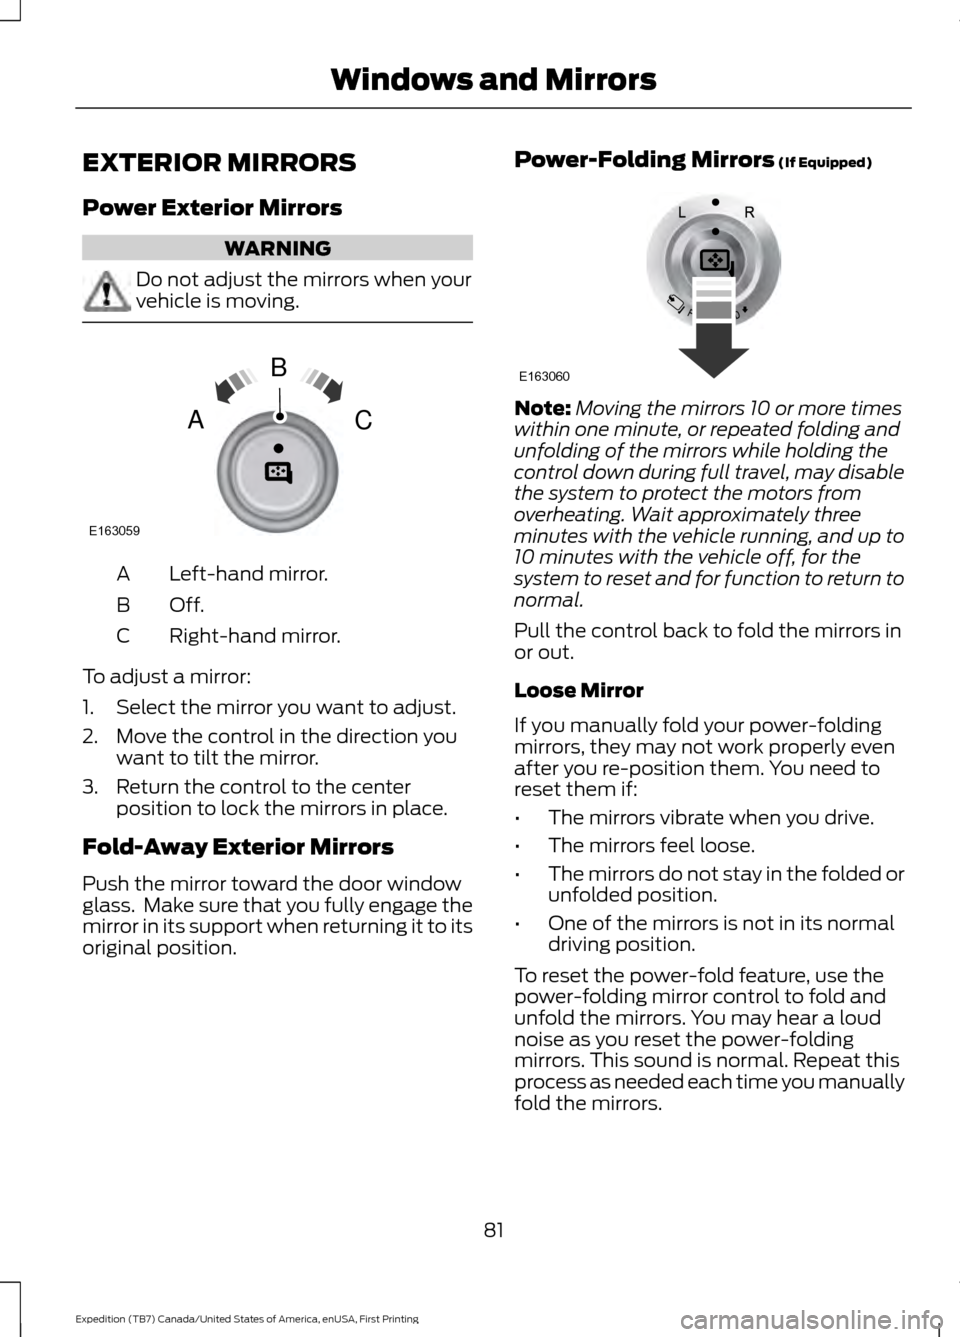
Window Lock
Unlock.
A
Lock.
B
Press the control to lock or unlock the rear
window controls.
Accessory Delay
The window switches remain operational
for several minutes when you switch the
ignition off or until you open either front
door.
80
Expedition (TB7) Canada/United States of America, enUSA, First Printing Windows and MirrorsE163056 E163057AB
Page 84 of 421

EXTERIOR MIRRORS
Power Exterior Mirrors
WARNING
Do not adjust the mirrors when your
vehicle is moving.
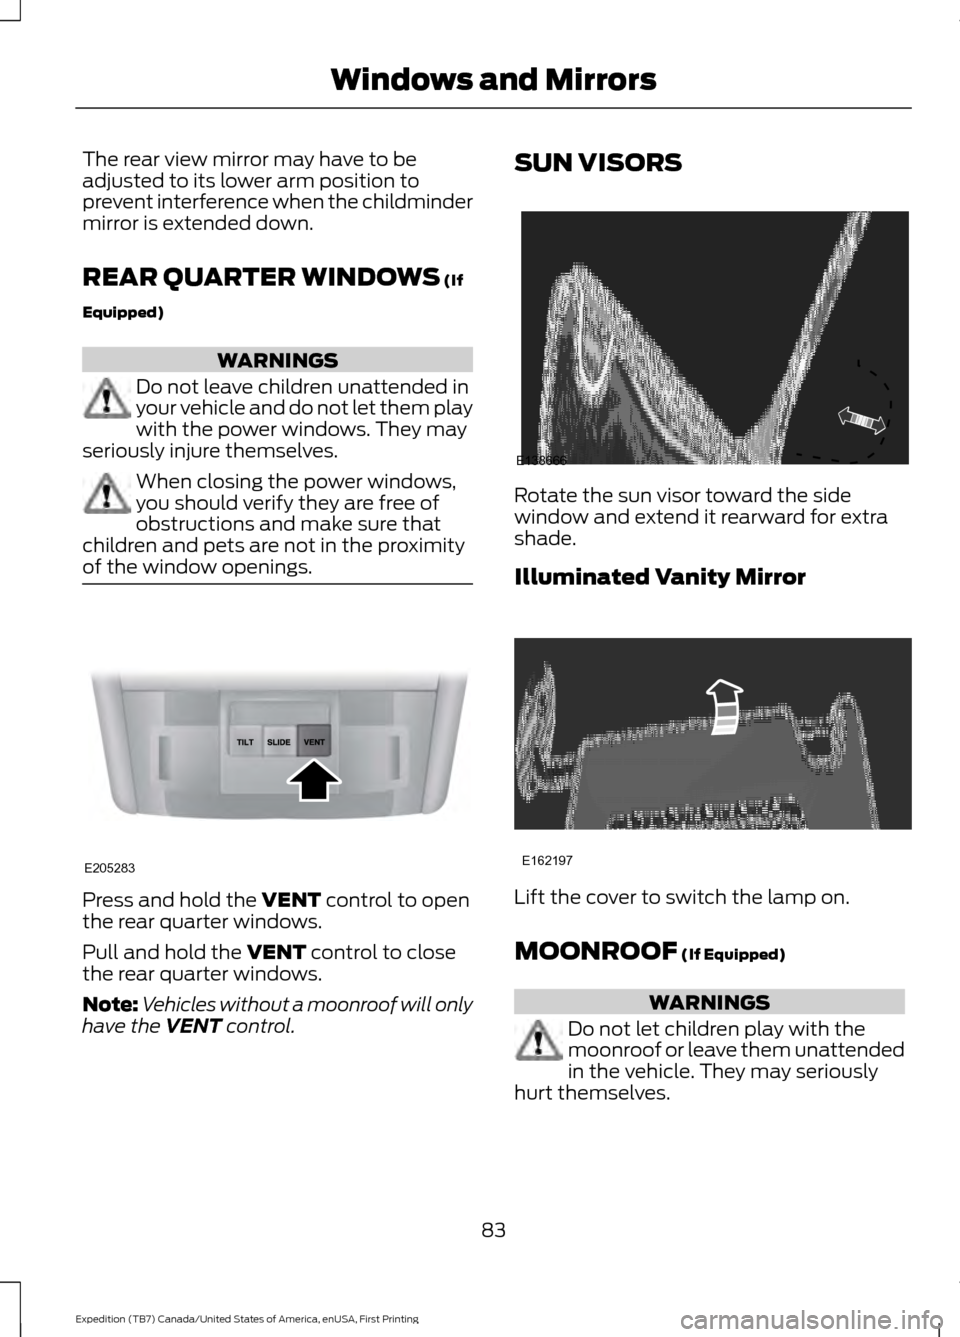
Left-hand mirror.
A
Off.B
Right-hand mirror.
C
To adjust a mirror:
1. Select the mirror you want to adjust.
2. Move the control in the direction you want to tilt the mirror.
3. Return the control to the center position to lock the mirrors in place.
Fold-Away Exterior Mirrors
Push the mirror toward the door window
glass. Make sure that you fully engage the
mirror in its support when returning it to its
original position. Power-Folding Mirrors (If Equipped) Note:
Moving the mirrors 10 or more times
within one minute, or repeated folding and
unfolding of the mirrors while holding the
control down during full travel, may disable
the system to protect the motors from
overheating. Wait approximately three
minutes with the vehicle running, and up to
10 minutes with the vehicle off, for the
system to reset and for function to return to
normal.
Pull the control back to fold the mirrors in
or out.
Loose Mirror
If you manually fold your power-folding
mirrors, they may not work properly even
after you re-position them. You need to
reset them if:
• The mirrors vibrate when you drive.
• The mirrors feel loose.
• The mirrors do not stay in the folded or
unfolded position.
• One of the mirrors is not in its normal
driving position.
To reset the power-fold feature, use the
power-folding mirror control to fold and
unfold the mirrors. You may hear a loud
noise as you reset the power-folding
mirrors. This sound is normal. Repeat this
process as needed each time you manually
fold the mirrors.
81
Expedition (TB7) Canada/United States of America, enUSA, First Printing Windows and MirrorsE163059
B
AC E163060
Page 85 of 421

Heated Exterior Mirrors
See Heated Windows and Mirrors (page
121).
Memory Mirrors
(If Equipped)
You can save and recall the mirror
positions through the memory function.
See
Memory Function (page 126).
Auto-Dimming Feature
The driver exterior mirror automatically
dims with the auto-dimming interior mirror.
Signal Indicator Mirrors
(If Equipped)
The outer portion of the appropriate mirror
housing blinks when you switch on the
direction indicator.
Blind Spot Monitor
(If Equipped)
See
Blind Spot Information System
(page 188).
INTERIOR MIRROR WARNING
Do not adjust the mirror when your
vehicle is moving.
Note:
Do not clean the housing or glass of
any mirror with harsh abrasives, fuel or other
petroleum or ammonia-based cleaning
products.
You can adjust the interior mirror to your
preference. Some mirrors also have a
second pivot point. This lets you move the
mirror head up or down and from side to
side. Auto-Dimming Mirror
Note:
Do not block the sensors on the front
and back of the mirror. Mirror performance
may be affected. A rear center passenger or
raised rear center head restraint may also
block light from reaching the sensor.
The mirror will dim automatically to reduce
glare when bright lights are detected from
behind your vehicle. It will automatically
return to normal reflection when you select
reverse gear to make sure you have a clear
view when backing up.
CHILDMINDER MIRROR
On double bin overhead consoles, the
conversation mirror allows the driver to
view the rear seating area. WARNING
Do not use the childminder mirror to
view rearward traffic, do not allow
rear passengers to distract you from
the driving task, and make sure the rear
view mirror has a clear view of rearward
traffic. Failure to do so could increase the
risk of a crash from an unseen vehicle,
which may result in serious injury. Press the release area on the rear edge of
the bin door to open the childminder mirror.
The door will open to full open position.
82
Expedition (TB7) Canada/United States of America, enUSA, First Printing Windows and MirrorsE205354
Page 86 of 421

The rear view mirror may have to be
adjusted to its lower arm position to
prevent interference when the childminder
mirror is extended down.
REAR QUARTER WINDOWS (If
Equipped) WARNINGS
Do not leave children unattended in
your vehicle and do not let them play
with the power windows. They may
seriously injure themselves. When closing the power windows,
you should verify they are free of
obstructions and make sure that
children and pets are not in the proximity
of the window openings. Press and hold the
VENT control to open
the rear quarter windows.
Pull and hold the
VENT control to close
the rear quarter windows.
Note: Vehicles without a moonroof will only
have the
VENT control. SUN VISORS
Rotate the sun visor toward the side
window and extend it rearward for extra
shade.
Illuminated Vanity Mirror
Lift the cover to switch the lamp on.
MOONROOF
(If Equipped)
WARNINGS
Do not let children play with the
moonroof or leave them unattended
in the vehicle. They may seriously
hurt themselves.
83
Expedition (TB7) Canada/United States of America, enUSA, First Printing Windows and MirrorsE205283 E138666 E162197